LIVE.LOVE.SEW FEATURE BLOCKS B.O.M PROGRAM
|
|
|
- Lucinda Melton
- 5 years ago
- Views:
Transcription

1 LIVE.LOVE.SEW FEATURE BLOCKS B.O.M PROGRAM
2 FEATURE BLOCKS Congratulations on finishing your twelve Feature Blocks! It has been so much fun sewing along with you all this past year, learning more about the history and tradition behind some of my favourite blocks, working with different techniques and making something truly beautiful! There are SO many options for your finished blocks imagine them in a mini quilt for your wall, or made up in a table runner or individual cushion covers. Following are some basic measurements for finishing your quilts with added sashing and border pieces. Measurements are given for the quilt in the cover photograph, however please feel free to use some of these ideas to make this quilt your own. Remember these are YOUR feature blocks and YOUR beautiful quilt projects. Also included are blank block templates at the beginning of each block pattern for you to use please photocopy, colour and arrange to your heart s desire. Work on your layout, work on your fabric placement and make something you truly love and are proud of! I can t wait to see your finished creations, so please tag and #livelovesewbom in any photos of your process or your finished makes. Enjoy! Keera x
3 BLOCK STATS: SAWTOOTH STAR Finished Size: 8 x 8 Finished Block: 8 x 8 Quantities are for 42 wide, 100% cotton fabrics. Measurements include ¼ seam allowances. ¼ seams are used throughout unless otherwise stated. Sew with right sides together unless otherwise stated. MATERIALS: 3 Fat Quarters in selected prints* CUTTING: * Mix and match your fabrics for each block {in this case we used three prints}. PREPARING: {one} Take your fabric and cut as follows: from Fabric A cut: {two} Using a fabric marker or pencil and ruler, mark a diagonal line on the wrong side of each: - eight {8x} 2 ½ x 2 ½ squares {A} - 2 ½ x 2 ½ squares {A} from Fabric B cut: - four {4x} 2 ½ x 2 ½ squares {B} - four {4x} 4 ½ x 2 ½ rectangles {C} from Fabric C cut: - one 4 ½ x 4 ½ square {D} STITCHING: {three} Make Four Flying geese units: Flying Geese Units: Match one print 2 ½ x 2 ½ square {A} with one solid fabric 4 ½ x 2 ½ rectangle {C}. Sew along marked line from step one. Cut ¼ on the outside of your marked/sewn line to trim piece for pressing {diagram a}. Press seams towards darker fabric yielding the following shape {diagram b}. Sew along marked line Cut ¼ on outside of sewn line {diagram a} {diagram b} Repeat for the opposite corner with a second 2 ½ x 2 ½ square {A} {diagram c}. Note that your square will overlap the middle corner of your first Easy Corner Triangle. Cut and press to yield one Flying Geese Unit {diagram d}. Make four units for each block. {diagram c} {diagram d}

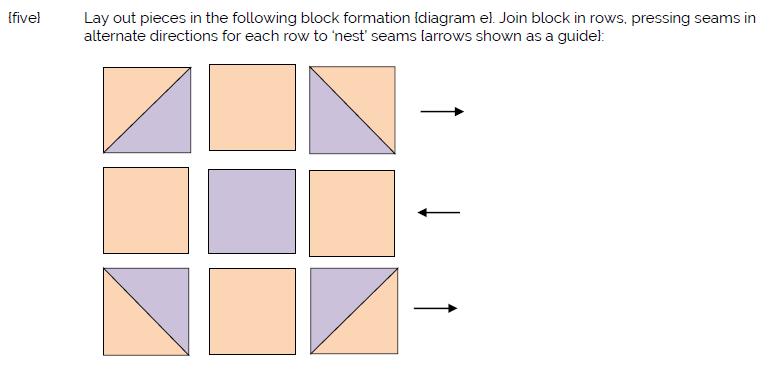
4 PIECING: {four} {five} To assemble each block you will need: - 4x Flying Geese Unit Pieces - 4x 2 ½ x 2 ½ squares {B} - 1x 4 ½ x 4 ½ square {D} Lay out pieces in the following block formation {diagram e}. Join block in rows, pressing seams in alternate directions for each row to nest seams {arrows shown as a guide}: {diagram e}
5 BLOCK STATS: RAIL FENCE Finished Size: 8 x 8 Finished Block: 8 x 8 Quantities are for 42 wide, 100% cotton fabrics. Measurements include ¼ seam allowances. ¼ seams are used throughout unless otherwise stated. Sew with right sides together unless otherwise stated. MATERIALS: 3 Fat Quarters in selected prints* * Mix and match your fabrics for each block {in this case we used three prints}. CUTTING: {one} Take your fabric and cut as follows: from Fabric A cut: - four {4x} 1 ⅞ x 4 ½ rectangles {A} from Fabric B cut: - four {4x} 1 ⅞ x 4 ½ rectangles {B} from Fabric C cut: - four {4x} 1 ⅞ x 4 ½ rectangles {C} STITCHING: {two} Make Four Rail Fence Units: Rail Fence Units: Match one 1 ⅞ x 4 ½ rectangle {A} with one 1 ⅞ x 4 ½ rectangle {B}. With right together sew along long edge. Press seams to left yielding the following shape {diagram a}. Repeat for all four A and B rectangles. sides {diagram a} With right sides together, match one 1 ⅞ x 4 ½ rectangle with the unit made from previous step. Sew along the right side long edge. Press seams to left yielding the following shape {diagram b}. Repeat for all remaining pieces. {diagram b}
6 PIECING: {four} To assemble each block you will need: - 4x Rail Fence Units {five} Lay out pieces in the following block formation {diagram c}. Join block in rows, pressing seams in alternate directions for each row to nest seams {arrows shown as a guide}: {diagram c}

7 BLOCK STATS: SHOO FLY Finished Size: 8 x 8 Finished Block: 8 x 8 Quantities are for 42 wide, 100% cotton fabrics. Measurements include ¼ seam allowances. ¼ seams are used throughout unless otherwise stated. Sew with right sides together unless otherwise stated. MATERIALS: 2 Fat Quarters in selected prints* * Mix and match your fabrics for each block {in this case we used two prints}.
8
9 BLOCK STATS: DUTCHMAN S PUZZLE Finished Size: 8 x 8 Finished Block: 8 x 8 Quantities are for 42 wide, 100% cotton fabrics. Measurements include ¼ seam allowances. ¼ seams are used throughout unless otherwise stated. Sew with right sides together unless otherwise stated. MATERIALS: 3 Fat Quarters in selected prints* * Mix and match your fabrics for each block {in this case we used three prints}. **Different variations of this block and colour combinations are achieved by alternating fabric placement. Keep in mind that each Flying Geese unit uses two B or C squares. Use the colouring sheets to experiment with fabric placement. Have fun! CUTTING: PREPARING: {one} Take your fabric and cut as follows: from Fabric A cut: - eight {8x} 4 ½ x 2 ½ squares {A} from Fabric B cut: - twelve {12x} 2 ½ x 2 ½ squares {B} from Fabric C cut: - four {4x} 2 ½ x 2 ½ squares {C} {two} Using a fabric marker or pencil and ruler, mark a diagonal line on the wrong side of each {diagram a}: - 2 ½ x 2 ½ squares {both B and C} {diagram a} PIECING: {three} Make Eight Flying geese units: Flying Geese Unit A: Match one 2 ½ x 2 ½ square {C} with one fabric 4 ½ x 2 ½ rectangle {A}. Sew along marked line from step two. Cut ¼ on the outside of your marked/sewn line to trim piece for pressing {diagram a}. Press seams towards darker fabric yielding the following shape {diagram c}. Sew along marked line Cut ¼ on outside of sewn line {diagram b} {diagram c}
10 Repeat for the opposite corner with one 2 ½ x 2 ½ square {B} {diagram d}. Note that your square will overlap the middle corner of your first Easy Corner Triangle. Cut and press to yield one Flying Geese Unit A {diagram e}. Make four units for each block. {diagram d} {diagram e} Flying Geese Unit B: Match one 2 ½ x 2 ½ square {B} with one fabric 4 ½ x 2 ½ rectangle {A}. Sew along marked line from step two. Cut ¼ on the outside of your marked/sewn line to trim piece for pressing. Press seams towards darker fabric. Repeat for the opposite corner with one 2 ½ x 2 ½ square {B}. Note that your square will overlap the middle corner of your first Easy Corner Triangle. Cut and press to yield one Flying Geese Unit B {diagram f}. Make four units for each block. Sew along marked line Cut ¼ on outside of sewn line {diagram f} {four} To assemble each block you will need - 4x Flying Geese Unit A - 4x Flying Geese Unit B {five} Lay out pieces in the following block formation {diagram G}. Join block in rows, pressing seams in alternate directions for each row to nest seams: {diagram e}
11 BLOCK STATS: RIBBONS Finished Size: 8 x 8 Finished Block: 8 x 8 Quantities are for 42 wide, 100% cotton fabrics. Measurements include ¼ seam allowances. ¼ seams are used throughout unless otherwise stated. Sew with right sides together unless otherwise stated. MATERIALS: 2 Fat Quarters in selected prints* * Mix and match your fabrics for each block {in this case we used two prints}. CUTTING: PREPARING: {one} Take your fabric and cut as follows: from Fabric A cut: - four {4x} 4 ½ x 2 ½ rectangles {A} - eight {8x} 2 ½ x 2 ½ squares {B} from Fabric B cut: - four {4x} 4 ½ x 2 ½ rectangles {A} - eight {8x} 2 ½ x 2 ½ squares {B} {two} Using a fabric marker or pencil and ruler, mark a diagonal line on the wrong side of each {diagram a}: - 2 ½ x 2 ½ squares {both B} {diagram a} PIECING: {three} Make Eight Flying geese units: Flying Geese Unit A: Match one 2 ½ x 2 ½ square {B} with one fabric 4 ½ x 2 ½ rectangle {A}. Sew along marked line from step two. Cut ¼ on the outside of your marked/sewn line to trim piece for pressing {diagram a}. Press seams towards darker fabric yielding the following shape {diagram c}. Sew along marked line Cut ¼ on outside of sewn line {diagram b} {diagram c} Repeat for the opposite corner with one 2 ½ x 2 ½ square {B} {diagram d}. Note that your square will overlap the middle corner of your first Easy Corner Triangle. Cut and press to yield one Flying Geese Unit A {diagram e}. Make four units for each block. {diagram d} {diagram e}
12 Flying Geese Unit B: Match one 2 ½ x 2 ½ square {B} with one fabric 4 ½ x 2 ½ rectangle {A}. Sew along marked line from step two. Cut ¼ on the outside of your marked/sewn line to trim piece for pressing. Press seams towards darker fabric. Repeat for the opposite corner with one 2 ½ x 2 ½ square {B}. Note that your square will overlap the middle corner of your first Easy Corner Triangle. Cut and press to yield one Flying Geese Unit B {diagram f}. Make four units for each block. Sew along marked line Cut ¼ on outside of sewn line {diagram f} {four} To assemble each block you will need - 4x Flying Geese Unit A - 4x Flying Geese Unit B {Unit A} {Unit B} {five} Lay out pieces in the following block formation {diagram G}. Join block in columns, pressing seams in alternate directions for each row to nest seams: {diagram g}


13 BLOCK STATS: CROSSROADS Finished Size: 8 x 8 Finished Block: 8 x 8 Quantities are for 42 wide, 100% cotton fabrics. Measurements include ¼ seam allowances. ¼ seams are used throughout unless otherwise stated. Sew with right sides together unless otherwise stated. MATERIALS: 2 Fat Quarters in selected prints* * Mix and match your fabrics for each block {in this case we used three prints}. CUTTING: PREPARING: {one} Take your fabric and cut as follows: from Fabric A cut: - four {4x} 4 ½ x 4 ½ squares {A} from Fabric B cut: - sixteen {16x} 2 ½ x 2 ½ squares {B} {two} Using a fabric marker or pencil and ruler, mark a diagonal line on the wrong side of each {diagram a}: - 2 ½ x 2 ½ squares {B} {diagram a} PIECING: {three} Make Square-in-a-Square units: Match one 2 ½ x 2 ½ square {B} with the corner of one 4 ½ x 4 ½ square {A}. Sew along marked line from step two. Cut ¼ on the outside of your marked/sewn line to trim piece for pressing {diagram b}. Press seams towards darker fabric yielding the following shape {diagram c}. Cut ¼ on outside of sewn line Sew along marked line {diagram b} {diagram c}


14 Repeat for the remaining three corners, one corner at a time, with 2 ½ x 2 ½ squares {B} making sure to align and sew according to the following unit layout {diagram d}: Note that your square will overlap the middle corner of each triangle piece. Press to yield one Square-in-a-Square unit {diagram e}. Make four units for each block. {diagram d} {diagram e} {four} To assemble each block you will need - 4x Square-in-a-Square Units {five} Lay out pieces in the following block formation {diagram f}. Join block in rows, pressing seams in alternate directions for each row to nest seams: {diagram f}
15 BLOCK STATS: SQUARE DEAL Finished Size: 8 x 8 Finished Block: 8 x 8 Quantities are for 42 wide, 100% cotton fabrics. Measurements include ¼ seam allowances. ¼ seams are used throughout unless otherwise stated. Sew with right sides together unless otherwise stated. MATERIALS: 2 Fat Quarters in selected prints* * Mix and match your fabrics for each block {in this case we used two prints}. CUTTING: PREPARING: {one} Take your fabric and cut as follows: from Fabric A cut: - eight {8x} 3 ½ x 3 ½ squares {A} from Fabric B cut: {two} Using a fabric marker or pencil and ruler, mark a diagonal line on the wrong side of each {diagram a}: - 3 ½ x 3 ½ squares {A} - eight {8x} 3 ½ x 3 ½ squares {B} {diagram a} STITCHING: {two} Make Half Square Triangles {HST} units by matching a 3 ½ x 3 ½ squares {A} with a 3 ½ x 3 ½ {B} square and sewing along ¼ on each side of the marked line {diagram b}. Using a rotary cutter, cut along the marked diagonal line to produce two half square triangle pieces. Repeat for all {A} and {B} squares. Press seams as desired and trim to 2 ½ square, producing the following HST units for your block {diagram C} 16 in total for each block: Stitch ¼ each side of marked line {diagram b} {diagram c} PIECING: {four} To assemble each block you will need {diagram d}: -16x Half Square Triangle Units
16 {diagram d} {five} Lay out pieces in the following block formation {diagram e}. Join block in rows, pressing seams in alternate directions for each row to nest seams {arrows shown as a guide}: {diagram e}


17 BLOCK STATS: EMPIRE STAR Finished Size: 8 x 8 Finished Block: 8 x 8 Quantities are for 42 wide, 100% cotton fabrics. Measurements include ¼ seam allowances. ¼ seams are used throughout unless otherwise stated. Sew with right sides together unless otherwise stated. MATERIALS: 3 Fat Quarters in selected prints* * Mix and match your fabrics for each block {in this case we used three prints}. CUTTING: PREPARING: {step 1} Take your fabric and cut as follows: from Fabric A cut: - two {2x} 3 ½ x 3 ½ squares {A} from Fabric B cut: - two {2x} 3 ½ x 3 ½ squares {B} - four {4x} 4 ½ x 2 ½ rectangles {C} - four {4x} 2 ½ x 2 ½ squares {D} from Fabric C cut: {step 2} Using a fabric marker or pencil and ruler, mark a diagonal line on the wrong side of each {diagram a}: - 3 ½ x 3 ½ squares {A} - 2 ½ x 2 ½ squares {D} - 2 ½ x 2 ½ squares {E} {diagram a} - eight {8x} 2 ½ x 2 ½ squares {E} - two {2x} 4 ½ x 2 ½ rectangles {F} PIECING: {step 3} Make six Flying geese units: Flying Geese Unit A: Match one 2 ½ x 2 ½ square {E} with one fabric 4 ½ x 2 ½ rectangle {C}. Sew along marked line from step two. Cut ¼ on the outside of your marked/sewn line to trim piece for pressing {diagram b}. Press seams towards darker fabric yielding the following shape {diagram c}. Cut ¼ on outside of sewn line Sew along marked line {diagram b} {diagram c}


18 Repeat for the opposite corner with one 2 ½ x 2 ½ square {E} {diagram d}. Note that your square will overlap the middle corner of your first Easy Corner Triangle. Cut and press to yield one Flying Geese Unit A {diagram e}. Make four units for each block. {diagram d} {diagram e} Flying Geese Unit B: Match one 2 ½ x 2 ½ square {D} with one fabric 4 ½ x 2 ½ rectangle {F}. Sew along marked line from step two. Cut ¼ on the outside of your marked/sewn line to trim piece for pressing. Press seams towards darker fabric. Repeat for the opposite corner with one 2 ½ x 2 ½ square {D}. Note that your square will overlap the middle corner of your first Easy Corner Triangle. Cut and press to yield one Flying Geese Unit B {diagram f}. Make two units for each block. {diagram f} {step 4} Make Half Square Triangles {HST} units by matching a 3 ½ x 3 ½ square {A} with a 3 ½ x 3 ½ square {B} and sewing along ¼ on each side of the marked line {diagram g}. Using a rotary cutter, cut along the marked diagonal line to produce two half square triangle pieces. Repeat for all {A} and {B} squares. Press seams as desired and trim to 2 ½ square, producing the following HST units for your block {diagram h} 4 in total for each block: {diagram g} {diagram h} {step 5} To assemble each block you will need - 4x Flying Geese Unit A - 2x Flying Geese Unit B - 4x HST units


19 {five} Lay out pieces in the following block formation {diagram i}. Join block in rows, pressing seams in alternate directions for each row to nest seams: {diagram i}
20 BLOCK STATS: RIBBON STAR Finished Size: 8 x 8 Finished Block: 8 x 8 Quantities are for 42 wide, 100% cotton fabrics. Measurements include ¼ seam allowances. ¼ seams are used throughout unless otherwise stated. Sew with right sides together unless otherwise stated. MATERIALS: 2 Fat Quarters in selected prints* * Mix and match your fabrics for each block {in this case we used two prints}. CUTTING: PREPARING: {one} Take your fabric and cut as follows: from Fabric A cut: - six {6x} 3 ½ x 3 ½ squares {A} - four {4x} 2 ½ x 2 ½ squares {B} from Fabric B cut: - six {6x} 3 ½ x 3 ½ squares {C} {two} Using a fabric marker or pencil and ruler, mark a diagonal line on the wrong side of each {diagram a}: - 3 ½ x 3 ½ squares {A} {diagram a} STITCHING: {two} Make Half Square Triangles {HST} units by matching a 3 ½ x 3 ½ squares {A} with a 3 ½ x 3 ½ {C} square and sewing along ¼ on each side of the marked line {diagram b}. Using a rotary cutter, cut along the marked diagonal line to produce two half square triangle pieces. Repeat for all {A} and {C} squares. Press seams as desired and trim to 2 ½ square, producing the following HST units for your block {diagram C} 12 in total for each block: Stitch ¼ each side of marked line {diagram b} {diagram c} PIECING: {four} To assemble each block you will need {diagram d}: -12x Half Square Triangle Units -4x 2 ½ x 2 ½ squares {B}
21 {diagram d} {five} Lay out pieces in the following block formation {diagram e}. Join block in rows, pressing seams in alternate directions for each row to nest seams {arrows shown as a guide}: {diagram e}
22 BLOCK STATS: FRIENDSHIP STAR Finished Size: 8 x 8 Finished Block: 8 x 8 Quantities are for 42 wide, 100% cotton fabrics. Measurements include ¼ seam allowances. ¼ seams are used throughout unless otherwise stated. Sew with right sides together unless otherwise stated. MATERIALS: 2 Fat Quarters in selected prints* * Mix and match your fabrics for each block {in this case we used two prints}. CUTTING: PREPARING: {one} Take your fabric and cut as follows: from Fabric A cut: - two {2x} 4 ¼ x 4 ¼ squares {A} - four {4x} 3 ¼ x 3 ¼ squares {B} from Fabric B cut: - two {2x} 4 ¼ x 4 ¼ squares {C} - one {1x} 3 ¼ x 3 ¼ square {D} {two} Using a fabric marker or pencil and ruler, mark a diagonal line on the wrong side of each {diagram a}: - 4 ¼ x 4 ¼ squares {A} {diagram a} STITCHING: {three} Make Half Square Triangles {HST} units by matching a 4 ¼ x 4 ¼ square {A} with a 4 ¼ x 4 ¼ {C} square and sewing along ¼ on each side of the marked line {diagram b}. Using a rotary cutter, cut along the marked diagonal line to produce two half square triangle pieces. Repeat for all {A} and {C} squares. Press seams as desired and trim to 3 ¼ square, producing the following HST units for your block {diagram c} 4 in total for each block: Stitch ¼ each side of marked line {diagram b} {diagram c} PIECING: {four} To assemble each block you will only need: - 4x Half Square Triangles - 4x 3 ¼ x 3 ¼ squares {B} - 1x 3 ¼ x 3 ¼ square {D} {diagram d}
23 {five} Lay out pieces in the following block formation {diagram d}. Join block in rows, pressing seams in alternate directions for each row to nest seams {arrows shown as a guide}:
24 BLOCK STATS: INDIAN STAR Finished Size: 8 x 8 Finished Block: 8 x 8 Quantities are for 42 wide, 100% cotton fabrics. Measurements include ¼ seam allowances. ¼ seams are used throughout unless otherwise stated. Sew with right sides together unless otherwise stated. MATERIALS: 2 Fat Quarters in selected prints* * Mix and match your fabrics for each block {in this case we used two prints}. CUTTING: PREPARING: {one} STITCHING: Take your fabric and cut as follows: from Fabric A cut: - six {6x} 2 ½ x 2 ½ squares {A} - four {4x} 3 ½ x 3 ½ squares {B} from Fabric B cut: - four {4x} 3 ½ x 3 ½ squares {C} - two {2x} 2 ½ x 2 ½ squares {D} {two} Using a fabric marker or pencil and ruler, mark a diagonal line on the wrong side of each {diagram a}: - 3 ½ x 3 ½ squares {B} {diagram a} {two} Make Half Square Triangles {HST} units by matching a 3 ½ x 3 ½ square {B} with a 3 ½ x 3 ½ {C} square and sewing along ¼ on each side of the marked line {diagram b}. Using a rotary cutter, cut along the marked diagonal line to produce two half square triangle pieces. Repeat for all {A} and {C} squares. Press seams as desired and trim to 2 ½ square, producing the following HST units for your block {diagram C} 8 in total for each block: Stitch ¼ each side of marked line {diagram b} {diagram c} PIECING: {four} To assemble each block you will need {diagram d}: -8x Half Square Triangle Units -6x 2 ½ x 2 ½ squares {A} -2x 2 ½ x 2 ½ squares {D}
25 {diagram d} {five} Lay out pieces in the following block formation {diagram e}. Join block in rows, pressing seams in alternate directions for each row to nest seams {arrows shown as a guide}: {diagram e}

26 BLOCK STATS: OLD MAID S PUZZLE Finished Size: 8 x 8 Finished Block: 8 x 8 Quantities are for 42 wide, 100% cotton fabrics. Measurements include ¼ seam allowances. ¼ seams are used throughout unless otherwise stated. Sew with right sides together unless otherwise stated. MATERIALS: 2 Fat Quarters in selected prints* * Mix and match your fabrics for each block {in this case we used two prints}. CUTTING: PREPARING: {one} STITCHING: Take your fabric and cut as follows: from Fabric A cut: - five {5x} 3 ½ x 3 ½ squares {A} - four {4x} 2 ½ x 2 ½ squares {B} from Fabric B cut: - five {5x} 3 ½ x 3 ½ squares {C} - two {2x} 2 ½ x 2 ½ squares {D} {two} Using a fabric marker or pencil and ruler, mark a diagonal line on the wrong side of each {diagram a}: - 3 ½ x 3 ½ squares {A} {diagram a} {two} Make Half Square Triangles {HST} units by matching a 3 ½ x 3 ½ squares {A} with a 3 ½ x 3 ½ {C} square and sewing along ¼ on each side of the marked line {diagram b}. Using a rotary cutter, cut along the marked diagonal line to produce two half square triangle pieces. Repeat for all {A} and {C} squares. Press seams as desired and trim to 2 ½ square, producing the following HST units for your block {diagram C} 10 in total for each block: Stitch ¼ each side of marked line {diagram b} {diagram c} PIECING: {four} To assemble each block you will need {diagram d}: -10x Half Square Triangle Units -4x 2 ½ x 2 ½ squares {B} -2x 2 ½ x 2 ½ squares {D}
27 {diagram d} {five} Lay out pieces in the following block formation {diagram e}. Join block in rows, pressing seams in alternate directions for each row to nest seams {arrows shown as a guide}: {diagram e}
28 MATERIALS: FINISHING YOUR QUILTS 3 ¼ Yards Solid Background Fabric CUTTING: {one} Take your fabric and cut as follows: {4x} 1 ½ x WOF Strips Sub-cut these into: - {10x} 1 ½ x 8 ½ strips - {2x} 1 ½ x 40 strips {1x} 10 x WOF Strip Sub-cut this into: - {2x} 10 x 17 ½ rectangles {2x} 15 x WOF Strips {2x} 35 x WOF Strips FINISHING: {Step 1} Lay blocks following the Quilt Layout Diagram on Page 1, or as desired! Note: refer to this diagram for following steps. {Step 2} Assemble quilt top in columns. Use a 1½ x 8 ½ horizontal sashing strip to join each block in each column. Press seams to one side and repeat for each column. You will now have two block strips, with sashing separating each of the six blocks. Sew the two 1½ x 40 vertical sashing strips end-to-end to create one long strip. Measure the length along the side of your columns and cut your strip to match this measurement. Join both block strips together with the vertical sashing strip in between. {Step 3} {Step 4} Take the two 10 x 17 ½ rectangles and join to the top and bottom of your sashed blocks. Press well and measure the length of your quilt top. Sew the two 15 x WOF strips end-to-end to create one long strip. Cut your strip to match the measurement taken in Step 3. Repeat for the two 35 x WOF strips. These two, joined pieces will form your left and right borders. Sew these pieces to each side of your blocks and press well. QUILTING: {Step 5} {Step 6} Layer quilt top, batting and backing fabric and baste with safety pins. Quilt as desired. Trim excess.
29 BINDING: {Step 7} {Step 8} {Step 9} Sew 2 ½ binding strips together end to end to form one long strip. Press seams open. Press strip in half with wrong sides together. Using a quarter inch {¼ } seam sew your binding strips to the front of your basted and quilted piece with raw edges together. Start along one side leaving a tail of about 6-10 inches. Sew along until you reach ¼ from the corner. Take your quilt and turn, lift your strip straight up and then bring it back down to align raw edges {diagram k}. Continue sewing your binding strips. Repeat for the next three corners. {stitch until ¼ from corner } {quilt back } {lift strip up, and then down to align raw edges, continue sewing in place ¼ from corner } {diagram k} {Step 10} {Step 11} {Step 12} When you reach the beginning of your binding, stop sewing and match and trim the two tails of binding strip, so it will sit neatly along the quilt edge. Unfold your strips and with right sides together, sew your two tails together {you may need to wrangle your quilt a bit to do this!}. Re-fold sewn strip and lay flat against side of your quilt and sew in place. Turn binding strip to back-side of your quilt and hand-sew in place. * in the case of machine binding complete all above steps, however sewing the binding strip to the back of the quilt in step 8, and turning to the front of the quilt, and machine stitching in step 12.


30 ABOUT THE DESIGNER Keera is cattle farmer s wife, mother to two beautiful girls, quilter, designer and teacher for LIVE.LOVE.SEW Pattern Co. She sets out to design and share her patterns, drawing inspiration from the place and space around her; her beautiful home in rural Australia and the colour and pattern of gorgeous modern and contemporary fabrics.. Our patterns are designed to give quilters the skills to make something truly beautiful and to help share their own story. LIVE.LOVE.SEW - Where every quilt tells a story, love is sewn in every stitch, and precious moments in time are shared. Thankyou for sharing in this journey with me - may you love your new quilt as much as I do! Keera x WEB: keera@livelovesew.com.au FEATURE BLOCKS MATERIALS REQUIRED: 12 Fat Quarters {or Scraps!} 4 yards Solid Fabric 4 yards Backing Fabric 1/2 yards Binding Fabric 65 x 65 Cotton/Bamboo Batting Feature Blocks and LIVE.LOVE.SEW Pattern Co. is copyright of Keera Job - January 2016 Duplication of any kind is prohibited. Every care has been taken to ensure the accuracy of this pattern and corresponding instructions. Please read all instructions before attempting this pattern. Please check to see if this pattern has been updated or corrected since purchase. Various Fabric collections and Manufacturers are used.
LIVE.LOVE.SEW. GOING UP! # x 58.5
 LIVE.LOVE.SEW GOING UP! #117 58.5 x 58.5 QUILT STATS: GOING UP! Finished Quilt: 58.5 x 58.5 Finished Block: 7 x 9.5 MATERIALS: 35 10 x 10 squares 2 ½ yards Solid Fabric 3 ¾ yards Print Fabric {backing}
LIVE LOVE SEW PATTERN CO. BASKET WEAVE # x 84
 LIVE LOVE SEW PATTERN CO. BASKET WEAVE #127 50 x 84 QUILT STATS: BASKET WEAVE Finished Quilt: 50 x 84 Finished Block: 6 x 6 MATERIALS: (1x) Rollie Pollie (Sweet Prairie Fabric) 1 ½ yards Solid Fabric (Background)
charmed #103 {free download}
 charmed #103 {free download} Quilt Stats: charmed Finished Size: 49½ x 49½ Finished Block: 7¾ x 7¾ Quantities are for 44 (112cm) wide, 100% cotton fabrics. Measurements include ¼ seam allowances. ¼ seams
Cheri Good Quilt Design s Ribbon Star
 Cheri Good Quilt Design s Ribbon Star Designer: Cheri Good Quilt Designs Ribbon Star Size 56 x 56 #110A Ribbon Star Strip Quilt Supplies Finished quilt size: 56 x 56 Cotton thread to match fabrics Basic
CHRISTMAS CANDY. Quilt Finished Size: 64" x 80" Block Finished Size: 8" x 8"
 CHRISTMAS CANDY Quilt design and instructions by Wendy Sheppard Specification: Advanced Beginner Quilt Finished Size: 64" x 80" Block Finished Size: 8" x 8" Cutting Instructions: From Fabric A, cut for
Figgy Pudding #131. Finished quilt size is 69-1/2 x 69-1/2. Materials Needed:
 #131 Figgy Pudding Finished quilt size is 69-1/2 x 69-1/2 Materials Needed: 10 fat quarters 2-3/4 yards background fabric 1 fat quarter for corner blocks 1 yard border fabric 2/3 yard binding fabric 4-1/2
Project: Time and Again Mini Quilt
 DESIGNER ANN HERMES (ANNHERMESQUILTS.COM) A two-color mini quilt makes a stunning table topper. without the prior written consent of Meredith Corporation. Meredith Corporation 2015. All rights reserved.
Finished Size: 75"x 75"
 Finished Size: 75"x 75" Finished Size: 75"x 75" Block Size: 1"x1" and 6"x6" Quilters Basics Read instructions before beginning a project. All instructions include a ¼" seam allowance. Press as you go.
FREE PATTERN. featuring STARGAZER COLLECTION BY AGF STUDIO
 FREE PATTERN featuring STARGAZER COLLECTION BY AGF STUDIO QUILT DESIGNED BY FABRICS DESIGNED BY CAP-ST-1106 TWINKLY PHASES CAP-ST-1108 PLANETARIUM CAP-ST-1103 INTERRUPTED SIGNAL CAP-ST-1104 TO BEARFINITY
Crescendo Pin Wheel Quilt
 Crescendo Pin Wheel Quilt Pinwheel quilts are the perfect example of a quilt pattern inspired by a real object. Whimsical and decorative, pinwheel quilts create gorgeous motifs that any quilter will love.
Finished Size 72"x72" PS44160
 Finished Size 72"x72" PS44160 Finished Size 72"x72" Quilters Basics Read instructions before beginning a project. All instructions include a ¼" seam allowance. Press as you go. Press seams in one direction.
Finished Size: 60 x70
 Finished Size: 60 x70 Finished Size: 60" x 70" Finished Block Size: 10" x 10" Cutting Label pieces as they are cut Quilters Basics Read instructions before beginning a project. All instructions include
Easy Star Table Runner
 ... where dreamers become quilters... Easy Star Table Runner Christmas Star Table Runner Runner: 15 x 49 General Directions Read through all directions before beginning. Sew using a ¼ seam unless otherwise
STARRY LOG CABIN. Written by Donna Jordan for Jordan Fabrics Finish Size: 41 x 58. Fabric Requirements:
 STARRY LOG CABIN Written by Donna Jordan for Jordan Fabrics Finish Size: 41 x 58 Fabric Requirements: 40-2 ½ Strips (Jelly Roll) Light Border Fabric: 1 yard Binding: ½ yard Backing: 2 ½ yards Cutting Instructions:
10 fat quarters for the blocks 1 fat quarter for the corner blocks
 Hey ya'll! This is Vanessa from Lella Boutique and I'm sorta hoping that I'm not the only one to have missed Christmas in July! Now that Into the Woods fabric is on its way to shops, I'm celebrating by
A Star in the Forest Table Topper 23 x 23 - A fat quarter project
 A Star in the Forest Table Topper 23 x 23 - A fat quarter project Read instructions before beginning. This project requires six fat quarters plus ¾ yard of backing fabric. Binding comes from one of the
featuring LETTERS COLLECTION AGF STUDIO
 featuring LETTERS FREE PATTERN COLLECTION BY AGF STUDIO QUILT DESIGNED BY AGF STUDIO FABRICS DESIGNED BY AGF STUDIO CAP-L-3000 ROSES & LETTERS CAP-L-3001 LOVE PUZZLE CAP-L-3002 XOXOXO CAP-L-3003 LOVE LIFE
READY. SET. QUICK & EASY PATTERNS
 READY. SET. QUICK & EASY PATTERNS USING THE ACCUQUILT GO! GO! Big and GO! Fabric Cutter Friendly 6 FREE patterns INSIDE GO! X Marks the Spot Baby Quilt featuring Riley Blake Designs Fabrics Download FREE
Let Freedom Ring. Navy Stars Cut 1 strip 4¼" x WOF. Cut the strip into 2 squares 4¼" x 4¼" and 1 square 3½" x 3½".
 FINISHED QUILT SIZE 64" x 81" Finished Block Size 15" x 15" Measurements include ¼" seam allowance. Sew with right sides together unless otherwise stated. Please check our website www.pennyrosefabrics.com
Central. Fabric. Dot to Dot Quilt. Supplies Needed. Instructions. Skill Level 2: Experience necessary. Project Instructions
 Fabric Project Instructions Central Dot to Dot Quilt Skill Level 2: Experience necessary Crafting Time: Weekend Project Supplies Needed 1 Fabric Central Dot Bundle 1 1 Fabric Central Dot Bundle 2 Fabric
Crossing Paths. Erin McMorris Intermix
 Featuring Erin McMorris Intermix Inspired by the flying geese design found in each block, this quilt mimics what a whole variety of flocks might look like, crossing paths and flying across the sky in every
Holidays with Our Homies
 Holidays with Our Homies Featuring Holiday Homies by Tula Pink Celebrate the holidays with Buck the dog, Gus the buck, and Ryan the goose in this whimsical saw tooth star quilt. Collection: Technique:
 Fling by Laura Jones 57" x 68" Featuring fabrics from the E60-1439-GRY E60-1440-PUR E60-1441-PUR E60-1442-GRN E60-1443-TURQ E60-1444-PUR E60-1444-GRY (includes binding) collection by Materials 1 Yard 1
free pattern featuring paperie COLLECTION BY AMY SINIBALDI
 free pattern featuring paperie COLLECTION BY AMY SINIBALDI QUILT DESIGNED BY AMY SINIBALDI COLOR OPTION FABRICS DESIGNED BY AMY SINIBALDI PPE-340 HAPPILY EVER AFTER PPE-341 COSETTE PPE-342 MANUSCRIPT PPE-343
GO! Qube 6" Storm at Sea Throw Quilt Finished Size: 50" x 50"
 GO! Qube 6" Storm at Sea Throw Quilt Finished Size: 50" x 50" For use with GO! Qube Mix & Match 6" Block (55775) Fabrics are provided by Island Batik To make a 6" Block use GO! Qube Mix & Match 6" Block
PS Finished Size 51"x56"
 PS19820 Finished Size 51"x56" Finished Size 51"x 56" Quilters Basics Read instructions before beginning a project. All instructions include a ¼" seam allowance. Press as you go. Press seams in one direction.
Domino Effect. Quilt 1 by Denise Russell. Skill Level: Advanced Beginner. Quilt size: 61 x 71. Free Project NOT FOR RESALE
 Domino Effect Quilt 1 by Denise Russell Quilt size: 61 x 71 Skill Level: Advanced Beginner Blank Quilting Corporation 49 West 37th Street New York, NY 10018 Tel: 800-294-9495 Fax: 212-679-4578 www.blankquilting.net
Under The S ea Table Runner
 Finished Size: 12" x 48" (30.48cm x 121.92cm) Under The S ea Supp lies Needed B efore you begin 3 Wishes Fabric Under the Sea Collection 1 yd. (91.44cm) 12281-Lt. Blue 3 8 yd. (34.29cm) 12289-Lt. Blue
Sawtooth Star Ornament with Applique Center
 Sawtooth Star Ornament with Applique Center Sawtooth Star with Applique Center Ornament/2 To make one Sawtooth Star Ornament with Applique Center you will need: 8 square of White or light colored background
Old Glory One Stamp. Alternate Piano Key Border. Morning Glory Designs by Reeze L. Hanson Quilts of Valor Pattern 65 x 79
 Old Glory One Stamp Alternate Piano Key Border Morning Glory Designs by Reeze L. Hanson Quilts of Valor Pattern 65 x 79 Instructions for cutting and piecing Quilt Panel and Border 1 1. Trim the quilt panel
Designed by Elise Lea for RK
 JustAND Kisses STARS STRIPES Designed by Elise Lea for RK www.robertkaufman.com Featuring Finished quilt measures: 72 x 82 For questions about this pattern, please email Patterns@RobertKaufman.com. Fabric
Floral Cluster. windhamfabrics.com. June Designed by Wendy Sheppard Featuring Botany by Kelly Ventura FREE PROJECT
 June 2018 Designed by Wendy Sheppard Featuring Botany by Kelly Ventura size: 70 x 70 windhamfabrics.com FREE PROJECT this is a digital representation of the quilt top, fabric may vary. please note: before
featuring NEST AGF STUDIO COLLECTION Sir BeaR
 featuring NEST COLLECTION BY AGF STUDIO FREE PATTERN Q U I LT D E S I G N E D B Y A G F S T U D I O FA B R I C S D ES I G N E D BY AG F S T U D I O CAP-N-6000 CAP-N-6001 CARE BEARS PLAYING DOTS CAP-N-6004
Just Kisses LADY ELIZABETH. Featuring
 Just Kisses LADY ELIZABETH Designed by Robert Kaufman Fabrics www.robertkaufman.com Featuring Finished quilt measures: 65-1/2 x 79 Quilt shown in colorstory. For alternate colorstories see pages 9-12.
Primo Plaid Flannels: New Blues
 #MakeItWithMarcusFabrics 66 x 84 PAGE 2 of 5 Fabric Requirements & Cutting Instructions Quilt Size: 66 x 84 Fabric A J306-0110 Fat Quarter Fabric B U038-0150 Fat Quarter Cut six 2 ½ squares. Fabric C U037-0118
featuring LETTERS COLLECTION BY AGF STUDIO Signage FREE PATTERN
 featuring LETTERS COLLECTION BY AGF STUDIO Signage FREE PATTERN Signage QUILT DESIGNED BY AGF STUDIO FABRICS DESIGNED BY AGF STUDIO CAP-L-3000 ROSES & LETTERS CAP-L-3001 LOVE PUZZLE CAP-L-3002 XOXOXO CAP-L-3003
Designed by Robert Kaufman Fabrics
 Just Côte Kisses d Azur Designed by Robert Kaufman Fabrics www.robertkaufman.com Featuring Finished quilt measures: 54 x 68-1/2 For questions about this pattern, please email Patterns@RobertKaufman.com.
Outback Wife Quilt. Requirements. Tools. By nightingale quilts for. Made Using. finished size of quilt: approx 99 x 99
 Requirements finished size of quilt: approx 99 x 99 (All strips are assumed to be width of fabric unless otherwise stated) Colours A-P: 10 x WOF, or a Fat Quarter of each colour Background (BG) fabric:
Eastham Table Runner. FreeSpirit presents: Eastham by Denyse Schmidt. Skill Level: Advanced Beginner. Finished Size: 16 x 61 (40.64cm x 154.
 Technique: Piecing, Quilting Eastham Table Runner Skill Level: Advanced Beginner Designed By: Brand: Crafting Time: The beauty of the collection lies in its versatility as the three gorgeous color ways
Mandy s Star. Designed By Linda Fitch for RJR Studio. Featuring Everything but the Kitchen Sink. Finished Sze 80-1/2 x 93-1/2
 Mandy s Star Designed By Linda Fitch for RJR Studio Finished Sze 80-1/2 x 93-1/2 Featuring Everything but the Kitchen Sink Mandy s Star Page 2 Mandy s Star Color Card Featuring the Everything but the Kitchen
Perfect Points Sampler
 Perfect Points Sampler by Ann Johnson for Connecting Threads Perfect Points Sampler: Lesson Five The Perfect Points Sampler was designed to provide practice for the techniques discussed in the Perfect
59 x 74 quilt designed by Judy Livingston Graceful Moments fabric collection by Maywood Studio
 Graceful Stars 59 x 74 quilt designed by Judy Livingston Graceful Moments fabric collection by Maywood Studio Graceful Stars (59 x 74 ) Quilt Quilt designed by Judy Livinston. Graceful Moments fabric collection
Snowballs and Stars. White Floral Cut 4 strips 2½" x WOF. Cut the strips into 56 squares 2½" x 2½".
 FINISHED QUILT SIZE 76" x 86" Finished Block Size 8" x 8" Measurements include ¼" seam allowance. Sew with right sides together unless otherwise stated. Please check our website www.rileyblakedesigns.com
Little Forest Quilt. 1. Use a rotary cutter and acrylic ruler to cut the number of pieces from each fabric as shown.
 Little Forest Quilt Finished Size: 40 ½" x 48 ½" (102.87cm x 123.19cm). Supplies Needed 3 Wishes Fabric Little Forest Collection 5 8 yd. (57.15 cm) - 12944-Gray 3 8 yd. (34.29cm) - 12949-Brown (binding)
Broken Hearts Mending Quilt Inspired by Marie Bostwick s A SINGLE THREAD READ THROUGH ALL THE INSTRUCTIONS BEFORE CUTTING AND SEWING.
 Broken Hearts Mending Quilt Inspired by Marie Bostwick s A SINGLE THREAD READ THROUGH ALL THE INSTRUCTIONS BEFORE CUTTING AND SEWING. Fabric Requirements Yardage Cut each fabric as follows: 6 pink fabrics
Hanging out with the Homies
 Hanging out with the Homies Featuring Holiday Homies by Tula Pink Showcase these great fabrics in these fun ornaments just hangin around for the holidays. Collection: Technique: Skill Level: Crafting Time:
Notes - Please wash, dry & iron your fabric before beginning. - Sew all seams with an accurate 1/4 seam allowance. CUTTING INSTRUCTIONS
 Notes - Please wash, dry & iron your fabric before beginning. - Sew all seams with an accurate 1/4 seam allowance. CUTTING INSTRUCTIONS Indicates fabric pattern is directional on strips Fabric A: Horizontal
Quilt-As-You-Go King Size Carpenter Star
 Quilt-As-You-Go King Size Carpenter Star Pattern by Linda Dufresne Hobbystash.com Finished Size : 120 x 120 (Illustrated on a queen size bed as a bedspread) The top has been divided into 3 sections to
Just Kisses NAPTIME FRIENDS
 Just Kisses NAPTIME FRIENDS Designed by Darlene Zimmerman Featuring Finished quilt measures: 46 x 60 See pages 8-9 for alternate napsize quilt. - Easy Angle (EZ Quilting #8823759A) - Companion Angle (EZ
Happy Winter Snowman Quilt
 1 Happy Winter Snowman Quilt This quilt is sure to become a classic addition to your décor at Christmas time. Rows of fun snowmen and loving hearts are highlighted against a deep blue winter sky. The quilt
The Flower Fields Quilt Featuring Flower Fields collection Finished Size: 66 x 78 Designed by Lynne Goldsworthy for Lecien
 The Flower Fields Quilt Featuring Flower Fields collection Finished Size: 66 x 78 Designed by Lynne Goldsworthy for Lecien Materials One FQ bundle of Lecien Flower Fields (scrappy binding is also made
QTfabrics.com QT Fabrics All rights reserved Pg 1. Designed by: Georgie Gerl. SIZE 77" X 63" for ½"binding 76½" x 62½" for ¼" binding
 SIZE 77" X 63" for ½"binding 76½" x 62½" for ¼" binding Jerry Gadamus Pg 1 Finished Size: 77"x 63" 26649X One Panel FABRIC REQUIREMENTS 26652K 3/4YARD 26653 X 1/4 YARD 26650 R 1 5/8 or 2 YARDS 1 BOLT 1
The 2018 Memoire a Paris Lone Star Quilt Featuring Memoire a Paris collection Finished Size: 83 square Designed by Lynne Goldsworthy for Lecien
 The 2018 Memoire a Paris Lone Star Quilt Featuring Memoire a Paris collection Finished Size: 8 square Designed by Lynne Goldsworthy for Lecien Fabric Requirements One FQ bundle of Memoire A Paris 2018
Snowbirds. See more Jinny Beyer quilt designs featuring her Palette Collection of fabrics at:
 See more Jinny Beyer quilt designs featuring her Palette Collection of fabrics at: www.jinnybeyer.com Spectrum - 67" x 81½" Lotus - 98" x 98" Fabric Requirements Jinny Beyer Palette Collection 2" x 4"
Finished Quilt Size 55" x 74 ½ " PROCESS COLOR:
 Vintage Modern PROCESS COLOR: Finished Quilt Size 55" x 74 ½ " Featuring fabrics from the Elizabeth collection from Fabric Requirements A B C D E F G 2012-91.. 2/3 yard 2012-5.. ½ yard 2013-5.. ¼ yard
Patriotic Stars. Blue Stripe Cut 12 strips 2½" x WOF. Cut the strips into 12 rectangles 2½" x 32½" for sashing.
 FINISHED QUILT SIZE 84" x 84" Finished Block Size 32" x 32" Measurements include ¼" seam allowance. Sew with right sides together unless otherwise stated. Please check our website www.rileyblakedesigns.com
Baby, Throw and Queen Size Pattern
 Aloha Ripple Quilt Baby, Throw and Queen Size Pattern By Andrea Smith of Happy Cloud Creations Baby: 36 1/2 x 42 1/2 inches Throw: 60 1/2 x 70 1/2 inches Queen: 84 1/2 x 98 1/2 inches Basic Instructions
 Stepping Stones Stepping Stones featuring fabrics from the River Mist collection from A B C D E F G Fabric Requirements Red 2099M-89... ⅔ yard 2100M-89... ⅔ yard 2102M-99... ⅔ yard 2105-88... ⅔ yard 2105-99...
#MakeItWithMarcusFabrics. Scrappier Dots. Fabric by Judie Rothermel. 57 x 68
 #MakeItWithMarcusFabrics Scrappier Dots 57 x 68 www.marcusfabrics.com @marcusfabrics PAGE 2 of 6 Quilt Cutting Instructions Fabric A Red Ditsy Dots 8272-0111 5/8 yard Cut five 3 ½ x WOF strips. Sub-cut
Sapphire Sapphire Fabric Requirements: Cutting Directions:
 Quilt Designed by Deb Mosa Finished Quilt Approx. x - Finished Block Size: x Sapphire fabrics by Exclusively Quilters - Style #90 Fabric Requirements: Based on wi fabric -/ yards large (#00-0) yards (#00-)
Rosy Cheeks Quilt Finished Quilt Size: 54 ½" x 70 ½"
 Designed by Jocelyn Ueng Rosy Cheeks Quilt Finished Quilt Size: 54 ½" x 70 ½" Quilt Fabric Materials White Tonal Floral* Red Large Rose Floral Red and Black Floral Black Small Floral Black Small Diamonds
Hoffman Ravenna. 60 x 75
 Hoffman Ravenna 60 x 75 Cutting Instructions: Seam Allowance: 1/4" LOF: Length of fabric WOF: Width of fabric RST: Right sides together Proof: Measure HST: Half square triangle : Cut corner-to-corner once.
Wild Things. Where the Wild Things Are quilt designed by Debby Kratovil
 Where the Wild Things Are quilt designed by Debby Kratovil Quilt size: approximately 42" x 42" Featuring fabrics from Wild Things collection by KG Art Studio for P&B Textiles Fabric collection by KG Art
Chloe Collection by Maywood Studio
 70" x 82" quilt designed by Denise Russell for Maywood Studio Chloe Collection by Maywood Studio Chloe Quilt Instructions For best results, read the pattern completely first. Press in the direction of
2016 Courtesy of Art Gallery Quilts LLC. All Rights Reserved.
 ST YL E NAME 2016 Courtesy of Art Gallery Quilts LLC. All Rights Reserved. CONSTRUCTION Sew all rights sides together with ¼"seam allowance. Arrange the triangles together in rows. QUILT DESIGNED BY AGF
WHOLESALE INFORMATION PACK
 LIVE.LOVE.SEW WHOLESALE INFORMATION PACK WWW.LIVELOVESEW.COM.AU WHERE EVERY quilt TELLS A story Keera Job pattern designer LIVE.LOVE.SEW Pattern Co. Grandale 101R Benolong Road Dubbo NSW 2830 Australia
Project: It Takes Two
 FABRICS are from the Bliss collection by Bonnie & Camille for Moda Fabrics (modafabrics.com). designer Camille Roskelley of thimble blossoms (thimbleblossoms.com) A quick-to-piece, big-block quilt for
VIRGINIA STAR QUILT Original design by Michelle Marvig
 Original design by Michelle Marvig PG 2/5 Original design by Michelle Marvig Finished Quilt : 52in x 67in The fabric requirements is for making quilt as shown in photograph. Before cutting review placement
free pattern featuring aligned COLLECTION BY AGF STUDIO
 free pattern featuring aligned COLLECTION BY AGF STUDIO QUILT DESIGNED BY AGF STUDIO FABRICS DESIGNED BY AGF STUDIO CAP-A-7000 Interconnected CAP-A-7001 Slanted CAP-A-7002 Hyphenated CAP-A-7003 Lineup
12 2½ strips strips ½ to 2½ strips. 42 1½ strips. 4 4 squares
 1 Block Finishing 216 There are 3 border finishes for the quilt: one fabric border, scrappy piano key border and scrappy multi horizontal To make the quilt larger, two more borders can be added as per
From each fat quarter, there should be: (2) 5 x 5 squares (16) 2.5 x 2.5 squares, and (8) 2.5 x 4.5 rectangles
 5 x 5 squares (16) 2.5 x 2.5 squares, and (8) 2.5 x 4.5 rectangles") Hi! This is Kristina Brinkerhoff from Center Street Quilts and I am excited to be back on the Moda Bake Shop today sharing my latest tutorial, Sky Full of Stars. This recipe has 16" blocks that are fat-quarter
Hi! This is Kristina Brinkerhoff from Center Street Quilts and I am excited to be back on the Moda Bake Shop today sharing my latest tutorial, Sky Full of Stars. This recipe has 16" blocks that are fat-quarter
Love Grows Here Quilt
 SIZE 67½" X 81½" Pg 1 Finished Size: 67½"x 81½" 26298 H one 24 repeat 2/3 YARD Numbers within gray box = Number of Bolts needed to make 12 kits; based on continuous cuts FABRIC REQUIREMENTS 26299 H 7/8
Finished Size: 71" x 82"
 Finished Size: 71" x 82" Fabric Requirements 38020-12 38027-11 38020-14 38022-14 38021-11 38023-13 Fabric 1 Fabric 5 Fabric 9 Fabric 13 Fabric 17 Background Fabric 21 Strip Set 1 ⅓ yd. ⅓ yd. 38021-12 38025-11
Double Star. Featuring fabrics from the Reflections of a Civil War collection from Jodi Barrows for
 Double Star Featuring fabrics from the Reflections of a Civil War collection from Jodi Barrows for Fabric Requirements (A) 2795-33... 3 ¼ yards (B) 2796-88... 1 yard (C) 2797-77... ¾ yard (D) 2161-88...
GO! Qube 8" Hugs & Kisses Baby Quilt Finished Size: 40" x 40"
 GO! Qube 8" Hugs & Kisses Baby Quilt Finished Size: 40" x 40" For use with GO! Qube Mix & Match 8" Block (55776) Fabrics are from the Cotton Couture Solids and assorted dot prints collections and are provided
Unit 14, Cordwallis Business Park, Clivemont Road, Maidenhead, Berkshire SL6 7BU +44(0)
") Scandi Finished size 60 x 7 (.m x.9m) Designed by Lynne Goldsworthy of lilysquilts.blogspot.com using the Scandi collection from Makower UK www.makoweruk.com Unit, Cordwallis Business Park, Clivemont Road,
Scandi Finished size 60 x 7 (.m x.9m) Designed by Lynne Goldsworthy of lilysquilts.blogspot.com using the Scandi collection from Makower UK www.makoweruk.com Unit, Cordwallis Business Park, Clivemont Road,
featuring playing pop COLLECTION BY agf studio Spur of the Moment free pattern
 featuring playing pop COLLECTION BY agf studio Spur of the Moment free pattern Spur of the Moment QUILT DESIGNED BY AGF STUDIO FINISHED SIZE 58" 64" FABRICS DESIGNED BY AGF STUDIO POP-2286 STRAWS OF RIP
NORFOLK FLOWERS. Blue Main Cut 8 strips 7½" x WOF for Border 2. Green Border Cut 7 strips 21/2" x WOF for Border 1.
 FINISHED QUILT SIZE 69" x 857/8" Finished Block Size 12" x 12" Measurements include ¼" seam allowance. Sew with right sides together unless otherwise stated. Please check our website www.pennyrosefabrics.com
Designed by Robert Kaufman Fabrics
 JustPOINSETTIAS Kisses FRAMED Designed by Robert Kaufman Fabrics www.robertkaufman.com Featuring Finished quilt measures: 24 x 24 For questions about this pattern, please email Patterns@RobertKaufman.com.
Patriotic Stars Block & Table Runner
 Patriotic Stars Block & Table Runner Approximate finished size 21 x 71 inches Designed by Cindy Roth Copyright 2017 Copyright 2017 Page 1 Patriotic Star Block & Table Runner Yardage Amounts Note: Amounts
BEAR HUG. Teal Cottage Cut 8 strips 2½" x WOF. Cut the strips into 116 squares 2½" x 2½".
 FINISHED QUILT SIZE 54" x 63" Finished Block Size 8" x 8" Measurements include ¼" seam allowance. Sew with right sides together unless otherwise stated. Please check our website www.rileyblakedesigns.com
All a Flutter Table Runner
 SIZE 48½" X 21½" Pg 1 Finished Size: 48½" x 21½" 26358 R FABRIC REQUIREMENTS 26359 P 26359 Q 26360 Q piecing only 1 BOLT 1 BOLT 1 BOLT 1 BOLT 26360 Q backing only 1-5/8 YARDS 26360 R includes binding 5/8
Reflections: Jewel Tones Quilt featuring the Reflections Collection from EBI Fabric Corp.
 Reflections: Jewel Tones Quilt featuring the Reflections Collection from EBI Fabric Corp. Size: 54" x 54" Skill Level: Intermediate Design by Sasha K Studio Fabric Requirements & Cutting Instructions (A)
Charmed. Finished Size 48 x 60 Finshed Block 9
 Charmed Finished Size 48 x 60 Finshed Block 9 Materials Needed: 3 1/2 yards of the brown floral (8786-9), for blocks and backing 1 1/4 yards of the brown stripe (8792-9) 1 1/4 yards of the pink butterfly
Gypsy Dreams. Quilt 2 by Denise Russell. Skill Level: Intermediate. Quilt size: 57 x 69. Free Project NOT FOR RESALE
 Gypsy Dreams Quilt 2 by Denise Russell Quilt size: 57 x 69 Blank Quilting Corporation 49 West 37th Street New York, NY 10018 Tel: 800-294-9495 Fax: 212-679-4578 www.blankquilting.net Skill Level: Intermediate
Designed by Robert Kaufman Fabrics
 Just HAY Kisses RIDE Designed by Robert Kaufman Fabrics www.robertkaufman.com Featuring Finished quilt measures: 56 x 72 For questions about this pattern, please email Patterns@RobertKaufman.com. Fabric
Fabric Requirements General Guidelines... Cutting Directions. (B) Red Floral Print. 4 3½ x 3½ squares (4N) 8 4½ x 8½ rectangles (7J)
 Red Floral Print. 4 3½ x 3½ squares (4N) 8 4½ x 8½ rectangles (7J)") Designed by Lani Padilla Kick off your holiday decorating and gift giving with this beautiful holiday tablerunner. Finished size: 24½ x 54½ Fabric Requirements General Guidelines... (A) Fat Quarter White
Designed by Lani Padilla Kick off your holiday decorating and gift giving with this beautiful holiday tablerunner. Finished size: 24½ x 54½ Fabric Requirements General Guidelines... (A) Fat Quarter White
featuring le vintage chic COLLECTION BY AGF STUDIO Escape free pattern
 featuring le vintage chic COLLECTION BY AGF STUDIO Tender Escape free pattern Escape Tender FABRICS DESIGNED BY AGF STUDIO CAP-VC-5000 Nostalgic Romance CAP-VC-5001 Picturesque Bloom CAP-VC-5002 Vintage
Sandi Blackwell s So Proudly We Hail
 Sandi Blackwell s So Proudly We Hail Designer: Sandi Blackwell www.stitchedbuy.com So Proudly We Hail Size 63 x 80 So Proudly We Hail A Square-agonals Design 63 x80 This pattern is constructed using the
A SPOOKY SLEEPOVER. This is a free pattern provided by The Red Boot Quilt Company The Red Boot Quilt Company
 A SPOOKY SLEEPOVER The Red Boot Quilt Company The Red Boot Quilt Company A SPOOKY SLEEPOVER Approx. Size 38 1/2in x 57 1/2in BEFORE THE FUN BEGINS Please read all instructions before you begin. Abbreviations.
f e a t u r i n g C a M p S I t e C O L L E C T I O N B Y a G f S t U D I O f r e e p a t t e r n
 free pattern featuring CAMPSITE COLLECTION BY AGF STUDIO QUILT DESIGNED BY AGF STUDIO FABRICS DESIGNED BY AGF STUDIO CAP-C-9000 Sneaky Little Foxes CAP-C-9001 Camping Stories CAP-C-9002 Wild Gatherings
Blink. De La Luna by Tula Pink
 Blink Featuring De La Luna by Tula Pink Take a look at these fun eyes are they watching you, or are they focused on Tula s portrait fabrics making a cameo appearance? Collection: Technique: Skill Level:
Section 1, Center Section Make One. Fabric Fabric # of Cutting Directions ID Location Strips
 Please read all instructions carefully prior to beginning quilt. All piecing uses a very accurate scant quarter inch seam allowance. In this quilt, accuracy is absolutely critical, so sew several sample
Patterns. Wallhanging & Chapel in the Pines. Deb Strain
 2 Patterns Wallhanging & Chapel in the Pines Deb Strain Chapel in the Pines Deb Strain Wallhanging 35 x 52 40 x 40 Cutting Directions Quilter Basics Read instructions before beginning a project. All instructions
FREE PATTERN. featuring BOUND COLLECTION BY APRIL RHODES
 FREE PATTERN featuring BOUND COLLECTION BY APRIL RHODES Q U I LT D E S I G N E D B Y A G F S T U D I O EVENING FA B R I C S D ES I G N E D BY A P R I L R H O D ES BOU-7040 PAINTING MORALE BOU-7045 BOU-7047
{ FEATURING PRISMA ELEMENTS}
 { FEATURING PRISMA ELEMENTS} FREE PROJECT SHEET DESIGNED BY FABRICS DESIGNED BY AGF-STUDIO FOR ART GALLERY FABRICS FINISHED SIZE: 52 1/2" x 73" CUTTING DIRECTIONS ¼" seam allowances are included. FABRIC
GO! Qube 6" Rick Rack Flower Throw Quilt Finished Size: 46" x 46"
 GO! Qube 6" Rick Rack Flower Throw Quilt Finished Size: 46" x 46" Fabrics provided by Timeless Treasures For use with GO! Qube Mix & Match 6" Block (55775) and GO! Qube 6" Companion Set Classics (55779)
Coastal Chic Batiks Collection by Monique Jacobs
 FREE Quilt Pattern 52" x 65" quilt designed by Monique Jacobs Coastal Chic Batiks Collection by Monique Jacobs Coastal Chic Batik Quilt Instructions For best results, read the pattern completely first.
free pattern featuring Stargazer COLLECTION BY AGF STUDIO
 free pattern featuring Stargazer COLLECTION BY AGF STUDIO QUILT DESIGNED BY FABRICS DESIGNED BY CAP-ST-1106 Twinkly Phases CAP-ST-1108 Planetarium CAP-ST-1103 Interrupted Signal CAP-ST-1104 To Bearfinity
Ladybug. Fly Away Home quilt designed by Leigh Headington. Finished quilt: " x " Finished block: 12" square
 Ladybug Fly Away Home quilt designed by Leigh Headington Finished quilt: 64 1 2" x 76 1 2" Finished block: 12" square Fabric Requirements 3/8 yard Dot-C1820 Red 1/4 yard Fun-C3851 Black 1/4 yard Fun-C3851