Pouring A Clear Epoxy Table Top. By Bob Chambers and Keith Bryan
|
|
|
- Roy Pierce
- 5 years ago
- Views:
Transcription

1 Pouring A Clear Epoxy Table Top By Bob Chambers and Keith Bryan Keith and I recently partnered up to apply a clear epoxy finish to a Spanish cedar dresser top that he had built. If you're unfamiliar with this finish it's that thick clear finish commonly used on bar tops and tabletops in restaurants and bars. Sometimes the finish will encapsulate pictures, coins, rocks, and other items. It's an extremely durable finish, though not particularly good with very hot objects. What makes this finish unique is that is poured on rather than brushed, wiped, or sprayed. It's also very messy to apply unless you take extra precautions (which unfortunately we did not). Like all epoxy it is comprised of a resin and a hardener that must be mixed just prior to use. There are at least three methods for applying an epoxy finish, depending upon the look you are trying to achieve. The first is to simply flow coat the entire work piece, allowing the epoxy to flow out and over the edges. This is the one we chose. The second is to mount the workpiece to a flat surface and then build a dam around the perimeter at a height equal to the thickness of the surface finish and at a distance from the edges equal to the thickness you want on the edges. The third method is to put banding around the edges of the workpiece that are taller than the top of the workpiece by the amount of thickness you will ultimately achieve. Our first step was to select an epoxy system that we felt would give us the results we wanted with a minimum amount of trouble. After indepently researching many offerings on the web we both came to the conclusion that Ultra Clear Epoxy was probably the best choice for a number of reasons. First, since we both knew nothing about applying an epoxy finish, information was important to us. Ultra Clear has a very good website chock full of instructional videos and information about the product and how to Ultra Clear Epoxy use it. Secondly it is advertised as self leveling to a thickness of 1/8" which was ideal for this project. Third, Keith was able to buy the finish as a kit which included a drill helix mixer for mixing, 2 one gallon mixing buckets with volume markings, a one quart marked bucket for mixing a seal coat, stirring stick, plastic paddle for working the finish as it is poured, and a very detailed instruction set. In addition Keith bought a plastic painter's cut can with throwaway liners which came in very handy. A pair of propane torches, a heat gun, gloves, and some shims completed our toolkit for this project. Keith bought a 2 gallon kit (one gallon of resin and one gallon of hardener) which was enough to mix a seal coat and a pour coat with 3/4 gallon left over. From start to finish the project took about seven hours, with five of those hours spent waiting for things to dry before we could move to the next step.


2 Step One Positioning and leveling the workpiece Keith covered his workbench with a piece of particle board that would serve as a sacrificial mount for the the dresser top as well as protect the top of the workbench. You can see this in the picture below. On top of this we placed several 2x4 blocks that would hold the dresser top above the particle board and allow the epoxy to drip off the edge without sticking the dresser top to the particle board. As we discovered later the particle board was not wide enough so we had to make some modifications. More on that later. Ultra Clear is self leveling. We wanted it to flow evenly over the sides so having the workpiece perfectly level was important. Plus we were not sure if the advertised 1/8" thickness would be maintained across the the entire surface if it was canted in one direction or another. So we used wood and plastic shims at various spots, including under the legs of the work bench until we got things more or less level. Keith had a couple of long bubble levels that were ideal for this. Leveling the table top Step Two Prepping the wood The raw wood was fairly light colored with not much visible character to the grain. Keith wanted it to be a little darker and wanted to pop the grain a little. We weren't sure that the epoxy finish would accomplish that in the same way that an oil based finished would, but we were reluctant to use a stain, not knowing for sure if the epoxy would be compatible. We finally decided to apply coat of Zinsser SealCoat, a dewaxed shellac that we were pretty sure would work. It would bring out some of the character in the wood as well as sealing the wood. We were also hopeful that it would seal well enough to prevent some of the bubbles that would appear when we started the process. In the end it might have had a little effect, but it's hard to say for sure if it would have been worse without it. We let the shellac dry for an hour which gave us time to study the epoxy instructions again before moving to the next step. Bob brushes on a shellac coat Step Three Apply a seal coat of epoxy With these finishes bubbles are the main problem that will have to be dealt with. The easiest way to make it more manageable is to brush on a coat of epoxy and let it cure for 4 6 hours before doing the final pour. But first we had to mix a quart of epoxy for this step. Keith measuring the seal coat components Before we could begin the mix the resin had to sit in hot water for 15 minutes. Following that the hardener went into the mixing container first, followed by the resin in exactly equal amounts. We then mixed for two minutes with the drill helix mixer, one minute by hand, and then three minutes with the drill mixer. This same regimen was used later when we mixed a full gallon.


3 Once mixed Keith poured some of the mixture into his cut can and began immediately brushing the epoxy over the surface. I followed him with a propane torch popping bubbles as they appeared. We found that a heat gun works just as well as a torch, the only difference really being that a heat gun can blow dust onto the surface. After popping bubbles for about a half hour we were finished with this phase. Before we could move on to the final pour we had to wait four hours for the seal coat to partially cure. There's a window where sanding between coats is not necessary, and four hours is the minimum wait time. At the end of four hours the workpiece looked pretty rough. We found some trash in the surface that we picked out with tweezers, and there were little irregularities everywhere. That was discouraging, but we were hopeful that the final pour would eliminate these problems. Keith brushes on the sealing coat. Notice the painter's cut can. Easy to hold and has a disposable liner. Once Keith finished brushing he grabbed a heat gun and started helping me pop bubbles. The seal coat looked pretty rough when we were finished. That was a little discouraging. Something to note here is that epoxy cures via an exothermic reaction between the resin and hardener. In other words as it hardens it gets hot. Really hot if there is a significant volume. After the seal coat was applied Keith put the brush in the cut can and set it aside. It might not be obvious in the picture, but it was hot enough to partially melt the plastic liner in the cut can.
 during the brush coat.")


. This part went reasonably well.")
4 Step Four The final pour The first thing we had to address was the fact that our mounting board was too narrow and left the edges of Keith's workbench exposed. This was obvious from the amount of epoxy that ended up on the mounting board (particle board) during the brush coat. Keith had some nice T tracks embedded in the workbench, so we wanted to keep it from getting damaged. Our solution was to butt some long boards up against the particle board and seal the gap with plastic packing tape. In this we were only partially successful, and the tape ended up leaking and partially gluing the boards to the workbench. Very poor planning on our part, but we definitely learned what to expect the next time we do this. A little later I'll show you a much better way to avoid this problem. Once we had more or less fixed the mounting board problem we were ready to mix a gallon of epoxy for the pour. We used the large mixing container supplied in the kit and used the procedure outlined in Step 3. Again we used a combination of drill mounted helix mixer and manual stirring. Keith measures the pour coat Using the helix mixer Manually stirring With all the mixing complete we moved immediately to the pour. Keith worked the main bucket while I tried to focus on the edges using the cut can (with a new liner!). This part went reasonably well. Occasionally I had to "encourage" the outward flow of epoxy to fill in areas that the pour missed with the little plastic spatula from the kit. We wondered if this would be necessary, and to some degree it was. At this point we had epoxy running off all four sides, and things were getting messy. You can see below why the support blocks were necessary. Working the edges Keith pours it on while I use the spatula Running off the edges


5 After finishing the pour we using propane torches to get rid of air bubbles in the surface. The seal coat had done its job well, and we only had a few problem areas where bubbles just kept coming. We continued using the torches for about 30 minutes, a little past the recommended time. We were careful to keep the flame moving to avoid burning the curing epoxy. As you can see below we now have a very nice dresser top with an ultra smooth finish. The only things left to do were to let it cure and remove the drips underneath the edge. Keith did that after a three day cure time using a combination of wood chisels and sanding.
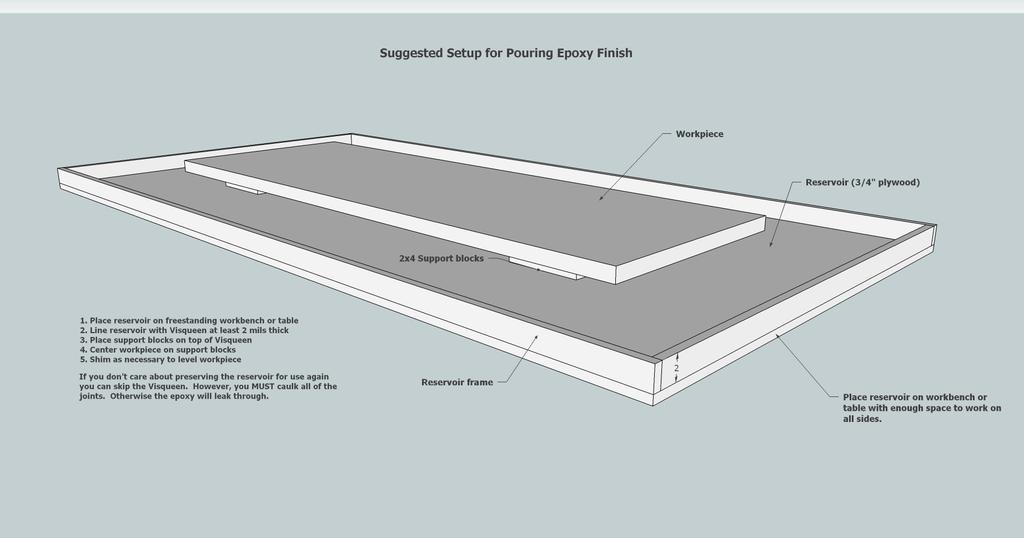
6 Lessons Learned 1. First of all this would have been difficult for one person to do. Keith and I had our hands full, and we were fortunate to have Curtis Dawson and Jim Landry show up and help us. So a big thanks to you guys! 2. This cannot be done outdoors. Like any finish that takes time to cure it will pick up everything that passes by. 3. We were able to mix and pour from the same container, although it's necessary to use a different container for each mix. Some sites will tell you to mix in one container and pour to another without scraping the sides to avoid having some partially mixed components from contaminating the mixture and producing areas that won't cure. This did not happen to us, but we religiously followed the mixing instructions that came in the kit. Also we didn't scrape the sides of the pour bucket to get that last little bit out. 4. Propane torches and heat guns work equally well to pop bubbles, but the torch has the advantage of not blowing particles in the air onto the surface. 5. A brushed on seal coat is mandatory if coating raw wood. Skip this step and bubbles with be a big problem later. 6. We found that denatured alcohol will get epoxy off your hands if you get to it quick enough. 7. Dewaxed shellac worked just fine beneath the epoxy, and improved the look of the wood. 8. Proper planning and space make a big difference. Having a big shop to work in allowed us to set up a mixing area and have plenty of room to move around the work surface. See the next page for a suggestion on how to set up a leak free pour area. We would have had fewer problems if we had built something like this initially, and we will definitely plan better on the next project.
7
Tabletop Epoxy Resin Instruction Guide
 Table Top Epoxy Full Instructional Guide WARNING! You should read through ALL of these instructions BEFORE starting. These instructions are intended for Bar Tops, Table Tops, Artwork and Countertop applications.
TOOLS & SUPPLIES (Included in ProTops Tool Kit)
") TOOLS & SUPPLIES (Included in ProTops Tool Kit) Clean Paint/Mixing Sticks Graduated Mixing Buckets Standard Mixing Cups Nylon Paint Brush Propane Torch 3M Masking Gun Masking Film & Painter s Tape Disposable
TOOLS & SUPPLIES (Included in ProTops Tool Kit) Clean Paint/Mixing Sticks Graduated Mixing Buckets Standard Mixing Cups Nylon Paint Brush Propane Torch 3M Masking Gun Masking Film & Painter s Tape Disposable
FAMOWOOD GLAZE COAT HIGH GLOSS CRAFT RESIN
 Eclectic Products, Inc. Manufacturing Facility 101 Dixie Mae Drive Pineville, Louisiana eclecticproducts.com 800.349.4667 ISO 9001:2015 Compliant Quality Management Systems Administration Office Eugene,
50 TIPS TO HELP YOU BE BETTER WITH RESIN. By Katherine Swift
 50 TIPS TO HELP YOU BE BETTER WITH RESIN By Katherine Swift 2016 Resin Obsession, LLC, all rights reserved Gainesville, FL 32606 www.resinobsession.com May not be shared in any form without permission
Polymer Composites Incorporated
 Rod Ham s Project, A Lesson In Synergy The following is an excerpt from correspondence that I had with Mr. Rod Ham who contacted me and inquired about the use of our MAX CLR-HP-HP for a project he had
Colorfil INSTRUCTIONS
 Colorfil INSTRUCTIONS SUPPLIES REQUIRED: HOT AIR GUN DENATURED ALCOHOL CLEAN WHITE RAG NYLON BRISTLE SCRUB BRUSH (tooth brush) ORBITAL SANDER ORBITAL ABRASIVES SPRAY BOTTLE WITH WATER OPTIONAL: SCALES
EPOXY WARNING! PREPARATION
 EPOXY WARNING! It is extremely Important that you read ALL of the instructions. Our epoxy is uniquely formulated and is not the same as other epoxy you might have used in the past. PREPARATION These instructions
COMPOSITES LAB MANUAL
 COMPOSITES LAB MANUAL Version 1 Lab 3: Surface Preparation, Wet Layup, and Vacuum Bagging The original version of this manual was a one student senior design project written by Katherine White, the Composite
Embedded Embroidery. Embroidery design: Martini. Braid or cording. Two-part (resin and hardener) forty-coat varnish. Tools needed: Wooden stool
 forty-coat varnish. Tools needed: Wooden stool") Embedded Embroidery As I went out to our deck recently, I noticed a stool that had been left outside for several days. I was slightly annoyed at first, but as I moved closer, I noticed some colored leaves
Embedded Embroidery As I went out to our deck recently, I noticed a stool that had been left outside for several days. I was slightly annoyed at first, but as I moved closer, I noticed some colored leaves
Amazing Clear Cast 80D Clear Epoxy
 Technical Data Sheet Amazing Clear Cast 80D Clear Epoxy Product Description: Alumilite's Amazing Clear Cast is a clear casting and coating system that cures to a rigid, durable, clear plastic. Use Amazing
How to make climbing grips. By,
 How to make climbing grips By, Items needed: * Items may be needed depending on your preference. - Carving Foam - Level Table - Cardboard - Pen - Ruler - Straight Edge - Box cutter - Hot melt glue gun
FAMOWOOD GLAZE COAT HIGH BUILD EPOXY COATING
 Eclectic Products LLC Manufacturing Facility 101 Dixie Mae Drive Pineville, Louisiana eclecticproducts.com 800.349.4667 ISO 9001:2008 Compliant Quality Management Systems Administration Office Eugene,
PREMIUM CONCRETE COUNTERTOP MIX INSTALLATION INSTRUCTIONS
 PREMIUM CONCRETE COUNTERTOP MIX INSTALLATION INSTRUCTIONS High Strength Fast Setting Pourable Helpful Items: TCC Materials February 09 Version 2.0 Tools Required: Concrete mixer or ½ drill (600 RPM or
Cold curing adhesive K-X280
 Instructions for use English Cold curing adhesive K-X280 A4048-1.0 en English 1 Safety instructions... 3 2 General information... 3 2.1 Scope of delivery for K-X280... 3 2.2 Accessories required for installation...
Get the benefits of oil with the ease of latex
 One of the most rewarding home improvement projects is putting a fresh coat of paint on your kitchen cabinets. A new color brightens up your kitchen, and can give it a complete updated look. But at the
Building the Bell Tower
 Building the Bell Tower Mold #55 does not contain all of the blocks to build this tower. You will need extra regular blocks (1/2" x 1/2" x 1") and square blocks (1/2" x 1/2" x 1/2"). These blocks can be
Parts List. Description. Installation Instructions
 Page 1 of 7 Parts List Aluminum Coping Hardware Kit 1 pkg Tek screws 1 tek screw nut driver 1 Snap strip removal tool 1 can Touch up spray paint 1 11/64 drill bit 8 pieces 1/8 Gray PVC 4 long 2 boxes Aluminum
BLADE REPAIR INSTRUCTION BOOKLET
 BLADE REPAIR INSTRUCTION BOOKLET Contents Section I: Section II: Section III: Section IV: Section V: Section VI: Removing a Blade Refer to this section if you need to remove the blade from an oar shaft.
Polyester Resin Casting Tutorial
 Polyester Resin Casting Tutorial By Spitfire At the request of a few members I am going to put together a tutorial on casting call blanks. It will be a work in progress as I have time to complete it. I
Tips & Tricks using Part 17
 Tips & Tricks using Part 17 Making a Secret Door Using Mold #96...1 Using Cotton Swabs For Antiquing...4 Planning Dungeon Waterways...5 Pouring and Texturing Water...6 Making Water for Fountains...11 Tips
GlassCast Penny Floor Project Page 1
 GlassCast Penny Floor Project Page 1 How to lay and resin coat a Penny Floor Contents Introduction 3 Before You Begin 3 Gathering and Preparing the Pennies 3 Tools, Materials & Conditions 4 Epoxy Resin
Somewhere along the way, we ve
 Precision 60 FINEHOMEBUILDING.com Window Trim A systematic approach ensures better joints and a faster installation By Anthony Vitale Somewhere along the way, we ve decided that it s the apprentice s job
Filling the cracks. Grinding and sanding. velomobiel.nl
 Filling the cracks We have published a manual on how to repair the laminate before, now it's time to smoothen the outside of the repair. This nose damage (picture ) has been repaired from the inside. The
SURFACE CASTING METHOD: For Molds & Core Boxes. Presented by: Hapco Inc.
 SURFACE CASTING METHOD: For Molds & Core Boxes Presented by: Hapco Inc. RAPIDFIL Detailed Specifications STEP 1 SPACER LAYER Apply a layer of ¼ foam to create a uniform ¼ thickness around the pattern.
How to build a Javelin Skiff
 How to build a Javelin Skiff This is not your grandfather s plywood boat! The Javelin involves a high-tech type construction, called composite. The hull can be constructed with foam or plywood; these materials
Designed for Vectric by Michael Tyler
 Project Tutorial Compatible with Current Version of: Featuring compatibility with nearly all CNC Machines Stone & Coral Inlay Vase Designed for Vectric by Michael Tyler It is our pleasure to provide our
Eerie Halloween by Nunn Design
 Eerie Halloween by Nunn Design Approximate finished length: 20 inches Beads and other products needed for necklaces: 1 - Pewter Itsy Square Bezel Pendant with Flat Loop by Nunn Design - Antique Gold -
Tips & Tricks using Part 24
 Tips & Tricks using Part 24 Finishing the River Sections... 2 Making Tentacles... 4 Making Fish... 6 Adding the Water... 8 Making the Plank Bridge... 13 Making Crystal Piles... 15 Finishing Various Accessories...
UNIT 11: PAINTING, STAINING, AND FINISHING
 KEY CONCEPTS 1. Equipment needed 2. Primary kinds of Paint: Interior/Exterior 3. Primary kinds of Stain: Interior/Exterior 4. Proper application techniques: Paint/Stain/Finish 5. Equipment care and clean
Finishes and Finishing Techniques
 Finishes and Finishing Techniques TED 126 Spring 2007 Review pages 147-150, 284-294 Finishes and finishing techniques The finishing process to choose depends partly on the type of wood and the appearance
Conquer your foes with 40+ custom colors that add a powerful burst of color to your projects.
 THE NEXT INNOVATION IN PAINT HAS ARRIVED Conquer your foes with 40+ custom colors that add a powerful burst of color to your projects. BUY 2 QUARTS - GET 1 FREE Expires on 12/31/18. Offer applies to the
Carbon Fiber Skinning Starter Kit
 CARBON WORKS www.gorillacarbons.com Carbon Fiber Skinning Starter Kit This Godzilla Carbonworks CF Skinning Starter Kit contains everything you need to take an original part (made from plastic, metal or
Cedar 2-Drawer Desktop Storage Cube
 Cedar 2-Drawer Desktop Storage Cube 5 ½ Dimensions 5 ½ 5 ½ 2 2 1 7/8 4 ¼ 4 ½ Author s Notes: Build a Cedar 2-Drawer Desktop Storage Cube from just 1 cedar fence picket. No angles, special cuts or rips
Introduction. Written By: Juan G. aka ArmJunkie
 Adventures in Plastic Casting v1.2 Written By: Juan G. aka ArmJunkie Introduction This article serves to chronicle my experiences in casting a plastic part using this Alumilite Mini Casting Kit. I learn
Tips & Tricks using Part 8
 Tips & Tricks using Part 8 Easy Sand Texturing...1 Advanced Sand Texturing...3 Making Palm Trees...5 Tips & Tricks using Bruce Hirst Part 8 Page i Easy Sand Texturing I'm going to make the sand textured
1Use the metal file to smooth
 Yamato: Step-by-step 85 Parts of the bridge and the hull a b c d e f a Part of the bridge b Part of the bridge c Part of the bridge d Radar x 2 e Part of the bridge x 2 f Wire Recommended tools and materials
Grade 11 Woods Lift Lid Coffee Table. Based on Under the big Top from Popular Mechanics Website
 Grade 11 Woods Lift Lid Coffee Table Based on Under the big Top from Popular Mechanics Website TABLE TOP 1. Select enough lumber to construct a top that is between 22 ½ and 24 wide after jointing. Ensure
Kam Aero 43% Extra 300.
 Stab Sheeting Kam Aero 43% Extra 300. Stabs / Elevator: Make your skins using the same method as you did for the fuselage foam parts. The stabs require 8 sheets (4 per stab) of 4 x 48 A grain sheeting.
INSTRUCTIONS FOR USING ITW PHILADELPHIA RESINS 1500LFH
 INSTRUCTIONS FOR USING ITW PHILADELPHIA RESINS 1500LFH --- Super Alloy Black 1500LFH is a liquid, injectable low friction material. The objective of these instructions is to allow the exact casting of
You expect to find PVC. PVC Lumber PROS & CONS OF PVC PROS
 PROS & CONS OF PVC PROS Won t rot. Doesn t have to be painted (but can be). No defects; consistent. Easy to cut and machine. Readily available. CONS Not designed for structural use. Plastic appearance
#70 grit sand Putty knives, sized as needed #1 fine gray sand Corner tools Milestone acrylic liquid
 Countertops Supplies Tools White and/or gray Milestone cement 12 inch steel trowel #70 grit sand Putty knives, sized as needed #1 fine gray sand Corner tools Milestone acrylic liquid Hock Universal tints
smooth operators Sanding Without Sandpaper
 tools of the trade smooth operators Sanding Without Sandpaper Sometimes sandpaper just won t cut it. Turn to these sandpaper alternatives to get the job done on highly detailed and curved surfaces. Sanding
How To Make A Two Part Mold And Cast Crystal Clear Medieval Knight Action Figures.
 http://wwwinstructablescom/id/how-to-make-a-two-part-mold-and-cast-crystal-clear/ How To Make A Two Part Mold And Cast Crystal Clear Medieval Knight Action Figures by ComposiMold on March 6, 2015 Table
Cowper From Steve Wolverton on the T&TTT forum, Feb 2005 For Reference Only Do not use to build a trailer. Check on Teardrop and Tiny Travel Trailers
 Cowper From Steve Wolverton on the T&TTT forum, Feb 2005 For Reference Only Do not use to build a trailer. Check on Teardrop and Tiny Travel Trailers for up to date building information; http://www.mikenchell.com/forums
Drum Trigger Project Part 2: Electric Bongo Case
 Drum Trigger Project Part 2: Electric Bongo Case When I started this project, it seemed that the best implementation of Ray Wilson s drum trigger circuit would be as a sort of hand drum. Since I ve got
Contents. pages 20-24: Installing Edge sinks into. custom laminate countertops page 8: Installing Edge sinks into postform laminate countertops
 Contents pages 2-8: Installing Edge sinks into custom laminate countertops page 8: Installing Edge sinks into postform laminate countertops pages 9-14: Installing Acrylic sinks into custom laminate countertops
Wood Turning Finishing Process. Compiled And Presented by Pete Marken For The 2018 Segmented Woodturners Symposium St Louis Missouri.
 Wood Turning Finishing Process Compiled And Presented by Pete Marken For The 2018 Segmented Woodturners Symposium St Louis Missouri. Why spend the time and effort to apply the best finish you can to a
INSTALLATION INSTRUCTIONS FOR #101NS & #101QR FIXED BASE
 INSTALLATION INSTRUCTIONS FOR #101NS & #101QR FIXED BASE #165 Anchor Kit #160/161 Epoxy Kit #163 Super Bundy Plus NOTE: BITUMINOUS PRODUCTS CANNOT BE USED TO INSTALL #101 FIXED BASE Revised MAY 2010 IMPACT
LATEX #80 LATEX #660 LATEX #80 VLA C R E A M L A T E X N E O F L E X
 LATEX #80 LATEX #660 LATEX #80 VLA C R E A M L A T E X N E O F L E X 24 BACKGROUND, GUIDELINES AND TIPS FOR USING LATEX #80 FROM THE MANUFACTURER The process of latex setting up is called vulcanization.
Here are the tools and materials we used for the project:
 When we began our kitchen remodel, we knew we were going to have to do something about the trash can-- our old one was stained and dented and just had to go. While we would have loved to have had room
Curved Metal Segmenting
 Curved Metal Segmenting A Tutorial by: David Washburn A.K.A djwood1 This tutorial was downloaded from The International Association of Penturners Introduction As I continue to learn about pen turning,
Veneering Inlay and Sand Shading by Jim Landry
 Veneering Inlay and Sand Shading by Jim Landry I recently built a blanket chest and wanted to create a unique veneer inlay on the inside of the lid. My wife and I used the Google Image search on the internet
One Piece Fiberglass Mold Construction
 One Piece Fiberglass Mold Construction (This is just a SAMPLE of the Main Manual) Simple Fiberglass Molds Can Be Used For Making Duplicate Parts For Many Applications Including Hobby & Automotive. This
Freehand Back-Filling: Polymer Clay and Resin Tutorial
 Page 1 of 9 Eugena Topina, 2016 Freehand Back-Filling: Polymer Clay and Resin Tutorial This tutorial is offered for your personal use only. Please do not distribute. Back-filling is a simple and very versatile
Bedtime for Bondo MERA Training
 Bedtime for Bondo 2002 MERA Training Section 1: Making the Plug/Model This section will show the process of building a plug/model for a plaster mold.this will represent what the final fiberglass part
IMPORTANT: This product cannot perform its intended function if not properly installed.
 www.emseal.com HORIZONTAL COLORSEAL INSTALL DATA - HORIZONTAL COLORSEAL FEBRUARY 2015, PAGE 1 OF 3 INSTALLD AT DO NOT OPEN ANY PACKAGES or install this material until all members of your crew have read
Cardboard Model Buildings
 Cardboard Model Buildings Get more model kits from http://www.modelbuildings.org PRINTING & ASSEMBLY TIPS: These OO designs can easily be resized by reducing the print percentage as follows: OO scale is
Obtained from Omarshauntedtrail.com
 http://usersites.horrorfind.com/home/haunts/monstermaze/ The Monster Maze Makes a Castle Facade Under $100 Requirements: $40.00-5 pieces of 4' x 8' plywood $ 3.00 - box of nuts, bolts, and washers $ 4.00-2
Finishing Brushes. no shop should be without. finishing room
 finishing room 4 Finishing Brushes no shop should be without A flawless, brushed-on finish starts with the right tool. And all you need is a small collection of brushes to handle any type of finish on
INSTRUCTIONS FOR REFINISHING A UBERTI STOCK.
 INSTRUCTIONS FOR REFINISHING A UBERTI STOCK. I have been refinishing gunstocks for 30 years on and off. Over the past several years I have done quite a few Uberti rifles and handgun grips to get the red
MUDGUN Drywall Finishing System
 Watch the demonstration video online at hydetools.com MUDGUN Drywall Finishing System Quick Start Guide Hyde Tools, Inc. / A Hyde Group Company / 800-872-4933 / custrelations@hydetools.com / hydetools.com
joining materials - wood
 UNIT D E S I G N A N D M A N U F A C T U R E : C O U R S E M A T E R I A L Wood joints joining materials - wood The majority of joints used in woodcraft have been designed specifically to attain the maximum
Paint Spraying: Spray gun parts Student A:
 Paint Spraying: Spray gun parts Student A: You need to replace some parts for your spray gun. However, you don t know the name of the part, or the part number. Telephone a paint gun supplier and order
Construction Guide for Quick Build MIG-29 Design by Tomas Hellberg
 Construction Guide for Quick Build MIG-29 Design by Tomas Hellberg This kit is very simple to put together. The biggest danger in messing up this kit is gluing the pieces to your work bench. But before
Full Size Slatted Headboard [1]
![Full Size Slatted Headboard [1]](/thumbs/86/94948649.jpg "Full Size Slatted Headboard [1]") [1] Submitted by CassieD [2] on Mon, 2011-08-22 22:15 [1] Additional Photos [3] Page 1 of 13 [4] Summary: I wanted a headboard that was simple, easy to build from stock, and made from hardwood. Problem
[1] Submitted by CassieD [2] on Mon, 2011-08-22 22:15 [1] Additional Photos [3] Page 1 of 13 [4] Summary: I wanted a headboard that was simple, easy to build from stock, and made from hardwood. Problem
A Pictorial of David Dawes AA400 HFT Thumbhole Stock in the Making
 DRAFT Version A Pictorial of David Dawes AA400 HFT Thumbhole Stock in the Making Part 1 and finally Part 2 as well Updated: February 2008 By James Mitchell (a.k.a. mitchejc) Note: Building rifle stocks
How Much Does A Touch Up Paint Job Usually Cost
 How Much Does A Touch Up Paint Job Usually Cost Touch Up Paint Images and Photo Gallery at AutomotiveTouchup. too much for a respray of my front and rear bumbers so i dicided to do it myself i did the
Working with Resin Models
 Working with Resin Models This article will run through the basic techniques and methods required to get the most out of preparing, cleaning up and assembling Forge World s resin kits. If you need extra
Furnace build report
 Furnace build report Cheap and Free Rick is the president of the Metro Detroit Metalworking Club. A few weeks ago we spent the better part of a Sunday over at C&F Rick s house while some aluminum casting
Finish / Case. Schaff Piano Supply Company Presents: Lacquer Stick Work. Basic Techniques. By Chuck Behm
 Schaff Piano Supply Company Presents: Lacquer Stick Work Basic Techniques By Chuck Behm / Lacquer Stick Techniques Lacquer Stick Work* -Rationale- Lacquer stick work is appropriate for some repairs in
Construction Guide for Quick Build F-22 Raptor Design by Tomas Hellberg
 Construction Guide for Quick Build F-22 Raptor Design by Tomas Hellberg This kit is very simple to put together. The biggest danger in messing up this kit is gluing the pieces to your work bench. But before
Pump Assembly. Lloyd Matthews September 2013
 Pump Assembly Lloyd Matthews September 2013 Before proceeding with this part of the build, the author recommends that Pt. No 227 1 mm diameter Brass Wire Figure H1, is replaced with 0.8 mm straight brass
Tools and Tips: ( 1 )
") Tools and Tips: As you build instructions will show in my many picture manual how to assemble. You can use your own methods as you desire, my results are very good. A smooth, flat work surface is very
Tools and Tips: As you build instructions will show in my many picture manual how to assemble. You can use your own methods as you desire, my results are very good. A smooth, flat work surface is very
Shutter Installation Instructions
 Shutter Installation Instructions ITEMS YOU WILL NEED: Tape measure Framing square Screw gun Circular saw Caulk gun PL premium adhesive Exterior grade screws 1 ¾" Safety glasses Putty knife Window and
Kathy's Demo Rims Presented to Ottawa Valley Woodturners Tuesday March 20th 2012
 Kathy's Demo Rims Presented to Ottawa Valley Woodturners Tuesday March 20th 2012 pyro carving gilding copper verdi green coloured pens prima dry brush technique with acrylic over pro etc epoxy: method
Irish Ornament or Pendant Sample. An Original Pattern With Complete Instructions
 Sheila Landry Designs Sheila Bergner-Landry, Designer RR 1, Box 47, Meteghan, Nova Scotia, Canada B0W 2J0 Phone Number: 902-482-7174 Email: sheilalandrydesigns@gmail.com Website Address: www.sheilalandrydesigns.com
REVISION LIST CHAPTER 25: AFT WINDOWS. The following list of revisions will allow you to update the Legacy construction manual chapter listed above.
 REVISION LIST CHAPTER 25: The following list of revisions will allow you to update the Legacy construction manual chapter listed above. Under the Action column, R&R directs you to remove and replace the
Building Instructions ARTEMIS Sailing Canoe Day Six Version 1.0 Brian Pearson & Dr. Axel Schmid Day Six. Align and Glue Planks
 Version 1.0 Brian Pearson & Dr. Axel Schmid 2016 Align and Glue Planks Steps: Align boat, check dimensions Join planks provisionally Pull wires Glue the outside planks Tools and Materials: Epoxy putty
The kit number is A and is represented by the image below.
 W203 HVAC Stepper Motor Linkage Repair As a lot of you have discovered, retail on the stepper linkage arms for the footwell damper steppers (M2/10 and M2/11) is relatively reasonable. I paid $32 at my
A Tale of Two Budget Moxons
 The two budget Moxons one with hardware the author made, and one with hardware she purchased. Within the hand-tool woodworking community, there has been all kinds of buzz recently about Moxon vises. So
Wanderlust Suitcase Vanity
 Wanderlust Suitcase Vanity If you re like me, you re always up for an adventure. When I saw some examples of DIY reclaimed suitcases, paired with the exciting new Wanderlust embroidery design collection,
Etching Logos and Patterns With Simple Tools. Two Variations
 Etching Logos and Patterns With Simple Tools Two Variations Notes by Michael Kemp Elemental Forge LLC What I was looking For I wanted to be able to etch a logo and text on my ricassos and use the same
Resin Tree Drop Earrings We look forward to bringing you exclusive innovations and distinctive products this year and beyond.
 Resin Tree Drop Earrings We look forward to bringing you exclusive innovations and distinctive products this year and beyond. www.nunndesign.com www.nunndesign.com 1 SUPPLIES NEEDED: PE9217-2 Pewter Drop
Flamingo. That s what I looked
 Plans N O W w w w. P l a n s N O W. c o m flip-seat Storage Bench Flamingo. That s what I looked like as I stood in the doorway perched on one leg, with my other foot raised so that I could untie the laces
GTS Music diy-guitar.com
 GTS Music diy-guitar.com IB Jem Style Kit GTS Music 313 Strachan St. Port Hope, Ontario L1A 0C2 Canada sales@diyguitarkits.net Please read these instructions carefully before beginning in order to have
Classic Kitchen Island
 America s leading woodworking authority Step by Step construction instruction. A complete bill of materials. Classic Kitchen Island Exploded view and elevation drawings. How-to photos with instructive
Preparing and Using Ground Pony Beads as a Replacement for Mineral Inlays
 Preparing and Using Ground Pony Beads as a Replacement for Mineral Inlays Background By Dave Mueller - The AggieTurner www.aggieturner.com After unsuccessfully trying to use minerals for enhancements and
This book, or portions of it, may not be duplicated, resold, or redistributed in any way, without the expressed written consent of Stay Tooned, Inc.
 *Patent Pending Copyright 2005 - Stay Tooned, Inc. All rights reserved worldwide. This book, or portions of it, may not be duplicated, resold, or redistributed in any way, without the expressed written
Steps and Resources for Composite Construction Mark Westlake
 Steps and Resources for Composite Construction Mark Westlake Hopefully the following information will help you avoid some of the learning curve that comes with a project of this complexity. Plug Construction
3Insert the second rod no. 4
 Yamato: Step-by-step 37 The stern block and searchlight control towers a b c d e f Recommended tools and materials Wood glue Sandpaper (no. 800 grain) Metal file Putty Craft knife For metal: Super Glue
Obtained from Omarshauntedtrail.com
 http://www.halloweenforum.com/tutorials step step/72060 corpsefied blucky crow cage.html Corpsefied Blucky in a Crow Cage Posted by: dariusobells This is sort of a two'fer since I had to corpsify my Blucky
The IntoPlay build. This section will show how to fill the components into the case halves, and also the case base, which will look like this:
 The IntoPlay build Ok, I presume you have read the sections about cutting the holes in the case front, speaker holes and spray painting, modding components, preparing the case, etc. So far, the guides
QUARTZ FABRICATION MANUAL
 QUARTZ FABRICATION MANUAL Quartz Fabrication Manual Rev. 1 Page 1 of 26 TABLE OF CONTENTS Product Description. 3 Slab Inspection.. 4 Fabrication Equipment.. 6 FABRICATION TIPS Cutting The Slab. 7 General
WHAT S ON THE MARKET?
 Smart Shopping for Home Furnishings Selecting Paint Dr. Leona Hawks Home Furnishings & Housing Specialist 1987 HI 13 Shopping for paint? When shopping for paint, you will find many different kinds. Some
Nojo Design: Large Step Cabinet: February 2012
 Nojo Design: Large Step Cabinet: February 2012 The largest single piece of furniture I ve ever made is this stepped cabinet. Finished piece is 8! tall and over 10 long. This project has been great, although
APPLICATION INSTRUCTIONS
 APPLICATION INSTRUCTIONS Protects, Restores and Refinishes Furniture Trailer and Van Floors The High Gloss Version of Proven FloorRestore READ THIS FIRST BEFORE YOU START! KeyTransportationProducts.com
Pewter Cast Collar and Threaded Finial
 Pewter Cast Collar and Threaded Finial Bob Roehrig Pewter is a malleable metal alloy. It is traditionally composed of 85 99% tin, mixed with copper, antimony, bismuth, and sometimes lead, although the
The following pages replace pages 7 thru 14 in the current printing of BUILDING THE PT ELEVEN. (As of December 2012.)This is a modified method for
This is a modified method for") The following pages replace pages 7 thru 14 in the current printing of BUILDING THE PT ELEVEN. (As of December 2012.)This is a modified method for gluing puzzle joints that we believe is simpler than the
The following pages replace pages 7 thru 14 in the current printing of BUILDING THE PT ELEVEN. (As of December 2012.)This is a modified method for gluing puzzle joints that we believe is simpler than the
GTS Music diy-guitar.com
 GTS Music diy-guitar.com Tele Style Kit GTS Music 313 Strachan St. Port Hope, Ontario L1A 0C2 Canada sales@diyguitarkits.net Please read these instructions carefully before beginning to build your guitar
After printing these plans, several pages will need to be taped together to form a larger plan. Below is a diagram of which pages need assembled.
 Watermill Building Plans For complete building instructions and instructional videos, please visit the main web site at www.hirstarts.com/watermill/watermill.html. Using these plans alone will not give