Laser LA-4P. Operating instructions
|
|
|
- Jonah Edwards
- 6 years ago
- Views:
Transcription


1 Laser LA-4P GB Operating instructions

2 A 1 2 3a 5 3c 3b 3a a 14b 14c


3 B C D E F Ø 50mm mm Ø 2-4,5 G


4 I K s > 6m > 20ft L M N P1 Q O 13 P2
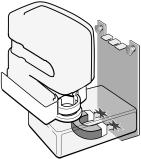
5 GB Operating instructions The STABILA LA-4P laser is an easy-to-use four-point laser for horizontal and vertical levelling and plumb lines. This simple-to-use tool allows you to transfer points between the floor and ceiling and to establish 90 points for laying out wall lines and putting up wall partitions. You can also use the laser for other applications where true plumb, square, and level setups are required.it is self-levelling in a range of ± 4. We have endeavoured to explain the unit's handling and functioning in as clear and comprehensible manner as possible. If, however, you still have any unanswered questions, we should be pleased to provide advice over the telephone at any time on the following telephone number: 0049 / / A G O P Q N Main components (1) ON/OFF switch (2) Green LED: Operating mode ON or READY / OK (3a) Vertical beam emission aperture (3b) Horizontal beam emission outlet: front (3c) Horizontal beam emission outlet: 90 (4) (5) (6) (7) (8) (9) (10) (11) (12) (13) (14) Battery compartment cover Protective cover 1/4" threaded connector for tripod Adapter Centring feet Centring feet locking system Hook Magnets 5/8" threaded connector for tripod Adapter wall bracket Fastening holes for: a) Nails / screws b) Screws c) Strap 10
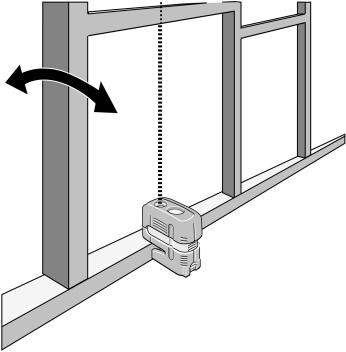
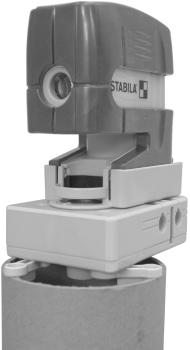
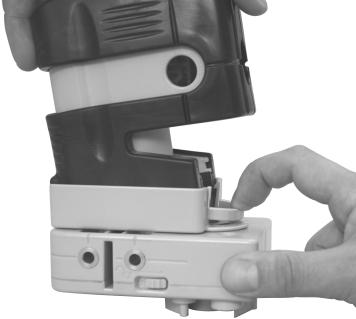
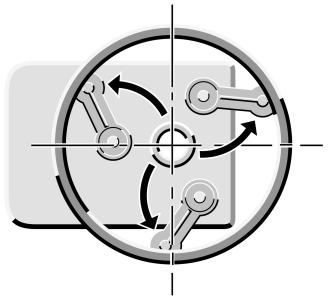
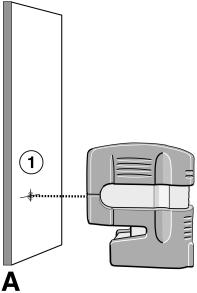
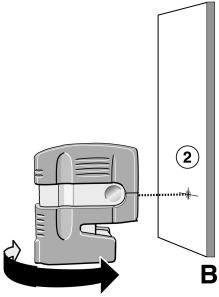
6 Getting started Press the power button. The green power-status LED lights to show that the laser is on. Holding down the ON / OFF key for 3 seconds activates automatic switch-off after 60 minutes. 1 Place the laser on a flat surface. The laser must be within ±4 of being level for it to self-level. Tip: Please note that if the laser beams are to travel through glass or other transparent materials, this can adversely affect the laser's accuracy Setting Up the Laser and Transferring a Point Adjust the position of the laser so that the down beam is on the control point. Locate the position of the up beam and level beam. Make a mark on the ceiling and wall respectively. Please note that the centre of laser dot is marked! Plumbing a Wall Place the laser so that the bottom feet are on the front edge of the bottom track. Switch the unit on ( button 1) Illuminated green LED -> laser in operation Adjust the top of the partition until the up beam is on the front edge of the top track. D 1 E Transferring drill hole points : With the adapter, you can easily perpendicularly transfer the centre points for drill holes with diameters of 50mm (1,96 ) to 115 mm ( 4,72 ). C Place the adapter with the centring feet in the drill hole. Slide the lock in the direction of the arrow. The centring feet now centre the adapter precisely in the drill hole. The drill hole point can now be perpendicularly transferred quite easily. F G 11


7 Checking the calibration The LA-4P four-point laser has been designed for building site use and leaves our factory perfectly calibrated. As with any precision instrument, however, its calibration must be regularly checked. The unit should be checked before starting any new tasks, particularly when the unit has been exposed to strong vibrations. After an impact, the unit should be checked throughout its whole self-levelling range. Checking plumblining Switch the unit on ( button 1) Place the laser so that its down beam is over a reference mark on the floor. 3. Locate the position of the up beam on the ceiling and make a mark. 4. Rotate the laser 180 and realign the down beam over the reference mark on the floor. 5. Locate the position of the up beam on the ceiling, which will be twice the actual error, and make a mark. < 6mm < 3 /16 6. Measure the difference between the two marks on the ceiling, which will be twice the actual error. The difference may not be greater than: 6mm in 7.5 m (3/16 in 25 ft), 7,5m / 25 ft 12
8 Horizontal checking Two parallel wall surfaces at least 6m ( or 20 ft) apart are required for the horizontal check. 1. Set the four-point laser on a flat surface, or mount it on a tripod, at a distance of 50 to 75mm ( 1,96 to 2,95 ) from a wall A, with its front sidefacing the wall Switch the unit on ( button 1) Mark the position of the visible laser dot on the wall (point 1) Turn the complete unit 180 without altering the height of the laser. Mark the position of the visible laser dot on the wall (point 2). Now move the unit directly in front of wall B Set the unit's height so that the laser dot's height matches that of point 2. 1 I K L 8. Without changing the height of the laser, rotate it 180 to place the beam near M the mark on the first wall (step 3 / point 1 ). Measure the vertical distance between the beam and the mark made in step 3. The difference may not be greater than: 6m 12m 18m 24m S / 20 ft / 40 ft / 60 ft / 80 ft Measured Value 3,0 mm 6,0 mm 8,0mm 11,0mm 1/8 inch 1/4 inch 5/16 inch 7/16 inch 13

 on the far wall or transfer the level beam location to the floor. 5. Move the LA-4P to point B and align the level beam to point C again. 6.")
 on the floor as close as possible to point A.")
9 Checking Level to Square Beam 90 Calibration 1. Find a room at least 10 m (35 ft) long. Mark a point (A) on the floor at one end of the room. 2. Set up the laser so that its down beam is over point A. Make sure the level beam points toward the far end of the room. 3. Mark a point (B) on the floor at the center of the room using a target to transfer the level beam location to the floor. 4. Mark a point (C) on the far wall or transfer the level beam location to the floor. 5. Move the LA-4P to point B and align the level beam to point C again. 6. Mark the location of the square beam (D) on the floor. Tip: To ensure accuracy, the distances from A to B, B to C, and B to D should be equal Turn the LA-4P 90 so that the level beam aligns with point D. Mark the location of the square beam (E) on the floor as close as possible to point A. Measure the distance between points A and E. Room length or distance between points A and C 10 m (35 ft) 20 m (70 ft) The 90 angle between the level beam and square beam is out of calibration if the distance between points A and E is: > 9,0 mm (3/8 inch) > 18,0 mm (3/4 inch) 14


10 Replacing the batteries Slide the battery cover (4) in the direction of the arrow and insert new batteries in accordance with the symbols in the battery compartment. 4 x 1,5V alkaline mignoncells, size AA, LR6 Tip: Remove the batteries if the unit will not be used for a long period! Recycling programme for our EU customers: In accordance with the WEEE regulations, STABILA provides a disposal programme for electronic products at the end of their service life. For more details, please contact: / Recycling or: 0049 / 6346 / NB: In Class II laser equipment, your eyes are protected from accidental, shortterm exposure to the laser beam by the lid-closing reflex and/or the reflex reaction to turn one's head. This equipment can therefore be used without additional protective measures. Nevertheless, you should not look directly into the laser beam. Do not let the unit fall into children's hands! EN : The laser goggles enclosed with these units are not safety goggles. They are designed to make the laser light easier to see. 15

11 Care and maintenance Dirty lens glass on the beam emitter detracts from the quality of the beam. It should be cleaned with a soft cloth. Clean the laser unit with a damp cloth. Do not spray or immerse the unit! Do not use solvents or thinners! The LA-4P four-point laser must be handled carefully, in the same way as any precision optical instrument. Tip: The laser unit should be allowed sufficient time to adjust to the ambient temperature before you start it up. For example, when the laser is brought from an extremely hot / cold vehicle onto the building site. When you re not using the laser, store it in its pouch/carrying case. Do not store the laser in a wet pouch/carrying case. If the pouch/carrying case gets wet, let it dry before storing the laser in it. Do not submerge the laser. Operating status display and error messages via the LEDs Illuminated green LED Laser beam flashing Flashing green LED -> laser in operation -> The unit is inclined too much + is outside the self-levelling range + the laser cannot level itself automatically -> laser in operation -> battery voltage very low -> battery replacement required imminently 16
12 Technical data Laser type: Output: Red diode laser, wavelength 635 nm < 1 mw, Laser Class 2 to EN :03-10 Working Range*: 20-30m ( ft) Self-levelling range: *: (horizontal) Levelling accuracy: Up Beam Accuracy*: Down Beam Accuracy ca. ± 4 ± 6 mm / 21m ± 1 mm / 0,5m ( +/ 1/4 70 ft ) ( +/ 1/ ft ) Level Beam Accuracy*: Square Beam Accuracy*: Batteries: Operating life: Operating temperature range: ± 6 mm / 30m ( +/ 1/4 100 ft ) ± 6 mm / 30m ( +/ 1/4 100 ft ) 4 x 1,5 V Mignon cells Alkaline, Size AA, LR6 Approx. 40 hours -10 C to +45 C (14 F to 113 F) Subject to technical modifications. * At 20 C ( 50 F ) Guarantee terms and conditions Stabila provides a guarantee against deficiencies and faults in the assured characteristics because of material or manufacturing faults for a period of 24 months from date of purchase. Any faults will be eliminated at Stabila's own discretion either by repairing or replacing the unit. Stabila accepts no wider claims. No liability is accepted for any faults due to inappropriate treatment (e.g. damage caused by the unit falling, operation with the wrong voltage or type of current, use of unsuitable current supply sources) or for any autonomous changes made to the unit by the purchaser or a third party. Also no claims under guarantee are accepted for natural wear and tear or any small faults that do not significantly affect the unit's operation. Any guarantee claims must be made via the dealer on the duly completed guarantee form (see last page) to be returned with the unit. 17
Laser LAX 300. Operating instructions
 Laser LAX 300 en Operating instructions A1 4 3 2a 1a 2b 8 4 5 9 1b 6 7 X1 X2 X3 5m 5m S = 5m X X S = 5m Y X Y3 Y1 Y2 X Y en Operating instructions The STABILA LAX 300 is an easy to use crossed line and
Laser LAX 300 G. Operating instructions
 Laser LAX 300 G en Operating instructions A1 4 3 2a 1a 2b 8 4 5 9 1b 6 7 A2 A3 11 10 A4 A5 A6 L1 ± 0,3 mm/m ± 23/64 A7 L1 ± 0,3 mm/m ± 23/64 L2 ± 1/4 ± 0,2 mm/m B1 B2 90 C1 C2 C3 C4 X1 X2 X3 5m 5m S
Multi-beam Self-leveling Line Laser
 Multi-beam Self-leveling Line Laser 2DL (519032) Congratulations on your choice of this self leveling line laser. For the purpose of long-term use of this instrument, we suggest your reading this instruction
Instruction Manual. Self-Leveling Cross-Line Laser Level Model No and
 3728H_Manuals 9/2/10 8:02 AM Page 1 Self-Leveling Cross-Line Laser Level Model No. 40-6620 and 40-6625 Instruction Manual Congratulations on your choice of this Self-Leveling Cross-Line Laser Level. We
QUAD 1000 OWNERS MANUAL OPERATION GUIDE
 QUAD 1000 OWNERS MANUAL OPERATION GUIDE www.laserlinemfg.com REV. 4.30.18 COMPONENTS 4001-0000 Quad 1000 5 arc second zenith laser featuring electronic servo self-leveling with variable temperature compensation
A510S Operation Manual
 A510S Operation Manual REV 1.1 1 Table of Contents 1 General Information 1-1 Description 1-2 Potential Operational Hazards 1-3 Technical Specifications 1-4 Instrument Overview 1-5 Function Summary 2 How
LAX 400 multi-line laser
 NEW Wide range of functions: 360 horizontal line around the entire room 90 angle for accurate layout work Plumb line upwards and downwards Accurate. Tough. Reliable. Easy-to-use. The LAX 400: help at hand
STABILA compact laser: For all professionals. For all finishing trades.
 LAX 300 cross line plus plumb points laser NEW NEW LA-5P 5 point laser STABILA compact laser: For all professionals. For all finishing trades. A C C U R A T E. T O U G H. R E L I A B L E. E A S Y - T O
STABILA compact lasers: For all finishing trades.
 LAX 300 cross line plus plumb points laser NEW NEW LA-5P 5 point laser STABILA compact lasers: For all finishing trades. A C C U R A T E. T O U G H. R E L I A B L E. E A S Y - T O - U S E. LAX 300 / LA-5P
DE EN FR ECOLINE EL 609 BEDIENUNGSANLEITUNG USER MANUAL MODE D EMPLOI EXACTLY WHAT YOU NEED.
 DE FR ECOLINE EL 609 BEDIUNGSANLEITUNG USER MANUAL MODE D EMPLOI EXACTLY WHAT YOU NEED. 1 FEATURES OPERATIONAL ELEMTS 1 vertical and 1 horizontal laser line form 1 laser cross Laser lines switchable separately
IMPORTANT: Read Before Using. Operating/Safety Instructions 8601-RL
 IMPORTANT: Read Before Using Operating/Safety Instructions 8601-RL 3 1 2 7 5 6 8 6 4-2- General Safety Rules! DANGER LASER RADIATION. AVOID DIRECT EYE EXPOSURE. DO NOT stare into the laser light source.
Please read these instructions before use and keep for future reference
 Wardrobe Assembly Guide Allen Key Provided (if required) Philips Screwdriver Required Hammer Required Please read these instructions before use and keep for future reference Caution! Two Person Assembly
Seite 2 Standard-Empfänger. EN Operation Instructions
 sign lux DE Bedienungsanleitung Seite 2 Standard-Empfänger EN Operation Instructions Page 10 Standard receiver FR Mode d emploi Page 18 Récepteur standard NL Gebruiksaanwijzing Pagina 26 Standaard ontvanger
1 Symbols. 4 Foreseeable misuse Do not use the device as a laser pointer. Do not use the device in explosive or aggressive environments.
 A 1 2 B 3 G H 4 C 7 5 6 I J D 8 9 10 11 12 13 12 13 K 14 E F 1 Symbols 1.1 Warning notices The warning notices differ from one another concerning the type of danger through the following signs: Caution
X2 LASER DISTANCE METER. Operating instruction
 X2 LASER DISTANCE METER Operating instruction A B C D E F 1 Symbols 1.1 Warning notices The warning notices differ from one another concerning the type of danger through the following signs: Caution warns
GETTING STARTED. Instructions IMPORTANT PS B PS B. Record the serial number from the tag on the door front.
 PS-15-20-B IMPORTANT Instructions Record the serial number from the tag on the door front. Keep keys in a secure place away from children. DO NOT STORE KEYS INSIDE SAFE GETTING STARTED When you first receive
INSTRUCTION MANUAL DW089-XE 3 BEAM LINE LASER
 INSTRUCTION MANUAL DW089-XE 3 BEAM LINE LASER Definitions: Safety Guidelines The definitions below describe the level of severity for each signal word. Please read the manual and pay attention to these
114-GB(cover,p1-12) 25/08/ :49 AM Page
 25/08/ :49 AM Page") WARNING: Protect Your Eyes Wear Safety Goggles AVERTISSEMENT: Protégez vos yeux, portez des lunettes de sécurité. ADVERTENCIA: Protéjase los ojos, use gafas de seguridad One Year Warranty Garantie de un
WARNING: Protect Your Eyes Wear Safety Goggles AVERTISSEMENT: Protégez vos yeux, portez des lunettes de sécurité. ADVERTENCIA: Protéjase los ojos, use gafas de seguridad One Year Warranty Garantie de un
Ricoh XR Speedlite 300P
 Ricoh XR Speedlite 300P Posted 1-4-04 This manual is for reference and historical purposes, all rights reserved. This page is copyright by mike@butkus. M. Butkus, NJ. This page may not be sold or distributed
Energate Foundation Meter Data Collector Installation Guide
 Energate Foundation Meter Data Collector Installation Guide The Meter Data Collector works with Foundation s built-in Meter Data Receiver. The collector attaches to the meter provided by your electricity
P10 LASER DISTANCE MEASURE. IMPORTANT: Read before Using
 IMPORTANT: Read before Using LASER DISTANCE MEASURE P10 www.prexiso-eu.com/penlaser Questions, problems, missing parts? Before returning to your retailer, call our customer service department For English
3x Magnification. Digital Zoom to 6x. CAUTION: Do not point Infrared Emitter directly into eye at close range.
 MxGenPRO MANUAL-English.qx_MxGenPRO Manual-English 12/16/14 9:24 AM Page 3 Instruction Manual 3x Magnification. Digital Zoom to 6x. CAUTION: Do not point Infrared Emitter directly into eye at close range.
Operator's Manual. 10-in. Digital Multi-function LEVEL with Laser Trac. Model No
 Operator's Manual 10-in. Digital Multi-function LEVEL with Laser Trac Model No. 320.48292! CAUTION Read, understand and follow all Safety Rules and Operating Instructions in this Manual before using this
LASER ENHANCED REVOLVER GRIP OWNER S MANUAL RED LASER GREEN LASER
 LASER ENHANCED RED LASER GREEN LASER REVOLVER GRIP OWNER S MANUAL LASER ENHANCED GRIP Installation Instructions Caution... 3 Safety Labels... 4 Installation...5-7 Programming...8-10 Batteries (Red Laser)...
Operating Manual MRL-101
 Operating Manual MRL-101 Maintenance and Safety While the instrument is operating, be careful not to expose your eyes to the laser beam. Direct exposure to a laser beam for a long time may be hazardous
62120LLCP PRECISION LASER SIGHT AND LIGHT INSTRUCTION MANUAL
 62120LLCP PRECISION LASER SIGHT AND LIGHT INSTRUCTION MANUAL TABLE OF CONTENTS A.) MOUNTING THE LASER AND LIGHT TO A 1" SCOPE TUBE. B.) REPLACING THE FLASHLIGHT BATTERIES. C.) REPLACING THE LASER BATTERIES.
User Manual Laser distance sensor. series OWLE. Welotec GmbH Zum Hagenbach Laer Manual_OWLE _EN 1/20
 User Manual Laser distance sensor series OWLE 1/20 English 1 General notes... 3 2 Functional principle... 4 3 Mounting instructions... 4 4 Application hints... 9 5 Teaching the OWLE...11 6 Technical data...17
USER MANUAL. Laser Distance Meter MODELS DT40M, DT60M, and DT100M
 USER MANUAL Laser Distance Meter MODELS DT40M, DT60M, and DT100M Contents Introduction... 3 Safety Instructions... 3 Descriptions... 4 Measurement Preparation... 6 Programming Menu... 8 Distance Measurements...
Table of Contents. Stabila LD 320 1
 Table of Contents EN Instrument Set-up - - - - - - - - - - - - - - - - - - - - - - - Introduction- - - - - - - - - - - - - - - - - - - - - - - - - - - - - - - Overview - - - - - - - - - - - - - - - - -
Pipe Laser Model No Instruction Manual
 Pipe Laser Model No. 40-6690 Instruction Manual Congratulations on your choice of this Pipe Laser. We suggest you read this instruction manual thoroughly before using the pipe laser. Save this instruction
Assembly Instructions
 Selling Station Assembly Instructions View from above without top A B C D Rounded finished corners on A & D Square unfinished 3-sides on B & C Selling Station Components (2) 2' x 6' Side s Have a channel
Laser Distance Finder Extech DT500
 User Guide Laser Distance Finder Extech DT500 Introduction Congratulations on your purchase of the Extech Model DT500 Laser Distance Finder. This meter measures Distance up to 70m (230 ) and calculates
Operating instructions Diffuse reflection sensor with background suppression. OJ51xx laser / / 2010
 Operating instructions Diffuse reflection sensor with background suppression OJ51xx laser 704811 / 00 05 / 2010 Contents 1 Preliminary note3 1.1 Symbols used 3 2 Safety instructions 3 3 Functions and features
Geo EasyTrack Auto Tracking System for Line Lasers
 DE EN FR Geo EasyTrack Auto Tracking System for Line Lasers USER MANUAL I www.geo-fennel.de www.geo-fennel.com www.geo-fennel.fr DE Dear customer, Thank you for your confidence in us having purchased a
Constable Oak Extension Dining Table
 Constable Oak Extension Dining Table Assembly Instructions - Please keep for future reference 176/0325 Dimensions Width - 160/ 200cm Depth - 90cm Height - 75cm Important - Please read these instructions
Photosynthetically Active Radiation (PAR) Smart Sensor (Part # S-LIA-M003)
 Smart Sensor (Part # S-LIA-M003)") Photosynthetically Active Radiation (PAR) Smart Sensor (Part # S-LIA-M003) The Photosynthetically Active Radiation (PAR) smart sensor is designed to work with the HOBO Weather Station logger. The smart
Photosynthetically Active Radiation (PAR) Smart Sensor (Part # S-LIA-M003) The Photosynthetically Active Radiation (PAR) smart sensor is designed to work with the HOBO Weather Station logger. The smart
P20 Zoom Flash Zoom Flash P20 P20 Zoomblitz Flash con zoom P20 Flash externo P20 Flash Zoom P20
 P20 Zoom Flash Zoom Flash P20 P20 Zoomblitz Flash con zoom P20 Flash externo P20 Flash Zoom P20 User s Guide Guide d'utilisation Benutzerhandbuch Manuale per l'utente Guía del usuario Guia do usuário 4J6021
INSTALLATION INSTRUCTIONS ROLLER SHADES
 INSTALLATION INSTRUCTIONS ROLLER SHADES Tools Required: Tape measure, pencil, drill, drill bits, screw driver, step stool or ladder. Note: use a 5/64 drill bit to pre-drill the screw holes (for attachment
Operation. 1 of 14. Serial number label
 Telecody Keypad Transmitter (US) WARNING There is a possible risk of injury or death if safety instructions will not be observed. Please read and follow all instructions in this manual as well as the information
PACIFIC LASER SYSTEMS. HVL100 Procedures
 PACIFIC LASER SYSTEMS HVL100 Procedures A. Setting Up for Level Calibration of Horizontal Lines, Plumb and Down pg. 2 B. Setting Up for Vertical Line Calibration pg. 4 C. Setting Up for Square Calibration
EXAMINER+ Manual V.1. ARROWHEAD FORENSICS Strang Line Road Lenexa, Kansas PHONE FAX
 P A R T O F T H E E L I T E S E R I E S ARROWHEAD FORENSICS 11030 Strang Line Road Lenexa, Kansas 66215 PHONE 913.894.8388 FAX 913.894.8399 www.arrowheadforensics.com EXAMINER+ Manual V.1 CONTENTS: Canon
Installation instructions
 Installation instructions T70RX-03AIB, T70RX-03AWB, T70TX-02TTB, T70TX-03STB, T70TX-06TTB LANGUAGE: English (original) IM-T70-RX001-A01-EN CONTENTS Chapter 1: CUSTOMER INFORMATION 3 Chapter 2: PRODUCT
QUANTUM Qflash T2 / X2 OPERATING INSTRUCTIONS
 QUANTUM Qflash T2 / X2 OPERATING INSTRUCTIONS 1.0 DESIGNATIONS T2 AND X2 1. Removable Reflector, two positions Normal and Wide angle. 2. Flash-tube 2A. Modeling Lamp (for Model X2 only) 3. Bounce Head,
Laser Distance Finder Extech DT500
 User Guide Laser Distance Finder Extech DT500 Introduction Congratulations on your purchase of the Extech Model DT500 Laser Distance Finder. This meter measures Distance up to 70m (230 ) and calculates
RIGGING MANUAL English
 KH7 RIGGING MANUAL English TABLE of CONTENTS SYMBOLS... 3 1. INTRODUCTION... 4 2. system components... 4 3. SAFETY information... 5 4. Product overview... 6 5. suspending a cluster... 8 6. stacking kh7
Operating Instructions GEMINI R
 Operating Instructions GEMINI R 060999-104 02.09.2011 General Notes For your safety Documentation Please familiarise yourself with these operating instructions and the safety information it contains before
WIRELESS 868 MHz TEMPERATURE STATION Instruction Manual
 WIRELESS 868 MHz TEMPERATURE STATION Instruction Manual INTRODUCTION: Congratulations on purchasing this temperature station with wireless 868 MHz transmission of outdoor temperature and display of indoor
Detectores de metales y otros materiales digitales GMS120 bosch manual ingles
 1 2 3 4 10 9 8 5 6 G ss 0 7 PrM ofe12 ional GM 120 4 2 12 13 Pro 14 15 17 18 18 16 M ss0 G M ss0 5 A e a b c d f g h i j k 12 2 A e ns or 3x G 10 English English afety otes Read and observe all instructions.
3B SCIENTIFIC PHYSICS
 3B SCIENTIFIC PHYSICS Equipment Set for Wave Optics with Laser 1003053 Instruction sheet 06/18 Alf 1. Safety instructions The laser emits visible radiation at a wavelength of 635 nm with a maximum power
Receiver Type /Version Factory No. Frequency. Transmitter Type /Version Factory No. Frequency
 Receiver Type /Version Factory No. Frequency Transmitter Type /Version Factory No. Frequency 1. STANDARD SPECIFICATION Portable transmitter. Receiver with integrated mounting holes. Multi-pin connecting
433 MHZ TEMPERATURE STATION Instruction Manual
 433 MHZ TEMPERATURE STATION Instruction Manual INTRODUCTION: Congratulations on purchasing this innovative 433MHz Temperature Station which displays the time with up to the minute indoor and up to three
CONTENTS. User Safety 2 Introduction and CXR880 Accessories 3 CXR880 Diagram 4 CXR880 Keypad and Remote Control 5 Operating Instructions 6
 CONTENTS User Safety 2 Introduction and CXR880 Accessories 3 CXR880 Diagram 4 CXR880 Keypad and Remote Control 5 Operating Instructions 6 Batteries 6 Power and Tilt 7 Rotating Laser 8 Line Lasers 9 Grade
Operating instructions Contrast sensor O5K / / 2016
 Operating instructions Contrast sensor O5K500 707 / 00 / 06 Contents Preliminary note. Symbols used Functions and features Installation. Installation conditions Operating and display elements 5 5 Electrical
WAREHOUSE HANGER INSTALLATION INSTRUCTIONS R H INS T A L L A TIO N INS T R U C TIO N S
 INS T A L L A TIO N INS T R U C TIO N S WAREHOUSE HANGER NOTE: Due to the size and weight of the Warehouse Hanger it is recommended that this Hanger be installed on 3 4 or wider doors. 10.11.2016 2-3/16"
3B SCIENTIFIC PHYSICS
 3B SCIENTIFIC PHYSICS Equipment Set for Wave Optics with Laser U17303 Instruction sheet 10/08 Alf 1. Safety instructions The laser emits visible radiation at a wavelength of 635 nm with a maximum power
Silicon Pyranometer Smart Sensor (Part # S-LIB-M003)
") (Part # S-LIB-M003) The smart sensor is designed to work with the HOBO Weather Station logger. The smart sensor has a plug-in modular connector that allows it to be added easily to a HOBO Weather Station.
(Part # S-LIB-M003) The smart sensor is designed to work with the HOBO Weather Station logger. The smart sensor has a plug-in modular connector that allows it to be added easily to a HOBO Weather Station.
Laser LAX 200. Operating instructions
 Laser LAX 200 en Operating instructions L1 ± 3/8 ov 100 ft L2 B1 B2 4 115 mm 1 2 59 mm 2 5 6 105 mm 1 4 8 570 gr 20.1 ounces C1 C2 10 9 A 2a 4 1a 2b 7 5 3 1b 6 8 8 ft 2m D1 D2 4 ft E1 E2 1 = X1 - Y1 2
Ambient Weather WS-0270 Wireless Indoor / Outdoor Thermometer with Indoor Humidity User Manual
 Ambient Weather WS-0270 Wireless Indoor / Outdoor Thermometer with Indoor Humidity User Manual Table of Contents 1 Introduction... 1 2 Getting Started... 1 2.1 Parts List... 2 2.2 Recommend Tools... 2
Visit us at
 testo 831 (0560 8316) Instruction manual 99 Washington Street Melrose, MA 02176 Phone 781-665-1400 Toll Free 1-800-517-8431 Visit us at www.testequipmentdepot.com 7 1. General Information Please read this
Table of Contents. Makita LD050P 1
 Table of Contents EN Instrument Set-up - - - - - - - - - - - - - - - - - - - - - - - Introduction- - - - - - - - - - - - - - - - - - - - - - - - - - - - - - - Overview - - - - - - - - - - - - - - - - -
Wide Angle Ophthalmoscope Instructions
 Wide Angle Ophthalmoscope Instructions PLEASE READ AND FOLLOW THESE INSTRUCTIONS CAREFULLY Contents 1. Symbols 2. Warnings & Cautions 3. Description of Product 4. Getting Started 5. Apertures & Filters
WS-7136U Wireless 433 MHz Temperature Station. Instruction Manual
 WS-7136U Wireless 433 MHz Temperature Station Instruction Manual TABLE OF CONTENTS Topic Page Inventory of Contents 3 Additional Equipment 4 Quick Setup 5-9 Detailed Setup Guide Battery Installation 10-12
Inspiration strikes. VS-210 FLASH. User s Manual
 Inspiration strikes. VS-210 FLASH User s Manual Copyright 2015 Gradus Group. Bolt and other names of Bolt products are trademarks of Gradus Group. Other product and corporate names mentioned herein are
Installation Manual. Solid Plastic Toilet Partitions. IN CANADA & AREAS OTHER THAN U.S.A.: IN THE U.S.A.:
 Installation Manual Solid Plastic Toilet Partitions Toilet Partitions & Lockers IN THE U.S.A.: Hadrian Inc., 7420 Clover Avenue, Mentor, OH 44060 Telephone: 440-942-9118 Fax: 440-942-9618 U.S. toll free
WS-9006U Wireless Temperature Station
 WS-9006U Wireless Temperature Station Instruction Manual RF reception indicator Outdoor Temperature Indoor Temperature Time Outdoor Temperature Sensor TX43U MIN/MAX/+ Button CF / SET Button FEATURES: Four
3-band Portable Radio ROBERTS. Sound for Generations. Please read this manual before use
 3-band Portable Radio Please read this manual before use ROBERTS Sound for Generations Controls (top panel) 2 3 4 1 5 6 1. On/Off and volume control 2. Tone control button 3. Waveband buttons 4. Headphone
How To Measure Your Finished Opening
 3000 Series Bifold Doors How To Measure Your Finished Opening MEASURE FROM RIGHT TO LEFT 2 PLACES (WIDTH) MEASURE FROM TOP TO BOTTOM 2 PLACES (HEIGHT) Tools Required for Assembly: Tools Needed: Phillips
SUNNY BEAM REPEATER Transmission Range Increase for Sunny Beam
 SUNNY BEAM REPEATER Transmission Range Increase for Sunny Beam User Manual SBeamRep-BEN091911 98-0002611 Version 1.1 EN SMA Solar Technology AG Table of Contents Table of Contents 1 Notes on this Manual..............................
Contents. Page English 1. French. Spanish. Reset of MIN/MAX records 915 MHz Reception Mounting Care and Maintenance Warranty Information
 Contents Language Page English 1 French Spanish WIRELESS 915 MHz TEMPERATURE STATION Instruction Manual TABLE OF CONTENTS Topic Page Inventory of Contents Features Setting Up Battery Installation Function
IMPORTANT!!! ASSEMBLY ASSEMBLY INSTRUCTIONS. (Internal Dimensions)
") ASSEMBLY ASSEMBLY INSTRUCTIONS (Internal Dimensions) Ent Spec Edition Ltr v-0- Overall dimensions including base: 7. L x 9 W x 0 H cms 97.5" L x 7" W x 8.7" H IMPORTANT!!! Please read these instructions
ASSEMBLY ASSEMBLY INSTRUCTIONS (Internal Dimensions) Ent Spec Edition Ltr v-0- Overall dimensions including base: 7. L x 9 W x 0 H cms 97.5" L x 7" W x 8.7" H IMPORTANT!!! Please read these instructions
Ambient Light Rejecting Fixed Frame Screen. (3.9 width frame) User s Guide
 User s Guide") Ambient Light Rejecting Fixed Frame Screen (3.9 width frame) User s Guide Attention: The DarkStar 9 is composed of high quality sensitive multi-layer projection material. Please follow the precautions
Ambient Light Rejecting Fixed Frame Screen (3.9 width frame) User s Guide Attention: The DarkStar 9 is composed of high quality sensitive multi-layer projection material. Please follow the precautions
PMT-L31 (for Low Ceilings) PMT-H35 (for High Ceilings)
 PMT-H35 (for High Ceilings)") English Ceiling Mount Bracket PMT-L31 (for Low Ceilings) PMT-H35 (for High Ceilings) Installation Manual Be sure to read this manual thoroughly before using this bracket. After you have read this manual,
English Ceiling Mount Bracket PMT-L31 (for Low Ceilings) PMT-H35 (for High Ceilings) Installation Manual Be sure to read this manual thoroughly before using this bracket. After you have read this manual,
AH Auto-Darkening Welding Helmet User Manual. Made in China
 AH7-220-0000 Auto-Darkening Welding Helmet User Manual Made in China 2016 TECHNICAL SPECIFICATIONS AH7-220-0000 Auto-Darkening Welding Helmet 2016 WARNING Please read all instructions before using the
User instructions Compound laboratory microscope
 KERN & Sohn GmbH Ziegelei 1 D-72336 Balingen E-mail: info@kern-sohn.com User instructions Compound laboratory microscope Tel: +49-[0]7433-9933-0 Fax: +49-[0]7433-9933-149 Internet: www.kern-sohn.com KERN
INSTRUCTION MANUAL INF Fax: (503)
") INSTRUCTION MANUAL INF151 1-800-547-5740 Fax: (503) 643-6322 www.ueiautomotive.com email: info@ueitest.com Introduction Congratulations on your purchase of the INF151 infrared thermometer. Like all UEi
INSTRUCTION MANUAL INF151 1-800-547-5740 Fax: (503) 643-6322 www.ueiautomotive.com email: info@ueitest.com Introduction Congratulations on your purchase of the INF151 infrared thermometer. Like all UEi
Manifold Electronic Gauge. Model: KC-100B-1 Operation Manual
 Manifold Electronic Gauge Model: KC-100B-1 Operation Manual Manifold Electronic Gauge Model: KC-100B-1 OVERVIEW KC-100B-1 manifold electronic gauge determines the distance to the object through electronic
Merloni Elettrodomestici. Technical Fitting Manual FRIDGE. Language Issue/Edition Page GB /
 GB 99-11-03/01 1-38 Index 1 CONFORMITY OF APPLIANCE 3 2 MAIN ASSEMBLY TYPES 3 2.1 Under worktop 3 2.2 Double door 10 2.3 Combined 14 2.4 Single door Fridge or single door Freezer 19 2.5 Combined free-standing
AP-N1001 FLASH USER S MANUAL
 AP-N1001 FLASH USER S MANUAL For video tutorials about your product(s), customer support, updated user manuals, and all other Altura Photo news please visit: www.alturaphoto.com FEATURES Guide Number:
Installation Operation Care
 Installation Operation Care Designer Roller and Designer Screen Shades Standard and Cassette Cordless Lifting System CONTENTS Getting Started: Product Views... 1 Tools and Fasteners Needed... 3 Installation
Color Video Projector
 3-865-080-11(1) Color Video Projector Installation Manual for Dealers GB CAUTION THIS INSTALLATION MANUAL IS FOR USE BY QUALIFIED PERSONNEL ONLY. VPH-V20M/V20U VPH-V22M 1998 by Sony Corporation English
SlimScan BT Users Manual
 SlimScan BT Users Manual ASP Microcomputers 456 North Road, Ormond, Victoria, 3204 Australia Telephone: (03) 9578-7600 FAX: (03) 9578-7727 email: solutions@asp.com.au World Wide Web: http://www.asp.com.au
Bidirectional Ultrasonic Distance Measurement
 Bidirectional Ultrasonic Distance Measurement Model: KC-200 Operation Manual Bidirectional Ultrasonic Distance Measurement Model: KC-200 OVERVIEW KC-200 bidirectional ultrasonic distance measurement determines
DE EN FR IT ES RU PL DA NL NO SV
 DE FR IT ES RU PL DA NL NO SV Table of Contents Instrument Set-up - - - - - - - - - - - - - - - - - - - - - - - Introduction- - - - - - - - - - - - - - - - - - - - - - - - - - - - - - - Overview - - -
Sliding Door Enclosure. Telephone Cleaning. Please retain this manual after installation for future reference and maintenance.
 Cleaning All chrome surfaces should be cleaned using a clean damp cloth. No abrasive cleaning agents or materials should be used. General glass cleaner can be used for the screen, but ensure that this
ATD AMP Variable Speed Reciprocating Saw Owner s Manual
 ATD-10535 7 AMP Variable Speed Reciprocating Saw Owner s Manual Manufactured in China To ATD Tools, Inc. Specifications TECHNICAL SPECIFICATIONS Voltage: 120V Frequency: 60Hz Power input: 7 Amps No load
Ricoh Speedlite PX Flash Unit This camera manual library is for reference and historical purposes, all rights reserved.
 Ricoh Speedlite PX Flash Unit This camera manual library is for reference and historical purposes, all rights reserved. This page is copyright by, M. Butkus, NJ. This page may not be sold or distributed
GREENHOUSE 6'x8' ASSEMBLY INSTRUCTIONS. (Internal Dimensions) Overall Dimensions (Approx.) L 193 W 200 H cms 97.5" L 76" W 78.
 Overall Dimensions (Approx.) L 193 W 200 H cms 97.5 L 76 W 78.") ASSEMBLY INSTRUCTIONS GREENHOUSE 'x8' (Internal Dimensions) Overall Dimensions (Approx.) 7. L 9 W 00 H cms 97." L 7" W 78.8" H 0 IMPORTANT You must read these instructions carefully before you start to
ASSEMBLY INSTRUCTIONS GREENHOUSE 'x8' (Internal Dimensions) Overall Dimensions (Approx.) 7. L 9 W 00 H cms 97." L 7" W 78.8" H 0 IMPORTANT You must read these instructions carefully before you start to
CONTENTS. SAFETY PRECAUTIONS: Before use, read the following safety precautions
 CONTENTS [1] SAFETY PRECAUTIONS: Before use, read the following safety precautions 2 [2] APPLICATION AND FEATURES 5 [3] NAME OF COMPONENT UNITS 6 [4] DESCRIPTION OF FUNCTIONS 8 [5] MEASUREMENT PROCEDURE
OPERATING MANUAL SESAM 800 MOBILE TAIL LIFT EN -D0
 OPERATING MANUAL SESAM 800 MOBILE TAIL LIFT 942913-000 EN -D0 2 (16) Table of Contents 1 Introduction 3 2 Scope 3 3 Service 3 4 Maintenance 4 5 Technical Specifications 4 6 Short Description of the System
USER MANUAL. ReadyFire G6 and IR6 Laser Sight SM25008 SM25009
 USER MANUAL ReadyFire G6 and IR6 Laser Sight SM25008 SM25009 ABOUT SIGHTMARK Sightmark offers a wide range of products that include red dot scopes, reflex sights, rangefinders, riflescopes, laser sights,
Assembly Instructions for model: VMPR1
 Assembly Instructions for model: VMPR1 Congratulations on your purchase! The VMPR1 ceiling mount provides a unique, simplified method of ceiling mounting inverted LCD/DLP projectors. Its low profile design
Hinge Door + Inline Panel + Return Panel
 Hinge Door + Inline Panel + Return Panel Instruction Manual DXL2HDR + DXL2HR + DXR Important Information Toughened glass is completely safe for use in our shower enclosures and bath screens; providing
WS-7220U-IT 915 MHz Wireless Weather Station. Instruction Manual
 WS-7220U-IT 915 MHz Wireless Weather Station Instruction Manual 1 TABLE OF CONTENTS Introduction..3 Inventory of Contents 4 Quick Set Up 4 Detailed Set Up 4-5 Battery Installation....4-5 12 or 24 Hour
CashConcepts CCE 4000
 CashConcepts CCE 4000 Coin Counter and Sorting Machine User Manual Introduction Thank you for choosing the CCE 4000. This coin counting and coin sorting machine is designed to simplify the daily cash or
Showpiece Cabinet Integrated Stand For 32" - 52" LCD HDTV
 Showpiece Cabinet Integrated Stand For 32" - 52" LCD HDTV Installation and Assembly Instructions 2009 Incredible Technologies Inc. Version 0109 Showpiece Cabinet Integrated Stand for 32" - 52" LCD HDTV
ezframe CineGrey 5D Ambient Light Rejecting Fixed Frame Screen
 1 ezframe CineGrey 5D Ambient Light Rejecting Fixed Frame USER S GUIDE Congratulations on your new ezframe purchase! The screen material included is our award winning CineGrey 5D which is a front projection
WIRELESS 915 MHz TEMPERATURE STATION Instruction Manual
 Contents Language Page English 1 French Spanish TABLE OF CONTENTS WIRELESS 915 MHz TEMPERATURE STATION Instruction Manual Topic Inventory of Contents Features Setting Up Battery Installation Function keys
DP-19 DUAL PURPOSE DETECTOR INSTRUCTION MANUAL
 DP-19 DUAL PURPOSE DETECTOR INSTRUCTION MANUAL Case Size: 5.3 h X 3.3 w x 1.5 d@ Weight: 8 oz. ABOUT THE DP-19 Battery: 9 volt transistor type Eveready 216 or equal Current: 17 milliamps Frequency Response:
BORE ALIGNMENT. Straightness measurement of bore and bearing journals PRINTER CONNECTION PC PROGRAM INCLUDED ELECTRONIC INCLINOMETER EXPANDABLE
 D650 D660 BORE ALIGNMENT Straightness measurement of bore and bearing journals ELECTRONIC INCLINOMETER PC PROGRAM INCLUDED PRINTER CONNECTION EXPANDABLE IT S ALL ABOUT STRAIGHTNESS The Easy-Laser Linebore
LOFT DOOR HANGER BARN DOORS & HARDWARE. Hardware Installation Instructions. Page
 LOFT DOOR HANGER Page 1 Specifications 2 7/16" 3/8" 1-1/2 1-3/4 Ø3 3 7/8" 11-1/16 Page 2 Parts and Tools Tools Needed Tape Measure Pencil Drill with 1/8, 1/4 and 3/8 bits, 1 spade bit and Phillips bit