Aardvark USA 202 East Washington Suite 306 Ann Arbor, Michigan Web:
|
|
|
- Leslie Caldwell
- 5 years ago
- Views:
Transcription
1 Aardvark USA 202 East Washington Suite 306 Ann Arbor, Michigan Web: Voice: Fax:
2
3
4
5
6 TABLE OF CONTENTS WELCOME TO THE USB3! PC SYSTEM REQUIREMENTS & SOFTWARE COMPATIBILITY MACINTOSH SYSTEM REQUIREMENTS & SOFTWARE COMPATIBILITY PRODUCT OVERVIEW PC INSTALLATION INSTRUCTIONS GUITAR TRACKS 2 QUICK START MACINTOSH INSTALLATION INSTRUCTIONS METRO SE QUICK START TROUBLESHOOTING FREQUENTLY ASKED QUESTIONS
7 WELCOME TO THE USB3 EASY CONNECTION No need to get out the tool kit for this one, simply connect the USB3 to your computer with the included USB cable, and you're ready to go! MAC/PC COMPATIBLE The USB3 works great on both Macintosh and Windows computers! For more information on PC and Mac system requirements, please refer to the System Requirements section of this manual (pages 3-5). LAPTOP COMPATIBLE The USB3 works great on USB enabled laptop computers. Although most laptops have built in audio inputs and outputs, the quality of sound is less than impressive. With the USB3, you can add high quality inputs and outputs to your laptop, transforming it into a portable, high-end audio workstation! PERFECT INTEGRATION WITH YOUR OPERATING SYSTEM Whether you are using Mac or PC, the USB3 uses the standard USB audio driver that come with your operating system. This ensures optimal performance with your OS, and compatibility with future OS updates! HIGH QUALITY AUDIO The USB3 has the high quality sound that customers have come to expect from Aardvark. Keeping the audio inputs and outputs away from the computer prevents unwanted noise from interfering with your audio. Our use of high end components insures precise, crystal-clear sound quality. For musicians, using the USB3 with your favorite audio software provides the quality you need to create professional sounding audio tracks. For Internet audio enthusiasts, the USB3 is great for listening to MP3's, and bringing in audio from outside sources for encoding. Even voice-recognition software users will benefit from using the USB3! Customers can plug their microphones right into the USB3. The USB3's high end components provide a more accurate voice signal than standard soundcards, enhancing the software's performance. 2
8 PC SYSTEM REQUIREMENTS & COMPATIBLE SOFTWARE In order to use the USB3 you will need to satisfy 3 main requirements 1 That you are running a compatible operating system. 2 That you have a compatible USB host controller. 3 That you have compatible audio software. See below for more details NOTE: For the most up to date information regarding hardware and software compatibility, please check our website Minimum requirements: 64 MB RAM 233 MHz processor Compatible host controller (more details below) 100 MB available HD space Available USB port. Operating System: Windows 98 SE, Windows ME or Windows 2000 Processor: Intel processors are recommended. USB Host Controller: Here is how to find out what USB host controller your PC uses: Go to START > SETTINGS > CONTROL PANEL Double click the System icon, then go to the Device Manger tab Scroll to the bottom, and double click Universal Serial Bus Controllers The USB controller list will appear. These are the host controllers that are tested and known to work: Intel AB PCI to USB Universal Host Controller Intel AB/EB PCI to USB Universal Host Controller Intel SB PCI to USB Universal Host Controller Intel AA PCI to USB Universal Host Controller Intel AB PCI to USB Universal Host Controller Ali PCI to USB Open Host Controller The following host controllers have been tested and are NOT compatible: Intel BA/BAM VIA Host controllers OPTI Host controllers SiS 7001 There is the chance that the host controller that your PC uses is not on either list. If your host controller is not listed here, but is Intel based, the USB3 should function fine. If it is not an Intel controller, it may still work. 3
9 PC SYSTEM REQUIREMENTS & COMPATIBLE SOFTWARE PC Compatible Software NOTE: If the program you use is not on this list, it does not necessarily mean it is incompatible. Feel free to check to see if your favorite software is compatible! Nulsoft Winamp Microsoft Windows Media Player Magix Samplitude Aurturia Storm Sonic Syndicate (using DirectSound drivers) ORION Image Line Fruity Loops Sonic Foundry: Vegas Audio Vegas Video ACID (Allows 24 bit Recording!) Sound Forge (Version 5 Allows 24 bit Recording!) Cakewalk: Pro Audio 9 SONAR Guitar Tracks Syntrillium: Cool Edit Pro Cool Edit 2000 IK Multimedia T-RacKs Groove Maker Native Instruments (using DirectSound drivers) Reaktor Spektral Delay Traktor Propellerhead Rebirth Reason (using DirectSound drivers) Almost any software that uses MME or DirectSound drivers should work fine. Incompatible PC Software DigiDesign Pro Tools Free Nemesys Gigastudio Steinberg Cubase VST (Has worked in some cases) Emagic Logic Audio (Has worked in some cases) Mark Of The Unicorn (Has worked in some cases) 4
10 MACINTOSH SYSTEM REQUIREMENTS & SOFTWARE COMPATIBILITY In order to use the USB3 you will need to satisfy 2 main requirements 1 That you are running a compatible operating system. 2 That you have compatible audio software. See below for more details NOTE: For the most up to date information regarding hardware and software compatibility, please check our website pro.com/usb3/tech Operating System: Any Power Macintosh running MAC OS or later. This includes all Power Mac, imac, imac DV, PowerBook, ibook, Titanium Laptop, G3 and G4 systems. Minimum requirements: 64 MB RAM 233 MHz 100 MB available Hard Disk space Standard Apple USB port Compatible Macintosh Software NOTE: If the program you use is not on this list, it does not necessarily mean it is incompatible. Feel free to check to see if your favorite software is compatible! Apple QuickTime Player Cakewalk Metro SE Metro Bias Peak LE Peak Casady & Greene SoundJam Mark of the Unicorn Digital Performer IK Multimedia T-RacKs Groove Maker Native Instruments (using Sound Manager) Reaktor Spektral Delay Traktor Almost any software that uses the Mac OS Sound Manager should work fine. Incompatible Macintosh Software Spark 1.5 & XL Digidesign ProTools Free Steinberg Cubase VST (Has worked in some cases) Emagic Logic Audio (Has worked in some cases) Propellerhead Rebirth Reason (using Sound Manager) Roxio Toast Jam 2.5 U&i Software Metasynth Metatrack 5

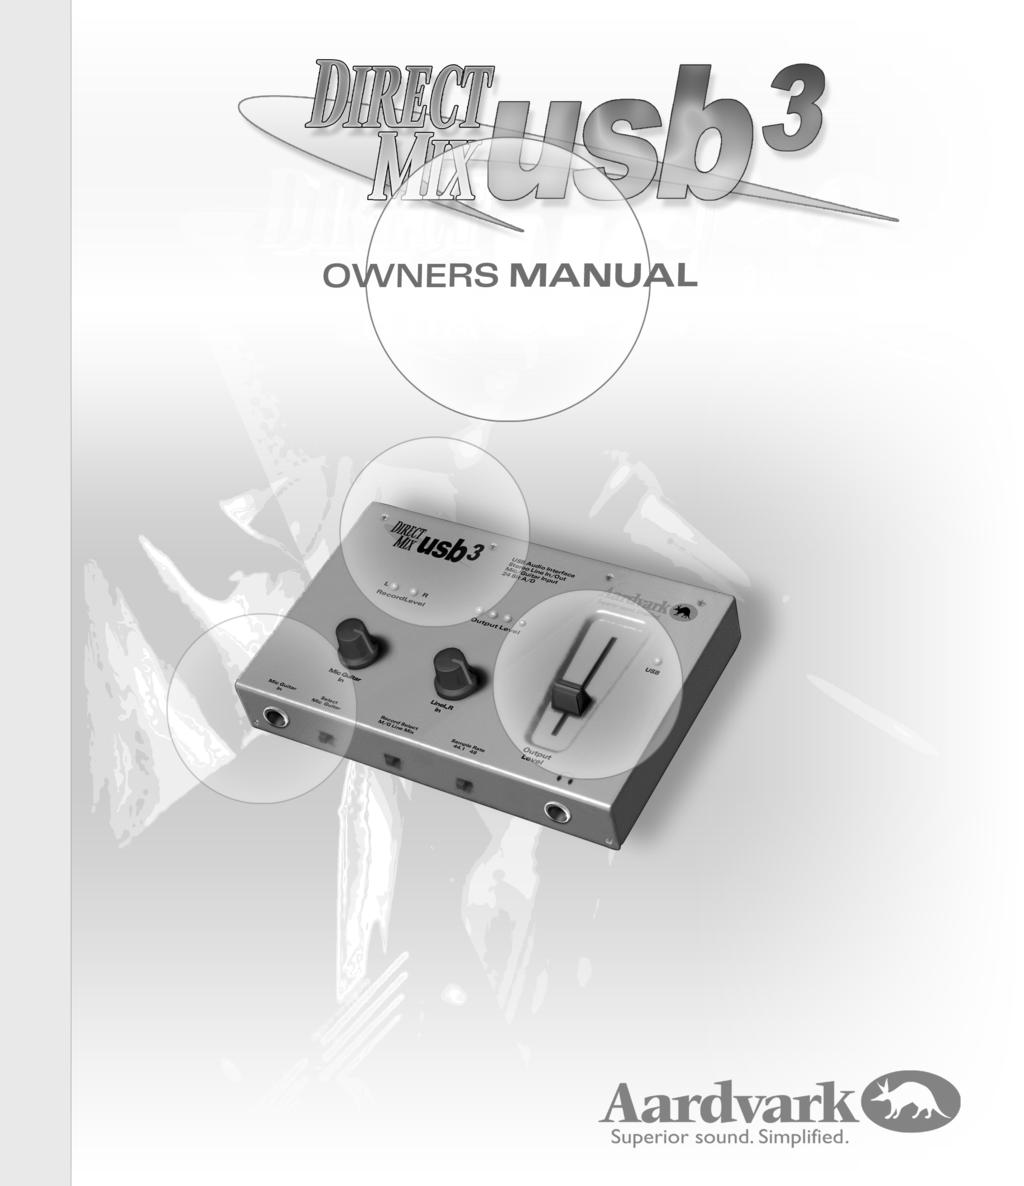
11 PRODUCT OVERVIEW USB3 PACKAGE CONTENTS: The USB3 should have the following items packaged: One USB3 hardware device One USB cable One Cakewalk Guitar Tracks/Metro SE CD The USB3 manual you are reading A legal agreement/disclaimer GETTING FAMILIAR WITH THE USB3 HARDWARE:! 1. Left and right line outputs: These 1/4" jacks operate at 10 db. Their output volume is controlled by the output level fader (#5) as well as software based controls. These jacks can be plugged into a mixer, an amplifier, or powered monitors. 2. Left and Right line inputs: These 1/4" jacks operate at 2 dbu to 30 dbu. These inputs are designed for use with line level devices such as synthesizers, drum machines, mixer outputs, CD players, MiniDisc, etc. The recording volume of these inputs can be adjusted with the Line L,R input level knob (#8). 3. USB connection: This is the port used to attach the USB3 to the computer via the included USB cable. IMPORTANT: If you want to disconnect the USB cable or change the sample rate you must exit all audio applications. 4. USB Power indicator: This light will glow when the USB3 is receiving power from the computer. This light simply indicates whether you have power coming from the USB port; this light may glow even if the USB3 is not properly installed. 5. Output Level Fader: This is the master output volume control of the USB3. It controls the output levels going to both the Headphones (#6) and the L/R line outputs (#1). This Fader does not change your recording levels. 6. Headphone Output: If you want to use headphones with the USB3, this is where you plug them in. Headphone volume is adjusted with the Output Level Fader (#5). 6
12 PRODUCT OVERVIEW! NOTE: The headphone output works best with low impedance headphones, 160 ohms or less. 7. Sample rate selection: This lets you select the sample rate you want to work at, either 44.1 khz or 48 khz. IMPORTANT: If you want to disconnect the USB cable or change the sample rate you must exit all audio applications. 8. Line L,R input level knob: This controls the input level of recording levels of signals going to line inputs L,R (#2). 9. Record Select Switch: This lets you choose what inputs you want to use to record. If the switch is all the way to the left, the USB3 will only record the MIC/GUITAR input (#14) NOTE: You will still be able to hear the L/R line inputs, even though they are not being recorded If the switch is in the center, the USB3 will only record the L/R line inputs (#2) NOTE: You will still be able to hear the mic/guitar input, even though it is not being recorded If the switch is all the way to the right, the USB3 will record the L,R line inputs, and the Mic/Guitar input simultaneously. 10. Output level LEDs: These four LEDs respond to the volume level of the signal being sent to the Headphone and L,R line outputs.from Left to right, this is the volume level each LED represents: -20dB (green), -12dB (green),- 6dB (green), 0 db (red). 11. Recording level OMNI LEDs: These LEDs change in intensity and color as the signal gets louder. They measure the level of the audio going into the A/D (analog to digital) converter. The color of the LEDs begin with a soft green light, which glows brighter as the signal becomes louder. As the signal loudness increases, a red light will appear. If the red light is consistently on, your recording levels are too high. Intermittent flickering of the red light is usually not a problem. 12. Mic/Guitar select switch: This switch is used to optimize the Mic/Guitar input (#14) for use with either microphones or guitars. If the switch is moved to the left, the impedance is optimized for microphone use(low-z), if it is moved to the right, the input impedance is optimized for guitar use (high-z). In addition, the guitar setting utilizes our proprietary EFR (Enhanced Frequency Response) technology, providing high quality direct guitar recording. 13. Mic/Guitar input level knob: This controls the input level of recording levels of signals going to the mic/guitar input (#14). 14. Mic/Guitar input: If you have a microphone or a guitar, plug it in here. 7
13 PRODUCT OVERVIEW - PC INSTALLATION INSTRUCTIONS NOTE: The USB3 does not work with condenser microphones or any other microphones that require phantom power. If you are not sure whether your microphone requires power or not, please check the microphone s documentation It is possible to use a separate preamp to power the mic, and then connect it to the USB3 via the line inputs on the back. PC INSTALLATION INSTRUCTIONS. The USB3 operates on Windows 98 SE, Windows ME, and Windows The USB3 is not compatible with Windows 95 additionally, Windows 98 First Edition has exhibited installation problems. For information on upgrading from Windows 95 or 98first edition please go to Please make sure you have a compatible USB host controller (see page 3) NOTE: The USB3 drivers are not written by Aardvark. Rather, they use Microsoft s standard USB audio driver. If you run into problems related to this driver, please contact Microsoft. 1.Power up your PC, and put your Windows 98 SE, ME or 2000 CD in your CD-ROM drive. Some computers sold with Windows preinstalled may not have included the Windows 98/SE/ME CD. If this is the case, the necessary files are probably already on your hard drive and no CD is required for installation. 2.Connect the USB3 to the USB port on your PC.If your PC has multiple USB ports, it should not matter which port you use. Check to see if the USB light on the USB3 is on. If it is, Windows should automatically detect new hardware. NOTE: If windows does not detect the new device, and the USB light is lit, you may have to force windows to find the hardware. Go to START SETTINGS CONTROL PANEL select ADD NEW HARDWARE, select NEXT, and Windows should find the USB3. 3.The Add New Hardware Wizard will appear, stating that it has found a USB COMPOSITE DEVICE, click Next > to proceed. 8


14 PC INSTALLATION INSTRUCTIONS 4.Next, the Wizard will ask "What do you want windows to do?" Choose "Search for the best driver for your device (Recommended), then click Next >. 5.Windows will then ask you where you want to install the drivers from. Make sure only the CD-ROM drive checkbox is checked, then click Next >. 9


15 PC INSTALLATION INSTRUCTIONS 6.If all is well, Windows should find the location of the driver, either on the CD, or on your hard drive, and the message to the right should appear. This message may be slightly different on your computer, depending on your PCs setup. Click Next >. 7.Windows should now begin copying the necessary files to your hard drive. 8.Once these drivers finish copying, Windows will install drivers for a USB Audio Device 9.Windows will install the drivers using the same procedure indicated in installation steps 3-7. Windows will then state that it has completed installing the software that the USB3 requires and will ask you to restart USB3 is now fully installed! 10
16 PC INSTALLATION INSTRUCTIONS! MAKING THE USB3 THE PREFERRED MULTIMEDIA DEVICE If you have multiple soundcards on your PC, and you would like to make the USB3 the preferred multimedia device, go to START > SETTINGS > CONTROL PANEL > MULTIMEDIA, select the AUDIO tab, and use the dropdown menus to select USB Audio Device as your preferred playback and recording device. IMPORTANT: Microsoft has acknowledged a bug in Windows that can cause the USB3 to not show up as a choice for preferred playback even though it does show up in the Device Manager as a USB Audio Device under Soundcards. If you are experiencing this problem, you will need to obtain the Microsoft Hotfix #Q from Microsoft Product Support. For more information, go to INSTALLING CAKEWALKS GUITAR TRACKS 2: For PC users, the USB3 comes bundled with Cakewalk Guitar Tracks 2, a powerful yet simple program that allows you to record and playback up to 8 mono or stereo tracks with the USB3! You do not need to install Guitar Tracks 2 in order for the USB3 to function. The USB3 will work with most available audio programs, please see page 4 for details. Installing Cakewalk Guitar Tracks 2 Insert the Cakewalk Guitar Tracks CD into your CD-ROM drive, and an installation guide should appear within a few seconds. NOTE: If the installation guide does not appear, go to MY COMPUTER, double click the CD-ROM drive, then double click AUTORUN.EXE From here, the Cakewalk Guitar Tracks 2 installer will walk you through the installation process. During the installation, you will be asked for a CD-KEY. The CD-KEY is printed on the Cakewalk Guitar Tracks 2 CD-ROM. When installation is finished, you will need to restart your computer. 11

17 GUITAR TRACKS 2 QUICK START GETTING STARTED WITH CAKEWALK GUITAR TRACKS 2 : This section provides information on how to get up and running with the USB3 and Cakewalk Guitar Tracks 2. The following information is simply an introduction to the program, aimed at showing you how to start recording tracks immediately. NOTE: For more in-depth information about using Cakewalk Guitar Tracks 2, use the Help menu to access tutorials, and other valuable resources. If you have questions or problems regarding Cakewalk Guitar Tracks 2, please contact Cakewalk technical support at support@cakewalk.com or call CAKEWALK. The main screen of Cakewalk Guitar Tracks 2 resembles a standalone multitrack with built in mixer. You can access all the basic playback and recording features from here. 12

18 GUITAR TRACKS 2 QUICK START In the lower right, you ll find the transport controls Controls 1-4 and 6 will not function until your first track has been recorded. 1.Moves the transport to the beginning of the song 2.Stops playback or recording 3.Plays back recorded tracks 4.Moves the transport to end of the song 5.Records any track armed for recording. NOTE: this button will be grayed out if no track is armed for recording 6.Will take the transport to any position in the song. Just to the left of the transport controls, is the master output strip. If you have plugin effects, this is where you can add them to the master mix. This controls the panning of the master mix This controls the overall volume of the master mix This lets you select the preferred output device for playback. You ll want to select USB audio device. 13
19 GUITAR TRACKS 2 QUICK START To the left of the Master output controls, are eight channel strips, which are used to control the eight available track This provides volume measurements for each track If you have effect plugins, this is where you can assign them to a track If you would like your effects plugins to be routed to multiple tracks, Aux 1 and 2 will let you decide how much of that effect to apply to a track. This determines the stereo placement of the track. Click this to arm a track for recording. This will solo the track (muting all other tacks). This will mute the track. The track fader only alters the volume of playback tracks. If you want to adjust your recording volume, it must be done with the USB3 hardware. Click here to choose the recording device for the track. You can also use this button to determine whether the track is mono or stereo. To record a track, simply press the button labeled Record on that track s channel strip. Then hit the record button in the lower right corner. Click stop to finish recording your track. 14


20 MACINTOSH INSTALLATION INSTRUCTIONS! IMPORTANT: In order to install the USB3 you MUST be running MAC OS or newer. Aardvark highly recommends Mac OS 9.1, which is a free upgrade for any user of 9.0.x. Aardvark is not the manufacturer of this software 1.Power up your MAC, USB installation is typically easier with the power on. 2.Using the provided USB cable, connect the USB3 to the USB port of your Mac. Do not use any of the USB ports on your keyboard as they will not provide enough power to operate the USB3 3.Go to the Apple menu in the upper left, select Sound from the Control Panels folder submenu. This will take you to the sound configuration menu. 4.On the INPUT tab, select the Line in of your USB audio device as your preferred input device. You can also use this tab to measure the input signal level. 5.On the OUTPUT tab, two options will now be available. The first is Built-in which will play sound through external speakers connected to the Macintosh or through the Mac s built-in speakers if no external speakers are connected. The second option will play sound through the USB3 s outputs, allowing you to route the output signal to external devices. 15

21 MACINTOSH INSTALLATION INSTRUCTIONS POTENTIAL INSTALLATION PROBLEMS: Insufficient power: If the suggestions provided by this error message do not get rid of the problem, first try to disable unnecessary USB devices. If that does not help, you may need to purchase a powered USB hub, which will provide the necessary power to run the USB3. One of the better powered USB hubs is made by Belkin. For more information, check out The Mac does not recognize the USB audio device: In order to use a USB audio device on Mac computers, you need to be on Mac OS or newer. If you already have Mac OS loaded, we recommend that you upgrade to Mac OS 9.1, this is a free upgrade from 9.0.x. Mac OS updates can be found at 16

22 MACINTOSH INSTALLATION INSTRUCTIONS USB3 BUNDLED MAC SOFTWARE: For Macintosh users, the USB3 comes bundled with Cakewalk Metro SE, a powerful Audio and MIDI sequencer for Macintosh. You do not need to install Metro SE in order for the USB3 to function. The USB3 will work with most available audio programs, please see page 5 for details. To help you learn how to use the program, the Metro SE CD-ROM includes a comprehensive PDF manual. You can reference this PDF from the Metro SE CD, or print it out to have a hard copy. If you have questions or problems regarding Metro SE, please contact Cakewalk technical support at metro.support@cakewalk.com or by phone at:1-888-cakewalk. INSTALLING METRO SE : Insert the Cakewalk Metro SE CD-ROM into your CD-ROM drive, and the contents of the CD should appear on your screen. Double Click the Install Metro program to begin installation. 17


23 MACINTOSH INSTALLATION INSTRUCTIONS Metro SE will ask if you want to perform an Easy or Custom install. For must users, it is best to choose the easy install. After installing Metro SE, you may be asked to install OMS as well. OMS is included on the Metro SE CD. To install OMS, simply insert the Metro SE CD-ROM, and run the OMS installer. When using Metro SE for the first time, you may be asked to setup OMS. You can ignore these requests. OMS is a MIDI utility, and the USB3 is strictly audio. There is no need to configure OMS to get the USB3 to work properly. In addition, Metro SE may provide a menu, asking if you want to change ports. Like OMS, you can safely ignore this. 18


24 GETTING STARTED IN METRO SE Once you get through setting up the ports and OMS, Metro SE will open as several windows, including the Transport, the Track View, and the Graphic Editor. Go to the setup menu, choose Digital Audio. To use the USB3 as your input device, configure the setup screen as shown. Once your audio devices are set up, head over to the track view. The first few tracks should be visible, more tracks can be found by simply scrolling down. To arm a track for recording, simply click the "R" column for that track. Once the track is armed for recording, simply click the RECORD button on the Transport. After recording a track, the audio you recorded should show up in the Graphic Editor. 19
25 TROUBLESHOOTING:! As straightforward as the USB3 is, there is always the possibility that you may run into problems. This section provides information on some of the issues that may arise. IMPORTANT: If you have tech support issues regarding installation or performance of the USB3 drivers, please contact the manufacturer of your operating system or motherboard. The USB3 software is not written by Aardvark. Rather, it uses the Standard USB audio drivers that come with your operating system (Windows 98SE, Windows ME, Windows 2000, or Mac OS). If you are having trouble with the software you are recording with (Cakewalk, etc.) please contact the company that writes the software. For any issues regarding the USB3 hardware itself, please refer to our website. PROBLEM: Inputs do not appear to work SOLUTION: First, be sure that the input levels are set to a high enough volume. For the Mic/Guitar input on the front, use the Mic/Guitar in knob to boost the incoming volume. For the 1/4" jacks on the back, use the Line L,R in knob to boost the incoming volume. After adjusting your input volume, check to see if the Record Level lights are responding. If they are, your inputs are working! If you still can t hear your inputs make sure the output level slider is turned up. PROBLEM: The lights that measure my recording level don t seem to work. SOLUTION: Be sure your recording levels are set high enough as stated in the previous question. If the levels are set properly, Be sure the Record Select M/G Line mix switch is set in the proper position. If should be to the left if you want to record the Mic/Line input, it should be in the center if you want to record the L/R line inputs on the back, or it should be to the right if you want to record the Mic/Guitar and line inputs simultaneously. PROBLEM: The USB3 does not show up as a selection for preferred playback but it does show up in the Device Manager as a USB Audio Device under Soundcards. SOLUTION: You will need to obtain the Microsoft Hotfix #Q from Microsoft Product Support. For more information go to 20
26 TROUBLESHOOTING: PROBLEM: My inputs work, but they are not recorded by my audio software SOLUTION: First, check to make sure the input select switch is in the appropriate position. If changing the input selector switch does not solve the problem, then the audio software you are using may have a different device assigned to record and play back audio. Even if you do not have another sound card installed, many programs require that you explicitly designate the USB3 as the preferred recording and playback device before it will work in the program. PROBLEM: I can't hear MIDI files SOLUTION: The USB3 is strictly an audio card, and does not play MIDI files. In order to hear MIDI files, you need an additional wavetable soundcard or MIDI interface. PROBLEM: I can't hear audio CD's through the USB3 SOLUTION: In order to hear Audio CDs through the USB3, your CD-ROM drive must support digital audio extraction. Contact the manufacturer of your CD-ROM drive to see if this is the case. You can also obtain a free alternate Windows system file that will allow real-time conversion from audio CDs, for more info visit and search for CDFS PROBLEM: I m playing a video game on my computer and some of the sounds are not working properly. SOLUTION: The USB3 is a professional audio interface that only operates at 44.1 and 48 KHz sample rates. Many game sounds are recorded at lower sample rates. PROBLEM: Playback on the USB3 is too quiet SOLUTION: First, be sure the Master Volume is turned up. Also, if you are a PC user, Go to Start > Programs > Accessories > Entertainment > Volume Control. This will bring up the volume mixer for the USB3, which may need to be turned up. 21
27 FREQUENTLY ASKED QUESTIONS Does the USB3 record 16 Bits or 24 bits? Both, but keep reading. Unlike many USB audio devices, the USB3 has high-end 24 Bit A/D converters inside the unit and is fully 24 bit compatible and will record 24 bits using the right software. However, most standard audio software can only record 16 bits using the standard USB audio driver provided by the operating system. Most software companies are working to update this and when ready should vastly expand the possibilities of the USB3. However, it is important to note that by using only the audio software that comes with the USB3, you will only be able to record at16 bits. If you want to record 24 bits with the USB3 today, there are solutions already available. If you are a PC user, than some software from Sonic Foundry ( such as ACID or Sound Forge 5.0 will allow you to record 24 bits with the USB3. Keep in mind that all CD s are recorded at 16 bit, so the USB3 is perfect for highresolution, professional CD recording. Ultimately, even if you don t need to use the 24 bit capability right out of the box, it s nice to know the 24 bit option is there. Will the USB3 make my audio sound better? Yes. Especially if you are using the standard audio hardware that came with your computer. Aardvark uses high quality components and completely shields your audio from any unwanted computer noise. The result is clean, detailed, professional sounding audio. I already have a regular soundcard, do I need to deactivate it to use the USB3? There is no need to deactivate your computer s other soundcard. The USB3 seamlessly integrates with other multimedia devices. You can configure Windows to recognize either the USB3 or your other soundcard as the preferred multimedia device. Can I play MP3 files through the USB3? Absolutely! Professional design and high-end components make the USB3 perfect for enjoying MP3 audio. Most MP3 players will automatically play out of the computer s preferred audio device, so just make sure that s set to the Aardvark USB3 and you should be able to listen to any MP3 file through the line outputs or even through the convenient headphone output right on the front of the unit. 22
28 FREQUENTLY ASKED QUESTIONS Can I play my audio CD s through the USB3? If your CD-ROM drive supports Digital Audio Extraction, then you will be able to play your audio CD s through the USB3. To find out if your CD-ROM supports this feature, you can check the CD Music Tab by going to; Start->Settings->Control Panel->Multimedia->CD Music Tab. You can also obtain a free alternate Windows system file that will allow real-time conversion from audio CDs, for more info visit and search for CDFS Can I use the USB3 with the standard audio software that comes with my Mac or PC? Yes. The USB3 will work with almost any audio software, including many of the standard audio players that come with the computer. This includes Windows Media Player & WinAmp for the PC, and Quicktime, MacAmp & SoundJam on the Mac. Using the USB3 with your computer should yield much better sound quality than your included soundcard both for recording and playback. Just make sure that your sample rate is set to either 44.1 khz or 48 khz. What is USB? Universal Serial Bus (USB) is a standard means for connecting devices to a computer. Almost all new computers, Mac or PC, should have several USB I/O ports. The USB can work with a computer keyboard, a mouse, digital cameras and many other devices that need to get information to or from the computer. The USB3 audio interface uses this standard port to easily get audio in and out of the computer. How does the USB3 work in getting audio to and from the computer? The USB3 is an audio interface that uses the common USB connection to get audio to and from the computer. This USB connection allows the USB3 to transfer 2 channels (Left & Right) of audio to the computer (RECORD) and at the same time transfer 2 channels of audio (Left & Right) from the computer (PLAY). The USB3 also receives all of its power from the USB connection. Imagine having 5 cables connected to your computer: one for each the Left & Right Input; 1 each for the Left & Right Output, and an AC power cord connected to the wall. This is the functionality that the one simple USB connection provides. 23
29 FREQUENTLY ASKED QUESTIONS Why does the USB3 come with Cakewalk Audio Software CD? The USB3 is a set of high quality inputs and outputs for your computer. An additional program, such as Cakewalk Guitar Tracks 2 for the PC or Metro SE for the Macintosh, is required to record, edit, mix and play audio from the computer. There are many different companies that make this kind of audio software. So the USB3 acts as just a high quality I/O and hardware mixer interface, all the actual audio recording is done using audio software. Is the USB3 Full Duplex? Yes. The USB3 is full Duplex, which means that you can record audio to the computer and playback audio from the computer at the same time. Most professional audio interfaces have this feature because you can overlay tracks onto the computer much easier when you can play back the software audio tracks while recording new ones at the same time. This is perfect for a software based home studio and really lets you get the most out of your system. Why did you choose 1/4" jacks for all the audio I/O? 1/4" jacks are a professional audio standard that not only provide good quality, but are also very easy to connect Guitars, Microphones, Line level and headphones directly into the USB3. These 1/4" jacks are also easily adapted to fit any other kind of jack style you need. Many devices use RCA, 1/8" or XLR connectors, all of which integrate perfectly into the USB3 with some readily available adapters. How can I connect my XLR microphone to the USB3? Many microphones have a 3-prong XLR connector. You can use a mic cable that has an XLR jack to connect to the microphone on one end and a 1/4" jack on the other end of the cable to connect into the USB3. You can also use a simple XLR to 1/4" adapter and it will work perfectly. Make sure the Mic/Gtr switch on the front is turned over to Mic. Are there separate amplifiers for the microphone and the guitar inputs? Absolutely. This gives you better quality for both your mic input and your guitar input. This is different than many devices that use the same amplifier for both mic & guitar input. Aardvark has different amplifiers for the Microphone input and a custom designed E.F.R. circuitry for the guitar input. Our mic preamp is very quiet, allowing you to get the most out of your microphones, so your vocals will sound clean and crisp and will be absolutely noise-free. 24
30 FREQUENTLY ASKED QUESTIONS The exclusive E.F.R. Circuitry (Enhanced Frequency Response) is activated when you change the Mic/Guitar Switch to Guitar. The guitar sound produced from the E.F.R. input will be an eye-opener for many guitar players. The special E.F.R. circuitry, custom made just for guitar players, creates a tone that s warmer and richer with a spectral clarity that results in great sounding guitar tracks. Is there phantom power on the USB3? No. Phantom power is commonly needed for professional condenser type microphones. The USB3 does not provide phantom power, so if you need to use condenser microphones, you will need to use an outboard pre-amp, and then come into the Line Inputs (L,R) on the back of the USB3. Aardvark also makes PCI card based audio interfaces, some of which use the XLR mic input and have Phantom power. For more information, check out the Q10 and the Direct Pro 24/96. Both of these systems have phantom power as well as many other professional features you may need: Can I transfer audio files into other audio software? Yes. The audio software that comes with the USB3 records in a standard audio formats so it s easily transferred and used by any other programs. For the Macintosh, the Cakewalk Metro SE that comes with the USB3 can record in the standard ".AIFF" Macintosh format. For Windows users, Cakewalk Guitar Tracks 2 can record in the Windows standard ".WAV" file. Both of these formats are very easily recognized by other audio software applications so it will be easy to transfer tracks recorded by the USB3 into almost any software you choose, including CD burning software or multimedia and internet streaming software. NOTE: Just because you can easily transfer the audio files that were recorded by the USB3 into another program for editing, does not necessarily mean that the USB3 can actually record and play with any recording software. If you plan on using the USB3 with another recording software application, make sure you check the current listing of compatible recording software at: 25
31 FREQUENTLY ASKED QUESTIONS How many channels can the USB3 play and record? The USB3 can record on the computer 2 channels (L,R) and playback from the computer 2 channels (L,R) simultaneously. The recording software will certainly allow you to mix and edit many more channels, allowing you the ability to keep all your individual tracks separate. For example, the Guitar Tracks 2 recording software allows you to have up to 8 individual tracks that can be edited, mixed and played through the USB3. Any recording software will let you mix the software tracks down into 2 channels for playback through the USB3. This means you can build your mix 2 tracks at a time, mix & edit all the separate channels in your software while you re monitoring the stereo output though the USB3 audio line outputs or its headphone output. How many channels can I mix with the USB3? The USB3 can mix up to 5 channels for monitoring via the USB3: One (1) from the Mic or Guitar Input, two (2) from the stereo Line (L,R) 1/4 Inputs, and two (2) from the stereo playback channels from the recording software. Does the USB3 work as a stand alone device? No. The USB3 gets all of its power from the computer it s connected to via the USB cable, so it cannot be used unless it is connected to a computer. On the top right of the unit, there is an LED labelled "USB" which indicates that the unit on and getting power. I m mainly a guitar player, how can I use the USB3? If you are a guitar player you will find some excellent uses for the USB3 listed below. 1) You can now start recording tracks on any computer: Desktop or Laptop. Mac or PC. It s easy to carry around so all you need is the USB3, a USB cable, headphones and a guitar and your up and running. 2) The custom designed EFR Circuitry is specially tailored to give you a unique sound that really warms up your guitar. You can use the EFR Guitar input to record to the computer, or you can just monitor directly to headphones or speakers to hear yourself play. 3) As long as the USB3 is connected to the computer so it gets power, you can use it just like a small audio mixer. The USB3 lets you record and play your tracks from the computer, mix with vocals and keyboards and easily lets you monitor everything all at once. 26
32 FREQUENTLY ASKED QUESTIONS What is the best way to listen to audio with the USB3? The USB3 gives you 2 possibilities. The headphone jack on the front is easiest if you want to listen to it with headphones. You can also simultaneously take the Line Outputs on the back of the unit to a mixer, powered speakers or an amplifier to listen to your music. Both the line outputs and the headphone output are always identical in what is monitored, and both can be adjusted with the level slider on the top of the USB3. If you have speakers or headphones with connections that are 1/8" or RCA jacks, it s easy to get adapters to fit into the 1/4" professional connections of the USB3. How can I plug both a guitar and a microphone into the USB3? You can record both a microphone input and a guitar input at the same time even though the USB3 shares an input for the mic and guitar input. To do this, you will need an external amplifier, a mic preamp for microphones or a DI box or other Hi- Z interface for the guitar, and then take the line level signal out of that into one of the two 1/4" line inputs on the back of the USB3. If you want to use our proprietary EFR Guitar Input circuitry, then you ll need an external mic preamp and take the line level output of the mic preamp into one of the USB3 line inputs. I have a PC, how many IRQs does the USB3 require? The USB3 needs one (1) dedicated IRQ to work properly. Sometimes, the USB3 can share an IRQ, but this typically results in audio dropouts and other unwanted glitches in your audio. For optimum performance make sure the USB3 has it s own dedicated IRQ. Can I use the USB3 with laptops? Yes. It will work with either Mac or PC laptops. It s important to note that with some "loaded" PC laptops, there may not be any IRQ s left, which the USB3 needs. Just make sure there is an IRQ available for the USB3 and it will work perfectly. It s also important to note that some laptops force the USB port into an IRQ that cannot be changed, which makes it incompatible with the USB3 and other USB audio devices. These IRQ conflicts can be avoided by using a laptop that provides Floating IRQs. Gateway ( and Winbook ( are among the manufacturers that provide some laptops with floating IRQs. However, most laptop manufactures now have solutions, so just make sure that the laptop you plan on using with the USB3 has Floating IRQs. If you are not sure, call the laptop manufacturer and they should be able to tell you if the laptop you have has Floating IRQs. 27
M-16DX 16-Channel Digital Mixer
 M-16DX 16-Channel Digital Mixer Workshop Using the M-16DX with a DAW 2007 Roland Corporation U.S. All rights reserved. No part of this publication may be reproduced in any form without the written permission
Mbox Basics Guide. Version 6.4 for LE Systems on Windows XP and Mac OS X. Digidesign
 Mbox Basics Guide Version 6.4 for LE Systems on Windows XP and Mac OS X Digidesign 2001 Junipero Serra Boulevard Daly City, CA 94014-3886 USA tel: 650 731 6300 fax: 650 731 6399 Technical Support (USA)
Direct Pro An In-Depth Look at a Perfectly Integrated Audio Workstation
 Direct Pro 2496 An In-Depth Look at a Perfectly Integrated Audio Workstation Index The Direct Pro Series: Background Page 3 2496: Overview Page 4 2496 Hardware Features Page 5 2496 Software Features Page
APPENDIX B Setting up a home recording studio
 APPENDIX B Setting up a home recording studio READING activity PART n.1 A modern home recording studio consists of the following parts: 1. A computer 2. An audio interface 3. A mixer 4. A set of microphones
Owner s Manual COMPLETE RECORDING SOLUTION
 Owner s Manual COMPLETE RECORDING SOLUTION Warranty/Technical Support/Service WARRANTY 1. Please register your product online at lexiconpro.com. Proof-of-purchase is considered to be the responsibility
Owner s Manual COMPLETE RECORDING SOLUTION
 Owner s Manual COMPLETE RECORDING SOLUTION Warranty/Technical Support/Service WARRANTY 1. Please register your product online at lexiconpro.com. Proof-of-purchase is considered to be the responsibility
LINE 6 GEARBOX 3.0 RECORDING SETUP GUIDE
 LINE 6 GEARBOX 3.0 RECORDING SETUP GUIDE Table of Contents LINE 6 GEARBOX 3.0 RECORDING SETUP GUIDE Getting Started...1 Updating & registering with Line 6 Monkey...1 About this guide...1 GearBox settings
WHAT COMPUTER DO I NEED? THE HARDWARE
 THE HARDWARE WHAT COMPUTER DO I NEED? Hardware is the physical pieces of computer equipment that you use. The central piece of hardware in a music technology setup is a computer. Nowadays this can be either
LINE 6 GEARBOX 3.1 RECORDING SETUP GUIDE
 LINE 6 GEARBOX 3.1 RECORDING SETUP GUIDE Table of Contents LINE 6 GEARBOX 3.1 RECORDING SETUP GUIDE Getting Started...4 Updating & registering with Line 6 Monkey...4 About this guide...4 GearBox settings
Universal audio/midi interface USER MANUAL
 Universal audio/midi interface USER MANUAL Contents Table of Contents Contents 2 English 3 Safety information 3 irig Pro DUO 3 Register your irig Pro DUO 3 irig Pro DUO overview 4 Installation and setup
Apogee Ensemble Thunderbolt Audio Interface
 Apogee Ensemble Thunderbolt Audio Interface Quick Start Guide Fall 2014 Contents Overview... 3 Introduction...3 Package Contents...4 Ensemble Product Tour...6 Getting Started... 8 System Requirements...8
Apogee Ensemble Thunderbolt Audio Interface
 Apogee Ensemble Thunderbolt Audio Interface Quick Start Guide July 2017 Contents Overview... 3 Introduction...3 Package Contents...4 Ensemble Product Tour...6 Getting Started... 8 System Requirements...8
Ultimate USB & XLR Microphone for Professional Recording
 yetipro Ultimate USB & XLR Microphone for Professional Recording 3 desktop or studio, the possibilities are endless. Congratulations on your purchase of Yeti Pro, the first microphone to combine the exceptional
M-Powered Basics Guide
 M-Powered Basics Guide Version 6.8 for M-Powered Systems on Windows or Macintosh Digidesign 2001 Junipero Serra Boulevard Daly City, CA 94014-3886 USA tel: 650 731 6300 fax: 650 731 6399 Technical Support
VERSION 3.5 RELEASE NOTES
 VERSION 3.5 RELEASE NOTES Mac OS X 10.4, Windows XP Updated Nov. 19, 2007 TABLE OF CONTENTS System Requirements... 2 Supported Line 6 Hardware...2 Windows System Requirements...2 Mac System Requirements...2
Gassmann Studio Tutorial
 Gassmann Studio Tutorial This document discusses some scenarios for using the Gassmann Studio successfully, and some troubleshooting tips for when things are not so successful. This document has no table
Hardware Reference written by Alexander Stamm, edited by Patryk Korman Document Version: 1.0 (07/2009) Product Version: 4.
 Product Version: 4.") HARDWARE REFERENCE The information in this document is subject to change without notice and does not represent a commitment on the part of Native Instruments GmbH. The software described by this document
HARDWARE REFERENCE The information in this document is subject to change without notice and does not represent a commitment on the part of Native Instruments GmbH. The software described by this document
GearBox 3.1 Release Notes
 GearBox 3.1 Release Notes Mac OSX 10.4.6; Windows XP Updated 3/12/2007 Introduction The GearBox 3.1 Release Notes provide useful information, including known issues using GearBox with various applications
Mic Mate Pro. User Manual
 R Mic Mate Pro User Manual Mic Mate Pro Features Congratulations and thank you for purchasing the MXL Mic Mate Pro. This device is designed to minimize your setup for recording and allow for professional
Introduction. 1. Theory of Operation
 Table of Contents Introduction......................................................2 1. Theory of Operation.............................................2 2. Features.......................................................3
User Guide (Clarett USB Edition)
") User Guide (Clarett USB Edition) Version 1.0 www.focusrite.com TABLE OF CONTENTS INTRODUCTION... 3 System Requirements....4 Software Installation...4 The Clarett USB Mixer basic principles...5 MIXING &
User Guide (Clarett USB Edition) Version 1.0 www.focusrite.com TABLE OF CONTENTS INTRODUCTION... 3 System Requirements....4 Software Installation...4 The Clarett USB Mixer basic principles...5 MIXING &
Focusrite Saffire 6 USB. User Guide
 Focusrite Saffire 6 USB User Guide 1 IMPORTANT SAFETY INSTRUCTIONS 1. Read these instructions. 2. Keep these instructions. 3. Heed all warnings. 4. Follow all instructions. 5. Do not use this apparatus
Table of Contents. Introduction...2. What s in the Box?...2. Fast Track USB Features...2. System Requirements...2. Windows...2. Macintosh...
 Table of Contents Introduction...2 What s in the Box?...2 Fast Track USB Features...2 System Requirements...2 Windows...2 Macintosh...3 Front Panel Controls...3 Rear Panel Controls...4 Software Installation...4
MP212 Principles of Audio Technology II
 MP212 Principles of Audio Technology II Lab #2 DM2000 and Pro Tools Version 3, 06/07/2012 revised AR, previous versions: JMC, JL Version 4, 09/15/2013 revised AR Copyright 2007 Berklee College of Music.
Miditech Guitarface USB
 Miditech Guitarface USB "Class Compliant" USB Audio Interface (WinXP/Vista no drivers necessary) 16 Bit/ 48 khz resolution LINE stereo interface HI-Z instrument preamp MIC preamp with 48V phantom power
M-16DX 16-Channel Digital Mixer
 M-6DX 6-Channel Digital Mixer Workshop Live Mixing with the M-6DX 007 Roland Corporation U.S. All rights reserved. No part of this publication may be reproduced in any form without the written permission
User Guide. Version 1.0.
 User Guide Version 1.0 www.focusrite.com TABLE OF CONTENTS OVERVIEW.... 3 Introduction...3 Features.................................................................... 4 Box Contents...5 System Requirements....5
QUICKSTART OWNER S MANUAL (ENGLISH) 1 8 MANUAL DE INICIO RÁPIDO DEL USUARIO (ESPAÑOL) 9 16 GUIDE D UTILISATION SIMPLIFIÉ (FRANÇAIS) 17 24
 1 8 MANUAL DE INICIO RÁPIDO DEL USUARIO (ESPAÑOL) 9 16 GUIDE D UTILISATION SIMPLIFIÉ (FRANÇAIS) 17 24") QUICKSTART OWNER S MANUAL (ENGLISH) 1 8 MANUAL DE INICIO RÁPIDO DEL USUARIO (ESPAÑOL) 9 16 GUIDE D UTILISATION SIMPLIFIÉ (FRANÇAIS) 17 24 KURZBEDIENUNGSANLEITUNG (DEUTSCH) 25 32 MANUALE RAPIDO DI UTILIZZO
QUICKSTART OWNER S MANUAL (ENGLISH) 1 8 MANUAL DE INICIO RÁPIDO DEL USUARIO (ESPAÑOL) 9 16 GUIDE D UTILISATION SIMPLIFIÉ (FRANÇAIS) 17 24 KURZBEDIENUNGSANLEITUNG (DEUTSCH) 25 32 MANUALE RAPIDO DI UTILIZZO
Tutorials by Steve Kostrey Revision for Cubase LE and Quality Control: Cristina Bachmann, Heiko Bischoff, Sabine Pfeifer The information in this
 Getting Started Tutorials by Steve Kostrey Revision for Cubase LE and Quality Control: Cristina Bachmann, Heiko Bischoff, Sabine Pfeifer The information in this document is subject to change without notice
How a Mixing Board Works
 How a Mixing Board Works Have you ever looked at a mixing board and wondered where on earth to start? It can strike fear into many new producers because of the amount of sliders, knobs, and buttons staring
There are three modes of operation for JoeCoControl selectable from the drop down menu in the blue top bar of the Mic/Line input controls window.
 JoeCoControl Overview JoeCo control is a powerful application for Mac or PC that allows full control of your JoeCo BlueBox Workstation Recorder product. To use JoeCo control, connect the USB2 cable supplied
User Guide. Version 1.0.
 User Guide Version 1.0 www.focusrite.com TABLE OF CONTENTS OVERVIEW.... 3 Introduction...3 Features.................................................................... 4 Box Contents...5 System Requirements....5
User Guide FFFA
 User Guide FFFA001255 www.focusrite.com TABLE OF CONTENTS OVERVIEW.... 3 Introduction...3 Features.................................................................... 4 Box Contents...4 System Requirements....4
User Guide FFFA
 User Guide FFFA001253 www.focusrite.com TABLE OF CONTENTS OVERVIEW.... 3 Introduction...3 Features.................................................................... 4 Box Contents...4 System Requirements....4
Getting Started Pro Tools M-Powered. Version 8.0
 Getting Started Pro Tools M-Powered Version 8.0 Welcome to Pro Tools M-Powered Read this guide if you are new to Pro Tools or are just starting out making your own music. Inside, you ll find quick examples
Recording guidebook This provides information and handy tips on recording vocals and live instruments at home.
 Welcome to The Hit Kit s QuickStart instructions! Read on and you ll be set up and making your first steps in the world of music making in no time at all! Remember, you can find complete instructions to
Fast Track Pro. Quick Start Guide
 Quick Start Guide USB Audio Series Quick Start Guide Installation Instructions For Windows XP PLEASE NOTE: do not connect your USB Audio series interface to your computer until the appropriate driver files
eti Ultimate USB microphone for professional recording
 eti Ultimate USB microphone for professional recording 3 Congratulations on your purchase of The Yeti, the most advanced and versatile multi-pattern USB microphone roaming the wild today. The Yeti is
Getting Started. Pro Tools LE & Mbox 2 Pro. Version 8.0
 Getting Started Pro Tools LE & Mbox 2 Pro Version 8.0 Welcome to Pro Tools LE Read this guide if you are new to Pro Tools or are just starting out making your own music. Inside, you ll find quick examples
User Guide. Version 1.2.
 User Guide Version 1.2 www.focusrite.com TABLE OF CONTENTS OVERVIEW.... 3 Features.................................................................... 4 Box Contents...5 System Requirements....5 Getting
TouchMix Series. Quick Start Guide. Installing the Windows Driver. Non-DAW audio playback from computer. TouchMix-30 Pro settings.
 TouchMix Series Quick Start Guide Setting up TouchMix-30 Pro with a computer: Windows driver installation, ios Core Audio configuration, itunes playback, and DAW setup This quick start guide is to help
Line 6 GearBox Version 2.0 Release Notes
 Line 6 GearBox Version 2.0 Release Notes System Requirements... 1 Supported Line 6 Hardware... 1 Windows System Requirements... 1 Mac System Requirements... 1 What s New in GearBox 2.0... 2 Key new features...
M-16DX 16-Channel Digital Mixer
 M-6DX 6-Channel Digital Mixer Workshop Using the M-6DX with SONAR LE 007 Roland Corporation U.S. All rights reserved. No part of this publication may be reproduced in any form without the written permission
Getting Started. Pro Tools LE & Mbox 2 Micro. Version 8.0
 Getting Started Pro Tools LE & Mbox 2 Micro Version 8.0 Welcome to Pro Tools LE Read this guide if you are new to Pro Tools or are just starting out making your own music. Inside, you ll find quick examples
Recording Overview. We will cover the following topics over the course of the semester:
 Recording Overview We will cover the following topics over the course of the semester: Basic (simultaneous) tracking: recording multiple tracks at the same time. This is commonly the procedure used when
We recommend you keep the following records for reference, as well as a copy of your sales receipt: Serial number: Date of purchase:
 Owner's Manual Introduction Congratulations on your purchase of the Samson G-Track Pro USB Microphone with Audio Interface. The G-Track Pro features dual 1 ultra thin capsules with selectable polar patterns,
Intro to Pro Tools. Pro Tools LE and Eleven Rack. Version 8.0.1
 Intro to Pro Tools Pro Tools LE and Eleven Rack Version 8.0.1 Welcome to Pro Tools LE and Eleven Rack Read this guide if you are new to Pro Tools or are just starting out making your own music. Inside,
MC1413 ADV. MIX SUITE STARTUP GUIDE. Ground Rules
 MC1413 ADV. MIX SUITE STARTUP GUIDE Ground Rules 1. absolutely no food or drinks in the Mix suite 2. never touch the projection screen in front of the room 3. the acoustical panels and diffusers on the
CONTENTS JamUp User Manual
 JamUp User Manual CONTENTS JamUp User Manual Introduction 3 Quick Start 3 Headphone Practice Recording Live Tips General Setups 4 Amp and Effect 5 Overview Signal Path Control Panel Signal Path Order Select
MUSC 1331 Lab 3 (Northwest) Using Software Instruments Creating Markers Creating an Audio CD of Multiple Sources
 Using Software Instruments Creating Markers Creating an Audio CD of Multiple Sources") MUSC 1331 Lab 3 (Northwest) Using Software Instruments Creating Markers Creating an Audio CD of Multiple Sources Objectives: 1. Learn to use Markers to identify sections of a sequence/song/recording. 2.
MUSC 1331 Lab 3 (Northwest) Using Software Instruments Creating Markers Creating an Audio CD of Multiple Sources Objectives: 1. Learn to use Markers to identify sections of a sequence/song/recording. 2.
MIX SUITE + VOCAL BOOTH BASICS
 MIX SUITE + VOCAL BOOTH BASICS Written/produced by FVNMA Technical Staff at the School of the Art Institute of Chicago, rev. 1/2/13 GROUND RULES: 1. ABSOLUTELY NO FOOD OR DRINK IN THE ROOM! 2. NEVER TOUCH
New for Pro Tools 9. Pro Tools HD Native vs Pro Tools HD Hardware
 New Pro Tools HD Series interfaces, including the HD I/O, HD Omni, Sync HD, HD MADI, and Pre, were introduced in 2010 along with the Pro Tools HD Native system. The Pro Tools HD Native PCIe card enables
Monitor Loudspeakers. Computer (serving as audio mixer, editor, recorder, signal processor, & synthesizer) Figure 1 General DAW Setup
 Figure 1 General DAW Setup") Chapter 1 Setting Up Your DAW In Chapter 1, we discuss certain computer and hardware equipment recommended in order to set up your own digital audio workstation (DAW). This worksheet is intended to help
Chapter 1 Setting Up Your DAW In Chapter 1, we discuss certain computer and hardware equipment recommended in order to set up your own digital audio workstation (DAW). This worksheet is intended to help
Mana Recording Studios
 Mana Recording Studios Mixing Requirements and Guidelines This document is list of requirements and guidelines for projects that are being sent to us for mixing. The goal of this document is to help us
Steven Slate Drums 4.0
 Steven Slate Drums 4.0 1 Steven Slate Drums 4.0 2 Introduction... 3 System Requirements... 4 Windows... 4 Mac OS X... 4 Installation... 4 Windows & Mac OS X... 4 Loading a Kit... 5 Loading an Instrument...
PA WATT PORTABLE PA SYSTEM PRODUCT MANUAL
 PA-5150 5 150-WATT PORTABLE PA SYSTEM PRODUCT MANUAL THANK YOU FOR CHOOSING POLSEN. The Polsen PA-5150 is an active PA system that s ideal for solo performers or vocalists. It can be used as a PA system
User Manual USB Condenser Microphone
 User Manual USB Condenser Microphone MICF-3001 Overview 1 Setting Up 1 Using the microphone with Windows 7/8/10 PC 3 Using a headphone with CF3001 4 Monitor your voice level (Computer system feature) 5
Fluid Audio SRI-2. User Guide English
 Fluid Audio SRI-2 User Guide English Für das Benutzerhandbuch in Ihrer Sprache besuchen sie bitte www.fluidaudio.com Para la guía del usuario en el idioma de su país, vaya a www.fluidaudio.com Pour le
User Guide FFFA
 User Guide FFFA001431 www.focusrite.com TABLE OF CONTENTS OVERVIEW.... 3 Introduction...3 Features.................................................................... 3 Box Contents...4 System requirements...4
QUICK SETUP GUIDE: Firewire/mLAN MACINTOSH OSX Cubase AI4 / Studio Manager / Motif XS Editor / Mac OSX
 QUICK SETUP GUIDE: Firewire/mLAN MACINTOSH OSX Cubase AI4 / Studio Manager / Motif XS Editor / Mac OSX Install Install Cubase AI4 on your Mac. Update to the latest version at www.steinberg.net Download
Owner s Manual AND APPLICATION GUIDE COMPLETE RECORDING SOLUTION
 Owner s Manual AND APPLICATION GUIDE COMPLETE RECORDING SOLUTION IMPORTANT SAFETY INSTRUCTIONS WARNING FOR YOUR PROTECTION PLEASE READ THE FOLLOWING: KEEP THESE INSTRUCTIONS HEED ALL WARNINGS The symbols
Version 2 - Basic User Guide
 Español Deutsch Français Nederlands 日本語 Version 2 - Basic User Guide GX POD Studio Interfaces GX UX1 UX2 KB37 ilok POD Farm 2 Basics POD Farm 2 Elements Plug-In Plug-Ins Standalone Operation Online Resources
Version 3.6 User Guide
 Version 3.6 User Guide Getting Started With Your Hardware GX UX1 UX2 KB37 DI UX8 POD X3 POD X3 Live PODxt PODxt Live PODxt Pro Guitar Port Stand-Alone Application GearBox Basics GearBox with POD X3 GearBox
USB Microphone. Marshall Electronics
 USB Microphone Marshall Electronics Warranty Marshall microphones are guaranteed against defects in material and workmanship for one year from date of purchase. Should you encounter any problem with this
LeMay Audio Products. MK-I Preamplifier Users Manual John P. LeMay All Rights Reserved Rev A
 LeMay Audio Products MK-I Preamplifier Users Manual 2008 John P. LeMay All Rights Reserved Rev A 08.12.24 Congratulations on purchasing one of the world s finest professional instrument preamplifiers!
This page intentionally left blank 10% 20% 30% 40% 50% 60% 70% 80% 90% 100%
 Reference Manual This page intentionally left blank 10% 20% 30% 40% 50% 60% 70% 80% 90% 100% Table Of Contents Introduction...5 Welcome!...5 About the MultiMix 8 FireWire...6 All-In-One Mixer and Multichannel
TEMPO USB MICROPHONE
 TEMPO USB MICROPHONE Congratulations on your purchase of the MXL Tempo USB microphone. MXL microphones are the result of worldclass engineering and manufacturing capabilities. They are designed to provide
MPA-201. Class A Microphone Preamplifier
 MPA-201 Class A Microphone Preamplifier You ve done, done it.. You ve purchased a truly exceptional piece of audio gear! Congratulations and thank you for purchasing the MPA- 201 Microphone Preamplifier
bx_control Control Listening and Monitoring Instrument M/S Matrix with Mono Maker and Stereo Width Control MANUAL
 bx_control Control Listening and Monitoring Instrument M/S Matrix with Mono Maker and Stereo Width Control MANUAL - for RTAS systems - for VST systems - for AU systems 2008 by BRAINWORX GmbH Brainworx
Intro to Pro Tools. Version 8.0.4
 Intro to Pro Tools Version 8.0.4 Welcome to Pro Tools LE Read this guide if you are new to Pro Tools or are just starting out making your own music. Inside, you ll find quick examples of how to record,
Miktek, LLC Nashville, TN USA tel: fax:
 Miktek, LLC Nashville, TN USA tel: 615.250.2434 fax: 615.346.9298 2017 All Rights Reserved, Miktek, LLC. Printed May 2017 v1 www. miktekaudio.com PRINTED IN CHINA Table of Contents Introduction.......................................................
SERIES ALLEN&HEATH. Multipurpose USB Mixers for Live Sound and Recording AP7205 ZED-14 ZED-420 ZED-436
 ALLEN&HEATH WORLD CLASS MIXING www.allen-heath.com/zed sales@allen-heath.com t:+44 (1326) 372070 LARGE FORMAT LIVE SOUND MIXERS ZEDZED-24 Multipurpose USB Mixers for Live Sound and Recording ALLEN&HEATH
BBGUNN s Allen and Heath ZED R16 setup guide for Reaper
 BBGUNN s Allen and Heath ZED R16 setup guide for Reaper So you ve bought or are thinking of buying an Allen and Heath Zed R16 and are wondering how to make it work with Reaper. Well, you ve come to the
2016 NEW PRODUCT GUIDE
 VIP SMART KEYBOARD CONTROLLER WITH MACKIE/HUI CONTROL Integrated 4.3-inch high-res full-color screen with dedicated interface buttons Screen provides 1:1 real-time feedback of plugin parameters Includes
MXL USB.006.
 MXL USB.006 www.mxlmics.com Congratulations on your purchase of the MXL USB.006 which uses a large 32mm gold diaphragm capsule for added warmth. MXL microphones are the result of world-class engineering
AUDIO INSTRUCTIONS CAPTURE STUDIO ONE PRO TOOLS
 AUDIO INSTRUCTIONS CAPTURE STUDIO ONE PRO TOOLS Updated 4/1/2016 SETTING UP THE LIVE ROOM Set the room up for recording. Arrange the studio rug in the live room and position microphone stands or direct
User Guide FFFA
 User Guide FFFA001426-01 www.focusrite.com TABLE OF CONTENTS OVERVIEW.... 3 Introduction...3 Features.................................................................... 3 Box Contents...4 System requirements...4
User Guide. Version 1.0 POWER
 User Guide POWER Version 1.0 www.focusrite.com TABLE OF CONTENTS OVERVIEW.... 3 Introduction...3 Product Compatibility...3 Features.................................................................... 4
SonicCell. Using SonicCell with GarageBand. Workshop ÂØÒňÎ. Expandable Synthesizer Module and Audio Interface SCWS06 1
 ÂØÒňΠWorkshop SonicCell Expandable Synthesizer Module and Audio Interface Using SonicCell with GarageBand 2008 Roland Corporation U.S. All rights reserved. No part of this publication may be reproduced
Flexible Functionality
 Complete and high-quality Music Studio for Apple ipad* (3rd generation), ipad 2 and ipad Connect your microphones, instruments and audio sources to virtually any audio/midi app Optional battery operation
mix 502, mix 802, mix 1202FX mixer user manual
 mix 502, mix 802, mix 1202FX mixer user manual Musikhaus Thomann Thomann GmbH Hans-Thomann-Straße 1 96138 Burgebrach Germany Telephone: +49 (0) 9546 9223-0 E-mail: info@thomann.de Internet: www.thomann.de
How To Record On Cubase The A to Z Guide
 musicproductiontips.net http://musicproductiontips.net/how-to-record-on-cubase/ How To Record On Cubase The A to Z Guide By Paschalis Recording on Cubase is easier than you think, so in this tutorial I
StudioLive MIXER INPUTS.
 StudioLive 24.4.2 Architect & Engineering Specifications 1. GENERAL CONFIGURATION. The mixer shall be a digital mixer and shall accommodate 24 line and/or 24 microphone signals, channels 1 24; and shall
Contents. Introduction to Saffire PRO 10 i/o Getting connected and setting up the hardware/software Front Panel Features...
 Contents Introduction to... 2 Getting connected and setting up the hardware/software... 3 Front Panel Features... 4 Rear Panel Features... 5 SaffireControl PRO software Features... 6 Recording analogue
HOOKING IT UP. Unpacking and Inspection. Installing in a Rack CHAPTER 3: Hooking It Up
 CHAPTER 3: HOOKING IT UP Unpacking and Inspection Your Studio 32 was packed carefully at the factory, and the container was designed to protect the unit during shipping. Please retain this container in
Studio D/E User s Guide
 Studio D/E User s Guide Studio D and E offer eight-channel surround playback as well as recording and playback from both Macintosh and Linux computers. The studios feature Yamaha DM-1000 mixers that allow
How To Mac. Setup your Macintosh computer: Go to APPLICATIONS > UTILITIES > AUDIO MIDI SETUP Set the AUDIO DEVICE as shown to use the mlan NETWORK
 How To Mac Setting up a Network with the Yamaha 01X, Motif XS and Mac computer mlan TOOLS for Macintosh version 1.2.0 (November 2008) Motif XS w/mlan16e2 - Operating System version 1.55.xx, IEEE1394 Firmware
Guitar Reamping Guide
 Guitar Reamping Guide Contents: Situations when reamping is helpful Why do I need a separate box for reamping? I have been ok without so far Here is what I use in my studio Basic Steps to Reamping Guitar
Contents. MIDI Test Additional Setup Latency On to Making Music... 41
 Teach Yourself CuBase Contents Introduction........................ 3 Chapter 1: Mac or PC?................ 4 QuickGuide: Cubase 5 s System Requirements for Mac.................. 5 QuickGuide: Cubase 5
Interfacing to the SoundStation VTX 1000 TM with Vortex Devices
 Interfacing to the SoundStation VTX 1000 TM with Vortex Devices Application Note Polycom Installed Voice Business Group September 2004 Rev. F TABLE OF CONTENTS TABLE OF CONTENTS... 2 INTRODUCTION... 6
User Guide Professional USB Recording Mic
 Minimum System Requirements Works with USB compliant computers - Microsoft Windows OS 7, 8, 10 or higher - Apple Macintosh OSX 10.4.11 or higher For additional information and support contact: cyberacoustics.com
NALA ATSI SOUND ENGINEERING SCHOOL
 NALA ATSI SOUND ENGINEERING SCHOOL PART 1: THE BASICS A) EQUIPMENT/GEAR: What do you need to record? B) IMPORTANT TERMS: What is the difference between Stereo and Mono? What is EQing? What is compression?
Contents. Saffire PRO 10 i/o. User Guide. Changes to Version 1. Additional Info. Hardware Monitoring Digital Output Monitoring...
 Contents Hardware Monitoring... 2 Digital Output Monitoring... 3 Digital Inputs and Sync Source Selection... 3 Changes to Version 1 Using Multiple Units on a PC... 3 Additional Info Setting up Multiple
Session KeyStudio. Quick Start Guide
 Session KeyStudio Quick Start Guide Session KeyStudio Quick Start Guide Introduction. 1 Session KeyStudio Features. 1 KeyStudio Keyboard:. 1 Micro USB Audio Interface (PC only). 1 Session Software (PC
Using an ASIO Audio Interface and Digital Audio Workstation Software with openhpsdr Revision 3 14 Jun 2015 WU2O
 Using an ASIO Audio Interface and Digital Audio Workstation Software with openhpsdr Revision 3 14 Jun 2015 WU2O Introduction Many people are using relatively low cost, professional audio interfaces such
Click on the numbered steps below to learn how to record and save audio using Audacity.
 Recording and Saving Audio with Audacity Items: 6 Steps (Including Introduction) Introduction: Before You Start Make sure you've downloaded and installed Audacity on your computer before starting on your
picotalk OPERATING MANUAL V1.2 (May 26, 2010) 6 Oakside Court Barrie, Ontario L4N 5V5 Tel: Fax:
 6 Oakside Court Barrie, Ontario L4N 5V5 Tel: Fax:") picotalk OPERATING MANUAL V1.2 (May 26, 2010) 6 Oakside Court Barrie, Ontario L4N 5V5 Tel: 905-803-9274 Fax: 647-439-1470 www.frightideas.com Getting Familiar with your picotalk Mouth Servo Output AUX
picotalk OPERATING MANUAL V1.2 (May 26, 2010) 6 Oakside Court Barrie, Ontario L4N 5V5 Tel: 905-803-9274 Fax: 647-439-1470 www.frightideas.com Getting Familiar with your picotalk Mouth Servo Output AUX
Quantum-series Ultra-low latency Thunderbolt Audio Interfaces and Studio Command Centers
 Ultra-low latency Thunderbolt Audio Interfaces and Studio Command Centers www.presonus.com English Table of Contents 1 Overview 1 1.1 Introduction 1 1.2 Interface Hardware Features 1 1.3 UC Surface Features
USB.007 Studio Quality USB Stereo Condenser Mic. User Manual
 USB.007 Studio Quality USB Stereo Condenser Mic User Manual Congratulations on your purchase of the MXL USB.007 which uses two gold diaphragm capsules in an X/Y pattern for stereo recording. MXL microphones
AUDACITY TABLE OF CONTENTS
 Audacity Tutorial AUDACITY Audacity is a free, easy-to-use and multilingual audio editor and recorder for Windows, Mac OS X, GNU/Linux and other operating systems. You can use Audacity to record live audio,