Cabinet is 90% assembled, all you need to do is to attach the legs, lay the glass top on the cabinet, connect the faucet, drains & ptrap.
|
|
|
- Jane Wiggins
- 5 years ago
- Views:
Transcription

1 Things you might need for the installation: vessel sink, plumber's putty(home depot), liquid nails(home depot), Bucket silicone caulk(home depot), Putty knife Plumber's putty Pipe wrench Channel-lock pliers Teflon tape Cabinet is 90% assembled, all you need to do is to attach the legs, lay the glass top on the cabinet, connect the faucet, drains & ptrap. The legs need to be drilled, & attached to the bottom of the cabinet. Pilot hole instruction: Learning how to drill pilot holes properly is an essential part of working with wood. A pilot hole is a small hole drilled before driving a screw into a piece of wood. The hole helps in multiple ways: it prevents the screw from splitting the wood; it allows for easier installation in dense hardwoods; and, it ensures that the screw will be installed straight, because it will follow the path of the pilot hole. Before attempting a woodworking project of any magnitude, you should learn how to make a pilot hole. Steps
, tracing along the ruler with a pencil.")
2 1 Mark the location of your intended hole with a pencil.if it is crucial that the screw is installed in a precise location, you may want to mark the spot with a pencil on the material. Use a ruler to determine your intended location (usually by measuring the distance from the edge of the material's surface), tracing along the ruler with a pencil. At the desired distance along the line you drew, make a small mark with the pencil.

3 2 Create an indentation using a center punch.a punch is a small, slender tool with a pointed end that allows you to create a small indentation in the work surface. This indentation will help keep your drill bit from slipping when starting the pilot hole. Position the tip of the punch over your pencil mark, and then strike the punch gently with a hammer.

4 3 Determine the appropriate size bit for drilling your pilot hole.as a general rule of thumb, your pilot hole should be slightly smaller than the diameter of your screw. This will remove as much material as possible, which will reduce the likelihood of splitting, but will still leave enough material for the screw's threads to grip into. o Exact recommendations for pilot hole diameters based on screw sizes can be looked up online. However, a visual check of your drill bit against the screw will suffice for most applications. It is best to err on the smaller side when choosing a bit; a pilot hole can always be made bigger, but not smaller.

5 4 Drill the pilot hole.after choosing a bit and fitting it into your drill, position the tip of the bit into the indentation you created with the center punch. Holding the bit at the angle you want the screw positioned, drill the hole to a depth equal to the screw's length. Back the bit out carefully.

6 5 Install the screw.once the pilot hole is drilled, you can install the screw. Fit your drill with a screwdriver bit and position the screw's tip into the pilot hole. Drive the screw in, being careful to angle it to follow the path of the hole. Repeat this process for each screw used.
7 CABINET MOUNTING INSTRUCTION Cut newspapers. Cut newspapers to match the size of the cabinet. Place the newspaper on the wall with masking tape to determine the best placement for your cabinet. You may need to tape several pieces of newspaper together if your cabinet is large. Mark the area. Use a pencil and a yardstick to draw a line marking where the bottom edge of the cabinet should be placed on the wall. If the wall cabinet will be installed over a base cabinet, be sure that the wall cabinet placement lines up perfectly with the base cabinet. Find the studs. Locate the studs in your bathroom wall with a stud finder. Mark the location of the studs with pencil on the wall and the cabinet. Take off the doors. If possible, remove the doors to make it easier to hang the bathroom cabinet. Removing the doors also prevents them from being damaged by a drill or other tools. Make pilot holes. Make pilot holes in the back of the cabinet with a drill. The pilot holes should be slightly smaller than the circumference of the wood screws you will be using to attach the cabinet. Place holes near the corners in the back wall of the cabinet; these holes should correspond with the location of a stud. Cabinets often contain strips of wood near the top and bottom that should be used to hang the cabinets. Make sure that you drill holes through these pieces of wood. Apply screws. Drive two-inch or three-inch wood screws through the pilot holes into the studs. The size of screws you use will depend on the thickness of wood used in the cabinet. Check the position of the cabinet with a level before you finish tightening the screws. Put the doors back. Replace the cabinet doors after the bathroom cabinet is securely attached to the wall. Remove the supporting piece of wood from the bottom of the cabinet. Screw holes can be filled in with wood putty and painted to match the wall. How do i mount the cabinet to the wall?

8 A good cabinet installation starts with a good layout. Measure from the highest point in the floor and draw a level line marking the top of the base cabinets. Measure up 19-1/2 in. from that line and draw another line for the bottom of the upper cabinets. Label the location of the cabinets and appliances on the wall. Draw a vertical line to line up the edge of the first cabinet to be installed. Finally, mark the stud locations.


9 Shim Large Bows Most of the time you can shim the cabinets as you go, but if there's an extreme bow in the wall (more than 3/8 in.), shim it out before you hang the cabinet. If you don't, you may accidentally pull the back off the cabinet while fastening it into place. Hold a level across the wall, and slide a shim up from the bottom (go in from the top when you're doing the top side) until it's snug. Then pin or tape it into place. It's easier to hang the uppers when you're not hanging way over the base cabinets. Rest the uppers on a ledger board it'll ensure a nice, straight alignment and eliminate the frustration of holding the cabinets in place while screwing them to the wall.
. Clamp the filler onto the cabinet flush with the inside of the vertical rail.")

10 Use a Block of Wood for Scribing Find the largest distance between the outside of the cabinet and the wall. Take that measurement and make a pencil mark on your filler strip (measure over right to left in this case). Clamp the filler onto the cabinet flush with the inside of the vertical rail. Measure over from the wall to your pencil mark, and make a scribing block that size. Use your block to trace a pencil line down the filler strip. Masking tape on the filler strip helps the pencil line show up better and protects the finish from the saw table. Many top cabinet makers prefer GRK's R4 self-countersinking screw. You'll pay accordingly, but why scrimp on screws when you're spending thousands of dollars on cabinets? Whatever you do, don't use drywall screws they'll just snap off and you'll end up with an extra hole. Please choose your screws accordingly, we dont know if you are installing over drywall, stone, tile, or glass panel; so you need to consult with your plumbers on what of screws to use on the walls.


11 Shim Fasten the Back, Then Line up the base cabinets with the level line on the wall. Fasten the back of the cabinets to that line. Once the backs of the cabinets are level, use shims to level the sides. Take your time on this step nobody likes to have eggs roll off a slanted countertop. If you are installing a free standing cabinet, then we recommend you Floor Use 2x2s to Secure Cabinets to the Cabinets that make up islands and peninsulas need to be secured to the floor. Join the island cabinets and set them in place. Trace an outline of the cabinets on the floor. Screw 2x2s to the floor 1/2 in. on the inside of the line to account for the thickness of the cabinets. Anchor the island cabinets to the 2x2s with screws. If needed, place flooring blocks under the 2x2s.

12 Raise the Cabinets for Flooring If the kitchen flooring is going to be hardwood or tile, and you're installing it after the cabinets, you'll have to raise the cabinets off the floor or the dishwasher won't fit under the countertop. Use blocks to represent the finished floor height, and add those distances to the guide line for the base cabinet tops. Hold the blocks back a bit from the front so the flooring can tuck underneath. Your flooring guys will love you for this. DRAINS INSTALLATION Step 1: Line Up the Drain Hole with the Cutout Line up the sink s drain hole with the cutout in the countertop. The homeowners in this project had the pros who supplied and installed the countertop handle the delicate job of cutting holes for the sink and faucet assembly Step 2: Apply Putty to the Underside


13 Roll out a bead of plumber's putty about 1/4" in diameter and place it around the underside of the drain. Step 3: Attach a Rubber Gasket On the underside of the counter, attach the rubber gasket, plastic washer and lock nut to the drain. Then, attach the drain stem. It is important that the hole for the drain through the top of the counter is not too large. It needs to be just big enough to allow the drain's pipe through. The thin metal ring and a retaining nut that screw onto the pipe from under the counter actually "clamp" the sink down. Apply a small bead of caulk to the bottom of the sink around the edge and carefully set it in place while keeping it centered over the hole. Wipe away any excess If your drain came with a rubber upper gasket you'll want to use it. Otherwise, apply plumber's putty to the underside edge of the upper retaining ring (that which makes contact with the

14 sink's inside surface where the drain penetrates through the bowl). Slip the lower fastening ring and nut onto the threaded end of the pipe. Hand-tighten and then use the pipe wrench to firmly secure the sink in place. Step 4: Dry-Fit the Pipes and Fittings Dry-fit the PVC pipe and fittings, including the P-trap, making cuts as needed.
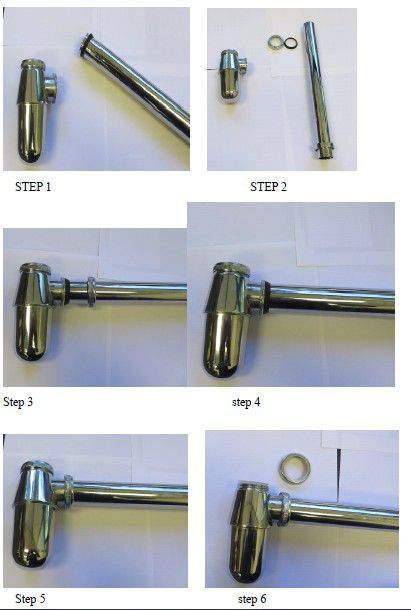
15

16 This is demo how the drain connected to your ptrap without the glass top & vessel sink. In real installation, you should put the drain the the surface of the glass top, bottom drain connecting the ptrap. Step 5: Apply Primer and Cement Apply PVC primer and PVC cement to the appropriate surfaces and assemble the drain, tying it into the roughed-in waste pipe. Make sure to hold each connection together for several moments so the chemical reaction of the primer and cement doesn't force the pieces apart. here are some videos how to change pop up drain on a similar vanity set, it will help you plumber to understand how the drain s tail piece connecting to the ptrap part
17 step1- Place the mounting ring. A mounting ring is only necessary if you're installing an above-counter vessel sink. Recessed vessel sinks are supported directly by the countertop. Place the ring directly over the drain hole in the countertop, applying adhesive or plumber's putty as directed by the instructions that came with your vessel sink. step2 Lower the sink vessel. Rest the sink either on the mounting ring or into the recessed hole in your countertop. Align the vessel drain hole facing directly step 3: Caulk the edges of the sink hole. From beneath the countertop, use silicone caulk to seal the seam between the vessel sink and the edges of the countertop hole. This will keep moisture from dripping down step 4. Separate the drain assembly. The drain assembly that came with your vessel sink may be completely assembled. Separate the drain body from the rest of the assembly. Since each vessel sink is different, check the manual that came with your sink to keep track of how the washers, nuts and O-rings fit on the assembly. You'll be reassembling it in Step 5. step 5. insert the drain body. Slide the drain body down into the sink's drain hole. If the vessel sink instructions require it, apply a bead of plumber's putty around the fitting and press it firmly into place. step 6 Reassemble the drain assembly. From underneath the vessel sink, reattach the rest of the washers and other assembly hardware to the drain body, protruding from the drain hole. Check the vessel sink instructions to be sure you assemble everything properly. Attach the P-trap. Depending on your vessel sink design, you may be using a custom P-trap and drain fittings. Otherwise, you can attach the drain assembly to the existing P-trap, hand-tightening the connections. Turn on the water. Release the stop valves for the hot and cold water and test the sink faucet.. To make the vessel sink stable & not moving, please apply a small bead of caulk to the bottom of the sink around the edge and carefully set it in place while keeping it centered over the hole. Wipe away any excess.
Waterlox It. Our guide will show you how to attach the vessel sink to the cabinet surface
 The cabinet is 90% assembled, the most important part of installation will be Vessel sink attachment Drain installation Faucet installation Our guide will show you how to attach the vessel sink to the
MALEKO WALL-MOUNT FAUCET INSTALLATION
 SKU(s): 934146 BEFORE YOU BEGIN We recommend consulting a professional if you are unfamiliar with installing bathroom fixtures and plumbing. Signature Hardware accepts no liability for any damage to the
WILLIS WALL-MOUNT FAUCET INSTALLATION
 SKU(s): 924620 BEFORE YOU BEGIN We recommend consulting a professional if you are unfamiliar with installing bathroom fixtures and plumbing. Signature Hardware accepts no liability for any damage to the
BALANTINE WALL-MOUNT FAUCET INSTALLATION
 SKU(s): 911574, 911575 BALANTINE WALL-MOUNT FAUCET INSTALLATION BEFORE YOU BEGIN We recommend consulting a professional if you are unfamiliar with installing bathroom fixtures and plumbing. Signature Hardware
ROTUNDA WALL-MOUNT FAUCET INSTALLATION
 SKU(s): 919045 BEFORE YOU BEGIN We recommend consulting a professional if you are unfamiliar with installing bathroom fixtures and plumbing. Signature Hardware accepts no liability for any damage to the
Installing your new Bevella Top. L Shaped Countertop with Joints No Finished Ends (Fits Between Four Walls)
") Installing your new Bevella Top L Shaped Countertop with Joints No Finished Ends (Fits Between Four Walls) Bevella RTI Countertops are engineered and manufactured to the highest quality standards, built
Installing your new Bevella Top L Shaped Countertop with Joints No Finished Ends (Fits Between Four Walls) Bevella RTI Countertops are engineered and manufactured to the highest quality standards, built
KITCHEN INSTALLATION GUIDE
 KITCHEN INSTALLATION GUIDE The step-by-step guide to installing your new kitchen right The materials and tools you ll need This brochure is your guide to preparing and installing your new kitchen. Inside
KITCHEN INSTALLATION GUIDE
 KITCHEN INSTALLATION GUIDE The step-by-step guide to installing your new kitchen right This brochure is your guide to preparing and installing your new kitchen. Inside you ll find tips and ideas, clear
 www.wildmanconstruction.com Changing your toilet is an easy project that should take half a day or less. The most common toilet has a separate tank that mounts on top of the bowl. These instructions apply
Chapter 22 - Cabinets & Vanities
 Chapter 22 - Cabinets & Vanities Contents Chapter 22 - Cabinets & Vanities... 22-1 Timing & Prerequisites... 22-2 Cabinets... 22-3 Cabinet Layout... 22-3 Wall Cabinets... 22-4 Assemble the Wall Units...
Cabinetry Installation
 Cabinetry Installation Easy to follow step-by-step kitchen cabinet installation Hammer Pry bar Screwdriver Phillips Flathead Level TOOL AND MATERIAL LIST Tape measure Pencil Straight edge Drill 3/16" drill
Safety First! Review the Safety Checklist before performing tasks in this chapter.
 Chapter 17. Cabinets 17.1 LAYING OUT KITCHEN CABINET UPPER UNITS 17.2 INSTALLING KITCHEN CABINET SUPPORT STRIPS 17.3 INSTALLING KITCHEN CABINET UPPER UNITS 17.4 INSTALLING RANGE HOOD 17.5 INSTALLING KITCHEN
WILLIS WIDESPREAD FAUCET
 SKU(s): 924621 WILLIS WIDESPREAD FAUCET BEFORE YOU BEGIN We recommend consulting a professional if you are unfamiliar with installing plumbing fixtures. Signature Hardware accepts no liability for any
Traditional Undermount: S Method (Undermount):
:") TOOLS REQUIRED 15.1 TOOLS REQUIRED The installation of Corian shape product must be a precise and exacting process to ensure that a good fit is always created. Using the correct tools is essential. In
TOOLS REQUIRED 15.1 TOOLS REQUIRED The installation of Corian shape product must be a precise and exacting process to ensure that a good fit is always created. Using the correct tools is essential. In
CABINET INSTALLATION INSTRUCTIONS
 CABINET INSTALLATION INSTRUCTIONS Please read these instructions through completely before beginning the installation. Thank you for choosing Plato Personalized Custom Cabinetry for your home. Your Plato
" BASE CABINET
 INSTALLATION GUIDE INSTALLATION GUIDE Before You Begin Installing Your Kitchen Cabinets 1. Read through installation guide to understand all steps and gather tools needed. 2. Verify that all of the hardware,
Frameless Inline Door With Return QCI5263
 INSTALLATION INSTRUCTIONS Frameless Inline Door With Return QCI5263 WALL MOUNT HINGES FRAMELESS DOOR / PANEL / RETURN PANEL QCI5263 REV. 0 Page 1 Certified 06/17/2016 Parts List with wall mount hinges
Frameless Inline Door QCI5254
 INSTALLATION INSTRUCTIONS Frameless Inline Door QCI5254 FRAMELESS DOOR / PANEL QCI5254 REV. 0 Page 1 Cer fied 06/16/2016 Parts List with wall mount hinges *Quanes may vary QCI5254 REV. 0 Page 2 Cer fied
FRAMELESS DOOR / PANEL WITH WALL MOUNT HINGES QCI5274
 FRAMELESS DOOR / PANEL WITH WALL MOUNT HINGES QCI5274 QCI0274 QCI5274 REV. Rev. 1 0 Page Page 1 1 Date Certified: Certified 06/16/2016 10/01/10 Parts List with wall mount hinges ITEM NO. Part # DESCRIPTION
INSTALLATION GUIDE KITCHEN SINKS
 INSTALLATION GUIDE KITCHEN SINKS Tools and Materials Tape Measure Safety Glasses Saw Construction Adhsive Suitable Support Framing Material [3/4" (1.9 cm) Max Thickness] Screws Important Information IMPORTANT!
VICTORIAN WIDESPREAD FAUCET
 VICTORIAN WIDESPREAD FAUCET SKU(s): 900889, 900890, 900907, 903778, 918910, 918911 BEFORE YOU BEGIN We recommend consulting a professional if you are unfamiliar with installing plumbing fixtures. Signature
Safety First! Review the Safety Checklist before performing tasks in this chapter.
 Chapter 17. Cabinets 17.1 LAYING OUT KITCHEN CABINET UPPER UNITS 17.2 INSTALLING KITCHEN CABINET SUPPORT STRIPS 17.3 INSTALLING KITCHEN CABINET UPPER UNITS 17.4 INSTALLING RANGE HOOD 17.5 INSTALLING KITCHEN
Frameless Inline Door QCI5250
 INSTALLATION INSTRUCTIONS Frameless Inline Door QCI5250 FRAMELESS PANEL / DOOR / PANEL QCI0249 REV. 3 Page 1 Certified 10/12/12 Parts List with pivot hinges *Quantities may vary. QCI0249 REV. 3 Page 2
UNIT No FRAMELESS PIVOT SHOWER DOOR
 INSTALLATION INSTRUCTIONS UNIT No. 3600 FRAMELESS PIVOT SHOWER DOOR NEED INSTALLATION HELP? Call 1-800-45-BASCO (452-2726) Monday - Friday 8:00 A.M. - 4:30 P.M. Eastern Time QCI0020 Rev. 3 Page 1 of 8
IMPORTANT INSTALLATION GUIDE VALENCIA ANGLE CORNER SHOWER READ ALL INSTRUCTIONS CAREFULLY BEFORE STARTING THE INSTALLATION
 INSTALLATION GUIDE VALENCIA ANGLE CORNER SHOWER SEALANT REQUIRED TO COMPLETE THIS INSTALLATION: (Supplied) Sika Sikasil NG (Arctic White) To seal the WHITE shower door and returns to the shower tray. Usage:
PRODUCT: LOKI INSTALLATION INSTRUCTIONS. Product is covered by U.S. patents. For more information visit
 R INSTALLATION INSTRUCTIONS PRODUCT: LOKI CONFIGURATION: SINGLE DOOR MOUNT: GLASS MOUNT Product is covered by U.S. patents. For more information visit www.krownlab.com . TOOLS + MATERIALS REQUIRED TOOLS
Installation Guide. Pionite Decorative Surfaces One Pionite Road, Auburn, Maine PIONITE ( )
") Installation Guide A Subsidiary of Panolam Surface Systems SMPBRO00-012 6/14 Pionite decorative laminates are designed for finished interior surfaces which require high impact, wear and stain resistance
Installation Guide A Subsidiary of Panolam Surface Systems SMPBRO00-012 6/14 Pionite decorative laminates are designed for finished interior surfaces which require high impact, wear and stain resistance
A-935 RODA WALL MOUNT HINGES
 INSTALLATION INSTRUCTIONS A-935 RODA WALL MOUNT HINGES NEED INSTALLATION HELP? Call 1-800-45-BASCO (452-2726) Monday - Friday 8:00 A.M. - 4:30 P.M. Eastern Time FRAMELESS DOOR / PANEL CELESTA QCI0274 REV.
Frameless Heavy Glass Door with Header
 INSTALLATION INSTRUCTIONS Frameless Heavy Glass Door with Header QCI5243 QCI5243 REV. 0 Page 1 Certified 06/16/16 Frameless Heavy Glass Door with Pivot Hinges ITEM NUMBER DESCRIPTION QUANTITY 1 DOOR GLASS
Double Frameless Swing Door QCI5247
 INSTALLATION INSTRUCTIONS Double Frameless Swing Door QCI5247 WALL MOUNT HINGES QCI5247 REV. 0 Page 1 Certified 06/16/2016 Parts List with wall mount hinges *Quantities may vary **Quantities double where
Frameless Inline Door QCI5248
 INSTALLATION INSTRUCTIONS Frameless Inline Door QCI5248 FRAMELESS PANEL / DOOR / PANEL QCI5248 REV. 0 Page 1 Certified 06/16/2016 Parts List with glass to glass hinges *Quantities may vary. **Support Bar
Frameless Heavy Glass Door with Wall Mount Hinges
 INSTALLATION INSTRUCTIONS Frameless Heavy Glass Door with Wall Mount Hinges QCI-5245 QCI5245 REV. 0 Page 1 Certified 06/16/16 Frameless Door with Wall Mount Hinges ITEM NUMBER DESCRIPTION QUANTITY 1 DOOR
FOLIO COUNTERTOP LAVATORY
 FOLIO COUNTERTOP LAVATORY 1. BEFORE YOU BEGIN HOW TO USE THESE INSTRUCTIONS Please read these instructions carefully to familiarize yourself with the required tools, materials, and installation sequences.
Frameless Door QCI5284
 Frameless Door QCI5284 F AB GLASS AND MIRROR www.fabglassandmirror.com Call: +1 888-474-2221 Fax: (614)-334-4919 Office Timing: 8:30-18:00 EST info@fabglassandmirror.com INSTALLATION INSTRUCTIONS Frameless
1. TOOLS + MATERIALS REQUIRED
 R INSTALLATION INSTRUCTIONS PRODUCT: BALDUR + ODEN CONFIGURATION: BI-PARTING DOOR MOUNT: TOP MOUNT Product is covered by U.S. patents. For more information visit www.krownlab.com. TOOLS + MATERIALS REQUIRED
Install Guide. view our Install video guide online
 view our Install video guide online CliqStudios.com LLC reserves the right to change, modify or discontinue policy, services and products at any time. All dimensions are nominal. Document only provided
INSTALLATION INSTRUCTIONS
 INSTALLATION INSTRUCTIONS BUILDERS CHOICE FRAMED Shower Height Swing Door Model: L533 Rev. 09.03.13 MAINTENANCE: Two primary materials are used to manufacture your new Aquatic enclosure; tempered glass
tile redi redi DOOR Redi Redi Swing Slide g TM TM...Opening Doors to Stunning Showers! TM TM SERIES: CONFIGURATION: MOUNTING PACKAGE:
 redi DOOR INSTALLATION INSTRUCTIONS tile redi Redi Redi Swing Slide g TM TM...Opening Doors to Stunning Showers! TM TM SERIES: CONFIGURATION: MOUNTING PACKAGE: 3000 Door-Door Header, sliding doors RDQCI5301
Frameless Bypass Slider
 INSTALLATION INSTRUCTIONS Frameless Bypass Slider QCI-5301 Heavy Glass Bypass Slider with Exposed Rollers QCI5301 Rev 0 Page 1 Certified 11/1/2016 Tools: To install your New Shower Enclosure, you may need
FRAMED CABINETRY INSTALLATION MANUAL
 FRAMED CABINETRY INSTALLATION MANUAL AN INDUSTRY GUIDE FOR PROFESSIONAL INSTALLATION RESULTS TO AVOID DAMAGE OR INJURY, READ IN ENTIRETY BEFORE STARTING MATERIAL & TOOL LIST FOR INSTALLATION Safety Glasses
TRUE TECHNICAL SERVICE MANUAL - ALL MODELS. DOORS/DRAWERS/LIDS
 DOORS/DRAWERS/LIDS 55 56 NOTES DOORS/DRAWERS/LIDS Swing s 73 74 NOTES INSTALLATION OF A GDM-SWING DOOR Phillips Head Screwdriver (2) - 1/8" Drift Punches (forged) Top Bracket NOTE: It may be necessary
Laminate Cabinet Installation Instructions
 Laminate Cabinet Installation Instructions www.easygaragestorage.com/installation How To Use These Instructions Thank you for your purchase! Please read each step of this manual thoroughly to ensure proper
Closet System Installation Manual
 Closet System Manual Thank you For choosing our Custom Closet Collection to fit all your needs Closets come fully assembled to make your project an enjoyable and satisfying experience. With quality Custom
Installation Instructions
 Installation Instructions Pedestal Lavatory Thank you for selecting VitrA. VitrA makes everything you could dream of for the bathroom and they all share one thing-the highest quality. PLEASE READ THE INSTRUCTIONS
INSTALLA- INSTALLATION. A guide to install a new IKEA kitchen
 A guide to install a new IKEA kitchen INSTALLA- INSTALLATION TION GUIDE GUIDE This guide provides you with tips and step-by-step instructions on how to install your kitchen on your own. Printed on: 06/2018
INSTALLATION INSTRUCTIONS 960 RODA GLASS TO GLASS HINGES ANGLED FRAMELESS PANEL / DOOR / PANEL CELESTA DRESDEN TRESOR
 INSTALLATION INSTRUCTIONS 960 RODA GLASS TO GLASS HINGES NEED INSTALLATION HELP? Call 1-800-45-BASCO (452-2726) Monday - Friday 8:00 A.M. - 4:30 P.M. Eastern Time ANGLED FRAMELESS PANEL / DOOR / PANEL
SHELTON THERMOSTATIC SHOWER PANEL
 SKU(s): 413241 BEFORE YOU BEGIN We recommend consulting a professional if you are unfamiliar with installing plumbing fixtures. Signature Hardware accepts no liability for any damage to the plumbing, floor,
The DeWils Guide to Designer Series Framed Cabinetry Installation
 The DeWils Guide to Designer Series Framed Cabinetry Installation www.dewils.com The first step in the cabinetry installation process is to prepare both yourself and the work areas for the new cabinets.
Frameless Fixed Panel Slider
 INSTALLATION INSTRUCTIONS Frameless Fixed Panel Slider QCI-5279 SINGLE ROLLER WITH ANTI-JUMP DOUBLE ROLLERS QCI5279 Rev Page Certified 08/09/6 Tools: To install your New Shower Enclosure, you may need
INSTALLATION INSTRUCTIONS
 INSTALLATION INSTRUCTIONS Cossu Wall Mount, Pedestal and Above Counter Lavatories Thank you for selecting DXV. To ensure this product is installed properly, please read these instructions carefully before
Two Panel Frameless Bypass Door
 INSTALLATION INSTRUCTIONS Two Frameless Bypass Door Series 00 Please Record Model Number From Carton Label Here Please read these instructions carefully to familiarize yourself with the required tools,
Synthesis TM Casework Collection Installation
 Synthesis TM Casework Collection Installation Note: Use the table of contents to find the install instruction for various units in the configuration. Applies to Models: Midmark 3 Casework Special Tools:
Vir Stil Console Lavatory INSTALLATION INSTRUCTIONS
 THANK YOU FOR CHOOSING KALLISTA We appreciate your commitment to Kallista quality products. Please take a moment to review this manual before you install your Kallista product. If you encounter any installation
INSTALLATION INSTRUCTIONS 935 RODA GLASS TO GLASS HINGES FRAMELESS DOOR / PANEL CELESTA DRESDEN GEOLUX TRESOR VONSE
 INSTALLATION INSTRUCTIONS 935 RODA GLASS TO GLASS HINGES NEED INSTALLATION HELP? Call 1-800-45-BASCO (452-2726) Monday - Friday 8:00 A.M. - 4:30 P.M. Eastern Time FRAMELESS DOOR / PANEL CELESTA DRESDEN
P a r k c o n s o l e s i n k a s s e m b l y i n s t r u c t i o n s
 P a r k c o n s o l e s i n k a s s e m b l y i n s t r u c t i o n s Before You Begin: Professional installation by two-person crew is required for this fixture. Install water supply and drain piping
CAELI THERMOSTATIC SHOWER PANEL
 SKU(s): 300280 CAELI THERMOSTATIC SHOWER PANEL BEFORE YOU BEGIN We recommend consulting a professional if you are unfamiliar with installing plumbing fixtures. Signature Hardware accepts no liability for
Balustrade Systems / Installation Instructions
 A. PARTS AND SUPPLIES NEEDED FOR INSTALLATION Hardware included for each 10 section of rail: 2 3 x 1-1/2 L-brackets 4 1-3/4 x 3/16 Blue hex-head screws for anchoring the L-brackets to the newel cap, column
How-to-Install. Laminate Countertops and Sheet Laminate. FREE brochure Reverso en español
 FREE brochure Reverso en español How-to-Install Laminate Countertops and Easy to install instructions provided inside Multiple colors available for unique design options Durable and easy to care for Accessory
Frameless Bypass Slider
 INSTALLATION INSTRUCTIONS Frameless Bypass Slider QCI-5301 3/8 or 1/4 Glass Bypass Slider with Exposed Rollers QCI5301 Rev 1 Page 1 Certified 6/5/2017 Tools: To install your New Shower Enclosure, you may
CABINETRY INSTALLATION
 CABINETRY INTALLATION INTALLATION EQUIPMENT #8 x 2 1 2 screws #8 x 2 1 2 washer head screws Variable speed drill, electric or cordless Extension cord Countersink drill bit Drill bits, 3/16 and 1/4 Assorted
Required Tools: Suggested Additional Tools: 1 Cordless Drill with Robertson Bits 1 Ratchet Wrench 1 7/16 or 11mm socket 1 7/16 or 11mm Gear Wrench
 Thank you for your recent purchase of a Cabinets by Hayley garage cabinet system. You are about to experience the best made cabinets that you can purchase. Cabinets by Hayley are designed for beauty and
FIXED SHOWER SCREEN For Wall Mount Hinges QCI5283
 FIXED SHOWER SCREEN For Wall Mount Hinges QCI5283 QCI5283 Page 1 Date Certified: 06/16/2016 Parts List with wall mount clamp ITEM NO. DESCRIPTION QTY. 1 FIXED GLASS PANEL 1 2 WALL MOUNT CLAMP 1 3 U-CHANNEL
Triplex Instructions for Packing and Unpacking
 2-8-8-2 Triplex Instructions for Packing and Unpacking It is recommended that you review all these instructions before removing the engine or tender from the poly foam container. www.mthtrains.com Table
PRIME SHOWER ENCLOSURE INSTALLATION INSTRUCTIONS
 PRIME SHOWER ENCLOSURE INSTALLATION INSTRUCTIONS IMPORTANT DreamLine reserves the right to alter, modify or redesign products at any time without prior notice. For the latest up-to-date technical drawings,
Preference Collection and Treatment Console INSTALLATION GUIDE
 Preference Collection 5580.69 and 5580.96 Treatment Console INSTALLATION GUIDE WARNING Failure to install the 5580 as described in this installation guide may cause the unit to collapse, resulting in serious
Installation Instructions 8115F 8115SF
 TM Installation Instructions 85F 85SF Single Control Centerset Lavatory Faucet with Speed Connect Drain Congratulations on purchasing your American Standard faucet with the Speed Connect Drain, a feature
Door Knocker Installation By Bill Shayler
 Door Knocker Installation By Bill Shayler Contents Door Knocker Installation. 3 What Is Needed.. 3 Common Installation Methods.. 3 Where to Install... 4 Surface Mount... 5 Through The Door Mount.. 7 YDK
Dura-Lock Roof System
 DLR-14 Dura-Lock Roof System Assembly and Installation Instructions Read the instructions before starting the job. They explain the steps required to produce a finished product that will meet factory specifications.
Plans. Easy-to-Build Full-size Deluxe Murphy Bed Plan. For more plans, tools and hardware visit rockler.com
 Easy-to-Build Full-size Deluxe Murphy Bed Plan Build a full-size Deluxe Murphy Bed complete with decorative molding and matching side cabinets! Plans For more plans, tools and hardware visit rockler.com
PRODUCT: BALDUR + ODEN
 R INSTALLATION INSTRUCTIONS PRODUCT: BALDUR + ODEN CONFIGURATION: SINGLE DOOR MOUNT: GLASS MOUNT Product is covered by U.S. patents. For more information visit www.krownlab.com . TOOLS + MATERIALS REQUIRED
INSTALL INSTRUCTIONS WELCOME TO THE NEWAGE PERFORMANCE CABINETRY SERIES NEWAGE STEEL WELDED CABINETRY
 NEWAGE STEEL WELDED CABINETRY WELCOME TO THE NEWAGE PERFORMANCE CABINETRY SERIES ALL CABINETS MUST BE MOUNTED TO STUDS ON A SECURE WALL, AS PER THESE INSTRUCTIONS. FAILURE TO DO SO MAY RESULT IN SERIOUS
C-Series & S-Series Classic Frame with Transom (Single or Pair)
") 1. TOOLS REQUIRED Tape measure 6' magnetic level 3' magnetic level Safety Glasses Screw gun #2 Screwdriver tip #3 Screwdriver tip Philips Head screwdriver (Used to move frame on wall using oval slots on
1. TOOLS REQUIRED Tape measure 6' magnetic level 3' magnetic level Safety Glasses Screw gun #2 Screwdriver tip #3 Screwdriver tip Philips Head screwdriver (Used to move frame on wall using oval slots on
FIXED PANEL SLIDER QCI5241
 INSTALLATION INSTRUCTIONS FIXED PANEL SLIDER QCI5241 FRAMELESS PANEL / DOOR / PANEL FRAMELESS DOOR / PANEL QCI5241 REV. 0 Page 1 Certified 06/16/2016 Parts List *Quantities may vary QCI5241 REV. 0 Page
1/4 FRAMELESS DOOR WITH INLINE PANEL 1413A-1713A-1813A
 1/4 FRAMELESS DOOR WITH INLINE PANEL 1413A-1713A-1813A F AB GLASS AND MIRROR www.fabglassandmirror.com Call: +1 888-474-2221 Fax: (614)-334-4919 Office Timing: 8:30-18:00 EST info@fabglassandmirror.com
Tuxedo Console Table INSTALLATION INSTRUCTIONS P73037, P73038, P _2_B Page 1 of 5
 P73037, P73038, P73039 Page 1 of 5 THANK YOU FOR CHOOSING KALLISTA We appreciate your commitment to Kallista quality products. Please take a moment to review this manual before you install your Kallista
Privacy Wall Glass Selections - Polished Edge Slider Door
 Privacy Wall Glass Selections - Polished Edge Slider Door 3/6" HEX BIT PUTTY KNIFE #2 ACR BIT SUCTION CUP HOLDERS DOOR LEAF: Satin Tempered Clear Tempered LOCTITE 425 SIDE LIGHT ETCHED GLASS STYLES: Satin
Product must be installed as shown using the screws and brackets provided. Use of incorrect hardware could result in damage to the product.
 General Notes These installation instructions are intended to be comprehensive for a typical Keyeira/Presto configuration. Your configuration may differ. If you have questions contact Geiger Customer Service
Step by Step Installation Instructions. Poly Shutters. Customer Service or visit us online at smithandnoble.com
 Step by Step Installation Instructions Poly Shutters Customer Service 800.248.8888 or visit us online at smithandnoble.com Thank you for purchasing from smith+noble. Your new window treatments have been
DURASTALL SHOWER STALL ASSEMBLY INSTALLATION REPAIR PARTS FOR ONE OF THE FOLLOWING MODELS:
 DURASTALL SHOWER STALL ASSEMBLY INSTALLATION REPAIR PARTS FOR ONE OF THE FOLLOWING : MODEL: 80 (32 ) 140 (36 ) Cabinet (rigid corners) with Standard Base complete with Curtain and Valve assembly. MODEL:
Chapter 14. Wall Sheetrock
 Chapter 14. Wall Sheetrock 14.1 PREPARATION 14.2 PLANNING 14.3 GENERAL INSTALLATION RULES 14.4 INSTALLING WALL SHEETROCK 14.5 FINISHING AND CLEANUP Tools needed by volunteers: Nail apron Tape measure Utility
Jeep Cherokee Door XJ Set Part # Revision J
 Jeep Cherokee 84-96 4 Door XJ Set Part # 10911 Revision J 6-5-06 Step 1: Prior to Installation: A) Fit: Verify the fit of the flares to vehicle. (Some filing, sanding, or cutting may be necessary to ensure
Model 6100 Illustrated Installation Instructions Contractors Wardrobe
 Model 6100 Illustrated Installation Instructions Contractors Wardrobe DESIGNERS MANUFACTURERS 26121 Avenue Hall Valencia, CA 91355 (661) 257-17 Fax: (661) 257-4907 Toll Free: (800) CW-DOORS (800) 293-6677
3/16 OR 1/4 FRAMELESS SWING DOOR WITH SINGLE INLINE PANEL OR TWO INLINE PANELS
 / OR / FRAMELESS SWING DOOR WITH SINGLE INLINE OR TWO INLINE S This instruction sheet applies to the following units with a magnetic handle. C7, C7, C79 This instruction sheet also applies to the following
Treviso POCKET BILLIARD TABLE INSTALLATION MANUAL. SERVICE DEPARTMENT P.O. BOX 68 BRISTOL, WI 53104
 Treviso TM POCKET BILLIARD TABLE INSTALLATION MANUAL www.brunswickbilliards.com SERVICE DEPARTMENT P.O. BOX 68 BRISTOL, WI 53104 51-905881-000 NOVEMBER 2008 NOTE: Please use the instructions in this manual
INSTALLATION INSTRUCTIONS
 INSTALLATION INSTRUCTIONS TOOLS REQUIRED Rechargeable, variable speed drill 3/8 diameter drill bit 3 Robertson bits #0, #1 and #2 Slot screwdriver Non marring hammer with 1 head Level Caulk or sealant
INSTALLATION AND CARE INSTRUCTIONS
 INSTALLATION AND CARE INSTRUCTIONS Vertical Applications Honeycomb Shades 52 C8-10-3401 Rev 2/14 CONTENTS Introduction...2 Before You Begin...3 Vertical Application Parts Overview...4 Materials Required...5
Cook's Corner Kitchen Assembly Instructions
 Assembly Instructions 00 Melissa & Doug, LLC All rights reserved 0 We care about your comments Please call us! -800-84-948 www.melissaanddoug.com PARTS D A E I ( pieces) Q N B F J R ( pieces) S ( pieces)
Installation And Care Instructions. Vertical Honeycomb Shades
 Installation And Care Instructions Vertical Honeycomb Shades Rev 5/2013 Table Of Contents Getting Started... 3 Parts Overview... 4 Materials Required... 5 Tools Required... 6 Outside Mount Installation...
4-lite Patio Door. Installation Instructions
 4-lite Patio Door Installation Instructions IMPORTANT: Read the instructions and familiarize yourself with the door parts and pieces before beginning assembly and installation. Note: Only the 5-0 x 6-8
Installation Instruction
 Tools Needed for Assembly Stud finder (for wood stud wall) Pencil Mark Electric drill Wood Stud Wall Installation Step 1. Locate the Wood Studs Installation Instruction Drill bit (for wood stud wall) Masonry
Step by Step Installation Instructions. Poly Shutters. Customer Service or visit us online at smithandnoble.com
 Step by Step Installation Instructions Poly Shutters Customer Service 800.248.8888 or visit us online at smithandnoble.com THANK YOU for purchasing from smith+noble. Your new window treatments have been
INSTALLATION INSTRUCTIONS
 INSTALLATION INSTRUCTIONS HIGH PRESSUE LAMINATE (HPL) TOILET PARTITIONS 1030 TrimLineSeries 1040 DesignerSeries Includes continuous hardware option.65. IMPORTANT: Storage and Handling Information on last
Steel Solutions USA 602 E. Walnut Street Watseka, IL p: (888) f: (815)
 f: (815)") Steel Solutions USA 602 E. Walnut Street Watseka, IL 60970 p: (888) 875-5004 f: (815) 432-3364 sales@steelsolutionsusa.com Published February 2011 2011 Steel Solutions USA. All rights reserved. version
Steel Solutions USA 602 E. Walnut Street Watseka, IL 60970 p: (888) 875-5004 f: (815) 432-3364 sales@steelsolutionsusa.com Published February 2011 2011 Steel Solutions USA. All rights reserved. version
Model 5400H / 7000H Illustrated Installation Instructions
 Model 5400H / 7000H Illustrated Installation Instructions Contractors Wardrobe DESIGNERS MANUFACTURERS 261 Avenue Hall Valencia, CA 91355 (661) 257-1177 (661) 257-4907 TOLL FREE: (800) CW-DOORS (800) 293-6677
woodworkersjournal.com MATERIAL LIST
 MATERIAL LIST T x W x L 1 Legs (2) 1 1 2" x 3 1 2" x 36 7 16" 2 End Uprights (2) 1 1 2" x 3 1 2" x 32 1 2" 3 Stringers (4) 1 1 2" x 3 1 2" x 42" 4 Top Cladding, Long (2) 3/4" x 7 1 4" x 65 3 4" 5 Side
MISCELLANEOUS CABINET REPAIRS
 MISCELLANEOUS CABINET REPAIRS 167 168 NOTES MISCELLANEOUS CABINET REPAIRS Cabinet Panel Repairs 175 SIDE PANEL REPLACEMENT - GDM SERIES INSTALLATION INSTRUCTIONS Tools Required 1/8" drill Rivet Tool Silicone
Pressure Balance Shower Only Dual Control (Volume & Temperature) Ceramic Disc Cartridge Platinum Shower Trim Kit
 Ceramic Disc Cartridge Platinum Shower Trim Kit") Shower Only PL8900-00 & TR-SH Pressure Balance Shower Only Dual Control (Volume & Temperature) Ceramic Disc Cartridge Platinum Shower Trim Kit - Installation Instructions Before Your Installation Read
Shower Only PL8900-00 & TR-SH Pressure Balance Shower Only Dual Control (Volume & Temperature) Ceramic Disc Cartridge Platinum Shower Trim Kit - Installation Instructions Before Your Installation Read
Salter Industries Spiral Stair
 Salter Industries Spiral Stair The Leader in Spiral Staircases Continuous Sleeve Stair Installation Instructions TOOLS NEEDED: 1. Electric drill with hex chuck and Phillips bit 2. Drill bits 1/8", 1/4",
Mount to the Wall INSTALLATION MANUAL
 Mount to the Wall 15 Locate the Wooden Studs This step applies to wooden stud wall installation only. Determine and mark the exact locations of two stud centers on the wall. Wooden studs should be spaced
Vanity Installation Instructions
 Vanity Installation Instructions Segments of these instructions will relate to your vanity. Please read these instructions thoroughly and ensure the appropriate instructions are used during the installation