How to build a Javelin Skiff
|
|
|
- Clyde Conley
- 5 years ago
- Views:
Transcription

1

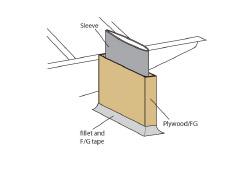
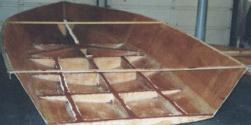
2 How to build a Javelin Skiff This is not your grandfather s plywood boat! The Javelin involves a high-tech type construction, called composite. The hull can be constructed with foam or plywood; these materials are used as a core sandwiched between two layers of fiberglass with epoxy resin. This type of construction is different than conventional boat building. But don t let this scare you. Many people have built the Javelin, and have never built a boat before. As long as you put enough determination and patience this will be rewarded with the final result, a high performance sailboat capable of speeds in excess of 20 knots. Weight is one of the most important factors, impacting on the boat performance. The goal is to build a light boat but also strong, to be capable of withstand high stress forces. This article describes the construction process using plywood. It is important to select the best materials for this project to get the best results. Materials The plywood used is Okoume marine plywood, and it complies to BS 1088 standard. There is another grade of plywood below Marine bonded, which complies to BS6566. That sometimes is also used, but care is needed in selecting the best sheets due to voids between the plies. The plywood thickness is 3mm with the exception of the false floor where it is recommended to use plywood at least 4mm thick, or if you prefer you may use 4mm through out. For this project you will need a total of eight (8) sheets of plywood. The fiberglass used is 4oz S, and biaxial fiberglass tape 4 wide for the joints. A better material to use would be carbon fiber tape, which is much stronger that fiberglass. The Mold The Javelin hull is built around a male mold. The first phase of the construction process is to build the mold. The mold is made with transversal formers erected on a building bench, accurately aligned, and braced to prevent movement. The stringers, or battens, are attached to the formers creating the hull shape. More stringers run over the outside of the formers better. The formers can be made of plywood at least 1 2 thick, or particle board at least 1 thick. The stringers can be 1/2 thick, and 15 long, cut from 2 x4 studs. *Very important* Before you transcribe the measurements into the formers, you have to take in consideration the thickness of the hull, plus the thickness of the stringers. For example, if you use 4mm plywood, plus 2mm for the thickness of the fiberglass, plus 126mm for the thickness of the stringers, you have to discount 132mm on both sides, and bottom of the former measurements. Notching the formers to accommodate the stringers it s not a good option, because you won t be able to re-adjust the stringers once they are in place. When transcribing the measurements to the formers, remember to add the height of the formers in relation to the reference plane. Always remember as a rule, measure twice cut once. After the formers have been traced, verify the measurements before cutting. Mark the formers F6 to F1/2, and mount them securely on the building bench. Make sure the forms are correctly placed according with the drawing. Then attach the stringers to the formers. Cover the stringers with brown packaging plastic tape, to prevent the panels to be glued to the stringers, specially in the areas where the panels join each other. After the mold is finished, verify the accuracy in your measurements, to assure that no mistakes were made. Remember the boat that you are building is as good as the mold you built. Attaching the panels to the mold. The second phase of the project is the construction of the hull shell. Place a sheet of plywood against the area, and mark the shape of the panel, leaving some excess to be trimmed after the panel is installed. The hull is made of joint panels of plywood, since a single sheet is not long enough for the entire length of the hull. The panel joints are made after the panels are attached to the mold. One process of attaching plywood panels to the mold is by drilling small holes, and using thin plastic coated electrical wire to tie the panels to the stringers, and in some locations you may have to use sheet-rock screws in order to bring the panel into the proper shape. Start by attaching the side panels. Once the side panels are attached, trim them to the proper dimensions. The building bench is constructed with two 2 x4 x16 studs, plus some additional wood for the cross-members and legs. The bench has to be sturdy and leveled. The bench height is very important to provide the best working conditions. One of the most challenging parts of the project is the bow area. The bottom panels for the bow require that you leave quite a bit of extra margin for adjustment, due to the twist that the panels are subjected to in this area. The plywood has to be forced into place in this area, and you may have to use C clamps, sheet-rock screws, to bring the plywood into the right shape. Bring the plywood slowly into shape, otherwise it will crack.2


3 One of the most challenging parts of the project is the bow area. The bottom panels for the bow require that you leave quite a bit of extra margin for adjustment, due to the twist that the panels are subjected to in this area. The plywood has to be forced into place in this area, and you may have to use C clamps, sheet-rock screws, to bring the plywood into the right shape. Bring the plywood slowly into shape, otherwise it will crack. To apply epoxy resin to large surfaces a foam roller provides good results, then on the final coat use a large plastic spatula. To clean epoxy resin use acetone, or alcohol, or other epoxycompatible water free solvents. Do not use other products that may contain contaminants, or leave oily residue The Joins Once all the panels are attached to the mold, it s time to make the joins. The joins require special attention to keep them to a minimum height, and at the same time they have to be strong. One misconception is to add more epoxy to make it stronger. This is far from the truth. By adding more epoxy, the weight increases and the joint becomes more susceptible to break. You should always remove the excess of epoxy. On the joins one should use biaxial tape. The fibers run at 45 degrees of each layer, providing better strength. Carbon tape is a better choice, but its cost is much higher. After applying the epoxy resin to the tape, you may cover it with kitchen wax paper to make the join smooth. Apply pressure using a flat surface object, to squeeze out the excess of resin. Leave the wax paper in place until the epoxy resin is cured. A few words about epoxy resin. Use only epoxy, other types of resin are not strong enough and they don t bond. Follow the manufacturer instructions to the letter. Use dispensers (pumps) for the epoxy/hardener mixture to be correct. The mixing proportions should be held as accurately as possible. Otherwise it will not cure properly and it will never provide the proper strength. If the epoxy and hardener stand for a long period of time (6 months or longer), stir or agitate each ingredient before use. Do not attempt to mix too much resin at a time. The best mixing containers are graduated and made of flexible polyethylene plastic. They are reusable, and the resin once cured will not stick to them. Make sure you stir the ingredients thoroughly, this is extremely important for the epoxy to cure properly. Avoid working in high humidity whenever possible; drastic changes in humidity can affect bonding strength. Ideal working temperatures range between 70oF and 85oF. However some manufacturers make special hardeners for lower temperatures. Surfaces must be clean and dry. These are two main factors affecting the success of the bonding. The picture below shows a great tool to apply epoxy resin in small surfaces, and hard to reach places. It can easily be done, by cutting a piece of a paint roller, and stapling it into a paint stick. After the resin is completely cured, remove any wax residue with acetone. When you need to apply layer of fiberglass on top of another, sand the layer underneath to provide better adhesion. Cut the fiberglass cloth of the size of each panel, over-lapping the joins slightly. Use a foam roller to apply the epoxy. Wet the surface with epoxy, then lay down the cloth, and make sure that there are no air pockets. Apply the epoxy resin in two coats, on the first coat the cloth threads are still visible after the resin is cured. Within a short time of the first coat being cured, apply the second coat. If you wait too long between coats you need to clean the entire surface with acetone, before applying the second coat. In general, epoxy resin is not self-leveling, due to its viscosity, so don t attempt to do this with a single coat of resin. This may cause an irregular surface with runs, and the use of excessive amounts of resin. At the end you will have a tremendous amount of work sanding it down. The second coat is applied with a plastic spatula. This requires a bit of practice, but once you acquire the skill you ll be able to spread the epoxy creating a smooth surface. Once again, don t use more epoxy than what you have to.
4


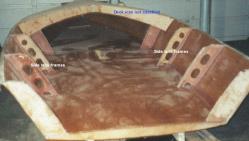
5 Once the hull outer shell has been fiber-glassed, it s time to remove the hull from the mold. You may use the building bench with the formers removed, to place the hull up righted. Place two stringers across the hull, side to side, for the hull to keep the right shape. The next step is to make the inside joins, using the same process used for the outside. For the inside joins, carbon tape is the ideal material to be used for its strength. Remember to place fiberglass at the bow. After the joins are done, fiberglass the inside of the hull. The frames The frames provide not only support for the false floor, but structural strength to the boat. Refer to the drawing on page 4 for the location of the frames. Note that the location different than the location of the formers. Mark each frame location on the inside of the hull, then place a string across and make several depth measurements, every 200mm, and note on a paper. Subtract 4mm from the depth, to compensate for the plywood strip to be placed on top. Then transfer the measurements to the plywood, and draw the line for the bottom of the frame, by connecting all the points with a flexible ruler or batten. The picture below shows the area near the center board box. The frames are fiber-glassed on both sides, and are T-shape. A strip of plywood, one inch wide, is fiber-glassed on top of the frame, to allow the false floor to have enough surface to attach to the frames. It s easier if all the frames are fiber-glassed outside. The stern frame should be doubled with two pieces of 4mm plywood. An additional block of hard-wood can be fiberglassed on the inside to provide a place to attach the rudder hardware.
6

7


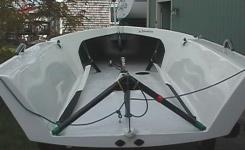
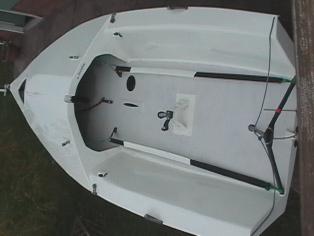
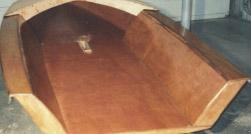
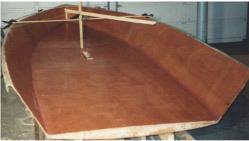
8 Pictures of the boat finished
Building Instructions ARTEMIS Sailing Canoe Day Six Version 1.0 Brian Pearson & Dr. Axel Schmid Day Six. Align and Glue Planks
 Version 1.0 Brian Pearson & Dr. Axel Schmid 2016 Align and Glue Planks Steps: Align boat, check dimensions Join planks provisionally Pull wires Glue the outside planks Tools and Materials: Epoxy putty
Repairing Sheet-Molded Compound (SMC) With Epoxy
 With Epoxy") Repairing Sheet-Molded Compound (SMC) With Epoxy 1. Properties: A. It does not dent. B. It does not rust C. Panels are formed using a flat sheet or compound that is heat molded in a press. 2. Preparation
Repairing Sheet-Molded Compound (SMC) With Epoxy 1. Properties: A. It does not dent. B. It does not rust C. Panels are formed using a flat sheet or compound that is heat molded in a press. 2. Preparation
Above are the offsets for the plywood panels.
 DinkyDink Plans Bottom Panel Half Station X Y X2 Y2 1 1/4 3/4 0 11 5/16 2 4 9/16 4 12 9/16 3 11 11/16 1/4 11 7/16 14 1/2 4 18 5/8 1/16 18 5/8 15 11/16 5 25 3/4 0 25 3/4 16 5/16 6 32 13/16 0 32 13/16 16
Making your Rudder Cassette
 Making your Rudder Cassette A list of the stuff you ll need The row of materials below is laid out in the order of application. The foam blank shown on the right is available from Bob at www.flyingfoam.com
Bateau.com PH18 CNC kit notes 1/5
 Bateau.com PH18 CNC kit notes 1/5 These building notes must be used in conjunction with the standard building notes included in the plans package for this boat. The PH18 kit is assembled as described in
Chapter # 002 : Creating Threaded Metal Anchoring Points in Fiberglass Foam Structures
 Chapter # 002 : Creating Threaded Metal Anchoring Points in Fiberglass Foam Structures The following is a method of creating permanent, threaded, metal anchor point in a foam & fiberglass structure. The
Jabiru Aircraft. Fit Ailerons
 Fit Ailerons Reference: Drawings 2033091 and 20210K1 Photos Parts Required: 2021091 Wing LS 202209N Wing RS 2027092 Aileron LS 202809N Aileron RS 2036034 Aileron reinforcement Left 203703N Aileron Reinforcement
Building a Scarab 350 Trimaran
 This boat was designed to be built using flat panels. In either foam laminated panels or plywood. 1. The build time is less. Panels are lofted, cut out and joined on the frame. 2. Frame can be simpler.
07 - Landing Gear. Landing Gear. February EGF Page 7-1
 Landing Gear February 2003 07-EGF Page 7-1 This Page Intentionally Left Blank Page 7-2 07-EGF February 2003 Contents 7.0 - Chapter Preface...7-4 7.0.1 - Parts List...7-4 7.0.2 - Tools List...7-4 7.0.3
10. Wing prep and subassembly
 Date Section Objective: Construct and fabricate the sub-assemblies of the wing panel. Required Parts: Wing left 11gal PN104-300, Wing right 1gal PN104-400, Wing left 15 gal option PN104-322, Wing right
REVISION LIST CHAPTER 25: AFT WINDOWS. The following list of revisions will allow you to update the Legacy construction manual chapter listed above.
 REVISION LIST CHAPTER 25: The following list of revisions will allow you to update the Legacy construction manual chapter listed above. Under the Action column, R&R directs you to remove and replace the
MAGNUM BOARD INTERIOR INSTALLATION GUIDELINES
 TECHNICAL BULLETIN No.: 090509-1405 Subject: Issue Date: September 4, 2009 Issue No.: II MAGNUM BOARD INTERIOR INSTALLATION GUIDELINES 1. CUTTING MAGNUM BOARD You can easily cut Magnum Board with carbide
Pre-Paint>Fuselage>Empennage>Fit elevator. Objectives of this task: Materials required: Prepare the horizontal stabiliser and the elevator
 Pre-Paint>Fuselage>Empennage>Fit elevator Objectives of this task: To fit the elevator to the horizontal stabiliser, to fit the trim tabs to the elevator and the end caps to the elevator and the horizontal
12. Wings, Flaps, Ailerons and Struts
 12. Wings, Flaps, Ailerons and Struts Fit Aileron Hinges Reference: Drawing 20270K2 Photo 12.1 Parts Required: 2007092 Aileron LS 200809N Aileron RS 2001394 Hinge 3/16 A1 (4) 2001694 Hinge Pin (4) PH0059N
COMPOSITES LAB MANUAL
 COMPOSITES LAB MANUAL Version 1 Lab 3: Surface Preparation, Wet Layup, and Vacuum Bagging The original version of this manual was a one student senior design project written by Katherine White, the Composite
1. Initial Precautions 2. Technical Precautions and Suggestions 3. General Information and Cure Stages 4. Understanding and Controlling Cure Time
 How to apply Arctic Silver Premium Thermal Adhesive 1. Initial Precautions 2. Technical Precautions and Suggestions 3. General Information and Cure Stages 4. Understanding and Controlling Cure Time 5.
Hatch Installation For Pygmy Solo and Double Kayaks
 Introduction/Overview Hatch Installation For Pygmy Solo and Double Kayaks The hatch kit consists of several wooden lips, strapping and hardware. The hatch is constructed by cutting a hole in your deck,
3Insert the second rod no. 4
 Yamato: Step-by-step 37 The stern block and searchlight control towers a b c d e f Recommended tools and materials Wood glue Sandpaper (no. 800 grain) Metal file Putty Craft knife For metal: Super Glue
Cowper From Steve Wolverton on the T&TTT forum, Feb 2005 For Reference Only Do not use to build a trailer. Check on Teardrop and Tiny Travel Trailers
 Cowper From Steve Wolverton on the T&TTT forum, Feb 2005 For Reference Only Do not use to build a trailer. Check on Teardrop and Tiny Travel Trailers for up to date building information; http://www.mikenchell.com/forums
#70 grit sand Putty knives, sized as needed #1 fine gray sand Corner tools Milestone acrylic liquid
 Countertops Supplies Tools White and/or gray Milestone cement 12 inch steel trowel #70 grit sand Putty knives, sized as needed #1 fine gray sand Corner tools Milestone acrylic liquid Hock Universal tints
CAUTIONS / INSTRUCTIONS
 CAUTIONS / INSTRUCTIONS EPOXY Epoxy is used for many purposes in the building of your boat. It is used to join wood, bond fiberglass, fill gaps, and seal the wood. We supply epoxy from Raka Boat Building
*Before starting, please read entire manual *Changes can be made in order for this manual to work for you. 3 x 6 I-Beam
 *Before starting, please read entire manual *Changes can be made in order for this manual to work for you 3 x 6 I-Beam Follow all applicable sections of the attached Manufacturing Plan. Objectives: Understand
TAPE & GLUE PROCESS Version: Jun. 2011
 FREE to print TAPE & GLUE PROCESS Version: Jun. 2011 The following small boat assembly process was developed out of the need for an easy, lightweight, cost effective and health friendly method of providing
This Manual Covers The Construction Of A Hood Scoop Plug From The Drawing Board. Through Construction. To Final Fitting.
 1 This Manual Covers The Construction Of A Hood Scoop Plug From The Drawing Board. Through Construction To Final Fitting. 2 TABLE OF CONTENTS: INTRODUCTION: 3 MAKING A PLUG FOR A CUSTOMIZED PRODUCT. 4
Steps and Resources for Composite Construction Mark Westlake
 Steps and Resources for Composite Construction Mark Westlake Hopefully the following information will help you avoid some of the learning curve that comes with a project of this complexity. Plug Construction
3Position the hull of the ship as
 Yamato: Step-by-step 25 The hull and stern deck c b d a b d c e e f a Rear frame b Stern deck x 2 c Stern deck x 2 d Side wall x 2 Wood glue Sandpaper (no. 400 grain) Craft knife Pliers d Side wall x 2
Building instructions ARTEMIS Sailing Canoe Day Five Version 1.0 Brian Pearson & Dr. Axel Schmid Day Five. Assembly of Planks and Frames
 Building instructions ARTEMIS Sailing Canoe Version 1.0 Brian Pearson & Dr. Axel Schmid 2016 Assembly of Planks and Frames Steps: Assembling hull plansk with wire Install frames Align and check keel rocker
Step by Step Wing Bagging
 Step by Step Wing Bagging By Evan Shaw 073 589 9339 evanevshaw@gmail.com Preparing the Leading Edge 1. Cut cores. (Cutting of wing cores is covered in another article elsewhere) 2. Sand the LE to a nice
FireFighter.21 Building Instructions
 A Tom Moorehouse design. Thank-you for purchasing the FireFighter.21. I believe that you will find it to be the best.21 rigger kit available. It has won 1 st place in the 2006 AMPBA nationals! It was designed
5If the protruding part is. 6Place 1 as is shown in the. 7Place what was assembled
 Yamato: Step-by-step 49 The base of the bridge and strakes a c b d a Base of the bridge b Base of the bridge c Base of the bridge d Strakes x 10 THE BASE OF THE BRIDGE 1Smooth 1 to 3, first using the metal
Wall Installations. Chapter 16 Wall Installations 16. 1
 16 Wall Installations Chapter 16 Wall Installations 16. 1 Alterna Premium Groutable Tile Create decorative backsplashes, accent walls, or other focal points with any size Alterna 16" x 16", 8" x 16", 8"
PITTS S2S CONSTRUCTION
 PITTS S2S CONSTRUCTION FUSELAGE CONSTRUCTION 1) Place the right fuselage side over the plan and mark the former positions. Place the left side over the right side and mark the former positions. Glue F1
Photo Essay How to Build an. Alaskan. Grand Banks Dory. Plans for this boat may be found at:
 Photo Essay How to Build an Alaskan Grand Banks Dory Plans for this boat may be found at: http://www.spirainternational.com/ How to Build an Alaskan Grand Banks Dory The Alaskan is an easy to build Spira
The following pages replace pages 7 thru 14 in the current printing of BUILDING THE PT ELEVEN. (As of December 2012.)This is a modified method for
This is a modified method for") The following pages replace pages 7 thru 14 in the current printing of BUILDING THE PT ELEVEN. (As of December 2012.)This is a modified method for gluing puzzle joints that we believe is simpler than the
The following pages replace pages 7 thru 14 in the current printing of BUILDING THE PT ELEVEN. (As of December 2012.)This is a modified method for gluing puzzle joints that we believe is simpler than the
Building small wooden boats in Myanmar
 19 12 ft & 18 ft Fit remaining floors The remaining floors can now be cut to size by taking measurements at the boat. The timber required is given in step 1. See step 10, 11 and 20 for installation procedures.
Building Instructions ARTEMIS Sailing Canoe Workshop and Tools Version 1.0 Brian Pearson / Dr. Axel Schmid Two Sawhorses. Workshop and Tools
 Building Instructions ARTEMIS Sailing Canoe Two Sawhorses Workshop Yes, you can build the ARTEMIS sailing canoe in the garage, with good lighting, and assuming a power supply. To have room to work it needs
MUDGUN Drywall Finishing System
 Watch the demonstration video online at hydetools.com MUDGUN Drywall Finishing System Quick Start Guide Hyde Tools, Inc. / A Hyde Group Company / 800-872-4933 / custrelations@hydetools.com / hydetools.com
PROJECT PLAN MODERN COFFEE TABLE
 BUILD IT WITH ROCKLER PROJECT PLAN MODERN COFFEE TABLE With its clean lines and striking geometry, this coffee table will lend iconic midcentury modern style to any living space. And you can build it yourself
A Skin-on-Frame Pram. Designed by Dana Munkelt. Drawings by Andrew Walters. Duckworks Boatbuilder's Supply duckworksbbs.com
 A Skin-on-Frame Pram Designed by Dana Munkelt Drawings by Andrew Walters Duckworks Boatbuilder's Supply duckworksbbs.com "" is a small skin-on-frame (SOF) pram design with a twist; a solid plywood floor.
Timberflex & Flexboard Technical Guide
 Timberflex & Flexboard Technical Guide A bendable substrate material that can be formed first and laminated last Patent #5,618,601; #5,232,762; #5,824,382 Doors Larger radius and small doors are easily
Installation Instructions
 www.marlite.com Effective Date 03/01/2018 ARTIZAN FRP, SYMMETRIX FRP, ENVUE FRP, STANDARD FRP Installation Instructions Statements expressed in this technical bulletin are recommendations for the application
8 x 10 Sandwich Panel
 *Before starting, please read entire manual *Changes can be made in order for this manual to work for you 8 x 10 Sandwich Panel Follow all applicable sections of the attached Manufacturing Plan. Objectives:
Use these notes in conjunction with the plans and the plan's building notes.
 GF18 CNC kit notes. Use these notes in conjunction with the plans and the plan's building notes. The standard kit is based on the GF18 with the sole option, central bench included. There are small differences
Glass Cloth (supplied pre cut) Fibre Flock
 Fibre Flock") Fitting Horizontal stabiliser:- Reference: Parts required: Drawing Photos Upper & Lower Fuselage Assy Horizontal Stabiliser Material required; LC 3600 LC 3600 AF 244 Resin Hardener Glass Cloth (supplied
Fitting Horizontal stabiliser:- Reference: Parts required: Drawing Photos Upper & Lower Fuselage Assy Horizontal Stabiliser Material required; LC 3600 LC 3600 AF 244 Resin Hardener Glass Cloth (supplied
Fitting Fiberglass arches to MK 1 Escort
 Fitting Fiberglass arches to MK 1 Escort This is a fairly big job and not for the faint hearted. I got a mate who has done some glass work before, to help me. The method of fixture is varied. You could
Sawn Baluster Sizing and Installation Guide
 Sawn Baluster Sizing and Installation Guide Welcome to the Durabrac sizing and installation guide for Sawn Balusters. This guide has been prepared to answer any questions you may have about our Sawn Balusters
SE5a Instrument Board part 2 - rev 1.1
 SE5a Instrument Board part 2 - rev 1.1 Fuel (Petrol) Valve This valve uses two circular name plates, eight brass screws, one black plastic base, copper wire and two black plastic risers. You can pick any
PoorBoy Skiff. A 10-11ft 6in skiff for outboard motoring By Steven Lewis
 PoorBoy Skiff. A 10-11ft 6in skiff for outboard motoring By Steven Lewis PoorBoy is about the simplest small motorboat you will come across. It consists of 2-2 1/4 sheets of plywood (1-1 1/4 sheets x3/8
Deck Repair Grady White Runabout
 Deck Repair Grady White Runabout An older Grady White runabout with pedestal mounted captains chairs had suffered a structural failure at one of the pedestal bases. The deck in this area was cored. Inadequate
SPUNKY ASSEMBLY MANUAL
 SPUNKY ASSEMBLY MANUAL Please read the tips section at the back of this manual regarding the use of laser cut parts. The proper removal and preparation of these parts is important. When laser cut, some
Tools and Tips: ( 1 )
") Tools and Tips: As you build instructions will show in my many picture manual how to assemble. You can use your own methods as you desire, my results are very good. A smooth, flat work surface is very
Tools and Tips: As you build instructions will show in my many picture manual how to assemble. You can use your own methods as you desire, my results are very good. A smooth, flat work surface is very
Redwood strips are tacked to the templates, and edge-glued. Drive brads through into the templates before putting on fiberglass doth.
 1 Make the building form and attach templates to the crosspieces. Nail a strip down the center to hold the stems and templates in position. prototype canoe took about three weekends to build. She's broad
Tripanel Marine Technical Bulletin
 Tripanel Marine Technical Bulletin Figure 1 Cabinet joints can be accomplished by four methods: a) rabbet one panel to the proper thickness of joining panel and epoxy joint b) dado to thickness of joining
Installation Guide. Welcome to the Pro Box Installation Guide
 23112 Mariposa, CA 90502 USA T 310.530.1383 F 310.325.6409 info@proboxfinsystems.com Welcome to the Pro Box Installation Guide This guide goes step by step through the entire installation process. Each
Tools and Tips: ( 1 )
") Tools and Tips: As you build instructions will show in my many picture manual how to assemble. You can use your own methods as you desire, my results are very good. A smooth, flat work surface is very
Tools and Tips: As you build instructions will show in my many picture manual how to assemble. You can use your own methods as you desire, my results are very good. A smooth, flat work surface is very
SZD-10 bis CZAPLA ASSEMBLY MANUAL IN PICTURES
 1 RUDDER Plan and parts: 2 Assembly steps: Photo above: glue together rudder spar, ribs and trailing edge. Clamp spar to a flat surface (chipboard on the photo) and make sure the straight aligment of the
Kam Aero 43% Extra 300.
 Stab Sheeting Kam Aero 43% Extra 300. Stabs / Elevator: Make your skins using the same method as you did for the fuselage foam parts. The stabs require 8 sheets (4 per stab) of 4 x 48 A grain sheeting.
COMPOSITES LAB MANUAL
 COMPOSITES LAB MANUAL Version 1 Lab 4: Wet Layup of complex shapes The original version of this manual was a one student senior design project written by Katherine White, the Composite lab assistant, during
Building Tips This model can be built using the following types of adhesives:
 Page 1 Building Tips This model can be built using the following types of adhesives: Epoxy (with or without microballons) Odorless cyanoacrylate (CA) with accelerator UHU Creativ for Styrofoam (or UHU
Installing your new Bevella Top. L Shaped Countertop with Joints No Finished Ends (Fits Between Four Walls)
") Installing your new Bevella Top L Shaped Countertop with Joints No Finished Ends (Fits Between Four Walls) Bevella RTI Countertops are engineered and manufactured to the highest quality standards, built
Installing your new Bevella Top L Shaped Countertop with Joints No Finished Ends (Fits Between Four Walls) Bevella RTI Countertops are engineered and manufactured to the highest quality standards, built
Installation Instructions Recommended Tools
 Recommended Tools Tape Measure Sharp Knife Duct Tape Mineral Spirits Clean Cloth Isopropyl Alcohol Blunt Putty Knife Caulking Gun Caulking Trowel Material Sizing 1. Joints must be sized every 5-7 feet
Arched. Building an. Passageway. Although my company specializes in high-end jobs
 Building an Arched Passageway All photos by Brian Striegler This straightforward approach combines basic shop methods with simple site joinery to create an elegant frame-and-panel archway by Gary Striegler
Hudson Dresser [1] Hudson Dresser Published on Ana White ( Submitted by dan-k [2] on Fri, :43 [1]
![Hudson Dresser [1] Hudson Dresser Published on Ana White ( Submitted by dan-k [2] on Fri, :43 [1]](/thumbs/90/102626096.jpg "Hudson Dresser [1] Hudson Dresser Published on Ana White ( Submitted by dan-k [2] on Fri, :43 [1]") [1] Submitted by dan-k [2] on Fri, 2011-03-11 11:43 [1] If you plan on staining this piece, it is recommended that you stain all of the drawer face materials before assembly for a more professional look.
[1] Submitted by dan-k [2] on Fri, 2011-03-11 11:43 [1] If you plan on staining this piece, it is recommended that you stain all of the drawer face materials before assembly for a more professional look.
SURFACE CASTING METHOD: For Molds & Core Boxes. Presented by: Hapco Inc.
 SURFACE CASTING METHOD: For Molds & Core Boxes Presented by: Hapco Inc. RAPIDFIL Detailed Specifications STEP 1 SPACER LAYER Apply a layer of ¼ foam to create a uniform ¼ thickness around the pattern.
Restoring the Bouyancy Tanks on 6878
 Restoring the Bouyancy Tanks on 6878 On March 31, 2001 I became the proud owner of Albacore 6878, a Skeene built in 1980. The boat was in pretty good shape, but like many Skeene and Ontario Yachts (non-foam
Storing, Handling, and Cleaning dekō Markerboards Storing Markerboards. Handling. Cleaning
 Storing, Handling, and Cleaning dekō Markerboards Storing Markerboards dekō markerboards must be stored inside, and stacked horizontally to avoid bowing. Do not store or transport dekō markerboards outdoors
Building an Unfeathered Paddle with a Wood Shaft and Carbon Fiber Blades
 Building an Unfeathered Paddle with a Wood Shaft and Carbon Fiber Blades by Duane Strosaker Choosing the Wood Two 3/4" pieces of Sitka spruce laminated with epoxy for an unfeathered one-piece paddle. For
1982 Hydrostream Viking Restoration
 1982 Hydrostream Viking Restoration Part 2a: The Rebuild Daniel W. Rickey Winnipeg, Manitoba Canada daniel@cancercare.mb.ca 2000-07-19 Introduction Part one of this report showed how the shoddy manufacturing
This article was written by Phill Brander (AUS), who has built many timber catamarans including a Paper Tiger.
, who has built many timber catamarans including a Paper Tiger.") Building a Paper Tiger Catamaran Scarfing Plywood Paper Tiger Catamaran GUIDES Warnings/Cautions As always, using any power tools, cutting implements or adhesives carries certain risks. Make sure you understand
Building a Paper Tiger Catamaran Scarfing Plywood Paper Tiger Catamaran GUIDES Warnings/Cautions As always, using any power tools, cutting implements or adhesives carries certain risks. Make sure you understand
Grade 11 Woods Lift Lid Coffee Table. Based on Under the big Top from Popular Mechanics Website
 Grade 11 Woods Lift Lid Coffee Table Based on Under the big Top from Popular Mechanics Website TABLE TOP 1. Select enough lumber to construct a top that is between 22 ½ and 24 wide after jointing. Ensure
Get the benefits of oil with the ease of latex
 One of the most rewarding home improvement projects is putting a fresh coat of paint on your kitchen cabinets. A new color brightens up your kitchen, and can give it a complete updated look. But at the
Tape Measure Metal Clippers Screw Bit Set With Extensions
 IMPORTANT: Read through instructions thoroughly before beginning to replace any damaged material. Minor damage can be fixed with a fiberglass repair kit and color matched paint. Tools Required Tape Measure
Photo Essay: How to Build a. Seneca. Pacific Power Dory. Plans for this boat may be found at:
 Photo Essay: How to Build a Seneca Pacific Power Dory Plans for this boat may be found at: http://www.spirainternational.com/ To begin building the Seneca, or any Spira International framed boat, a strongback
FLITZEBOGEN-2 Assembly instructions
 FLITZEBOGEN-2 Assembly instructions Trim the end of the fuselage to the length of 925mm from the nose. Be careful to avoid splitting the carbon fibers. Sand the base of the stab mount in preparation for
Nanton Grain Mill Assembly
 ( 1 ) Nanton Grain Mill Assembly Locate package for assembling storage building. These are cut from 1/8 masonite. Inspect and lightly sand edges where it will be bonded. Use white glue or CA glue to bond.
3 Simple Steps to a Beautiful Tile Surface. Tec Skill Set How-To Project Guide Floor Tile 1. PREPARE THE SURFACE 2. SET THE TILE. Reverso en español
 Reverso en español Tec Skill Set How-To Project Guide Floor Tile 3 Simple Steps to a Beautiful Tile Surface 1. PREPARE THE SURFACE 2. SET THE TILE 3. Grout AND CAULK H.B. Fuller Construction Products Inc.
Building the Wee Lassie Canoe. A Michigan Woodworkers Guild Presentation by Bob Mills
 Building the Wee Lassie Canoe A Michigan Woodworkers Guild Presentation by Bob Mills So you want to build a boat, eh? Ok, how about this for starters? Carved by Livio De Marchi, Woodcarver Extraordinaire
Contents. Study Plans. 2 Introduction. 4 List of Materials. 5 Glue, Resin and Fixings. 6 Tools. 7 Construction Sequence
 Volare Study Plans Contents 2 Introduction 4 List of Materials 5 Glue, Resin and Fixings 6 Tools 7 Construction Sequence Study Plans The study plans consist of an abridged version of the first 7 pages
Piper Cherokee /3 scale. Construction Manual
 Piper Cherokee 140 1/3 scale Construction Manual STAB CONSTRUCTION 1. Remove foam cores from cradle and place on flat surface. Inspect pieces before you epoxy halves together making sure leading and trailing
Procedure on construction of each of the following subsystems:
 Procedure on construction of each of the following subsystems: Chest Cavity with Fittings Diaphragm with wood support Lungs Ribs + Spine Stand (including rib movement system) Section 1: Chest Cavity with
Installation Instructions Palladium 3D Hi Impact Wall System, Partial Height with Color Matched Caulk Joints
 Please read all instructions before installing Palladium 3D Hi Impact Wall System.. Before installation: a. Acclimate rigid sheet, Palladium 3D boards, adhesives and wall substrates to room temperature
PRO CYC PRO CYC, INC. SYSTEM SUPER 1.5 EZ
 ASSEMBLY INSTRUCTIONS SYSTEM SUPER 1.5 EZ Congratulations on your decision to use the world s most advanced and user-friendly cyclorama system. We have taken a great deal of care to create and ship your
M. R. Mittleman, Constructor Member, Long Island Woodworkers
 M. R. Mittleman, Constructor Member, Long Island Woodworkers You wanna do what??? February 24, 2016 Long Island Woodworkers Presentation 2 Some particulars about the craft to be constructed: Model name
C-180 Builder s Manual
 C-180 Builder s Manual. May 20, 2002 Last revised July 11, 2002 Copyright! 2002 Douglas Binder, Mountain Models www.mountainmodels.com sales@mountainmodels.com (719) 630-3186 1 Required Equipment! Xacto
PRO CYC PRO CYC, INC. SYSTEM SUPER 3EZ
 ASSEMBLY INSTRUCTIONS SYSTEM SUPER 3 EZ Congratulations on your decision to use the world s most advanced and user-friendly cyclorama system. We have taken a great deal of care to create and ship your
Optima 450 LED Edge-Lit Single-Sided Light Box. Installation Instructions INSTALLATION INSTRUCTIONS. Figure 1. Tools you ll need
 Installation Instructions Optima 450 LED Edge-Lit Single-Sided Light Box Figure 1 INSTALLATION INSTRUCTIONS Before you begin These instructions illustrate the Stylmark Optima 450 LED Edge-Lit Single-Sided
woodworkersjournal.com MATERIAL LIST
 MATERIAL LIST T x W x L 1 Legs (2) 1 1 2" x 3 1 2" x 36 7 16" 2 End Uprights (2) 1 1 2" x 3 1 2" x 32 1 2" 3 Stringers (4) 1 1 2" x 3 1 2" x 42" 4 Top Cladding, Long (2) 3/4" x 7 1 4" x 65 3 4" 5 Side
TANDY WALKER'S A 2nd CLASS BOMBER 10 to 20. FW:10 Class A Bomber LG. FW:11 Class A Bomber Pylon Primary Sructure
 TANDY WALKER'S A 2nd CLASS BOMBER 10 to 20 FW:10 Class A Bomber LG I finished up the landing gear (LG) this morning and shot a couple of pictures for you to see. The first picture shows the LG with 3/32"
PRO CYCTM PRO CYC, INC. SYSTEM 1.5 FS
 ASSEMBLY INSTRUCTIONS Congratulations on your decision to use the world s most advanced and user-friendly cyclorama system. We have taken a great deal of care to create and ship your cyc, so please take
Cold curing adhesive K-X280
 Instructions for use English Cold curing adhesive K-X280 A4048-1.0 en English 1 Safety instructions... 3 2 General information... 3 2.1 Scope of delivery for K-X280... 3 2.2 Accessories required for installation...
Photo Essay Building a. Key Largo. Carolina Dory. Plans for this boat may be found at:
 Photo Essay Building a Key Largo Carolina Dory Plans for this boat may be found at: http://spirainternational.com/ Photo Essay Building a Key Largo Carolina Dory The Carolina Dory is a specialized type
Tools Required: Steps to completion:
 SEAMING Introduction This bulletin addresses seaming Corian Solid Surface. Overview High quality seams are essential to maximize the appearance and performance of Corian Solid Surface installations. Tight
Loose Lay Luxury Vinyl Plank
 Loose Lay Luxury Vinyl Plank FLEX COLLECTION Installation & maintenance * PLEASE READ CAREFULLY * Installation, maintenance & warranty guideline for loose lay luxury vinyl products. Adherence to This guideline
BUILDING A STORM DOOR
 BUILDING A STORM DOOR BY NEAL BARRETT Illustrations by George Retseck If you're in the market for a storm door, you probably know that there are many styles and models available. However, most of them
LUNAR EXPRESS. Little
 Little LUNAR EXPRESS The Little Lunar Express kit contains all the parts necessary* to build a flying high power rocket: 1) Pre-slotted boattail 1) Airframe 5.5" long 1) Nose cone 2) Main fins 2) Stabilizer
A H M 531 The Civil Engineering Center
 Table of Contents contents Page Introduction 1 Objectives 2 Background 2 Apparatus and tools 3 Requirements 5 Procedures 6 Conclusion 10 References 10 1 Introduction Carpentry work is one of the most important
Masking: Each mirrored sheet is well protected by a durable paint backing and
 STORAGE Horizontal storage: If mirror sheets are stored flat, care must be taken to avoid warping, slipping and scratching. If different sizes are stored together the largest panels should at the bottom
Your Best Finish! Darrell Krasoski and Charles Samaha Article originally prepared for the SeaWind Express
 Your Best Finish! By Darrell Krasoski and Charles Samaha Article originally prepared for the SeaWind Express Whether it s for being able to identify your boat from a distance, protecting the plastic from
4. Bevel the LE face of HS1-HS11 to match the horizontal stab leading edge sweep angle.
 BEFORE YOU BUILD 1. Unroll each sheet of the plans. Roll them inside out so that they will lie flat on the building surface. 2. Assemble the tools that you will need to build each section so that they
Quality Marine Equipment Since Antifouling Paint For Metal Under The Waterline ROLLER. Application Instructions.
 Quality Marine Equipment Since 1981 Antifouling Paint For Metal Under The Waterline ROLLER Application Instructions www.antifoulingpaint.net THANK YOU! Thank you for selecting Velox Plus Antifouling Paint