City Trim Range. Installation Guide
|
|
|
- Harriet Roberts
- 5 years ago
- Views:
Transcription
1 City Trim Range Installation Guide


2 Handle Panels with Care Compact Laminate or CDF panels are very dense and durable panels, however if they are mistreated, stored or handled incorrectly it could potentially damage the panels. To prevent any damage please read and take notice of the following diagrams: Storage & Handling Conditions
3 Cleaning & Maintenance of Duralam Panels Compact Laminate has a non-porous surface which is easy to clean. The decorative and homogenous core of the Duralam Compact Laminate Panels are impervious and resistant to most commonly used cleaning agents and disinfectants. Recommended Cleaning Products: Ajax Spray & Wipe Water & Soap PL Removing Extreme Soiling: Extreme soiling such as dust, dirt, food, juice etc that has accumulated over time should be removed following the process outlined below: Apply hot water and an interiors detergent or soap based cleaning agent, applied with a sponge or soft nylon brush. Apply the diluted cleaning agent to the surface and leave it to soak for a period of time. Then rinse off with clean water and dry with an absorbent cloth. Don t Use: Any highly acidic or alkaline products should be refrained from being used Abrasive or polishing materials. Sandpaper or any other course material Other Useful Tips: If any chemical solution has been applied to the board, it should be washed off in order protect the panels. Apply CRC to hinges and door locks when required in order to free up and smoothen the movements. For further information, please contact our customer service team on: or us at: admin@duraplan.co.nz
4 What Tools are needed? Straight edge Level Drop saw Small step ladder Timber blocks and packers Drill Nylon Hammer Circular saw No. 1 & 2 Square Drive and Pozi-drive Broom Small Brush & Shovel Materials Supplied by Duraplan 13mm compact laminate Aluminium components Hardware Fixings Note 1: Other power tools such as planner, multi-tool, jig-saw and sander may be needed. Note 2: Other general hand tools such as squares and levels are advised to be on site as they may also be required. Note 3: If other suppliers are necessary such as drill bits and double sided tape they will be provided by Duraplan as part of the main package. All Installation Instruction must be thoroughly read and understand before the installation process begins: All walls must be straight, square and flush. The system should be dry-fitted All holes must be pre-drilled using a 4.1mm drill bit These installation instructions must be followed in conjunction with the installation plans provided Refer to the photo galley near the end for reference and further guidance
5 Installation Process Step 1. Report to the site office for site induction. Check the area where you are to work for quality of safety. Once the area is safe, proceed with the install. Step 2. Open the packages and find related plans. Check colours, style and measurements. Step 3. Check the levels and find the highest point. Mark horizontal levels and wall channel positions Step 4. Mark out and fix wall channels in a plumb position as per installation plan measurements. Use stainless square drive 10 x 1 ½ inch screws (supplied) for fixing the wall channels to the wall
6 a. Lift centre panels into place, slide it into the wall channel. b. Level the panel using blocks/packers to the correct height to a position to support the centre panels. c. Check the panel is in the correct position i.e. level, plumb, straight d. MAKE SURE ALL HOLES ARE DRILLED THE ENTRE DEPTH OF THE SCREW. Drill a 4.1mm hole in the compact where the 5mm hole is in the wall channel. DO NOT DRILL RIGHT THOUGH TO THE OTHER SIDE OF THE WALL CHANNEL. e. Screw the panel to the wall channel using 10 x ½ self-taping screws (supplied)
7 Step 5. Mark out the foot base positions as per the installation plans. Note that each project has its own unique measurements. Note the measurement from the straight front line of the centre panels to the position of the back face of the front pilaster is 6mm minimum. b. Mark out the positions for the fixing holes. For concrete use 8mm masonry drill bit. Take extra care in ensuring accuracy of the positions of the holes. Suggestion drill a small 3mm hole first to help guide the larger 8mm drill into the correct position c. Bolt in place using 60mm x 8mm bolts (supplied) d. Trim the end foot in order to ensure that the end pilasters are even Step 6. Fit side/end wall channels in place at correct height in relation to the city trim foot. Use 10 x 1 ½ stainless screws (supplied) Step 7. Fit end pilaster to channel and foot. The panel may need to be trimmed up. Start at the end which the door hinges from. Screw in place wall channel using 4.9mm x 10mm screws and use the 4mm x 15mm screws for screwing into the foot bases predrilling with a 3.5mm drill bit (supplied). Step 8. Check door gaps as proceeding. Fit centre pilaster in place. They need to be placed level and plum in the base of the foot. (Note check that the end caps for the foot bases will fit correctly. Ensure that the pilaster is not holding the cap apart from the foot base. Make any adjustments it required, otherwise move onto the next part b of step 8). b. Screw in place. While doing this ensure that the pilasters remain plum, level and in the correct forward and back position. Use 4.9mm screws for the channels and 4 x 15mm screws for the foot base. c. Remove the support blocks
8 Step 9. Fit doors from left to right/right to left using the screws supplied as marked for door hinges. b. Fix the gravity self-closing hinges to the top position of the pilasters Step 10. Fix the door stops/coat hooks in position. Step 11. Check all locks and keepers are in the correct positions for height, level, plumb and straight.
9 Step 12. Fit end caps to the foot bases. b. Dry fit dry fir the end caps to the foot bases and ensure that the pilaster is not holding the end cap apart from the foot base. c. With the silkaflex supplied, place the some glue on the foot base where the location lugs fit into the foot. d. Fit end cap in place and remove access with mineral turps. e. Some tape (masking tape) may be needed to hold the end cap in place temporally while the glue sets. Step 13. Final check off ensure Doors are sitting, open/shut correctly Rebated lines are parallel Pilasters are fixed correctly All feet are correctly fixed to the floor All panels are straight and level That there is an even flush front finish to the face of the partitions That the operations of the system operate smoothly and correctly. All necessary screws are in place Clean all components, including any pencil marks on the walls for floors. Sweep out the room and dispose of any rubbish and wipe the system/panels clean.

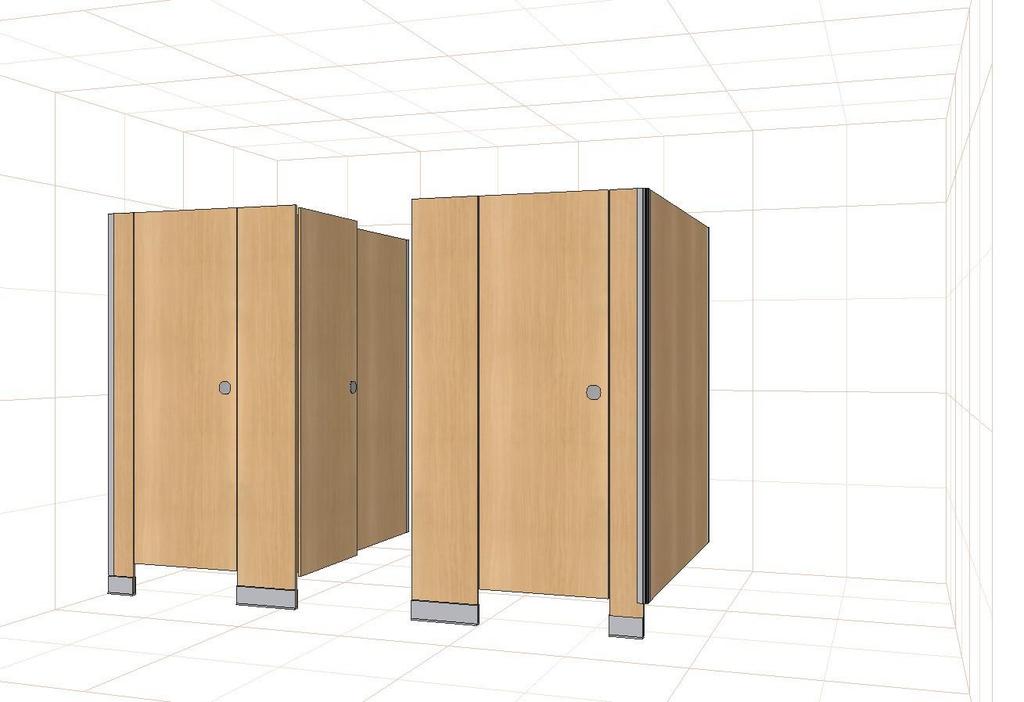
10 Photo Gallery:


11 For further information, please contact our customer service team on: or us at:
Duralam Wall Linings. Installation Guide. Duralam 6mm Compact Laminate Wall Panelling Installation Guide
 Duralam Wall Linings Installation Guide 2016 Handle Panels with Care Compact Laminate panels are very dense and durable panels, however if they are mistreated, stored or handled incorrectly it could potentially
Step-by-step Installation Guide
 Product: Resco Series Product Code: S-5000WW Installation Guide Wall to wall version. July 2017 Step-by-step Installation Guide WALL TO WALL VERSION JULY 2017 Job# 5147 Resco Series-5000 WW version. Step-by-step
Step-by-step Installation Guide
 Product: Resco Series Product Code: S-5000WW Installation Guide Wall to wall version. November 2017 Step-by-step Installation Guide WALL TO WALL VERSION NOVEMBER 2017 Job# 5230 Resco Series-5000 WW version.
Step-by-step Installation Guide
 Product: Resco Series 5000 Product Code: S-5000R Installation Guide Return version. May 2014 Step-by-step Installation Guide RETURN VERSION (Only 1 side wall) May 2014 IMPORTANT SAFE PANEL HANDLING INSTRUCTIONS
VANITY INSTALLATION INSTRUCTIONS
 VANITY INSTALLATION INSTRUCTIONS Congratulations and thank you for your purchase. These cabinets have been designed and assembled to a very high standard and if installed correctly will provide you with
Curium 19.4H Installation Instructions & Parts List
 Curium 19.4H Installation Instructions & Parts List Illustration Curium 19.4H Right Hand Page 1 of 21 30/06/2016 Revision 1.0 IMPORTANT This shower screen / enclosure must be installed by suitably qualified
Curium 19H Installation Instructions & Parts List
 Curium 19H Installation Instructions & Parts List Illustration Curium 19H Right Hand Page 1 of 15 01/07/2016 Revision 2.1 IMPORTANT This shower screen / enclosure must be installed by suitably qualified
Gallium 03 Installation Instructions & Parts List
 Gallium 03 Installation Instructions & Parts List Illustration Gallium 03, H1 Handle Left Hand: Open Out 04/05/2016 Revision 1.1 Page 1 of 19 IMPORTANT This shower screen / enclosure must be installed
QUATRA LUX SHOWER ENCLOSURE INSTALLATION INSTRUCTIONS
 QUATRA LUX SHOWER ENCLOSURE INSTALLATION INSTRUCTIONS IMPORTANT DreamLine reserves the right to alter, modify or redesign products at any time without prior notice. For the latest up-to-date technical
AQUA ULTRA SHOWER DOOR & TUB DOOR INSTALLATION INSTRUCTIONS
 AQUA ULTRA SHOWER DOOR & TUB DOOR INSTALLATION INSTRUCTIONS IMPORTANT DreamLine TM reserves the right to alter, modify or redesign products at any time without prior notice. For the latest up-to-date technical
Radon 07 Installation Instructions & Parts List
 Radon 07 Installation Instructions & Parts List Illustration Radon 07, H1 Handle Right Hand: Open Out 14/06/2016 Revision 1.1 Page 1 of 21 IMPORTANT This shower screen / enclosure must be installed by
Ranch Rail Vinyl Fence
 Ranch Rail Vinyl Fence INSTALLATION INSTRUCTIONS These instructions are to be used as general guidelines for the installation of your vinyl fence under normal installation conditions. Local conditions
INTRODUCTION Tools Required Laminate Washroom Products... 4 DUCT PANELS Fixing the Frame: Fixing the Shadow Panels...
 Contents INTRODUCTION... 2 Tools Required... 3 Laminate Washroom Products... 4 DUCT PANELS... 4 Fixing the Frame:... 5 Fixing the Shadow Panels... 9 Fitting the Duct Panels:... 10 WASHSTATIONS... 15 Fixing
Xenon 05 Installation Instructions & Parts List
 Xenon 05 Installation Instructions & Parts List Illustration Xenon 05, H1 Handle Left Hand: Open Out 26/05/2016 Revision 2.1 Page 1 of 19 IMPORTANT This shower screen / enclosure must be installed by suitably
FLEX 48 x 72 / 60 x 72
 FLEX 48 x 72 / 60 x 72 SHOWER DOOR INSTALLATION INSTRUCTIONS IMPORTANT DreamLine reserves the right to alter, modify or redesign products at any time without prior notice. For the latest up-to-date technical
PRISM LUX / PYRAMID SHOWER ENCLOSURE INSTALLATION INSTRUCTIONS
 PRISM LUX / PYRAMID SHOWER ENCLOSURE INSTALLATION INSTRUCTIONS IMPORTANT DreamLine reserves the right to alter, modify or redesign products at any time without prior notice. For the latest up-to-date technical
Dubnium 11 Installation Instructions & Parts List
 Dubnium 11 Installation Instructions & Parts List Illustration Dubnium, H1 Handle Right Hand: Open Out Page 1 of 25 IMPORTANT This shower screen / enclosure must be installed by suitably qualified individuals.
UNIDOOR X (STYLE L1)
") UNIDOOR X (STYLE L) SHOWER DOOR & GLASS PANEL INSTALLATION INSTRUCTIONS IMPORTANT DreamLine reserves the right to alter, modify or redesign products at any time without prior notice. For the latest up-to-date
UNIDOOR X (STYLE L) SHOWER DOOR & GLASS PANEL INSTALLATION INSTRUCTIONS IMPORTANT DreamLine reserves the right to alter, modify or redesign products at any time without prior notice. For the latest up-to-date
Titan Install Guides.
 Titan Install Guides http://www.troax.com/gb Contents Titan Partitioning Pages 3-10 Titan King 1 Pages 11-17 Titan SSS Handle Pages 18 Page 2 http://www.troax.com/gb Rev B 21/02/17 Titan Partition You
I N S TA L L AT I O N & M A I N T E N A N C E G U I D E
 I N S TA L L AT I O N & M A I N T E N A N C E G U I D E E N V I R O B U I L D. C O M + 4 4 ( 0 ) 2 0 8 0 8 8 4 8 8 8 Version 3.2 EnviroBuild 2018 C O N T E N T S Storage & Handling 03 Tools 04 Calculating
CAVALIER. Shower Door Installation Instructions
 CAVALIER Shower Door Installation Instructions IMPORTANT DreamLine reserves the right to alter, modify or redesign products at any time without prior notice. For the latest up-to-date technical drawings,
UNIDOOR (STYLE B & C)
") UNIDOOR (STYLE B & C) SHOWER DOOR GLASS PANEL INSTALLATION INSTRUCTIONS IMPORTANT DreamLine TM reserves the right to alter, modify or redesign products at any time without prior notice. For the latest
UNIDOOR (STYLE B & C) SHOWER DOOR GLASS PANEL INSTALLATION INSTRUCTIONS IMPORTANT DreamLine TM reserves the right to alter, modify or redesign products at any time without prior notice. For the latest
Titan - Double Skin Steel Partitioning. Installation Pack
 Titan - Double Skin Steel Partitioning Installation Pack Troax Lee Manufacturing Ltd. Scan me Troax Lee Manufacturing Ltd Telephone : +44 (0) 1384 277 441 Building 52, Third Avenue, Facsimilie : +44 (0)
How to operate (folding)
") How to operate (folding) LEFT HAND STACKING OUTWARD OPENING How to operate (folding) RIGHT HAND STACKING OUTWARD OPENING LOCK BOTH LEVER HANDLE AND FLAT HANDLE UTILISING THE D-HANDLE LOCATED ABOVE THE
How to operate (folding) LEFT HAND STACKING OUTWARD OPENING How to operate (folding) RIGHT HAND STACKING OUTWARD OPENING LOCK BOTH LEVER HANDLE AND FLAT HANDLE UTILISING THE D-HANDLE LOCATED ABOVE THE
ROOM FOLD SLIDING FOLDING INTERNAL DOORSET FITTING & FIXING GUIDELINES
 EDITION 7 ROOM FOLD SLIDING FOLDING INTERNAL DOORSET IMPORTANT You can only assemble these door configurations by using the frame provided. Your warranty will be invalid if other alternatives are used.
PRISM SHOWER ENCLOSURE INSTALLATION INSTRUCTIONS
 PRISM SHOWER ENCLOSURE INSTALLATION INSTRUCTIONS IMPORTANT DreamLine reserves the right to alter, modify or redesign products at any time without prior notice. For the latest up-to-date technical drawings,
MIRAGE-X / BELLA. Shower Door Installation Instructions
 MIRAGE-X / BELLA Shower Door Installation Instructions IMPORTANT DreamLine reserves the right to alter, modify or redesign products at any time without prior notice. For the latest up-to-date technical
INSTALLATION INSTRUCTIONS FRAMELESS CONTINUOUS HINGE SHOWER ENCLOSURE QCI5233
 INSTALLATION INSTRUCTIONS FRAMELESS CONTINUOUS HINGE SHOWER ENCLOSURE QCI5233 QCI5233 Rev 0 Page 1 Certified 06/20/2016 INSTALLATION NOTES: Unpack your unit carefully and inspect for freight damage. Lay
Ulltraclad Aluminium Cladding. Contents. 1.0 General Information Design Information Installation Information 7. 4.
 Ulltraclad Aluminium Cladding Contents 1.0 General Information 2 2.0 Design Information 4 3.0 Installation Information 7 4.0 Maintenance 10 5.0 Health & Safety 10 1 1.0 General Information 1.1 Introduction
FLEX 28 / 32 / 42 x 72
 FLEX 28 / 32 / 42 x 72 SHOWER DOOR INSTALLATION INSTRUCTIONS IMPORTANT DreamLine reserves the right to alter, modify or redesign products at any time without prior notice. For the latest up-to-date technical
PRIVACY FENCE WITH SCALLOPED PICKET INSTALL INSTRUCTIONS
 PRIVACY FENCE WITH SCALLOPED PICKET INSTALL INSTRUCTIONS These instructions are to be used as general guidelines for the installation of your vinyl fence under normal installation conditions. Local conditions
DURACRYL WALL INDEX INTRODUCTION TOOLS AND MATERIALS REQUIRED FLAT SHOWER WALL SIDE CONTOUR SHOWER WALL CORNER CONTOUR SHOWER WALL FLAT BATH WALL
 DURACRYL WALL FLAT SHOWER WALL SIDE CONTOUR SHOWER WALL CORNER CONTOUR SHOWER WALL FLAT BATH WALL INSTALLATION GUIDE INDEX PAGES Introduction 1 Tools and materials 1 Construction requirements - timber
SHOWER ENCLOSURE INSTALLATION
 T F e34 x 46 s a QUATRA LUX 32 x 46 / ele A R r r fo SHOWER ENCLOSURE INSTALLATION I NSTRUCTIONS d e D v o r p IMPORTANT DreamLine reserves the right to alter, modify or redesign products at any time without
SHOWER DOOR INSTALLATION & CARE GUIDE
 SHOWER DOOR INSTALLATION & CARE GUIDE For models: SD-AZ-0 Please Note: This is a two person job. The glass doors are extremely heavy and it is highly recommended to use professional installers. For any
VITREO X SHOWER / TUB DOOR INSTALLATION INSTRUCTIONS
 VITREO X SHOWER / TUB DOOR INSTALLATION INSTRUCTIONS IMPORTANT DreamLine reserves the right to alter, modify or redesign products at any time without prior notice. For the latest up-to-date technical drawings,
INSTALLATION INSTRUCTIONS
 INSTALLATION INSTRUCTIONS 1350 COMBAT SERIES TOILET PARTITIONS IMPORTANT: Review these instructions thoroughly prior to installation. In the United States: BOBRICK WASHROOM EQUIPMENT INC. 200 Commerce
PRIVACY FENCE WITH LATTICE INSTALLATION INSTRUCTIONS
 PRIVACY FENCE WITH LATTICE INSTALLATION INSTRUCTIONS These instructions are to be used as general guidelines for the installation of your vinyl fence under normal installation conditions. Local conditions
FLEX ENCLOSURE SHOWER ENCLOSURE INSTALLATION INSTRUCTIONS
 FLEX Enclosure manual Ver 3 Rev 06/06 FLEX ENCLOSURE SHOWER ENCLOSURE INSTALLATION INSTRUCTIONS IMPORTANT DreamLine reserves the right to alter, modify or redesign products at any time without prior notice.
FRENCH LINEA PANEL SHOWER PANEL INSTALLATION INSTRUCTIONS
 FRENCH LINEA PANEL SHOWER PANEL INSTALLATION INSTRUCTIONS IMPORTANT DreamLine reserves the right to alter, modify or redesign products at any time without prior notice. For the latest up-to-date technical
Install Instructions for Corvallis #4008GRC Mantel
 Install Instructions for Corvallis #4008GRC Mantel Please read this manual before installing the suite. This manual should remain with the homeowner. Updated 12/10/13 NOTE the installation requirements
ESSENCE. Shower / Tub Door Installaion Instructions
 ESSENCE Shower / Tub Door Installaion Instructions IMPORTANT DreamLine reserves the right to alter, modify or redesign products at any time without prior notice. For the latest up-to-date technical drawings,
Trackstar Manual Folding Shade Installation Instructions
 Trackstar Manual Folding Shade Installation Instructions Tracklock or Cord and Pulley Lifting System Thank you for purchasing your new Trackstar folding shade. It has been custom-made from the highest
INFINITE RANGE - HINGE DOOR
 INFINITE RANGE - HINGE DOOR HINGE DOOR + 1 SIDE RETURN PANEL (CORNER) Please read these instructions before installing, as incorrect fitting will invalidate the guarantee-carry out each stage before moving
SINGLE TRACK BYPASS (patent pending) barn door hardware
 barn door hardware") SINGLE TRACK BYPASS (patent pending) barn door hardware Installation Manual What is included in your kit: Part number Part name Quantity 1 Inner door hanger 2 2 Outer door hanger 2 3 5/16 x 1.5 lag bolts
SINGLE TRACK BYPASS (patent pending) barn door hardware Installation Manual What is included in your kit: Part number Part name Quantity 1 Inner door hanger 2 2 Outer door hanger 2 3 5/16 x 1.5 lag bolts
Hinge Door + Inline Panel + Return Panel
 Hinge Door + Inline Panel + Return Panel Instruction Manual DXL2HDR + DXL2HR + DXR Important Information Toughened glass is completely safe for use in our shower enclosures and bath screens; providing
ELEGANCE SHOWER DOOR/ENCLOSURE INSTALLATION INSTRUCTIONS. Style A Style B Style C Style D
 ELEGANCE SHOWER DOOR/ENCLOSURE INSTALLATION INSTRUCTIONS IMPORTANT DreamLine reserves the right to alter, modify or redesign products at any time without prior notice. For the latest up-to-date technical
FLEX SHOWER DOOR INSTALLATION INSTRUCTIONS
 FLEX SHOWER DOOR INSTALLATION INSTRUCTIONS IMPORTANT DreamLine reserves the right to alter, modify or redesign products at any time without prior notice. For the latest up-to-date technical drawings, manuals
600mm 3 drawer base cabinet
 Follow these instructions to build and attach your cabinet. Things you need to know ase cabinets come with different positions for attaching your. If you are choosing the rebated back option make sure
INSTALLATION GUIDE DUOFUSE SLAT WALL SYSTEM
 06/2013 ENG 1 INSTALLATION GUIDE DUOFUSE SLAT WALL SYSTEM The Duofuse wood composite slat wall system is much more durable than wooden fences, and correct installation is necessary to enjoy the fences
SHIPLOCK CLADDING PRODUCT GUIDE INSTALLATION TECHNICAL SPECIFICATIONS CARE & MAINTENANCE
 SHIPLOCK CLADDING PRODUCT GUIDE INSTALLATION TECHNICAL SPECIFICATIONS CARE & MAINTENANCE SHIPLOCK CLADDING CN-04E / CN-04W / CN-W008 Prior to the installation of any form of Cladding, it is recommended
Materials and Tools: Printer s Triple Console Cabinet. Free Plans to build a Triple Console Cabinet
 Materials and Tools: Materials: 3 sets euro style bottom corner mount drawer slides, 16 length 3 sets inset hinges 24 cup style handles 8 2x2 @ 8 feet long 6 1x3 @ 8 feet long 6 1x2 @ 8 feet long 1 sheet
Original Gallery System
 GAllery System Art Displays Original Gallery System a Gallery System product Here s everything you need to know to get started with your Gallery System Art Hanging System GS getting started To install
Melamine Plastic Laminate. Toilet Partition Installation Manual
 Melamine Plastic Laminate Toilet Partition Installation Manual PHONE: FAX: 1-866-317-2786 ATTENTION DO NOT MIX FASTENER PACKS EACH FASTENER PACK HAS THE NECESSARY BOLTS, BARRELS AND SCREWS TO INSTALL THE
UNIDOOR-X TUB DOOR TUB DOOR INSTALLATION NSTRUCTIONS. MODEL #s D58580-##
 T F UNIDOOR-X TUB DOOR se A R a e l re TUB DOOR INSTALLATION I NSTRUCTIONS r o D ved f IMPORTANT DreamLine reserves the right to alter, modify or redesign products at any time without prior notice. For
Visions Tub Door & Backwall
 Visions Tub Door & Backwall TUB DOOR & BACKWALL INSTALLATION INSTRUCTIONS IMPORTANT DreamLine reserves the right to alter, modify or redesign products at any time without prior notice. For the latest up-to-date
Installation Guide. Pionite Decorative Surfaces One Pionite Road, Auburn, Maine PIONITE ( )
") Installation Guide A Subsidiary of Panolam Surface Systems SMPBRO00-012 6/14 Pionite decorative laminates are designed for finished interior surfaces which require high impact, wear and stain resistance
Installation Guide A Subsidiary of Panolam Surface Systems SMPBRO00-012 6/14 Pionite decorative laminates are designed for finished interior surfaces which require high impact, wear and stain resistance
KITCHEN INSTALLATION GUIDE
 KITCHEN INSTALLATION GUIDE The step-by-step guide to installing your new kitchen right The materials and tools you ll need This brochure is your guide to preparing and installing your new kitchen. Inside
ESSENCE - H SHOWER / TUB DOOR INSTALLATION INSTRUCTIONS
 ESSENCE - H SHOWER / TUB DOOR INSTALLATION INSTRUCTIONS IMPORTANT DreamLine reserves the right to alter, modify or redesign products at any time without prior notice. For the latest up-to-date technical
KITCHEN INSTALLATION GUIDE
 KITCHEN INSTALLATION GUIDE The step-by-step guide to installing your new kitchen right This brochure is your guide to preparing and installing your new kitchen. Inside you ll find tips and ideas, clear
Locker Installation Guide. Lockers Available From CES Company Phone: Fax:
 Locker Installation Guide Lockers Available From CES Company Phone: 707-664-9964 Fax: 707-664-9964 info@cescompany.com Table of Contents Page 3-4 Tools and Materials Page 5-6 Step 1 Base Construction Page
How to fit an Internal Door
 How to fit an Internal Door How to fit an Internal Door The following instructions are for installing a internal door only. If you have any queries please contact Cheshire Mouldings technical helpline
10x10 Trellis Pergola
 0x0 Trellis Pergola ASSEMBLY GUIDE Ver.-007 Table of Contents PAGE 0x0 Trellis Pergola Introduction & Overview...................................................... Pergola Materials Overview..............................................................
QWALL 5.2 (2 Back Panels)
") QWALL 5. ( Back Panels) SHOWER ACRYLIC WALL INSTALLATION INSTRUCTIONS IMPORTANT DreamLine TM reserves the right to alter, modify or redesign products at any time without prior notice. For the latest up-to-date
QWALL 5. ( Back Panels) SHOWER ACRYLIC WALL INSTALLATION INSTRUCTIONS IMPORTANT DreamLine TM reserves the right to alter, modify or redesign products at any time without prior notice. For the latest up-to-date
Please read these instructions before use and keep for future reference
 Wardrobe Assembly Guide Allen Key Provided (if required) Philips Screwdriver Required Hammer Required Please read these instructions before use and keep for future reference Caution! Two Person Assembly
Hinge Door + Side Panel
 Hinge Door + Side Panel Instruction Manual KL+ KR Important Information Toughened glass is completely safe for use in our shower enclosures and bath screens; providing our products are installed according
PRIME SHOWER ENCLOSURE INSTALLATION INSTRUCTIONS
 PRIME SHOWER ENCLOSURE INSTALLATION INSTRUCTIONS IMPORTANT DreamLine reserves the right to alter, modify or redesign products at any time without prior notice. For the latest up-to-date technical drawings,
INFINITY-Z SHOWER DOOR / TUB DOOR INSTALLATION INSTRUCTION. MODEL #s 01-Chrome
 INFINITY-Z SHOWER DOOR / TUB DOOR INSTALLATION INSTRUCTION IMPORTANT DreamLine reserves the right to alter, modify or redesign products at any time without prior notice. For the latest up-to-date technical
INSTALLATION INSTRUCTIONS FRAMELESS CONTINUOUS HINGE SHOWER ENCLOSURE QCI5232
 INSTALLATION INSTRUCTIONS FRAMELESS CONTINUOUS HINGE SHOWER ENCLOSURE QCI5232 QCI5232 Rev 0 Page 1 Certified 06/20/2016 INSTALLATION NOTES: Unpack your unit carefully and inspect for freight damage. Lay
ASSEMBLY INSTRUCTIONS GL75. BASE SIZE: 2.190m x 1.520m
 ASSEMBLY INSTRUCTIONS GL75 BASE SIZE: 2.190m x 1.520m CONGRATULATIONS ON PURCHASING A DURATUF GUARDIAN SHED. BEFORE YOU BEGIN THE ASSEMBLY PLEASE NOTE SOME IMPORTANT POINTS: BEFORE YOU START: Read all
INSTALLATION INSTRUCTIONS
 Tools required for the installation. A. Core Drill 87mm Drill bit B. Tape measure C. Spirit Level D. Marking pen E. Caulking gun F. Cutting Pliers G. Cordless Drill and Philips head bit, 5mm Drill bit.
Stainless Steel 95C34 Series
 Stainless Steel 95C34 Series Toilet Partition Installation Manual PHONE: FAX: 866-317-2786 ATTENTION DO NOT MIX FASTENER PACKS EACH FASTENER PACK HAS THE NECESSARY BOLTS, BARRELS AND SCREWS TO INSTALL
Basic Assembly For Conventional Series 9000 Structural Panels
 Steelcase, Inc. Grand Rapids, MI 49501 U.S.A. 1-888-783-3522 Basic Assembly For Conventional Series 9000 Structural Panels NOTE: Assembly directions for curved panels are the same as standard panels. Tools
IMPORTANT!!! ASSEMBLY ASSEMBLY INSTRUCTIONS. (Internal Dimensions)
") ASSEMBLY ASSEMBLY INSTRUCTIONS (Internal Dimensions) Ent Spec Edition Ltr v-0- Overall dimensions including base: 7. L x 9 W x 0 H cms 97.5" L x 7" W x 8.7" H IMPORTANT!!! Please read these instructions
ASSEMBLY ASSEMBLY INSTRUCTIONS (Internal Dimensions) Ent Spec Edition Ltr v-0- Overall dimensions including base: 7. L x 9 W x 0 H cms 97.5" L x 7" W x 8.7" H IMPORTANT!!! Please read these instructions
Vinyl Windows and Doors
 Vinyl Windows and Doors Manufactured by Pella Corporation Installation Instructions for Replacement of Aluminum Sliding Doors in Hard Coat Stucco Applications. Part Number: V981555 2009 Pella Corporation
UNIDOOR (STYLES B&C)
") UNIDOOR (STYLES B&C) SHOWER DOOR & GLASS PANEL INSTALLATION INSTRUCTIONS IMPORTANT DreamLine reserves the right to alter, modify or redesign products at any time without prior notice. For the latest up-to-date
UNIDOOR (STYLES B&C) SHOWER DOOR & GLASS PANEL INSTALLATION INSTRUCTIONS IMPORTANT DreamLine reserves the right to alter, modify or redesign products at any time without prior notice. For the latest up-to-date
INSTALLATION INSTRUCTIONS
 Tools required for the installation. A. Core Drill 87mm Drill bit B. Tape measure C. Spirit Level D. Marking pen E. Caulking gun F. Cutting Pliers G. Cordless Drill and Philips head bit, 5mm Drill bit.
Installation Manual for Metal Toilet Partitions Elite & Elite Plus Series
 P a g e 1 Table of Contents Page General Notes and Tools Required 3 STEP 1: Establish Floor Bracket Locations 4 STEP 2: Fasten Floor Brackets 4 & 5 STEP 3: Erect Panels 6 STEP 4: Erect Wall Pilaster 7
How-to-Install. Laminate Countertops and Sheet Laminate. FREE brochure Reverso en español
 FREE brochure Reverso en español How-to-Install Laminate Countertops and Easy to install instructions provided inside Multiple colors available for unique design options Durable and easy to care for Accessory
UNIDOOR/UNIDOORLUX/UNIDOOR PLUS
 UNIDOOR/UNIDOORLUX/UNIDOOR PLUS SINGLE SHOWER DOOR INSTALLATION INSTRUCTIONS IMPORTANT DreamLine reserves the right to alter, modify or redesign products at any time without prior notice. For the latest
FRAMED PANEL / DOOR / PANEL CONTINUOUS HINGE SHOWER ENCLOSURE INSTALLATION INSTRUCTIONS
 FRAMED / DOOR / CONTINUOUS HINGE SHOWER ENCLOSURE INSTALLATION INSTRUCTIONS QCI5229 Rev 0 6 INSTALLATION NOTES: Unpack your unit carefully and inspect for freight damage. Lay out and identify all parts
ASSEMBLY INSTRUCTIONS GG77. BASE SIZE: 2.190m x 2.020m
 ASSEMBLY INSTRUCTIONS GG77 BASE SIZE: 2.190m x 2.020m CONGRATULATIONS ON PURCHASING A DURATUF GUARDIAN SHED. BEFORE YOU BEGIN THE ASSEMBLY PLEASE NOTE SOME IMPORTANT POINTS: BEFORE YOU START: Read all
HORIZONTAL RETRACTABLE SCREEN Unika and Genius
 HORIZONTAL RETRACTABLE SCREEN Unika and Genius Single Door Assembly and Fitting Guide. Please read through before installing your screen. Retractable Horizontal Screen Single Door (Unika shown) Before
INSTALLATION INSTRUCTIONS FOR ULTRA LATTICE AND ALUMAWOOD ARBORS
 INSTALLATION INSTRUCTIONS FOR ULTRA LATTICE AND ALUMAWOOD ARBORS GENERAL INFORMATION: Lattice arbors are designed to be freestanding or attached. They are designed to resist a 10 lb. to 30 lb. per square
UNIDOOR LUX (STYLE E)
") UNIDOOR LUX (STYLE E) SHOWER DOOR & GLASS PANEL INSTALLATION INSTRUCTIONS IMPORTANT DreamLine reserves the right to alter, modify or redesign products at any time without prior notice. For the latest up-to-date
UNIDOOR LUX (STYLE E) SHOWER DOOR & GLASS PANEL INSTALLATION INSTRUCTIONS IMPORTANT DreamLine reserves the right to alter, modify or redesign products at any time without prior notice. For the latest up-to-date
Hinge Door + One Inline Panel
 inge Door + One Inline Panel Instruction Manual KLD + KL Important Information Toughened glass is completely safe for use in our shower enclosures and bath screens; providing our products are installed
x2 1/4 (6mm) Floor Anchor
 Floor Anchor") INSTALLATION GUIDE Main Components x1 Rail x5 Wall Spacer x2 Anti-jump Block x2 Straight Strap x1 Right Stopper x1 Left Stopper x5 5/16 (8mm x 60mm) Carriage Bolt x5 5/16 (8mm x25mm) Anchor x5 5/16 (8mm
INSTALLATION GUIDE Main Components x1 Rail x5 Wall Spacer x2 Anti-jump Block x2 Straight Strap x1 Right Stopper x1 Left Stopper x5 5/16 (8mm x 60mm) Carriage Bolt x5 5/16 (8mm x25mm) Anchor x5 5/16 (8mm
Argon 02 Installation Instructions & Parts List
 Argon 02 Installation Instructions & Parts List Illustration Argon, H1 Handle Right Hand: Open Out 16/06/2016 Revision 1.1 Page 1 of 10 IMPORTANT This shower screen / enclosure must be installed by suitably
DURACRYL WALL INDEX INTRODUCTION. TOOLS AND MATERIALS REQUIRED. FLAT SHOWER WALL SIDE CONTOUR SHOWER WALL CORNER CONTOUR SHOWER WALL FLAT BATH WALL
 DURACRYL WALL FLAT SHOWER WALL SIDE CONTOUR SHOWER WALL CORNER CONTOUR SHOWER WALL FLAT BATH WALL INSTALLATION GUIDE INDEX PAGES Introduction 1 Tools and materials 1-2 Construction requirements - timber
Installation Manual. Solid Plastic Toilet Partitions. IN CANADA & AREAS OTHER THAN U.S.A.: IN THE U.S.A.:
 Installation Manual Solid Plastic Toilet Partitions Toilet Partitions & Lockers IN THE U.S.A.: Hadrian Inc., 7420 Clover Avenue, Mentor, OH 44060 Telephone: 440-942-9118 Fax: 440-942-9618 U.S. toll free
QWALL 4 ACRYLIC SHOWER WALL INSTALLATION INSTRUCTIONS
 QWALL 4 ACRYLIC SHOWER WALL INSTALLATION INSTRUCTIONS IMPORTANT DreamLine TM reserves the right to alter, modify or redesign products at any time without prior notice. For the latest up-to-date technical
tile redi redi DOOR Redi Swing SERIES: CONFIGURATION: MOUNTING PACKAGE:
 redi DOOR INSTALLATION INSTRUCTIONS tile redi Redi Swing g TM TM...Opening Doors to Stunning Showers! TM TM SERIES: CONFIGURATION: MOUNTING PACKAGE: 2900V Door-Panel No header, offset pivot hinges, u-channel
Track Rack. * Track Racks are not lockable
 The Track Rack s unique staggered, sliding hook design creates the greatest parking efficiency while still providing easy access to any particular bike. When adding or removing a bike to the rack, simply
How To Create An Entertainment Unit
 How To Create An Entertainment Unit Materials required: 2 x Pine Panels - 1800mm x 450mm x 18mm 4 x Pine Panels - 310mm x 450mm x 18mm 1 x Pine Panels - 650mm x 450mm x 18mm 6 x Bun feet (your choice of
12 x 12 Flat Top Pergola
 x Flat Top Pergola A S S E M B LY G U I D E Model: Freemont OPTIONAL ACCESSORY Bolt Down Bracket Kit ( for Pergola) Ver /NOV 00 AI-BP0-0- Ta b l e o f Co n t e n t s PAGE x Flat Top Pergola Introduction
10 x 10 Flat Top Two Tone Pergola
 0 x 0 Flat Top Two Tone Pergola Models: Bordeaux ASSEMBLY GUIDE OPTIONAL ACCESSORIES Arch Kit System ( Arches) Privacy Fence Panel System ( Panels & Middle Post) Bolt Down Bracket Kit ( for Pergola) Ver.0-00
Frameless Hinged Door Enclosure. These instructions must be left with the user. Installation Guide W2-B
 Frameless Hinged Door Enclosure These instructions must be left with the user Installation Guide 1 1290643-W2-B 1290643-W2-B 2 Introduction Thank you for purchasing a quality product. To enjoy the full
Contents. pages 20-24: Installing Edge sinks into. custom laminate countertops page 8: Installing Edge sinks into postform laminate countertops
 Contents pages 2-8: Installing Edge sinks into custom laminate countertops page 8: Installing Edge sinks into postform laminate countertops pages 9-14: Installing Acrylic sinks into custom laminate countertops
McCue Bumper Installation Instructions
 McCue Bumper Installation Instructions McCue 8" Bumper Tools Required: Saw with 10-12" blade Tape measure Flat head screwdriver Phillips screw driver Pencil or chalk line Drill with Philips driver bit
Ballistic Fiberglass Doors & Frames
 INSTALLATION INSTRUCTIONS Ballistic Fiberglass Doors & Frames IMPORTANT: Read all instructions before beginning installation. These instructions are provided to help prevent installation problems caused
Centre-fold Door. Installation Instructions. Please note: Images shown are for illustration purposes only
 Centre-fold Door Installation Instructions Please note: Images shown are for illustration purposes only Please read these instructions in full before installing. The enclosure can be installed to give