INSTALLATION. GlUElEss CliCK BamBoo installation GUidE. Introduction. Tips for a successful installation
|
|
|
- Alban King
- 5 years ago
- Views:
Transcription
1 GlUElEss CliCK BamBoo installation GUidE Introduction Thank you for purchasing a Yanchi Bamboo Floor! Our flooring combines superior technology and the highest quality materials available so that your new floor will perform for many years to come. Please carefully read the following Installation Guideline to be sure you understand the things you will need to know to ensure your floor will perform at the maximum level Please understand that this is a natural product and will have shading variations. During installation, it is best to work out of several cartons and mix the various shades in a pleasing pattern.when choosing a flooring product for areas in your home; children, pets, and lifestyle activity should be taken carefully into consideration.this flooring will scratch and dent, just like any other wood flooring. Therefore, it is important to protect your floor with thick felt or rubbers pads under chairs and other furniture that may be moved across the floor. In some cases, it may be necessary to protect your floor from heavy furniture. Never drag furniture or appliances across the floor. Scratches, dents, shading variations, and installation issues are not covered by our Warranty. PLEASE READ BEFORE INSTALLING Tips for a successful installation 1. Be sure to read all instructions and Warranty first so you can get your questions answered before you begin. 2. Purchase 105% of the square footage in order to ensure that you have enough material to complete the area. If you are installing diagonally, you should purchase an extra 15% (depending on room size). It is best if you purchase all of your flooring at the same time; some products can vary significantly if purchased at a later date. It is also helpful if you have extra material that can be used for future repairs 3. It is important to acclimate this product for at least 15 days. To properly acclimate, move the product into the rooms where they will be installed. Ensure the carton is open and raised off the ground. 4. Moisture testing is required to avoid conditions which may affect your flooring and provide a breeding ground for unhealthy mold and mildew 5. Be sure to leave spacing around the entire edge of the flooring so the flooring has room to expand and contract. You will even need to have spacing even under door frames and at kitchen islands. Small pieces of flooring can be used as spacers, and shims or spacers can be used to make smaller adjustments; allow at least 3/8 inch (9.5 mm) for smaller rooms and 1/2 inch ( 12.7 mm) for larger rooms. In very large rooms (more than 40 feet {12.2 m} long), you will need to leave an expansion gap of 1/2 inch ( 12.7 mm), which can then be covered with the T-Molding. We also recommend leaving an expansion gap in the door opening between rooms; this also can be covered by the T-Molding placed directly under the door 6. You will need to undercut door frames to allow for expansion; this can be done by placing a piece of flooring on the subfloor and then the saw blade on top of the flooring before beginning the cut. 7. A tapping block and pull bar will be necessary to gently push or pull the flooring together. Never hit the tongue or groove directly with a hammer. Gentle tapping is the most effective way to push or pull the planks together. Never try to force the planks to lie flat; a few gentle taps on the tapping block in the middle of the plank will generally help the plank fold down into place. If you still have difficulty, Page 1
2 cut the plank into a smaller piece and us e to begin or finish a row. 8. During installation, it is important to inspect the flooring. Any planks that are not suitable should be not be installed. Please note that it is the responsibility of the person installing the floor to inspect the flooring for defects or other issues that may not be suitable. Once the flooring is installed, it is considered acceptable, and becomes the responsibility of the person installing the floor. Please remember that damaged planks should have the damaged portion cut off, and the undamaged portion used to begin or end a row. 9. Because of the stability of engineered flooring, it may be installed on, above, or below grade (basements). When installing over a crawl space or concrete, it will be necessary to use a vapor barrier to prevent moisture migration. A plastic film with a minimum thickness of 6 mil should be placed with a 4 6 inch ( mm) overlapped seam, and then taped with duct tape or other suitable tape. If the flooring does not have the padding attached, you will need to use a padding or underlayment purchased separately. Some padding (underlayment) will have its own moisture barrier attached, and it will not be necessary to use a separate moisture barrier. 10. Underlayments: There are many types of underlayments available through local retailers. Some examples are cork, rubber, sound deadening panels, and standard foam. Foam padding may or may not have the moisture barrier attached, be sure to consult with the retailer to be sure. A moisture barrier is required over concrete and a good idea over a crawl space. If your home owner s association has sound transmission requirements, you will need to use a sound deadening underlayment. Consult with your local retailer to determine if the underlayment meets these requirements. 11. Be sure that all doors that open into the area will have enough clearance to open; it may be necessary to cut the bottom of the door to ensure that it will open and close fully without rubbing against the floor. Door cutting should be done by an experienced carpenter. Also be sure that any appliances and fixtures will fit back in their place once the flooring is installed. 12. Protect your floor from scratches. Use thick felt or rubber pads under chairs & tables. Also, if your chairs or other furniture have rolling castors, you made need to replace with softer rubber castors. Heavy furniture may require addition protection to prevent denting under the legs. Never push/drag furniture or appliances across the floor as they can damage the finish. INSTALLation Guideline Responsibilities Of The Owner / Installer If you take care to install this flooring correctly, taking all precautions suggested in this guideline, this flooring will give you many years of satisfaction. While it is not necessary to use a professional to install this flooring, a professional can advise you of existing or past conditions that may affect the long term performance of the flooring. This is only guideline and cannot supply all the details you may encounter regarding the installation. Detailed preparation and installation procedures are outlined by the National Wood Flooring Association s Hardwood Flooring Manual (NWFA) or BuildDirect cannot be responsible for the installation under any circumstances. Please remember it is the responsibility of the person installing the floor to determine the suitability of the application, materials, and conditions before beginning the installation. Page 2
3 Pre- Installation Procedures/Acclimation Please handle, transport, and unload the flooring with care. Flooring should be stored in a dry place, with at least a four-inch air space under cartons. Flooring should not be delivered until the building has been closed in with windows and doors in place, and until cement work, plastering, painting, and all other materials are thoroughly dry. It is important to acclimate this product for at least 15 days. To properly acclimate, move the product into the rooms where they will be installed. Ensure the carton is open and raised off the ground. In addition, the heating or cooling system should be operating and controlled at F (30-23 C) for at least 72 hours before, during and maintained after installing. As with all wood flooring, your flooring will experience less expansion/contraction if the humidity is controlled year-round. Moisture Test: Moisture testing is required, it will alert you of current moisture issues that will affect the installation and promote the growth of unhealthy mold and mildew which could potentially affect you and your family s health. If necessary, you may want to consult with a professional for proper testing and guidance. Moisture levels above 32.5 % in wood subfloors or 4.5 on moisture encounter meters for concrete subfloors can promote the growth of mold and should be investigated to determine the cause and solution of the problem. Checking for moisture: Use a Delmhorst J-4 (or equivalent) moisture meter for wood, or a Tramex Concrete Moisture Encounter meter (or equivalent) for concrete. You can also use a calcium chloride test for concrete; test results above 3 lbs. per 3000 square feet (92.9 square meters) in a 24 hour period can indicate a moisture issue. Other Considerations: Before installation, lay out the flooring where it is to be installed (that is, lay the planks down roughly as they will appear after installation), taking care to mix it in a shading pattern pleasing to your eye. Installer should inspect each plank at this time for finish and quality. Once installed, it becomes the responsibility of the installer/homeowner. Remember that all natural flooring comes in a range of colors and shades. Our quality control procedures at the factory ensure that very few, if any defective planks are delivered to the consumer. Remove baseboards and undercut door jambs to insure a quality installation. Remember to allow room for expansion around the entire perimeter of the flooring. Failure to provide room for expansion will result in installation issues. Recommended Areas This flooring may be installed on, above, or below grade (soil level). This flooring should not be installed in wet areas such as bathrooms (with tub/shower) or mud rooms. Care should be taken not to expose the flooring to standing water or liquids for extended periods of time, as it may damage the floor. Acceptable subfloors: Because of the versatility of our flooring, it can be installed over virtually any hard surface floor such as wood, vinyl, and even ceramic tile (be sure the tiles are firmly attached to the subfloor). Carpet or other textile products will need to be removed prior to installation. Before beginning the installation, check for squeaks and other loose areas to ensure they are firmly a ttached. Areas that are loose should be fastened with screws or ring shank nails, as it will not be possible to do this once the flooring is installed. Subfloor preparation: The subfloor should be clean, free from dirt or other debris, and relatively flat and level. Normal requirements call for no more than 3/36 inch (4.7 mm) difference in a 30 foot (3.05 m) radius. While it may not be critical to be exact, it will provide a more solid base for the flooring which will help to eliminate movement or hollow sounds when walked on. High spots can be removed by sanding (wood) or grinding (concrete), or the low spots may be filled with an appropriate leveling compound Page 3
4 Radiant heat subfloors (in floor heating): Due to the popularity of radiant heat and the many systems available; you will need to consult with the manufacturer of the system to ensure that it is compatible with this flooring. The temperature of the heating system should never exceed 85 F (29.44 C) and must be designed so that the heating is carefully controlled so that it gradually heats to the operating temperature. Rapid heating or excessive heat may damage the flooring or finish. Maintaining the humidity between 35% - 50% in your home will keep expansion and contraction to a minimum, and is highly recommended. If installed in concrete, the concrete should be fully cured (30 60 days) before beginning preparation for flooring. For both wood and concrete subfloors, the radiant heat should be turned on for approximately one week to ensure excess moisture is removed. Turn the system off for at least 24 before beginning the installation. After the flooring is installed, the system may be turned back on. It is important the system be returned to the operating temperature slowly, preferably over hours. Installation GENERAL Method A: Position the plank at a angle to the plank already installed. Move the plank gently up and down while pushing forward. The plank will then automatically fold into place. You can either insert the tongue into the groove or the groove on to the tongue. The tongue in groove method is most common, and also the easiest. Never force the plank to lay flat, always help it to fold into position. See Diagrams A-1 through A-3. Method B: You can also tap the planks into place with a tapping block and hammer without lifting the planks. For this method you will need a special tapping block designed for 4/2 inch (42mm) flooring. The planks should not be tapped together with a single tap. To avoid damaging the plank, you must tap them together gradually. See Diagrams B-1 and B-2. Remove all wall base or molding, and undercut door trims if needed. When installing over concrete or a crawl space, you will need to use a vapor barrier; you can use polyethylene film (6 mm or more thickness) for this purpose (Figure 4). Overlap the seams by 4 6 inches ( mm), and then tape the seams to provide a seamless moisture barrier. Put down the plastic film as necessary until you complete that section, this will help to keep the moisture barrier from getting damaged. Allow the film to run up the wall a short distance; then trim so it will be covered by wall molding (Figure 2). When starting the installation, it is important to take time to plan the installation; accurate measurements will allow you to avoid having to cut small strips when you reach the other side of the room. If necessary, you may need to Page 4
 to allow room for expansion.")
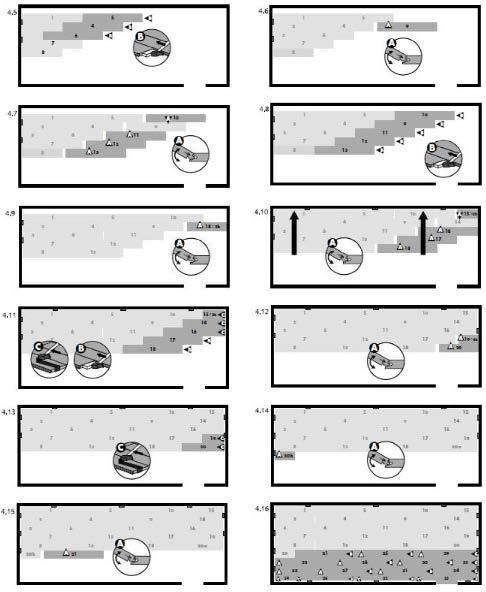
5 trim the starting row width so that you can avoid very thin strips of flooring when you reach the other side of the room. To start, the sides of the planks that will go next to the wall will need to have the tongue portion removed (Figure 3) to allow room for expansion. You will also need to take a board and cut off one third; these two pieces will be used to begin the second and third rows. Follow the procedures shown in Figures for the first four rows; you can then push these rows into place along the wall. Be sure to use spacers or scrap pieces of flooring along the wall to maintain expansion gap. At this point, you can avoid a stair step joint pattern by using the pieces of boards cut off when finishing a row (or cut new ones). Be sure these pieces are at least 8 inches (203 mm) long. Always keep the end joints at least 8 inches (203 mm) apart. You can then finish the room as shown in Figures Please Note: Be sure there is sufficient room for expansion along all walls, under door frames, and around any pipes or fixtures attached to or come through the subfloor. Rooms longer than 40 feet ( m) will require an expansion gap (you can decide where you think it will look best), which can be finished with the T-Molding. When installing in other rooms, leave an expansion gap directly beneath the door; this can then be covered with the T-Molding. Never attach the flooring directly to the subfloor as it will prevent the floor from expanding/ contracting. Page 5
6 Page 6
7 In places where you cannot use the tapping block to push the boards into place, you will need to use the pull bar. You can then gently tap the boards in place. This is necessary for the last board in each row and when finishing the last row. See Diagrams 5A 5C. Pipes: In rows where there is a pipe or other object through the subfloor, make sure the object lines up exactly where two boards will meet on the short ends. Take care to measure carefully before cutting, so the two boards end at the middle of the object. Use a drill or hole bit that is the diameter of the pipe or object, plus 3/4 inch (20mm) for expansion. Click the two short sides of the boards together, then drill the hole centered on the joint between the boards as shown. Now you can separate the two boards and install as normal. See Diagrams 6A 6C. Under door frames: When sawing boards that will go under the door frame, you need to be sure to leave 3/8 inch (70mm) for expansion under the door frame. When undercutting the door frame, be sure you cut far enough under, so that the frame covers the board, and still has enough room for expansion. Use the tapping block to gently tap the board into place, and then use the pull bar to gently tap into place. Remember that this board needs to end so that the transition piece used in the doorway ends directly under the middle of the door, plus the expansion gap. If you are installing in the adjacent room, the T-Molding should be centered under the door. See Diagrams 7A & 7B. Transitions: All transition pieces should be attached to the subfloor with a high quality construction adhesive available at all Home Centers and Hardware stores. Place a generous bead of adhesive under the part of the transition that will sit directly on the subfloor, and then press the transition firmly in place. Be sure the transition sits firmly in the adhesive, and take care not to get any adhesive on the finish. Remove any adhesive from the finish immediately with mineral spirits and buff off any residue with a dry soft cloth. It may be necessary to place heavy weights on Page 7
8 the transition until the adhesive dries to ensure it will lay flat. If necessary, you can also use small finish nails by pre-drilling, countersinking, and then filling the nail hole with matching putty. Never attach the transitions directly to the flooring. Finishing the floor: Remove spacers around the perimeter of the floor, then replace existing or install new wall base or molding. Never nail the wall base or molding directly to the flooring. CONGRATULATIONS! You can now enjoy your beautiful new floor! Page 8
Engineered Strand Uniclic Floating Installation
 Engineered Strand Uniclic Floating Installation Introduction Thank you for choosing our Engineered Strand Bamboo Flooring! You have selected one of the highest quality engineered floors available. Our
Lifestyle Laminates Uniclic Floating Floor
 Lifestyle Laminates Uniclic Floating Floor Thank you for choosing Wellmade Laminate Flooring, featuring the glue-less Uniclic floating installation system. You have selected one of the highest quality
SOLID STRAND BAMBOO INSTALLATION GUIDE. Tips for a successful installation
 SOLID STRAND BAMBOO INSTALLATION GUIDE Please keep in mind that all hardwood flooring will scratch, dent, and change color over time. Therefore, you will need to decide if hardwood is suitable for your
Engineered Strand Bamboo Flooring
 Engineered Strand Bamboo Flooring Introduction Thank you for choosing Wellmade Engineered Strand Bamboo! You have selected one of the highest quality engineered floors available. Our engineered flooring
1. Read all instructions/warranty first: Get all your questions answered before you start installing the floor by calling
 STRAND WOVEN BAMBOO INSTALLATION GUIDE Please keep in mind that all hardwood flooring will scratch, dent, and change color over time. Therefore, you will need to decide if hardwood is suitable for your
Engineered Hardwood Flooring Installation Instructions
 Engineered Hardwood Flooring Installation Instructions 1 Important Information before You Begin 1.1 Installer/Owner Responsibility Carefully inspect all materials before installation. Materials installed
AquaGuard - Water Resistant Flooring Installation guidelines
 AquaGuard - Water Resistant Flooring Installation guidelines Before You Start: Please read all the instructions before you begin the installation. Improper installation will void the warranty. Important
DuChâteau Vinyl DeLuxe Grand Collection LuxCor Click Installation Instructions
 DuChâteau Vinyl DeLuxe Grand Collection LuxCor Click Installation Instructions General Information Intended for indoor residential and commercial use only, DuChâteau Vinyl DeLuxe Grand Collection - Luxcor
Laminate Floor Installation Guide
 Laminate Floor Installation Guide Introduction This guide will take you through the necessary steps to install your Bel-Air Laminate Flooring. Make sure to carefully read through this guide so that you
For ANGLE-DROP Styles
 For ANGLE-DROP Styles BEFORE INSTALLATION: 1. READ THESE DETAILED INSTALLATION INSTRUCTIONS. 2. Material and tool requirements: - Estimate square footage and add 10%. - Select underlayment (over concrete
TORLYS LEATHER PLANK INSTALLATION INSTRUCTIONS
 ENGLISH INSTRUCTIONS TORLYS LEATHER PLANK INSTALLATION INSTRUCTIONS Dear Customer, You have chosen a high quality TORLYS Leather floor, well suited for all residential application except bathrooms and
Installation Instructions for Viking Hearth Engineered Wood Flooring
 Installation Instructions for Viking Hearth Engineered Wood Flooring 4.16.15 PLEASE READ THESE INSTRUCTIONS IN THEIR ENTIERTY BEFORE BEGINNING THE INSTALLATION. Installer s / Owners Responsibility As a
TRIVERSA TRIVERSA ID. Triversa Triversa ID Installation Instructions. Remove the wall base and doorway trim. Always undercut wood door casings
 INSTALL ON ALL GRADE LEVELS Above Grade On Grade Below Grade by CONGOLEUM TRIVERSA TRIVERSA ID Triversa Triversa ID Installation Instructions GENERAL INFORMATION ATTENTION! READ BEFORE INSTALLING! Handle
Prior to installation, the installer assumes all responsibility for final inspection and quality of the product
 Mae Terra Hardwood Installation Instructions ¾ Solid Nail Down Protect your investment. Review and adhere to the flooring installation instructions. Please note that these are instructions for the experienced
Installation Instructions for Engineered Wood Flooring
 Installation Instructions for Engineered Wood Flooring PLEASE READ THESE INSTRUCTIONS IN THEIR ENTIERTY BEFORE BEGINNING THE INSTALLATION. Installer s / Owners Responsibility As a natural product, hardwood
Engineered Hardwood Installation
 Engineered Hardwood Installation Installer / Owner Responsibility Carefully inspect all materials before installation. Materials installed with visible defects are not covered under the warranty. Do not
SINCE 1995 HYBRID / LOFT / MANOR LINE INSTALLATION GUIDE
 HYBRID / LOFT / MANOR LINE INSTALLATION GUIDE We strive to offer our customers the highest quality bamboo flooring. Please carefully read this installation guide to ensure satisfactory results from your
INSTALLATION. Installer / Owner Responsibility. Basic Tools and Equipment. Putty and Filler Use. Recommended Installation Methods
 Installer / Owner Responsibility Carefully inspect all materials before installation. Materials installed with visible defects are not covered under the warranty. Do not install if you are not satisfied
INSTALLATION LAMTON INSTALLATION INSTRUCTIONS. Lamton Laminate Flooring with Underlay Attached Glueless Installation. Tools and Accessories
 Lamton quality laminate flooring is manufactured to exacting standards for long life and lasting beauty. Following these simple procedures for installation and it will ensure many years of pride and satisfaction.
Engineered Installation Instructions
 Engineered Installation Instructions Thank you for choosing STRAVAGANZA products! Hardwood flooring is a natural product; therefore defects in the flooring can occur in the manufacturing process or naturally
¾ Solid Installation Instructions
 ¾ Solid Installation Instructions Thank you for choosing STRAVAGANZA products! Hardwood flooring is a natural product; therefore defects in the flooring can occur in the manufacturing process or naturally
INSTALLATION. Installation Guide. Installing Bamboo Flooring on Top of a Wood Subfloor
 READ COMPLETELY BEFORE STARTING INSTALLATION. Congratulations on choosing Yanchi bamboo flooring. Please take time to read the following procedures before you begin installation. With the correct installation
Engineered Hardwood Installation
 Engineered Hardwood Installation Installer / Owner Responsibility Carefully inspect all materials before installation. Materials installed with visible defects are not covered under the warranty. Do not
Glueless Laminate Installation Instructions
 2nd FLOOR 1st FLOOR BASEMENT Glueless Laminate Installation Instructions! CAUTION: WOOD DUST ing, sanding, and/or machining of wood products can produce wood dust that can cause respiratory, eye, and skin
Installation Guide. When purchasing Aboeda flooring, add 5%-15% to actual square footage needed for cutting allowance.
 Installer/Owner Responsibility Aboeda strives to offer its customers high quality hardwood flooring. Please carefully read this installation guide to ensure satisfactory results from your floor. Carefully
Please read and review installation instructions completely before proceeding with the actual installation.
 INSTALLATION INSTRUCTIONS Important / Read First Please read and review installation instructions completely before proceeding with the actual installation. Owner / Installer responsibility The installer
Laminate Flooring Alternative to Hardwood Flooring
 Laminate Flooring Alternative to Hardwood Flooring Laminate flooring is moderately expensive, with a cost generally between that of vinyl and hardwood flooring. It's easier to install than hardwood and
Nail-Down Installation Instructions Prefinished 3/4 and 5/8 solid
 Nail-Down Installation Instructions Prefinished 3/4 and 5/8 solid Thank you for choosing 3 4 or 5 8 Exotic Hardwood Flooring. Protect your investment; review and adhere to the flooring installation instructions.
READ PRIOR TO BEGINNING INSTALLATION
 READ PRIOR TO BEGINNING INSTALLATION Bella Cera La Palazzina Engineered Hardwood Flooring Installation Instructions Check for Proper Color Selection Prior to Installation 1 Important Information before
Columbia Laminate Installation Instructions
 Columbia Laminate Installation Instructions 1. General Uniclic is a revolutionary system for installing laminated flooring without using glue. Uniclic uses an ingenious form of tongue and groove to click
BOIS CHAMOIS VINTAGE HARDWOOD FLOORING
 Professional Installation Recommended Nail-Down Installation Instructions Solid 3/4 x 7 x Random Length (6 10 ) Thank you for choosing Bois Chamois Vintage Hardwood Flooring. Protect your investment; thoroughly
Installation Instructions FOR INTERLOCKING ENGINEERED HARDWOOD (P.1)
") Installation Instructions FOR INTERLOCKING ENGINEERED HARDWOOD (P.1) Glue or Floating Installation: INTERLOCKING ENGINEERED WOODS can be installed over most sub-fl oors, and are engineered to be very dimensionally
Installation Instructions FOR INTERLOCKING ENGINEERED HARDWOOD (P.1) Glue or Floating Installation: INTERLOCKING ENGINEERED WOODS can be installed over most sub-fl oors, and are engineered to be very dimensionally
Wood Molding Installation Guide
 Wood Molding Installation Guide 1 P age Estimating the Quantity of Molding Required for the Job. Calculate the following: 1. Total lineal feet of Wall Base required for the job: Lineal feet 2. Total lineal
LUXURY VINYL FLOORING INSTALL INSTRUCTIONS
 PLEASE READ ALL INSTRUCTIONS CAREFULLY BEFORE YOU BEGIN INSTALLATION. IMPROPER INSTALLATION WILL VOID WARRANTY. Installation Preparation: The information on this sheet provides general guidelines. All
INSTALLATION INSTRUCTIONS
 Part I INSTALLATION AND CARE: Product Description: Engineered T&G hardwood flooring planks ore designed for use in multiple locations. Acceptable location includes basements, ground floors or high-rise
WOOD INSTALLATION GUIDE
 WOOD INSTALLATION GUIDE WOOD INSTALLATION DEFINITION FLOOR PREPARATION UNDERLAYMENT INSTALLATION MOULDINGS TOOLS NEEDED WHAT IS WOOD FLOORING? WOOD COMES IN A VARIETY OF SIZES, COLORS, SHADES AND INSTALLATION
INSTALLATION INSTRUCTIONS FOR ELKALAMINATE. IN ORDER TO OBTAIN A GOOD RESULT, WE ADVISE TO FOLLOW ALL GIVEN INSTRUCTIONS CAREFULLY.
 INSTALLATION INSTRUCTIONS FOR ELKALAMINATE. IN ORDER TO OBTAIN A GOOD RESULT, WE ADVISE TO FOLLOW ALL GIVEN INSTRUCTIONS CAREFULLY. PREPARATION Let the planks acclimatize for 48 hours in the unopened packaging
Trendwood Flooring Installation Instructions
 Trendwood Flooring Installation Instructions READ ALL OF THESE INSTRUCTIONS THOROUGHLY BEFORE BEGINNING INSTALLATION. Flooring Installation Instructions PRIOR TO INSTALLATION It is the installer's responsibility
Install your floor between 18 and 30 C.
 GOLDEN RULES 8-0 C Install your floor between 8 and 0 C. Quick-Step Livyn must be acclimatized in the room of installation between 8-0 C for a period of at least 8 hours before installation. This floor
FITTING INSTRUCTIONS FOR OFD SOLID OAK FLOORING
 FITTING INSTRUCTIONS FOR OFD SOLID OAK FLOORING SECTION 1 Installers Responsibility Pre-Installation SECTION 2 Glue Down (Solid & Engineered Flooring) SECTION 3 Secret Nailing (Solid & Engineered Flooring)
INSTALLATION INSTRUCTIONS FOR QUICK-STEP LAMINATE WITH HYDROSEAL TECHNOLOGY.
 . PREPARATION. INSTALLATION. FINISHING. MAINTENANCE INSTALLATION INSTRUCTIONS FOR QUICK-STEP LAMINATE WITH HYDROSEAL TECHNOLOGY. IN ORDER TO OBTAIN A GOOD RESULT, WE ADVISE TO FOLLOW ALL GIVEN INSTRUCTIONS
Installation Information
 Add for glue-down: Recommended Boardbrokers adhesive. Add for staple or nail-down: 1 1/2 staples or cleats (minimum), power nail model # 45 or compressor, in-line regulator, nylon/plastic tapping block,
CFS Engineered Flooring Floating Installation Instructions
 CFS Engineered Flooring Floating Installation Instructions CFS s stable engineered hardwood floors are natural products and as a result are not perfect. All of the floors CFS manufactures are in accordance
Pompeii Birch & Hickory Engineered Hardwood Flooring Installation Instructions
 Pompeii Birch & Hickory Engineered Hardwood Flooring Installation Instructions Tip: Check for proper color selection and style prior to Installation. No claims will be accepted after installation. 1 Important
BAMBOO FLOORING PRE-FINISHED SOLID BAMBOO INSTALLATION GUIDE
 BAMBOO FLOORING PRE-FINISHED SOLID BAMBOO INSTALLATION GUIDE PLEASE READ AND REVIEW THE ENTIRE INSTALLATION GUIDE BEFORE PROCEEDING WITH THE ACTUAL INSTALLATION IMPORTANT NOTICE: HOME LEGEND strongly recommends
INSTALLATION INSTRUCTIONS
 FLOATING-FLOOR APPLICATION INSTRUCTIONS Thank you for choosing Vanier Hardwood Flooring. Protect your investment. Review and adhere to the flooring installation instructions. Please note that these are
INSTALLATION INSTRUCTIONS FOR QUICK-STEP LAMINATE.
 . PREPARATION. INSTALLATION. FINISHING. MAINTENANCE INSTALLATION INSTRUCTIONS FOR QUICK-STEP LAMINATE. IN ORDER TO OBTAIN A GOOD RESULT, WE ADVISE TO FOLLOW ALL GIVEN INSTRUCTIONS CAREFULLY. - 0-% RH 8h
INSTALLER / OWNER RESPONSIBILITIES
 www.mainetraditionsflooring.com TM HARDWOOD FLOORING Crafted by Kennebec Lumber Company INSTALLER / OWNER RESPONSIBILITIES Common Facts / Issues Hardwood floors are made from beautiful trees that each
ENGINEERED WOOD INSTALLATION GUIDE: The Cardinal Collection
 ENGINEERED WOOD INSTALLATION GUIDE: The Cardinal Collection READ BEFORE INSTALLATION OF OILED FINISHED FLOORING DO S 1. Do mix wood from several boxes of flooring during installation. 2. Do make your best
Solid Installation Guidelines Elegance Plyquet
 Solid Installation Guidelines Elegance Plyquet Structure and Finish Warranty: Elegance Plyquet makes exceptionally high quality prefinished exotic and domestic solid hardwood floors. We are proud to warranty
Repairs. Chapter 10 Repairs 10. 1
 10 Repairs Chapter 10 Repairs 10. 1 Repairs As an installer, you will probably be called upon to repair damage to a resilient floor. Here are some of the most common problems and the recommended repairs
TONGUE & GROOVE NAIL-DOWN INSTALLATION INSTRUCTIONS
 FEBRUARY 2017 TONGUE & GROOVE NAIL-DOWN INSTALLATION INSTRUCTIONS Applicable to: Kahrs Supreme 20mm 3/4 Grande Collection Only PROTECT YOUR INVESTMENT! Maintain your warranty: Only use Kährs branded underlayments,
INSTALLATION GUIDE FOR MAZAMA MULBERRYWOOD HARDWOOD FLOORING
 INSTALLATION GUIDE FOR MAZAMA MULBERRYWOOD HARDWOOD FLOORING READ COMPLETELY BEFORE STARTING INSTALLATION. Congratulations on choosing Mulberrywood flooring. Please take time to read the following procedures
Wall Installations. Chapter 16 Wall Installations 16. 1
 16 Wall Installations Chapter 16 Wall Installations 16. 1 Alterna Premium Groutable Tile Create decorative backsplashes, accent walls, or other focal points with any size Alterna 16" x 16", 8" x 16", 8"
INSTALLATION GUIDE; ENGINEERED & HARDWOOD FLOORING (COMMERCIAL & RECLAIMED)
") INSTALLATION GUIDE; ENGINEERED & HARDWOOD FLOORING (COMMERCIAL & RECLAIMED) ATTENTION! INSTALLER/OWNER RESPONSIBILITIES Beautiful hardwood floors are a product of nature and, therefore, they will show
INSTALLATION GUIDE; ENGINEERED & HARDWOOD FLOORING (COMMERCIAL & RECLAIMED) ATTENTION! INSTALLER/OWNER RESPONSIBILITIES Beautiful hardwood floors are a product of nature and, therefore, they will show
Staple-Down, Glue-Down and Floating Installation IndusParquet 1/2 Engineered
 Staple-Down, Glue-Down and Floating Installation IndusParquet 1/2 Engineered Thank you for choosing IndusParquet ½ Engineered Hardwood Flooring. Protect your investment; review and adhere to the flooring
INSTALLATION INSTRUCTIONS
 VESDURA VINYL PLANKS 3MM PVC GLUE DOWN - OAK COLLECTION Safety First CAUTION Asbestos Warning in existing floor. Do not sand, dry scrape, bead blast or mechanically pulverize existing resilient flooring.
BOIS CHAMOIS VINTAGE HARDWOOD FLOORING
 Professional Installation Recommended Glue Down Installation Instructions Solid or Engineered 5/8 or 3/4 Thank you for choosing Bois Chamois Vintage Hardwood Flooring. Protect your investment; thoroughly
Manufacturer 12mm Laminate Flooring Installation Guidelines
 Manufacturer 12mm Laminate Flooring Installation Guidelines IMPORTANT Do not open immediately. Before opening, acclimatize planks for 48 hours by laying each box horizontally and individually in the center
For best results, it is essential that you follow the installation instructions exactly.
 For best results, it is essential that you follow the installation instructions exactly. PREPRTION Let the planks acclimatize for 48 hours in the unopened packaging at the normal room temperature, in the
INSTALLING YOUR UNICLIC FLOOR - Small planks / 3 sizes
 INSTALLING YOUR UNICLIC FLOOR - Small planks / 3 sizes 1) General The panels must be rotated on both short and long edges to fit into one another. This can be performed by inserting either the tongue into
Exterra Installation Guide
 Exterra Installation Guide Installing the foam padding Please review this installation guide before you begin installing the floor. If you have any questions, please call us at 800-428-5306 any time Monday
ENGINEERED TONGUE & GROOVE INSTALLATION INSTRUCTIONS 3/8, 7/16, 1/2, 9/16, 5/8, 3/4 Float-In / Glue-Down / Nail Down
 ENGINEERED TONGUE & GROOVE INSTALLATION INSTRUCTIONS 3/8, 7/16, 1/2, 9/16, 5/8, 3/4 Float-In / Glue-Down / Nail Down Important / Read First Please read and review installation instructions completely before
Loose Lay Luxury Vinyl Plank
 Loose Lay Luxury Vinyl Plank FLEX COLLECTION Installation & maintenance * PLEASE READ CAREFULLY * Installation, maintenance & warranty guideline for loose lay luxury vinyl products. Adherence to This guideline
TOOLS AND/OR ACCESSORIES NEEDED: NAIL/STAPLE-DOWN INSTALLATION
 http://www.simplefloors.com Artisan : 3/4 Exotic Imports Passport Collection 2 Hardwood Installation Instructions Beautiful, exotic hardwood floors are natural products and as a result are not perfect.
Kraus Engineered Luxury Vinyl Plank 5G Insta-Loc Click Installation Instructions
 Kraus Engineered Luxury Vinyl Plank 5G Insta-Loc Click Installation Instructions GENERAL GUIDELINES All instructions and recommendations are based on the most recent information available. They should
INSTALLATION INSTRUCTIONS FOR ENGINEERED WOOD
 INSTALLATION INSTRUCTIONS FOR ENGINEERED WOOD Glue, Staple/Nail Down, or Floating Installation: ENGINEERED WOODS can be installed over most sub floors, and are engineered to be very dimensionally stable,
INSTALLATION INSTRUCTIONS of Chevron and Herringbone Engineered Hardwood Flooring
 INSTALLATION INSTRUCTIONS of Chevron and Herringbone Engineered Hardwood Flooring www.tomson-floors.com TABLE OF CONTENTS 3 USING THE PRODUCT 3 YOUR RESPONSIBILITIES 4 PRE-INSTALLATION INSPECTION 5 BASIC
Glue-Down and Floating Installation IndusParquet 5/16 Engineered
 Glue-Down and Floating Installation IndusParquet 5/16 Engineered Thank you for choosing IndusParquet 5/16 Engineered Hardwood Flooring. Protect your investment; review and adhere to the flooring installation
installation Prefinished 3/4 solid (including various widths such as 3 1/4, 3 5/8, 4 3/4, 5 ) naildown installation instructions
 naildown installation instructions") Prefinished 3/4 solid (including various widths such as 3 1/4, 3 5/8, 4 3/4, 5 ) naildown installation instructions Thank you for choosing Jasper Floors Exotic Hardwood Flooring. Jasper Floors feature
Prefinished 3/4 solid (including various widths such as 3 1/4, 3 5/8, 4 3/4, 5 ) naildown installation instructions Thank you for choosing Jasper Floors Exotic Hardwood Flooring. Jasper Floors feature
English Professional Installation Guidelines
 Professional Installation Guidelines General Installation Instructions NOTE: After proper acclimation, open cartons just prior to installation. NOTE: Mannington Laminate Flooring is intended to be installed
Staple/Nail-DOWN APPLICATIONS INSTALLATION INSTRUCTIONS
 Staple/Nail-DOWN APPLICATIONS INSTALLATION INSTRUCTIONS GENERAL NOTES: Inspect all materials carefully before installation. Warranties do not cover materials with visible defects once they are installed.
INSTALLATION INSTRUCTIONS FOR QUICK-STEP LAMINATE WITH HYDROSEAL TECHNOLOGY.
 . PREPARATION. INSTALLATION. FINISHING. MAINTENANCE INSTALLATION INSTRUCTIONS FOR QUICK-STEP LAMINATE WITH HYDROSEAL TECHNOLOGY. IN ORDER TO OBTAIN A GOOD RESULT, WE ADVISE TO FOLLOW ALL GIVEN INSTRUCTIONS
INSTALLATION INSTRUCTIONS
 INSTALLATION UV-OILED STRUCTURED FLOORING Please read all of these instructions thoroughly before beginning installation. In addition to these instructions, we recommend that the installer follow all installation
Zenterra TM Installation Guide
 Zenterra TM Installation Guide Installing the foam padding Please review this installation guide before you begin installing the floor. If you have any questions, please call us at 800-428-5306 any time
General Installation Instructions. Laminate Drop & Lock installation - 2G
 General Installation Instructions Laminate Drop & Lock installation - 2G A. INTRODUCTION Laminates and other wooden material acts after the surrounding climate, the main factor is the relative humidity
Glueless Laminate Installation Instructions Wood Designs
 OptiCore Installation Grade Glueless Laminate Installation Instructions Wood Designs! CAUTION: WOOD DUST The International Agency for Research on Cancer has classified wood dust as a nasal carcinogen.
LATITUDES 6.5 INSTALLATION & MAINTENANCE INSTRUCTIONS HARDWOOD
 REVISED 1/14/2016 LATITUDES 6.5 INSTALLATION & MAINTENANCE INSTRUCTIONS HARDWOOD PLEASE READ ALL INSTRUCTIONS CAREFULLY, BEFORE YOU BEGIN INSTALLATION. IMPROPER INSTALLATION WILL VOID WARRANTY. OWNER/INSTALLER
Installation Instructions Floating-Floor Application Thank you for choosing Indusparquet Hardwood Flooring (IP)
") Installation Instructions Floating-Floor Application Thank you for choosing Indusparquet Hardwood Flooring (IP) Protect your investment. Review and adhere to the flooring installation instructions. Please
Installation Instructions Floating-Floor Application Thank you for choosing Indusparquet Hardwood Flooring (IP) Protect your investment. Review and adhere to the flooring installation instructions. Please
General Installation Instructions
 General Installation Instructions Good web sites to check out that may assist you are: For gluing engineered boards over timber chipboard/particle board/ yellow tongue: https://www.youtube.com/watch?v=bpyfr373tl8
Galaxy SPC RIGID-CORE UNICLIC HYBRID PLANK. Installation Guidelines
 Galaxy SPC RIGID-CORE UNICLIC HYBRID PLANK Installation Guidelines ** Read all instructions carefully before installing. Incorrect installation will invalidate and void warranty. ** The planks you are
Chapter 25 - Flooring
 Chapter 25 - Flooring Contents Chapter 25 - Flooring... 25-1 Timing & Prerequisites... 25-2 Preparation... 25-3 Clean Up the Job Site... 25-3 Clean and Sand the Sub-Flooring... 25-3 Check the Gap under
ARTISTIC FINISHES. The Artistic Touch TM. Installation and Maintenance Guide. Copyright 1999 Artistic Finishes, Inc. All rights reserved.
 ARTISTIC FINISHES The Artistic Touch TM Installation and Maintenance Guide Estimating the quantity of molding required for the job Calculate the following: 1. Total lineal feet of Wall Base required for
INSTALLATION INSTRUCTIONS
 GLUE DOWN APPLICATION INSTRUCTIONS Thank you for choosing Vanier Hardwood Flooring. Protect your investment. Review and adhere to the flooring installation instructions. Please note that these are instructions
Engineered Prefinished & Unfinished Flooring
 AACER FLOORING INSTALLATION INSTRUCTIONS Engineered Prefinished & Unfinished Flooring 877-582-1181 aacerflooring.com AACER FLOORING INSTALLATION INSTRUCTIONS Engineered Prefinished & Unfinished Flooring
Quest ¾ and 5/8 Solid Installation Instructions
 Quest ¾ and 5/8 Solid Installation Instructions ATTENTION INSTALLER Please read carefully before installing the product. Make sure to follow our installation instructions and acclimatization recommendations
Installation Instructions
 Aspex Digitally Printed Wall Art PL PREMIUM HEAVY DUTY ADHESIVE ASPEX WALL ART DOUBLE SIDED FOAM TAPE Installation of Aspex Digitally Printed Wall Art with Foam Tape and PL Premium Adhesive. Maximum size
Installation Instructions
 Information You will find all illustrations and instructions on the backside of the box and on the inserted instruction folder in the package. General The floor should be a floating installation i.e. not
PLEASE READ THESE INSTRUCTIONS COMPLETELY BEFORE BEGINNING THE INSTALLATION.
 PLEASE READ THESE INSTRUCTIONS COMPLETELY BEFORE BEGINNING THE INSTALLATION. PurParket fl oors must be installed in accordance with the following instructions. Failure to do so may void the product warranty.
Carmel Bay & Touch of Euro Engineered Floors - Installation Instructions
 Carmel Bay & Touch of Euro Engineered Floors - Installation Instructions OWNER/INSTALLATION TECHNICIAN RESPONSIBILITIES: Order Quantity: When the flooring is ordered, a minimum of 5% (recommended 7% -
¾ Solid Hardwood Flooring Installation Information
 ¾ Solid Hardwood Flooring Installation Information! ATTN: INSTALLERS Caution: Wood Dust Sawing, sanding and machining wood products can produce wood dust. Airborne wood dust can cause respiratory, skin
MOHAWK LAMINATE INSTALLATION INSTRUCTIONS
 MOHAWK LAMINATE INSTALLATION INSTRUCTIONS General Mohawk flooring panels us Uniclic technology, a revolutionary system for installing laminate floors without using glue. The panels can be clicked together
DL HARDWOOD FLOOR INSTALLATION INSTRUCTIONS CARE AND MAINTENANCE:
 CARE AND MAINTENANCE: DL HARDWOOD FLOOR INSTALLATION INSTRUCTIONS REGULAR CARE AND MAINTENANCE: Regular cleaning and sweeping of sand and dirt will be required to maintain your new DiamondLiving flooring
Required Tools. Installation of Hook Plates & Discs. Professional Installation Guidelines for Engineered Wood & Hardwood with LocPlate Products
 Professional Installation Guidelines for Engineered Wood & Hardwood with LocPlate Products Required Tools Utility Knife Chalk Line Measuring Tape Conventional cutting tools for Engineered Wood and Solid
Engineered Wood Flooring Installation Guidelines
 Engineered Wood Flooring Installation Guidelines READ ENTIRE INSTALLATION GUIDELINES BEFORE PROCEEDING WITH THIS INSTALLATION. ALL WORK SHOULD BE PERFORMED IN ACCORDANCE WITH NWFA (National Wood Flooring
Royal Collection. Installation Guidelines
 Royal Collection Installation Guidelines Congratulation! Thank you for purchasing TEKA pre-finished engineered hardwood flooring. You made the right choice for the right product. Manufacture only real
How to Install Elite Bayside Beadboard
 How to Install Elite Bayside Beadboard Beadboard will give a room a warm and comfortable feeling. Its beauty lies in its simplicity. It is one of the easiest to install out of all wainscoting, regardless
ENGINEERED TONGUE & GROOVE
 ENGINEERED TONGUE & GROOVE Multi-layer & OSB core INSTALLATION INSTRUCTIONS 7/16, 1/2, 9/16, 5/8 Float-in / Glue-Down / Nail or Staple IMPORTANT INFORMATION BEFORE YOU BEGIN Please read and review installation
installation PreFinished 3/8, 1/2 and 9/16 engineered staple, glue-down and Floating installation instructions
 PreFinished 3/8, 1/2 and 9/16 engineered staple, glue-down and Floating instructions Thank you for choosing Vanier Floors! Our line features exotic species that bring a world of distinctive beauty and
Laminate Installation Guide
 Laminate Installation Guide Wilsonart Tap- N- LockTM Glueless Technology Installation System Featuring Wilsonart ClassicTM, Wilsonart Estate Plus, Wilsonart DuoLink Flooring, and Wilsonart Red Label Woods