Phone (662) Fax (662) DETAIL MANUAL. and guide to Reed s Metals products
|
|
|
- Hector Watts
- 5 years ago
- Views:
Transcription


1 Phone (662) Fax (662) DETAIL MANUAL and guide to Reed s Metals products Perma-Loc & Secure-Seam Standing Seam Roofing Panels & Accessories -1-

2 Reed s Metals Standing Seam Roofing Panels Reed s Metals is happy to offer the addition of three styles of Standing Seam roofing to its other popular lines of roofing panels. Standing seam, the Cadillac of roofing panel systems, offers the advantage of a completely hidden fastening system, eliminating the worry that sometimes accompanies the exposed fasteners of other styles of roofing.* Formed from 26 gauge AZ-50 Galvalume coated steel, coated with the best paint system available in any roofing, and with the added advantage of on-site panel manufacture (our most common arrangement for sale), we believe our product to be the best and most affordable of its kind in the Central And Southeastern U.S Reed s Metals standing seam roofing comes in two styles, and each style is available in either of three distinct profile patterns. Perma-Loc is our most popular and economical standing seam panel style. Fig. 2 The Secure-Seam panel (top) features 1¾ ribs and mounts with special clips; the 1 high Perma-Loc nail-strip panel (bottom) is our most popular standing seam panel. The rib profile is shown on the upper panel, the striation profile on the lower. features approximately one-inch high ribs and net panel coverage of either 12 or 16 inches. The nail strip and screws that attach each panel are in turn covered by each subsequent panel as each overlapping panel locks in place over the previous one (see Fig. 5). The Secure-Seam panel also uses a locking rib feature, but offers a 1¾inch rib that attaches with specially designed clips. It comes in widths of 14, 16, and 20 inches. Both styles of standing seam panel are available with either striations or ribs, either of which affords an attractive appearance according to the tastes of the customer. Consult Figure 2 for the profile you would like for your standing seam roof. * Any Roofing system with exposed fasteners can be applied leak-proof if installed properly. We recommend employing only proven and reputable roofing installers. Customer Satisfaction is our TOP PRIORITY!... a credo we live by at Reed s Metals. We manufacture and deliver to your specifications and greatly appreciate the opportunity to serve you

.")
3 Reed s Metals standing seam roofing is available in either 25-year acrylic-coated or any of over 20 colors, comprising of 40-year low gloss.7 to.9 mil full strength 70% Kynar 500/Hylar 5000 fluorocarbon coatings over a urethane primer of.2 to.3 mil on the finish side, with primer and washcoat on the reverse side. Metallic coatings are also available and carry the same 40-year warranty. We manufacture both stock and custom trims and flashings, and provide Fig. 4 Secure-Seam panels showing lap details and placement of UL-90 clips. screws and other accessories specific to standing seam installation (see back page). Reeds Metals, recommends the convenience of on-site manufacturing with our portable roll-former. Delivery or customer pick-up of crated panels is also available at our facility. Fig. 5 Perma-Loc panels showing lap detail and nail strip. While there are many possible trim and attachment solutions in the application of standing seam roofing, the Reeds Metals sales team endorses the methods shown in this manual as being among the best recommended in the standing seam industry. We are glad to offer our advice, suggestions, or comments to those who prefer variations of these procedures. We cannot endorse methods that are unfamiliar to the industry, however, and can only support those which meet the standards of engineering that have been passed in controlled tests, or have been shown reliable by experienced contractors

4 Standing Seam Trim Fig. 6 Roofing trim and flashings are named by the location or function of that particular piece on the building - 4 -

5 Installation of Panels Roof Pitch Mississippi Building Code requires a minimum pitch of 2/12 for the 1¾" Secure-Seam, and 3/12 pitch for the 1" Perma-Loc, to ensure proper water drainage. This means that the minimum roof slope required for all panels is either 2 or 3 inches of rise per foot, depending on which profile you choose. Consult our representative for recommendations for your particular roof pitch, and about roofing options if you have less than either of these minimums. Ordering and Applying Trim The most common flashing for standing seam roofing is the ridge cap, which is used at the peak of a roof where two opposing roof slopes join, and attaches to the roof with z- flashing. Other flashings that attach with z-flashing include transition flashing (which also requires panel starter), end wall and sidewall flashings. Panel starter is required to attach panels over valleys. Eave flashings include gable flashing, which runs up the sloped ends of the roof, and eave drip, which trims out the lower ends of the panels and provides a surface for the attachment of the lower end of the panel. Both gable flashing and eave drip are often applied above fascia trim, and may be attached with either surface screws or hidden eave cleats. For details about the application of each type of trim, see the details provided on pgs Roof pitch must be given when ordering ridge caps, endwalls, valleys, and eave drip. When a steeper roof slope meets a lesser slope, both slopes should be mentioned when ordering transition flashing. Dormer Detail Fig. 7 Most of the basic standing seam trims are used on dormers. The bottom corners of the dormer are similar to the placement of sidewall and endwall flashings on chimneys. All but valleys and eave drip require z-flashing; valleys require panel starter, and eave drip may be screwed or fastened with eave cleats
 869-7797 Toll Free (888) 987-6382 Fax (662) 869-7799 Fig.")
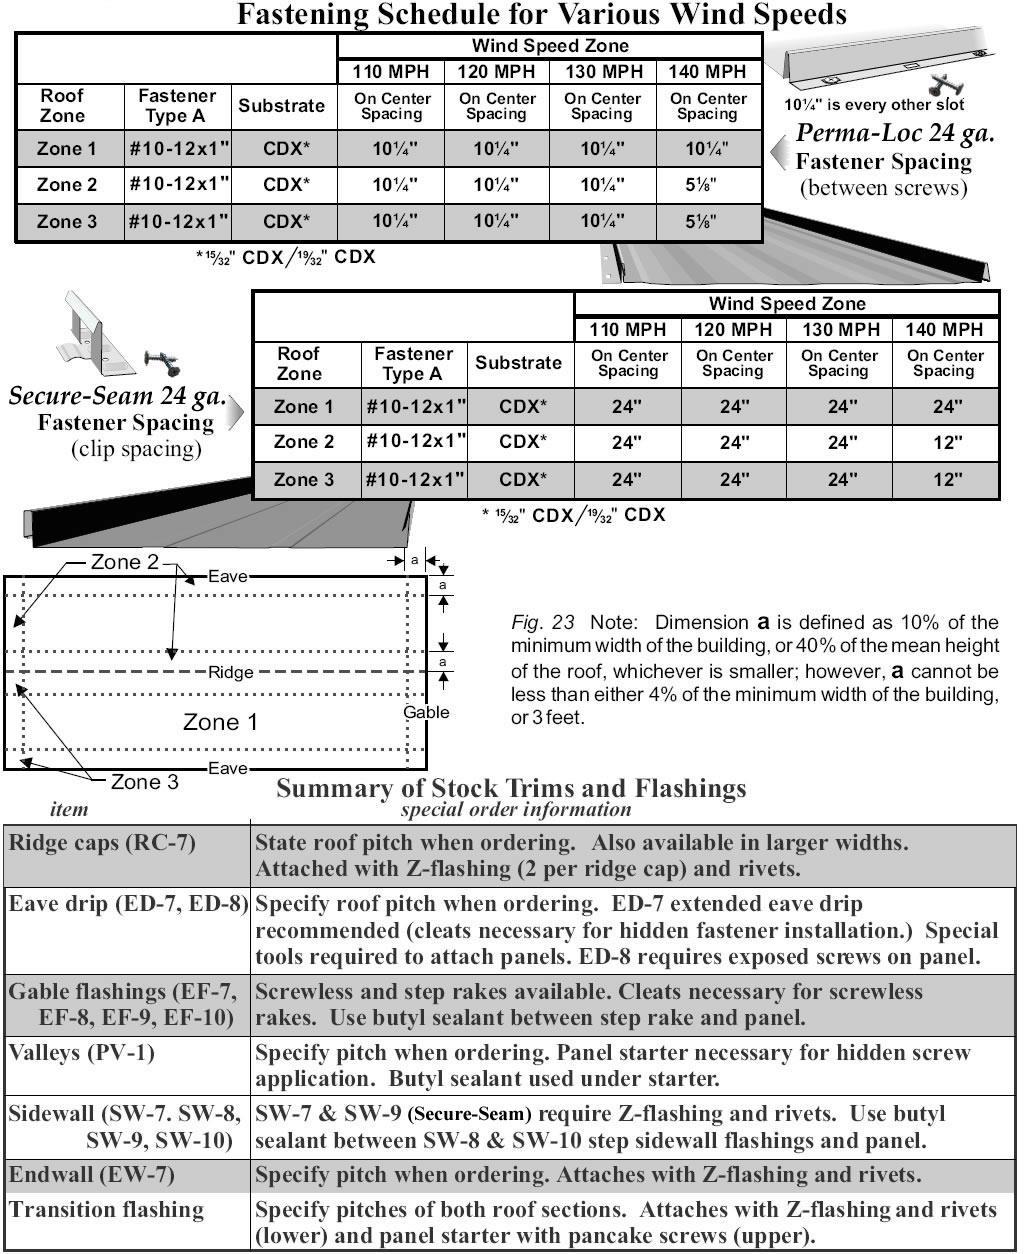
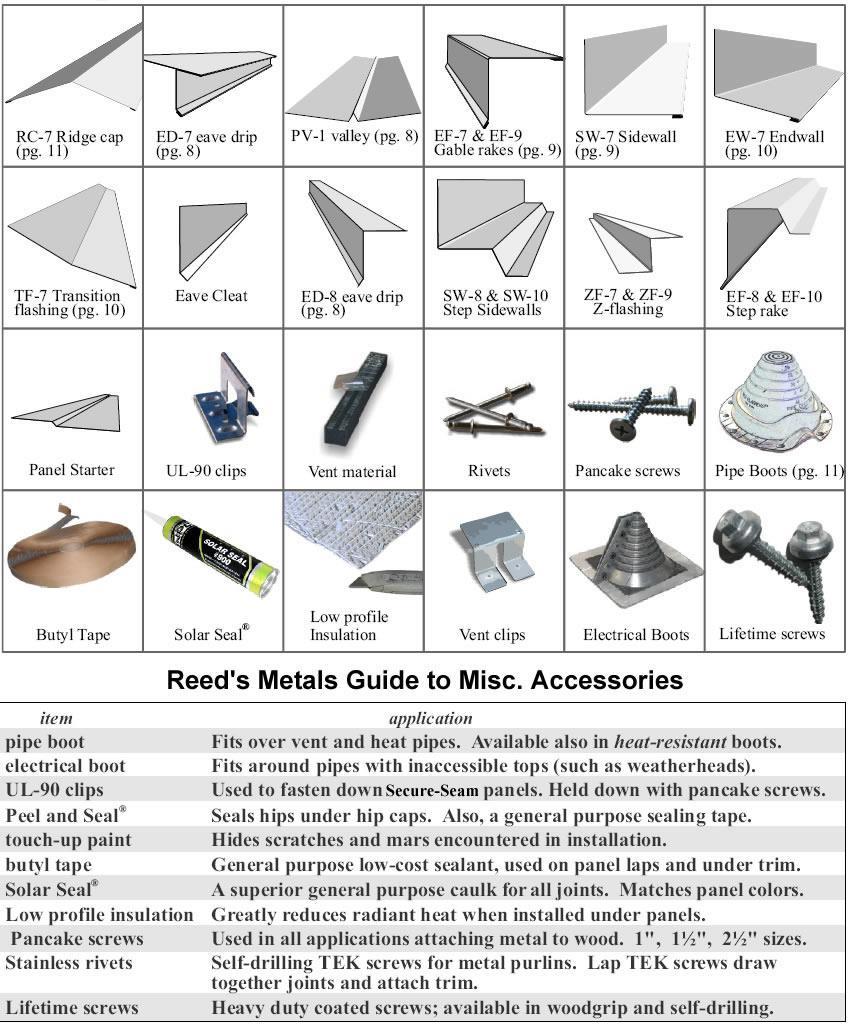
6 General Principles of a Typical Installation Hidden Fastener System Except for only a few differences, the high-rib Secure-Seam panels and the low-rib Perma-Loc panels are installed in the same general fashion. Where pancake screws are applied to the nailstrip of the Perma-Loc (662) Toll Free (888) Fax (662) Fig. 8 Each Panel should be installed over the extended eave drip, pressed down and attached with the appropriate fasteners, and eave hems finished before installing the next panel. panel, special clips (that require 2 screws each) are used for the Secure-Seam panel. When used, extended eave drip should be installed first along the drip edge of the roof. The lower end of each panel is then trimmed and the hem pre-bent before installation (see p. 12). The starter panel is laid out with the overlap side against an eave or wall and the hem pulled up tight and then compressed around the eave drip. The nailstrip (or clips, in the case of Secure- Seam) is screwed off completely with pancake screws before the next panel is installed. Care should be taken that the starter panel is square with the roof, since the first panel determines the lay of all that follow it. The pre-bent eave end of the next panel is then pulled tight against the eave drip and pressed or walked down over the first panel, its nailstrip secured, and the next panel applied, and so on. Each panel is always screwed off and the hem finished before installing the next. The unfastened length against the gable or wall is secured (then or later) with z-flashing and either gable rakes (on the gable eave) or sidewalls (against a wall). Ordering Roof Panels and Screws Care should be taken to order panels of the correct length to avoid having to make corrective measures after purchase. Panel lengths should fall 2 to 3 inches short of the ridge when a vented ridge is desired, and should ordered to extend 2½ inches past the eave when being attached to extended eave drip (see p. 9). The Reed s Metals sales personnel are ready to assist customers with information specific to their particular roof. Special, flat-headed screws called pancake screws are used to attach either nail strip panels or the clips that secure the locking panels. Woodgrip pancakes are used when going into wood decking, or self-drilling pancakes for going into metal purlins. The same screws also secure attachment flashings like z-flashing, panel starter, and eave cleats. 1/8-inch stainless rivets are recommended for attaching ridge caps, endwall and sidewall flashings, transition flashings, and any other flashings that attach to z-flashing. See page 9 for more information on screw spacing and ordering. On Perma-Loc (nailstrip) panels, screws should be centered in slot and should not be tightened completely to allow for panel expansion
7 Fig. 9 Allowances must be made when ordering panels to allow for hemming of panels, overhang, ridge venting, and errors. *4 to 11 for 1¾ Secure-Seam Since allowance must be made in the hidden fastener system for hemming panels that attach to extended eave drip (see p. 12), these panels should be ordered approximately 2½" longer than the substrate decking to allow panel length for the 1½" nose on extended eave drip plus the 1" hem. Likewise, panels ending in valleys should be ordered 1" longer for hemming, but with allowance made for a 3 or 4" passageway between the panel and the valley diverter to allow for the flow of water (subtract 3 or 4"). Where the deck makes a transition from a higher to lesser pitch, lower panels should be ordered from the transition point downward allowing for eave drip (as above), and upper panels must allow for a setback away from the transition point depending upon the roof pitch, the less the difference in pitch, the greater the setback, and the more the need for a longer length on the lower side of the transition flashing (see p. 15 for details). The general principles of attaching the upper and lower edges of standing seam roofing are most thoroughly covered in the sections on Eave drip (p. 12) and Ridge caps (p. 10). Trimming and Cutting Steel Panels The best devices for cutting steel panels across the profile are circular saws, nibblers, and various shear attachments for drills. Hand operated snips also work. Nibblers, and especially Carborundum blades on electric saws, however, do have a tendency to either leave hot metal particles that can burn paint surfaces or leave rust marks on panels and trim. The same is true of any filings left on the roof caused by the application of screws. Care should be taken to brush all such particles from roof surfaces immediately after application. To cut panels lengthwise: Note carefully where the panel is to be cut, and, using a straightedge, score deeply down the length of the panel with a sharp-pointed utility knife. Folding the panel along the score mark, and bending back again if necessary, should produce a clean break in the panel. Keep Materials Dry! Paint and finishes of Reed s Metals panels and trim are designed to withstand severe rain and wet weather conditions. Neither painted, galvanized, or Galvalume finishes, however, are designed to be in continuous contact with water for long periods of time. Damage will result if uninstalled panels or trim are allowed to remain wet in storage. Be sure to store material that will not be installed immediately in a dry location. Wet material should be air-dried and restacked if installation is not planned right away

8 How to Figure and Apply Screws Cleats, and Other Accessories Standing seam roofing is particularly noted for its use of hidden fasteners. Pancake screws are used because they are strong and yet have a low profile that does not interfere with panel and trim installation. For nailstrip panels, one pancake screw is required every 10¼ inches, (every other slot), which comes out to 86 screws per 100 sq. ft of roof for 16 inch panels. This makes the number of screws necessary equal to the linear footage of the order times 1.15: # screws = linear ft of panels x 1.15 Fig. 10 Above chart is for a typical Perma-Loc roof with all hidden fasteners. For each type of trim on the left, the amount of the necessary accessory at the top of the chart is shown in each box. While caulk will work where butyl sealant is shown, we recommend butyl sealant on full lengths of trim because it is economical and easy to apply. Since other panel widths make the total for the entire roof to vary, please confirm all estimates with your Reed s Metals representative when you place your order. For Secure-Seam panels, one clip is applied every 2 feet, with 2 pancake screws holding each clip. This makes 38 clips and 75 screws per square of 16-inch roofing. For solid decking, at least ½-inch structural plywood or OSB (5/8" for any high velocity wind zone of 120 and above) supported on rafters at a maximum of 24" on center is required. Policies All standing seam trim and panels are manufactured from 26-gauge prime coil stock, and is returnable as long as it is deemed by our company s representative as being in good, clean, resalable condition, free from scratches, mars, and other damage. The same general principle applies also to the return of other accessories such as screws, boots, closures, etc. Trim that is custom-made is not returnable, and is considered the property of the customer once it has been made, whether paid for or not. See below for details. Delivery policy - Delivery charges apply to all orders where delivery is requested, as well as crating charges when crating is necessary. Please consult the Reed s Metals sales department for details. Sales tax - All orders picked up at Reed s Metals, and all orders delivered within the state of Mississippi, are subject to state sales tax. Tax exemptions should be verified prior to delivery or customer pickup. Warrantied products - Painted standing seam panels come with a 40-year coil manufacturer s warranty, and unpainted Galvalume comes with a 20-year warranty. All trim is manufactured from the best grade in stock of the particular color ordered. Indemnity - All prices and designs are subject to change without notice. Disclaimer - While we have made every attempt at accuracy in this manual, we are not responsible for typographic, printing, or technical errors in this or any other publication. Return Policy - All panel orders and special order (non-stock) trim are considered the property of the customer and non-refundable once they are manufactured. Only trim made from our normally stocked colors may be returned for a refund providing it is returned in a clean, resalable condition. Restocking charges may apply
9 - 9 -


10 Ridge Cap The Ridge Cap is used to seal the upper point at which two slopes meet. This can be both along the ridge of the roof as well as the covering for a hip, as well as on the ridge of dormers. Attachment to the roof is most generally accomplished through the use of z-flashing. Z-flashings are either notched or cut to length (to fit between Fig. 11 To attach ridge caps, z-flashings are either notched (left) or cut into pieces (right) and mounted with screws at the upper ends of the panels. Caulk is applied on the bottom side and around the panel ribs to seal the ridge against rain. The mounted ridge cap is attached to the z-flashing with rivets. panel ribs) and attached with screws to the roof through the panels. Ridge caps are in turn attached with rivets to the z-flashing. Whether the z-flashing is notched or cut to length, gaps between it and the panels should be kept to a minimum (no more than ¼ inch) since the gap will be sealed with caulk. Z-flashing must be sealed both beneath and where it butts against the panel ribs with Solar Seal 900 caulk or equivalent. Thus sealed, z-flashing forms a water-proof barrier to protect the roof peak from leaks from blowing rain. When used on a hip roof, z-flashing is cut or notched at whatever widths are appropriate for the pitch and cut of the hip. Fig. 12 Ridge caps can be installed as vented (using vent clips and vent material) or sealed (using Z-flashings), as shown also in Fig

11 Fig dimentional view of ridge showing closure vent clips and closure material installed on left, and z-closure installed on right. When attic ventilation is desired, vent clips can be used in the place of z- flashing. Vent clips straddle each rib, and support the ridge cap in much the same manner as the z-flashing. Closure material is inserted between the ribs and sandwiched between the panels and the ridge caps. The decking must, of course, be cut at the ridge to let out hot air. Vent material must be cut to the proper length for installation. It is a sponge-like or fibrous material that prevents wind-driven rain, insects, and leaves and debris from entering the attic, while at the same time allowing the release of hot air out of the attic. Installation may require caulk to hold the material in place. Attachment Flashings Eave cleats allow the Hidden fastener system to Work with the eave drip and gable rakes. The factory-hemmed edge of the rake or eave drip fits around the kick-out of the cleat, which is attached to the fascia board with pancake screws. Panel starter is used to attach the lower ends of hemmed panels over trim above the eave, as with valleys and transition flashing. pancake screws and sealed beneath with butyl sealant. Fig. 14 Pipe Boots provide a watertight seal around roof vents and come in a variety of sizes. They seal with caulk under the base and around pipe, and conform to the shape of the panel ribs. It is attached with Z-flashing is the basis for attaching five basic trims to the roof. When attaching ridge caps, transition flashing, and endwalls, z-flashing must be notched or cut to fit between panel ribs. When attaching gable trim and sidewalls, the z-flashing is not cut, but is mounted parallel to the ribs. Z- flashing must be attached with screws and, to prevent leaks, with butyl tape (or equivalent) underneath. Order ZF-7 for Perma-Loc, and EF-9 for Secure-Seam. For specifics, see each type of trim being attached


12 Eave Drip & Fascia Fascia and extended eave drip provide a protective covering for the fascia boards and edges of roof decking at the drip eave of the building. Unlike conventional exposed fastener roofing, eave drip on the standing seam roof also acts as an anchoring device for the lower edges of the panels, allowing a continuation of the hidden fastener system all the way down to the soffit. Fascia are overlapped by eave cleats, which approximately line up with the roof edge of the decking, and are held in place by pancake screws. The extended eave drip has an open hem that hooks onto the cleat at its lower end, and is screwed to the Fig. 15 Layered view of eave, showing fascia (1), cleat (2), extended eave drip (3), and panel (4). Note how the eave drip fits around the cleat, and how the cut panel (which is bent on site by the installer) fits around the nose of the eave drip (in actual use, extended eave drip must match color of panel). decking on the roof side. Panels are trimmed in a specific manner (see diagram below), bent with a hemming tool, and crimped around the extended eave drip, securing the lower end of the panel. Screws applied to the nail strip of the Perma-Loc panel (or cleats and case of Secure-Seam panels) secure the rest of the length of the panel. The same hemming procedure applies to valleys and transition flashing, although these are attached to roof cleats instead of the nose of the extended eave drip. See valleys andtransition flashing (p. 15) for Specific details. When ordering care must be taken to specify the correct pitch of eave drip to avoid either unnecessary effort inapplying the trim (if ordered too flat) or eave drip that stands out from the eave (if ordered Fig. 16 To apply panels over extended eave drip, the panel is first trimmed, then folded with a hemming tool, and finally compressed around the eave drip with broad-nosed pliers


13 too steep). If more than one pitch is involved, specify the number of each pitch (eave drip comes in 10-foot lengths). Order 90 degree eave drip for square-cut eaves. While the hidden fastener system calls for eave cleats, exposed screws are a simpler and easier-to-install option for eave drip. Surface screws are simply installed at intervals along the face of the trim. Finally, while the remainder of the roof uses hidden fasteners, some installers elect to use screws in the conventional fashion along the eave only of the building. These simplifying procedures both reduce cost and allow faster application of the roofing. Gable Flashing Gable trim serves a similar purpose to eave drip, but acts mainly to protect the exposed edge of the gable end of the building from both wind and rain rather than to serve any function in anchoring panels. The attachment of the eave side has the same options described under Eave Drip and Fascia, with regard to cleats vs. exposed screws. For the hidden fastener system, the roof side must be attached to z-flashing that runs parallel to the panel ribs and is in turn fastened to the roof with screws and sealed with butyl tape or comparable sealant. Fig. 17 Standard gable trim (EF-7) attaches to the z-flashing with rivets and to the fly rafter with either eave cleats (hidden fastener system) or exposed screws. The step rake option is shown below. A common option in gable trim is the use of the step rake, which simplifies installation by allowing exposed screws at intervals along its length on the roof side (see diagram below)

, or with panel screws (using the caulk edge SW-7-C, SW-8-C, or SW-10-C")
14 Fig. 18 Standard SW-7 Sidewall attaches to z-flashing with rivets and is covered on the wall side by siding. Side-Wall Flashing Sidewall installation is similar to that of gable trim. As with the EF-7 gable rake, the standard SW-7 sidewall fastens with rivets to z- flashing installed over the roof panel and, like the EF-8 step rake, the SW-8 step sidewall mounts directly to the roof with roofing screws. Either style is attached to the wall with flat fasteners like pancake screws if installed under siding (as shown in figure 17), or with panel screws (using the caulk edge SW-7-C, SW-8-C, or SW-10-C counter-flashed version) if the wall side is exposed to weather. In either case butyl tape (or equivalent) is necessary to seal under either the z-flashing or the panel side of the step rake. End-Wall Flashing Installation of endwalls combines Principles similar to those described for sidewalls and ridge caps. Z-flashing is either notched or cut in lengths between ribs, and attached with screws and sealant. The endwall is attached to the z-flashing with rivets, and to the wall with screws. When not covered by siding, the caulk-edge version (EW-7C) is necessary to seal the wall side of the endwall. Specify roof pitch when ordering. Fig. 19 Endwall flashing is applied where the upper slope of a roof meets a wall

15 Preformed Valley Panels ending in valleys must be cut and hemmed diagonally and attached to panel starter that is screwed down to the roof through the valley (see hemming diagram on p. 12). Because of the amount of water flow in the valley, care should be taken to apply butyl sealant or equivalent between the starter strip and the valley. Fig. 21 Lap detail for panel cleat on transition flashing or valley. Fig. 20 Diagonally-cut panels are hemmed and attached to panel starter that is mounted on the surface of the valley. TF-7 Transition Flashing Transition flashing is required when a roof makes a change from a steeper to a lesser pitch. The panels of the upper slope are hemmed in the same fashion as they are for eave drip and attached in the same way as valleys to panel cleats. On the lower side, the transition flashing extends over the panels and is attached to z-flashing with rivets. If the lower roof is steeper than the upper section, gambrel flashing is used, mounted in the same way. Be sure to specify both upper and lower pitches when ordering. Fig. 22 Transition flashing combines the attachment techniques of valleys (top of page) with that used with ridge caps (p. 10). Notice the panel set-back that allows proper watershed from the upper panels onto the lower. The less the difference in pitch, as well as the flatter the roof, the greater the amount of set-back, and the more need for a longer "a" side on the transition flashing. The need is magnified even more for the higher-ribbed Gulf Seam panel. Standard dimensions: a = 6½ b = 6½ Custom dementions: specify length for a and b
16 - 16 -
Best Buy Metals Toll Free / Phone / Fax
 DETAIL MANUAL for Vertical Seam Best Buy Metals Toll Free 1-800-728-4010 / Phone 423-479-6382 / Fax 423-728-3066 www.bestbuymetals.com Vertical Seam Roofing Panels Fig. 2 Vertical Seam Has 1-3/4" high
MANUAL. Perma-Loc & Secure-Seam. Standing Seam Roofing Panels & Accessories. and guide to Town and Country Metals products
 DETAIL MANUAL and guide to Town and Country Metals products Perma-Loc & Secure-Seam Standing Seam Roofing Panels & Accessories Town & Country Metals, LLC 10 Progress Parkway Union, MO 63084 Town and Country
DETAIL MANUAL for Standing Seam / Image II
 DETAIL MANUAL for Standing Seam / Image II Best Buy Metals Toll Free 1-800-728-4010 / Phone 423-479-6382 / Fax 423-728-3066 www.bestbuymetals.com Best Buy Metals Standing Seam Roofing Panels Fig. 2 Standing
DETAIL MANUAL. Metal Roofing Wholesalers. Classic Rib Roofing Panels
 Metal Roofing Wholesalers Classic Rib Roofing Panels DETAIL MANUAL 1178 Topside Rd Louisville, TN 37777 The Classic Rib Roofing Panel Figure 1 House With Classic Rib Metal Roofing Installed Classic Rib
Tuff-Rib Install Guide
 Install Guide bestbuymetalroof.com Page 2 of 27 Page 3 of 27 1. Page 4 2. a. Installation Guide b. Panel Squaring Pages 5, 6 Pages 7, 8 3. Pages 9, 10 4. a. Fascia (optional) b. Eave / 1.5x3.5 Angle c.
DETAIL MANUAL. For R-Panel / PBR Panel. Metal Roofing Wholesalers
 Metal Roofing Wholesalers DETAIL MANUAL For R-Panel / PBR Panel 1178 Topside Rd Louisville, TN 37777 Picture of Gulf Coast Figure 1 Metal Roofing Plant PBR/R-Panel The 26-gauge R-Panel is a strong, durable,
Table of Contents Light Gauge Metal Roof & Wall Panels
 Table of Contents Light Gauge Metal Roof & Wall Panels Installation Guide for Delta Rib, Nor-Clad, Strata Rib & 2-1/2 Corrugated Introduction Important Notice Notes: April 2008 Minimum Recommended Tools
Tuff-Rib. Installation Manual. Nationwide supplier of quality metal roofing. Toll-Free (800) S. Lee Hwy. Cleveland, TN 37311
 S. Lee Hwy. Cleveland, TN 37311") Installation Manual Nationwide supplier of quality metal roofing. 65 S. Lee Hwy. Cleveland, TN 7.. www.bestbuymetals.com Toll-Free (800) 78-00 IMPORTANT NOTICE This manual contains suggestions and guidelines
Installation Manual Nationwide supplier of quality metal roofing. 65 S. Lee Hwy. Cleveland, TN 7.. www.bestbuymetals.com Toll-Free (800) 78-00 IMPORTANT NOTICE This manual contains suggestions and guidelines
Installation Instructions
 Installation Instructions ROLL VENT STANDARD / METRIC Page Installation Considerations 3 Roll Vent Standard General Installation 4 Roll Vent Metric General Installation 5 Steep Pitch Guidelines 6 Asphalt
Installation Manual. Future Roof Shingle / Slate Products
 Installation Manual Future Roof Shingle / Slate Products REVISED 14/09/2010 Future Roof Shingle Installation Manual is a component of Future Roof, Inc. and as such is intended to be used with Future Roof
401 SW 33rd Ave Ocala, FL
 401 SW 33rd Ave Ocala, FL 34474 352-622-1035 www.metalroofingofocala.com Table of Contents Panels...Pg.1 Ultra Rib Trim...Pg.2-4 PBR Trim...Pg.5-6 5V Trim...Pg.7-9 TCM-Lok...Pg.10-11 Insulation/Ventilation:
Storing, Handling, and Cutting Steel Panels
 Storing, Handling, and Cutting Steel s Storing Specifically check your quantities, colors, and lengths All materials should be used as soon as possible Steel bundles should be stored indoors with enough
Table of Contents. Installation Guide for Profile with Hidden Fasteners 3. Installation Steps 4, 5. Prestige Series Moldings 6, 7. Other Accessories 8
 1 Table of Contents Page(s) Installation Guide for Profile with Hidden Fasteners 3 Installation Steps 4, 5 Prestige Series Moldings 6, 7 Other Accessories 8 Trims & Accessories 9 Eave Starters 10 Gableboards
Installation Guide. Step 3. Valley Flashing. Step 7. Transition Flashings and Accessories. Step 6. Hip and Ridge Installation
 Step 7. Transition s and Accessories Step 3. Valley Step 6. Hip and Ridge Installation Step 2. Rake Trim Step 5. Installing the Shingles Step 1. Eave Starter Installation Step 4. Endwall s Installation
METAL ROOFING INSTALLATION GUIDE
 METAL ROOFING INSTALLATION GUIDE STANDING SEAM ROOFING PANELS Horizon 16 and Climaguard 16 Regardless of whether your roofing project is a new installation or a re-roof, and whether your building is residential,
REGAL. Installation Manual
 REGAL Installation Manual General Information The details shown on the following pages are suggestions or guidelines for installing the Regal system. The installation details shown here are proven methods
4. Metal roof jacks at penetrations and attachments
 - - - - - - - - - - - - - - - - - - - - - - - - - - - - - - - - - - - - - - - - - - - - - - - - - - - - - - - - - - - - - - - - - - - - - - SECTION 07 61 00 METAL SHINGLE ROOFING - - - - - - - - - - -
TIOGA Table of Contents
 Table of Contents TABLE OF CONTENTS Product Data Sheet...2 Engineering Data...3 General Information...4 Handling...5 Roof Preparation...5 Fastening Recommendations...6 Field Cutting...7 Touch-up Paint...7
RIDGEMASTER PLUS CAUTION INSTALLATION INSTRUCTIONS ALWAYS WEAR SAFETY GLASSES TOOLS NEEDED GENERAL GUIDELINES FOR RIDGEMASTER PLUS AND HIPMASTER
 INSTALLATION INSTRUCTIONS RIDGEMASTER PLUS CAUTION Before beginning installation read all general guidelines, special notes and installation steps thoroughly and be sure to check and follow all your local
5V Installation Manual
 Flat 1/2 12 24 Striated www.tricountymetals.com 5V Installation Manual Table of Contents Important Notice/Safety/Storage/Tools...1 Product Information/Product Approvals...2 Roofing Anatomy/ Trim...3 Measuring
Ultra-Rib Installation Manual
 www.tricountymetals.com Ultra-Rib Installation Manual Table of Contents Important Notice/Safety/Storage/Tools...1 Product Information/Product Approvals...,...2 Roofing Anatomy/Side Trim...3 Measuring Your
Installation Manual. Future Shingle Products
 Installation Manual Future Shingle Products TITLE REVISED 7/4/2011 Future Shingle Installation Manual is a component of Future Roof, Inc. and as such is intended to be used with Future Roof products only.
Tuff Rib Panel Installation Specifications
 Tuff Rib Panel Installation Specifications ROOF APPLICATION: Roof slope must be a minimum of a 2/12 pitch to use this product. For slopes lower than a 3/12 pitch, lap sealant is suggested on the side laps
CertainTeed. Shake / Slate Installation Guide
 CertainTeed Shake / Slate Installation Guide Table of Contents System Components... 2 General Conditions, Safety and Roof Preparations... 3... 4 Eave/Drip Edge... 5 Inner Gable... 6 Outer Gable... 7 Open
BARRELL VAULT BATTENLESS
 i BARRELL VAULT BATTENLESS INSTALLATION GUIDE INSTALLATION NOTIFICATION The installation procedures demonstrated in this manual are recommended methods for the installation of the Gerard Barrel Vault battenless
Steel Roofing & Siding INSTALLATION GUIDE
 Steel Roofing & Siding INSTALLATION GUIDE Your Authorized Dealer is: WASHINGTON Auburn (800) 700-7228 WASHINGTON Spokane (866) 321-5954 www.nuraymetals.com CALIFORNIA Redlands (800) 806-8729 CONTENTS BEFORE
installation guide Villa
 installation guide Villa Table of Contents Introduction............................. 2 Safety................................... 2 Tools.................................... 2 Codes & Requirements....................
Ekoroof LiteTile Dimensions
 Ekoroof LiteTile Dimensions 7 3 3.5 Height 40 Width 20 Length Weight per Panel: 3 kg / 6.61 lbs 2 2 Area per panel 800 in / 5.55 ft 2 Panels per Square: 20 (including overlap, for a 100 ft covered area)
HipMaster Installation Instructions
 Mid-America, Plus and HipMaster Installation Instructions New applications for metal, slate and wood shingle roofs (see page 7) CAUTION: Before beginning installation read all general guidelines, special
Five Star Panel Installation Instructions
 Five Star Panel Installation Instructions How to Store Five Star Panels You will need to store FIVE STAR PANELS in dry place to prevent staining, deterioration and possibly void all warranties. Stand the
ProSnap 100 STANDARD DETAILS
 ProSnap 100 OVER WOOD DECK STANDARD DETAILS Austin - Headquarters/Sales Office 830 Sagebrush Drive Austin, TX 78758 (512) 452-1515 (800) 428-7412 Fax (512) 833-7499 www.ctmrs.com email: info@ctmrs.com
PBR Panel Installation Specifications
 4906 St. Stephens Rd. 5780 Hwy 90 W Eight Mile, Al 36613 Theodore, AL 36590 251 456 2254 251 653 1550 251 457 2254(F) 251 653 1514(F) PBR Panel Installation Specifications ROOF APPLICATION: Roof slope
Inspire Slate Starter Piece Hip and Ridge. 13 1/2" Height: 13 ½" Width: 12" Squares/ Pallet. Bundles/ Square
 December 2017 Classic Slate Application Guidelines Only Basic Roofing Tools Required Hand fastened or fastened with a pneumatic nail gun Utility knife or a standard circular saw Tape measure, pry bar,
Inspire Aledora Slate Application Guidelines
 July 2014 Inspire Aledora Slate Application Guidelines Only Basic Roofing Tools Required Hand fastened or fastened with a pneumatic nail gun Utility knife or a standard circular saw Tape measure, pry bar,
Barrel Vault Counter Batten and Batten
 Barrel Vault Counter Batten and Batten INSTALLATION GUIDE www.gerardusa.com INSTALLATION NOTIFICATION The installation procedures demonstrated in this manual are recommended methods for the installation
Table of Contents. Notes to Designer/User Map of Typical Roof Conditions Fastener Placement Fastener Selection...
 Table of Contents Section Page Notes to Designer/User... 2-3 Map of Typical Roof Conditions... 4 Fastener Placement... 5 Fastener Selection... 6 Ridge/Hip Flashing... 7 Valley Flashing... 8 Eave Flashings...
2 ½ Corrugated Panel Installation Specifications
 2 ½ Corrugated Panel Installation Specifications ROOF APPLICATION: Roof slope must be a minimum of a 2/12 pitch to use this product. When using this product butyl lap sealant is recommended for all slopes.
TABLE OF CONTENTS A-1
 TABLE OF CONTENTS PAGE NUMBER: DETAIL DESCRIPTION A-1...TABLE OF CONTENTS A-2...GENERAL NOTES B-1...GENERAL INFORMATION C-1...EAVE DRIP DETAIL C-2...EAVE DRIP with GUTTER DETAIL C-3 & C-4...FIXED RIDGE
installation guide 7 8 Corrugated corrugated metal panel
 installation guide / 7 8 Corrugated corrugated metal panel Table of Contents General Notes Handling and Storage 1-3 Tools and Equipment, Field Cutting Panels 4 Safety 5 Preparing to Install your New Roofing
Installation Instructions
 Installation Instructions RAPID RIDGE STANDARD / 7 / METRIC Page Installation Considerations 3 Rapid Ridge Standard General Installation 4 Rapid Ridge Metric General Installation 5 Rapid Ridge 7 General
Straight Rib Series Metal Roofing Panel Installation Guide
 D-Rib G-Rib C-Rib Straight Rib Series Metal Roofing Panel Installation Guide 7000 AIRPORT LINE R.R., BOX 7 HENSALL, ONTARIO N0M X0 EASY BUILDING PRODUCTS TEL. : 5-6-07 TOLL FREE : -888-76-777 FAX: 5-6-08
INSTALLATION GIUDE.
 INSTALLATION GIUDE INTRODUCTION The instructions and drawings included here are intended only as a guide for the installation of ECO Roofing Systems Spanish and Modern profiles. The materials and methods
Roofing Training - Basics. Sandy Wesch
 Roofing Training - Basics Sandy Wesch Tools Hammer Measuring Tape Chalk Line & Chalk Speed Square Framing Square Utility Knife Metal Snips Extension Ladder(s) 2 Safety Any tools or material up on the roof
Hatteras Shingles. CertainTeed Shingle Applicator s Manual. YOUR OBJECTIVE: To learn the correct procedures for installing Hatteras shingles
 CertainTeed Applicator s Manual Hatteras s 14 YOUR OBJECTIVE: To learn the correct procedures for installing Hatteras shingles HATTERAS SHINGLES Hatteras shingles are a premium oversize (18" x 36") roofing
 TremLock T-138 INSTALLATION MANUAL T-138 www.tremcoroofing.com 3735 Green Road Beachwood, Ohio 44122 1.800.852.6013 50 Beth Nealson Drive Toronto, Ontario M4H 1M6 1.800.668.9879 7241 6/8/18 TABLE OF CONTENTS
SLATE & SHINGLE INSTALLATION
 EAVE EDGE Apply a small strip of roofing paper to the bottom of eave. Eave flashing is attached to substrate with roofing nails every 9". Install underlayment over entire roof. (See Fig. 1) PAGE 1 Bend
Toll Free: S.E. 16th Street Trenton, Florida Tel: SW 90th Trail Live Oak, Florida Tel:
 Toll Free: 877-766-3309 301 S.E. 16th Street Trenton, Florida 32693 Tel: 352-463-8400 10142 SW 90th Trail Live Oak, Florida 32060 Tel: 386-330-0101 3021 N.W. Blitchton Road Ocala, Florida 34475 Tel: 352-622-5500
Table of Contents. Roof to Head Wall w/ Side Flashing DECRA Shake XD Roof Overview Roof Penetration - Pipes & Vents...
 Table of Contents DECRA Shake XD Roof Overview.... 2 DECRA Shingle XD Roof Overview.... 3 Introduction... 4 Safety... 4 Tools.... 4 Estimating Sheet... 4 Codes & Requirements... 4 Roof Slope... 4 Underlayment...
Installation Catalog
 PREMIUM ROOFING. LEGENDARY SERVICE. www.marcometals.com Installation Catalog 1 MARCO METALS, LLC Premium roofing. Legendary service. Marco Metals, LLC is a family-owned and operated company with its origin
Table of Contents. Fasteners... 4 Venting Preparation Installation with Battens - DECRA Tile & DECRA Shake 1
 Table of Contents DECRA Tile & Shake Roof Overview... 2 Introduction... 3 Safety... 3 Tools.... 3 Estimating Sheets... 4 Codes & Requirements... 4 Roof Slope... 4 Underlayment... 4 Deck Preparation....
VENTED GABLE DETAIL ROOF PANEL GABLE FLASHING 24" C/C MAX. BUTYL SEALANT TAPE ROOF PURLIN FLASH AB-1, AB-2, AB-3, OR AB-4
 GABLE FLASHING FASTENER @ 24" C/C MAX. ROOF PURLIN BUTYL SEALANT TAPE FLASH AB-1, AB-2, AB-3, OR AB-4 FASTENER @ EVERY MAJOR RIB OR 12" C/C MAX. F-J TRIM FABRAL ALUMINUM SOFFIT FASTENER 24" C/C MAX. BUTYL
SmartVent Eave Edge Installation Instructions
 SmartVent Eave Edge Installation Instructions STEP 1: Cut a slit 1 wide (or a series of 1 ¾ holes at 3 on center) into the roof decking 6 to 7 up from the drip edge. SmartVent is rated 9NFA. Ensure drip
INSTALLATION GUIDE LEARN MORE AT DECRA.COM
 Villa Tile INSTALLATION GUIDE LEARN MORE AT DECRA.COM Table of Contents DECRA Villa Tile Roof Overview... 2 Introduction... 3 Safety... 3 Tools.... 3 Estimating Sheet... 3 Codes & Requirements... 3 Roof
Thompson Architectural TM-RIB PANEL ACCESSORY DETAIL GUIDE
 TM-RIB PANEL ACCESSORY DETAIL GUIDE FL11101.1 FL11101.2 TA125 (UL580 Class 90) Certified Thompson Architectural Metal Roofing is proud to be a partner of the Energy Star Roof Products Program SINGLE SOURCE
Table of Contents. Important Notices 3. Residential Roofing Application 4. Trims & Accessories 5. Trim Glossary 6, 7, 8. Estimating Material 9
 Table of Contents Page(s) Important Notices 3 Residential Roofing Application 4 Trims & Accessories 5 Trim Glossary 6, 7, 8 Estimating Material 9 Eave Trim Installation 10 Connecting Eavestarters 10 Gable
Features 24 ga steel or 26 ga steel. Colors available on standard or premium and metallic. 16 to 24 o.c. On site factory made.
 Strip Width Base Material Thickness Min Tensible Min Yield Coatings 16.00 to 24 in Steel.0128 to.027 in 52 - ksi 50 - ski Painted / Galvalume UL CONSTRUCTION NUMBERS: TGKX539 The Nail Strip 1.5 (NS-150)
DIRECTIONS FOR APPLICATION
 Instructions 1 General NOTICE: THESE SHINGLES MUST BE APPLIED TO CONFORM WITH ALL APPLICABLE BUILDING CODES. THESE DIRECTIONS REPRESENT COMMON AND ACCEPTED ROOFING PRACTICES. DEVIATIONS FROM THESE DIRECTIONS
DIRECTIONS FOR APPLICATION
 Instructions 1 General NOTICE: THESE SHINGLES MUST BE APPLIED TO CONFORM WITH ALL APPLICABLE BUILDING CODES. THESE DIRECTIONS REPRESENT COMMON AND ACCEPTED ROOFING PRACTICES. DEVIATIONS FROM THESE DIRECTIONS
westmansteel.com Installation Guide Proudly Canadian. Family Owned. Cambridge (ON) TF. (855) F. (855)
 TF. (855) F. (855)") MEMBER COMPANY Proudly Canadian. Family Owned. Cambridge (ON) TF. (8) 620-2720 F. (8) 97-829 Winnipeg \ Brandon (MB) TF. (800) 661.282 F. (800) 661.90 Swift Current \ Regina \ Saskatoon (SK) TF. (800)
MEMBER COMPANY Proudly Canadian. Family Owned. Cambridge (ON) TF. (8) 620-2720 F. (8) 97-829 Winnipeg \ Brandon (MB) TF. (800) 661.282 F. (800) 661.90 Swift Current \ Regina \ Saskatoon (SK) TF. (800)
MetroCOTTAGE Shingle
 Batten-less Installation Sept. 14, 2017 INSTALLATION WARNING! These install details are provided to demonstrate a recommended installation method for Metro Roof panels and accessories. used in the United
C e r t a i n T e e d S h i n g l e A p p l i c a t o r s M a n u a l. and Carriage House STEEP. Slope Application. (over 21/12)
") C e r t a i n T e e d S h i n g l e A p p l i c a t o r s M a n u a l Grand Manor 16 and Carriage House YOUR OBJECTIVE: To learn the correct method of installing each of these roofing products. These shingles
C e r t a i n T e e d S h i n g l e A p p l i c a t o r s M a n u a l Grand Manor 16 and Carriage House YOUR OBJECTIVE: To learn the correct method of installing each of these roofing products. These shingles
A P P L I C A T I O N I N S T R U C T I O N S
 1 2 3 General Instructions NOTICE: THESE SHINGLES MUST BE APPLIED TO CONFORM WITH ALL APPLICABLE BUILDING CODES. THESE DIRECTIONS REPRESENT COMMON AND ACCEPTED ROOFING PRACTICES. DEVIATIONS FROM THESE
b) Symphony comes pre-packaged in color and width blends. There is no need to mix Symphony at the job site. Currently Symphony is available in the
 Symphony comes pre-packaged in color and width blends. There is no need to mix Symphony at the job site. Currently Symphony is available in the") PART 1 GENERAL 1) DESCRIPTION a) CertainTeed Symphony TM composite slate is an innovative roofing product that simulates the appearance, texture, and contours of traditional natural slate. It is a carefully
PART 1 GENERAL 1) DESCRIPTION a) CertainTeed Symphony TM composite slate is an innovative roofing product that simulates the appearance, texture, and contours of traditional natural slate. It is a carefully
Installation Instructions Split Shake, Staggered Shake, Shingle, Perfection Shingle, and Shapes
 Installation Instructions Split Shake, Staggered Shake, Shingle, Perfection Shingle, and Shapes General Guidelines These instructions show one type of installation and are intended for the professional
Terrabella Shake & Shingle Znap Ver. 2.0
 Terrabella Shake Znap Actual length = 52.6 Actual Width = 16.33 Coverage length = 49.7 Coverage width = 14 Terrabella Shingle Znap Actual Length = 52.375 Actual Width = 15.25 Coverage Length = 49.375 Coverage
DIRECTIONS FOR APPLICATION
 Instructions 1 General NOTICE: THESE SHINGLES MUST BE APPLIED TO CONFORM WITH ALL APPLICABLE BUILDING CODES. THESE DIRECTIONS REPRESENT COMMON AND ACCEPTED ROOFING PRACTICES. DEVIATIONS FROM THESE DIRECTIONS
eco-shake INSTALLATION INSTRUCTION
 1 eco-shake INSTALLATION INSTRUCTION NOTE: Shuffling the eco-shakes during installation may be necessary to obtain a uniform color throughout the roof. Due to the natural wood content in the ecoshakes,
Horizon-Loc. Installation Details 16" COVERAGE C GUID_INSTL_HLOC_160606
 Horizon-Loc Installation Details ¾" 1" 4" 16" COVERAGE D C GUID_INSTL_HLOC_160606 INDEX Information in the catalog may vary by plant location. Please call your salesperson to verify product availability.
Installation Manual. For Gerard Shingle Products
 Installation Manual For Gerard Shingle Products Gerard Shingle Installation Manual is a component of Gerard roofing products and as such is intended to be used with Gerard products only. All information
Steel Shingle Installation Guide
 Page THESE ARE THE MANUFACTURER S APPLICATION INSTRUCTIONS FOR THE ROOFING CONDITIONS DESCRIBED. TAMKO BUILDING PRODUCTS, INC. ASSUMES NO RESPONSIBILITY FOR LEAKS OR OTHER ROOFING DEFECTS RESULTING FROM
IRONSTONE SLATE & FLASHING SPECIFICATIONS IRONSTONE SLATE
 8 5/8" A) 1 5/8" 5/8" 1 10" 10 1 5 50" 9 7/8" IRONSTONE SLATE & FLASHING SPECIFICATIONS IRONSTONE SLATE 1/8" 1 B) 3/8" 2 7/8" 1 3/8" 3/8" 3/8" 3/8" 1" 1 5/8" 1 5/8" 1 2 1 8.3" 3/4" Overall Length 52 Length
MasterRib. Installation Manual. July Toll-Free (888) MTL-ROOF. PO Box 229 Fayetteville, NC Rev.
 MTL-ROOF. PO Box 229 Fayetteville, NC Rev.") MasterRib Installation Manual July 010 PO Box 9 Fayetteville, NC 80.. www.unionmetalroofing.com Toll-Free (888) MTL-ROOF Rev. 7/10 IMPORTANT NOTICE This manual contains suggestions and guidelines on how
MasterRib Installation Manual July 010 PO Box 9 Fayetteville, NC 80.. www.unionmetalroofing.com Toll-Free (888) MTL-ROOF Rev. 7/10 IMPORTANT NOTICE This manual contains suggestions and guidelines on how
E-Z BUILD STEEL BARN 12' 12' 12' 16' 12' 20'
 E-Z BUILD STEEL BARN 12' 12' 12' 16' 12' 20' BUILD You can construct your own E-Z frame barn with the help of this step by step guide. North American softwood dimensional lumber sizes: Nominal Actual in
Slate Shingle Specifications
 Slate Shingle Specifications California Slate is a proud member of the Slate Roofing Contractors Association of North America, Inc. (SRCA) which publishes Section 07310 Slate Shingles setting forth architectural
Installation Instructions
 Installation Instructions SHARK VENT XLP / XTRA Page Installation Considerations 3 Shark Vent XLP & Xtra General Installation 4 Steep Pitch Guidelines 5 Asphalt Shingles Detail 6 Ridge Beam Detail 7 Hip
Shapes Siding. Perfection Shingles. Chalk Line
 Snap a Chalk Line Shapes Siding Perfection Shingles Chalk Line To establish a straight reference line to guide the positioning of the starter strip and the first course of siding, snap a chalk line. starter
Table of Contents. Important Notices 3. Residential Roofing Application 4. Trims & Accessories 5. Trim Glossary 6, 7, 8, 9
 1 Table of Contents Page(s) Important Notices 3 Residential Roofing Application 4 Trims & Accessories 5 Trim Glossary 6, 7, 8, 9 General Installation Recommendations 10 Installation Guidelines Roof Preparation
TABLE OF CONTENTS A. PBR
 TABLE OF CONTENTS A. PBR Panel 1. PBR Panel Architect/Engineer Information....................................... 2 2. PBR Panel UL 90 Requirements............................................... 3 3. PBR
Installation Instructions
 Installation Instructions Building Design and Construction To ensure adequate performance and longevity, protect metal panels from potentially corrosive situations and materials. When treated lumber will
SG-30 A P P L I C A T I O N I N S T R U C T I O N S. Directions For Application
 1 2 3 General Instructions NOTICE: THESE SHINGLES MUST BE APPLIED TO CONFORM WITH ALL APPLICABLE BUILDING CODES. THESE DIRECTIONS REPRESENT COMMON AND ACCEPTED ROOFING PRACTICES. DEVIATIONS FROM THESE
PROJECT INSTRUCTIONS Roofing
 PROJECT INSTRUCTIONS Roofing This handout outlines some basic regulations contained within the 2015 Minnesota State Building Code, as well as other good building practices. However, this handout is not
METRO PANELS (EXPOSED
 METRO PANELS 001EX-METRO-PANELS.VSD STARTER EAVE Detail Metro V-Bat RISER METAL (1) PANELS (2) FASTENERS (5) BOTTOM ROW fastening 0.75in. (4) METRO RISER Metal, With Integral Batten Riser & Locator-Lip.
Chapter 16: Roof Steel
 Chapter 16: Roof Steel Most Common Mistakes: 1. Roof purlins not checked for alignment. 2. Failure to properly square roof. 3. Reversing steel laps. 4. Using not enough or too many screws. 5. Over or under
6 STEP INSTALLATION GUIDE BY DCI
 6 STEP INSTALLATION GUIDE BY DCI STEP 1 (Ensure metal drip edge was previously installed.) Begin by cutting a slit 1 wide (or a series of 1 ¾ holes 3 on center) into the roof decking 6 to 7 up from the
Light Gauge Metal Roof and Wall Panels. Installation Guide for Delta Rib, Delta Rib III, Nor-Clad, Strata Rib & Corrugated
 Light Gauge Metal Roof and Wall Panels Installation Guide for Delta Rib, Delta Rib III, Nor-Clad, Strata Rib & 2 1 2 Corrugated Light Gauge Metal Roof & Wall Panels ASC Building Products A Division of
Granite Ridge Shingle Guardian Shingle
 Allmet Installation Manual Shingle Profiles Granite Ridge Shingle Guardian Shingle March 2017 This Installation Manual is designed as an instructional tool to clearly depict to the contractor, installer,
Skyline Roofing. Installation, Flashings and Details Guide
 Skyline Roofing Installation, Flashings and Details Guide Table of Contents Section Page Introduction...2 Delivery, Handling and Storage...3 Safety Considerations...3 Equipment......................................4
Installation Instructions
 Installation Instructions XTRACTOR VENT X18 / X18 XTRA / XLP Page Installation Considerations 3 X18 and X18 Xtra General Installation 4 XLP General Installation 5 Steep Pitch Guidelines 6 Asphalt Shingles
WESTERN WAVE Panel. Vertical Installation and Technical Information
 WESTERN WAVE Panel Vertical Installation and Technical Information Western States Western Wave Wall and Soffit Panels (Vertical) Installation, Flashings & Shop Drawing Detail Guide Section Notes to Designer
Grand Manor Carriage House and Centennial Slate 16 YOUR OBJECTIVE: To learn the correct method of installing each of these roofing products.
 CertainTeed Shingle Applicator s Manual Grand Manor Carriage House and Centennial Slate 16 YOUR OBJECTIVE: To learn the correct method of installing each of these roofing products. 90 STEEP Slope Application
AIA Specification. Section Slate Shingles PART 1 GENERAL
 AIA Specification Section 07315 Slate Shingles PART 1 GENERAL 1.1 RELATED DOCUMENTS A. Drawings and general provisions of the Contract, including General and Supplementary Conditions and Division 1 Specification
Table of Contents. Important Notices 3. Residential Roofing Application 4. Trims & Accessories 5. Trim & Accessory Glossary 6, 7, 8
 Table of Contents Page(s) Important Notices 3 Residential Roofing Application 4 Trims & Accessories 5 Trim & Accessory Glossary 6, 7, 8 Estimating Material 9 Roof Preparation: 5 Steps 10, 11 Shingle Installation
Gerard Installation Manual Shingle Profiles
 Gerard Installation Manual Shingle Profiles Granite Ridge Shingle Guardian Shingle March 2017 This Installation Manual is designed as an instructional tool to clearly depict to the contractor, installer,
DECRA Shingle Installation Guidelines
 Installation Guide DECRA Shingle Installation Guidelines General Instructions Failure to use these guidelines may void the product warranty. Local building codes may require additional application techniques
Polytegola N. Bitumen Roof shingles. Application guide
 Polytegola N Bitumen Roof shingles Application guide Application manual POLYTEGOLA N CONTENT 1. Foreword - General conditions 3 2. POLYTEGOLA N designs 4 3. Roof pitches 5 4. Storage 5 5. Roof decking
ROOFING APPLICATION STANDARD (RAS) No. 115 STANDARD PROCEDURES FOR ASPHALTIC SHINGLE INSTALLATION
 No. 115 STANDARD PROCEDURES FOR ASPHALTIC SHINGLE INSTALLATION") ROOFING APPLICATION STANDARD (RAS) No. 115 STANDARD PROCEDURES FOR ASPHALTIC SHINGLE INSTALLATION 1. Scope 4. Underlayment 2. 1.1 This roofing application standard has been developed to provide a responsive
ROOFING APPLICATION STANDARD (RAS) No. 115 STANDARD PROCEDURES FOR ASPHALTIC SHINGLE INSTALLATION 1. Scope 4. Underlayment 2. 1.1 This roofing application standard has been developed to provide a responsive
VENTED GABLE DETAIL ROOF PANEL GABLE FLASHING 24" C/C MAX. BUTYL SEALANT TAPE ROOF PURLIN FLASH AB-1, AB-2, AB-3, OR AB-4
 ROOF PANEL GABLE FLASHING FASTENER @ 24" C/C MAX. ROOF PURLIN BUTYL SEALANT TAPE FLASH AB-1, AB-2, AB-3, OR AB-4 FASTENER @ EVERY MAJOR RIB OR 12" C/C MAX. F-J TRIM FABRAL ALUMINUM SOFFIT FASTENER 24"
Installation Guide. Guardian Slate Roof System. England, Scotland & Wales
 Installation Guide Guardian Slate Roof System England, Scotland & Wales March 2016 Product Information Construction: Manufactured from resin bonded crushed limestone Size (slate): 445 x 294mm (ridgecap):
DESIGNER SERIES GUTTER SYSTEM INSTALLATION INSTRUCTIONS
 DESIGNER SERIES GUTTER SYSTEM INSTALLATION INSTRUCTIONS GENERAL DESCRIPTION: The Designer Series Gutter System is a specially designed roof edge drainage product for industrial, commercial, and high end