Building a Scarab 350 Trimaran
|
|
|
- Eustace George
- 5 years ago
- Views:
Transcription

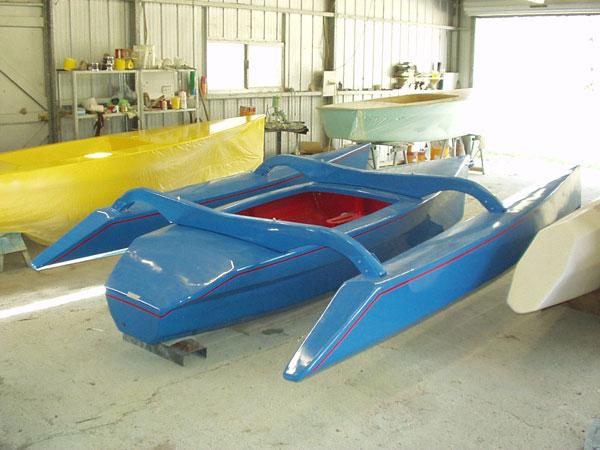
1 This boat was designed to be built using flat panels. In either foam laminated panels or plywood. 1. The build time is less. Panels are lofted, cut out and joined on the frame. 2. Frame can be simpler. Panels are rigid enough to hold the shape. 3. If the panels are accurately joined there is less time spent long-boarding the boat. 4. The only area that needs to be bogged is between the tapes not the entire hull. PLYWOOD This boat was designed to be built using 4mm and 10mm for the centreboard and rudder blade. Building a Scarab 350 Trimaran FOAM Foam provides good heat and sound insulation. Attaching fittings to a foam boat can be a bit tricky. The foam must be removed where bolts pass through
2 and replaced with strong filler to prevent crushing the foam, this can be achieved by drilling the bolt hole in the appropriate place and using a bent nail or similar to dig out the foam. Any exposed foam at the edge of the bulkheads in the main hull is removed to about 10mm and backfilled with filler. We used woven mat 200gsm approx. to cover the 10mm foam (Klegecell). RESIN Epoxy resin is used to build plywood hulls. It can also be used with foam panels. We use polyester resin to laminate our panels. It is less expensive and there is no problem with shrinkage in cold weather. Fillers can be added to resin to use for either gluing applications where strength is needed or for fairing areas before painting. Material suppliers offer filler for particular purposes when you buy the resin or you can make your own. We make our own fillers using different combinations depending on the job. If you want to make your own you will need to experiment with combinations until you feel comfortable with the result. We use Q cells for any areas that need to be sanded later. Strong glue can be made using aerosil mixed with cotton fibres. LAMINATING THE PANELS. PLYWOOD FILLERS Resin and hardener (or catalyst with polyester) should be mixed thoroughly before adding any filler. Marine plywood (4mm) is cut to the full length of the hull panels and joined with a butt-strap across the whole width. Scraps of plywood can be used to support the panel. The plywood does not need to be covered with glass.

3 FOAM We construct our panels by joining the foam sheets together the full length of the boat and then cover with glass. This method works well and calculation of soak coat recommended by the manufacturer of the foam and the theoretical amount of resin needed to laminate the glass are well within accepted levels. We use LSE (low styrene emission) resin and the smell of polyester resin is minimal. So it shouldn't annoy the neighbours. The foam is cut to the desired length and the edges to be joined glued together. We use resin mixed with aerosil. The foam is held in place with drywall (gyprock) screws. We place a piece of plastic under the joint to protect the table underneath and prevent our panel becoming a permanent part of the table. Once the resin sets (usually about 2 hours) the screws are removed. You can fill the screw holes with filler or leave them to fill with resin as you laminate the foam. If you don t fill the holes the resin will pass through the holes leaving a blob of resin underneath. This is easy to remove with a small grinder with a sanding disc. Lay the glass over the length and smooth. Cut peel ply in short lengths (about a metre in the beginning). Mix the resin and pour it over a section of the foam (about a metre to begin). Allow gravity to help saturate the glass and soak the foam. Using a metal drywall spatula (10 inch wide works well) spread the resin and work it into the glass. When you are satisfied the glass is saturated and there are no air bubbles, add the peel ply. Work the peel ply until there are no air bubbles or

4 excess resin. Sometimes a small amount of resin poured over the peel ply makes it easier to work the air bubbles out. Finish one area then move on to the next until all the foam is covered with peel ply. The time to build the full length panels is approx. 10% of the total build-time of the hulls but once the panels are cut out they are very quick to set up on the building frame and are very stiff. Most of our customers build their boats using plywood but that is beginning to change. I can only think it is the rising price of plywood and epoxy resin. We use polyester resin on our boats, partly for the cost and partly for the safety reasons. Many people find they develop an allergy to epoxy resin over time.


5 LOFTING To loft the boat panels a straight line is drawn on the edge of the fabricated panel or plywood and marked at 500mm intervals. A square can be used to draw lines perpendicular to the base line. Mark the dimensions given on the plans along the perpendicular lines. Panel pins or dry wall screw are attached at the marks and a flexible baton is bent to create a smooth line. The baton can be made from a narrow piece of plywood the length of the overall panel. (We use an old sail batten. Draw the lines onto the peel ply. The panels are cut out using a jigsaw. The bulkheads were drawn up from the dimensions on the plans.

.")
6 SETTING UP THE BUILDING FRAME FOR MAIN HULL ATTACHING THE PANELS TO THE BUILDING FRAME. This building frame was built using plywood. The building frame longitudinals and bulkheads have slots and fit together egg crate fashion. The cut panels are attached to the building frame (drywall screws for foam and staples for plywood). If you mark the position of the bulkheads on the inside it will help position the permanent bulkheads.


7 All the panels are added. It is important to ensure the chines are fair at this time. The chines were filled and sanded and then taped. If you use strips of peel ply the weave will be filled with resin making it easier to finish with minimum sanding. The hull was turned and the chines taped. A quick neat technique is to use a wet fillet. The bog is applied in a rough fillet and the glass tape is applied over the wet fillet. Using a compactor, squeeze out air bubbles and shape the fillet wiping off any excess filler.


8 The all the bulkheads were taped to the hull using wet fillets A carlin was added between bulkhead no.8 and no.4. A plywood stinger to strengthen the deck was added between bulkhead no.2 and no.4.


9 Supports were added to support the side deck. If a prodder is desired then it is built at this time. Glass is laminated over a metal tube covered with cardboard or something similar. A stem web and a forestay web are attached. Scrap foam or plywood is glued to the inside of the hull to support the deck. Deck is glassed, trimmed and glued to the supports using soft metal. The assembly is mounted in the nose of the hull and taped in.


10 The aft deck and the side decks are attached. An edge is built using foam between the fore and aft decks. A mast support tube is made from glass laminated over a metal tube covered with cardboard or similar. A plywood mast support was added and a hole cut in the hull bottom for the centreboard. The dagger-board case was made of laminated foam and taped to the floor.


11 A dagger board support was added around the mast support tube and the dagger case. The inside of the hull was filled ready to paint. The outside was filled and faired.


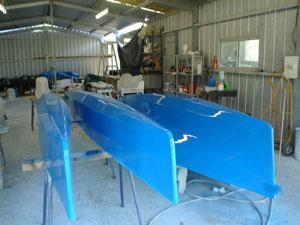
12 THE FLOATS The building technique for the floats is the same as the main hull. The same longitudinals are used. The temporary bulkheads are in the same position as the permanent bulkheads so it is a good ideas the mark the inside of the panels at the as they are added. This aids in adding the permanent ones in the right position and saves levelling the bulkheads. The panels added to the frame and joined with drywall screws (foam) or staples (plywood). The chines are taped and hull turned over.


13 All the inside chines are taped using wet fillets. The float is levelled or you can use the markings that you added when attaching the panels. The bulkheads are added and taped in. The sloping transom is added and taped to the hull.


14 Doublers were added around the edge of the float to hold the deck. The deck is added. Plywood will bend in a fair curve but laminated foam is too stiff to bend. A solution is to score the laminated foam partly through, glue the deck down and add bog in the scores. Trim and sand the joints. Then the deck can be glassed over the edges.
 have chines. The panels are taped together.")
15 SANDING AND FILLING This section shows how we finish boats. There are many other methods you could use. If you already know how to fill and paint a boat you might skip this section. When the boat is sanded you will be able to see through the bog slightly. All of Ray's designs (with the exception of the Avalon 8.2 and the Scarab 12) have chines. The panels are taped together. If you have used peel-ply over the taped chines on the outside then the weave of the glass should be full of resin. If you have made your own panels using peel-ply then the weave should be mostly full of resin as well. If you are building with plywood, add a coat of epoxy resin to all the bare wood and sand. The best way to a good finish is to apply filler to the depth of the tape with very little filler on the tape itself. We use Q-cells mixed with the resin, either polyester or epoxy. It is easy to apply, easy to sand, can be used beneath the water-line and is inexpensive. We use a drywall tool: a 10" spatula covers a wide area smoothly. We sand the boat using a random orbital sanded hooked to a vacuum system to cut down on the dust.
. The boat is sanded and primed again.")
16 PAINTING The boat is now ready to be primed. We use Jotun Penguard high build epoxy primer sprayed on with an airless sprayer. Any pin holes which are hard to fill can be filled with Septone blade putty (the putty must be sandwiched between layers of epoxy primer). The boat is sanded and primed again. When the primer hardens the boat is sanded and cleaned thoroughly ready for a finish coat. We use gravity feed gun with a 1.4mm nozzle and Jotun Imperite, a two part polyurethane. The first coat is a light coat which is allowed to tack off about 15 minutes. This prevents the paint from running. Then spray on two more coats. If you prefer to paint with a roller or brush follow the directions on the label. We spray primer twice. After the first coat we sand the boat and fix any imperfections which are only visible after the boat is painted.

17


18 BUILDING THE CENTREBOARD AND RUDDER These pictures are of another boat but the technique is the same. The dagger board and the rudder are made using layers of plywood. Two pieces of 10mm plywood are laminated using a couple of layers of glass cloth and epoxy resin between. When the board is shaped the glass inside gives a sharp finish to the trailing edge directions in the plans. The boards are shaped a small grinder with a sanding disc. Then the board is cut to shape. A template is included in the plans. After the correct shape was achieved the board was covered with glass cloth and epoxy resin. The board is filled, sanded and painted.


19 A rudder head is made using a form ply mould. The mould is waxed and layers of glass are wrapped around the mould. Peel ply was used on the outside to minimise the time spent finishing the head. After the mould was removed the rudder head is trimmed to shape and joined to the rudder blade with a stainless pivot pin. The pintles are screwed onto the blade to match the gudgeons on the stern


20 The tiller is made from laminated hoop pine and varnished.
Building a Scarab 18/650 folding trimaran
 Building a Scarab 18/650 folding trimaran The plans for these two boats will be sent by email and contain everything needed to build these boats, including rig and trailer drawings and a list of all materials
Making your Rudder Cassette
 Making your Rudder Cassette A list of the stuff you ll need The row of materials below is laid out in the order of application. The foam blank shown on the right is available from Bob at www.flyingfoam.com
Above are the offsets for the plywood panels.
 DinkyDink Plans Bottom Panel Half Station X Y X2 Y2 1 1/4 3/4 0 11 5/16 2 4 9/16 4 12 9/16 3 11 11/16 1/4 11 7/16 14 1/2 4 18 5/8 1/16 18 5/8 15 11/16 5 25 3/4 0 25 3/4 16 5/16 6 32 13/16 0 32 13/16 16
How to build a Javelin Skiff
 How to build a Javelin Skiff This is not your grandfather s plywood boat! The Javelin involves a high-tech type construction, called composite. The hull can be constructed with foam or plywood; these materials
Illustrated Guide to Building a Spira International Ply on Frame Boat
 Illustrated Guide to Building a Spira International Ply on Frame Boat Spira International, Inc. Huntington Beach, California Copyright, 2008 All Rights Expressly Reserved Building a Spira International
Hatch Installation For Pygmy Solo and Double Kayaks
 Introduction/Overview Hatch Installation For Pygmy Solo and Double Kayaks The hatch kit consists of several wooden lips, strapping and hardware. The hatch is constructed by cutting a hole in your deck,
A Skin-on-Frame Pram. Designed by Dana Munkelt. Drawings by Andrew Walters. Duckworks Boatbuilder's Supply duckworksbbs.com
 A Skin-on-Frame Pram Designed by Dana Munkelt Drawings by Andrew Walters Duckworks Boatbuilder's Supply duckworksbbs.com "" is a small skin-on-frame (SOF) pram design with a twist; a solid plywood floor.
SZD-10 bis CZAPLA ASSEMBLY MANUAL IN PICTURES
 1 RUDDER Plan and parts: 2 Assembly steps: Photo above: glue together rudder spar, ribs and trailing edge. Clamp spar to a flat surface (chipboard on the photo) and make sure the straight aligment of the
JAE Mini Sprint. Fast Electric Outrigger. A Zippkits R/C Boat. Building Instructions
 Z I P P M A N U FA C T U R I N G JAE Mini Sprint Fast Electric Outrigger A Zippkits R/C Boat Building Instructions 2011 Zipp Manufacturing - Frankfort, New York 13340 www.zippkits.com Toll Free (866) 922-ZIPP
CAUTIONS / INSTRUCTIONS
 CAUTIONS / INSTRUCTIONS EPOXY Epoxy is used for many purposes in the building of your boat. It is used to join wood, bond fiberglass, fill gaps, and seal the wood. We supply epoxy from Raka Boat Building
Building Instructions ARTEMIS Sailing Canoe Day Six Version 1.0 Brian Pearson & Dr. Axel Schmid Day Six. Align and Glue Planks
 Version 1.0 Brian Pearson & Dr. Axel Schmid 2016 Align and Glue Planks Steps: Align boat, check dimensions Join planks provisionally Pull wires Glue the outside planks Tools and Materials: Epoxy putty
Photo Essay How to Build an. Alaskan. Grand Banks Dory. Plans for this boat may be found at:
 Photo Essay How to Build an Alaskan Grand Banks Dory Plans for this boat may be found at: http://www.spirainternational.com/ How to Build an Alaskan Grand Banks Dory The Alaskan is an easy to build Spira
Nanton Grain Mill Assembly
 ( 1 ) Nanton Grain Mill Assembly Locate package for assembling storage building. These are cut from 1/8 masonite. Inspect and lightly sand edges where it will be bonded. Use white glue or CA glue to bond.
6mmFlyRC.com Super Bandit Assembly Instructions
 Assembly Instructions Start the assembly with forward fuselage. Lay the two fuselage sides down on a flat surface and glue the foam corner doublers to the locations shown on the plans. Make sure to make
Building Tips This model can be built using the following types of adhesives:
 Page 1 Building Tips This model can be built using the following types of adhesives: Epoxy (with or without microballons) Odorless cyanoacrylate (CA) with accelerator UHU Creativ for Styrofoam (or UHU
Penobscot 14 Building Log
 Penobscot 14 Building Log Date July 26, 2004 Duration Activity plane jig boards July 27, 2004 July 28, 2004 cut jig boards cut frame boards, assemble jig July 29, 2004 6.75 hr assemble jig August 2, 2004
More Storage Space Under Yacht Bed
 More Storage Space Under Yacht Bed Open up storage space under your bed! Convert your bed deck to a Lifting Hatch with Gas Spring assist! Many bed decks on boats and RV s have two or three pieces of plywood
A Slim,Comfortable. In 1979 I spent five months designing. This system works for most chairs and uses common materials
 A Slim,Comfortable This system works for most chairs and uses common materials An upholstered slip seat complements a beautiful chair. Using modern materials, it s not difficult to construct an elegant
Cardboard Model Buildings
 Cardboard Model Buildings Get more model kits from http://www.modelbuildings.org PRINTING & ASSEMBLY TIPS: These OO designs can easily be resized by reducing the print percentage as follows: OO scale is
WORKING of nidaplast
 nida 8/gb - 03.07.07 Technical Information. 2 WORKING of nidaplast nidaplast is a polypropylene honeycomb covered on both faces with a soft polyester nonwoven fabric. It is available in 2500 x 1200 mm
Cockpit Kit. Full Depth - Builds Quickly - Light Weight READ THROUGH THIS INSTRUCTION MANUAL FIRST. IT CONTAINS IM- laser cut wood kit
 The Savage Light Sukhoi Su- 27 Cockpit Kit contains everything you need to build a full depth semi scale Su-27 cockpit, yet adds less than an ounce to your finished model s weight (not including pilot).
Building Instructions Diva cabin boat
 Building Instructions Diva cabin boat Order no. 3093/00 aero-naut Modellbau Stuttgarterstr. 18-22 D-72766 Reutlingen / Germany http://www.aero-naut.com 1 For pictured building instructions please see the
Introduction: The model should be assembled following the sequence of the stages of construction described in these instructions.
 Victoria Bestell-Nr. 3082/00 Introduction: The model should be assembled following the sequence of the stages of construction described in these instructions. The laser-cut components are individually
Delfini. 19x6 Console Semi Flat Hull. Study Plans
 Delfini 19x6 Console Semi Flat Hull Study Plans Contents 3 Introduction 4 Specification 6 List of Materials 7 Glue, Resin and Fixings 8 Tools 9 Construction Sequence 2 Introduction This is the 19' x 6'
Piper Cherokee /3 scale. Construction Manual
 Piper Cherokee 140 1/3 scale Construction Manual STAB CONSTRUCTION 1. Remove foam cores from cradle and place on flat surface. Inspect pieces before you epoxy halves together making sure leading and trailing
HOW TO SELECT & USE A ROLLER
 HOW TO SELECT & USE A ROLLER www.paintaids.co.nz 1 select the right roller The two most important things for a great paint finish are: a good quality paint, and the right roller sleeve to match the paint
Building an Unfeathered Paddle with a Wood Shaft and Carbon Fiber Blades
 Building an Unfeathered Paddle with a Wood Shaft and Carbon Fiber Blades by Duane Strosaker Choosing the Wood Two 3/4" pieces of Sitka spruce laminated with epoxy for an unfeathered one-piece paddle. For
Miniature Steam Models Wattle Steam Powered Launch
 Miniature Steam Pty Ltd Bringing the Highest Standards to Model Engineering Assembly Instructions Miniature Steam Models Wattle Steam Powered Launch Manufacturer: Miniature Steam Pty Ltd PO Box 16 Montrose
Swift assembly guide
 Swift assembly guide Download the assembly guide at www.scihighmodels.com/swift.pdf Sample kit shown with aluminium bells (available with the Deluxe kit) Shown here without main tanks Version 10/12/2010
10. Wing prep and subassembly
 Date Section Objective: Construct and fabricate the sub-assemblies of the wing panel. Required Parts: Wing left 11gal PN104-300, Wing right 1gal PN104-400, Wing left 15 gal option PN104-322, Wing right
FUSELAGE CONSTRUCTION
 FUSELAGE CONSTRUCTION Note: prior to building and gluing on the work surface use protective covering on your building surface. (wax paper or clear wrap) Fit the laser cut Fuselage Front and Fuselage Rear
FLEXITEEK INSTALLATION INSTRUCTIONS
 an Advanced Plastic Fabrications Company 99 marcus Blvd., 631.244.3620 631.231.4466fax FLEXITEEK INSTALLATION INSTRUCTIONS Before you begin, take your new Flexiteek deck out of the shipping package and
Contents. Study Plans. 2 Introduction. 4 List of Materials. 5 Glue, Resin and Fixings. 6 Tools. 7 Construction Sequence
 Volare Study Plans Contents 2 Introduction 4 List of Materials 5 Glue, Resin and Fixings 6 Tools 7 Construction Sequence Study Plans The study plans consist of an abridged version of the first 7 pages
SAAB JAS 39 Gripen. Building Instructions Designed by: Steve Shumate. Taken From:
 SAAB JAS 39 Gripen Building Instructions Designed by: Steve Shumate Taken From: http://www.rcgroups.com/forums/showthread.php?t=308830&page=1 Lightly tack glue the paper templates to the foam sheets using
Pre-Paint>Wings>Fit ailerons. Objectives of this task: Materials and equipment required: Size the ailerons and pre-mould strips
 Pre-Paint>Wings>Fit ailerons Objectives of this task: In this task the ailerons and the pre-mould strips will be sized and trimmed, then flocked onto the wings and glassed in place, and the next day the
Repairing Sheet-Molded Compound (SMC) With Epoxy
 With Epoxy") Repairing Sheet-Molded Compound (SMC) With Epoxy 1. Properties: A. It does not dent. B. It does not rust C. Panels are formed using a flat sheet or compound that is heat molded in a press. 2. Preparation
Repairing Sheet-Molded Compound (SMC) With Epoxy 1. Properties: A. It does not dent. B. It does not rust C. Panels are formed using a flat sheet or compound that is heat molded in a press. 2. Preparation
3Insert the second rod no. 4
 Yamato: Step-by-step 37 The stern block and searchlight control towers a b c d e f Recommended tools and materials Wood glue Sandpaper (no. 800 grain) Metal file Putty Craft knife For metal: Super Glue
PLANS BY KELLEY FARMHOUSE DESIGNS LOFTED DORM ROOM BED
 PLANS BY KELLEY FARMHOUSE DESIGNS LOFTED DORM ROOM BED DIMENSIONS: 82" X 70" X 45" DIFFICULTY LEVEL: INTERMEDIATE TOOLS REQUIRED ONE+ Circular Saw ONE+ AirStrike 16GA Finish Nailer ONE+ Impact Driver ONE+
Tape Measure Metal Clippers Screw Bit Set With Extensions
 IMPORTANT: Read through instructions thoroughly before beginning to replace any damaged material. Minor damage can be fixed with a fiberglass repair kit and color matched paint. Tools Required Tape Measure
Building the Wee Lassie Canoe. A Michigan Woodworkers Guild Presentation by Bob Mills
 Building the Wee Lassie Canoe A Michigan Woodworkers Guild Presentation by Bob Mills So you want to build a boat, eh? Ok, how about this for starters? Carved by Livio De Marchi, Woodcarver Extraordinaire
4. Bevel the LE face of HS1-HS11 to match the horizontal stab leading edge sweep angle.
 BEFORE YOU BUILD 1. Unroll each sheet of the plans. Roll them inside out so that they will lie flat on the building surface. 2. Assemble the tools that you will need to build each section so that they
1Smooth pieces 4, 5 and 6, using
 Yamato: Step-by-step 109 Machine-guns, anti-aircraft guns and decking h e f a b c g d e f a Anti-aircraft gun base x 2 b Anti-aircraft gun (bottom) x 2 c Anti-aircraft gun (top) x 2 d Machine-gun base
Artificial Grass. Fitting Guide
 Artificial Grass Fitting Guide Quick Start Artificial grass is quick and easy to fit, we have a quick-start guide below or continue on for a more in depth how-to guide. We recommend you have a quick read
SASKATOON, Saskatchewan
 CONSTRUCTION GUIDE AVRO ARROW (CONTEST VERSION) Copyright, Bill Jones, 2004 SASKATOON, Saskatchewan This is a work in progress, so there are a couple of rough areas ( I ll point out those that I m aware
Fitting Fiberglass arches to MK 1 Escort
 Fitting Fiberglass arches to MK 1 Escort This is a fairly big job and not for the faint hearted. I got a mate who has done some glass work before, to help me. The method of fixture is varied. You could
Cowper From Steve Wolverton on the T&TTT forum, Feb 2005 For Reference Only Do not use to build a trailer. Check on Teardrop and Tiny Travel Trailers
 Cowper From Steve Wolverton on the T&TTT forum, Feb 2005 For Reference Only Do not use to build a trailer. Check on Teardrop and Tiny Travel Trailers for up to date building information; http://www.mikenchell.com/forums
The finishing of a centre board
 The finishing of a centre board By: Ton Jaspers (W5011) Since half the cost of a centre board is in the finishing, it pays to do the finishing yourself. Others may argue the entire board can be made by
Kam Aero 43% Extra 300.
 Stab Sheeting Kam Aero 43% Extra 300. Stabs / Elevator: Make your skins using the same method as you did for the fuselage foam parts. The stabs require 8 sheets (4 per stab) of 4 x 48 A grain sheeting.
AN IMPROVED DESIGN FOR AMATEUR BUILDERS.. TAKES SAIL OR MOTOR
 BUILDING A General H ERE is a rowboat that is in a class by itself the final development of a long line of forerunners. This graceful little V-bottom craft is 13 ft. long, carries from four to six passengers,
Redwood strips are tacked to the templates, and edge-glued. Drive brads through into the templates before putting on fiberglass doth.
 1 Make the building form and attach templates to the crosspieces. Nail a strip down the center to hold the stems and templates in position. prototype canoe took about three weekends to build. She's broad
How to make climbing grips. By,
 How to make climbing grips By, Items needed: * Items may be needed depending on your preference. - Carving Foam - Level Table - Cardboard - Pen - Ruler - Straight Edge - Box cutter - Hot melt glue gun
THE APOGEE A 100-INCH AMA DURATION SAILPLANE FROM DYNAFLITE
 THE APOGEE A 100-INCH AMA DURATION SAILPLANE FROM DYNAFLITE Apogee is the intermediate sailplane designed to be competitive in AMA duration contests. Effective spoilers, rudder and full flying stabilizer
Additional Parts List:
 THE TIME MACHINE Additional Parts List: In addition to the cast resin parts enclosed in this kit, there should also be a plastic bag containing the following items needed to complete your time machine
3Position the hull of the ship as
 Yamato: Step-by-step 25 The hull and stern deck c b d a b d c e e f a Rear frame b Stern deck x 2 c Stern deck x 2 d Side wall x 2 Wood glue Sandpaper (no. 400 grain) Craft knife Pliers d Side wall x 2
Bedtime for Bondo MERA Training
 Bedtime for Bondo 2002 MERA Training Section 1: Making the Plug/Model This section will show the process of building a plug/model for a plaster mold.this will represent what the final fiberglass part
Robert Bosch GmbH. Wall organiser
 Wall organiser The organisational talent Wall organiser Say goodbye to messiness! The wall organiser is the ideal place to store everything that tends to lie around. 1 Introduction Wardrobes, drawers and
Handrail H Series. Product Installation. Instructions. Installation Instructions For. Wall Mounted and Freestanding Round Handrails
 Product Installation Installation Instructions For Instructions Handrail H Series Installation Instructions for Wall Mounted and Freestanding Round Handrails Step Nosing F Series Concrete and Timber Step
San Felipe: Step by Step Pack 6
 Pack 6 Your parts Framing Tools and equipment Glue Knife Sandpaper Superglue Tweezers Clear varnish a Retrieve the grating that you assembled on Page 100. Cut two pieces of 2 x 3 mm wooden strip to fit
1Use the metal file to smooth
 Yamato: Step-by-step 85 Parts of the bridge and the hull a b c d e f a Part of the bridge b Part of the bridge c Part of the bridge d Radar x 2 e Part of the bridge x 2 f Wire Recommended tools and materials
Hull Modifications. General Introduction
 Hull Modifications General Introduction The living quarters for the Captain consisted of the Great Cabin, used for daily activities; Stateroom, used as sleeping quarters and the Coach Cabin, which in larger
PoorBoy Skiff. A 10-11ft 6in skiff for outboard motoring By Steven Lewis
 PoorBoy Skiff. A 10-11ft 6in skiff for outboard motoring By Steven Lewis PoorBoy is about the simplest small motorboat you will come across. It consists of 2-2 1/4 sheets of plywood (1-1 1/4 sheets x3/8
Noville School Diorama Part 4 Making the Floors and Plastering the Walls and Ceilings
 Noville School Diorama Part 4 Making the Floors and Plastering the Walls and Ceilings Moulds and Materials Making the Floors Plastering the Ceiling Plastering the Walls Installing the Ceiling and Floor
REVISION LIST CHAPTER 25: AFT WINDOWS. The following list of revisions will allow you to update the Legacy construction manual chapter listed above.
 REVISION LIST CHAPTER 25: The following list of revisions will allow you to update the Legacy construction manual chapter listed above. Under the Action column, R&R directs you to remove and replace the
Step by Step Wing Bagging
 Step by Step Wing Bagging By Evan Shaw 073 589 9339 evanevshaw@gmail.com Preparing the Leading Edge 1. Cut cores. (Cutting of wing cores is covered in another article elsewhere) 2. Sand the LE to a nice
Rudder Pedals. Fig 1. Pedals and bar they slide on.
 Rudder Pedals Why adjustable pedals are needed on a kayak that is only paddled by one person can be answered by the question, do you always wear the same footwear? Personally I often go bare foot, wear
RFS Class II Rocket Assembly Instructions
 RFS Class II Rocket Assembly Instructions Instructions by: Loc Precision Photos by: Great Lakes Space Port Sheboygan Education Foundation, Inc. Welcome and thank you for joining the Rockets for Schools
Photo Essay Building a. Key Largo. Carolina Dory. Plans for this boat may be found at:
 Photo Essay Building a Key Largo Carolina Dory Plans for this boat may be found at: http://spirainternational.com/ Photo Essay Building a Key Largo Carolina Dory The Carolina Dory is a specialized type
EXPRESS ASSEMBLY MANUAL SECTION 3 F5-RG/FT WING ASSEMBLY. Procedure 3.155A WING CLOSE-OUT PROCEDURES
 Procedure 3.155A WING CLOSE-OUT PROCEDURES In this procedure The lower wing skin will be bonded to the upper wing For this procedure, the following parts will be required: Part Number Description Qty 111-11-060-01
Harriet Chair with Modifications
 Harriet Chair with Modifications This modification of the Harriet chair includes a slat back, padded seat, and is 2 inches wider than the original plan. The overall dimensions of the finished chair: 38
G. Building the Cab, Cab Roof and Cab Boiler Extension Page 14 and Backhead.
 G. Building the Cab, Cab Roof and Cab Boiler Extension Page 14 and Backhead. Cab. In order to ensure that the cab and tender would actually look right, as what often appears on a drawing is not always
Introducing The Cloud Models Westland Whirlwind
 Produced by Cloud Models,Deopham Road,Morley,Wymondham, Norfolk,NR18 9AA E-mail sales@cloudmodels.com web site cloudmodels.com Introducing The Cloud Models Westland Whirlwind By Tricks Thank you for purchasing
September 10, 2009 Page 1 PRODUCT DESCRIPTION PRODUCT FEATURES
 September 10, 2009 Page 1 PRODUCT FEATURES BASIC USES/RELATED USES Interior decorative tile. Architectural tile for decorative wall surfaces, backsplashes and other applications. Custom architectural and
Robert Bosch GmbH. Minimalist washstand
 Minimalist washstand Neat and tidy Minimalist washstand Minimalist design in the bathroom is in fashion. And rightly so, as this washstand proves: because less is more! 1 Introduction Here s an idea to
Central New York Rocket Team Challenge 2018 Rocket Assembly Instructions
 Central New York Rocket Team Challenge 2018 Rocket Assembly Instructions Note: These instructions vary from those provided by the manufacturer of the rocket kits. There is also considerable varying discussion
Tools and Tips: ( 1 )
") Tools and Tips: As you build instructions will show in my many picture manual how to assemble. You can use your own methods as you desire, my results are very good. A smooth, flat work surface is very
Tools and Tips: As you build instructions will show in my many picture manual how to assemble. You can use your own methods as you desire, my results are very good. A smooth, flat work surface is very
84 WING SPAN MESSERSCHMITT BF-109
 84 WING SPAN MESSERSCHMITT BF-109 (COPYRIGHT PROTECTED 2014) ALL RIGHTS RESERVED MEISTER 84 ME-109 SIERRA GEAR UPDATE PLEASE NOTE: THE MAIN GEAR MOUNTING PLATE FROM SIERRA IS NOT SQUARE. YOU HAVE TO ROUND
Kentucky 4H Wood Science Plans Notebook. Plans Level 1
 Kentucky 4H Wood Science Plans Notebook Plans Level 1 MATERIALS NEEDED: 1 piece wood 3/4" x 2 x 2 1 piece wood 3/4" x 3 x 3 1/2" 1 wooden spring-type clothespin 2-1 1/2" nails 1-1/2 woodscrew Wood Glue
San Felipe: Step by Step Pack 3
 Pack 3 Your parts Bulwarks Gun port covers x 2 Tools and equipment Wood glue Sandpaper Brushes Wood stain Hammer Pin pusher/nails Razor saw a Remove the longer bulwark and test-fit it in place at the bow
Installing your SHOE KEEL
 Installing your SHOE KEEL The shoe keel is there solely to protect the bottom of the hull. On a windy day, it will offer some resistance to a side or quartering wind and will help to avoid being blown
Building instructions ARTEMIS Sailing Canoe Day Five Version 1.0 Brian Pearson & Dr. Axel Schmid Day Five. Assembly of Planks and Frames
 Building instructions ARTEMIS Sailing Canoe Version 1.0 Brian Pearson & Dr. Axel Schmid 2016 Assembly of Planks and Frames Steps: Assembling hull plansk with wire Install frames Align and check keel rocker
Photo Essay: How to Build a. Seneca. Pacific Power Dory. Plans for this boat may be found at:
 Photo Essay: How to Build a Seneca Pacific Power Dory Plans for this boat may be found at: http://www.spirainternational.com/ To begin building the Seneca, or any Spira International framed boat, a strongback
FLITZEBOGEN-2 Assembly instructions
 FLITZEBOGEN-2 Assembly instructions Trim the end of the fuselage to the length of 925mm from the nose. Be careful to avoid splitting the carbon fibers. Sand the base of the stab mount in preparation for
Gluing windows with SABA Glasstack 760
 Info sheet 208 Gluing windows with SABA Glasstack 760 Version 2008-05-08 EN, replaces all prior versions Page 2 of 9 Info sheet 208 Gluing windows with SABA Glasstack 760, version 2008-05-08 EN 1. Introduction
SAN FELIPE: Step by Step Pack 2
 Pack 2 Your parts Stern reinforcement Bulkheads The poop deck Bulkhead planks Planks Tools and equipment Knife Pencil Wood glue Sandpaper File a Using leftover 5 x 5-mm wooden strips, measure and cut beams
Installation Instructions
 Aspex Digitally Printed Wall Art PL PREMIUM HEAVY DUTY ADHESIVE ASPEX WALL ART DOUBLE SIDED FOAM TAPE Installation of Aspex Digitally Printed Wall Art with Foam Tape and PL Premium Adhesive. Maximum size
PRO CYCTM PRO CYC, INC. SYSTEM 1.5 FS
 ASSEMBLY INSTRUCTIONS Congratulations on your decision to use the world s most advanced and user-friendly cyclorama system. We have taken a great deal of care to create and ship your cyc, so please take
Bluenose II Part 2. Planking the Hull
 Planking the Hull Planking is time consuming and requires care, but it can be very satisfying to watch your creation take shape. It is also the point at which many would-be ship modelers throw up their
Installation Guide. Pionite Decorative Surfaces One Pionite Road, Auburn, Maine PIONITE ( )
") Installation Guide A Subsidiary of Panolam Surface Systems SMPBRO00-012 6/14 Pionite decorative laminates are designed for finished interior surfaces which require high impact, wear and stain resistance
Installation Guide A Subsidiary of Panolam Surface Systems SMPBRO00-012 6/14 Pionite decorative laminates are designed for finished interior surfaces which require high impact, wear and stain resistance
The Rubley Building Instructions for Assembly of the N scale kit. v1.1
 The Rubley Building Instructions for Assembly of the N scale kit. v1.1 Kit Contents: 197 ea. laser cut 1/16" acrylic parts. 1ea. adhesive backed.020 styrene part. 10 ea..060 x 1" styrene alignment pins.
Clay Modeling Film. Features of Clay Modeling Film. Use Clay Modeling Film
 Clay Modeling Film The series of Clay Modeling Film, originally developed by TOOLS INTERNATIONAL Corp, is mainly used for interior/exterior shape confirmation, checking highlights and qualification studies
Bluenose II Part 3. Dia. 1: Plank layout on stern post
 The Final Planking The race is nearly won now. Just 6 more planks and we re through. Instead of placing another batten, we re going to place a full-width plank all along the edge of the keel. This plank
M. R. Mittleman, Constructor Member, Long Island Woodworkers
 M. R. Mittleman, Constructor Member, Long Island Woodworkers You wanna do what??? February 24, 2016 Long Island Woodworkers Presentation 2 Some particulars about the craft to be constructed: Model name
This article was written by Phill Brander (AUS), who has built many timber catamarans including a Paper Tiger.
, who has built many timber catamarans including a Paper Tiger.") Building a Paper Tiger Catamaran Scarfing Plywood Paper Tiger Catamaran GUIDES Warnings/Cautions As always, using any power tools, cutting implements or adhesives carries certain risks. Make sure you understand
Building a Paper Tiger Catamaran Scarfing Plywood Paper Tiger Catamaran GUIDES Warnings/Cautions As always, using any power tools, cutting implements or adhesives carries certain risks. Make sure you understand
ADULT. Adirondack / Muskoka Chair Plans
 ADULT Adirondack / Muskoka Chair Plans Materials List 3/4" x 9 1/2" (1.9cm x 24.1cm) redwood, cedar or pine boards. Six, 8' (2.44m) boards should make one chair depending on knots and layout. You can also
Cambridge International Examinations Cambridge International General Certificate of Secondary Education
 Cambridge International Examinations Cambridge International General Certificate of Secondary Education *2410250691* DESIGN AND TECHNOLOGY 0445/32 Paper 3 Resistant Materials May/June 2018 1 hour Candidates
Continue gluing the remaining top parts ensuring the angled piece is glued well. Set aside and let dry. See photo below
 Radiator rev 1.1 The SE5a s radiator is one of the most recognized radiators in WW1. It is one of the components that defines the SE5a. The original SE5a has seen multiple radiator designs used during
The following pages replace pages 7 thru 14 in the current printing of BUILDING THE PT ELEVEN. (As of December 2012.)This is a modified method for
This is a modified method for") The following pages replace pages 7 thru 14 in the current printing of BUILDING THE PT ELEVEN. (As of December 2012.)This is a modified method for gluing puzzle joints that we believe is simpler than the
The following pages replace pages 7 thru 14 in the current printing of BUILDING THE PT ELEVEN. (As of December 2012.)This is a modified method for gluing puzzle joints that we believe is simpler than the
Cobra X Q Construction Tips Construction: Bel y pan
 Cobra X Q Construction Tips : The white plastic in this kit is high impact styrene. It can be painted with most types of coatings if light coats are applied this is necessary due to the thickness of the
Parts Identification
 We are excited to introduce the Model Aero Aqua Sport. This is an excellent sport flyer, equally at home flying from grass fields, water, or even snow! The unique V-tail gives the Aqua Sport a distinctive
plasterdesign trade range cornice
 plasterdesign trade range cornice Plaster Design s Trade Range Cornice has been developed with ease of installation in mind, from the easy to transport 2.4 metre lengths, to the purpose made mitre guides