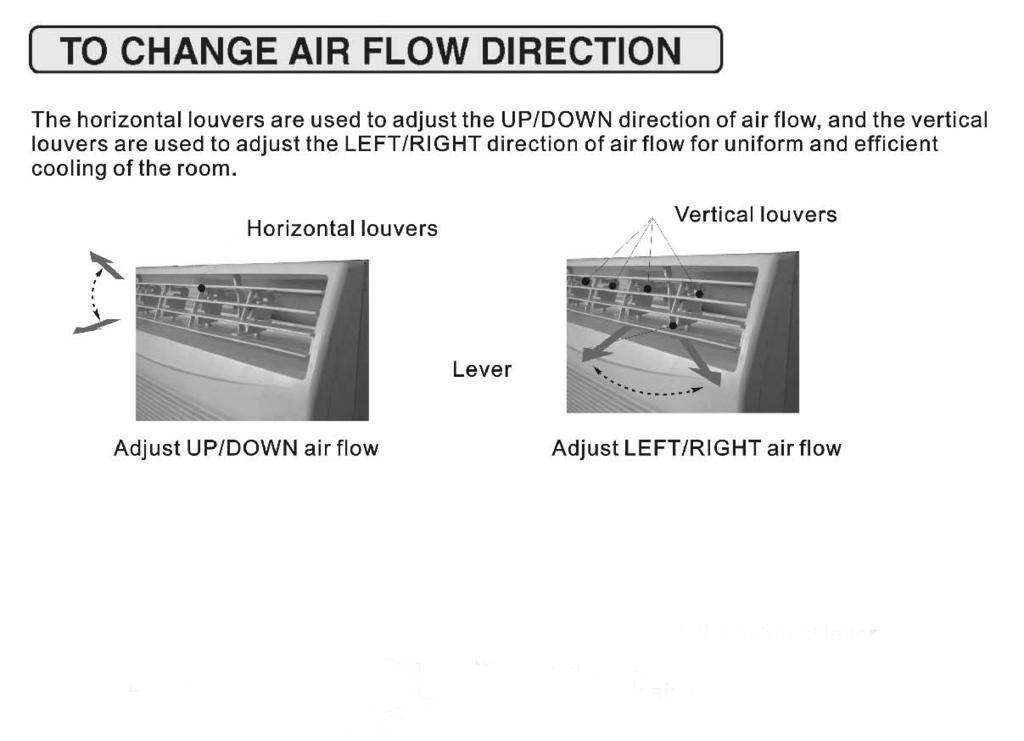
AF-Q100PX AF-Q120PX PRECAUTIONS THE TO EXHAUST AIR FROM THE ROOM 16 AF-Q100PX,AF-Q120PX. Timer. Fan Fan Slower Faster ON/OFF
|
|
|
- Charleen Daniels
- 5 years ago
- Views:
Transcription
1 Timer an an Slower aster Save A-Q100PX A-Q120PX Cool Auto an Energy THE TO EXHAUST AIR ROM THE ROOM A-Q100PX,A-Q120PX 18 PRECAUTIONS
2
3 A-Q100PX,A-Q120PX remote control
4
5 an Slower Timer an aster Save oam top window gasket Window sash seal (thin, adhesive-backed) Left accordion panel Sill support (2) Nut (2) Bolt (2) Cool an Top mounting rail Auto Energy Remote control Top mounting rail seal strip Right accordion panel Type A (6) Type B (7) Type C (6) Type D (3) Window locking bracket (2)


6 WINDOW REQUIREMENTS These instructions are for a standard double-hung window. You will need to modify them for other types of windows. CAUTION: If the sill support bolts do not contact the window sill, or if you have a window without a sill, you must order accessory kit RAK87 to properly install this air conditioner. All supporting parts must be secured to firm wood, masonry or metal. The electrical outlet must be within reach of the power cord. REMOVE THE AIR CONDITIONER ROM THE CASE A B Remove and save the 2 screws from the lower sides of the front grille. Grasp the lower corners of the grille while pressing in on the case sides with your finger tips. Pull out to release and lift it up. NOTE: Do not pull the bottom edge toward you more than 3 or you may damage the tabs of the grille. STORM WINDOW REQUIREMENTS A storm window frame will not allow the air conditioner to tilt toward the outside, and will keep it from draining properly. To adjust for this, attach a piece of wood to the sill. WOOD PIECES WIDTH: 2 LENGTH: Long enough to fit inside the window frame. THICKNESS: To determine the thickness, place a piece of wood on the sill to make it 1/2 higher than the top of the storm window frame or the vinyl frame. Attach securely with nails or screws provided by the installer. 1/2 higher than storm window frame Storm window frame 1/2 higher than vinyl frame (on some windows) Sill Vinyl frame Wood C D Remove 4 screws of control panel from front panel. Remove the ground screw from each side of the case. Keep them in a safe location.


7 E Slide the air conditioner from the case by gripping the base pan handle and pulling forward while bracing the case. Do not pull or lift on the styrofoam discharge area. ATTACH THE TOP MOUNTING RAIL SEAL STRIP INSTALL THE SIDE ACCORDION PANELS A Slide the left and right accordion panels Remove the backing from the top mounting into the top and bottom mounting rails. rail seal strip and attach the seal strip to B Attach the accordion panels to the case the bottom of the top mounting rail, along using 3 Type A screws on each side. the front edge. Allow the seal strip to overlap 3/8 on each end. Top mounting rail 3/8 Remove backing from seal strip 3/8 RONT VIEW 3/8 overlap Top mounting rail Seal strip PREPARE THE WINDOW Cut the window sash seal to the window width and stick the adhesive side to the bottom of the sash. 3/8 overlap INSTALL THE TOP MOUNTING RAIL ONTO THE CASE Attach the top mounting rail onto the top of the case with 3 Type B screws. Window sash seal INSIDE


8 A B C INSTALL THE CASE IN THE WINDOW Open the window and mark the centerline of the window sill. Carefully place the case on the window stool and align the center mark on the bottom front with the centerline of the sill. Pull the window down behind the top mounting rail. Secure the case to the window sill by using 3 Type D screws. NOTE: Do not shut the window so tightly that movement of the accordion panels is restricted. D Select the position that will place the sill supports near the outermost point on the sill. Place the short side of the sill supports, on the case bottom, toward the window. Attach the sill supports to the case track hole in relation to the selected position using 2 Type B screws in each support. G Pull the accordion panels to each window sash track. Attach them on each side to the window sash and the window sill using 4 Type C screws. Screws Long side of sill supports OUTSIDE E Adjust the bolt and the nut in each support so that the case is installed with a slight tilt to the outside. Use a level; about 1/2 bubble will be the correct case slant to the outside. 8 CAUTION: If the sill support bolts do not contact the window sill, or if you have a window without a sill, you must order accessory kit RAK87 to properly install this air conditioner.


9 9 A B C 10 A SECURE THE CASE IN WINDOW AND INSTALL OAM TOP WINDOW GASKET CAUTION: To prevent broken glass or damage to windows, on vinyl or other similarly constructed windows, attach the support bracket to the window side jam. Attach the window locking brackets (one on each side) with Type C screws. Vinyl Cut the foam top window gasket to the window width. Stuff the foam between the glass and the window to prevent air and insects from getting into the room. NOTE: If the gasket supplied does not fit your window, obtain appropriate material locally to provide a proper installation seal. INSTALL THE AIR CONDITIONER IN THE CASE Slide the air conditioner into the case by the base pan. Do not push on the controls, styrofoam air discharge housing or the finned coils. Make sure the air conditioner is firmly seated. B C D E Replace the 2 ground screws removed earlier, one on each side of the case. IMPORTANT: The ground screws must be reinstalled to ensure a proper ground. Install control panel back to the front panel. Attach the front grille to the case by inserting the tabs on the grille into the slots on the front top of the case. Push the grille in. Secure the front grille to the case by replacing the 2 screws removed earlier. Press on the top of the grille to help with side screw installation. Connect power. 9
10 10
11 lights 18 11
12 SPEED 12
13 EATURE SETS SPEED LOWERS TEMPERATURE OR TIME Auto Cool an Slower Timer an Energy Save an aster ACTIVATES SAVE RAISES TEMPERATURE OR TIME SETS SPEED DISPLAYS TEMPERATURE/TIME SPEED ACTIVATES ADJUSTS TEMPE- RATURE OR TIME EATURE The display always shows the set temperature except when setting the Delay timer. SETS TURNS UNIT ON OR O TURNS UNIT ON OR O SETS SPEED 13
14 14
15 15
16 16

17 an Slower Auto Cool Timer an aster Energy Save an 17
18 18

19 19
20 20
21
Installation Instructions
 Installation Instructions READ BEFORE INSTALLING UNIT For Slider Casement Air Conditioners INSTALLATION WARNINGS AND CAUTION Carefully read the installation manual before beginning. Follow each step as
Installation Instructions
 READ BEFORE INSTALLING UNIT For Slider Casement Air Conditioners To avoid risk of personal injury, property damage, or product damage due to the weight of this device and sharp edges that may be exposed:
Installation Instructions For Slider Casement Air Conditioners
 Installation Instructions For Slider Casement Air Conditioners NOTE: These instructions describe installation in a typical wood framed window with a wood SLIDE-BY sash, or installation in a metal CASEMENT
Installation Instructions
 READ BEFORE INSTALLING UNIT INSTALLATION WARNINGS AND CAUTION Carefully read the installation manual before beginning. Follow each step as shown. Observe all local, state, and national electrical codes
Installation Instructions
 edium + Heavy duty READ BEFORE INSTALLING UNIT Preliminary instructions: 1. Check window opening size: the mounting parts furnished with this air conditioner are made to install in a wooden sill double-hung
READ BEFORE INSTALLING UNIT INSTALLATION WARNINGS AND CAUTION
 edium + Heavy duty READ BEFORE INSTALLING UNIT INSTALLATION WARNINGS AND CAUTION Carefully read the installation manual before beginning. Pay attention to danger and safety notices. be exposed: Carefully
Installation Instructions
 For Medium (15-18.5K) + Heavy duty (22-28.5K) Air Conditioner READ BEFORE INSTALLING UNIT To avoid risk of personal injury, property damage, or product damage due to the weight of this device and sharp
Installation Instructions
 For Medium (15-18.5K) + Heavy duty (-8.5K) Air Conditioner READ BEFORE INSTALLING UNIT To avoid risk of personal injury, property damage, or product damage due to the weight of this device and sharp edges
installation instructions For Slider Casement Air Conditioners
 installation instructions For Slider Casement Air Conditioners NOTE: These instructions describe installation in a typical wood framed window with a wood SLIDE-BY sash, or installation in a metal CASEMENT
READ BEFORE installing UNiT
 READ BEFORE installing UNiT For Slider Casement Air Conditioners To avoid risk of personal injury, property damage, or product damage due to the weight of this device and sharp edges that may be exposed:
Installation Instructions
 3 4 5 3 4 5 6 7 8 9 0 Installation Instructions READ BEFORE INSTALLING UNIT Compact Window Mounting (0~K BTU) To avoid risk of personal injury, property damage, or product damage due to the weight of this
Installation Instructions
 3 4 5 3 4 5 6 7 8 9 0 Installation Instructions READ BEFORE INSTAING UNIT BR Window Mounting (0,000 -,000 BTU) INSTAATION WARNINGS AND CAUTION Carefully read the installation manual before beginning. be
Installation Instructions
 3 4 5 3 4 5 6 7 8 9 0 Installation Instructions READ BEFORE INSTALLING UNIT MSII MSIII Window Mounting (5,000~8,000 BTU) INSTALLATION WARNINGS AND CAUTION The unit is for window mounting only. Carefully
READ BEFORE installing UNiT
 READ BEFORE installing UNiT For Slider Casement Air Conditioners Carefully read the installation manual before beginning. Follow each step as shown. Observe all local, state, and national electrical codes
INSTALLATION INSTRUCTIONS. IMPORTANT- Observe all CAUTION BEFORE YOU BEGIN
 BEFORE YOU BEGIN Read these instructions completely and carefully. IMPORTANT- Save these instructions for local inspector s use. IMPORTANT- Observe all governing codes and ordianaces. Note to Installer-
READ BEFORE INSTALLING UNIT Compact Window Mounting (10-12K BTU)
") READ BEFORE INSTALLING UNIT Compact Window Mounting (10-12K BTU) To avoid risk of personal injury, property damage, or product damage due to the weight of this device and sharp edges that may be exposed:
READ BEFORE INSTALLING UNIT Compact Window Mounting (10-12K BTU) To avoid risk of personal injury, property damage, or product damage due to the weight of this device and sharp edges that may be exposed:
INOVO 2-LITE SLIDING PATIO DOOR
 INOVO 2-LITE SLIDING PATIO DOOR ASSEMBLY AND INSTALLATION INSTRUCTIONS IMPORTANT: READ THE INSTRUCTIONS AND FAMILIARIZE YOURSELF WITH THE DOOR PARTS AND PIECES BEFORE BEGINNING ASSEMBLY AND INSTALLATION.
HONDA RIDGELINE (KIT #601) Installation Instructions (to be used in addition to owners manual)
 Installation Instructions (to be used in addition to owners manual)") HONDA RIDGELINE (KIT #601) Installation Instructions (to be used in addition to owners manual) IMPORTANT NOTE: Read before beginning installation. These instructions replace all of Step 1 of the instructions
HONDA RIDGELINE (KIT #601) Installation Instructions (to be used in addition to owners manual) IMPORTANT NOTE: Read before beginning installation. These instructions replace all of Step 1 of the instructions
Installation Instructions For Heavy Duty (FAS Models) and Median (FAM Models) Air Conditioners
 and Median (FAM Models) Air Conditioners") Installation Instructions For Heavy Duty (FAS Models) and Median (FAM Models) Air Conditioners Please read ALL instructions before installing. Two people are recommended to install this product. If a new
Installation Instructions For Heavy Duty (FAS Models) and Median (FAM Models) Air Conditioners Please read ALL instructions before installing. Two people are recommended to install this product. If a new
INOVO 4-LITE SLIDING PATIO DOOR ASSEMBLY AND INSTALLATION INSTRUCTIONS
 INOVO 4-LITE SLIDING PATIO DOOR ASSEMBLY AND INSTALLATION INSTRUCTIONS IMPORTANT: READ THE INSTRUCTIONS AND FAMILIARIZE YOURSELF WITH THE DOOR PARTS AND PIECES BEFORE BEGINNING ASSEMBLY AND INSTALLATION.
HR175 Sash Replacement Kit Installation Instructions
 HR175 Sash Replacement Kit Installation Instructions IMPORTANT: Please read before you begin. Weather Shield HR175 Sash Replacement Kits Important: Thoroughly read and follow these instructions, failure
IMPORTANT: Read and save these instructions.
 Part No 116603 MPORTANT: Read and save these instructions Air Conditioner MPORTANT: nstaller: Leave nstallation nstructions with homeowner Homeowner: Keep nstallation nstructions for future reference Save
Block Frame Inovo Patio Door/Transom/Sidelite Field Mulling Instructions. simonton.com/installation. If mulling sidelites, skip to Step 5.
 Effective Date: 10/1/17 Tools Needed Kit Contents Safety Glasses Cordless Drill Phillips Screw Bit Two-step Drill Bit (3/8-1/8 ) Utility Knife Interior Mullion Exterior Mullion Cover Hardware Kit Clamps
Fixed Upper Sash Replacement Guide for Andersen 400 Series Woodwright Springline Single-Hung Windows
 Fixed Upper Sash Replacement Guide for Andersen 400 Series Woodwright Springline Single-Hung Windows Manufactured Between September 2005 and October 2006 Read all instructions carefully before attempting
4. Partially open the operating panel and tilt the top toward the interior of the door (Figure 4). Lift the panel off the sill and set it aside.
. Lift the panel off the sill and set it aside.") Effective Date: 10/1/2017 Tools Needed Kit Contents Hardware Kit Safety Glasses Cordless drill Phillips screw bit Two-step drill bit (3/8-1/8 ) utility knife Interior Mullion Exterior Mullion Cover clamps
Effective Date: 10/1/2017 Tools Needed Kit Contents Hardware Kit Safety Glasses Cordless drill Phillips screw bit Two-step drill bit (3/8-1/8 ) utility knife Interior Mullion Exterior Mullion Cover clamps
Sash Replacement Guide for Andersen 400 Series Tilt-Wash Transom Windows
 for Andersen 400 Series Tilt-Wash Transom Windows Read all instructions carefully before attempting this procedure. If you have any questions about your ability to complete this procedure, call Andersen
Flashing Materials. Rough Opening Preparation
 Installation Instructions for CertainTeed New Construction Windows Handling vinyl windows CAUTION: Always store vinyl windows and doors in an upright position on a slight angle. Never lay them flat or
western window systems westernwindowsystems.com installation instructions non-pocket 2-1/4 panels
 series 2600 multi-slide non-pocket 2-1/4 panels windowsystems.com windowsystems.com movement, which can cause warping and other problems. Frame kit components: Each door will have a head assembly, a threshold
Installation Instructions
 by Precision Screen & Security s 27040 San Bernardino Ave, Redlands, CA 92374 www.precision-screens.com TM Installation Instructions NOTE: Prior to Permanently mounting the BacTrac, insure the handle and
7878 K940. Checkpoint Antenna. Kit Instructions. Issue B
 7878 K940 Checkpoint Antenna Kit Instructions Issue B Revision Record Issue Date Remarks A July 7, 2009 First issue B Nov2013 Revised the Checkpoint installation procedures for 7878 and 7874 scanners Added
864 Double-Door Face. Compatibility: 864 TRV GS 864 HO. Packing List: Installation Details. Used on All Fireplaces
 Compatibility: 864 TRV GS 864 HO Packing List: 864 ST Used on All Fireplaces Doors Faceplate Baffle Hinge Pins Magnets (shipped on doors) Faceplate #8 x 3/8 Sheet Metal Screws Upper and Lower Grills Installation
IMPORTANT: Read and save these instructions.
 Part No. 1162148 Rev. B MPORTANT: Read and save these instructions. Air Conditioner MPORTANT: nstaller: Leave nstallation nstructions with homeowner. Homeowner: Keep nstallation nstructions for future
GENUINE PARTS INSTALLATION INSTRUCTIONS
 GENUINE PARTS INSTALLATION INSTRUCTIONS DESCRIPTION: APPLICATION: PART NUMBER: Running Boards Kit Nissan Pathfinder/ Infiniti QX60 999T6 X5060 (Pathfinder Running Board Kit) 999T6 R5060 (Infiniti QX60
Assembly Instructions 10 X 10 Aluminum Frame Building
 Assembly Instructions 10 X 10 Aluminum Frame Building 27 97 9 8 47 36 74 52 10 10 X 10 Square Building W/ Dome Includes: The Steel Entry Door with a Dead Bolt Lock assembly and Aluminum Door Frame. Metal
LF Series Assembly Instructions
 LF Series Assembly Instructions 1998760 Revision A-10 Complete Series Master Packet 2010 Kimball International, Inc. T 800.482.1818 F 812.482.8300 Footprint Storage and Metal Filing Systems Assembly Instructions
INSTALLATION GUIDE 2009-CURRENT HUMMER H3T PRODUCT CODE:
 INSTALLATION GUIDE 2009-CURRENT HUMMER H3T PRODUCT CODE: 268 June 22, 2010 TOOLS NEEDED COMPONENTS INCLUDED P2 Tip 3/8" Drill Rubber Gasket(s) x 2 Bracket(s) x 2 1/2" Drill Bit Bulkhead Flange #2 Phillips
4-lite Patio Door. Installation Instructions
 4-lite Patio Door Installation Instructions IMPORTANT: Read the instructions and familiarize yourself with the door parts and pieces before beginning assembly and installation. Note: Only the 5-0 x 6-8
Winthrop (864) Bungalow, Tree of Life
 Bungalow, Tree of Life") Compatibility: 864TRV, 864HH, 864ST Fireplace Packing List: Left and Right Side Door with (2) Magnets Each (2) Door Handles (4) Optional Mesh Screen Inserts (Bungalow Only) (2) Hinge Brackets (for mounting
Compatibility: 864TRV, 864HH, 864ST Fireplace Packing List: Left and Right Side Door with (2) Magnets Each (2) Door Handles (4) Optional Mesh Screen Inserts (Bungalow Only) (2) Hinge Brackets (for mounting
PetSafe Cat Windoor. Installation Guide. Please read this entire guide before beginning
 PetSafe Cat Windoor Installation Guide Please read this entire guide before beginning Thank you for choosing PetSafe. Our mission is to be the most trusted brand in the pet ownership experience. We want
3/16 FRAMELESS SERIES BY-PASS TUB AND SHOWER ENCLOSURES #3344, 3345, 3037
 / FRAMELESS SERIES BY-PASS #, 5, 07 PLEASE READ THOROUGHLY BEFORE STARTING INSTALLATION Item 5 7 8 9 0 5 7 8 Part # 09/050 0 05 A05 8 0 0 0 70 0 09 5 5 0 0 7 0 Description Tub Header Stay Clean Sill Tub
The Festival Assembly Instructions
 The Festival Assembly Instructions Toll Free: 866.768.8465 Hours: 9-5 Monday-Friday EST www.homeplacestructures.com Package ships as shown CONTACT INFORMATION: HomePlace Structures 301 Commerce Drive New
Endura All-Aluminum Z-Articulating Cap Sill Retrofit Kit for French Doors
 Endura All-Aluminum Z-Articulating Cap Sill Retrofit Kit for French Doors Installation Instructions Before You Begin: This retrofit kit is designed for the Endura Z-Series All- Aluminum sill. Please ensure
(Non Handed Kits) Slotted Hand Screwdriver. Power Driver & Bits. Work Gloves
 Slotted Hand Screwdriver. Power Driver & Bits. Work Gloves") Patio Door Kit Assembly Instructions -- 2-Panel Patio Door with Non-Assembled Frame and Assembled Sash Panels. (Non Handed Kits) Project Requirements: ~ This door was manufactured for installation into
Patio Door Kit Assembly Instructions -- 2-Panel Patio Door with Non-Assembled Frame and Assembled Sash Panels. (Non Handed Kits) Project Requirements: ~ This door was manufactured for installation into
TrendWall Floor-To-Ceiling Panels Installation Instruction
 TrendWall Floor-To-Ceiling Panels Installation Instruction TrendWall Components Covered by this Instruction: Crown (and accessories) Floor Plate Solid Panel Filler Panel Wall Channel Door Section Pilaster
Page 1. FIG. #1 - Shower Door Assembly SHOWER & BATH ENCLOSURES BUILT TO LAST A LIFETIME HANDLE ASSEMBLIES REMOVED FOR CLARITY.
 FIG. #1 - Shower Door Assembly 29 1 2 1 6 9 9 5 HANDLE ASSEMBLIES REMOVED FOR CLARITY. 25 25 PLEASE REFER TO FIG. #2 FOR INSTALLATION 26 12 17 18 18 17 10 3 11 7 10 8 Page 1 FIG. #2 - Top View 5 21 10
Fan, Eden/Northfield, GS Installation Instructions (SKU ) Packing List
 Packing List") Packing List Blower Assembly Wiring Harness Rheostat with Nut and Knob Snap Disc Mounting Hardware (4) rubber grommets with brass inserts, (4) nuts, (4) washers. Cover Assembly Installation Warning: Make
Packing List Blower Assembly Wiring Harness Rheostat with Nut and Knob Snap Disc Mounting Hardware (4) rubber grommets with brass inserts, (4) nuts, (4) washers. Cover Assembly Installation Warning: Make
Sun Windows General Information New Construction Sliding Door Installation Instructions H F
 A G B D C H F H E H A. Apply Weather Resistive Barrier B. Apply Bottom Flashing Tape C. Install Sill Pan End Caps & Pan D. Caulk Sides & Top Nailing Surface, Set Door, Fasten E. Apply Side Flashing Tape
3-LITE PATIO DOOR INSTALLATION INSTRUCTIONS
 3-LITE PATIO DOOR INSTALLATION INSTRUCTIONS IMPORTANT: Read the instructions and familiarize yourself with the door parts and pieces before beginning assembly and installation. TOOLS NEEDED: Tape Measure
Repair Instructions. Replacing a La Z Time Mechanism Side Subassembly. Remove the Back(s): Remove the Mechanism Assembly: CAUTION.
: Remove the Mechanism Assembly: CAUTION.") Replacing a La Z Time Mechanism Side Subassembly Tools Required: Slotted Screwdriver Power Driver 8" Driver Extension Ruler Note: Extension springs are not typically used on non-chaise standard width styles,
Replacing a La Z Time Mechanism Side Subassembly Tools Required: Slotted Screwdriver Power Driver 8" Driver Extension Ruler Note: Extension springs are not typically used on non-chaise standard width styles,
BMW X5 OEM RUNNING BOARD PART#SBBW
 INSTALLATION INSTRUCTIONS 2014-2016 BMW X5 OEM RUNNING BOARD PART#SBBW-146-74 QTY HARDWARE 1 Driver Side OEM Running Board 1 Passenger Side OEM Running Board 8 Rivet Pin 1 Page Step 1: Verify all parts
INSTALLATION MANUAL. Decoration panel BYCQ140E2W1 BYCQ140E2W1W BYCQ140E2W1B
 INSTALLATION MANUAL Decoration panel BYCQ0EW BYCQ0EWW BYCQ0EWB PEN0-A.book Page Thursday, January 0, 09 :0 PM c b a e b g a +6 d f h g g 6 6 mm 6 6 7 9 8 8 0 BYCQ0EW BYCQ0EWW BYCQ0EWB Decoration panel
SLIDING TUB / SHOWER ENCLOSURE WITH STATIONARY 90º PANEL
 SLIDING TUB / SHOWER ENCLOSURE WITH STATIONARY 0º PANEL This instruction sheet applies to the following units. C, C7, C7, C77, C, C7 This instruction sheet also applies to the following units. VTE / VSE
Assembly Instructions 10 X 10 Aluminum Roof Support
 Assembly Instructions 10 X 10 Aluminum Roof Support Aluminum Roof Support Bolt Package 16-5/16 X 2 ¼ SS Bolt 24-5/16 X 1 SS Bolt 40-5/16 SS Nylon Lock Nuts 16-5/16 SS Flat Washers 28-4 ½ Wood Screws 36-1
Pleated Shades with Continuous Cord Loop Option
 Pleated Shades with Continuous Cord Loop Option Installation Instructions Email: customerservice@blindster.com Call us: (888) 256-8672 Mon - Fri 8am - 7pm (CT) Thank you for purchasing a Pleated Shade
T he Double-Hung Replacement System replaces the sash and balance system of an older double-hung window. The
 Double-Hung Replacement System Installation The Pozzi Collection PID001 (12/03) T he Double-Hung Replacement System replaces the sash and balance system of an older double-hung window. The frame of the
PRODUCT GUIDE Aluminum Single-Hung Windows (JPG002) INTRODUCTION
 INTRODUCTION") This guide contains procedures for common user serviceable repair tasks found on aluminum single-hung windows. If a condition arises that is not covered in this guide, please contact us for professional
This guide contains procedures for common user serviceable repair tasks found on aluminum single-hung windows. If a condition arises that is not covered in this guide, please contact us for professional
PREMIER V Picture Window Cast In Place
 PREMIER V Picture Window Cast In Place 28972 R. Ave Adel, Iowa 50003 800-343-9370 1850 West Adriatic Place Englewood, Colorado 80110 303-935-4679 Visit Monarch Materials Group, Inc. at www.monmatgrp.com
Move System Swivel Caster Installation ( )
") Move System Swivel Caster Installation (002-10265-00) Caution Always disconnect power to chair before removing covers or performing any service procedures. Step 1: Remove Top Cover A) Position chair to
Move System Swivel Caster Installation (002-10265-00) Caution Always disconnect power to chair before removing covers or performing any service procedures. Step 1: Remove Top Cover A) Position chair to
Installation Instructions
 by Plato Woodwork Installation Instructions Plato Woodwork, Inc. 200 Third Street SW P.O. Box 98 Plato, MN 55370 www.platowoodwork.com 800.328.5924 SECTION GUIDE GETTING STARTED PAGE # Installation Methods...
Cellular SlumberShade
 Cellular SlumberShade with energy saving blackout sidetracks Installation Instructions 152110 1/6/2011 BASICS A few simple tools are required: - Measuring tape - Power drill, drill bits - Hex head and/or
INSTALLATION INSTRUCTIONS - INSTRUCCIONES DE INSTALACION FOR HURRICANESHIELD IMPACT-RESISTANT DOUBLE-HUNG, SINGLE-HUNG AND SIMULATED-HUNG
 2008 Pella Corporation Part Number: 80ED0101 INSTALLATION INSTRUCTIONS - INSTRUCCIONES DE INSTALACION FOR HURRICANESHIELD IMPACT-RESISTANT DOUBLE-HUNG, SINGLE-HUNG AND SIMULATED-HUNG Instrucciones en español
Model 6100 Illustrated Installation Instructions Contractors Wardrobe
 Model 6100 Illustrated Installation Instructions Contractors Wardrobe DESIGNERS MANUFACTURERS 26121 Avenue Hall Valencia, CA 91355 (661) 257-17 Fax: (661) 257-4907 Toll Free: (800) CW-DOORS (800) 293-6677
INTERIOR. Checkrail. Flashing tape
 Pella Corporation 2007 Part Number: 808F0100 INSTALLATION INSTRUCTION - INSTRUCCIONES DE INSTALACION FOR PELLA PRECISION FIT DOUBLE-HUNG VENT WINDOW PARA LA VENTANA DE GUILLOTINA CON HOJA PRACTICABLE PRECISION
The wick in your heater needs replacing if, after repeated cleanings, any of the following conditions still exist:
 WICK REPLACEMENT The wick in your heater needs replacing if, after repeated cleanings, any of the following conditions still exist: Slow to light, hard movement of the wick adjuster knob, kerosene odor
Cellular Shades SLUMBERSHADE. with energy saving blackout sidetracks. Installation & Care Instructions
 Cellular Shades SLUMBERSHADE with energy saving blackout sidetracks Installation & Care Instructions 152725 B 9/14/2017 GETTING STARTED A few simple tools are required: - Measuring tape - Power drill,
PORTA~TRACE. GAGNE, INC. 41 Commercial Dr. Johnson City, New York Phone: Fax: ASSEMBLY INSTRUCTIONS
 PORTA~TRACE GAGNE, INC. 41 Commercial Dr. Johnson City, New York 13790 Phone: 1-607-729-3366 Fax: 1-607-729-7644 ASSEMBLY INSTRUCTIONS PORTA~TRACE MODEL 2436T LIGHT TABLE PORTA~TRACE MODEL 3648T LIGHT
Replacing the Reciprocator on the SWF Compact Series Machine (601C and 1201C)
") Follow the instructions below to replace the reciprocator in the SWF Compact series machines. The tools required can be found in the tool kit that came with the machine. Preparation 1. First, place the
Follow the instructions below to replace the reciprocator in the SWF Compact series machines. The tools required can be found in the tool kit that came with the machine. Preparation 1. First, place the
Sliding Glass Door Assembly and Installation Guide
 Sliding Glass Door Assembly and Installation Guide Index Door System Components and Hardware The following components are needed to complete the installation of your Sliding Patio Door unit. Check all
Written By: Ben Eisenman
 iphone 3GS Front Panel Replacement Replace a cracked front panel on an iphone 3GS. Written By: Ben Eisenman ifixit CC BY-NC-SA www.ifixit.com Page 1 of 18 INTRODUCTION Use this guide to separate and replace
Installation Guide for Andersen 400 Series Tilt-Wash Transom Windows with Stormwatch Protection (PG Upgrade) Manufactured After 2006
 Manufactured After 2006") for Andersen 400 Series Tilt-Wash Transom Windows with Stormwatch Protection (PG Upgrade) Manufactured After 2006 Thank you for choosing Andersen. Instructions are for typical, new wood-framed wall construction
for Andersen 400 Series Tilt-Wash Transom Windows with Stormwatch Protection (PG Upgrade) Manufactured After 2006 Thank you for choosing Andersen. Instructions are for typical, new wood-framed wall construction
Replacing the build plate clamps
 Repair manual Replacing the build plate clamps Instructions The build plate clamps hold the glass plate in place on the heated bed. There are two fixed in place at the back of the heated bed and two at
High Rise Sit-Stand Desk Converter
 High Rise Sit-Stand Desk Converter Assembly Instructions for Model DC350 Patent No. 9,332,839 PRE-ASSEMBLY Please read all instructions before beginning assembly. We strongly recommend you watch the video
Jabiru Installation instructions
 Page 1 of 5 s Step Description 1 Mark out centre line of the installation 2 Align centre line of installation with the centre line of the "Front Panel Cut out" template. Align "FLOOR" on template with
Custom. Options Guide. and. Installation Instructions. GE Monogram 36" Built-In Refrigerators. Models: ZIS36NY ZISW36DY ZISB36DY
 GE Monogram 36" Built-In Refrigerators Custom Options Guide and Installation Instructions With Custom Panel Dimensions and Trim Kit Installation Instructions Monogram refrigerators offer a range of custom
IMPORTANT INSTALLATION GUIDE VALENCIA ANGLE CORNER SHOWER READ ALL INSTRUCTIONS CAREFULLY BEFORE STARTING THE INSTALLATION
 INSTALLATION GUIDE VALENCIA ANGLE CORNER SHOWER SEALANT REQUIRED TO COMPLETE THIS INSTALLATION: (Supplied) Sika Sikasil NG (Arctic White) To seal the WHITE shower door and returns to the shower tray. Usage:
Travel Trailer Latch With Dead Bolt Trailer Latch With Dead Bolt. U.S. Patent No. 5,927,773
 60-250 Travel Trailer Latch With Dead Bolt 60-251 Trailer Latch With Dead Bolt Service Manual (Installation and Troubleshooting) U.S. Patent No. 5,927,773 CONTENTS 1. BASIC COMPONENTS 2. INSTALLATION OF
Installation Instruction
 Tools Needed for Assembly Stud finder (for wood stud wall) Pencil Mark Electric drill Wood Stud Wall Installation Step 1. Locate the Wood Studs Installation Instruction Drill bit (for wood stud wall) Masonry
Mira Premium Series Bi-Parting French Sliding Patio Door Installation Instructions
 PREMIUM SERIES W I N D O W S Mira Premium Series Bi-Parting French Sliding Recommended Tools & Accessories Tape Measure Level (3 or longer) Hammer Power Screwdriver Load bearing Shims Flashing (recommended)
XL-GC03 Sliding Door Lock Installation Manual PAT XL-GC06 Sliding Door Hanger Installation Manual XL-GC08 Sliding Door Lock Guide Installation Manual
 XL-GC0 Sliding Door Lock Installation Manual PAT XL-GC0 Sliding Door Hanger Installation Manual XL-GC0 Sliding Door Lock Guide Installation Manual Read all instructions carefully before installation. Before
Assembly and installation help
 Assembly and installation help A supplement to the directions The Purpose of this tutorial is to expand (not replace) upon the directions that come with the system and to help provide shortcuts, the first
Tilt and Slider Replacement Window Installation Instructions
 Tilt and Slider Replacement Window Installation Instructions Installer Please leave this booklet for the homeowner after the install is completed. IMPORTANT: Please read completely before you begin. Part
https://www.wallbedsbywilding.com/wallbed-installation-studio-series/
 For Wallbed models: KING SIZE INSTRUCTION BOOKLET #C1 Watch step by step installation instructions at: https://www.wallbedsbywilding.com/wallbed-installation-studio-series/ WARNING! ALL MURPHY/WALLBED
GE Monogram. Installation. Instructions. Microwave Oven. Under Cabinet Installation. and. JX827 Series Built-In Kit. Models.
 GE Monogram Installation Instructions Under Cabinet Installation and JX827 Series Built-In Kit Models ZEM200 Series CAUTION WARNING Before you begin Read these instructions completely and carefully. IMPORTANT:
2300 BI-FOLD INSTALLATION GUIDE
 2300 BI-FOLD INSTALLATION GUIDE INSTALLATION INSTRUCTIONS OF MAIN FRAME Header #8 x 2½ zinc coated screws 2 1 2 Jamb Jamb 1 1 3 #8 x 2½ zinc coated screws 4 1 4 3 #8 x 2½ zinc coated screws 5 Threshold
1 Removing The Screen Track, Screen and Screen Rollers Note: The screen remains in the track while the track is removed and/or installed.
 Sliding Door Screen and Screen Track Replacement Service Instruction These instructions apply to: Architect Series 12/2004-Current Designer Series 3/2005-Current Tools Required: #2 Phillips head screwdriver
 For Wallbed models: KING SIZE INSTRUCTION BOOKLET #C1 Watch step by step installation instructions at: https://www.wallbedsbywilding.com/wallbed-installation-studio-series/ WARNING! ALL MURPHY/WALLBED
Vinyl Windows and Doors
 Vinyl Windows and Doors Part Number: V983571 2011 Pella Corporation INSTALLATION INSTRUCTION - INSTRUCCIONES DE INSTALACION 350 SERIES WINDOW INTO EXISTING WOOD FRAME WINDOW Lea las instrucciones en español
Portofino Case2 Installation Guide
 Portofino Case2 Installation Guide vjun16 (for 17 or 24 mm Surface Wall Profile) DO NOT ASSEMBLE WITHOUT FULLY READING THESE INSTRUCTIONS Page 2 Thank you for purchasing this Portofino Case 2 shower enclosure.
Due to possible damage in shipping, the vertical stop assembly has been removed from this machine.
 Due to possible damage in shipping, the vertical stop assembly has been removed from this machine. To assemble, insert the threaded rod through the shroud opening in the top of the machine. Start the four
Installation Guide for Andersen 400 Series Tilt-Wash Transom and 200 Series Narroline Transom Windows
 for Andersen 400 Series Tilt-Wash Transom and 200 Series Narroline Transom Windows Congratulations! You have just purchased one of the many fine Andersen products. Proper assembly, installation and maintenance
Chapter 12 - Windows and Doors
 Chapter 12 - Windows and Doors Contents Chapter 12 - Windows and Doors... 12-1 Timing & Prerequisites... 12-2 Verifying Windows and Doors Orders... 12-3 Windows... 12-4 Prepare the Window Openings... 12-4
Table of Content. Sayl Disassembly for Recycling
 Y Sayl Disassembly for Recycling Table of Content 1. Work Chair Disassembly... 2 2. Side Chair Disassembly...17 3. Work Stool Footring Disassembly... 22 1 Y Sayl Disassembly for Recycling Work Chair Disassembly
Replacement Guide For Ventilating Window on Self-Storing Door with Retractable Insect Screen
 Replacement Guide For Ventilating Window on Self-Storing Door with Retractable Insect Screen IMPORTANT: READ ENTIRE GUIDE BEFORE BEGINNING INSTALLATION. PLEASE NOTE: Proper assembly, installation and maintenance
Desk/Wall-Mount Rack
 Desk/Wall-Mount Rack Patent(s) Pending Installation Instructions Post P/N: 119-1752 119-1781 119-1782 119-4014 Frame P/N: 119-1591 119-1754 119-1755 Kit Contents (2) Frames (4) Posts Assembly Hardware
This instruction manual is an in-depth look and explanation of how to assemble and install the Murphy Bed properly and efficiently.
 This instruction manual is an in-depth look and explanation of how to assemble and install the Murphy Bed properly and efficiently. Don t be put off by the size of the instruction manual as the large diagrams
BEFORE YOU BEGIN Read these instructions completely and carefully.
 Installation Instructions Over the Range Microwave Oven Questions? Call 1.800.561.3344 or Visit our Website at: GEAppliances.ca BEFORE YOU BEGIN Read these instructions completely and carefully. IMPORTANT
Chapter 12 - Windows and Doors
 Chapter 12 - Windows and Doors Contents Chapter 12 - Windows and Doors... 12-1 Timing & Prerequisites... 12-2 Verifying Windows and Doors Order... 12-3 Windows... 12-4 Prepare the Window Openings... 12-4
POWER PET. Low-E Automatic Patio Pet Door Installation and Operating Instructions
 POWER PET Low-E Automatic Patio Pet Door Installation and Operating Instructions Power Pet, Regular Height, Patio Door Assembly Steps Estimated assembly time: Under 1 hour STEP 1: Assemble the tools you
How To Install Windows: Nail-Fin Application
 How To Install Windows: Nail-Fin Application Required Tools & Materials: Materials: 1 3/4" galvanized roofing nails. Nails must penetrate at least 1" into framing For mulled and/or DP50 or above units:
Panel Assembly and Installation
 Assembly and Installation Assembly and Installation for Andersen 400 Series Frenchwood, 200 Series Narroline, 200 Series Perma-Shield Gliding Patio Doors and 400 Series Perma-Shield Gliding Patio Doors