MWF Rafters. User Guide
|
|
|
- Jeffrey Hopkins
- 5 years ago
- Views:
Transcription


1 MWF Rafters User Guide September 18 th, 2018
2 2 Table of contents 1. Introduction Things You Should Know Before Starting Roof Panels Structure Orientation Member Selection Panel Regenerate... Error! Bookmark not defined Revit Detail Levels Family Types Loading Families Creating New Family Members Properly Creating a Template Creating a Panel Using Revit Roof Element... Error! Bookmark not defined. 2.2 Panel Properties... Error! Bookmark not defined System Properties Facia Board Valley Plate Ridge Rafter Bird's Mouth Panel Properties Place Ledger Rafter Setting Regenerate... Error! Bookmark not defined Delete... Error! Bookmark not defined Template Manager Opening Type Manager Tools Regenerate Panel Align Merge Edits...30

3 3 1. Introduction Focused on specific areas of MWF Rafters functionality, this manual highlights the main features in this module. As each topic explains tools which are used to complete common tasks, users will learn some of the practices which will help improve efficient design and the development of a framed roof. To take the most out of the instructions given in this tutorial, start by creating a simple model with basic roof types in Revit to follow the steps in each topic. 1.1 Things You Should Know Before Starting When starting a project and using MWF Rafters, there are a few basic tips one should know to better utilize the software Rafter Supports When creating rafters, there is an option to select the supports for the rafters. This will allow the creation of birdsmouth cuts in the rafters based on the location of the supports. The supports can be structural walls and structural beams (including a panel top track). If you want to make a wall the support of the rafters, make sure this wall is set as structural Roof Panels Structure Orientation When an MWF Rafter Panel in a 3D view is selected, arrows will indicate each roof panel and which rafter(s) will be created on them. In this example, there are three panels (indicated by three arrows) which we can apply different properties for. Additionally, nodes and range limits of the roof boundaries will be placed at every domain.


4 Member Selection Select either the panel label, any member of the panel or the datum when changes or modifications need to be applied to a panel Revit Detail Levels Revit's detail level must be set to medium or fine. If set to Coarse, framing members and datum will appear solely as thin straight lines. Changing the level of detail after framing the walls in your project is a suitable approach to keeping your project light Family Types MWF uses some basic family catalogues as a reference. Before creating panels, load the rafter families that will be used for your project. Users can also duplicate original rafter families from MWF installation folders and create new joist/track types or rename the families' folders according to their needs. However, when creating new member types, users must maintain the same parameters used in the original MWF floor families. These parameters are needed for running all functions in MWF properly. The About option is found in the MWF icon menu. By clicking Home Directory in the main MWF dropdown, you will be directed to the MWF installation folder in your computer Loading Families Loading MWF stud families is important to do before creating your own templates. Other framing members such as connectors will be found in this location as well. Using Revit's Insert tab and Load Family button, locate the MWF installation folder and open it. You can then choose between the Imperial or Metric folder depending on your project units.


5 5 Open your desired folder and select the family that you need Creating New Family Members Properly MWF provides you with a wide variety of families and sizes. If the specific size you need is not in the list, simply add it in manually. To properly create new family size that is not in the given list of sizes you must first locate the family s.txt file. In this instance we will be creating a new BIMSF-SSMA-T.


6 6 Open the corresponding.txt file and notice the comma separated code along the top and the list of available framing members. Insert the desired measurements of the track and name it according to the order in which MWF reads the txt file. bf##length##inches: flange length d##length##inches: web depth tf##length##inches: material thickness. For instance, if you have a track that is 6 ½ deep with a 2 ½ flange and a thickness of 3/64, you can assign the code name: 650T Next, at the bottom of the txt file insert: 650T250-43,2.5,6.5,0.045,1.25, Save the txt file and upon reloading that family, your new track size will be available.
7 7 2. Creating a Rafter System Select a Revit roof that contains one structural layer in the project. Under MWF Truss Rafter menu select the Create command: The window below will appear. When creating a roof system, you can have only nodes, boundary lines and representative arrows and labels created first, or have the rafter objects also created by checking the box Frame it Now.


8 Once you hit Create, another window will appear. To select the Rafters Alignment, choose to each layer of the Revit roof object the rafters should align to. 8 After choosing the rafter s alignment, the Bird s Mouth window will appear. Within this window you can Add or Remove supports for a birdsmouth cut. You can also add horizontal and vertical offsets from the rafters support.


9 9 3. Rafter System Templates Rafter templates will contain all properties of a Rafter Panel. Templates can be saved so their properties can be reused in other roof instances in the project. 3.1 Creating a New Rafter Template To create a new template, after creating at least one roof panel and modifying the desired properties of the rafter s panel, go to the Properties tab and click Template. The Template Manager dialog box will open. Click on Save As, give the new template a name and click OK to save it. A new template will be created.

10 Modifying a Rafter System Template To modify a template, go to the Properties tab and click Template. 4. Panel Properties After creating the panels, you can access the panel properties for more options. There are two types of properties: system properties and panel properties.
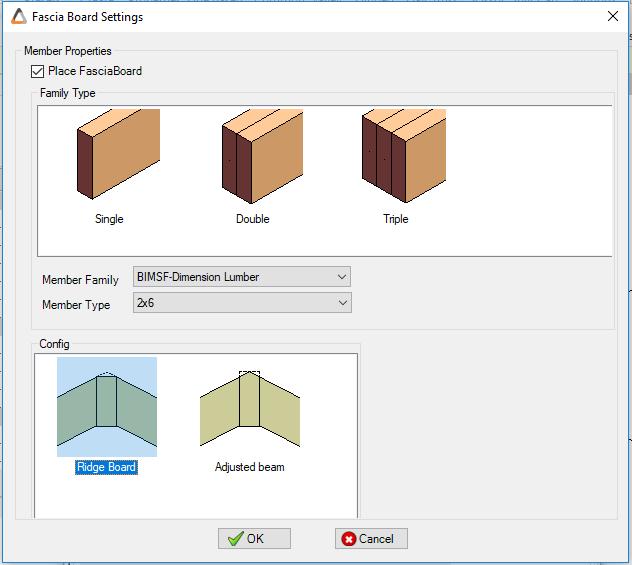
11 System Properties The system properties contain: fascia board, valley plate, ridge rafters and bird s mouth Facia Board You can add fascia board by double clicking on Fascia Board, checking the box Place Facia Board and then choose the desired member family and type. You are also able to choose the configuration.
12 12

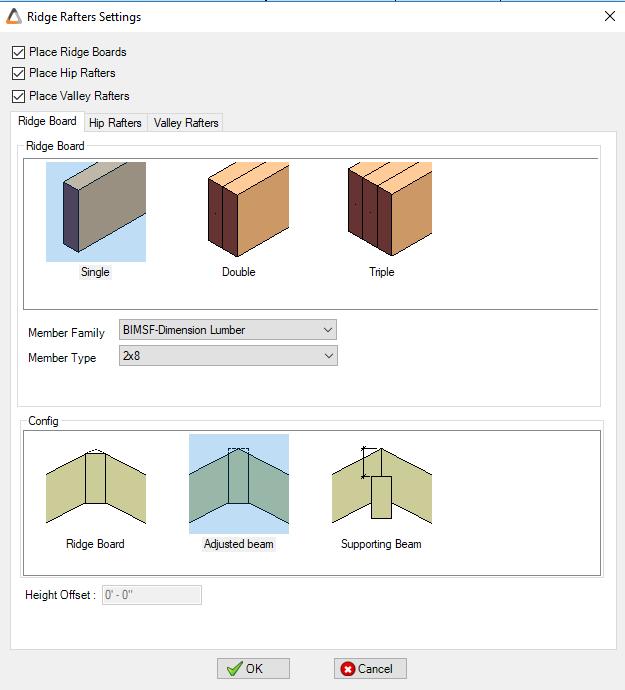
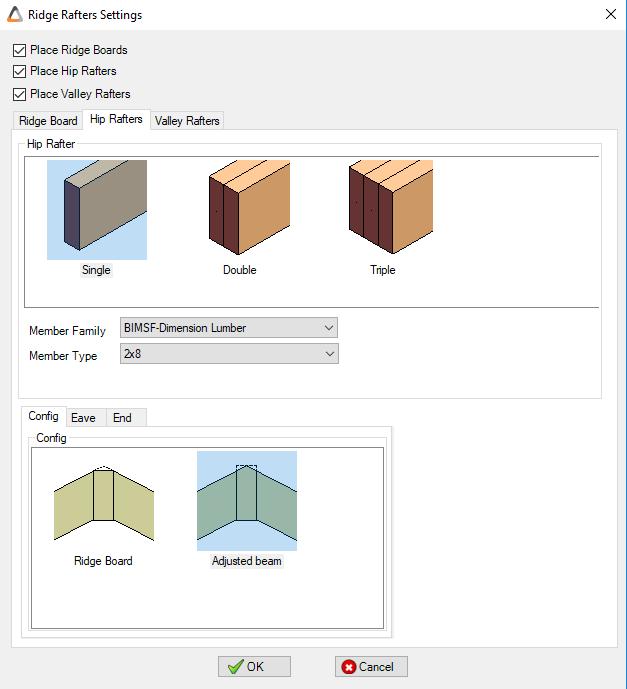
13 Valley Plate You can add a valley plate by double clicking on Valley Plate, checking the box Place Valley Plate and then choose the desired member family and type Ridge Rafter Add a ridge rafter by double clicking on Ridge Rafter. Check/uncheck the boxes Place Ridge Rafters, Place Hip Rafters and Place Valley Rafters. You can then choose whichever you would like to add into the project by checking their box.
14 14
15 15

16 16


17 2.2.5 Bird s Mouth Add a bird s mouth by choosing the support and adding the offset. Please take note that you should have a top track of wall panels already generated to use as the support. 17 Once the bird s mouth window pops up, you can add support and the support tracks that you can choose showed up automatically.


18 18 Option to add Offset horizontally or vertically.

19 Panel Properties Within the panel s Properties tab, you can set different values for every single panel or just simply check the box Apply changes to All Panels Place Ledger Next, double click on Place Ledger and by check the box Place Ledger you can place the ledger and also choose your member family and type.

20 Rafter Setting Within panel Properties, double click on Rafter. When a window appears, specify the spacing and Min. Length of the rafters and member configuration.

21 Note: You can save all modifications on the template by updating the template 21
22 Regenerate Any changes on the Properties tab can applied to the rafter system by clicking Regenerate. 2.4 Delete All Rafters can be deleted by hitting Delete in the Truss Rafters menu. 5. Template Manager On the Template Manager window, simply Import/Export the desired template. Users can also rename and delete any old templates.

23 23 6. Opening Type Manager If you have any openings on the roof or dormer, easily apply opening type from the lists shown within Opening Type Manager. Each type can be modified as well.
24 24 The Default templates are: Default (Dormer Opening) Default (Joist Supported) Default (Rim Supported) Each opening type can be modified (i.e. the Header, Trimmer).

25 25 Note: You can change your Opening Type, by choosing the opening marker on the panel and then selecting Change Opening Type from the EDIT tab. 1-Choose the opening marker.


26 26 2-Go to Edits and choose Change Opening Type. Example of opening type: Default (Joist Supported)


27 27 Example of opening type: Default (Rim Supported)
28 28


29 29 7. Tools Within the Tools tab, users can regenerate, align and merge rafter systems. 5.1 Align Rafters can be aligned by using Align Rafters on the Tools tab. The image before shows how to align rafters. 5.2 Merge Rafters with two different systems can be merge together to create one panel.

30 30 8. Edits On the Edits menu, delete/add rafter members, cut by void or by reference plane and change the opening type. 8.1 Cut by reference plane


31 By assigning the reference plane, you can cut rafters as per the selected reference plan. 31


32 Cut by Void 8.3 Override generated
33 Add Member Simply add new member to rafter system. 8.5 Delete Member Simply delete new member to rafter system. 8.6 Change Opening Type Please refer to section Opening Manager
Revit Structure 2012 Basics:
 SUPPLEMENTAL FILES ON CD Revit Structure 2012 Basics: Framing and Documentation Elise Moss autodesk authorized publisher SDC PUBLICATIONS www.sdcpublications.com Schroff Development Corporation Structural
Revit Structure 2013 Basics
 Revit Structure 2013 Basics Framing and Documentation Elise Moss Supplemental Files SDC P U B L I C AT I O N S Schroff Development Corporation Better Textbooks. Lower Prices. www.sdcpublications.com Tutorial
WOOD FRAMING ROOF+ FRAMING CONFIGURATION
 WOOD FRAMING ROOF+ FRAMING CONFIGURATION Framing Configuration Framing Configuration here user can define all framing parameters. It allows user to configure and save settings for all sorts of frames main
Advance Steel. Tutorial
 Advance Steel Tutorial Table of contents About this tutorial... 7 How to use this guide...9 Lesson 1: Creating a building grid...10 Step 1: Creating an axis group in the X direction...10 Step 2: Creating
Working with Detail Components and Managing DetailsChapter1:
 Chapter 1 Working with Detail Components and Managing DetailsChapter1: In this chapter, you learn how to use a combination of sketch lines, imported CAD drawings, and predrawn 2D details to create 2D detail
Purlin Roof. Create a New Folder in your chosen location called Purlin Roof. The nine parts that make up the project will be saved here.
 Purlin Roof Prerequisite Knowledge Previous knowledge of the following commands is required to complete this lesson. Sketching (Line, Rectangle, Add Relations, Dimensioning), Inserting Planes, Extrude,
WOOD FRAMING ROOF+ FEATURES
 WOOD FRAMING ROOF+ FEATURES Load Families & Schedules Load Families & Schedules loads sample framing, connection families and sample schedules to the current project. You can find the families in Project
84 part video tutorial training course. The course is 100% free with no catches or exclusions. You don
 Please Note: If you're new to Revit, you may be interested in my " Beginner's Guide to Revit Architecture " 84 part video tutorial training course. The course is 100% free with no catches or exclusions.
METAL FRAMING FLOOR+ FRAMING CONFIGURATION
 METAL FRAMING FLOOR+ FRAMING CONFIGURATION Framing Configuration Framing Configuration here user can define all framing parameters. It allows user to configure and save settings for all sorts of frames
036-ShopDrawings hsbinoutput/shop Drawings
 1 FUNCTION The function of this document is to provide information on how to use the shop drawings (hsbinoutput\shop drawings) in hsb2009+. In hsbcad you have Element drawings that can be generated automatically
METAL FRAMING ROOF+ FRAMING CONFIGURATION
 METAL FRAMING ROOF+ FRAMING CONFIGURATION Framing Configuration Framing Configuration here user can define all framing parameters. It allows user to configure and save settings for all sorts of frames
Introduction to Parametric Modeling AEROPLANE. Design & Communication Graphics 1
 AEROPLANE Design & Communication Graphics 1 Object Analysis sheet Design & Communication Graphics 2 Aeroplane Assembly The part files for this assembly are saved in the folder titled Aeroplane. Open an
Revit Structure 2014 Basics
 Revit Structure 2014 Basics Framing and Documentation Elise Moss Authorized Author SDC P U B L I C AT I O N S Better Textbooks. Lower Prices. www.sdcpublications.com Powered by TCPDF (www.tcpdf.org) Visit
Autodesk Advance Steel. Drawing Style Manager s guide
 Autodesk Advance Steel Drawing Style Manager s guide TABLE OF CONTENTS Chapter 1 Introduction... 5 Details and Detail Views... 6 Drawing Styles... 6 Drawing Style Manager... 8 Accessing the Drawing Style
METAL FRAMING RAFTER+ Split Beam Systems
 METAL FRAMING RAFTER+ Split Beam Systems Split Beam System Revit doesn t have any possibility to control a distance of the first and last rafter spacing of Beam System. It is the main reason to use the
Advance Steel. Drawing Style Manager s guide
 Advance Steel Drawing Style Manager s guide TABLE OF CONTENTS Chapter 1 Introduction...7 Details and Detail Views...8 Drawing Styles...8 Drawing Style Manager...9 Accessing the Drawing Style Manager...9
CBCL Limited Sheet Set Manager Tutorial 2013 REV. 02. CBCL Design Management & Best CAD Practices. Our Vision
 CBCL Limited Sheet Set Manager Tutorial CBCL Design Management & Best CAD Practices 2013 REV. 02 Our Vision To be the most respected and successful Atlantic Canada based employeeowned firm, delivering
REVIT - RENDERING & DRAWINGS
 TUTORIAL L-15: REVIT - RENDERING & DRAWINGS This Tutorial explains how to complete renderings and drawings of the bridge project within the School of Architecture model built during previous tutorials.
Designing in the context of an assembly
 SIEMENS Designing in the context of an assembly spse01670 Proprietary and restricted rights notice This software and related documentation are proprietary to Siemens Product Lifecycle Management Software
Pro/E WILDFIRE, week6
 Pro/E WILDFIRE, week6 1. Set working directory 2. File>New>Name is lbrack 3. When you create the part, make sure that the back surface of the vertical plate is on the front datum plane, and the lower surface
Vectorworks Architect Tutorial Manual by Jonathan Pickup. Sample
 Vectorworks Architect Tutorial Manual by Jonathan Pickup Table of Contents Introduction...iii Step 1 Layer and Model Setup... 1 Document Setup...1 Layer Setup (Model Setup)...7 Step 2 Property Line...
FDESIGN TUTORIALS - MAIN-Index. Index 1 SECTIONS DRAWINGS. 2 SURFACES DRAWINGS. 3 INTERIM PRODUCTS DRAWINGS. 4 MODEL DRAWINGS. 5 OTHER TOOLS.
 FDESIGN TUTORIALS - MAIN-Index Index 1 SECTIONS DRAWINGS. 2 SURFACES DRAWINGS. 3 INTERIM PRODUCTS DRAWINGS. 4 MODEL DRAWINGS. 5 OTHER TOOLS. 1 Tasks 1.01 Format and Title Block. 1.02 FORAN Sections. 1.03
Autodesk Medical Center
 Autodesk Medical Center Page 1 Contents Autodesk Medical Center... 1 Revit Projects... 3 Exercise 1 Create a new project file... 3 Datum Elements... 4 Exercise 2 Add Grids... 5 Exercise 3 Edit Levels...
Module 2: Radial-Line Sheet-Metal 3D Modeling and 2D Pattern Development: Right Cone (Regular, Frustum, and Truncated)
") Inventor (5) Module 2: 2-1 Module 2: Radial-Line Sheet-Metal 3D Modeling and 2D Pattern Development: Right Cone (Regular, Frustum, and Truncated) In this tutorial, we will learn how to build a 3D model
Inventor (5) Module 2: 2-1 Module 2: Radial-Line Sheet-Metal 3D Modeling and 2D Pattern Development: Right Cone (Regular, Frustum, and Truncated) In this tutorial, we will learn how to build a 3D model
Getting Started Guide
 SOLIDWORKS Getting Started Guide SOLIDWORKS Electrical FIRST Robotics Edition Alexander Ouellet 1/2/2015 Table of Contents INTRODUCTION... 1 What is SOLIDWORKS Electrical?... Error! Bookmark not defined.
WOOD FRAMING FLOOR+ FEATURES
 WOOD FRAMING FLOOR+ FEATURES Load Families &Schedules Load Families & Schedules loads sample framing, connection families and sample schedules to the current project. You can find the families in Project
Release Notes - Fixes in Tekla Structures 2016i SP1
 Release Notes - Fixes in Tekla Structures 2016i SP1 is modified., the ID of the connection plate is not changed anymore when the connection now uses normal rebar groups instead of tapered groups., the
Roof Tutorial Wall Specification
 Roof Tutorial The majority of Roof Tutorial describes some common roof styles that can be created using settings in the Wall Specification dialog and can be completed independent of the other tutorials.
Vertical Offset Base and Safety Rail System Installation Instructions
 Section 5 Vertical Offset Base and Safety Rail System Installation Instructions The vertical offset base and safety rail assembly are designed to be used in residential construction for sloped or flat
Walls. Section. Walls. When you finish this section, you should understand the following:
 GOLDMC03_132283433X 8/24/06 2:23 PM Page 123 Section 3 Walls When you finish this section, you should understand the following: How to place a wall object. How to change walls by dynamically pulling on
User Guide V10 SP1 Addendum
 Alibre Design User Guide V10 SP1 Addendum Copyrights Information in this document is subject to change without notice. The software described in this document is furnished under a license agreement or
Roof Magician. Advanced Software for Roof Modeling and Estimating. Tutorial for defining Tiles, Shingles and Shakes
 Roof Magician Advanced Software for Roof Modeling and Estimating Tutorial for defining Tiles, Shingles and Shakes Document Issue 1.0.0-28 th September 1999 Table of Contents TABLE OF CONTENTS... 2 INTRODUCTION...
Making an Architectural Drawing Template
 C h a p t e r 8 Addendum: Architectural Making an Architectural Drawing Template In this chapter, you will learn the following to World Class standards:! Starting from Scratch for the Last time! Creating
METAL FRAMING WALL+ FRAMING CONFIGURATION
 METAL FRAMING WALL+ FRAMING CONFIGURATION Framing Configuration Framing Configuration definition of all framing parameters. It allows to configure and save settings for all sorts of frames main wall Frames
House Design Tutorial
 House Design Tutorial This House Design Tutorial shows you how to get started on a design project. The tutorials that follow continue with the same plan. When you are finished, you will have created a
Release Notes - Fixes in Tekla Structures 2016i PR1
 Release Notes - Fixes in Tekla Structures 2016i PR1, you can now set the to either or. is modified., the ID of the connection plate is not changed anymore when the connection now uses normal rebar groups
Converting a solid to a sheet metal part tutorial
 Converting a solid to a sheet metal part tutorial Introduction Sometimes it is easier to start with a solid and convert it to create a sheet metal part. This tutorial will guide you through the process
Create styles that control the display of Civil 3D objects. Copy styles from one drawing to another drawing.
 NOTES Module 03 Settings and Styles In this module, you learn about the various settings and styles that are used in AutoCAD Civil 3D. A strong understanding of these basics leads to more efficient use
Lesson 17. The Focus of this lesson is:
 The Focus of this lesson is: Inserting beams between frames to support Roof Top Units or concentrated loads Loading the roof beams so they design Locating a roof framed opening Lesson Comments: This lesson
Advance Steel suite 6.1 / SP2
 Advance Steel suite 6.1 / SP2 This document describes only the improvements in Service Pack 2 compared to Service Pack 1. The installation of SP2 includes SP1; please see the previous document for improvements
Import/Export of tendons in module StatiCa Tendon
 IDEA Tutorial Import/Export of tendons in module StatiCa Tendon by using formats DXF, TXT and table format Import/Export of tendons in module StatiCa Tendon 1 Contents 1. Terminology... 2 2. Import...
Applied Precast Concrete Detailing
 Applied Precast Concrete Detailing Tekla Structures 11.0 August 30, 2005 Copyright 2005 Tekla Corporation Copyright 2005 Tekla Corporation Applied Precast Concrete Detailing i Copyright 2005 Tekla Corporation
Top Down Assembly Modeling Release Wildfire 2.0
 Top Down Assembly Modeling Release Wildfire 2.0 Note: Comprehensive Modeling Assignment This is a 30 point assignment as such takes the place of the final exam. Four Plate Mold Base, Inner Two Plates Begin
Stratigraphy Modeling Boreholes and Cross. Become familiar with boreholes and borehole cross sections in GMS
 v. 10.3 GMS 10.3 Tutorial Stratigraphy Modeling Boreholes and Cross Sections Become familiar with boreholes and borehole cross sections in GMS Objectives Learn how to import borehole data, construct a
AUTODESK INVENTOR Trial Projects
 AUTODESK INVENTOR Trial Projects Drawing Creation Create detailed drawings of a collar flange PART 1: CREATING DRAWING VIEWS page: 2 1. 2. 3. Start by clicking the Projects icon in the ribbon. Navigate
House Design Tutorial
 Chapter 2: House Design Tutorial This House Design Tutorial shows you how to get started on a design project. The tutorials that follow continue with the same plan. When you are finished, you will have
This tutorial will guide you through the process of adding basic ambient sound to a Level.
 Tutorial: Adding Ambience to a Level This tutorial will guide you through the process of adding basic ambient sound to a Level. You will learn how to do the following: 1. Organize audio objects with a
House Design Tutorial
 Chapter 2: House Design Tutorial This House Design Tutorial shows you how to get started on a design project. The tutorials that follow continue with the same plan. When we are finished, we will have created
Vectorworks Architect
 SAMPLE by Jonathan Pickup third edition written with version 2011 Vectorworks Architect Tutorial Manual Table of Contents Introduction... iii How to Use this Manual... iii New Ways of Drawing... iv Vectorworks
Subdivision Cross Sections and Quantities
 NOTES Module 11 Subdivision Cross Sections and Quantities Quantity calculation and cross section generation are required elements of subdivision design projects. After the design is completed and approved
CONTENTS CHAPTER 1 WHAT THIS IS ALL ABOUT...
 CONTENTS CHAPTER 1 WHAT THIS IS ALL ABOUT... 17 INTRODUCTION... 17 Terminology... 18 MACINTOSH AND WINDOWS... 20 CONVENTIONS USED IN THIS TUTORIAL... 21 Command Menu Title And Pull-Down Menu... 22 Commands,
Stratigraphy Modeling Boreholes and Cross Sections
 GMS TUTORIALS Stratigraphy Modeling Boreholes and Cross Sections The Borehole module of GMS can be used to visualize boreholes created from drilling logs. Also three-dimensional cross sections between
SolidWorks Part I - Basic Tools SDC. Includes. Parts, Assemblies and Drawings. Paul Tran CSWE, CSWI
 SolidWorks 2015 Part I - Basic Tools Includes CSWA Preparation Material Parts, Assemblies and Drawings Paul Tran CSWE, CSWI SDC PUBLICATIONS Better Textbooks. Lower Prices. www.sdcpublications.com Powered
ARCHLine.XP Interior Windows. Learning Interior. Learning material for the basics of ARCHLine.XP Interior. ARCHLine.
 ARCHLine.XP Interior 2010 Windows Learning Interior Learning material for the basics of ARCHLine.XP Interior ARCHLine.XP Interior Information in this document is subject to change without notice and does
EG1003 Help and How To s: Revit Tutorial
 EG1003 Help and How To s: Revit Tutorial Completion of this tutorial is required for Milestone 1. Include screenshots of it in your Milestone 1 presentation. Downloading Revit: Before beginning the tutorial,
Sheet Metal OverviewChapter1:
 Sheet Metal OverviewChapter1: Chapter 1 This chapter describes the terminology, design methods, and fundamental tools used in the design of sheet metal parts. Building upon these foundational elements
WEEK 5: Shaft Modeling (C51X01, C51X02) Revolved Features, Chamfer
 Revolved Features, Chamfer") WEEK 5: Shaft Modeling (C51X01, C51X02) Revolved Features, Chamfer 1. Creating the Shaft Model 1. File> New> Part, Name: C51X01> OK 2. Insert> Revolve> Placement> Define> select TOP datum plane> Sketch
WEEK 5: Shaft Modeling (C51X01, C51X02) Revolved Features, Chamfer 1. Creating the Shaft Model 1. File> New> Part, Name: C51X01> OK 2. Insert> Revolve> Placement> Define> select TOP datum plane> Sketch
House Design Tutorial
 Chapter 2: House Design Tutorial This House Design Tutorial shows you how to get started on a design project. The tutorials that follow continue with the same plan. When you are finished, you will have
Scaffolding Software iscaf - Design v6.50. New Features. August 2015
 Scaffolding Software iscaf - Design v6.50 August 2015 2010-2015 iscaf - Design : 6.5 (August, 2015) Windows 10 No Problem! All our software runs on Windows 10. iscaf is also optimized for 64-bit operating
Toothbrush Holder. A drawing of the sheet metal part will also be created.
 Prerequisite Knowledge Previous knowledge of the following commands is required to complete this lesson; Sketch (Line, Centerline, Circle, Add Relations, Smart Dimension,), Extrude Boss/Base, and Edit
Rhinoceros modeling tools for designers. Using Layouts in Rhino 5
 Rhinoceros modeling tools for designers Using Layouts in Rhino 5 RH50-TM-LAY-Apr-2014 Rhinoceros v5.0, Layouts, Training Manual Revised April 8, 2014, Mary Fugier mary@mcneel.com Q&A April 8, 2014, Lambertus
Lesson 6: Drawing Basics
 6 Lesson 6: Drawing Basics Goals of This Lesson Understand basic drawing concepts. Create detailed drawings of parts and assemblies:. Before Beginning This Lesson Create Tutor1 and Tutor2 parts and the
AEROPLANE. Create a New Folder in your chosen location called Aeroplane. The four parts that make up the project will be saved here.
 AEROPLANE Prerequisite Knowledge Previous knowledge of the following commands is required to complete this lesson. Sketching (Line, Rectangle, Arc, Add Relations, Dimensioning), Extrude, Assemblies and
Embroidery Gatherings
 Planning Machine Embroidery Digitizing and Designs Floriani FTCU Digitizing Fill stitches with a hole Or Add a hole to a Filled stitch object Create a digitizing plan It may be helpful to print a photocopy
This document describes the new features of MTpro version as compared to MTpro
 New features in MTpro 3.6 This document describes the new features of MTpro version 3.6.0.0 as compared to MTpro 3.5.0.0. Table of contents 1 General... 2 2 New contents... 3 2.1 New CAD models... 3 2.2
Table of Contents. Lesson 1 Getting Started
 NX Lesson 1 Getting Started Pre-reqs/Technical Skills Basic computer use Expectations Read lesson material Implement steps in software while reading through lesson material Complete quiz on Blackboard
AutoCAD Civil 3D 2009 ESSENTIALS
 AutoCAD Civil 3D 2009 ESSENTIALS SDC PUBLICATIONS Schroff Development Corporation www.schroff.com Better Textbooks. Lower Prices. Alignments and Profiles Section 2: Profiles In this section you learn how
Framing Tech 1
 Western Technical College 31410366 Framing Tech 1 Course Outcome Summary Course Information Description Career Cluster Instructional Level Total Credits 3.00 Total Hours 108.00 This course introduces the
Module 1E: Parallel-Line Flat Pattern Development of Sheet- Metal Folded Model Wrapping the 3D Space of An Oblique Circular Cylinder
 Inventor (10) Module 1E: 1E- 1 Module 1E: Parallel-Line Flat Pattern Development of Sheet- Metal Folded Model Wrapping the 3D Space of An Oblique Circular Cylinder In this Module, we will explore the topic
EXERCISE 1: CREATE LINE SPARKLINES
 EXERCISE 1: CREATE LINE SPARKLINES In this exercise you ll create line sparklines. Then you ll convert the line type to the column type. Part 1: Create the sparklines Before you start, notice that the
SolidWorks Design & Technology
 SolidWorks Design & Technology Training Course at PHSG Ex 5. Lego man Working with part files 8mm At first glance the Lego man looks complicated but I hope you will see that if you approach a project one
7.0 - MAKING A PEN FIXTURE FOR ENGRAVING PENS
 7.0 - MAKING A PEN FIXTURE FOR ENGRAVING PENS Material required: Acrylic, 9 by 9 by ¼ Difficulty Level: Advanced Engraving wood (or painted metal) pens is a task particularly well suited for laser engraving.
Using Siemens NX 11 Software. The connecting rod
 Using Siemens NX 11 Software The connecting rod Based on a Catia tutorial written by Loïc Stefanski. At the end of this manual, you should obtain the following part: 1 Introduction. Start NX 11 and open
Creating and Editing Plot Style Tables
 AutoCAD and Its Applications BASICS Supplemental Material Chapter 28 Creating and Editing Plot Style Tables The plot style tables supplied with AutoCAD are appropriate for many plotting applications. Use
Architecture 2012 Fundamentals
 Autodesk Revit Architecture 2012 Fundamentals Supplemental Files SDC PUBLICATIONS Schroff Development Corporation Better Textbooks. Lower Prices. www.sdcpublications.com Tutorial files on enclosed CD Visit
Alibre Design Exercise Manual Introduction to Sheet Metal Design
 Alibre Design Exercise Manual Introduction to Sheet Metal Design Copyrights Information in this document is subject to change without notice. The software described in this documents is furnished under
Sections & Details VOCABULARY
 1 Sections & Details VOCABULARY 1 ROOF FRAMING DETAIL RIDGE BOARD SHEATHING SHINGLES WEB FASCIA RAFTER (chord) SOFFIT SHEATHING STUD INSULATION DOUBLE TOP PLATE CEILING JOIST 2 FOUNDATION DETAIL STUD SHEATHING
Autodesk Architectural Desktop Functionality for the Autodesk Building Systems User
 11/28/2005-1:00 pm - 2:30 pm Room:N. Hemispheres (Salon A1) (Dolphin) Walt Disney World Swan and Dolphin Resort Orlando, Florida Autodesk Architectural Desktop Functionality for the Autodesk Building Systems
House Design Tutorial
 House Design Tutorial This House Design Tutorial shows you how to get started on a design project. The tutorials that follow continue with the same plan. When you are finished, you will have created a
Introduction to Sheet Metal Features SolidWorks 2009
 SolidWorks 2009 Table of Contents Introduction to Sheet Metal Features Base Flange Method Magazine File.. 3 Envelopment & Development of Surfaces.. 14 Development of Transition Pieces.. 23 Conversion to
Module 1C: Adding Dovetail Seams to Curved Edges on A Flat Sheet-Metal Piece
 1 Module 1C: Adding Dovetail Seams to Curved Edges on A Flat Sheet-Metal Piece In this Module, we will explore the method of adding dovetail seams to curved edges such as the circumferential edge of a
Kitchen and Bath Design Tutorial
 Kitchen and Bath Design Tutorial This tutorial continues where the Interior Design Tutorial left off. You should save this tutorial using a new name to archive your previous work. The tools and techniques
Learning Objectives. Description. Your AU Experts: Gabriel Hernandez Applied Software. David Ronson Applied Software
 MSF21377 The Optimal Revit to Fab Workflow Gabriel Hernandez Applied Software David Ronson Applied Software Learning Objectives Design to Fabrication workflows General modification of Fabrication parts
Deck Tutorial. Decks and Porches. Drawing Decks
 Deck Tutorial The Deck Tutorial continues where the Landscaping Tutorial left off, and explains how to create a deck off the back of the house and connect it to the terrain with an exterior staircase.
MS Word Training Formatting Pictures
 Introduction MS Word Training Formatting Pictures There are many ways to format pictures in Word. For instance, you can change the size or shape of an image to better suit your document. You can also enhance
FOCUS ON REAL DESIGN AUTOMATE THE REST CUSTOMTOOLS BATCH CONVERTING YOUR SOLIDWORKS FILES
 FOCUS ON REAL DESIGN AUTOMATE THE REST CUSTOMTOOLS BATCH CONVERTING YOUR SOLIDWORKS FILES Table of Contents BATCH CONVERTING YOUR SOLIDWORKS DOCUMENTS... 3 Introduction... 3 What does it do?... 3 How does
Assignment 5 CAD Mechanical Part 1
 Assignment 5 CAD Mechanical Part 1 Objectives In this assignment you will apply polyline, offset, copy, move, and rotated dimension commands, as well as skills learned in earlier assignments. Getting Started
Kitchen and Bath Design Tutorial
 Kitchen and Bath Design Tutorial This tutorial continues where the Interior Design Tutorial left off. You should save this tutorial using a new name to archive your previous work. The tools and techniques
Creating and Editing Plot Style Tables
 AutoCAD and Its Applications BASICS Supplemental Material Chapter 28 2013 Creating and Editing Plot Style Tables The plot style tables supplied with AutoCAD are appropriate for many plotting applications.
BIM. e Submission Guideline Structural. Annex 1a. Recommended Process Revit 2010
 BIM e Submission Guideline Structural Annex 1a Recommended Process Revit 2010 Building and Construction Authority 5 Maxwell Road #16-00 Tower Block MND Complex Singapore 069110 www.bca.gov.sg Revision
PowerPoint 2016: Formatting Pictures. Introduction
 PowerPoint 2016: Formatting Pictures Introduction There are a variety of ways to format the pictures in your slide show. The picture tools in PowerPoint make it easy to personalize and modify the images
Ribbon (Panels) + Options Bar + Contextual Tabs (tools based on selection)
 + Options Bar + Contextual Tabs (tools based on selection)") Week 11 Revit, Basics Building Information Modeling (BIM) - Parametric 3D Model File Types: Projects RVT (template = RTE) Families - RFA (template = RFT), "Symbols" Layout Workspace - Elevation Markers
Week 11 Revit, Basics Building Information Modeling (BIM) - Parametric 3D Model File Types: Projects RVT (template = RTE) Families - RFA (template = RFT), "Symbols" Layout Workspace - Elevation Markers
Advance Concrete. Tutorial
 Advance Concrete Tutorial Table of contents About this tutorial... 9 How to use this guide... 10 Lesson 1: Creating a building grid... 11 Step 1: Create a default building grid... 11 Step 2: Set the distances
Module 10. Assemblies and Corridors. Objectives
 NOTES Module 10 Assemblies and Corridors In this module, you learn to work with assemblies and corridors in AutoCAD Civil 3D. Corridor models are used to represent road designs in Civil 3D. An assembly
84 part video tutorial training course. The course is 100% free with no catches or exclusions. You don
 Please Note: If you're new to Revit, you may be interested in my " Beginner's Guide to Revit Architecture " 84 part video tutorial training course. The course is 100% free with no catches or exclusions.
TABLE OF CONTENTS INTRODUCTION...4
 Starting Guide TABLE OF CONTENTS INTRODUCTION...4 Advance Steel... 4 Where to find information?... 5 INSTALLATION... 5 System requirements... 5 Starting the installation... 5 STARTING ADVANCE STEEL...
Full Section Tutorial Creating a Part
 Full Section Tutorial Creating a Part 1. Create a block with the following measures a. Length=4.00 b. Depth=4.00 c. Height= 2.00 2. Place a Counterbore hole on the top view at the center of the block with
HIP AND GABLE ROOF COMPONENTS
 Page 18. VU20976 Roof Framing HIP AND GABLE ROOF COMPONENTS Plan view of the hip and gable roof that you are going to build. Again, don't be tempted just to look the names, put in a bit more effort to
METAL FRAMING Wall+ SHOP DRAWINGS
 METAL FRAMING Wall+ SHOP DRAWINGS Shop Drawings Finish your modeling with built-in shop drawing generator and deliver your wall framing estimation the same hour. Build your complete shop drawings with