EZ-MATRIX I N S TA L L AT I O N I N S T R U C T I O N S EZ-MATRIX
|
|
|
- Marshall Gordon
- 5 years ago
- Views:
Transcription


1 TM I N S TA L L AT I O N I N S T R U C T I O N S
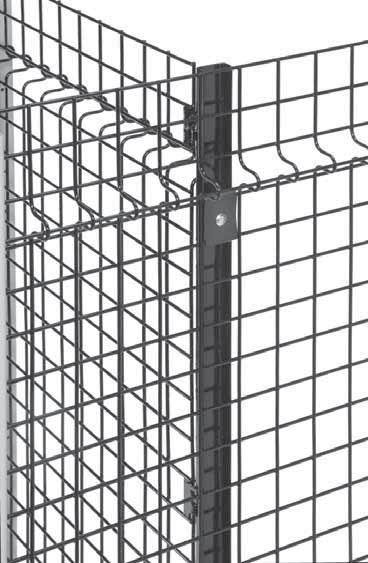
 Panels are to be installed horizontally between posts, parallel with the ground.")
2 READ THESE INSTRUCTIONS page 2 Installer Tips: Installation is best completed with the help of one or two people. Prior to beginning, please read through all instructions pertinent to your installation. (Doors, panels, etc...) Panels are to be installed horizontally between posts, parallel with the ground. Prior to beginning, if at all possible lay out the parts where they are to be installed. Make sure all posts are installed perpendicular to the floor, shims may be required. Use 3.5 spacer block (NOT SUPPLIED) to support the panel during the installation on one side if only one person is installing panels. See 2A on page 3 Standard partitioning assembly Begin installation at a wall (if your plan calls for a wall connection), using a 2.5 post at wall. Hinge door opening is determined by transom. Consult your plan for location and dimensions. Temporarily install transom at floor level. Assembly hooks will be installed on the inside of enclosure. Self-Tapping Screw Installation Recommendations: When installing self-tapping screws use a standard variable speed screw gun equipped with an adjustable clutch or depth locating nosepiece. Take care not to over tighten or strip, set the drill accordingly. DO NOT USE IMPACT TYPE GUN WHEN INSTALLING SELF-TAPPING SCREWS. Because screws could strip, securely clamp component parts in place before attaching with self-tapping screws. If screws are overtightened and strip, drill through post and use bolts (NOT SUPPLIED) of adequate size. Tools Required: 1/2 masonry bit (drill holes in floor for post) 3/8 wrench or socket (screws for attaching door parts) 1/2 wrench or socket (screws to secure panels if used instead of drive rivet) 3/4 wrench or socket (secure nuts on floor anchor) 7/16 wrench or socket (various 1/4 bolts for ceiling, panel kits plates, etc.) Phillips screw driver (install lock) Small Hammer Parts Recommended: Floor Anchors (Part #H5814 in Kit Post. 1/2 x 3-3/4 ) and Matrix Shims (Part #H5820 in Kit Post) Drill Bits (Various) Flat Screw Driver Tape Measure Electric Screw Gun Safety Items (hardhat, gloves, safety glasses & steel toed work shoes); remove jewelry The following installation instructions should be used as a guide for installing Wireway Husky EZ-Matrix Partitions. Good common sense and appropriate safety precautions must be used during installations. The product may be unstable during installation; accordingly - temporary bracing should be used until all hardware is tightened and the product is properly anchored to the floor. Permanent field bracing (NOT SUPPLIED) may be installed. Call Factory. Installation problems arising from job site conditions should be referred to a professional installer. Refer product assembly questions to Wireway Husky Corp Tools Recommended: Safety Ladder (most jobs too tall to reach from floor) Carpenter Level Chalk Line Heavy Duty Wire Cutters Prior to Installation: Prior to beginning installation please check bill of lading to make sure that you have all the parts required for the assembly Make sure that the installation area is clear of all obstructions Read thoroughly all the instructions pertinent to your installation Safety Items Safety gloves, hard hat and safety glasses should be worn during installation.


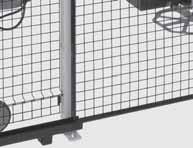
3 STANDARD PARTITION ASSEMBLY 8 and 10 Panel Arrangements Screws page 3 5 LINE POST 2-1/2 SQ 46-3/16 6 Hardware 1/2 Nut and washer 3 INSTALL PANELS HORIZONTALLY 2 FLOOR ANCHOR HEIGHT EZ-Matrix Installation Instructions: - EZ-Matrix installation is best accomplished with two or three persons. - Use a chalkline to mark the partition runs on the floor. Dimensions to be used are outside measurements 1. Right Angles can easily be made by use of a triangle - see sketch triangle INSTALLING DRIVE RIVET - Starting with a line post 5 : lag the first post to the floor using two Floor Anchors 2. Make sure the slots in the tube face inward of the enclosure. - 3 Install the hooks of the first panel in the lagged 2.5 Line Post at the lowest level. Engage the panel s opposing hooks in the next unlagged Line Post. Install one heavy-duty drive rivet per hook for maximum security. - Use 3.5 spacer block (NOT SUPPLIED) to support the panel during the installation on one side if only one person is installing panels. See 2A standard partitioning assembly VIEW FROM OUTSIDE ENCLOSURE 1 CHALK LINE 2A SPACER BLOCK 2 FLOOR ANCHOR - Lag the second square post to the floor using two Floor Anchors 2. - Install the top panel. Install one per side minimum, but use six drive rivets if desired. Alternate: use removeble 5/16 x 1 self threading Screws (Not included) in place of the 1/4 heavy-duty drive rivet.


4 STANDARD PARTITION ASSEMBLY page 4 Bottom Panel - First Panel Installed Top Panel - Complete Installation FIRST POST 4 INSTALL TOP PANEL SECOND POST 5 ADD MID PANEL CLIP 1 LAG FIRST POST IN PLACE 2 INSTALL PANEL AND SECOND POST 3 LAG SECOND POST IN PLACE VIEW FROM OUTSIDE ENCLOSURE
5 DOOR ARRANGEMENTS Sliding Doors page 5 1. Door opening width: The distance between 2-1/2 square line posts is determined using transom overhead (if present) Measuring width of the door opening minus 1-3/4. If transom is used (See page 8) install temporarily at base of door opening to establish precise opening width (used in swing and slide doors). 2. Customer to install lock. (See pages 10-11). 3. Attach two 4 wheel trolley into the door 1/2 diameter holes provided. (See page 6). 4. Using two 5/16 x 3 carriage bolts, attach the bottom slam. Using two 5/16 x 3 carriage bolts, attach the latch receiver. (See page 14). 5. Fasten the track bracket assembly (See page 6 B ) to the post on either side of the door opening using 1/4 x 1 hex head self threading screws. 6. Install the door track in the track bracket assemblies. Secure the track by tightening the set screws provided in the two track brackets. 7. Slide the door s trolleys into the overhead track. (See page 6). 8. Install a track bumper as a keeper for the door trolley. (See page 7). 9. Attach the bottom guide as shown on page 7.


6 DOOR ARRANGEMENTS Single Sliding Door page 6 Sliding Door Assembly for 6, 8 and 10 Doors B 4 WHEEL TROLLEY TRUCK END OF TRACK IF POST IS AVAILABLE. OTHERWISE, USE MID-PANEL BRACKET. FOR DETAILS SEE PAGE 5 OPENING MUST BE WIDTH OF DOOR MINUS 1-3/4 4 WHEEL TROLLEY IN THE DOOR


")
7 FOR DETAILS SEE PAGE 5 DOOR ARRANGEMENTS Double Sliding Door page 7 TRACK BUMPER RUBBER BUMPER TRACK BUMPER (Used to stop slide door trolley (to prevent overtravel of door trolleys) BOTTOM GUIDE CANE BOLT-PADLOCK HASP PROVIDED (Lock into floor when doors in closed position) OPENING MUST BE WIDTH OF DOOR MINUS 1-3/4


8 DOOR ARRANGEMENTS Swing Door page 8 HEADER ONLY USED WHEN TRANSOM IS NOT USED. (FULL HEIGHT DOOR) Temporarily install door transom at bottom to establish proper door opening. Come back later to finish door installation. SINGLE SWING DOOR DOUBLE SWING DOOR 1. The opening between line posts for a hinged door installation is exactly equal to the installed transom width. 2. Install the Transom and fasten the line posts to the floor. 3. Install the cylinder lock or padlock attachment with the door in a horizontal position. See page 9.


9 HINGED DOOR PADLOCK ATTACHMENTS page 9 INSERT ATTACHMENT THROUGH SLOT AS SHOWN DRILL THROUGH AND BOLT Swing Door Hardware


10 LOCK OPTIONS page 10 DOOR/GATE LOCKS Key Lock Thumb-Turn Latch Door Knob Entry Interior Key Door Knob Lever Handle SWING DOOR - INSIDE VIEW SWING DOOR - OUTSIDE VIEW Can Be Hinged Left = Swing out; or Hinged Right = Swing in ELECTRICAL LOCKING DEVICES Coded Card Reader Ten-Digit Key Pad Electro-Magnetic Lock Electric Strike Master Lock ADA Handle Five-Button Coded Access Lock Push Paddle Push Bar Alarm Lock SLIDE DOOR - INSIDE VIEW SLIDE DOOR - OUTSIDE VIEW


11 LOCK ASSEMBLY page 11 SLIDE DOOR LOCK - INSIDE VIEW SWING DOOR LOCK - INSIDE VIEW


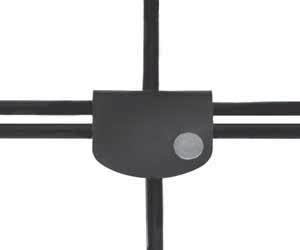
12 MID PANEL CONNECTION page 12 MID PANEL - OUTSIDE VIEW MID PANEL - INSIDE VIEW MID PANEL SUPPORT BAR MID PANEL CONNECTOR


13 HARDWARE ITEMS page 13 1 One way Screw Universal Metal Shim 1/2 Washer Double Hook Clips (For Custom Fit Panels) For Corners 1/2 Nut Drive Rivet 1-1/4 Hex Screw 1-5/8 Bolt For Posts 3-3/4 Lag Slide Door Track MID PANEL TRACK BRACKET (Used for attaching slide door track bracket to mid panel where no posts are available.) 4 WHEEL TROLLEY TRUCK FOR SLIDE DOOR continued...


 MID")
14 SLIDE DOOR HARDWARE ITEMS page 14 Bottom Guide LATCH RECEIVER Latch Receiver BOTTOM SLAM 4 WHEEL TROLLEY TRUCK Bottom Slam LATCH RECEIVER AND BOTTOM SLAM ON POST (Bolts to install included) MID PANEL TRACK BRACKET


15 VIEW FROM OUTSIDE ENCLOSURE CEILING SUPPORT Ceiling Panel Assembly CEILING CLIP CEILING TUBE CONNECTION page 15 Hook easily installs into post for a secure fit. 2-1/2 TUBING BACK CLIP SCREW VIEW FROM INSIDE ENCLOSURE


16 APPLICATIONS MID PANEL TRACK HANGER USED AT CORNERS page 16 MARKET SEGMENTS Communications Industry Residential Manufacturing Government and Military Retailers and Restaurants DEA Applications Warehousing, Office MID PANEL CLIP
17 TROUBLESHOOTING TIPS page 17 Swing Door: Door does not latch - make sure post are level and plum - make sure distance between post is the same as at transom and bottom. - turn key and/or thumb turn to see if tongue retracts. - make sure lock tongue and strike bar receiver align. - make sure lock tongue is facing in proper position. Rounded face of tongue should always contact the strike bar. Slide Door: Door does not latch - make sure Post are level and plum - make sure tounge is installed with rounded end up - make sure tounge is aligned with latch receiver - turn key and see if tongue retracts down. - adjust hight and tilt of door with top trolley bolts.


18 CUSTOM PANEL page 18 Cut-To-Fit Six clips are included with your order. Panels can be cut with 2 adjustability. VIEW OF HOOK AND POST OUTSIDE ENCLOSURE VIEW OF HOOK AND POST INSIDE ENCLOSURE DRIVE RIVET HEAD RIVET END - FLARED TAMPER PROOF BACKPLATE DOUBLE HOOK FASTENER CUSTOMIZED (SPECIAL WIDTH PANELS)


19 POST EXTENSIONS page /2 Tubular Posts Heavy duty 2-1/2 tubular posts are double the strength of 2 square commercial tubing. 1 1 DRIVE RIVET INSTALLED AT FACTORY SPLICE TUBE ENGAGING BOTTOM POST Use flathead screwdriver to align spliced post to bottom post

20 CORNER POST EXTENSIONS page 20 Corner Posts SPLICE CORNER TUBE ENGAGING BOTTOM POST
21 TERMS AND CONDITIONS page 21 It is the intent of Wireway Husky Corp. that any product received by our Customers fully meets their expectations. Wireway Husky product is Marketed and Distributed by a number of pre-qualified Distributor organizations around the world. If you have any questions about the applications or installation of your product or, in the event that this product is received by you in a form you believe to be sub-standard or below expectations, please contact the Distributor responsible for specifying and suppling your product. If for some unforeseen circumstance the particular Distributor is unavailable or unresponsive, we then encourage you to call Wireway Husky All parts subject to change without notice 2008, Wireway Husky Corp. All Rights Reserved. Ches #12527
MATRIX GUARD. I nstallation I nstructions TERMS AND CONDITIONS. Call or visit
 TERMS AND CONDITIONS It is the intent of Wireway Husky Corp. that any product received by our Customers fully meets their expectations. MATRIX GUARD Wireway Husky product is Marketed and Distributed by
Qwik-Fence Installation Instructions
 Qwik-Fence Installation Instructions 1 Tools Required The following installation instructions should be used as a guide for installing Folding Guard Qwik-Fence Partitions. Good common sense and appropriate
WireCrafters, LLC. General Information
 WireCrafters, LLC. General Information 6208 Strawberry Lane 502/363-6691 www.wirecrafters.com Louisville, Kentucky 40214 502/361-3857 FAX 1-800-626-1816 The following General Installation Instructions
LPR System Installation instructions
 Toll LPR System Installation instructions 1 General Information The following installation instructions should be used as a guide for installing Folding Guard LPR System. Good common sense and appropriate
Installation Instructions
 Contents Page General Information and Installer Tips.......... 2 Panels & Posts............................. 3 Enclosure Description..................... 4 Hinge Door Hardware................... 4-5 Step-by-Step
BioPrism Solid Surface
 Please read all instructions before installing products. These instructions are intended for use with InPro s standard toilet partitions, which include 58 high doors and wall panels, when deviating from
PRE-ENGINEERED HORSE STALL SYSTEMS SDFD SLIDING DOOR c/w FOLD-DOWN GRILL. & Assembly. Installation Instructions
 PRE-ENGINEERED HORSE STALL SYSTEMS 4800 SDFD SLIDING DOOR c/w FOLD-DOWN GRILL & Assembly Installation Instructions 4800 SDFD Sliding Door c/w Fold-Down Grill Components - 1 3 /4" x 2" x 88" channels (2)
Installation Manual for Metal Toilet Partitions Standard Series
 For Video instructions http://www.hadrian-inc.com/tech-data/installation/toilet-partitions.aspx P a g e 1 Table of Contents Page General Notes and Tools Required 3 STEP 1: Establish Floor Bracket Locations
Installation Manual. Solid Plastic Toilet Partitions. IN CANADA & AREAS OTHER THAN U.S.A.: IN THE U.S.A.:
 Installation Manual Solid Plastic Toilet Partitions Toilet Partitions & Lockers IN THE U.S.A.: Hadrian Inc., 7420 Clover Avenue, Mentor, OH 44060 Telephone: 440-942-9118 Fax: 440-942-9618 U.S. toll free
Installation Manual for Metal Toilet Partitions Elite & Elite Plus Series
 P a g e 1 Table of Contents Page General Notes and Tools Required 3 STEP 1: Establish Floor Bracket Locations 4 STEP 2: Fasten Floor Brackets 4 & 5 STEP 3: Erect Panels 6 STEP 4: Erect Wall Pilaster 7
INSTALLATION INSTRUCTIONS
 INSTALLATION INSTRUCTIONS LAMINATED P LASTIC TOILET PArTITIONS 1540 ClassicSeries with Options IMPORTANT: Storage and Handling Information on last page. For faster, easier installation, please review these
PRE-ENGINEERED HORSE STALL SYSTEMS 4884 HSD STANDARD SLIDING DOOR. & Assembly. Installation Instructions
 PRE-ENGINEERED HORSE STALL SYSTEMS 4884 HSD STANDARD SLIDING DOOR & Assembly Installation Instructions 4884 HSD Standard Sliding Door Components Some Considerations When Choosing Your Stall System - 1
Installation Instructions
 Installation Instructions For Models: Model Number / Description File Name 1540 Classic Series P-Lam Toilet Partitions 1540.pdf 1 INSTALLATION INSTRUCTIONS LAMINATED PLASTIC TOILET PARTITIONS 1540 Classic
INSTALLATION INSTRUCTIONS
 INSTALLATION INSTRUCTIONS SOLID PHENOLIC TOILET PARTITIONS 1080 DuraLineSeries Class-A Fire Rated Includes Institutional Hardware Option.67 IMPORTANT: Storage and Handling Information on last page. Review
Assembly Instructions
 Unite Panel System Hinge Door July 2016 #12 x / slotted hex washer head bolt Figure 1 threshold bracket frame Detail F threshold bracket threshold bracket (installed) #12 x / slotted hex washer head bolt
Melamine Plastic Laminate. Toilet Partition Installation Manual
 Melamine Plastic Laminate Toilet Partition Installation Manual PHONE: FAX: 1-866-317-2786 ATTENTION DO NOT MIX FASTENER PACKS EACH FASTENER PACK HAS THE NECESSARY BOLTS, BARRELS AND SCREWS TO INSTALL THE
ED1300/1300F SERIES CONCEALED VERTICAL ROD DEVICE INSTALLATION INSTRUCTIONS
 ED1300/1300F SERIES CONCEALED VERTICAL ROD DEVICE INSTALLATION INSTRUCTIONS Ver.2 1300 SERIES CONCEALED VERTICAL ROD DEVICE Top Strike Latch Screws Strike Screws Release Plunger Top Latch Plunger Screws
Independent Containment System (ICS)
") Installing the Independent Containment System (ICS) Complete these instructions to install the Independent Containment System (ICS). Prerequisites This installation requires a team of at least two people.
Installing the Independent Containment System (ICS) Complete these instructions to install the Independent Containment System (ICS). Prerequisites This installation requires a team of at least two people.
Phone # La Jolla Doors. Block Frame Installation Manual Aluminum Frame with either Vinyl or Aluminum Panels
 Phone # 800-440-8785 www.lajolladoors.com La Jolla Doors Block Frame Installation Manual Aluminum Frame with either Vinyl or Aluminum Panels Thank you for choosing La Jolla Doors In this manual you will
Oxford Stalls Installation Instructions
 Oxford Stalls Installation Instructions RAMM Horse Fencing and Stalls 13150 Airport Hwy. Swanton, OH 43558-9615 1-800-434-8456 Rev. 8/15/17 Before You Start Typical stall sizes are 10 x 10, 12 x 12 or
TOOLS REQUIRED FOR ASSEMBLY. Rubber Mallet or Plastic Tip Hammer PARTS REQUIRED FOR ASSEMBLY OF SINGLE ENTRY STARTER.
 TOOLS REQUIRED FOR ASSEMBLY Rubber Mallet or Plastic Tip Hammer Top Cover Support PARTS REQUIRED FOR ASSEMBLY OF SINGLE ENTRY STARTER Back Stop Divider Closed 'L' Upright Slotted Reinforcement Support
RLP Flat Track Hardware sliding door hardware/ barn door track
 Page 1 of 9 Installation Suggestions for: RLP Flat Track Hardware sliding door hardware/ barn door track Read these instructions to end before starting installation or ordering hardware. Reclaimed Lumber
Heavy Duty I-Beam Trolley
 Heavy Duty I-Beam Trolley ASSEMBLY INSTRUCTIONS I-BEAM TROLLEY Recommended Tools Level Tape Measure Pencil Drill with 1/8, 1/4, and 3/8, Drill Bits and Phillips Bit Socket Wrench with 9/16 Socket I-BEAM
INSTALLATION INSTRUCTIONS
 INSTALLATION INSTRUCTIONS HIGH PRESSUE LAMINATE (HPL) TOILET PARTITIONS 1030 TrimLineSeries 1040 DesignerSeries Includes continuous hardware option.65. IMPORTANT: Storage and Handling Information on last
table of contents Sliding Door Accessories Page Latches & Snuggers Stay Rollers Brackets & Stops
 table of contents Square Track & Accessories Pages 4-7 Square Track Options Page 4 Light Duty Track Page 4 Square Track Brackets Page 5 Square Track Accessories Page 5 Square Track Trolleys Page 6-7 Offset
Installation Instructions
 AMPCO Stainless Steel and Baked Enamel Toilet Partitions AMPCO Florida 11400 NW 36 th Avenue Miami, FL 33167 T. 305.821.5700 florida@ampco.com AMPCO Texas 201 Railroad Avenue Sanger, TX 76266 T. 940.458.7401
Rolling Curtain door Manual
 Rolling Curtain door Manual Installation Maintenance parts Model 944 PHONE 800 448 8979 FAX 800 236 8722 website www.tracrite.com EMAIL tr@tracrite.com ADDRESS 216 Wilburn Road Sun Prairie, WI 53590 This
Shetland Stalls Installation Instructions
 Shetland Stalls Installation Instructions RAMM Horse Fencing and Stalls 13150 Airport Hwy. Swanton, OH 43558-9615 1-800-434-8456 Rev. 1/9/18 Before you start Kit can accommodate up to 12 wide stall front
End of Row Doors. Revision Number 1
 End of Row Doors Single Swing Door Café Style Doors Revision Number 1 Wright Line LLC 160 Gold Star Boulevard Worcester, MA 01606 Tel: 800-225-7348 508-852-4300 Fax: 508-365-6178 www.wrightline.com info@wrightline.com
MPA-9000 Universal Ceiling Projector Mount Kit
 I N S T R U C T I O N M A N U A L Universal Ceiling Projector Mount Kit The Universal Ceiling Projector Mount provides a unique, simplified method of ceiling mounting your inverted projector. This low
Dublin Stalls Installation Instructions
 Dublin Stalls Installation Instructions RAMM Horse Fencing and Stalls 13150 Airport Hwy. Swanton, OH 43558-9615 1-800-434-8456 Rev. 9/13/17 Part Identification Round Track Bracket (4) (Not Painted) Round
CONTENTS TOOL LIST U P S I D E I N N O V A T I O N S, L L C RAMP AND STEP SYSTEM ASSEMBLY INSTRUCTIONS. Revised: June 2013
 U P S I D E I N N O V A T I O N S, L L C RAMP AND STEP SYSTEM ASSEMBLY INSTRUCTIONS TOOL LIST Required Tools: - Reciprocating Saw with Metal Cutting Blade - Drill - 7/16 Drill Bit for Metal Drilling -
INSTALLATION INSTRUCTIONS
 INSTALLATION INSTRUCTIONS MAXIMUM PRIVACY HIGH PRESSURE LAMINATE (HPL) TOILET PARTITIONS 2030 TrimLineSeries 2040 DesignerSeries IMPORTANT: Storage and Handling Information on last page. Review these instructions
INSTRUCTION SHEET U19
 U19 All Refrigerator and All Freezer Trim Kit Installation Product Line: U19 All Refrigerator and All Freezer Models Parts Included in Kit TRIMKITEZ1 (Part# 297333500): Single Trim Kit Components Single
Franklin Mills Stackable Movable Lateral Instructions
 Franklin Mills Stackable Movable Lateral Instructions Table of Contents: Table of contents...1 Tools Required...2 Stationary Shelving Assembly...3-7 Mobile Shelving Assembly...8-16 Rail Assembly...8-11
INSTALLATION INSTRUCTION
 INSTALLATION INSTRUCTION Soild Phenolic Series contents page 1080 DuraLineSeries...2-21 1180 DuraLineSeries...2-21 2080 DuraLineSeries Maximum Privacy...22-41 2180 DuraLineSeries Maximum Privacy...22-41
INSTALLATION GUIDE. C20-FTL STRAIGHT PARTITION Transit Partition ( Perforated Window, No Access, Steel )
") INSTALLATION GUIDE C20-FTL STRAIGHT PARTITION Transit Partition ( Perforated Window, No Access, Steel ) QUICK START GUIDE Phase 1 - Assembly q 1.1 Setup... q 1.2 Partition Assembly... 3-5 5-6 Phase 2 -
INSTALLATION GUIDE C20-FTL STRAIGHT PARTITION Transit Partition ( Perforated Window, No Access, Steel ) QUICK START GUIDE Phase 1 - Assembly q 1.1 Setup... q 1.2 Partition Assembly... 3-5 5-6 Phase 2 -
Installation Instructions - Model V4JSD 1
 Installation Instructions - Model V4JSD 1 Support Assemblies: Parts list: (Note see enclosed cut sheet for quantities and dimensional information) A vertical structural member (1 ½ x 1 ½ modular frame)
HIGH RISE Portable Restroom Assembly Instructions
 HIGH RISE Portable Restroom Assembly Instructions 2530 Xenium Lane North, Minneapolis, MN 55441 Telephone: 763-553-1900 / Fax: 763-553-1905 800-328-3332/ www.satelliteindustries.com PN 20930 REV C 8/16
ESA-100 Fixed Sidelite/Non Breakout
 /Non Breakout Exterior View Installation Instructions For use with ESA II Controller 1 Tools Required: Suggested Fasteners Required - (Not supplied) Screwdrivers Small Straight (FlatBlade) - for Terminal
Privacy Wall Glass Selections - Polished Edge Slider Door
 Privacy Wall Glass Selections - Polished Edge Slider Door 3/6" HEX BIT PUTTY KNIFE #2 ACR BIT SUCTION CUP HOLDERS DOOR LEAF: Satin Tempered Clear Tempered LOCTITE 425 SIDE LIGHT ETCHED GLASS STYLES: Satin
INSTALLATION INSTRUCTIONS
 www.marwincompany.com Kit Number Door Height Rough Opening Height KD200BB68 80 84 ½ KD200BB70 84 88 ½ KD200BB80 96 100 ½ INSTALLATION INSTRUCTIONS 200BB SERIES KD POCKET DOOR FRAME FOR 2 X 4 STUD WALLS
INS T A L L A TIO N INS T R U C TIO N S. Ceiling Mount Track System
 Ceiling Mount Track System 10.26.2016 Specifications Ceiling Post: Unassembled 2-7/8 Assembled 1-11/16 7/8 7-9/16 5-7/8 3/8 2 Tubes 1/2 2-3/8 5 Parts and Tools Tools Needed Tape Measure Pencil Drill with
INSTALLATION INSTRUCTIONS. PLASMA TV WALL MOUNT TILT Universal (RGTU-210) WARNINGS WARNING
 WARNINGS WARNING") PLASMA TV WALL MOUNT TILT Universal (RGTU-210) S CAUTION CAUTION CAUTION A alerts you to the possibility of serious injury or death if you do not follow the instructions. A CAUTION alerts you to the possibility
PLASMA TV WALL MOUNT TILT Universal (RGTU-210) S CAUTION CAUTION CAUTION A alerts you to the possibility of serious injury or death if you do not follow the instructions. A CAUTION alerts you to the possibility
ICU TRACKLESS SLIDING DOOR
 Interior View 0 Installation Instructions Tools Required: Screwdrivers Small Straight (Flat Blade) - for Terminal Block wiring # Phillips (Crosspoint) - for various #8, #0, and #4 screws Wrenches / Sockets
ESA-200 Fixed Sidelite
 Exterior View Installation Instructions For use with ESA II Controller 1 Tools Required: Suggested Fasteners Required - (Not supplied) Screwdrivers Small Straight (FlatBlade) - for Terminal Block wiring
Spring Loaded All Season Roll-Up Doors
 Spring Loaded All Season Roll-Up Doors STAND-OFF MOUNTING METHOD INSTALLATION INSTRUCTIONS READ THIS FIRST Carefully examine the crate(s) for damage before opening. If the carton is damaged, immediately
** Do Not Contact the Store ** For Assistance, including missing or broken parts, Call Customer Service at:
 3/01/2007 VISIT THE LITIME WEB SITE: WWW.LITIME.COM ** Do Not Contact the Store ** For Assistance, including missing or broken parts, Call Customer Service at: 1 (800) 225-3865 Double Shed Doors for Back
FOR PROFESSIONAL GARAGE DOOR INSTALLERS
 Composite Garage Doors Installation Instructions FOR PROFESSIONAL GARAGE DOOR INSTALLERS Tools required Screwdriver Claw Hammer Locking Pliers Power Drill Level with a 3/32" Drill Bit Utility Knife 9/16",
INSTALLATION INSTRUCTIONS
 INSTALLATION INSTRUCTIONS SOLID PHENOLIC TOILET PARTITIONS 1080 DuraLine Series 1180 DuraLine Series Class-A Fire Rated IMPORTANT: Review these instructions thoroughly prior to installation. FLOOR ANCHORED
MSP-DCCPGTU Large Screen Tilt Display Mount
 INSTALLATION INSTRUCTIONS Large Screen Tilt Display Mount The Large Screen Tilt Display Mount is a quick disconnect mounting solution for large flat panel displays. The mount features infinite adjust ability
INSTALLATION INSTRUCTIONS FOR FRONT CASTING DECK RAIL Ranger
 INSTALLATION INSTRUCTIONS FOR FRONT CASTING DECK RAIL Ranger TOOLS REQUIRED FOR INSTALLATION: Drill motor, (1) 5/16 inch drill bit, (1) 13/64 drill bit, (1) 3/16 inch hex wrench (1) 3/32 inch hex wrench.
PFW Installation Guide Installationsanleitung, Guía de Instalacíon, Guida de Installazione, Guide d Installation, Installatie gids
 Maximum Flat Panel Weight: 100 lb. / 45.35 kg. Included Components Wall Mount (Qty 1) Extension Bracket (Qty 1 Pair) Bracket (Qty 1 Pair) 5/16 Flat Washers (Qty 4) Universal Spacers (Qty 8) M5 Allen Driver
Rockwell 4-in-1 Sliding Door
 Rockwell 4-in-1 Sliding Door ASSEMBLY INSTRUCTIONS ROCKWELL 4-IN-1 SLIDING DOOR Recommended Tools Drill with Phillips Bit Socket Wrench with 7/16 Socket Rubber Mallet Adjustable Square ROCKWELL 4-IN-1
IMPORTANT: installation. FLOOR ANCHORED CEILING HUNG OVERHEAD BRACED FLOOR-TO- CEILING ANCHORED
 INSTALLATION INSTRUCTIONS MAXIMUM PRIVACY COMPACT LAMINATE TOILET PARTITIONS 2080 DuraLineSeries 2180 DuraLineSeries Class-A Fire Rated Includes Institutional Hardware Option.67 IMPORTANT: Storage and
C-Series & S-Series Classic Frame with Transom (Single or Pair)
") 1. TOOLS REQUIRED Tape measure 6' magnetic level 3' magnetic level Safety Glasses Screw gun #2 Screwdriver tip #3 Screwdriver tip Philips Head screwdriver (Used to move frame on wall using oval slots on
1. TOOLS REQUIRED Tape measure 6' magnetic level 3' magnetic level Safety Glasses Screw gun #2 Screwdriver tip #3 Screwdriver tip Philips Head screwdriver (Used to move frame on wall using oval slots on
For installation assistance, contact SARGENT at DOORS SHOWN HERE SWING IN FOR ILLUSTRATION PURPOSES ONLY.
 SARGENT Installation Instructions for LP8600 x LR8600 & 12-LP8600 x 12-LR8600 Series Low Profile Panic and Fire Exit Devices on Double Egress & Double Doors or LS8600 & 12-LS8600 Low Profile Exit Device
Installation Instruction
 Tools Needed for Assembly Stud finder (for wood stud wall) Pencil Mark Electric drill Wood Stud Wall Installation Step 1. Locate the Wood Studs Installation Instruction Drill bit (for wood stud wall) Masonry
INSTALLATION INSTRUCTIONS
 INSTALLATION INSTRUCTIONS HIGH PRESSUE LAMINATE (HPL) TOILET PARTITIONS 1030 TrimLineSeries 1040 DesignerSeries Includes continuous hardware option.65. IMPORTANT: Storage and Handling Information on last
Adjustable Countertop Installation
 Adjustable Countertop Installation Applies to Models: A1, A2, A3, A4, A5, & A6 Required Tools: Stud Finder, Level 1/4 deep well socket, Screwdrivers, Tape Measure, Drill and Drill Bits Language of origin:
INSTALLATION INSTRUCTIONS
 INSTALLATION INSTRUCTIONS COMPACT LAMINATE TOILET PARTITIONS 1080 DuraLineSeries 1180 DuraLineSeries Class-A Fire Rated Includes Institutional Hardware Option.67 IMPORTANT: Storage and Handling Information
FIXED PANEL SLIDER QCI5241
 INSTALLATION INSTRUCTIONS FIXED PANEL SLIDER QCI5241 FRAMELESS PANEL / DOOR / PANEL FRAMELESS DOOR / PANEL QCI5241 REV. 0 Page 1 Certified 06/16/2016 Parts List *Quantities may vary QCI5241 REV. 0 Page
PFW 6875 Installation Guide Installationsanleitung, Guía de Instalacíon, Guida de Installazione, Guide d Installation, Installatie gids
 Maximum Flat Panel Weight: 160 lb. / 72.57 kg. Included Components Wall Mount (Qty 1) Extension Brackets (Qty 2) Bracket (Qty 1 Pair) 5/16 Flat Washers (Qty 4) Universal Spacers (Qty 8) M5 Allen Driver
Installation Instructions Kit, Base Rail Bracket Part # 31413
 Installation Instructions Kit, Base Rail Bracket Part # 31413 Dealer / Installer: Provide a copy of these Instructions to the end user of this product. These Instructions provide important operating and
Box Track INSTALLATION INSTRUCTIONS
 Box Track INSTALLATION INSTRUCTIONS BOX TRACK Recommended Tools Level Tape Measure Pencil Drill with 1/8, and 1/4, Drill Bits, Phillips Bit and Slotted Bit Socket Wrench with 9/16 Socket 9/16 and 5/8 Wrench
C-Series. Fabric Diffuser. Installation Guide. 30 Angle Diffusion. Flat Diffusion COMPONENT DETAILS...3 INSTALLATION
 C-Series Fabric Diffuser Installation Guide 30 Angle Diffusion Flat Diffusion COMPONENT DETAILS...............3 INSTALLATION Prepare metal inlet collar for fabric connection.............................
Track Rack. * Track Racks are not lockable
 The Track Rack s unique staggered, sliding hook design creates the greatest parking efficiency while still providing easy access to any particular bike. When adding or removing a bike to the rack, simply
Trak-Slider Instructions
 Trak-Slider Instructions 1/4-20 x 3/4" Hex Head Bolt 1/4-20 Flanged Hex Nut Gusset 1/4-20 x 1/2" Allen Cap Screw 1/4-20 Nylock Nut Rivet 1/4-20 x 3/8" Pan Head Phillips Machine Screw 1/4 USS Flat Washer
Assembly Instructions
 10' and 12' Octagon Cedar Gazebo Assembly Instructions Toll Free: 866.768.8465 Hours: 9-5 Monday-Friday EST www.homeplacestructures.com Package ships as shown revised 06/20/09 Cedar Gazebo Assembly Instructions
BIKE FILE (301)
") B IK E F I L E High Efficiency The Bike File is our most space efficient u-lock compatible product. Sturdy sliding hangers allow nine bikes to be securely stored in an eight-foot section while allowing
B IK E F I L E High Efficiency The Bike File is our most space efficient u-lock compatible product. Sturdy sliding hangers allow nine bikes to be securely stored in an eight-foot section while allowing
Heavy-Duty Bypass Track System
 Heavy-Duty Bypass Track System Please Note: This track system must be installed with the screws going into a solid surface such as studs or a header. Due to the spacing of the holes on these Brackets,
INSTALLATION INSTRUCTIONS DODGE RAM 2 & 4WD 1500 PART # P5058
 INSTALLATION INSTRUCTIONS 2009-13 DODGE RAM 2 & 4WD 1500 PART # P5058 PARTS LIST: Qty Description Qty Description 1 Grille Guard 12 12-1.75mm Hex Nuts 2 Upper Frame Mounting s (for trucks without tow hooks
PFW 6870 Installation Guide Installationsanleitung, Guía de Instalacíon, Guida de Installazione, Guide d Installation, Installatie gids
 Installationsanleitung, Guía de Instalacíon, Guida de Installazione, Guide d Installation, Installatie gids Max: 72kg/160lbs MOUIN_PFW6870_V01 Included Components Wall Mount (Qty 1) Bracket (Qty 1 Pair)
Showpiece Cabinet Integrated Stand For 32" - 52" LCD HDTV
 Showpiece Cabinet Integrated Stand For 32" - 52" LCD HDTV Installation and Assembly Instructions 2009 Incredible Technologies Inc. Version 0109 Showpiece Cabinet Integrated Stand for 32" - 52" LCD HDTV
Sliding Glass Door Assembly and Installation Guide
 Sliding Glass Door Assembly and Installation Guide Index Door System Components and Hardware The following components are needed to complete the installation of your Sliding Patio Door unit. Check all
Frameless Inline Door QCI5250
 INSTALLATION INSTRUCTIONS Frameless Inline Door QCI5250 FRAMELESS PANEL / DOOR / PANEL QCI0249 REV. 3 Page 1 Certified 10/12/12 Parts List with pivot hinges *Quantities may vary. QCI0249 REV. 3 Page 2
SB-WM-ART1-M-BL. Weatherproof Universal Single-Arm Articulating Mount for Medium Displays INSTALLATION MANUAL
 SB-WM-ART1-M-BL Weatherproof Universal Single-Arm Articulating Mount for Medium Displays INSTALLATION MANUAL WARNING The maximum weight of this wall mount is 90 lbs (41 kg). Use with heavier than the maximum
Gared Pro-S Portable Backstop
 Models: 9616 & 9618 Installation, Operation and Maintenance Instructions Please read all instructions before attempting installation or operation of these units SAVE THESE INSTRUCTIONS FOR FUTURE USE PUBLICATION
Installation Manual for Metal Emperor Lockers
 P a g e 1 Table of Contents Page General Notes and Tools Required 2-3 Assemble Shelves with Coat Hooks/Coat Rods 4 Fastening Chart 5 Knock Down Locker Assembly (Banks of Three) 6-12 Appendix A: Dress End
Stainless Steel 95C34 Series
 Stainless Steel 95C34 Series Toilet Partition Installation Manual PHONE: FAX: 866-317-2786 ATTENTION DO NOT MIX FASTENER PACKS EACH FASTENER PACK HAS THE NECESSARY BOLTS, BARRELS AND SCREWS TO INSTALL
INSTALLATION INSTRUCTION
 INSTALLATION INSTRUCTION Plastic Laminate Series contents page 1030 TrimLineSeries...2-21 1040 DesigerSeries...2-21 Urinal Screens, Benches, Shower Seats...22-31 2030 TrimLineSeries Maximum Privacy...32-47
DX-TVMLPTB03. Low-Profile TV Wall Mount ASSEMBLY GUIDE. For either wood-stud or concrete wall installations
 ASSEMBLY GUIDE DX-TVMLPTB03 Low-Profile TV Wall Mount For either wood-stud or concrete wall installations Safety information and specifications...2 Tools needed...........................3 Package contents......................3
INSTALLATION INSTRUCTIONS
 INSTALLATION INSTRUCTIONS Special-Lite Restroom Partitions IMPORTANT - BEFORE YOU START... 1. Read through these installation instructions first to understand the order of work. 2. Check all components
INSTALLATION INSTRUCTIONS GRILLE GUARD RAM 1500 PART # 5058/5058-2
 INSTALLATION INSTRUCTIONS GRILLE GUARD PART # 5058/5058-2 PARTS LIST: Qty Description Qty Description 1 Grille Guard 8 12-1.75mm x 35mm Hex Bolts 2 Upper Frame Mounting s (for trucks without tow hooks
Installation Instructions for Vista Air Vertically Folding Walls
 Installation Instructions for Vista Air Vertically Folding Walls Use these instructions in conjunction with your shop drawings to see the specifics that are particular to the model you are installing.
MSP-DCCPGSU Large Screen Static Display Mount
 INSTALLATION INSTRUCTIONS Large Screen Static Display Mount The Large Screen Static Display Mount () is a quick disconnect mounting solution for large flat panel displays. The mount self-adjusts for the
Assembly Instructions
 InTandem Table System November 20 InTandem Table System - Worksurface #4 x/" 4 wood screw power beam Tools Provided T-0 Extended Torx Driver T-25 Torx Driver Additional Tools Required Soft protective
GlideRite Retractable Cover System For Hot Spot Spas (SE & SLX only)
") List of Contents Quantity Description 12 #10 x 1 ½ Flat Head Phillips Screw (see pg. 2) 2 #10 x ½ Pan Head Phillips Screw (see pg. 2) 8 ¼ x 2 ½ Lag Bolt (see pg. 2) 7 ¼ 20 x 5 / 8 Hex Head Bolt (see pg.
List of Contents Quantity Description 12 #10 x 1 ½ Flat Head Phillips Screw (see pg. 2) 2 #10 x ½ Pan Head Phillips Screw (see pg. 2) 8 ¼ x 2 ½ Lag Bolt (see pg. 2) 7 ¼ 20 x 5 / 8 Hex Head Bolt (see pg.
Assembly Instructions 10 X 10 Aluminum Frame Building
 Assembly Instructions 10 X 10 Aluminum Frame Building 27 97 9 8 47 36 74 52 10 10 X 10 Square Building W/ Dome Includes: The Steel Entry Door with a Dead Bolt Lock assembly and Aluminum Door Frame. Metal
Kawasaki Teryx 750 Cab Kit* Caution: Before using this product, read this manual and follow all Safety Instructions.
 Owner s Manual Model: Kawasaki Teryx 750 Kawasaki Teryx 750 Cab Kit* Caution: Before using this product, read this manual and follow all Safety Instructions. Safety Instructions Cab Kit Contents Hardware
Cellar Hanger ASSEMBLY INSTRUCTIONS
 Cellar Hanger ASSEMBLY INSTRUCTIONS CELLAR HANGER Recommended Tools Drill with 1/8 and 1/4 Drill Bits, 1-1/8 Forstner Bit or 1-1/8 Spade Bit, and Phillips Bit 9/16, 7/16, and 5/8 Combination Wrench Socket
Frameless Inline Door QCI5248
 INSTALLATION INSTRUCTIONS Frameless Inline Door QCI5248 FRAMELESS PANEL / DOOR / PANEL QCI5248 REV. 0 Page 1 Certified 06/16/2016 Parts List with glass to glass hinges *Quantities may vary. **Support Bar
ESA-300 Full Breakout
 Interior View 0 Installation Instructions For use with ESA II Controler DORMA AUTOMATICS, Inc. 94 Sherwood Drive Toll-Free: 877-67-6 DL844-00 Lake Bluff, IL 60044 Fax: 877-4-7999 Rev. /07 Tools Required:
TOOL LIST FOR TAILGATE HIDDEN LATCH & LINK ASSY FOR FORD FLARESIDE TRUCKS
 TOOL LIST FOR TAILGATE HIDDEN LATCH & LINK ASSY FOR 53-87 FORD FLARESIDE TRUCKS Vise Grip Clamps C-clamps Sharpie Marker Ball Peen Hammer Center Punch 3/8 or 1/2 Drill 5/32, 7/32, 9/32, and 3/8 Drill Bits
Installation Instructions Kit, Base Rail Bracket Part # 31413
 Installation Instructions Kit, Base Rail Bracket Part # 31413 Dealer / Installer: End User: Provide a copy of these Instructions to the end user of this product. These Instructions provide important operating
96 (Standard Length)
") Setbacks 96 (Standard Length) Bike Files may be lined up end to end to fill the available space. A 36 aisle should be left between the ends of bikes in racks facing one another. 36 aisle 50 Installation
Setbacks 96 (Standard Length) Bike Files may be lined up end to end to fill the available space. A 36 aisle should be left between the ends of bikes in racks facing one another. 36 aisle 50 Installation
TrendWall Floor-To-Ceiling Panels Installation Instruction
 TrendWall Floor-To-Ceiling Panels Installation Instruction TrendWall Components Covered by this Instruction: Crown (and accessories) Floor Plate Solid Panel Filler Panel Wall Channel Door Section Pilaster
Pillar Hanger ASSEMBLY INSTRUCTIONS
 Pillar Hanger ASSEMBLY INSTRUCTIONS PILLAR HANGER Recommended Tools Drill with 1/8, 1/4, and 3/8 Drill Bits, 1-1/8 Forstner Bit or 1-1/8 Spade Bit, and Phillips Bit 9/16 and 5/8 Combination Wrench Socket
The Festival Assembly Instructions
 The Festival Assembly Instructions Toll Free: 866.768.8465 Hours: 9-5 Monday-Friday EST www.homeplacestructures.com Package ships as shown CONTACT INFORMATION: HomePlace Structures 301 Commerce Drive New
MAKO TM CASH DISPENSER
 MAKO TM CASH DISPENSER PEDESTAL INSTALLATION GUIDE VERSION 2.0 TDN 0702-000 2/99 CORPORATE HEADQUARTERS: RMA (RETURN MATERIAL AUTHORIZATION) RETURN ADDRESS: 522 E. Railroad Street 2405 B Street Long Beach,