|
|
|
- Buck Campbell
- 5 years ago
- Views:
Transcription


1

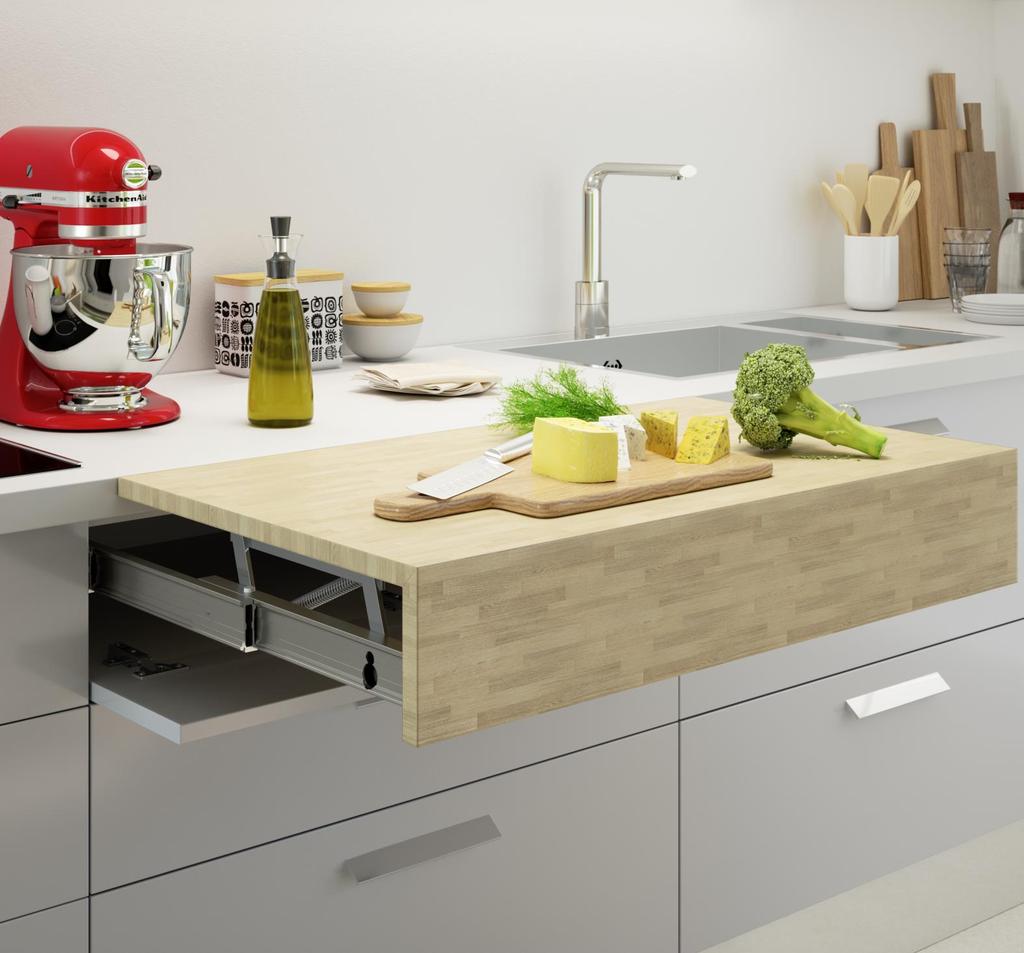
2 INTRODUCTION Intuitive furniture is the need of the hour. In times like these where every extra square meter is considered as good as gold, installing versatile home interiors becomes crucial. You will be surprised at the amount of functionality that can be brought in by some intelligent furniture fittings. Häfele brings to you its spontaneous range of Extendable Table Fittings that grants you the liberty to design your dream abode as envisaged and in fact helps create more space. These fittings simply blend into your interiors when closed but once released they end up making quite a statement. Discover Häfele s latest addition to the extendable table fitting range - OPLÀ TOP which is ideal for kitchens with small worktops thus optimizing space. Along with OPLÀ TOP, Häfele reintroduces its efficient and ergonomic extendable table fittings: LUNCH and PARTY MENSOLA. Häfele s range of extendable table fittings consists of : OPLÀ TOP (NEW) : a small fitting that enables the table top to be pulled out of the drawer unit in a manner such that it flushes with the kitchen counter-top. This fitting can be used as a small table for breakfast or as an extension to the kitchen worktops in small kitchens and kitchenettes LUNCH: a small two leaf table top fitting that can be used as a study table in rooms, as a dining table or as an extension to the kitchen worktops in small kitchens and kitchenettes etc. PARTY MENSOLA: a comparatively larger sized, four leaf, table top fitting with a higher weight carrying capacity. It is ideal for use as dining tables in kitchens, as desks in offices etc. This product communication takes you through the following details : TOPIC PAGE NO. OPLA TOP 3 Product Specifications 6 Technical Specifications 7 Installation Specifications 8-11 LUNCH 12 Product Specifications 15 Technical Specifications 16 Installation Specifications PARTY MENSOLA 19 Product Specifications 22 Technical Specifications 23 Installation Specifications ORDERING INFORMATION 30


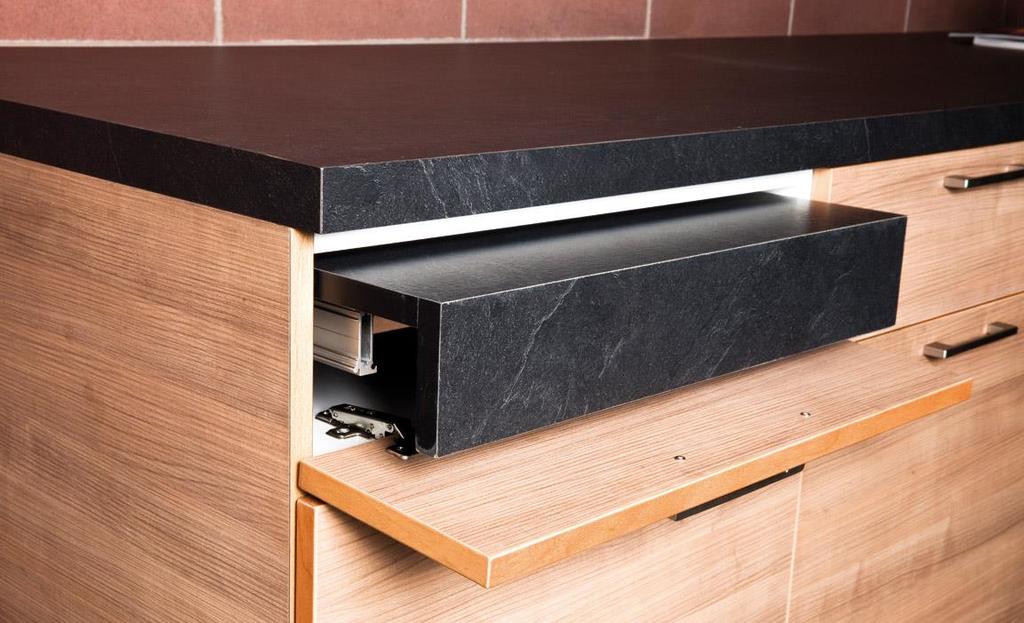
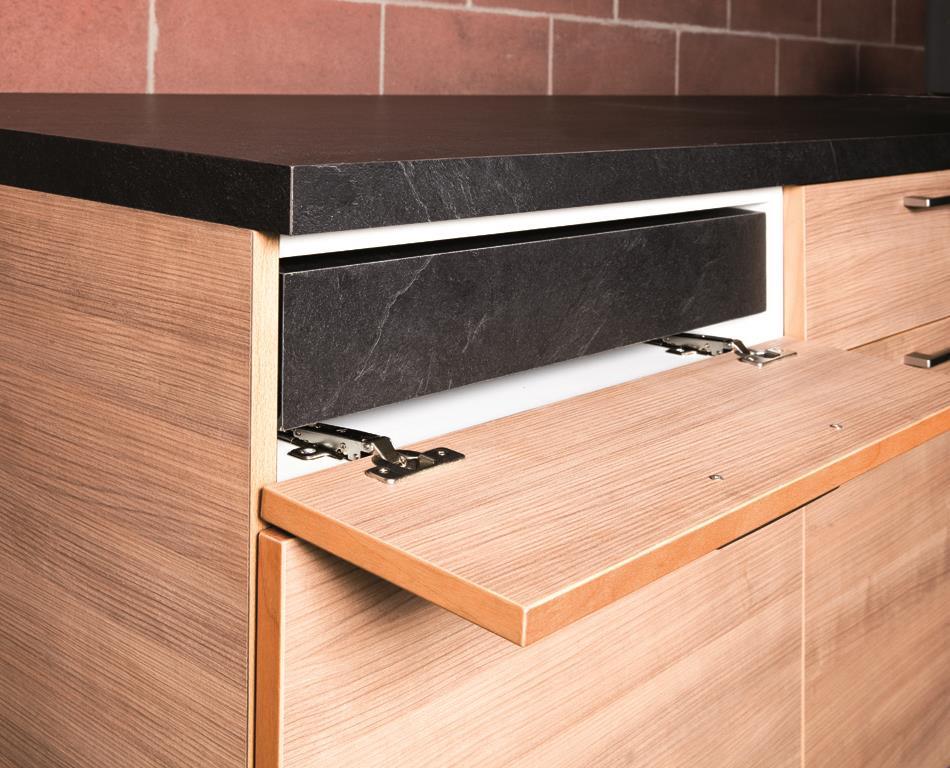
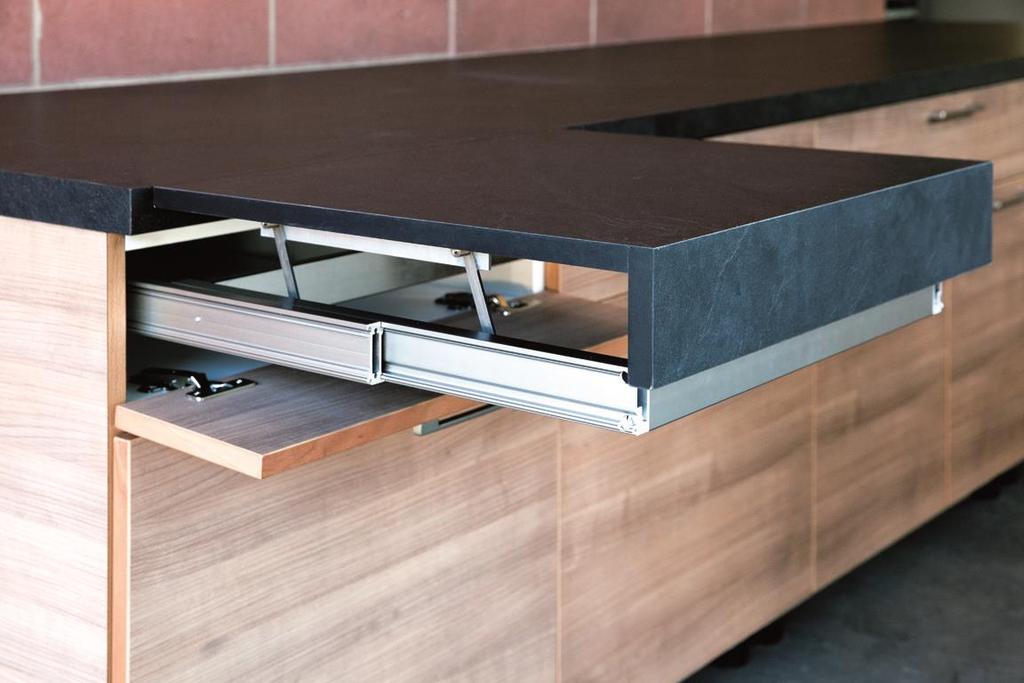
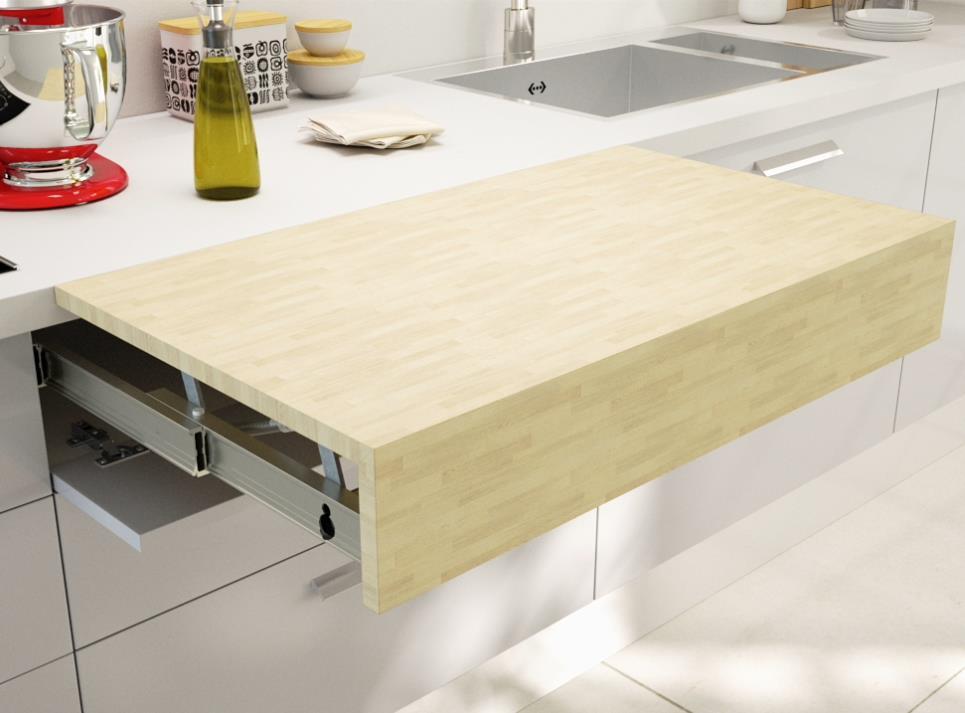
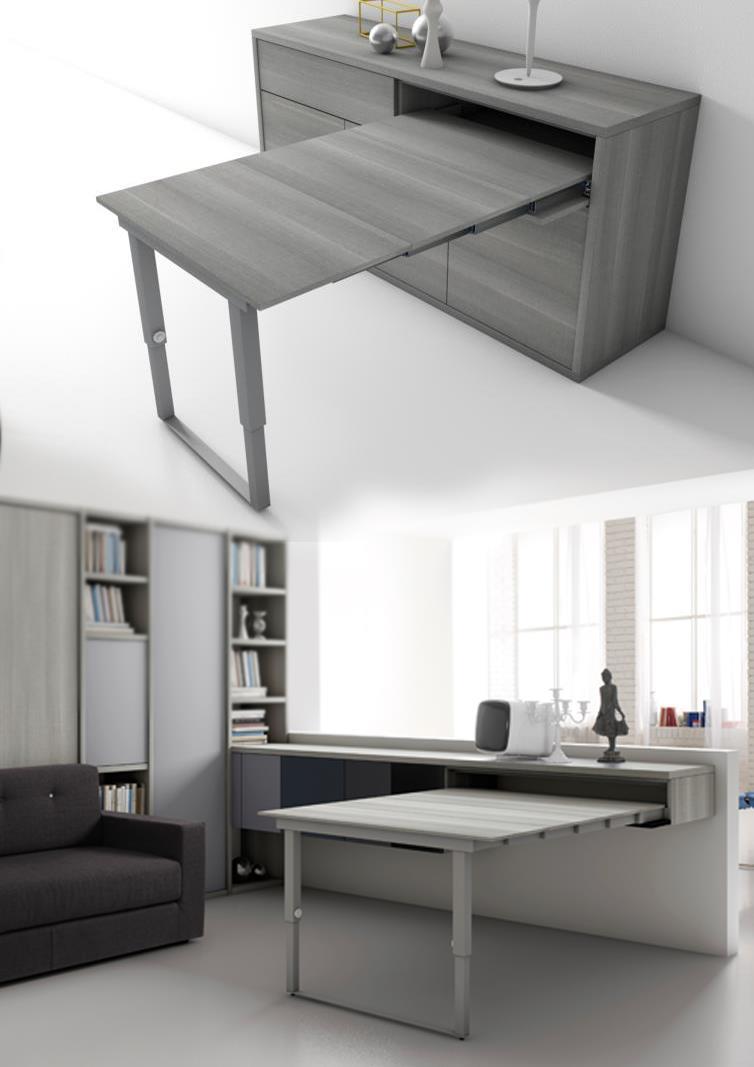
3 This space-saving system enables the table top to be pulled out of the drawer unit in a manner such that it flushes with the kitchen counter-top. Hidden inside a cabinet when not in use, OPLÀ table optimizes space in a small kitchen thus making it Ideal for kitchens with small worktops. It guarantees a very useful additional area to be used as a small table for breakfast or as an extension to the kitchen worktop in small kitchens and kitchenettes
4
5


 : Aluminum Finish :")
 x 512 mm (length) 900")

6 OPLÀTOP : & Number of plane : 1 Weight carrying capacity : 40 Kg (evenly distributed) Material (sliding guides) : Aluminum Finish : Stainless Steel Dimensions : 600 mm (width) x 512 mm (length) 900 mm (width) x 512 mm (length) Functioning Steps : Closed Panel pulled out Panel adjusts to the same height as the counter

 18 mm 20 mm 18 mm 20 mm Cabinet Internal Width (L1) =")
 = (L1-179) 385 mm 381 mm 685 mm 681 mm Bar length (L4) 445.5 mm 445.5 mm 745.")
7 S ST L2 = Space between the slides L4 = Rod Length L3 = Distance between fixing plane holes L1 = Internal Width TECHNICAL SPECIFICATIONS OPLÀ TOP: & General Dimensions: ^ ^ 89.5 mm mm Overall Height = 55 mm ^ ^ 89.5 mm mm General Cabinet Dimensions: Maximum Length Opened E E1 x H C P Specifications For Width 600 mm For Width 900 mm Side Panel Thickness (L) 18 mm 20 mm 18 mm 20 mm Cabinet Internal Width (L1) = Width (Lx2) 564 mm 560 mm 864 mm 860 mm Space between the slides (L2) = (L ) mm mm mm mm Distance between fixing plane holes (L3) = (L1-179) 385 mm 381 mm 685 mm 681 mm Bar length (L4) mm mm mm mm Plane width (Z) = L mm 555 mm 859 mm 855 mm Plane thickness (S) mm Min. vertical free space requirement (H) = 60 mm + S Min. internal free space requirement (P) Top thickness (ST) Protrusion (X) : (Refer note 2) Opening plane (E) Complete top length (E1) = (E -X) Opening mechanism (C) : mm 540 mm mm mm 530 mm mm 505 mm Note1: Side Thickness of panels can vary from mm. The table demonstrated above shows you measurements of 2 commonly used side thicknesses. Note 2: Protrusion (X) depends on the thickness of the side panel, will vary between mm.
 S (Plane thickness) I Accessories : Damper M6 Brass bushes (Dimension: Ø8 x 12 mm) M5 x 10 Screw Drilling holes")
 For cabinet sides less than 20 mm, fix the recommended number of side spacers (included) on to the external")

 Note: If the plane thickness (S) and the top thickness (ST) are equal, then the distance of the second bush from the top (Y) will be equal")
8 53 L3 (distance between fixing plane holes) 1 mm Z (plane width) INSTALLATION SPECIFICATIONS OPLÁTOP: & Plane Size : Damper D Ø 12 Ø 10 E1 (Length plane) S (Plane thickness) I Accessories : Damper M6 Brass bushes (Dimension: Ø8 x 12 mm) M5 x 10 Screw Drilling holes for Mechanism Position E = Position of M6 bushes (Dimension of hole to be drilled: Ø 8 x 12) I = Position of M5 x 10 screws for fixing the spacers (Dimension of hole to be drilled : Ø 10 x 5) For cabinet sides less than 20 mm, fix the recommended number of side spacers (included) on to the external slides (optional) J= Side spacers For: Side thickness 20 mm No Spacer Side thickness 19 mm 1 Spacer Side thickness 18 mm 2 Spacers Side thickness 17 mm 3 Spacers Side thickness 16 mm 4 Spacers Side thickness 15 mm 5 Spacers I I E E Here, S = Plane thickness ST =Top thickness Y = Distance of the second bush E from the top Y0 = 68.5 mm (fixed) Note: If the plane thickness (S) and the top thickness (ST) are equal, then the distance of the second bush from the top (Y) will be equal to Y0, i.e mm. However if there is a difference between S and ST, then in that case the difference will be added to Y0 to arrive at Y.

 As shown in the image, you need to")


9 INSTALLATION SPECIFICATIONS OPLÀ TOP: & Mounting the mechanism onto the cabinet M6 Brass Bushes (Dimension:Ø8 x 12 mm) As shown in the image, you need to drill four holes (ø 8 13 mm) on each cabinet side for installing the brass bushes. External slide Allen key M5x12 Tapered screw Fix the external slides on to the right side of the cabinet (or vice - versa) by using Socked Head Screws and use the Allen key to tighten them M6x12 Socked head cap screws Place and fix the stabilizing rod with a tapered screw to the attached external slide, as shown in the image Attach the other external slide to the left side of the cabinet (or vice-versa) and to the other end of the stabilizing rod

 M6x12 Socked head cap screws Washers")
 Drill four holes at the bottom side of the plane for")


10 INSTALLATION SPECIFICATIONS OPLÀ TOP: & Fixing the plane to the mechanism M6 Brass Bushes (Dimension:Ø8 x 12 mm) M6x12 Socked head cap screws Washers (Dimension: Ø12x1.35 ) Drill four holes at the bottom side of the plane for installing the brass bushes and two holes on the inner edge for the dampers Mount the plane on to the fixed external slides by placing the washers and using the Socked Head Screws. Tighten them using an Allen key Adjustments The position of the plane can be adjusted in order to achieve a flushed look with the table top. The plane, once partially fixed in position with the Socked Head Screws, can be adjusted vertically for it to reach the table top while the rotating wheel on the external guides can be adjusted clockwise and anti-clockwise in order to flush the plane with the table top. Once the adjustments are done, tighten the Socked Head Screws with an Allen key Attaching the spring and dampers to the fitting Dampers Spring After fixing the plane on the external guides, attach the spring below the plane on both sides, for smooth operation and insert the dampers to achieve seamless transitions of the plane

 Quantity: 12 Washer (Ø12x1.")
 Quantity: 12 Screw (M5x10 ) Quantity: 8 Side spacers Quantity: 20")

11 INSTALLATION SPECIFICATIONS OPLÀ TOP: & BOM Components Sliding guides Quantity: 2 Stabilizing rod Quantity: 1 Socked head cap screw (M6x12) Quantity: 12 Washer (Ø12x1.35 ) Quantity: 4 Tapered screw (M5x12) Quantity: 2 M6 Brass bushes (Ø8x12 mm) Quantity: 12 Screw (M5x10 ) Quantity: 8 Side spacers Quantity: 20 Springs Quantity: 2 Dampers Quantity: 2 Allen Key Quantity: 2 Using hinges for the cabinet door To mount the cabinet door, you can use any auto hinge or flap hinge with a magnetic catch of your choice, but its total height should not be more than 18 mm.


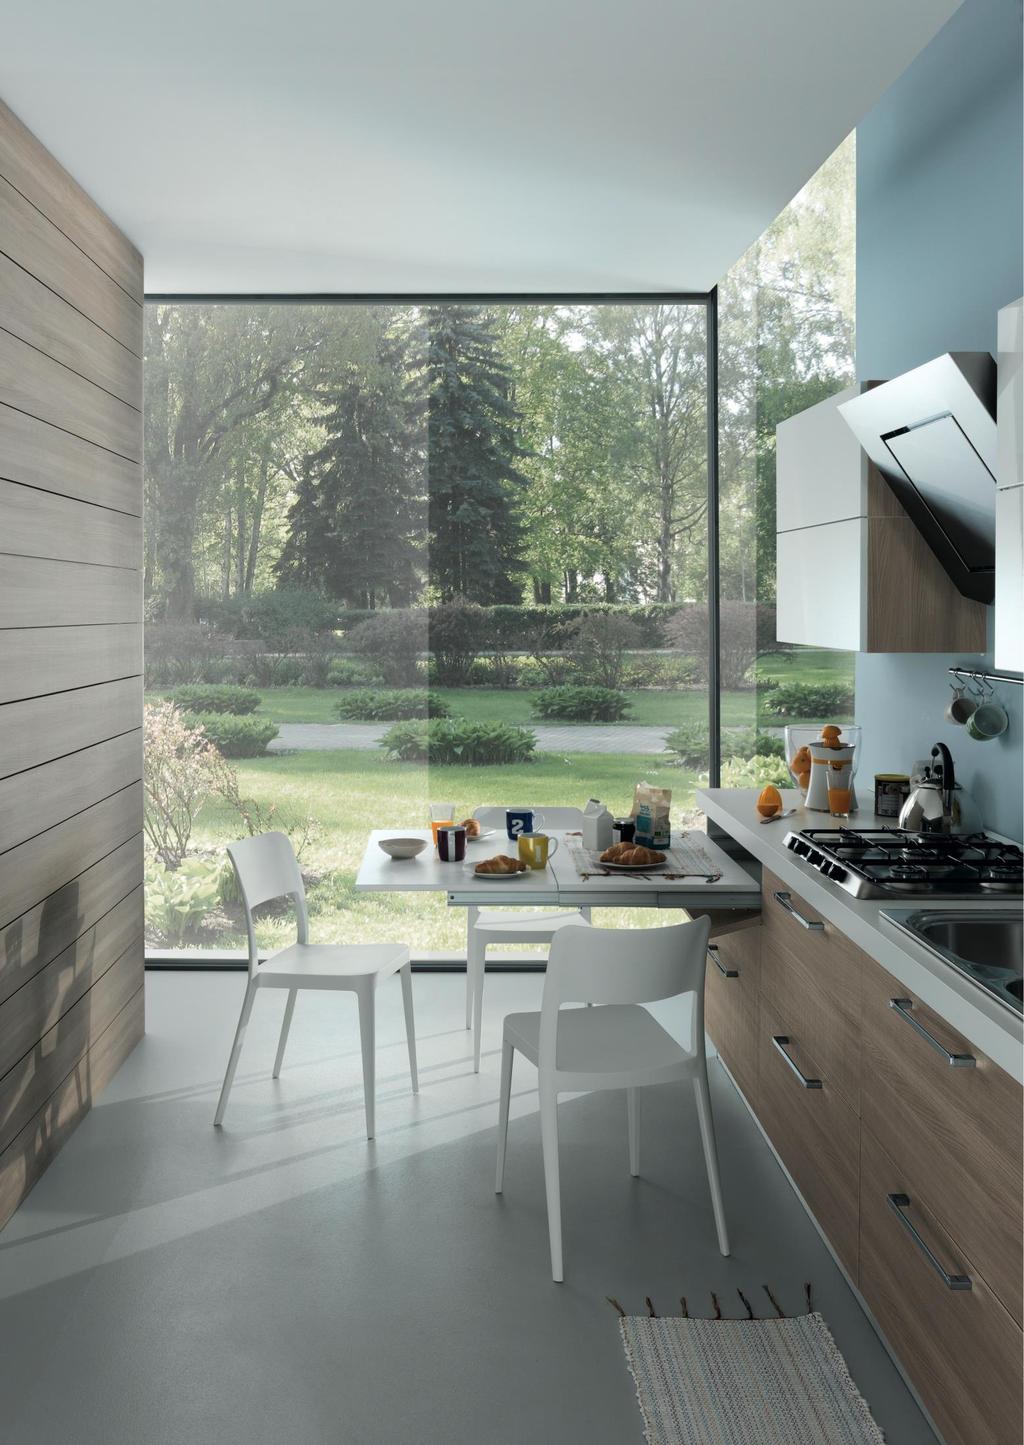
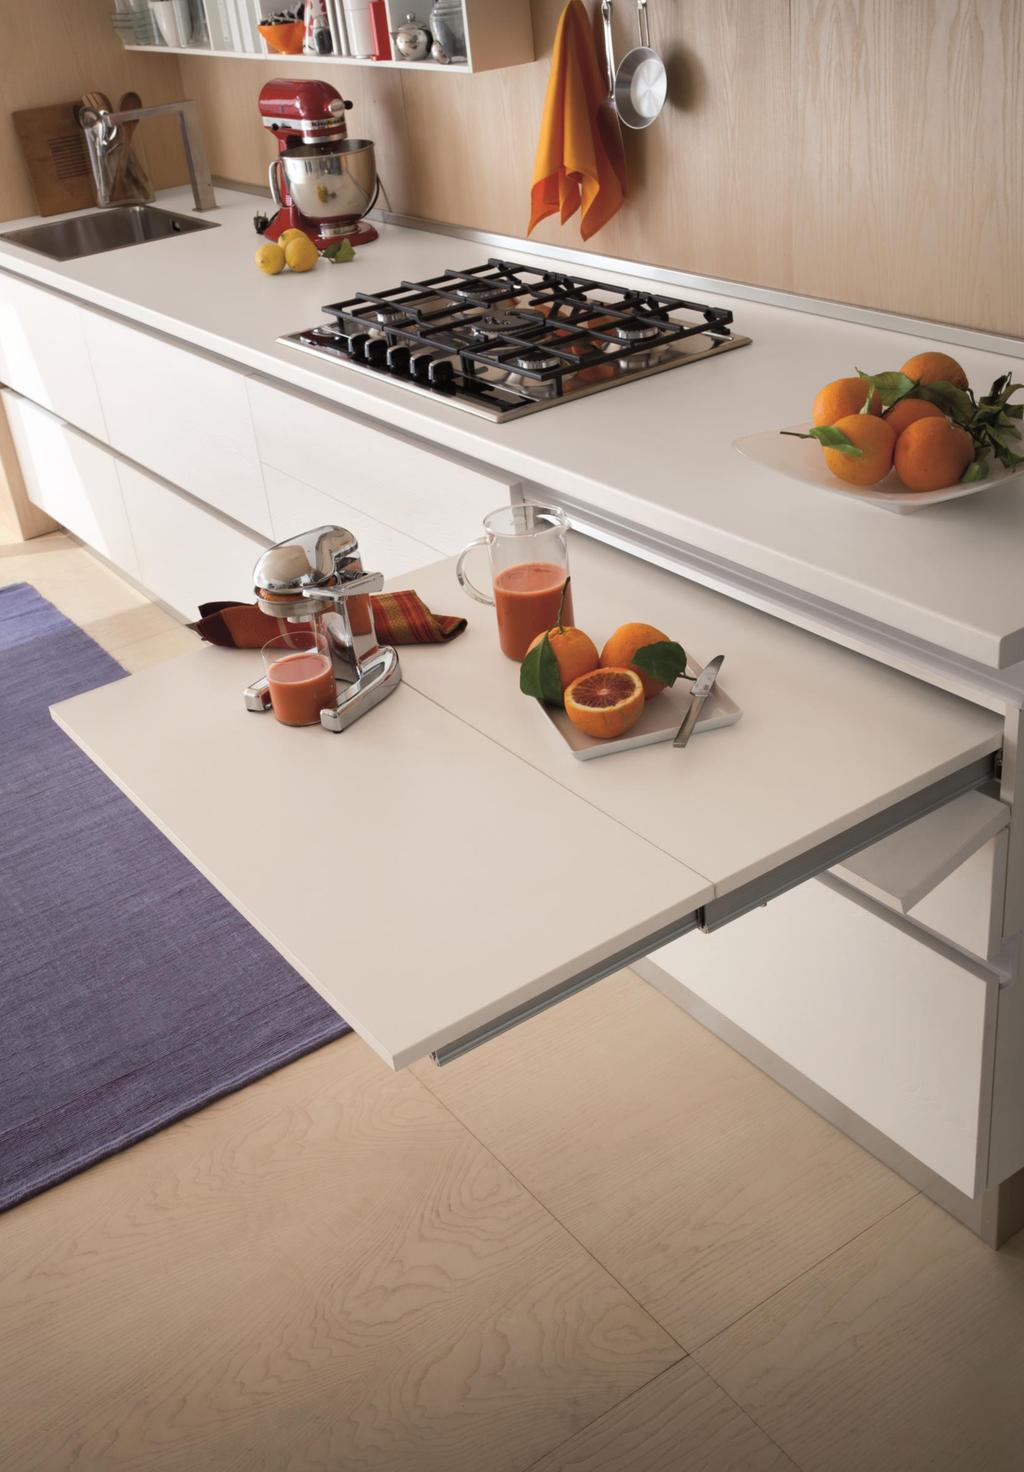
12 This space-saving system consists of a pull-out tabletop fitting stored in a space normally used for a drawer. The table fitting pulls out instantly by simply opening the hinged front of the drawer space. Created to cater to the needs of functionality in small spaces, this runner is ideal for small kitchens and kitchenettes needing a tabletop for breakfast or simply as an extension of the worktop for preparing meals.
13
14

 Material")

 Functioning Steps : Closed")

15 PRODUCT SPECIFICATIONS LUNCH : Number of planes : 2 Weight carrying capacity : 60 Kgs. (evenly distributed) Material (sliding guides) : Natural Anodised Aluminium Finish : Stainless Steel Dimensions : 600 mm (width) 969 mm (length) Functioning Steps : Closed Slides Opening Plane Tilting Push the red locking lever to close the mechanism Opened
 (B) (F) Specifications Side Panel Thickness (L) L = 15 mm L = 18 mm L =")
 : 436 mm 430 mm 426 mm Handle length (C) = A 158 412 mm 406 mm 402")
 : 18 mm 18 mm 18")
![mm Width of the planes (P) = 600 [[L 2] + 3] 567 mm 561 mm 557 mm Min.](/docs-images/86/93836777/images/16-4.jpg "vertical free space requirement (E) = 62 + [S 2] 98 mm 98 mm 98 mm Min.")

16 (D) (E) (C) (P) TECHNICAL SPECIFICATIONS LUNCH : (A) (B) (F) Specifications Side Panel Thickness (L) L = 15 mm L = 18 mm L = 20 mm Overall width (A) = 600 (L 2) : 570 mm 564 mm 560 mm Space between the slides (B) : 436 mm 430 mm 426 mm Handle length (C) = A mm 406 mm 402 mm Distance between fixing plane holes (D) = A mm 482 mm 478 mm Length of sliding guides : 789 mm 789 mm 789 mm Plane Thickness (S) : 18 mm 18 mm 18 mm Width of the planes (P) = 600 [[L 2] + 3] 567 mm 561 mm 557 mm Min. vertical free space requirement (E) = 62 + [S 2] 98 mm 98 mm 98 mm Min. internal free space requirement (F) : 540 mm 540 mm 540 mm Note: Side Thickness of panels can vary from mm. The table demonstrated above shows you measurements of 3 commonly used side thicknesses.
 on each cabinet side for installing the brass bushes.")


17 INSTALLATION SPECIFICATIONS LUNCH : Drilling measurements for external slide You need to drill four holes (ø 8 13 mm) on each cabinet side for installing the brass bushes. Brass bushes (included in the pack) Dimension: (ø 8 12 mm) Mounting the mechanism onto the cabinet Screw (M6 x12) Screw (M5 x 6) When this product is delivered to you, the sliding guides come attached as a single mechanism. Hence, in order to mount the mechanism onto the cabinet, it is necessary to first disassemble the two external slides from the rest of the mechanism. To do this, you need to unscrew the two screws in the rear of the second profile. You can now fix the external slides onto the cabinet sides using the included screws (M6 12). Lastly, insert or slide in the mechanism on the mounted external slides and tighten the two screws (one on each side of the second profile). Finally you must screw under the front part of each external slide with (M5x6) screws for additional stability.
 Dimension: (ø 8 12 mm) Screw (M6 x 60) To install the")


18 INSTALLATION SPECIFICATIONS LUNCH : Plane dimensions Brass bushes (included in the pack) Dimension: (ø 8 12 mm) Screw (M6 x 60) To install the fixed plane onto the sliding guides, you need to first drill four holes (ø 8 13 mm) under the fixed plane for fitting in the brass bushes. The fixed plane can then be mounted by inserting the screws (M6 60) properly into the holes on the central slide. Note: This system can either be mounted in a cabinet of a base unit or can be mounted in a cabinet that is suspended by the help of wall hanging brackets. In case you wish to suspend the cabinet, you will have to order the wall hanging brackets separately


 and high capacity (100 Kg")
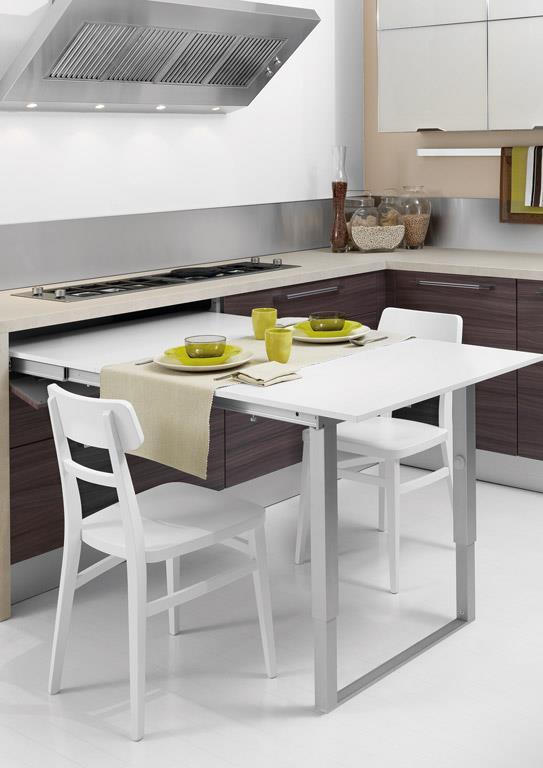
19 This new transformable system is designed and engineered down to the smallest detail. It can be mounted in a standard drawer compartment without the need for special fittings, guaranteeing a large-sized (up to approx mm) and high capacity (100 Kg equally distributed) table fitting with an integrated telescopic leg.
20
21


 : Natural Anodised")
 1794 mm")


22 PRODUCT SPECIFICATIONS PARTY MENSOLA : Number of planes : 4 Weight carrying capacity : 100 Kgs. (evenly distributed) Material (sliding guides) : Natural Anodised Aluminium Finish : Stainless Steel Dimensions : 900 mm (width) 1794 mm (length) Functioning Steps : A 2. The leg is now free to rotate 4. Pull out the lower part of the leg until you hear a click from the blocking button 1. Turn the lever as indicated 3. Turn the lever as indicated Closed Slides Opening Turning & Extending the Leg Placing the Three Free Top Panels Opened B B Push the red locking lever to close the mechanism
 (H) (F) (C) (B) (A) Specifications Side Panel Thickness (L) 15 mm 18 mm 20 mm Overall width (A) = 900 (L 2) : 870 mm")
 : 838 mm 832 mm 828 mm Complete Top Length (E) : 1794 mm 1794 mm 1794 mm Total Length Outside the Cabinet (F) :")
 = 80 + [S 4] 152 mm 152 mm 152 mm Note: Side Thickness of panels can vary from 15-20 mm.")
23 (D) (G) TECHNICAL SPECIFICATIONS PARTY MENSOLA : (B) (H) (F) (C) (B) (A) Specifications Side Panel Thickness (L) 15 mm 18 mm 20 mm Overall width (A) = 900 (L 2) : 870 mm 864 mm 860 mm Minimum Cabinet Depth (B) : 502 mm 502 mm 502 mm Minimum Cabinet Height (C) : 155 mm 155 mm 155 mm Width of the Planes (D) : 838 mm 832 mm 828 mm Complete Top Length (E) : 1794 mm 1794 mm 1794 mm Total Length Outside the Cabinet (F) : 1562 mm 1562 mm 1562 mm Table Top Height (G) : 733 mm 733 mm 733 mm Plane Thickness (S) : 18 mm 18 mm 18 mm Min. vertical free space requirement (H) = 80 + [S 4] 152 mm 152 mm 152 mm Note: Side Thickness of panels can vary from mm. The table demonstrated above shows you measurements of 3 commonly used side thicknesses.

 on each cabinet side for installing the brass bushes.")

24 INSTALLATION SPECIFICATIONS PARTY MENSOLA : Drilling measurements for slide installation Brass bushes (included in the pack) Dimension: (ø 8 12 mm) You need to drill four holes (ø 8 13 mm) on each cabinet side for installing the brass bushes. Attaching the leg to the sliding guide Screw (M6 x 12) Before installing the mechanism into the cabinet, you need to fix the extendable leg onto the sliding guide. TPS Screw (M6 x16)


25 INSTALLATION SPECIFICATIONS PARTY MENSOLA : Separating the external guide from the mechanism When this product is delivered to you, the sliding guides come attached as a single mechanism. Hence, in order to mount the mechanism onto the cabinet, it is necessary to first disassemble the two external slides from the rest of the mechanism. To do this follow the below mentioned steps. 2. Unscrew the two screws in the rear of the first central profile. 1. Unscrew the two screws under the external slide Fixing the lateral bar and external slide to the cabinet sides Lateral Bar External Slide Screw (M6 x 12) In order to mount the mechanism onto the cabinet, you will first have to fix the Lateral Bar to the internal cabinet sides using an Allen key and 4 screws (M6 12). Using the same Allen key, fix the external slide to the lateral by with another 4 screws (M6 12).


 Dimension: (ø 8 12 mm) Screw (M6 x 60) To install the fixed plane onto the sliding guides, you need to first drill")
 properly into the")

26 INSTALLATION SPECIFICATIONS PARTY MENSOLA : Mounting the mechanism onto the cabinet 1. Tighten the two screws in the rear of the first central profile. Slide in the mechanism on the mounted external slides. Tighten the screw on each side when the end of the first central slide is about 250 mm from the back of the external slide. Once that is done tighten the two screws under the external slide. 2. Tighten the two screws under the external slide Assembly of the top fixed plane Female Pin Brass bushes (included in the pack) Dimension: (ø 8 12 mm) Screw (M6 x 60) To install the fixed plane onto the sliding guides, you need to first drill four holes (ø 8 13 mm) under the fixed plane for fitting in the brass bushes. The fixed plane is then ready to be mounted on the sliding guides by inserting the four screws (M6 60) properly into the holes on the central slide. Before you assemble the fixed plane onto the sliding guide, you need to also drill three holes (as per the dimensions mentioned below) on the front side of the fixed plane (the side that will face the central plane) in order to insert the female centering pins. Side Panel Thickness 15 mm 18 mm 20 mm X 350 mm 350 mm X Distance from the edge (X) 63 mm 66 mm 68 mm
 You need to drill 3 holes in the back side of the")


27 INSTALLATION SPECIFICATIONS PARTY MENSOLA : Assembly of the top central planes (2) You need to drill 3 holes in the back side of the center planes to insert the male centering pins. These male centering pins fit perfectly into the hollow female centering pins inserted in the front side of the fixed / central planes Female Pin Male Pin Drill 3 holes in the front side of the center planes to insert the female centering pins. Assembly of the final top plane Male Pin You need to drill 3 holes in the back side of the final top plane to insert the male centering pins. Plastic Locking Clip Two plastic locking clips need to be installed under the final top plane. These locking clips get secured onto the protrusions present on either sides of the sliding guides, thereby anchoring and stabilising the entire table extension. Note: Dimensions for drilling the male and female centering pins remain the same as demonstrated in the table on pg. 17


 13-19 Dim. A Dim. B Dim. C Dim. D Dim. E Gap F Gap G Gap H 9.")


28 INSTALLATION SPECIFICATIONS PARTY MENSOLA : Alternative to using male and female centering pins for joining planes If you do not prefer using the male and female centering pins for the purpose of joining the planes, you could use hinges like in LUNCH. The two options are: Article No.: Concealed Hinge, Opening Angle180, Nickel Plated, For 13 to 19 mm thick panel For Wood Thickness (mm) Dim. A Dim. B Dim. C Dim. D Dim. E Gap F Gap G Gap H 9.6 mm 43 mm 22 mm 5.5 mm 6 mm 17.1 mm 2.4 mm 2.7 mm Article No.: Folding Leaf Hinge, Zinc Alloy, Yellow Chromatised, For 18 to 19 mm thick panel Note: The BOM for PARTY MENSOLA includes the male and female centering pins as the default option. In case you wish to install hinges, you will have to order them separately You will have to use 3 hinges to join two planes, hence you will have to order 9 hinges for connecting all the planes to each other Please keep in mind that since the planes, with the use of hinges, will be connected to each other, it will make folding and unfolding of the planes a strenuous activity


29 INSTALLATION SPECIFICATIONS PARTY MENSOLA : Using hinges for the frontal cabinet door To mount the frontal cabinet door, you can use hinges of your choice but its final height should not be more than 18 mm. Alternatively you could also use flap hinges for a flushed look as demonstrated below: Positioning of the felts under the top planes Place the 12 felts over the top of the sliding guides with the adhesive side facing upwards. Place the two central and the final top plane in their positions following the indicated sequence so that the felts get glued onto their proper positions on the bottom of the three top planes. Felts Note: This system can either be mounted in a cabinet of a base unit or can be mounted in a cabinet that is suspended by the help of wall hanging brackets. In case you wish to suspend the cabinet, you will have to order the wall hanging brackets separately
 x 512 (length) Consists of : Pair of Sliding Guides 34,100/- 505.73.")
30 ORDERING INFORMATION Extendable Table Fittings Article Number Description MRP (INR) OPLÀ TOP Dimensions: 600 mm (width) x 512 (length) Consists of : Pair of Sliding Guides Stabilizing Rod Spacers and Fastening Material 33,333/- Damper OPLÀ TOP Dimensions: 900 mm (width) x 512 (length) Consists of : Pair of Sliding Guides 34,100/ Stabilizing Rod Spacers and Fastening Material LUNCH Extension Table Fittings Dimensions: 600 mm (width) 969 mm (length) Consists of: Damper Pair of Sliding Guides Handle (can be cut to size as per the side panel thickness) Fastening Material 29,465/- Article No.: , Concealed Hinges PARTY MENSOLA Extension Table Fittings Dimensions: 900 mm (width) 1794 mm (length) Consists of: Assembled Mechanism Pair of Lateral Bar Fastening Material Plastic Locking Clips Male and Female Centering Pins 96,540/- Accessories: PARTY MENSOLA Article Number Description MRP (INR) Concealed Hinge, Opening Angle180, Nickel Plated, For 13 to 19 mm thick panel 979/ Folding Leaf Hinge, Zinc Alloy, Yellow Chromatised, For 18 to 19 mm thick panel 732/ Male and Female Centering Pins (only if additional pieces are required) 14/-
31 Häfele India Private Limited Office No. 3, Building A, BETA, I Think Techno Campus, Off J.V.L.R, Opp. Kanjurmarg East, Mumbai Tel.: Fax: New Delhi Kolkata Chennai Hyderabad Bangalore Pune Ahmedabad Srilanka Bangladesh Nepal Bhutan Toll Free Customer Care No.: SMS HAFELE to customercare@hafeleindia.com
 www.hafeleindia.com www.hafeleindia.com Silver Gold Rose Gold Graphite Dark Bronze PROFIN : ONE RANGE. MANY SOLUTIONS. 2. Stack Modular Shelving Pg. 23-32 3. Rail Door Profiles Pg. 33-41 1. Gola Profiles
FURNITURE HARDWARE & ACCESSORIES - PART 2 : SHELF SUPPORT AND SHELVING SYSTEMS
 www.hafeleindia.com FURNITURE HARDWARE & ACCESSORIES - PART 2 : SHELF SUPPORT AND SHELVING SYSTEMS ABOUT ITALIANA FERRAMENTA ITALIANA FERRAMENTA is specialized in the production of high quality accessories
FURNITURE HARDWARE & ACCESSORIES - PART 3 : LEVELLERS AND HANGERS
 www.hafeleindia.com FURNITURE HARDWARE & ACCESSORIES - PART 3 : LEVELLERS AND HANGERS ABOUT ITALIANA FERRAMENTA ITALIANA FERRAMENTA is specialized in the production of high quality accessories and ironmongery
14/08/15 AVAILABLE FROM MIDRAND RANDBURG DURBAN UMHLANGA MARGATE CAPE TOWN GHANA
 4/08/5 AVAILABLE FROM MIDRAND RANDBURG DURBAN UMHLANGA MARGATE CAPE TOWN GHANA PINETOWN BALLITO KRABY DROP DOWN with Kimana Hinges (pg 3) For further information: www.italianaferramenta.com > CATALOGUE
Furniture Fittings Concealed Hinges
 Blum Clip Top Blumotion, opening angle 110 Material: Steel cup and arm : Screw fixing Installation: Door onto carcase without tools (Clip system) Adjustment: 3 dimensional (with appropriate mounting plate)
Kitchen Fittings Hanging Cabinets and Accessories
 Cabinet hanger Knock-in version, load bearing capacity 130 kg/pair Depth adjustment Finish: Galvanized Concealed mounting of cabinet hanger behind the rear panel (Min. 16 mm free space required) Mounting
Organisational Kitchen Fittings Kitchen Cabinet Accessories
 Kitchen waste bin systems Single waste bin, capacity 1 litres Carcase width: Min. 400 mm For door mounting: For left and right hand use Installation: Screw fixing to side panel Housing: Steel, plastic
Hinges and Flap Fittings Information
 Information METALLAMAT Adjustment options Lateral adjustment Adjusting on concealed hinge + mm Height adjustment Via mounting plates adjusting ± 2 mm Depth adjustment Adjusting on concealed hinge + 4 mm,
ATTRACTION drawer. Twin-walled seel drawer. Complete. 50 Kilos resistance. indamatic. Range of concealed runners up to. self closing and soft closing.
 F U R N I T U R E F I T T I N G S M A N U F A C T U R E R Twin-walled seel drawer. Complete Range of concealed runners up to 50 Kilos resistance. indamatic self closing and soft closing. Double wall 405
In addition to this general mounting and adjustment instruction you need the fitting specification document, where the individual drilling dimensions
 Mounting and Adjustment Instruction for corner carrousel fitting In addition to this general mounting and adjustment instruction you need the fitting specification document, where the individual drilling
TRIADE MAXI TRIADE MAXI WOOD AND GLASS SHELVING SYSTEMS
 is the concealed mounting bracket for shelves minimum 0mm thick. It has been conceived to simplify the shelf installation. It is provided with three indipendent adjustments: 1) VERTICAL Before installing
Locks and Catches Catches and Furniture Bolts
 Magnetic catch with low noise closure Material: Plastic housing Version: with closed surface and internal magnet, magnets no viewable : Press fixing Pull 0. kg, for drilling hole Ø8 mm white 26.01.701
Technical Documentation Lift Advanced
 Technical Documentation Lift Advanced 1 1 Introduction... 4 2 Basic Information... 5 2.1 Hinge Recommendations... 5 Lift Advanced HF... 5 Lift Advanced HK... 5 2.2 Usage of Aluminium Fronts... 5 19mm Aluminium
Mounting Instructions Item No.: /521/522/420/421/422
 Mounting Instructions Item No.: 541.35.520/521/522/420/421/422 Revolving Corner Unit In addition to these general mounting instructions, please refer to the fitting instructions, where the individual drilling
Section 11 CABLE & ROD SYSTEMS, SIGN FIXING & SIGN STANDOFFS. Web. acrylicdesign.ie .
 Section 11 CABLE & ROD SYSTEMS, SIGN FIXING & SIGN STANDOFFS Web. acrylicdesign.ie Email. sales@acrylicdesign.ie Acrylic Design 2004-2015 Mobile Cable System Components Single panel clamp Stand Off for
Material Packing Brown Grey Pine Black White
 RTA Connectors Minifix Zinc alloy For housing: 12 or 18 Bolt hole: Ø 7 or 8, depending on choice of connecting bolt Drilling distance B: Distance from centre of Minifix housing to shelf front edge (24
Copyright Black Box Corporation. All rights reserved Park Drive Lawrence, PA Fax
 Copyright 2003. Black Box Corporation. All rights reserved. 1000 Park Drive Lawrence, PA 15055-1018 724-746-5500 Fax 724-746-0746 JULY 2003 RM3010A RM315-R2 RM323-R2 RM329 RM451 RM457 RM3020A RM316 RM324-R2
CROWN IMPERIAL ASSEMBLY INSTRUCTIONS
 CROWN IMPERIAL ASSEMBLY INSTRUCTIONS Standard Drawer Box Page 1 of 14 Standard Drawer Box Parts Parts Supplied B C D A E F G Page 2 of 14 Part Letter Part Name Quantity 300-600 Deep Pan A Base Panel 1
MADE IN GERMANY. Developed & Manufactured By. Drawer Runner System.
 MADE IN GERMANY Developed & Manufactured By Drawer Runner System www.hafele.com MADE IN GERMANY Overview BASI SYSTEM Drawer sides with multi-functional benefi ts The Moovit drawer system provides completely
Hawko Zhaga Systems Installation Instructions
 Hawko Zhaga Systems Installation Instructions Contents Wire Suspension Installation 4 Recessed Brackets 6 Fixed Suspension Rods 8 Swivel Suspension Rods 10 Surface Mount Ceiling 12 Surface Mount Wall
ACCESSORIES. Wooden Dowels. Fasteners. Miscellaneous. Shelf Supports
 ACCESSORIES ACCESSORIES Fasteners PMI has a variety of Fasteners and Connectors for any application. Euro-Bolts, Spiral Cam Connectors, Screws and Sleeves - we have your solution! Shelf Supports Assorted
Ready To Go SimpleSpec tm. Installation Manual. For more information, please visit 3-form.com or call
 Contents Overview ( 1) 3/8" Varia Panel = Cable Tensioner with Cover Plate KIT Stainless Steel: 3-15-1636-K Black Oxide: 3-15-2005-K Cable Tensioner with Cover Plate SS: 3-15-1636 BO: 3-15-2005 + M8 Thread
WALL UNIT. Assembly Guide Lift. 288 x x x x 800
 Assembly uide 288 x 600 288 x 800 360 x 600 360 x 800 or Internal Use: I.WR.INS.032_WKIN00121_WALL_600_800_Lift_Rev2.indd Assembly uide EORE YOU START INSTALLATION SHOULD E PERORMED Y A OMPETENT PERSON
Assembly guide. Before you start...check the pack and make sure all the components and fixings are included see. Tools required (Not Supplied)
") M FITT-054 Issue - Issue Assembly guide Soft close 800 LH Pull & Swing Corner Unit Component parts Tools required (Not Supplied) B S O T Spirit level Cross Head Screwdriver Tape measure E&F J P* Allen
M FITT-054 Issue - Issue Assembly guide Soft close 800 LH Pull & Swing Corner Unit Component parts Tools required (Not Supplied) B S O T Spirit level Cross Head Screwdriver Tape measure E&F J P* Allen
Table and Furniture Base Fittings Plinth Adjusting Fittings
 Adjusting screw with M8 or M thread Rigid, for glide inserts, steel thread Finish/Colour: Black, thread galvanized Version: With acceptance Ø30 mm Thread M8 650.22.381 M 650.22.382 Packing: 1 or 0 pcs.
Installation Operation Care
 Installation Operation Care Palm Beach Polysatin Shutters CONTENTS Getting Started Installation Overview...1 Unpacking...1 Tools and Materials Needed...1 Fasteners...2 Frame Assembly Assemble the Frame
FA968800TX Manchester Fireplace Console - Brown Mahogany Assembly Instructions
 FA968800TX Manchester Fireplace Console - Brown Mahogany Assembly Instructions For assistance with assembly, contact: Southern Enterprises Inc. Customer Service 1-800-633-5096 service@seidal.com www.seidal.com
Merloni Elettrodomestici. Technical Fitting Manual FRIDGE. Language Issue/Edition Page GB /
 GB 99-11-03/01 1-38 Index 1 CONFORMITY OF APPLIANCE 3 2 MAIN ASSEMBLY TYPES 3 2.1 Under worktop 3 2.2 Double door 10 2.3 Combined 14 2.4 Single door Fridge or single door Freezer 19 2.5 Combined free-standing
Company profile WITH EVERY STEP WE MAKE, WE WANT TO KEEP CONTRIBUTING TO OUR GOOD REPUTATION OF A STRONG CZECH MANUFACTURER OF LOCKS AND FITTINGS
 Furniture fittings Company profile TOKOZ a.s. is a company working in the field of security mechanisms for more than 90 years. Thanks to years of experience we have become real experts on manufacturing
Bi-Pass And Bi-Fold Sliders
 Bi-Passs and Bi-Fold Sliders Installation Guide Bi-Pass And Bi-Fold Sliders Tools required: Hand Drill Counter Sink Drill BitSet #8 Philips Screw Driver Measuring Tape Level What s Included: Panels with
TECHNICAL MANUAL - CONSTRUCTION AND INSTALLATION
 ERGON T.E. LIVING SLIM TECHNICAL MANUAL - CONSTRUCTION AND INSTALLATION Swinging-sliding door with connecting rod on frame JAMB THICKNESS 30/40 mm CELEGON S.r.l. - Via G. Galilei, 6-30035 Mirano (Venezia)
Folding Concepta 25. Flush when closed, completely open. Hardware for bi-folding cabinet pocket doors up to 25 kg (55 lbs.) per door.
 per door.") Flush when closed, completely open. Hardware for bi-folding cabinet pocket doors up to 25 kg (55 lbs.) per door. Description Flush cabinet fronts open fully end to end with HAWA-Folding Concepta 25. Two
Flush when closed, completely open. Hardware for bi-folding cabinet pocket doors up to 25 kg (55 lbs.) per door. Description Flush cabinet fronts open fully end to end with HAWA-Folding Concepta 25. Two
Composition of kit SC3140 SC3110 SC3100 SC3140 SC3120. KF-SC31-R0_EN PAGE 2 of 15. max mm. max. 100 kg. 10 mm
 Composition of kit SC3140 SC3100 SC3140 SC3120 max. 100 kg 10 mm max. 2700 mm KF-SC31-R0_EN PAGE 2 of 15 important information KF-SC31-R0_EN PAGE 3 of 15 DIAGRAM OF WALL OPENING AND CROSS-SECTION Lv LG
Selekta Pro 2000 Fast assembly hinges for office and commercial furniture
 Fast assembly hinges for office and commercial furniture 99 The program opening angles 180 and 270 with pre-mounted pan-head screws with eccentric height adjustment ± 2 mm with eccentric overlay adjustment
Bathroom Installation Guide
 Bathroom Installation Guide Please read instructions carefully and check products before starting. Products should be fitted/installed by an experienced and competent fitter, failure to do so may invalidate
INSTALLATION INSTRUCTIONS
 INSTALLATION INSTRUCTIONS HIGH PRESSUE LAMINATE (HPL) TOILET PARTITIONS 1030 TrimLineSeries 1040 DesignerSeries Includes continuous hardware option.65. IMPORTANT: Storage and Handling Information on last
FOLDING POCKET DOOR SYSTEM ALT-F Installation Manual
 FOLDING POCKET DOOR SYSTEM ALT-F Installation Manual Thank you for selecting our product. Before starting installation, please read this manual thoroughly to ensure correct installation. Please keep this
STANDARD 430E Series. Bottom mounted full extension drawer runners 430E E E E E E E E E4000
 STANDARD 430E Series Bottom mounted full extension drawer runners Specifications Runner 430E8000 430E7500 430E7000 430E6500 430E6000 430E5500 430E5000 430E4500 430E4000 430E3500 430E3000 430E2500 Nominal
Mounting Instructions Item No.: xxx
 Mounting Instructions Item No.: 271.92.xxx Wall-Beds 1 General Notes For vertical folding beds Successful and safe installation of Bed-Lift and construction of casework requires a professional skill level
LINK OPENING SYSTEMS FOR FLAP AND DROP DOWN DOORS. click 2 INSTALLATION UNHANDED MECHANISM COVER CAP INSERTION
 INSTALLATION Recommended fi xing countersunk head wood screws Ø 4 x 18 mm for door 18 mm min. thick. Pre-inserted screw Ø 3,5 x 16 mm - PZ2. The door bracket has to be placed with the narrow part of the
#916 CLASSIC 16 GUN CABINET ASSEMBLY INSTRUCTIONS
 Thank you for purchasing this quality product. A list of PARTS and INSTRUCTIONS is included to assist you. Unpack and identify all parts included on the Parts List and Hardware List. If parts are missing,
MOVENTO. The Evolution of Motion
 The Evolution of Motion is the latest advancement in concealed runner technology. It brings together all of the features, innovations and benefits that Blum has developed since first manufacturing drawer
Allora ALCOVE ENCLOSURE INSTALLATION BEFORE INSTALLATION CHECK THAT YOUR ALLORA SHOWER ENCLOSURE SYSTEM IS UNDAMAGED
 Allora ALCOVE ENCLOSURE INSTALLATION BEFORE INSTALLATION CHECK THAT YOUR ALLORA SHOWER ENCLOSURE SYSTEM IS UNDAMAGED ALCOVE SHOWER Your shower can be installed to open Left hand or Right hand by rotating
ASSEMBLY AND ADJUSTMENT
 EDGE MONITOR ARM EDGE Rev A 2/17 Model EDGE-SLV Model EDGE-BLK Model EDGE-WHT ASSEMBLY AND ADJUSTMENT EDGE MONITOR ARM PARTS AND TOOLS PLEASE REVIEW these instructions before beginning the assembly and
Melamine Plastic Laminate. Toilet Partition Installation Manual
 Melamine Plastic Laminate Toilet Partition Installation Manual PHONE: FAX: 1-866-317-2786 ATTENTION DO NOT MIX FASTENER PACKS EACH FASTENER PACK HAS THE NECESSARY BOLTS, BARRELS AND SCREWS TO INSTALL THE
Preference Collection and Treatment Console INSTALLATION GUIDE
 Preference Collection 5580.69 and 5580.96 Treatment Console INSTALLATION GUIDE WARNING Failure to install the 5580 as described in this installation guide may cause the unit to collapse, resulting in serious
MANUAL e130. Wallstation
 MANUAL 07.29.13 e130 Wallstation The Enovate Medical e130 Wallstation was designed to set a new standard in quality. Enovate Medical s goal is to provide a wallstation that is ready for years of use,
Utensil sets. 15" wide cabinets with 1-1/2" frames and 5/8" thick drawer sides. 21" wide cabinets with 1-1/2" frames and 5/8" thick drawer sides
 Utensil sets a 15" wide cabinets with 1-1/2" frames and 5/8" thick drawer sides 11-5/8" 6-1/8" 4-1/4" 18" Drawer length ZHI.457FI1A 21" Drawer length ZHI.533FI1A 21" wide cabinets with 1-1/2" frames and
INSTALLATION INSTRUCTIONS
 INSTALLATION INSTRUCTIONS SOLID PHENOLIC TOILET PARTITIONS 1080 DuraLineSeries Class-A Fire Rated Includes Institutional Hardware Option.67 IMPORTANT: Storage and Handling Information on last page. Review
Cardo DOOR & RETURN SHOWER ENCLOSURE INSTALLATION PLEASE READ THESE INSTRUCTIONS CAREFULLY.
 Cardo DOOR & RETURN SHOWER ENCLOSURE INSTALLATION PLEASE READ THESE INSTRUCTIONS CAREFULLY. IT IS RECOMMENDED TO USE A TRAINED SHOWER INSTALLER FOR THIS SHOWER TO OBTAIN THE BEST INSTALLATION. D Square
STANDARD. Drawer runner program. Perfecting motion.
 STANDARD Drawer runner program Perfecting motion STANDARD drawer runners Table of Contents Blum STANDARD drawer runners apply proven technology built upon years of experience to ensure a solid performance
ASOLA - THETA ISTRUZIONI DI MONTAGGIO FITTING INSTRUCTIONS INSTRUCTIONS DE MONTAGE INSTRUCCIONES DE MONTAJE MONTAGEANLEITUNG. IMPBAT Rev.
 ASOLA - THETA I F E D ISTRUZIONI DI MONTAGGIO FITTING INSTRUCTIONS INSTRUCTIONS DE MONTAGE INSTRUCCIONES DE MONTAJE MONTAGEANLEITUNG IMPBAT08-2 - Rev. 00 "THETA" FITTING INSTRUCTIONS SUB-FRAME Correct
Handleless Uni t Specification
 Handleless Uni t Specification QUALITY BRITISH CRAFTSMANSHIP 160 Handless Fitting Guide - Parts Index & Base Cabinet Section 1 150 325 DRAWER 870 870 870 73 73 720 720 DOOR 685 325 2 x
Fig. 2 DORMA-Glas Stand/Issue 02/03 Seite/Page 1/7
 FSW Installation instructions Track rail 75 x 72 mm 1. Ceiling substructure and installation of the track rail (Fig. 1): The track rail must be bolted over its entire length (including the stacking track
Assembly and Installation Guide
 The Easy Hang Closet Solution SM Install Your elfa In An Instant. Enjoy The Benefits For A Lifetime. Basic Tools For elfa Assembly and Installation Level Hand or Power Drill Drill Bits 1/8", 3/8", 5/16"
GEZE SLIDING DOOR SYSTEMS
 GEZE Perlan 140 Multi-faceted uses with individual accessories The discrete design supports every required room effect and makes the sliding door system with its accessories a guarantee for elegant and
Simple, practical and economical. Largest range on the market. SlowMotion Zeta optional
 256 Affordable drawer system Simple, practical and economical Largest range on the market SlowMotion Zeta optional Uniset Uniset drawers are used by a very large base of Kitchen and bathroom manufacturers
Connector Technology, Shelf Supports Connection Fittings
 MODULAR Connection fitting for recess mounting Finish: Burnished : For recess mounting The plate should allways be installed so that the supporting plate butts against the end of the recess. For rapid
INSTALLATION GUIDE DUOFUSE GARDEN GATE
 Installation guide nr.: Version Publication date MOVO- 0008 V2 1/04/2015 INSTALLATION GUIDE DUOFUSE GARDEN GATE The Duofuse wood composite garden gate is much more durable than a wooden gate, and correct
EDGE2 DUAL MONITOR ARM
 EDGE2 DUAL MONITOR ARM EDGE2 Rev A 2/17 Model EDGE2-SLV Model EDGE2-BLK Model EDGE2-WHT ASSEMBLY AND ADJUSTMENT EDGE2 DUAL MONITOR ARM PARTS AND TOOLS PLEASE REVIEW these instructions before beginning
Door Hinges Drill-in Hinges
 Drill-in hinge StarTec Frame part For timber lining frames For rebated doors Maintenance-free friction bearing To use in combination with receiver Max. door weight: 40 kg Knuckle: Ø15 mm Drilling bit Ø7.2
PREASSEMBLED ELEMENTS FOR LIFTING AND SLIDING DOORS
 PROFILE SYSTEM PRE-ASSEMBLED ELEMENTS FOR LIFTING AND SLIDING DOORS s r ood gni d i l s dna gni t f i l r o f s t neme l e de l bme s s a - er P PREASSEMBLED ELEMENTS FOR LIFTING AND SLIDING DOORS MINITEC
Follow these steps to assemble your Hiddenbed 1 Construct the 3 main parts 2 Assemble them together 3 Add a mattress. YOUR HIDDENBED IS READY! 2
 Mounting Instructions Item No.: 271.97.300 Hiddenbed Furniture parts supplied by the customer Follow these steps to assemble your Hiddenbed 1 Construct the 3 main parts 2 Assemble them together 3 Add a
Hardware Fitting Accessories Bolts
 Lever action flush bolt With slide Width: 19 mm Stroke (a): 25 mm 1 Flush bolt 1 Set of fastening material With lever arm Width: 19 mm Stroke (a): 18 mm 1 Flush bolt 1 Set of fastening material Stainless
35mm 110 Deg. Concealed Hinge with Mounting Plate. 35mm 110 Deg. Soft Closing Concealed Hinge. 26mm 95 Deg. Concealed Hinge with Mounting Plate
 35mm 110 Deg. Concealed Hinge with Mounting Plate Most economical of our 35mm concealed hinges. 386 41102 00 386 41102 08 386 41102 15 Slide-on Full overlay Self Closing Slide-on Half overlay Self Closing
INSTALLATION INSTRUCTION RRU DOUBLE LIGHT POLE MOUNT
 INSTALLATION INSTRUCTION RRU Double Light Pole Mount for installation of two RRU units on mast, towers or other vertical structures. CUE DEE YOUR INNOVATIVE PARTNER 1 CONTENTS 1. PRODUCT COVERED IN THIS
Section 1. Kitchen installation. Base cabinets
 Section 1 Kitchen installation Base cabinets Pre-build - Cabinet leg... page 16 Pre-build - Alternative cabinet leg... page 18 Pre-build - Cabinets.... page 19 Pre-build - Corner base cabinet centre upright
XL-GC03 Sliding Door Lock Installation Manual PAT XL-GC06 Sliding Door Hanger Installation Manual XL-GC08 Sliding Door Lock Guide Installation Manual
 XL-GC0 Sliding Door Lock Installation Manual PAT XL-GC0 Sliding Door Hanger Installation Manual XL-GC0 Sliding Door Lock Guide Installation Manual Read all instructions carefully before installation. Before
Quick Fit Installation Guide Retractable Screen - Single Door
 Quick Fit Installation Guide Retractable Screen - Single Door 1 REMOVE KIT PARTS FROM SHIPPING TUBE 15 Mounting screws 1 Housing end cap screw 2 Handles 1 Housing end cap 1 Bushing 1 Pull bar end cap 2
Mast Solutions Document/Installation Manual
 Mast Solutions Document/Installation Manual The Mast family from Veritas is the perfect answer to movable and stationery partitions and room dividers, and hinged doors. This system is extremely versatile
Installation Instructions
 Supafold Slide Aside System Three Fold Room Divider Installation Instructions Distinctive Doors Ltd Supafold Slide Aside Internal Folding System IMPORTANT: Before proceeding with the installation, and
Quill Stop V2 Installation Guide 11/16/2014
 Thank you for purchasing the Quill Stop for the Sieg X3 (Grizzly G0463) and SX3 (Grizzly G0619) mills. Your feedback is always appreciated. Please email questions and comments to gregpriest@cox.net. What
Installers guide Deadbolt 02.
 Installers guide Deadbolt 02. version 0.7.1 Specifications Model igloohome Smart Deadbolt 02 Material Zinc Alloy Current Rating (Standby) ~30uA Current Rating (Active) ~200mA Batteries 4 x AA Alkaline
INSTALLATION INSTRUCTIONS
 INSTALLATION INSTRUCTIONS SOLID PHENOLIC TOILET PARTITIONS 1080 DuraLine Series 1180 DuraLine Series Class-A Fire Rated IMPORTANT: Review these instructions thoroughly prior to installation. FLOOR ANCHORED
K15.12 ROLLENBAND K15 DOORS
 K15 DOORS 01.04.2015 Waregemstraat 5-9870 Zulte - Belgium - T. +32 9 388 88 81 - F. +32 9 388 88 21 - commercial@sobinco.com - www.sobinco.com CONTENTS 1. General characteristics....03 2. Application range....03
TRUE TECHNICAL SERVICE MANUAL - ALL MODELS. DOORS/DRAWERS/LIDS
 DOORS/DRAWERS/LIDS 55 56 NOTES DOORS/DRAWERS/LIDS Springs 97 TORSION SPRING REPLACEMENT GDM RADIUS FRONT - SWING DOOR INSTALLATION INSTRUCTIONS Tools Required (2) - 1 8" drift Punch (forged) Needle-Nose
Weatherfold 4s 50, 75 & 100
 Codes Weatherfold 4s 50, 75 & 100 Brio Australia P: +61 2 87186718 W: brio.com.au E: sales@brio.com.au Brio RMD UK Ltd. P: +44 191 2291224 W: briouk.com E: sales@briouk.com INSTBWS1 REV D - NOV 2011 Brio
TANDEM plus BLUMOTION
 TANDEM plus BLUMOTION Premium Concealed Runners for Wood Drawers TANDEM plus BLUMOTION TANDEM plus BLUMOTION brings together all of the features, innovations and benefits that Blum has developed since
TECHNICAL MANUAL - CONSTRUCTION AND INSTALLATION
 ERGON T.E. LIVING SLIM TECHNICAL MANUAL - CONSTRUCTION AND INSTALLATION Swinging-sliding door with connecting rod on frame JAMB THICKNESS 30/40 mm CELEGON S.r.l. - Via G. Galilei, 6-30035 Mirano (Venezia)
Custom Wood Frame Overlay for Glass Doors Installation Instructions
 MARVEL CUSTOM WOOD FRAME OVERLAY FOR GLASS DOORS Custom Wood Frame Overlay for Glass Doors Installation Instructions Wine Cellars 6SWC 6SWCE 61WC 61WCM 66SWC (2 required) 66SWCE (2 required) Beverage Centers
INSTALLATION INSTRUCTIONS
 INSTALLATION INSTRUCTIONS HIGH PRESSUE LAMINATE (HPL) TOILET PARTITIONS 1030 TrimLineSeries 1040 DesignerSeries Includes continuous hardware option.65. IMPORTANT: Storage and Handling Information on last
Pedestal Desk IMPORTANT NOTE Carefully remove all the parts from the carton and put them individually on a soft cloth to prevent scratches
 88 5549 181 Pedestal Desk IMPORTANT NOTE Carefully remove all the parts from the carton and put them individually on a soft cloth to prevent scratches or other damage occurring to the parts. We have taken
GlideRite Retractable Cover System For Hot Spot Spas (SE & SLX only)
") List of Contents Quantity Description 12 #10 x 1 ½ Flat Head Phillips Screw (see pg. 2) 2 #10 x ½ Pan Head Phillips Screw (see pg. 2) 8 ¼ x 2 ½ Lag Bolt (see pg. 2) 7 ¼ 20 x 5 / 8 Hex Head Bolt (see pg.
List of Contents Quantity Description 12 #10 x 1 ½ Flat Head Phillips Screw (see pg. 2) 2 #10 x ½ Pan Head Phillips Screw (see pg. 2) 8 ¼ x 2 ½ Lag Bolt (see pg. 2) 7 ¼ 20 x 5 / 8 Hex Head Bolt (see pg.
MUTO COMFORT DORMOTION XL 150/80 L 80
 MUTO COMFORT DORMOTION XL 150/80 L 80 Installation instructions - Wall mount with DORMOTION ( ) TABLE OF CONTENTS Closer overall Overview Intended use Wall requirements and fittings Safety instructions
NEWS Part. N /0 MINITEC NEWS
 NEWS 2009 Part. N 95.0423/0 MINITEC NEWS 2009 1 TABLE OF CONTENT INTRODUCTION CONTENTS 3 END CAP Z WITH HAMMER TAPS 3 END CAP 45X45 VA 4 ANGLE 25 GD-Z 4 ANGLE 45X90 GD-Z 5 ANGLE 90 GD-Z 5 HINGE 19 S 6
ASSEMBLY INSTRUCTIONS FOR SL500A AND SL500AL
 ASSEMBLY INSTRUCTIONS FOR SL500A AND SL500AL January 2013 The SL500A is a square upright glass cabinet with a single hinged lockable door. It has five adjustable shelves plus the base. It also has an optional
ZARGEN AND INTEGRA ZARGEN & INTEGRA STEEL DRAWER SYSTEMS.
 ZARGEN AND INTEGRA ZARGEN & INTEGRA STEEL DRAWER SYSTEMS Zargen and Integra steel drawer systems provide flexibility to please the most demanding design needs. www.grassusa.com Zargen and Integra Drawer
Preference Collection 5580 Treatment Console INSTALLATION GUIDE
 Preference Collection 5580 Treatment Console INSTALLATION GUIDE 0 WARNING Failure to install the 5580 as described in this installation guide may cause the unit to collapse, resulting in serious injury
GlideRite Retractable Cover System For HotSpring & Tiger River Spas (except Classic & pre-2000 Landmark Spas)
") List of Contents Quantity Description 12 #10 x 1 ½ Flat Head Phillips Screw (see pg. 2) 2 #10 x ½ Pan Head Phillips Screw (see pg. 2) 8 ¼ x 2 ½ Lag Bolt (see pg. 2) 7 ¼ 20 x 5 / 8 Hex Head Bolt (see pg.
List of Contents Quantity Description 12 #10 x 1 ½ Flat Head Phillips Screw (see pg. 2) 2 #10 x ½ Pan Head Phillips Screw (see pg. 2) 8 ¼ x 2 ½ Lag Bolt (see pg. 2) 7 ¼ 20 x 5 / 8 Hex Head Bolt (see pg.
Tried-and-tested quality.
 Tried-and-tested quality. Rugged single and full-extension drawer slides in tried-and-tested quality for top requirements. www.grass.at, info@grass.eu Roller slides Tried-and-tested quality and functionality.
RH-412 STEEL DOORS INSTALLATION INSTRUCTIONS
 RH-412 STEEL DOORS INSTALLATION INSTRUCTIONS By following the steps outlined below, the assembly, installation and adjustment of the steel doors, will be a simple process. Let s start with the Driver Side.
a.k.a. casegoods instructions
 a.k.a. casegoods instructions a a.k.a. workwall installation IMPORTANT NOTES Failure to install product according to installation instruction will result in loss of warranty. Tools required for assembly
Interior Equipment/Shop Fittings
 Interior Equipment/ Contents Room and Frontwall Systems DIFLEX Adjusting foot for raised floors Hook-in profile Hook-in profile Eilox SHOPTEC Shopfitting system Wall channel Bracket Column Accessories
R-EVO MANUAL. English
 R-EVO MANUAL English 1 ENGLISH VERSION Adjusting the holster for your revolver With versatility, refined design, high quality, elegance and resistance - R-EVO, the new GR Holster for revolvers, supplies
Kitchen Installation Manual
 Kitchen Installation Manual June 2018 www.howdens.com 2 www.howdens.com Section pages Introduction... page 4 Supplied products... page 4 Guide - Hints and tips... page 5 Cabinet installation fittings...
Lift-off hinge. Rising hinge. Standard hinge. Heavy duty hinge. Parliament hinge. Spring hinge. Double action spring hinge. Concealed mortise hinge
 Door Hinges Contents Butt hinges Lift-off hinge Rising hinge Standard hinge Heavy duty hinge Parliament hinge Spring hinge Double action spring hinge Concealed hinges Concealed mortise hinge Pivot door
INSTALLATION INSTRUCTIONS RH 412 STEEL DOORS
 By following the steps outlined below, the assembly, installation and adjustment of the steel doors, will be a simple process. Let s start with the Driver Side. Note: Having the hood open makes the job
aluminium profile system
 aluminium profile system 63 AME System aluminium profiles overview series profiles introduction 80x80 x80 x80/180 x Aluminium profiles are provided with longitudinal grooves which can be used in conjunction
J. Base 1 pc. 1 pc. P. Shelf 2 pcs. Gate Leg. 1 pc. Head Cap Bolt 13 pcs. (+1 extra) Cam Lock Screw. Cam Lock. 20 pcs. (+1 extra)
 Cam Lock Screw. Cam Lock. 20 pcs. (+1 extra)") 88 5023 95C Kitchen Island with Breakfast Bar IMPORTANT NOTE Carefully remove all the parts from the carton and put them individually on a soft cloth to prevent scratches or other damages occuring to the
88 5023 95C Kitchen Island with Breakfast Bar IMPORTANT NOTE Carefully remove all the parts from the carton and put them individually on a soft cloth to prevent scratches or other damages occuring to the
Sentinel Series Cigar Humidor End Tables
 Sentinel Series Cigar Humidor End Tables Assembly Instructions Models: Sentinel 500, 1000 and 1500 Style: Traditional SENTINEL ASSEMBLY INSTRUCTIONS Congratulations! You have purchased a superior cigar