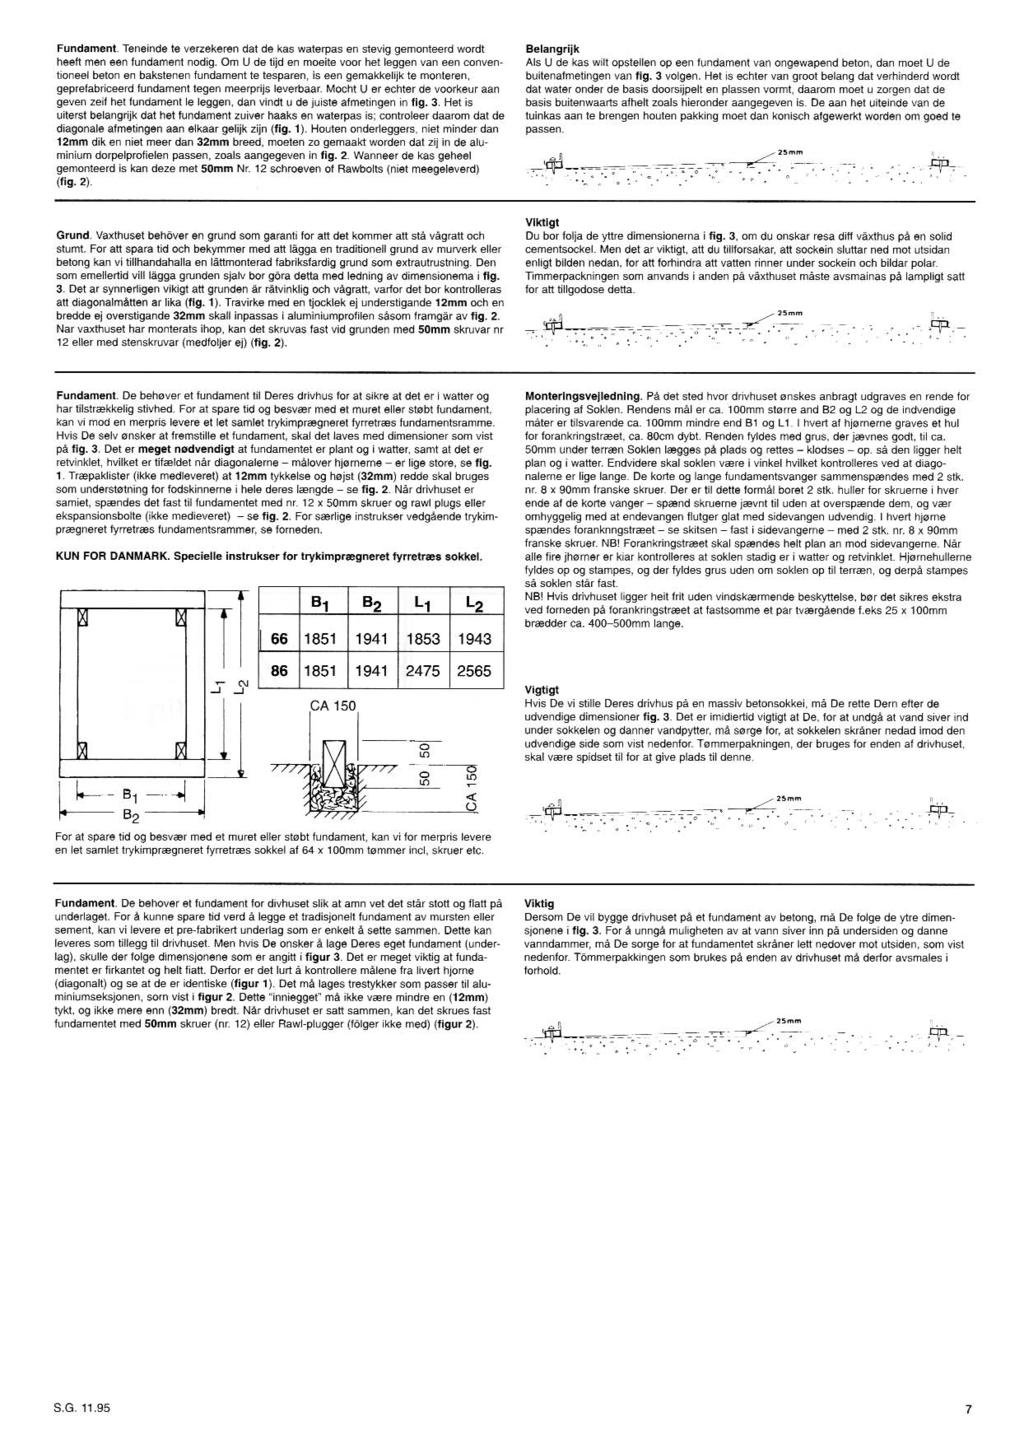
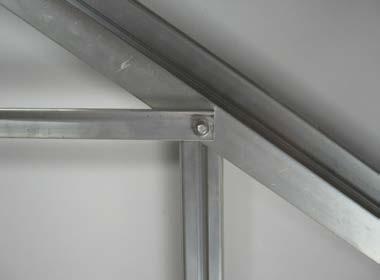
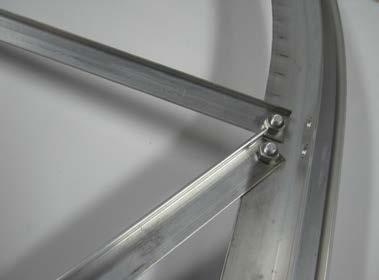
46, 66, Page /01/17
|
|
|
- Kerry Morrison
- 5 years ago
- Views:
Transcription


1 46, 66, Only Instructions Page Please refer to website for the most up to date instructions. 05/01/17
2
3
4 No. 6 x 16mm Long 711
5
6
7


8 F B D E C A
9

10 G I,H J K L
11
12 M N O P Q
13
14

15
16 EE FF
17 (333) (1753).
18 EE FF
19
20 00402
21
22 00402
23
24

25 MM. NN. 18. RR. OO OO 18. QQ.
26
27

28 Glazing Plan for 6ft Curved Greenhouses with Long Pane Toughened Glass Following Glazing and Safety Instructions in Main Assembly Instructions with the Following Exception. Z-clips and Bendable Clips are not required. The roof glass should instead be fully inserted into the ridge before the Spring Clips are fitted to secure the curved acrylic panels Code: Description: x 610 Toughened Glass x 356 Toughened Glass x 544 Toughened Glass x 300 Toughened Glass x 19 x 217 x 19 Toughened Glass x 620 x Curved Toughened Glass x 330 Toughened Glass x 895 Toughened Glass x 636 x 836 x 636 Toughened Glass x 1105 Toughened Glass x 445 Toughened Glass x 460 Clear Acrylic Panel Black Plastic Z Section 610mm Clear Plastic H Section 610mm
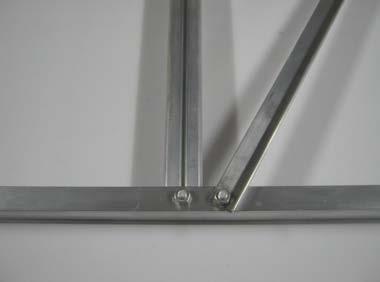
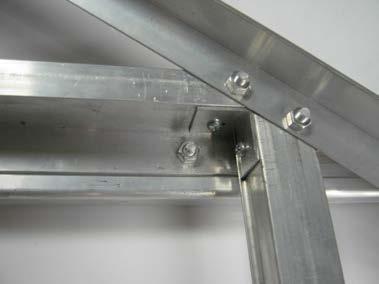
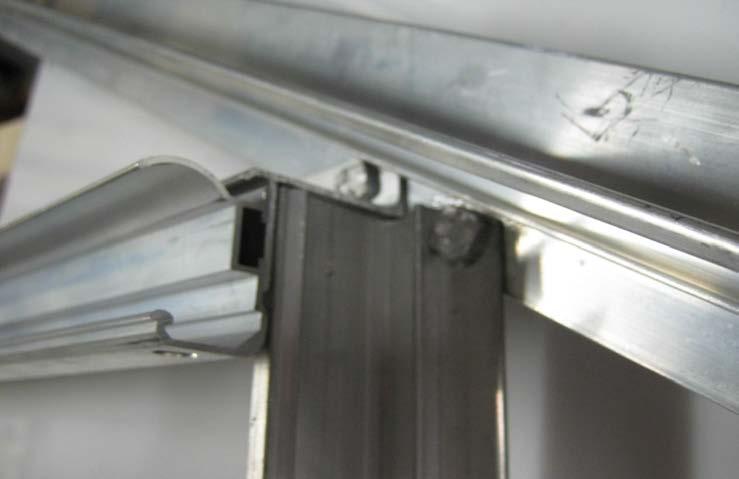
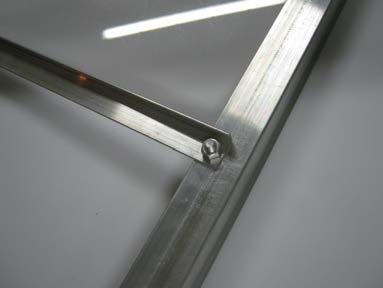
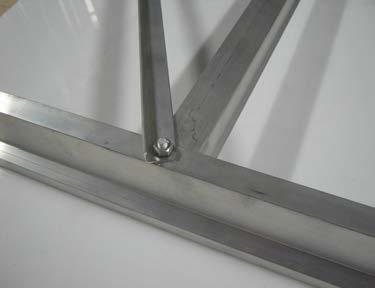
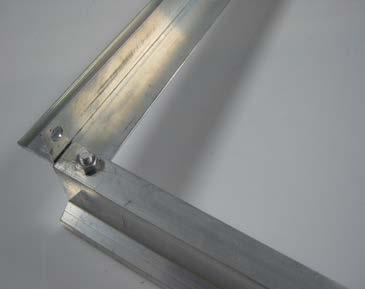
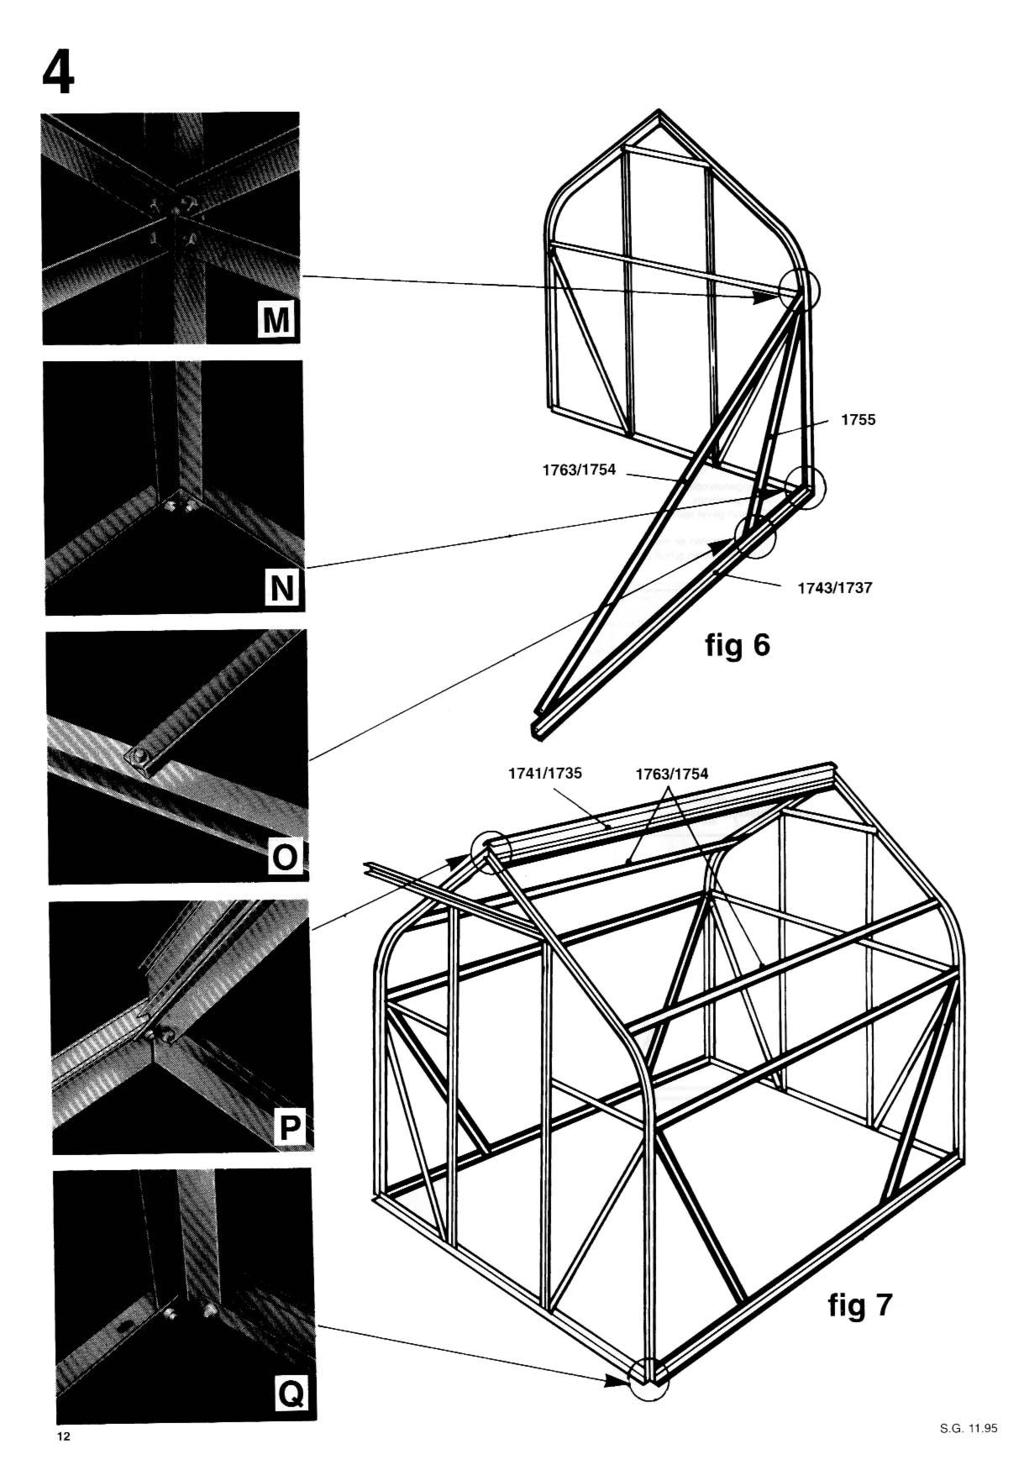
29 46 Curved Greenhouse Assembly Instructions (To be read together with Curved Greenhouse Assembly Instructions) Parts List Refer to the parts list in this amendment. Please quote the full code number if you should require spares. 1 Base Follow section 1 of the original instruction, except that dimension B is 1298 mm for the 46 greenhouse. 2 Plain Gable End Refer to section 2 of the original instruction. 3 Door Gable End Refer to section 3 of the original instruction. 4 Assembly Refer to the amended fig 6 and fig 7 in this amendment. Follow section 4 of the original instruction, except that for the 46 greenhouse the eaves brace is 12752, the side sill is 01781, the ridge is 01783, and 2, not 4, diagonal struts are used, fitted to opposite corners of the greenhouse. 5 Assembly Refer to fig VV in this amendment. Follow section 5 of the original instruction, noting that for the 46 greenhouse there is only one intermediate bar on each side, and therefore only one stabiliser The roof vent sill is replaced by which secures to the hole drilled in the right hand plain gable bar 01760GV using a self tapping screw (fig VV in this amendment), and to the right hand intermediate bar using an aluminium bolt (fig W in the original instruction.) 6 Door Refer to section 6 of the original instruction. 7 Roof Vent Refer to section 7 of the original instruction, except that the vent is assembled using M6 x 6 mm pan head screws and square nuts instead of M6 x 10 mm aluminium bolts and hex nuts. 8 Glazing Refer to section 8 of the original instruction. The glass required is listed in this amendment together with a glazing plan for the sides of the greenhouse BJG 09/07/01 29
30 Parts List Code No. Item Quantity Length mm Aluminium Bolts M6 x 10 mm Aluminium Hex Nuts M Glazing Spring Clip Glass Retaining Clip Glazing Strip 45 M 333 Door Weather Seals Door Bottom Bar Slider Self Tapping Screw 16 No. 6 x 16 mm Door Wheel Pan Head Screw 2 M4 x 16 mm Steel Hex Nut 2 M Steel Washer 2 M Mushroom Head Screw 1 M6 x 40 mm Steel Hex Nut 1 M Door Track Support Spacer Roof Vent Stay Roof Vent Stay Peg Self Tapping Screw 11 No. 6 x 6 mm Glazing Retaining Strip Side Sill Bar End Sill Bar Intermediate Glazing Bar Plain End Vertical Bar L.H Plain End Vertical Bar R.H Door End Vertical Bar L.H Door End Vertical Bar R.H Vertical Door Bar Eaves Brace Door End Horizontal Strut Plain End Horizontal Strut Diagonal Side Strut Diagonal End Strut Gable End Bar Door End L.H Gable End Bar Door End R.H Gable End Bar Plain End L.H GV Gable End Bar Plain End R.H Door Track Sill Bar Door Track Support, Vertical Door Track Support, Horizontal Door Track Ridge Bar Roof Vent Sill Roof Vent Hinge Roof Vent Bottom Bar Roof Vent Side Bar Intermediate Door Bar Top Door Bar Bottom Door Bar Door Wheel Housing Stabiliser Plain End Horizontal Strut, Top Corner Bracket Bendable Glazing Clip Pan Head Screw M6 x 6 mm Square Nut M Cropped Head Bolts M6 x 10 mm BJG 09/07/01 30
31

32 This product is delivered by a company in the Juliana Group -
 SUPREME WALL GARDEN ASSEMBLY INSTRUCTIONS 24/08/16 www.hallsgreenhouses.com Please refer to website for the most up to date instructions. SAFETY WARNING 1. Always wear protective glasses, shoes, gloves
GROWING BETTER THROUGH DESIGN. 6ft Lean-To LEAN-TO. Assembly Instructions 04/02
 GROWING BETTER THROUGH DESIGN 6ft Lean-To LEAN-TO Assembly Instructions 04/02 6ft Lean-To Greenhouse Base Plan Introduction/Tools/Contents / / Contents This is a copy of our Lean-To greenhouse base plan.
Zero Threshold TM. Hints and Tips Handbook. Birdlip. Burford. Blockley. Bourton
 Birdlip Burford Zero Threshold TM Hints and Tips Handbook Blockley www.edengreenhouses.com Bourton Customer Helpline: +44 (0)1242 676625 Mon Fri 9:00am 5:00pm mail@eden greenhouses.com EH 1.02 Dear Customer,
Gardman Lean-to Greenhouse Assembly Instructions
 Page 1 Gardman Lean-to Greenhouse Assembly Instructions Our Help Line provides support and advice to customers of Summer Garden Buildings after ordering. For advice before you buy you can phone us free
Greenhouse Assembly Instructions
 Greenhouse Assembly Instructions Our Help Line provides support and advice to customers of Summer Garden Buildings after ordering. For advice before you buy you can phone us free 7 days a week on 0800
GROWING BETTER THROUGH DESIGN. Regent Royale Rosette Regal GREENHOUSE. Assembly Instructions 04/02
 GROWING BETTER THROUGH DESIGN Regent Royale Rosette Regal GREENHOUSE Assembly Instructions 04/02 Greenhouse Base Plan We cannot emphasis how important it is to have a proper base for your Robinsons Greenhouse
GROWING BETTER THROUGH DESIGN LEAN-TO. Lean-To. Assembly Instructions 04/02
 GROWING BETTER THROUGH DESIGN Lean-To LEAN-TO Assembly Instructions 04/02 2 Lean-To Greenhouse Base Plan Introduction / Tools / Contents This is a copy of our Lean-To greenhouse base plan. Dimensions shown
Summer Greenhouses 6x8 GREENHOUSE 185. Assembly instructions for the. 6x8 Aluminium Greenhouse 185 PLEASE READ ALL INSTRUCTIONS BEFORE PROCEEDING
 Summer Greenhouses 6x8 GREENHOUSE 185 Assembly instructions for the 6x8 Aluminium Greenhouse 185 PLEASE READ ALL INSTRUCTIONS BEFORE PROCEEDING Summer Greenhouses phone us free on 0800 9777 828 CONTENTS
Side DuraRac Installation Instructions
 Side DuraRac Installation Instructions Ford Transit Med/ High Roof Full Size Van (129.9 or 147.6 Wheelbase) Frame Kit Part Number CRC 22 1020 001 Revision 1.0 11/12/14 STEP 1. These instructions are based
A (mm) B (mm) A (mm) B (mm) 14 x x x ft extension. 8ft extension ft extension ft extension 3720
 B (mm) A (mm) B (mm) 14 x x x ft extension. 8ft extension ft extension ft extension 3720") NOMINAL SIZE A (mm) B (mm) NOMINAL SIZE A (mm) B (mm) 14 x 8 2610 6ft extension 1860 14 x 10 3230 4450 14 x 12 3850 8ft extension 2480 10ft extension 3100-12ft extension 3720 Thank you for purchasing your
NOMINAL SIZE A (mm) B (mm) NOMINAL SIZE A (mm) B (mm) 14 x 8 2610 6ft extension 1860 14 x 10 3230 4450 14 x 12 3850 8ft extension 2480 10ft extension 3100-12ft extension 3720 Thank you for purchasing your
A (mm) B (mm) A (mm) B (mm) 12 x x x ft extension. 8ft extension ft extension ft extension 3720
 B (mm) A (mm) B (mm) 12 x x x ft extension. 8ft extension ft extension ft extension 3720") NOMINAL SIZE A (mm) B (mm) NOMINAL SIZE A (mm) B (mm) 12 x 8 2632 6ft extension 1860 12 x 10 3824 3252 12 x 12 3872 8ft extension 2480 10ft extension 3100-12ft extension 3720 Thank you for purchasing your
NOMINAL SIZE A (mm) B (mm) NOMINAL SIZE A (mm) B (mm) 12 x 8 2632 6ft extension 1860 12 x 10 3824 3252 12 x 12 3872 8ft extension 2480 10ft extension 3100-12ft extension 3720 Thank you for purchasing your
NOMINAL SIZE A (mm) B (mm)
 B (mm)") NOMINAL SIZE A (mm) B (mm) X 1990 X 8 198 210 X 10 3230 X 12 3850 Thank you for purchasing your new Robinsons greenhouse. We recommend you familiarise yourself with the instructions and read all safety
NOMINAL SIZE A (mm) B (mm) X 1990 X 8 198 210 X 10 3230 X 12 3850 Thank you for purchasing your new Robinsons greenhouse. We recommend you familiarise yourself with the instructions and read all safety
Cold Frame Instructions
 1 05/13 Cold Frame Instructions Thank you for purchasing your new Alton cold frame. We recommend you familiarise yourself with the instructions and read all safety information before you commence assembly.
Installation Instructions - Model V4JSD 1
 Installation Instructions - Model V4JSD 1 Support Assemblies: Parts list: (Note see enclosed cut sheet for quantities and dimensional information) A vertical structural member (1 ½ x 1 ½ modular frame)
6 Wide AMATEUR CEDAR GREENHOUSE
 6 Wide AMATEUR CEDAR GREENHOUSE ASSEMBLY INSTRUCTIONS PLEASE READ ALL INSTRUCTIONS BEFORE PROCEEDING 04/11 6 WIDE AMATEUR CEDAR GREENHOUSE Assembly Instructions Contents Page YOUR NEW GREENHOUSE Introduction
8 Wide AMATEUR CEDAR GREENHOUSE
 8 Wide AMATEUR CEDAR GREENHOUSE ASSEMBLY INSTRUCTIONS PLEASE READ ALL INSTRUCTIONS BEFORE PROCEEDING 04/11 8 WIDE AMATEUR CEDAR GREENHOUSE Assembly Instructions Contents Page YOUR NEW GREENHOUSE Introduction
8 Wide Victorian Cedar Greenhouse Assembly Instructions
 07/14 09/14 Contents: Introduction Base Preparation Overview Base Assembly Side Assembly Rear Assembly Front Assembly Frame Assembly Door Assembly Roof Assembly Half Board Installation Louvre Installation
6 Wide Evolution Cedar Greenhouse Assembly Instructions
 1 02/14 6 Wide Evolution Cedar Greenhouse Assembly Instructions Contents: Introduction Base Preparation Overview Base Assembly Side Assembly Rear Assembly Front Assembly Roof Assembly Louvre Assembly Glazing
Extrusions POLYLOCK ATTACHING EXTRUSIONS
 Extrusions POLYLOCK ATTACHING EXTRUSIONS ITEM # DESCRIPTION USES 1001 Aluminum Girt 16 lengths Used in metal end packages and sidewalls as horizontal members. Requires girt/baseboard splice (#1000). 1000
NOMINAL SIZE. A (mm) B (mm) 8 X 6 8 X 8 8 X X
 B (mm) 8 X 6 8 X 8 8 X X") NOMINAL SIZE A (mm) B (mm) X 6 1990 X 259 2610 X 10 3230 X 12 350 Thank you for purchasing your new Robinsons greenhouse. We recommend you familiarise yourself with the instructions and read all safety
NOMINAL SIZE A (mm) B (mm) X 6 1990 X 259 2610 X 10 3230 X 12 350 Thank you for purchasing your new Robinsons greenhouse. We recommend you familiarise yourself with the instructions and read all safety
Illustration Part Description Base List Weight/ Ft./ Box Number Price/S.L. S.L. S.L. Qty.
 Prices DO NOT include glazing gaskets or weathering. See Accessories sheet. Exterior Glazed Back Members for 1" Glass Illustration Part Description Base List Weight/ Ft./ Box Price/S.L. S.L. S.L. Qty.
RH-412 STEEL DOORS INSTALLATION INSTRUCTIONS
 RH-412 STEEL DOORS INSTALLATION INSTRUCTIONS By following the steps outlined below, the assembly, installation and adjustment of the steel doors, will be a simple process. Let s start with the Driver Side.
NOMINAL SIZE A (mm) B (mm)
 B (mm)") NOMINAL SIZE A (mm) B (mm) x 2012 x 8 232 1972 x 10 3252 x 12 3872 Thank you for purchasing your new Robinsons greenhouse. We recommend you familiarise yourself with the instructions and read all safety
NOMINAL SIZE A (mm) B (mm) x 2012 x 8 232 1972 x 10 3252 x 12 3872 Thank you for purchasing your new Robinsons greenhouse. We recommend you familiarise yourself with the instructions and read all safety
8 Wide Evolution Cedar Greenhouse Assembly Instructions
 02/14 8 Wide Evolution Cedar Greenhouse Assembly Instructions Contents: Introduction Base Preparation Overview Base Assembly Side Assembly Rear Assembly Front Assembly Roof Assembly Louvre Assembly Glazing
10 Wide Victorian Cedar Greenhouse Assembly Instructions
 06/15 10 Wide Victorian Cedar Greenhouse Assembly Instructions Contents: Introduction Base Preparation Overview Base Assembly Side Assembly Rear Assembly Front Assembly Frame Assembly Door Assembly Roof
Extension Standard building 03/15
 Extension Standard building 03/15 8 Wide Evolution Extension Assembly Instructions Contents: Introduction Base Preparation Overview Base Assembly Side Assembly Front Assembly Extension Installation Rear
10 Wide Victorian Cedar Greenhouse Assembly Instructions
 12/15 10 Wide Victorian Cedar Greenhouse Assembly Instructions Contents: Introduction Overview Base Preparation Side Assembly Rear Assembly Front Assembly Frame Assembly Door Installation Roof Assembly
6 5 Wide TRADITIONAL CEDAR GREENHOUSE
 6 5 Wide TRADITIONAL CEDAR GREENHOUSE ASSEMBLY INSTRUCTIONS PLEASE READ ALL INSTRUCTIONS BEFORE PROCEEDING 08/04 6 5 WIDE TRADITIONAL CEDAR GREENHOUSE Assembly Instructions Contents Page Introduction 3
IDP Entry-Fit Steel Door Frames. Installation Instructions K2A and NK2A Series Frames
 IDP Entry-Fit Steel Door Frames Installation Instructions K2A and NK2A Series Frames IDP Inc 21300 W. 8 Mile Rd. Southfield, MI 48075 1-877-645-2770 www.idpframes.com email: info@idpframes.com K2A and
W1209 1/2 10 X 12 SOLARIUM ASSEMBLY INSTRUCTIONS
 W09 / 0 X SOLARIUM ASSEMBLY INSTRUCTIONS Assembly by more than one person is suggested. Base Dimensions x 8, Largest Dimensions x (see pg.3) L:\WP5\Instructions\SOLARIUMS INSTRUCTION BOOKS\W09\ZZZ-09.W09.GP.EN.doc
CONSTRUCTION GUIDE 27ft Wide and 30ft Wide SHEEP HOUSE
 The Outside, Inside CONSTRUCTION GUIDE 27ft Wide and 30ft Wide SHEEP HOUSE Thank you for purchasing a Premier Sheep House. Please take the time to carefully read through this Construction Guide before
Assembly instructions. 6x4. Model GH1354A. 6x6. Model GH1357A. 6x8. Model GH1360A. 6x10. Walk-in Greenhouse. Model GH1363A
 ssembly instructions x Model GH x Model GH7 x8 Model GH0 x0 Model GH Walk-in Greenhouse Statement ear Customer! May we congratulate you on your new Greenhouse. We feel sure that by following the detailed
S H E D A S S E M B L Y I N S T R U C T I O N S
 T I T A N R A N G E S H E D A S S E M B L Y I N S T R U C T I O N S 6 X 4ft = 190 x 150 cm 6 X 6ft = 190 x 190 cm 6 X 8ft = 190 x 255 cm COMPONENT LIST Component illustrations are given as a visual guide
8 Wide AMATEUR CEDAR GREENHOUSE
 8 Wide AMATEUR CEDAR GREENHOUSE ASSEMBLY INSTRUCTIONS Our Help Line provides support and advice to customers of Summer Greenhouses after ordering. For advice before you buy phone us free 7 days a week
Version 2016_1.1 VICTORIAN ASSEMBLY INSTRUCTIONS. Victorian Vi-23, 34, 36
 Version 2016_1.1 VICTORIAN ASSEMBLY INSTRUCTIONS Victorian Vi-23, 34, 36 PRODUCT INFORMATION Dear customer, Thank you for buying a high-quality aluminium greenhouse. REMARKS The drawings in these instructions
10 Wide AMATEUR CEDAR GREENHOUSE
 10 Wide AMATEUR CEDAR GREENHOUSE ASSEMBLY INSTRUCTIONS PLEASE READ ALL INSTRUCTIONS BEFORE PROCEEDING 04/11 10 WIDE AMATEUR CEDAR GREENHOUSE Assembly Instructions Contents Page YOUR NEW GREENHOUSE Introduction
PRODUCT INFORMATION MANUAL SECTION: 16 FIXED METAL AWNINGS FIXED METAL AWNINGS
 FIXED METAL AWNINGS Fixed Metal Awnings BAHAMA Maximum Width Minimum Width Minimum projection Minimum Drop TS - Truss Support Maximum Overhang Minimum Overhang Unlimited 500mm TS=1601mm PS=2847mm PS=
LAWN AND GARDEN GREENHOUSE
 MODEL# OGAL-66 OGrow Walk-in 6' x ' LAWN AND GARDEN GREENHOUSE With Heavy Duty Aluminium Frame Let'sGrow Together! Thank you for purchasing the OGROW greenhouse Follow the assembly and safety instructions
DUTCH GABLE FREESTANDING CARPORT
 DUTCH GABLE FREESTANDING CARPORT STRATCO OUTBACK ASSEMBLY INSTRUCTIONS. Your complete guide to building a FREESTANDING Outback DUTCH GABLE CARPORT BEFORE YOU START Carefully read these instructions. If
10 Wide AMATEUR CEDAR GREENHOUSE
 10 Wide AMATEUR CEDAR GREENHOUSE ASSEMBLY INSTRUCTIONS Our Help Line provides support and advice to customers of Summer Greenhouses after ordering. For advice before you buy phone us free 7 days a week
6 Wide Victorian Cedar Greenhouse Assembly Instructions
 04/15 6 Wide Victorian Cedar Greenhouse Assembly Instructions Contents: Introduction Base Preparation Overview Base Assembly Side Assembly Rear Assembly Front Assembly Frame Assembly Door Assembly Roof
LAWN AND GARDEN GREENHOUSE
 MODELS# OG0AL8-BKE OGAL-8 OGrow Walk-in ' x 8' LAWN AND GARDEN GREENHOUSE With Heavy Duty Aluminium Frame MANUAL VERSION # Grow r! e h t e g To Let's Thank you for purchasing the OGROW greenhouse Follow
NOMINAL SIZE. A (mm) B (mm) 8 x 6. 8 x x x
 B (mm) 8 x 6. 8 x x x") NOMINAL SIZE A (mm) B (mm) x 6 2012 x 2632 2602 x 10 3252 x 12 372 Thank you for purchasing your new Robinsons greenhouse. We recommend you familiarise yourself with the instructions and read all safety
NOMINAL SIZE A (mm) B (mm) x 6 2012 x 2632 2602 x 10 3252 x 12 372 Thank you for purchasing your new Robinsons greenhouse. We recommend you familiarise yourself with the instructions and read all safety
8 Wide Victorian Cedar Greenhouse Assembly Instructions
 09/14 8 Wide Victorian Cedar Greenhouse Assembly Instructions Contents: Introduction Base Preparation Overview Base Assembly Side Assembly Rear Assembly Front Assembly Frame Assembly Door Assembly Roof
S H E D A S S E M B L Y I N S T R U C T I O N S
 T I T A N R A N G E S H E D A S S E M B L Y I N S T R U C T I O N S 8 X 10 ft Approx = 2550 x 3140 cm COMPONENT LIST Component illustrations are given as a visual guide only and are not in proportion PART
6 Wide Victorian Cedar Greenhouse Assembly Instructions
 01/15 6 Wide Victorian Cedar Greenhouse Assembly Instructions Contents: Introduction Overview Base Preparation Side Assembly Rear Assembly Front Assembly Frame Assembly Door Installation Roof Assembly
12 Wide Evolution Cedar Partition Assembly Instructions
 06/13 12 Wide Evolution Cedar Partition Assembly Instructions Contents: Introduction Base Preparation Side Assembly Glazing Door Installation Frame Finishing Section - 1 2 3 4 5 Page 3 4 5-6 7 8-9 10-14
NOMINAL SIZE A (mm) B (mm)
 B (mm)") NOMINAL SIZE A (mm) B (mm) 11 x 6 2012 11 x 8 2632 3536 11 x 10 3252 11 x 12 3872 Thank you for purchasing your new Robinsons greenhouse. We recommend you familiarise yourself with the instructions and
NOMINAL SIZE A (mm) B (mm) 11 x 6 2012 11 x 8 2632 3536 11 x 10 3252 11 x 12 3872 Thank you for purchasing your new Robinsons greenhouse. We recommend you familiarise yourself with the instructions and
Orion. English Garden VITAVIA 6' x 6'(3800) and 6' x 8' (5000) These revised instructions replace the original instructions provided in the kit.
 and 6' x 8' (5000) These revised instructions replace the original instructions provided in the kit.") 6' x 8' Orion English Garden VITAVIA 6' x 6'(3800) and 6' x 8' (000) These revised instructions replace the original instructions provided in the kit. 7979 State Route 36 Mount Vernon, WA 9873-369 Ph.
6' x 8' Orion English Garden VITAVIA 6' x 6'(3800) and 6' x 8' (000) These revised instructions replace the original instructions provided in the kit. 7979 State Route 36 Mount Vernon, WA 9873-369 Ph.
gabriel ash essential range
 gabriel ash essential range Dear Customer, Please read ALL these instructions before assembly. The assembly of your new Essential greenhouse requires no technical knowledge. However it is important that
W1610 1/2 10 X 16 SOLARIUM ASSEMBLY INSTRUCTIONS Assembly by more than one person is suggested.
 adlonco@hotmail.com W60 / 0 X 6 SOLARIUM ASSEMBLY INSTRUCTIONS Assembly by more than one person is suggested. Requires 96 clearance at the wall Base Dimensions 90 x 8, Largest Dimensions 90 x (see pg.3)
3 D Printer Enclosure Assembly Instructions
 3 D Printer Enclosure Assembly Instructions Tools Required: 2.5 mm Allen wrench (included) Phillips screwdriver Adjustable Wrench Parts Included: Plexiglas Back with fan and filters installed (29.5 x 35.5
12 X 18 SOLARIUM ASSEMBLY INSTRUCTIONS
 1218 12 X 18 SOLARIUM ASSEMBLY INSTRUCTIONS Assembly by more than one person is recommended. Base Dimensions 12 ½ x18 11, Largest Dimensions 13 6 x20 ½ (see pg.1) L:\WP51\Instructions\SOLARIUMS INSTRUCTION
6 Wide Victorian Cedar Greenhouse Assembly Instructions
 01/15 6 Wide Victorian Cedar Greenhouse Assembly Instructions Contents: Introduction Base Preparation Overview Base Assembly Side Assembly Rear Assembly Front Assembly Frame Assembly Door Assembly Roof
Extension Standard building 10/14
 Standard building Extension 10/14 8 Wide Victorian Cedar Greenhouse Extension Assembly Instructions Contents: Introduction Base Preparation Overview Base Assembly Side Assembly Frame Assembly Door Installation
CONSTRUCTION GUIDE 21ft Wide and 24ft Wide SHEEP HOUSE
 The Outside, Inside CONSTRUCTION GUIDE 21ft Wide and 24ft Wide SHEEP HOUSE Thank you for purchasing a Premier Sheep House. Please take the time to carefully read through this Construction Guide before
Gambrel Barn Construction Manual 8x8 through 16x24 Units
 Gambrel Barn Construction Manual 8x8 through 16x24 Units Tools Needed: Cordless drill (12V or higher) #2 square drive bit Hammer 6 step ladder Tape measure Square utility knife w/ blade & hook blade Little
CROSSBAR RAFTER ISOMETRIC
 Super Sky Products' typical glazing system consists of glass panels or "lites" which are attached to the main framing members using extruded aluminum "retainers" or "pressure plates". These retainers are
12 X 18 SOLARIUM ASSEMBLY INSTRUCTIONS
 adlonco@hotmail.com 1218 12 X 18 SOLARIUM ASSEMBLY INSTRUCTIONS Assembly by more than one person is recommended. Base Dimensions 12 ½ x18 11, Largest Dimensions 13 6 x20 ½ (see pg.1) ZZZ-18.1218.0530-1.GP.EN.HER.doc
ASSEMBLY INSTRUCTIONS FOR SL500A AND SL500AL
 ASSEMBLY INSTRUCTIONS FOR SL500A AND SL500AL January 2013 The SL500A is a square upright glass cabinet with a single hinged lockable door. It has five adjustable shelves plus the base. It also has an optional
GIRTS ON BACK OF BUILDING
 GIRTS ON BACK OF BUILDING ALL GIRTS ARE 1 1/2 SQUARE TUBE. GIRT LENGTHS FOR 12, 20, 24, AND 30 WIDE BUILDINGS: ON 12 WIDE BUILDINGS GIRTS ARE 67 3/4 LONG ON 20 WIDE BUILDINGS GIRTS ARE 56 3/4 LONG ON 24
MODULAR HIGH TUNNEL INSTALLATION GUIDE
 9615 Grandview Rd. Kansas City, MO 64137 Version: 15 JAN -2015 Sustainable Agriculture Solutions MODULAR HIGH TUNNEL INSTALLATION GUIDE (816) 444-7330 SmallFarmTools.com Thank you for purchasing a Modular
C R O S S C O U N T R Y S E R I E S C U R V E D M O D E L G R E E N H O U S E I N S T R U C T I O N S
 Contents Foreword....................................................................... 2 User Notes..................................................................... 2 List of Drawings.................................................................
Assembly Instructions 10 X 10 Aluminum Roof Support
 Assembly Instructions 10 X 10 Aluminum Roof Support Aluminum Roof Support Bolt Package 16-5/16 X 2 ¼ SS Bolt 24-5/16 X 1 SS Bolt 40-5/16 SS Nylon Lock Nuts 16-5/16 SS Flat Washers 28-4 ½ Wood Screws 36-1
INSTALLATION INSTRUCTIONS
 NOTE: Bolts should remain hand tight until all bolts are installed. STEP 1 Installing the door base (both sides). 1. Locate the outer, roll cage, mounting bolt (passenger side is shown in the illustration).
HIGH RISE Portable Restroom Assembly Instructions
 HIGH RISE Portable Restroom Assembly Instructions 2530 Xenium Lane North, Minneapolis, MN 55441 Telephone: 763-553-1900 / Fax: 763-553-1905 800-328-3332/ www.satelliteindustries.com PN 20930 REV C 8/16
GALVANIZED SHED GREEN 2.3 X 2.3 X 1.9m
 INSTRUCTIONS FOR: GALVANIZED SHED GREEN 2.3 X 2.3 X 1.9m MODEL NO: GSS2323G Thank you for purchasing a Sealey product. Manufactured to a high standard, this product will, if used according to these instructions,
E N G L I S H GARDEN SHED. Assembly Instructions. Suitable for Models WITH VARYING DEPTHS
 GARDEN SHED Assembly Instructions Suitable for Models 6' Wide 8' Wide 0' Wide WITH VARYING DEPTHS GI0003 November 0 INSTALLATION ADVICE It's Not That Difficult! The construction of your shed isn't as complicated
GlideRite Retractable Cover System For HotSpring & Tiger River Spas (except Classic & pre-2000 Landmark Spas)
") List of Contents Quantity Description 12 #10 x 1 ½ Flat Head Phillips Screw (see pg. 2) 2 #10 x ½ Pan Head Phillips Screw (see pg. 2) 8 ¼ x 2 ½ Lag Bolt (see pg. 2) 7 ¼ 20 x 5 / 8 Hex Head Bolt (see pg.
List of Contents Quantity Description 12 #10 x 1 ½ Flat Head Phillips Screw (see pg. 2) 2 #10 x ½ Pan Head Phillips Screw (see pg. 2) 8 ¼ x 2 ½ Lag Bolt (see pg. 2) 7 ¼ 20 x 5 / 8 Hex Head Bolt (see pg.
ASSEMBLY INSTRUCTIONS
 GARDEN SHED 6X5ft B/C 9400988362649 GARDEN SHED 6X7ft B/C 9400988362656 GARDEN SHED 6X9ft B/C 9400988362663 GARDEN SHED 6X1 B/C 9400988362670 111 ft ASSEMBLY INSTRUCTIONS Product specifications may change
INSTALLATION INSTRUCTIONS RH 412 STEEL DOORS
 By following the steps outlined below, the assembly, installation and adjustment of the steel doors, will be a simple process. Let s start with the Driver Side. Note: Having the hood open makes the job
ALDoor DOUBLE DOOR INSTALLATION
 Assembly Top Jamb Side Jamb Horizontal Vertical Vertical Jamb Brackets General Layout 15-20 mm Red (LHS) Cable Drum Red Cone Black Cone Black (RHS) Cable Drum 75 mm Minimum Left Hand Side Bearing Plate
SIGNATURE FRONT BUMPER INSTALL
 SIGNATURE FRONT BUMPER INSTALL JL **PLEASE READ THROUGH THE INSTRUCTIONS BEFORE BEGINNING ANY PART OF THE INSTALLATION PROCESS** 1. You can now remove the trim strip (2 vertical clips, 4 horizontal, 2
8 Wide Evolution Cedar Partition Assembly Instructions
 09/13 8 Wide Evolution Cedar Partition Assembly Instructions Contents: Introduction Overview Base Preparation Partition Frame Assembly Glazing Door Installation Parts List Section - 1 2 3 4 5 Page 3 4
Absco Regent Shed Assembly Instructions Model: J30372R
 Absco Regent Shed Assembly Instructions FRONT: 9ft-0-7 64in SIDE: ft-3 3in HEIGHT: 6ft-0-43 64in ft-4-3in CONCRETE SLAB 0ft--3 64in CONCRETE SLAB WHEN LAYING YOUR CONCRETE SLAB, ENSURE THERE IS A REBATED
Privacy Wall Glass Selections - Polished Edge Slider Door
 Privacy Wall Glass Selections - Polished Edge Slider Door 3/6" HEX BIT PUTTY KNIFE #2 ACR BIT SUCTION CUP HOLDERS DOOR LEAF: Satin Tempered Clear Tempered LOCTITE 425 SIDE LIGHT ETCHED GLASS STYLES: Satin
C R O S S C O U N T R Y S E R I E S C U R V E D L E A N T O M O D E L G R E E N H O U S E I N S T R U C T I O N S
 Contents Foreword....................................................................... 2 User Notes..................................................................... 2 List of Drawings.................................................................
W X 12 SOLARIUM ASSEMBLY INSTRUCTIONS Two or more adults required for assembly
 adlonco@hotmail.com W07-3 8 X SOLARIUM ASSEMBLY INSTRUCTIONS Two or more adults required for assembly Requires 96 clearance at the wall Base Dimensions x 9 /, Largest Dimensions x98 / (see pg.) ZZZ-87.W07-3.7-5.GP.EN.HER.doc
6 x 6 OCTAGONAL CEDAR GREENHOUSE
 6 x 6 OCTAGONAL CEDAR GREENHOUSE ASSEMBLY INSTRUCTIONS PLEASE READ ALL INSTRUCTIONS BEFORE PROCEEDING 07/2010 6 x 6 OCTAGONAL CEDAR GREENHOUSE Assembly Instructions Contents Page Introduction 3 Safety
Installation Instructions for Vista Air Vertically Folding Walls
 Installation Instructions for Vista Air Vertically Folding Walls Use these instructions in conjunction with your shop drawings to see the specifics that are particular to the model you are installing.
Renaissance. Assembly Instructions GREENHOUSE. for models BEFORE OPENING ANY OF THE BOXES PLEASE READ THESE INSTRUCTIONS 03/07
 Renaissance GREENHOUSE ssembly Instructions for models 68 610 612 EFORE OPENING NY OF THE OXES PLESE RED THESE INSTRUCTIONS 03/07 RENISSNCE Greenhouse ase Plan You may have already considered the position
TOOLS REQUIRED: HARDWARE INCLUDED: 13MM FLAT WRENCH FOR LEVELING THE STRUCTURE RATCHET WITH 5MM HEX BIT FOR CORNER SCREWS ON TOP TRAVERSE BEAMS
 1 TOOLS REQUIRED: RATCHET WITH 5MM HEX BIT FOR CORNER SCREWS ON TOP TRAVERSE BEAMS 13MM FLAT WRENCH FOR LEVELING THE STRUCTURE RUBBER MALLET FOR INSERTING PANELS 8MM HEX BIT WITH EXTENSION FOR HEX BOLT
ASSEMBLY INSTRUCTIONS FOR "GA" MODULAR BUILDINGS ALL MODELS
 ASSEMBLY INSTRUCTIONS FOR "GA" MODULAR BUILDINGS ALL MODELS W01 CAUTION: Some parts have sharp edges. Care must be taken when handling the various pieces to avoid a mishap. For safety sake, please read
Handleless Uni t Specification
 Handleless Uni t Specification QUALITY BRITISH CRAFTSMANSHIP 160 Handless Fitting Guide - Parts Index & Base Cabinet Section 1 150 325 DRAWER 870 870 870 73 73 720 720 DOOR 685 325 2 x
W1610 1/ X 16 SOLARIUM ASSEMBLY INSTRUCTIONS Two or more adults required for assembly
 adlonco@hotmail.com W60 /-3 0 X 6 SOLARIUM ASSEMBLY INSTRUCTIONS Two or more adults required for assembly Requires 96 clearance at the wall Base Dimensions 90 x 8, Largest Dimensions 90 x (see pg.4) ZZZ-0.W60-3.4-5.GP.EN.HER.doc
WPS crew Doors Installation instructions
 WPS-132-133 crew Doors Installation instructions ORDER OF INSTALLATION FOR A COMPLETE ENCLOSURE OF A CREW WPS (Weather Protection System) IS AS FOLLOWS: 1. Heater 2. Rear Thresholds - Right Hand & Left
Installation Guide Simplicity Alfresco. V1.9 Lu070318
 0333 305 5272 www.canoports.co.uk Installation Guide Simplicity Alfresco V1.9 Lu070318 Tools Required Below is a list of tools that you will require to install your the Simplicity Alfresco System. Cordless
gabriel ash essential range
 gabriel ash essential range to be used in conjunction with the online assembly video found at www.gabrielash.com Certified Installers if required Thomas Hearn 07540 618852 Matthew Honeyborne 07977 788242
T R A D I T I O N A L S E R I E S C O T T A G E R O O F F R E E S T A N D I N G M O D E L G R E E N H O U S E I N S T R U C T I O N S
 Contents Foreword....................................................................... 2 User Notes..................................................................... 2 List of Drawings.................................................................
Kawasaki Teryx 750 Cab Kit* Caution: Before using this product, read this manual and follow all Safety Instructions.
 Owner s Manual Model: Kawasaki Teryx 750 Kawasaki Teryx 750 Cab Kit* Caution: Before using this product, read this manual and follow all Safety Instructions. Safety Instructions Cab Kit Contents Hardware
Walk-in Greenhouse. Assembly instructions. 8x6. 8x8. 8x10. 8x12. Model GH1399A Model GH1400A. Model GH1402A Model GH1403A. Model GH1405A Model GH1406A
 Assembly instructions 8x6 Model GH1399A Model GH1400A 8x8 Model GH1402A Model GH1403A 8x10 Model GH1405A Model GH1406A 8x12 Model GH1408A Model GH1409A Walk-in Greenhouse Statement Dear Customer! May we
Easy2Build TM. 6 x 8 Easy-Grow Greenhouse. Assembly Instructions. Smart Tech solutions
 EasyBuild TM Smart Tech solutions 6 x 8 Easy-Grow Greenhouse Assembly Instructions 0 S tr uct ure 7 PC SHELL Systems Trading Corporation 50 7th Avenue Suite 809, New York, NY 03 Customer Service: (877)
GlideRite Retractable Cover System For Hot Spot Spas (SE & SLX only)
") List of Contents Quantity Description 12 #10 x 1 ½ Flat Head Phillips Screw (see pg. 2) 2 #10 x ½ Pan Head Phillips Screw (see pg. 2) 8 ¼ x 2 ½ Lag Bolt (see pg. 2) 7 ¼ 20 x 5 / 8 Hex Head Bolt (see pg.
List of Contents Quantity Description 12 #10 x 1 ½ Flat Head Phillips Screw (see pg. 2) 2 #10 x ½ Pan Head Phillips Screw (see pg. 2) 8 ¼ x 2 ½ Lag Bolt (see pg. 2) 7 ¼ 20 x 5 / 8 Hex Head Bolt (see pg.
Shed Assembly Instructions
 Shed Kit Contents The shed kit includes all the parts needed to assemble your shed except for tools and fasteners such as screws and nails. The various pieces are pre-cut and many are marked to indicate
SAF-T-LINER MVP-EF PARTS MANUAL. Window Section. Page 5-1. Windows 10/96
 Windows Page 5-1 Driver's Standard Page 5-2 Windows Driver's Standard Item Part Num. Number Qty. Description Notes 45001506 1 Sash - Driver's, Assembly, with Tempered Glass 7/32" Complete with Trim, No
Titan 79 EB Greenhouse Assembly Instructions
 Titan 9 EB Greenhouse Assembly Instructions Model Titan 9 EB Hunkin Garden Products Ltd sales@hunkin.co.nz www.hunkin.co.nz Ph 0800 8 Dear Customer! Thank you for purchasing one of our greenhouses. We
Walk-in Greenhouse. Assembly instructions A B. MODEL A (mm) B (mm) C (mm) / / 2. Hobby / / 16
 B (mm) C (mm) / / 2. Hobby / / 16") ssembly instructions C MODEL (mm) (mm) C (mm) Hobby Passion 689 8 9 7 / 8 3666 5 / 6 438 4 4 / 4 7 0 5 / 6 Walk-in Greenhouse Climapod ssembly Tips and Tricks Prior to the assembly of the greenhouse, you
ssembly instructions C MODEL (mm) (mm) C (mm) Hobby Passion 689 8 9 7 / 8 3666 5 / 6 438 4 4 / 4 7 0 5 / 6 Walk-in Greenhouse Climapod ssembly Tips and Tricks Prior to the assembly of the greenhouse, you
STOP! Call Us First! DO NOT RETURN TO STORE.
 16632 STOP! Call Us First! DO NOT RETURN TO STORE. For immediate help with assembly or product information call our toll free number: 1-800-844-9273 or email: customerservice@backyardproductsllc.com Our
Installation Guide. Evolve bi-fold. 8. Door restrictor- optional p9. 1. Before you start p2. 9. Adjustment. 2. Measuring and surveying p2
 Evolve bi-fold Installation Guide 1. Before you start p2 8. Door restrictor- optional p9 2. Measuring and surveying p2 3. Configuration details p4 4. Installation p5 5. Glazing p5 6. Glazing packer details
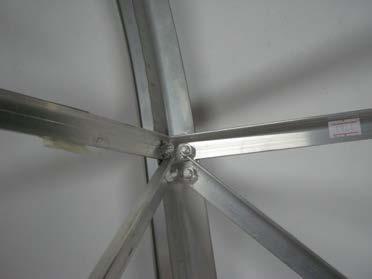
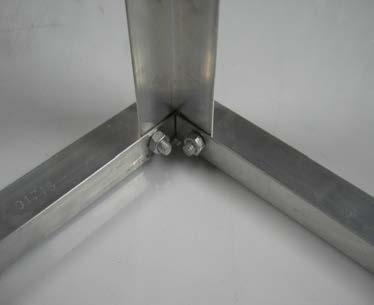
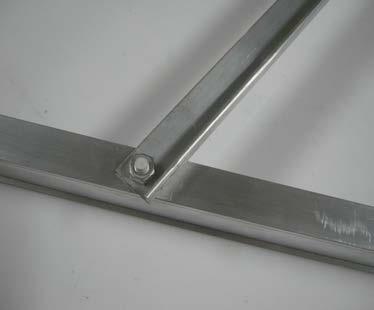
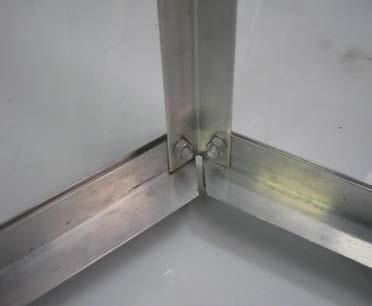
MARQUEE INSTALLATION HANDBOOK. Curved Structures
 MARQUEE INSTALLATION HANDBOOK Curved Structures 12m Curved Roof Beam Assembly Instructions Ensure there are no overhead or underground obstructions or services before starting to assemble frame. Square