Handrail Installation. Paramount Cable Railing Systems 49 Stokes Drive Carson City, NV
|
|
|
- Milton Potter
- 5 years ago
- Views:
Transcription


1 Handrail Installation Paramount Cable Railing Systems 49 Stokes Drive Carson City, NV
. Check to assure all components are included, report any missing items immediately. Separate all posts and fasteners.")
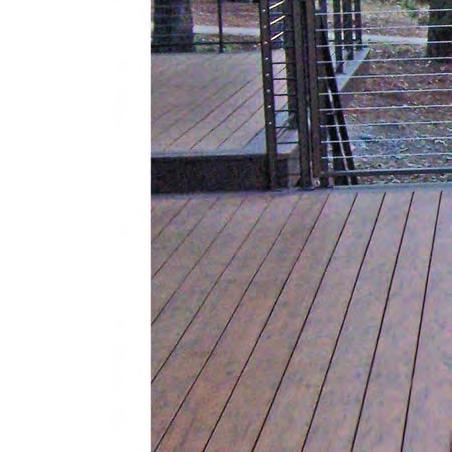
2 Handrail Installation Figure 1: Separate posts, fasteners, and hardware. Check against component list provided with your order. Before you begin Use care when using sharp tools to open package. Unwrap package and separate all components (Figure 1). Check to assure all components are included, report any missing items immediately. Separate all posts and fasteners. Included in your package will be components from Ultra-tec and an instruction manual for installing the Ultra-tec hardware. You will need You will need the following tools and supplies to install your cable railing: Allen wrenches: 3/16, 5/32, 1/8 Bottom-mount screws for posts: Stainless steel, flat head #14 x 2-1/2 or 3 for end posts #14 x 1-1/2-2 for intermediate posts Note: use of galvanized fasteners is not recommended. Chalk/snap line Drop cloth to protect deck surface Level Masking tape Power drill Tape measure Page 2 Handrail Installation

.")


.")
.")
3 Lay out the components Use the drawings supplied to lay out the railing (Figure 2). Each post is numbered and the drawings indicate the position of each post. Figure 2: Drawings of the layout are provided. For top-mounted posts, use a snap line to produce a straight line for railing (Figure 3). Mark all post centers using a pencil or a marker on masking tape so that your deck is not permanently marred. Snap line Figure 3: Snap a chalk line for the railing. Lay out posts and top rail according to plan. Locate post cap rail screw (Figure 4) and tube-lok splice connectors (Figure 5). Note: Use the protective foam wrap to minimize abrasions on railing components and to avoid marring your deck surface. Figure 4: Locate cap rail screws. Assemble rails Assemble the splice connector into the top rail with the 3/8 hole (Figure 6). Install the Allen set screw loosely into the splice connector. Assemble the top rails together with the splice connectors (Figure 7). Note: All pre-drilled post attachment holes must be on the same side. Figure 6: Assemble the splice connector into the top rail. Figure 5: Locate the tube-lok splice connectors Tighten set screws until rail halves are tight and do not flex. Figure 7: Put the top rails together with the splice connectors. Handrail Installation Page 3
.")


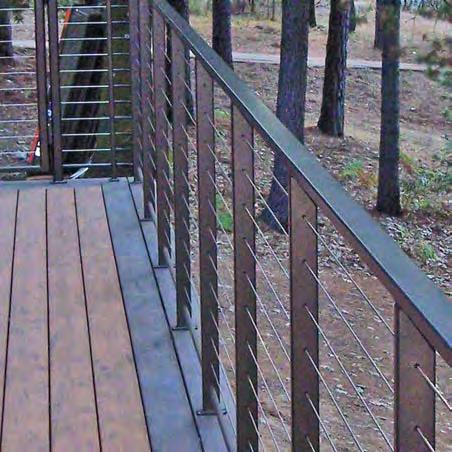
4 Attach posts Attach posts to top rail using screws supplied (10 x 24) (Figure 8). Install the lower spreader bar if your railing system includes this option (Figure 9). It may be necessary to loosen the rail cap mounting screws. Figure 8: Attach posts to top rails. Note: Tighten all screws when finished. Position railing on deck The railing is ready to stand up and place over chalk line (Figure 10). Figure 9: Install the spreader bar. Figure 10: All posts are connect to top rails, spreader bar is installed. Your railing is ready to bring upright. Page 4 Handrail Installation
.")
.")
. Move the railing off the chalk line.")


5 Figure 11 Once the railing is upright, check each end according to previously marked lay out (Figure 11). Holding the rail in position, move each post and center over chalk line (Figure 12). Figure 12 Mark each hole through the mounting pad (Figure 13). Move the railing off the chalk line. Pre-drill all mounting holes using a drill bit approximately half of the diameter of the fastener (Figure 14). Figure 13 Figure 14 Attach railing to deck Place the railing back over the chalk line and attach with fasteners (Figure 15). Figure 15 Handrail Installation Page 5
.")
.")


6 Level the railing Use shims or small washers under post pads to bring railing into plumb and level (Figure 16). Install grommets Grommets are provided to provide a barrier between the cable and the surface of the posts through which the cable is drawn when being installed (Figure 17). Level Install the grommets in the pre-drilled holes in the posts. One side of the grommets is slightly smaller then the other side. Using the tool provided, install with smaller side into posts (Figure 18). Post pads Grommet Figure 16: Use shims or washers under post pads to level the railing. Figure 17: Grommets protect the cable and post. Figure 18: Grommet installation tool and grommet. Tighten screws Tighten all screws and mounting fasteners (Figure 19) BEFORE installing cable. Figure 19: Tighten all screws and fasteners. Page 6 Handrail Installation


7 Figure 21: If your cable is pre-swaged, screw it into the tapped end post. Figure 20: Uncoil the cable. Uncoil the cable Using care, uncoil, stretch out, and untangle all cables (Figure 20). String the cable If your application uses a pre-swaged threaded stud on one end for the cables, screw the cable into the tapped end post (Figure 21). If an Ultra-tec Invisiware receiver is used, attach cables to these. String cables through posts and grommets (Figure 22). Note: USE CARE not to snag cable strands on the inside of the post or grommet. Install the remaining Ultra-tec hardware, using the instruction guides provided for each procedure. Figure 22: String cable through posts. Congratulations! Enjoy the view! Finished railing! Handrail Installation Page 7


8 Yo W c a am Con a o ay PIH has been designing, manufacturing, and installing metal products for commercial and residential use since Custom railings and stairs are our specialty, as well as fabricated structural steel, gates, ornamental iron and decorative metalwork. Paramount Cable Railing Systems is a subsidiary of Paramount Iron & Handrail, Inc. v x n y N f 77 7 a a i
ATLANTIS RAIL Contact Information
 ATLANTIS RAIL Contact Information Customer Service (800) 541-6829 (508) 732-9191 Spectrum System Installation Instructions Atlantis Rail s Spectrum System is an easy to install, universal cable railing
Horizontal Cable Systems
 ALUMINUM RAILING INSTALLATION INSTRUCTIONS v2012 orizontal Cable Systems 1) Check Contents Of Packages: Verify that all parts have arrived and that they match the packing list. 1A) Coastal applications:
Deck Mount Installation with Bench
 Deck Mount Installation with Bench 1. Mark track with square. 2. Cut tracks with saw. 3. Drill ¼ hole (if needed.) 4. Countersink track. 5. Countersink all track 6. File all track ends. ends. 7. Lay out
Face Mount to Through-the-Post Mount
 Face Mount to Through-the- Mount Cable Runs through Two Corners When going around two corners, it s necessary to tension the cable from both ends as shown in Deck 4. Use the 672 series The tensioning devices
Clearview Railing System Installation Instructions
 Clearview Railing System Installation Instructions Disclaimer: AGS Stainless, Inc. has its Clearview Railing Systems designed by a professional engineer to meet the requirements of the latest national
Safety Glasses Work Gloves Chop Saw with Cutting Disk. Half Round File Pencil Marker
 ATLANTIS RAIL Contact Information: Atlantis Rail Systems 70 Armstrong Road 3900 Civic Center Drive Plymouth, MA 02360 North Las Vegas, NV 89030 (800) 541-6829 or (508) 732-9191 (508) 732-9798 www.atlantisrail.com
Horizontal Cable Systems
 ALUMINUM RAILING INSTALLATION INSTRUCTIONS Horizontal Cable Systems 1) Check Contents Of Packages: Verify that all parts have arrived and that they match the packing list. 1A) Coastal applications: Confirm
1-1/4 PIPE 36-1/2 VERTICAL 1-1/4 PIPE 42-1/2 VERTICAL. Wa gner Companies FAX:
 WALL MOUNT PAD (OPT.) 1-1/4 PIPE 36-1/2 VERTICAL S/S 1X19 STRAND END POST TOP RAIL INTERMEDIATE POST WALL MOUNT PAD (OPT.) CABLE BRACE (OPT.) FOOT PADS CORNER SECTION ASSY. (OPT.) 1-1/4 PIPE 42-1/2 VERTICAL
Now available at participating Feeney (2/14) AF# A. Stores. 1/8'' Stainless Steel Cable Assemblies to Enhance Any Railing and Any View!
 AF# A. Stores. 1/8'' Stainless Steel Cable Assemblies to Enhance Any Railing and Any View!") 2014 Feeney (2/14) AF# 2009-236A Now available at participating Stores 1/8'' Stainless Steel Cable Assemblies to Enhance Any Railing and Any View! Easy-to-install, prefabricated cable assemblies are an
2014 Feeney (2/14) AF# 2009-236A Now available at participating Stores 1/8'' Stainless Steel Cable Assemblies to Enhance Any Railing and Any View! Easy-to-install, prefabricated cable assemblies are an
#4 Phillips Driver Bit 1/8, 4mm, 5.5mm & 8mm (5/16 ) Allen Wrench. Safety Glasses
 Allen Wrench. Safety Glasses") ATLANTIS RAIL Contact Information: Atlantis Rail Systems 70 Armstrong Road 3900 Civic Center Drive Plymouth, MA 02360 North Las Vegas, NV 89030 (800) 541-6829 or (508) 732-9191 (508) 732-9798 www.atlantisrail.com
ATLANTIS RAIL Contact Information: Atlantis Rail Systems 70 Armstrong Road 3900 Civic Center Drive Plymouth, MA 02360 North Las Vegas, NV 89030 (800) 541-6829 or (508) 732-9191 (508) 732-9798 www.atlantisrail.com
March 1, Fax:
 March 1, 2017 U.S.A. Manufacturer The Cable Connection 52 Heppner Drive Carson City, Nevada 89706 800.851.2961 775.885.1443 Fax: 775.885.2734 E-mail: info@ultra-tec.com www.ultra-tec.com Framework You
Open Up Your View With CABLE SYSTEMS
 Open Up Your View With CABLE SYSTEMS PRESENTED BY CROWN HERITAGE Our Cable Multiple options to accomodate any deck or stair design Marine Grade 316 stainless steel Swaging is the term used for attaching
Template. Blue 242. May 2018 trademarks of Suncor Stainless, Inc. Loctite is a registered trademark of Henkel Corporation
 ATLANTIS RAIL Contact Information: Atlantis Rail Systems 70 Armstrong Road 3900 Civic Center Drive Plymouth, MA 02360 North Las Vegas, NV 89030 (800) 541-6829 or (508) 732-9191 (508) 732-9798 www.atlantisrail.com
PARTS INCLUDED IN FIXED STAIR CABLE RAIL KIT:
 175 SERIES FIXED STAIR CABLE RAIL - INSTALLATION INSTRUCTIONS PARTS INCLUDED IN FIXED STAIR CABLE RAIL KIT: FIXED STAIR TOP RAIL (1) A FIXED STAIR BOTTOM RAIL (1) B D UPPER SADDLE BRACKET (1) C BRACKET
MOTORIZED STANDARD SHADE WITH CABLES Installation Instructions
 Tools Needed Drill Measuring Tape Pencil 2 Level Plumb Line ¼ Masonry Drill Bit Hammer Linesmans Pliers Cable Cutters Phillips & Flat-Head Screw Driver 11/32 Socket or Open End Wrench 5/32 Allen Wrench
Architectural Cable Railing Products. ISO Certified U.S.A. Manufacturer
 Architectural Cable Railing Products ISO Certified U.S.A. Manufacturer January 1, 2013 Ultra-tec Cable Railing Products More choices than ever when designing a cable railing you and your clients will be
Installation Instructions for. Handrail Component System
 Handrail STEP-BY-STEP Installation Instructions for Handrail Component System Rise in Inches Run in Inches 8 8.5 9 9.5 10 10.5 11 11.5 12 12.5 13 13.5 14 14.5 15 8.5 47 45 43 42 40 39 38 36 35 34 33 32
Instruction Manual. The Clear Choice! Aluminum Railing. Stainless Railing. Cable Railing. Trellis Systems. Maintenance Free. 316 Stainless Steel
 Instruction Manual Aluminum Railing Stainless Railing Cable Railing Trellis Systems Maintenance Free 316 Stainless Steel Virtually Invisible Light Strong Durable Custom Colors The Clear Choice! 1 Table
Chalk Line. #4 Phillips Driver Bit. Cable Cutters
 ATLANTIS RAIL Contact Information: Atlantis Rail Systems 70 Armstrong Road 3900 Civic Center Drive Plymouth, MA 02360 North Las Vegas, NV 89030 (800) 541-6829 or (508) 732-9191 (508) 732-9798 www.atlantisrail.com
Cable Cutter Square. 25 Tape Measure. Chalk Line Level Loctite 242 Blue
 ATLANTIS RAIL Contact Information: Atlantis Rail Systems 70 Armstrong Road 3900 Civic Center Drive Plymouth, MA 02360 North Las Vegas, NV 89030 (800) 541-6829 or (508) 732-9191 (508) 732-9798 www.atlantisrail.com
Fortress Fe Posts must always be secured to the deck framing. Fortress Fe Posts should never be attached to only the deck boards.
 Installation Instructions for FortressCable H-Series Stair Panels with Simplified Stair Bracket SSB-05 and Fe Posts It is the responsibility of the installer to meet all code and safety requirements, and
Mount to the Wall INSTALLATION MANUAL
 Mount to the Wall 15 Locate the Wooden Studs This step applies to wooden stud wall installation only. Determine and mark the exact locations of two stud centers on the wall. Wooden studs should be spaced
Installation Fence Guide Kodiak Iron. Exceptional Fencing Extraodinary Customer Service
 Installation Fence Guide Kodiak Iron Exceptional Fencing Extraodinary Customer Service Kodiak Fence System Installation Guide Thank you for the purchasing the Kodiak Fence System. Fence installation is
YJ Bow Assembly. Installation Instructions INSTALLATION TIME SKILL LEVEL TOOLS. Vehicle Application: Jeep Wrangler YJ Part Number: 55004
 Installation Instructions YJ Bow Assembly Vehicle Application: Jeep Wrangler YJ 1988 1995 Part Number: 55004 INSTALLATION TIME SKILL LEVEL 2 Hours 2 - Moderately Easy TOOLS 1/8" Bit 10' #2 #50, #45, #50
Tape Measure Carpenter s Square Touch-up Paint Chalk Line. Blue 242. Template
 ATLANTIS RAIL Contact Information: Atlantis Rail Systems 70 Armstrong Rd. Plymouth, MA 02360 (800) 541-6829 or (508) 732-9191 (508) 732-9798 www.atlantisrail.com NOVA System Installation Instructions The
ATLANTIS RAIL Contact Information: Atlantis Rail Systems 70 Armstrong Road 3900 Civic Center Drive Plymouth, MA North Las Vegas, NV 89030
 ATLANTIS RAIL Contact Information: Atlantis Rail Systems 70 Armstrong Road 3900 Civic Center Drive Plymouth, MA 02360 North Las Vegas, NV 89030 (800) 541-6829 or (508) 732-9191 (508) 732-9798 www.atlantisrail.com
PROTECT-A-POOL INGROUND REMOVABLE SAFETY FENCE
 PROTECT-A-POOL INGROUND REMOVABLE SAFETY FENCE I N S T A L L A T I O N I N S T R U C T I O N S INSTALLATION TOOLS The following tools are required for installation. Chalk Pencil Utility Knife Tape Measure
HARDWARE MOUNTING HOLE BORING GUIDE FOR METAL RAILINGS
 HARDWARE MOUNTING HOLE BORING GUIDE FOR METAL RAILINGS March 1, 2017 TABLE OF CONTENTS Through-the-Post Mounted Fittings Page Invisiware Receiver... 2-3 Invisiware Radius Ferrule... 4-6 Receiver with Push-Lock
A - Railing Frame Material Specifications
 A - Railing Frame Material Specifications NOTE: We strongly recommend stainless steel for exterior applications. R-1 8/1/02 B Stainless Steel Spacers (For Horizontal Railing Double Post End Post using
TO O L K IT. Public Bike Repair
 TO O L K IT Public Bike Repair The Dero Tool Kit includes all the necessary tools to perform most routine maintenance and adjustments on most bikes. All the tools are securely fastened with stainless steel
User Instructions Multiline Otter Scoreboard Caddy Assembly
 List of parts: User Instructions Multiline Otter Scoreboard Caddy Assembly Single Caddy Double Caddy 1 1 Base assembly with attached wheels 2 4 1 1 2 4 4 8 10 20 12 Uprights (60 or 74 aluminum extrusion)
Continuous Handrail Kit Installation Instructions
 Continuous Handrail Kit Installation Instructions ALUMINUM RAILING SYSTEM Canadian Version Wall Application (see page 2) Railing Application (see page 7) Wall anchors not provided Hardware included: 1x
Fortress Fe Posts must always be secured to the deck framing. Fortress Fe Posts should never be attached to only the deck boards.
 Installation Instructions for Fortress Horizontal Cable Panel System with UB-05 Brackets and Fe Posts It is the responsibility of the installer to meet all code and safety requirements, and to obtain all
Architectural Cable Railing Products
 Architectural Cable Railing Products August 1, 2017 ISO Certified U.S.A. Manufacturer www.ultra-tec.com TABLE OF CONTENTS ULTRA-TEC RAILING PRODUCTS Cable Type and Size... 3 Options for How to Receive
The Queen Quilter Professional Quilters Kit Frame
 The Queen Quilter Professional Quilters Kit Frame Assembly Instructions Table of Contents: Before you begin......................... Pg. 2 Wood parts............................. Pg. 3 Hardware..............................
General Array Layout Sketch
 General Array Layout Sketch Cold TO Panels Hot FROM Panels OR Cold TO Panels Hot FROM Panels 1 Introduction This document describes how to install EZ series panels. The EZ series panels are designed to
ULTRA SPACE SAVER SQUARED Installation Instructions
 Installation Instructions The Ultra Space Saver Squared has several steps for installation. Note that the single and double sided setups and parts are different. Make sure you follow the instructions according
Cable Railing Kit Application Guide
 Cable Railing Kit Application Guide January 2019 Nationwide Industries 10333 Windhorst Rd. Tampa, FL 33619 813.988.2628 Fax: 813.988.3465 Photo courtesy of FabWorx Framework You Will Need for Cable Railing
HANDRAIL HEIGHT PER LOCAL CODE AUTORITY
 WOOD END CAPS PLEASE READ PLEASE READ THESE INSTRUCTIONS THOROUGHLY PRIOR TO BEGINNING THE HRWS-6CSLBW INSTALLATION! 3 1/16" [77.7mm] THIS INSTRUCTION SHEET IS INTENDED TO PROVIDE A SPECIFIC GUIDE TO FOLLOW
Fortress Fe Posts must always be secured to the deck framing. Fortress Fe Posts should never be attached to only the deck boards.
 Installation Instructions for FortressCable H-Series Cable Panel System With UB-05 Brackets and Fe Posts It is the responsibility of the installer to meet all code and safety requirements, and to obtain
Downtown Rack. Custom logo option available
 Custom logo option available Downtown Rack The Downtown Rack uses thick, square-tube construction that can t be cut with a pipe cutter. The extended width of the Downtown Rack makes for easy bike parking
CYCL E STAT IO N. High Capacity
 CYCL E STAT IO N High Capacity The Dero Cycle Station provides high-capacity, covered bike parking for bicycle commuters. With a high roof and open platform, the Dero Cycle Station allows bike corrals,
VINYL CLASSIC FREESTANDING PERGOLA ASSEMBLY INSTRUCTIONS
 P a g e 1 VINYL CLASSIC FREESTANDING PERGOLA ASSEMBLY INSTRUCTIONS Shown: 8' x 12' Vinyl Classic Pergola with 12" Top and Main Runner Spacing The design of this pergola is based on all posts being installed
ASSEMBLY AND INSTALLATION INSTRUCTIONS
 ASSEMBLY AND INSTALLATION INSTRUCTIONS CORPORATE HEADQUARTERS WESTERN SALES AND MANUFACTURING PLANT P.O. Box 400 1017 SW Berg Parkway Canby, Oregon 97013 (503) 266 2231 (503) 266 4334 www.srsmith.com 06
Box Track INSTALLATION INSTRUCTIONS
 Box Track INSTALLATION INSTRUCTIONS BOX TRACK Recommended Tools Level Tape Measure Pencil Drill with 1/8, and 1/4, Drill Bits, Phillips Bit and Slotted Bit Socket Wrench with 9/16 Socket 9/16 and 5/8 Wrench
The Phoenix. Professional Quilting Frame. Copyright January 1, 2016 Jim M. Bagley, GraceWood, Inc (Reproduction Prohibited) Version 2.
 Version 2.") The Phoenix Professional Quilting Frame Copyright January 1, 2016 Jim M. Bagley, GraceWood, Inc (Reproduction Prohibited) Version 2.1 1 The Phoenix Professional Quilting Frame Parts List Box 1...3 Box
The Phoenix Professional Quilting Frame Copyright January 1, 2016 Jim M. Bagley, GraceWood, Inc (Reproduction Prohibited) Version 2.1 1 The Phoenix Professional Quilting Frame Parts List Box 1...3 Box
Treviso POCKET BILLIARD TABLE INSTALLATION MANUAL. SERVICE DEPARTMENT P.O. BOX 68 BRISTOL, WI 53104
 Treviso TM POCKET BILLIARD TABLE INSTALLATION MANUAL www.brunswickbilliards.com SERVICE DEPARTMENT P.O. BOX 68 BRISTOL, WI 53104 51-905881-000 NOVEMBER 2008 NOTE: Please use the instructions in this manual
INSTALLATION INSTRUCTIONS FOR HAND OPERATED SILENT STEEL ADC HEAVY DUTY CURTAIN TRACK MODELS: 280, 281, 282, 280-A, 283-N, 283-R
 INSTALLATION INSTRUCTIONS FOR HAND OPERATED SILENT STEEL ADC HEAVY DUTY CURTAIN TRACK MODELS: 280, 281, 282, 280-A, 283-N, 283-R I. SUSPENDED INSTALLATIONS 1. Lay the two track halves on the floor with
PORCH COMPANY PVC PANEL AND DECKORATOR RAILING
 PORCH COMPANY PVC PANEL AND DECKORATOR RAILING Installation Instructions +1-615-730-8067 porchstore@porchco.com www.porch-store.com Assumption: Your deck is built, your decking is down and your 4x4 core
This manual will aid in the assembly of the FireBall V90 and FireBall X90. The assembly of both machines will be identical, unless specified.
 This manual will aid in the assembly of the FireBall V90 and FireBall X90. The assembly of both machines will be identical, unless specified. Step #1 Lay all parts out to verify quantities. (2) 2 x 25-1/4
ADI CABLE RAILING FOR METAL. AS&D TM Aluminum Railing. Solutions TM Aluminum Railing
 TM ADI CABLE RAILING FOR METAL AS&D TM Aluminum Railing pg 120-131 Solutions TM Aluminum Railing pg 132-133 119 AS&D Railing System Overview For the discriminating homeowner, a contemporary, esthetically
Installing Cable Railings
 A simple approach to a great upgrade Figure 1. Cable railings exert considerable tension on the end posts. The solution is to use beefier end posts and fill in between them with sub-rails. by Mark Ellis
Oakland II POCKET BILLIARD TABLE INSTALLATION MANUAL
 TM Oakland II POCKET BILLIARD TABLE INSTALLATION MANUAL www.brunswickbilliards.com SERVICE DEPARTMENT P.O. BOX 68 BRISTOL, WI 53104 EMAIL: BRUNSWICKSERVICE@BRUNSWICKBILLIADS.COM 51-906253-000 OCTOBER 2016
Cottage Picket Gate. 6 in in in in
 S S E M LY I N S T R U T I O N S www.newenglandarbors.com ottage Picket Gate 1.875 in 6 in 43.75 in 22.5 in 2 48.5 in Please read through before starting assembly. heck ox for These ontents (1 ox) In the
INSTALLATION INSTRUCTIONS FOR FRONT CASTING DECK RAIL Ranger
 INSTALLATION INSTRUCTIONS FOR FRONT CASTING DECK RAIL Ranger TOOLS REQUIRED FOR INSTALLATION: Drill motor, (1) 5/16 inch drill bit, (1) 13/64 drill bit, (1) 3/16 inch hex wrench (1) 3/32 inch hex wrench.
ARCHITECTURAL HARDWARE
 05 52 00/JOH BuyLine 7969 ARCHITECTURAL HARDWARE 2009 AMERICA S #1 MANUFACTURER OF STAINLESS STEEL CABLE FITTINGS - SINCE 1958 C. Sherman Johnson Co. Inc. East Haddam, CT USA 1-800-874-7455 www.csjohnson.com
Pathway Stair System For use with the Pathway Modular Ramp System, as freestanding stair, or with other structures.
 Assembly Manual Pathway Stair System For use with the Pathway Modular Ramp System, as freestanding stair, or with other structures. Manufactured in the USA LIFETIME WARRANTY. Please register at www.ezaccess.com/warranty-satisfaction.
INSTALLATION INSTRUCTIONS
 INSTALLATION INSTRUCTIONS GLI POOL PRODUCTS / 1100 PERFORMANCE PLACE / YOUNGSTOWN, OH 44502 PH. 800-448-2343 FAX 330-744-1228 www.glipoolproducts.com WARNING THERE IS NO SUBSTITUTE FOR COMPETENT ADULT
Spiral Slide
 IMPORTANT Page 1 PLEASE READ THESE INSTRUCTIONS BEFORE COMMENCING ASSEMBLY. All equipment must be installed in accordance with these instructions. Check your shipment against Bill of Lading and Parts list.
ULTRA SPACE SAVER Installation Instructions
 Installation Instructions The Ultra Space Saver has several steps for installation. Note that the single and double sided setups and parts are different. Make sure you follow the instructions according
Steel Solutions USA 602 E. Walnut Street Watseka, IL p: (888) f: (815)
 f: (815)") Steel Solutions USA 602 E. Walnut Street Watseka, IL 60970 p: (888) 875-5004 f: (815) 432-3364 sales@steelsolutionsusa.com Published February 2011 2011 Steel Solutions USA. All rights reserved. version
Steel Solutions USA 602 E. Walnut Street Watseka, IL 60970 p: (888) 875-5004 f: (815) 432-3364 sales@steelsolutionsusa.com Published February 2011 2011 Steel Solutions USA. All rights reserved. version
HANDRAIL HEIGHT PER LOCAL CODE AUTORITY
 WITH WOOD END CAPS PLEASE READ PLEASE READ THESE INSTRUCTIONS THOROUGHLY PRIOR TO BEGINNING THE INSTALLATION! 3" [77.3mm] THIS INSTRUCTION SHEET IS INTENDED TO PROVIDE A SPECIFIC GUIDE TO FOLLOW FOR THE
Intercooler Shroud and Belt Cover for WRX
 Intercooler Shroud and Belt Cover for 2015+ WRX 2016-05-18 Thank you for purchasing this PERRIN product for your car! Installation of this product should only be performed by persons experienced with installation
UNIVERSAL PANEL AND GATE
 PVC Fencing / Residential Style UNIVERSAL PANEL AND GATE INSTALLATION INSTRUCTIONS Fencing Without Boundaries TM 1 BEFORE YOU START, IT S IMPORTANT TO CHECK......That fence footings do not exceed legally
CertainTeed INSTALLATION GUIDE SIMTEK FENCE PRODUCTS. Fence Installation Guide 3', 4' & 6' High
 CertainTeed INSTALLATION GUIDE SIMTEK FENCE PRODUCTS Fence Installation Guide 3', 4' & 6' High INSTALLATION GUIDE These instructions are designed to assist both professional installers and do-it-yourselfers
AFCO-Rail Post INSTALLATION INSTRUCTIONS AFCO-RAIL POST
 AFCO-Rail Post INSTALLATION INSTRUCTIONS TOOLS REQUIRED: Drill Bits (for the appropriate fastener) Drill (with adjustable clutch, recommended) Level String Line Tape Measure Tools to install fasteners
INSTALLING INVISIRAIL GLASS PANELS POST INFORMATION... 2 PRE-INSTALLATION... 2
 Contents POST INFORMATION... 2 PRE-INSTALLATION... 2 STEP A1: MEASURING FOR INVISIRAIL CUSTOM GLASS PANELS (skip if using Standard Sized Panels)... 2 STEP A2: GATHER ADDITIONAL TOOLS/SUPPLIES... 2 STEP
Cable Tray Kit: - Cable Tray - Cable Tray Cover - Power Block Support (x2) Top Support Kit: (x2) - 2 Top Supports. Quantities are per bench
 Top Support Kit: (x2) - 2 Top Supports. Quantities are per bench") Parts Included (per back to back bench) Column Kit: (x2) - 1 LH & 1 RH Column - Control Box - Hand Switch Cable Tray Kit: - Cable Tray - Cable Tray Cover - Power Block Support (x2) Depth Support Kit: -
Parts Included (per back to back bench) Column Kit: (x2) - 1 LH & 1 RH Column - Control Box - Hand Switch Cable Tray Kit: - Cable Tray - Cable Tray Cover - Power Block Support (x2) Depth Support Kit: -
INSTALLATION INSTRUCTIONS GUIDE
 CERTAINTEED RAILING AND DECKING INSTALLATION INSTRUCTIONS GUIDE Kingston Vinyl Railing and Vinyl Decking CONTENTS Important Information Before You Begin...3 Helpful Hints, Tips, Fire Information and Tools
6 1/2 x 6 1/2 Flat Top Pergola
 6 / x 6 / Flat Top Pergola A S S E M B L Y G U I D E Models: Portland, Liberty O P T I O N A L A C C E S S O R Y Bolt Down Bracket Kit V.-0506 Ta b l e o f Co n t e n t s PAGE The Introduction & Overview......................................................
1. Layout. Step 1. Step 2. Step 3. Fig. 1
 1-3/8 Panel Clamp Tools You Will Need: Tape Measure, Mason s String, Stakes, Hole Digger, Shovel, Level, Wheelbarrow, Wrenches or Adjustable Wrench, Hacksaw, Pliers, Cutting Pliers, Fence Stretcher and
What you should have. 1. Telescopic Pole (1) 2. Arc tubing (4) for Lower Ring. 3. Numbered bars or spokes(8) 4. Center plate (1)
 2. Arc tubing (4) for Lower Ring. 3. Numbered bars or spokes(8) 4. Center plate (1)") 20 ft RGB Pole Tree What you should have 1. Telescopic Pole (1) 2. Arc tubing (4) for Lower Ring 3. Numbered bars or spokes(8) 4. Center plate (1) 5. Top Ring (1) 6. Hardware and wrenchs a. Hardware i.
20 ft RGB Pole Tree What you should have 1. Telescopic Pole (1) 2. Arc tubing (4) for Lower Ring 3. Numbered bars or spokes(8) 4. Center plate (1) 5. Top Ring (1) 6. Hardware and wrenchs a. Hardware i.
WOOD POST FD POST. Installation Guide FD POST MOUNT STAIR / ANGLE RAILING LAG STAIR / ANGLE RAILING STUD CABLE RAILING FITTINGS
 Installation Guide It is the responsibility of the installer to meet or exceed all code and safety requirements, and to obtain all required building permits. These instructions are only a guide and may
March 25, The Wagner Companies W Brown Deer Road Milwaukee, WI P F
 INSTALLATION GUIDE March 25, 2016 The Wagner Companies 10600 W Brown Deer Road Milwaukee, WI 53224 888-243-6914 P - 414-214-0444 F - 414-214-0450 technical@mailwagner.com www.shop.wagnercompanies.com www.wagnercompanies.com
Fortress Railing Overview ACTUAL FREIGHT CHARGES APPLY TO ALL FORTRESS RAIL ORDERS
 Fortress Railing Overview 4 3 1 Fe 26 Iron Railing Systems Fortress Use the steps below for the following pages to complete your rail Vertical Cable and Glass Options Available Fortress Iron Railing System
6 1/2 x 6 1/2 Wood Grain Flat Top Pergola
 6 / x 6 / Wood Grain Flat Top Pergola A S S E M B LY G U I D E Models: Lakewood OPTIONAL ACCESSORY Bolt Down Bracket Kit Ver /AUG/0 Ta b l e o f Co n t e n t s PAGE The 6.5 x 6.5 Wo o d Grain Flat Top
Top Mount Ultra Modern Hanger
 Top Mount Ultra Modern Hanger ASSEMBLY INSTRUCTIONS TOP MOUNT ULTRA MODERN HANGER Recommended Tools Level Tape Measure Pencil Drill with 1/8, and 1/4, Drill Bits and Phillips Bit Socket Wrench with 9/16
I N S T A L L A T I O N I N S T R U C T I O N S. RailEasy MARINER
 I N S T A L L A T I O N I N S T R U C T I O N S RailEasy MARINER Atlantis Rail Systems 2007 Atlantis Rail Mariner Installation Guide Atlantis Rail Systems December 2, 2008 Atlantis Rail Systems Contact
Office Partitions WARNING. Assembly Instructions. Customer Service A S S E M B LY HARDWARE H1 H2 H3 H4 H5 H8 H9 H10 H11 H12
 Customer Service 1-800-645-2986 Assembly Instructions WARNING In order to prevent structural failure, instability, t i p - o v e r, and/or serious injury, please follow i n s t ructions care f u l l y.
Swerve Rack CUSTOM RACKS AVAILABLE
 CUSTOM RACKS AVAILABLE Swerve Rack The design of the Swerve mirrors the bike frame, thus providing superior bike support while making it easy to secure both the bike frame and wheel with a standard u-lock.
May 14, Installation Manual
 May 14, 2012 Installation Manual Contents MAG TRACKER Components...1 Mount Installation...7 Module Installation & Grounding...11 Maintenance...14 Warranty......14 Contact Information......14 May 14, 2012
Installation manual. For setting in concrete/on base plates - Panel height 1830
 1 Aluminium fencing and drive-in gates Installation manual For setting in concrete/on base plates - Panel height 1830 Aluclos system components: U10 Connecting U-bracket 1900 mm CL18/CL18.XL Half-height
RAMPAGE P R O D U C T S. INSTALLATION INSTRUCTIONS BRONCO ZIPPER FASTRACK TOP PART #984xx BRONCO TOOLS REQUIRED
 RAMPAGE P R O D U C T S 84 (+/- 1/4 ) INSTALLATION INSTRUCTIONS BRONCO ZIPPER FASTRACK TOP PART #984xx BRONCO 1966-1977 TOOLS REQUIRED 3/8 WRENCH 7/16 WRENCH ½ WRENCH #2 PHILLIPS SCREWDRIVER 1/8 DRILL
Football Goal Posts MODEL SERIES: FGP400 and FGP600 series
 Football Goal Posts MODEL SERIES: FGP400 and FGP600 series Installation and Maintenance Instructions Please read all instructions before attempting installation of these units SAVE THESE INSTRUCTIONS FOR
Installing A Carver Bimini Top
 Installing A Carver Bimini Top How To Prolong The Life Of Your Bimini Top Carver Bimini Tops are a classy way to protect yourself and your boat from the elements. They also add style and color to your
Frameless Fixed Panel Slider
 INSTALLATION INSTRUCTIONS Frameless Fixed Panel Slider QCI-5279 SINGLE ROLLER WITH ANTI-JUMP DOUBLE ROLLERS QCI5279 Rev Page Certified 08/09/6 Tools: To install your New Shower Enclosure, you may need
IDR assembly instructions:
 IDR assembly instructions: Required Tools: 2 X 12mm Open End Wrench 14mm open end wrench #2 Phillips Head Screw Driver (Drill with adjustable torque clutch recommended) 8mm nut driver (Supplied in IDR-AK)
POST INSTALL INSTRUCTIONS
 POST INSTALL INSTRUCTIONS Layout your deck or patio to optimize the railing sections and posts. Use speed square for placement of post. Important to have blocking below decking and fastened to or through
INSTALLATION INSTRUCTIONS
 INSTALLATION INSTRUCTIONS HIGH PRESSUE LAMINATE (HPL) TOILET PARTITIONS 1030 TrimLineSeries 1040 DesignerSeries Includes continuous hardware option.65. IMPORTANT: Storage and Handling Information on last
Assembly Instructions for model: VMPR1
 Assembly Instructions for model: VMPR1 Congratulations on your purchase! The VMPR1 ceiling mount provides a unique, simplified method of ceiling mounting inverted LCD/DLP projectors. Its low profile design
Baby Grande or Grande Crank Shade with Cables and Housing Installation Instructions
 Baby Grande or Grande Crank Shade with Cables and Housing Installation Instructions Tools Needed Drill 3/8 Metal Drill Bit Screwdriver (Flat & Phillips) Measuring Tape Pencil 4 Level Plumb Line ¼ Masonry
INSTALLATION VIDEOS ONLINE
 Railing Installation Guide GLASS PICKET CABLE INSTALLATION VIDEOS ONLINE Videos are broken up into small segments which covers most aspects of glass, picket, and cable railing installations. Cable railing
Framework for Cable Railing
 Framework for Cable Railing End Post Construction Since hundreds of pounds of tension are being applied to end posts using cable railing, those posts must be substantial enough to handle that tension.
PLAYLAND 72 SPIRAL SLIDE 3.5 Posts, 3.5 Posts / 48 Grid and 5 Posts
 PLAYLAND 72 SPIRAL SLIDE 3.5 Posts, 3.5 Posts / 48 Grid and 5 Posts USER GROUP: 2-12 RECOMMENDED CREW: 2 people TOOLS REQUIRED: T-30 TORX tool (supplied by manufacturer) T-45 TORX tool (supplied by manufacturer)
INSTALLATION INSTRUCTIONS CONTOURED LIGHT BAR APPLICATION: CHEVY EQUINOX/ GMC TERRAIN PART NUMBERS: ,
 INSTALLATION INSTRUCTIONS CONTOURED LIGHT BAR APPLICATION: 2010-2014 CHEVY EQUINOX/ GMC TERRAIN PART NUMBERS: 32-21020, 32-21025 ITEM QUANTITY DESCRIPTION TOOLS NEEDED 1 1 CONTOUR BAR TORQUE WRENCH 2 1
Double Beam Freestanding Pergola Installation Guide
 Double Beam Freestanding Pergola Installation Guide Patent Pending. Copyright 2011 USAVinyl, LLC - All Rights Reserved The information contained in these instructions are proprietary to USAVinyl, LLC and
HQ Precision-Glide Track Upgrade 2 Extension Kit for HQ Studio Frame Part# QF09750
 HQ Precision-Glide Track Upgrade 2 Extension Kit for HQ Studio Frame Part# QF09750 Important Note: Upgrading the track system on the HQ Studio Frame requires the use of this 2 Extension Kit (Part #QF09750),
INSTALLATION INSTRUCTIONS
 INSTALLATION INSTRUCTIONS SOLID PHENOLIC TOILET PARTITIONS 1080 DuraLineSeries Class-A Fire Rated Includes Institutional Hardware Option.67 IMPORTANT: Storage and Handling Information on last page. Review
Model #SH & CH SH Pine CH Naturaline
 Model #SH304-101 & CH304-101 Assembly Manual SH304-101 Pine CH304-101 Naturaline Component Parts A 2 ea. Angled Rail - 2 x 4 x 107-1/8" B 1 ea. Center Angled Rail - 2 x 4 x 107-1/8" C 9 ea. Rock Board
Designing a Wood Railing
 Inside: Construction, location of end posts Configuration of corners Location of intermediate posts Choosing the right cable diameter Spacing of cables Cutting cables in field versus factory-cut Hardware