Installation Procedures 2015 Roush Mustang Stage 1 & 2. SNS 62b
|
|
|
- Sheena Austin
- 5 years ago
- Views:
Transcription


1 Installation Procedures 2015 Roush Mustang Stage 1 & 2 SNS 62b
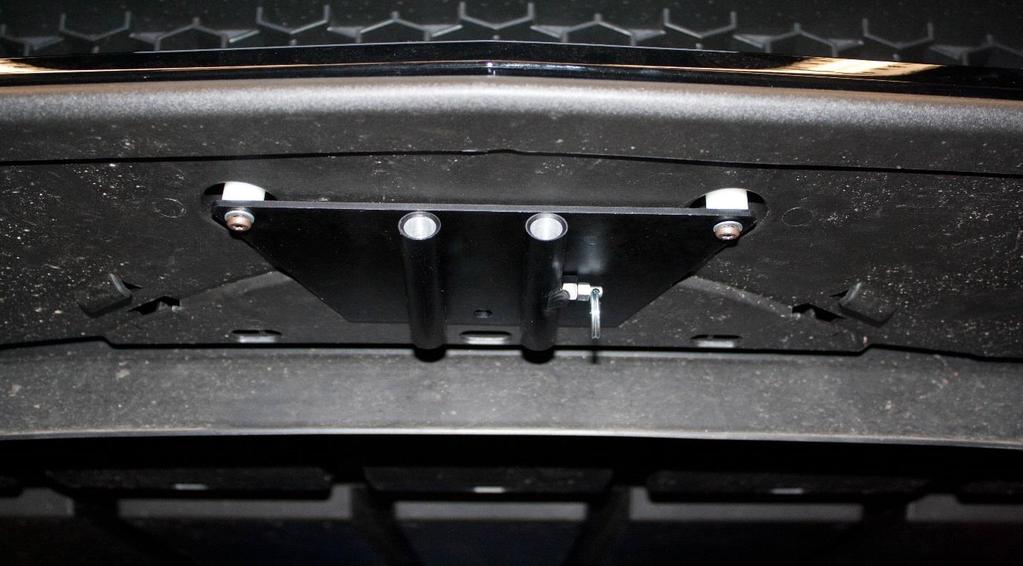
2 Warning: Please read directions completely before starting. If you have any questions please contact BMPP before beginning your installation. Also please check our website (bigmikesperformanceparts.com) for any updates or changes. Thank You. Parts Included: License Plate mounting bracket Assembly. Includes Base Plate and License Plate Holder. License Plate mounting Screws: (2) 6mm X 16mm (Phillips head), (2) 6mm nuts with lock washers (10mm wench size) Base plate mounting screws: (2) 4.2mm X55mm screws (1) 6.3mmX20mm with washer (2) nylon 1 1/2 spacers. Tools Needed: T15 Torx, 7mm & 10mm sockets with ratchet Note: 1/4 inch drive preferred but 3/8 will work (but extra caution will be needed when tightening screws) Phillips screwdriver & 10mm wrench 1/8 inch drill bit and drill. Step 1: Insure all parts listed above are accounted for. Note: If at any time during the installation process you need assistance please call (831) Step 2: Separate the license plate holder from the base by simply pulling the pull pin ring outward and sliding apart. Step 3: Remove the two center spoiler screws (4.2mm) using a 7mm socket and ratchet. See figure 1 for location. Note: If your vehicle is equipped with the air dam shown in figure 1a it must be modified as follows: Carefully separate the center spot weld that holds the rubber air dam to the underbody deflector panel as shown in figure 1a. This can usually be done by simply pulling on the air dam at the point of the weld. Step 4: Now position the base mount with the two holes towards the front of the car, centered over the two holes where the two 4.2mm screws was just removed. Note: On the 3.2 and V-6 models equipped with the air dam shown in figure 1a, the base plate will slide between the underbody deflector panel and the rubber air dam. Tube will be facing down see figure 2. Now slide the rubber air dam back towards the rear of the bracket and slip the lip of the air dam under the rear of the bracket. Using the (2) 4.2mm X 55mm screws and the (2) 1 1/2 nylon spacers secure the base plate in place. See figure 2a.
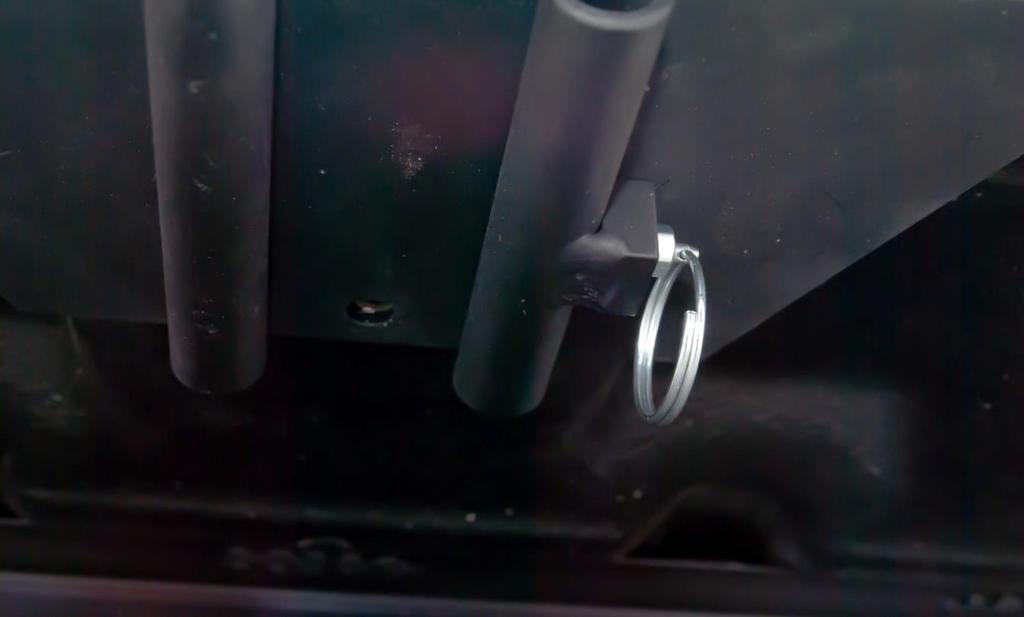
3 Step 5: Once base plate is secured using the two front mounting holes, carefully drill one pilot hole for the rear mounting screw. This will secure the rear of the bracket and the air dam. See figure 3. Step 6: Using the 6.3X20mm screw secure the rear of base plate to the vehicle using the following method. Caution: When tightening the screw extreme care should be taken not to over tighten screw or the hole may become stripped and lose its ability to secure the base plate. Place the screw into the 10mm socket and begin to tighten. Once the screw is flush with the plate stop. Now Tighten screw one half turn and stop. Step 7: Secure the license plate and frame (optional) to the license plate bracket using the two screws and nuts provided. Requires the Phillips screwdriver and 10mm wrench (Not included). Step 8: Slide the license plate rods into the two tubes located on the base plate. Slide the rods into the tubes until the rods hit the pull pin. Simply pull the ring on the pull pin and advance the rods. Release ring and continue to advance rods until the pull pin locks into place. NOTE: If the rods become difficult to insert into the tubes, spray with WD-40 or any other silicone type spray lube. See figure 4. In some occasions the license plate may require a little adjustment to level. Simply pull pin and slide plate out approximately two inches, grab frame at arrows (See figure 5) and rotate. If plate is high on left or right side, rotate high side down slightly and release. Verify alignment and repeat as necessary. Once leveled plate will remain level. Congratulations!! You have just installed the STO N SHO TM (Patent Pending) front license plate mounting system. Thank You for your purchase. Caution: Bracket lowers ground clearance by approx. 1/2 inch. Remove prior to entering automated car wash Exercise care when entering or exiting steep driveways or damage will occur Parking Stops or high curbs, stop well before or damage will occur Remove prior to running on race track or racing Medium skill level required. If unsure, have bracket installed by your local Dealer or Body shop. Limited Lifetime Warranty (Transferable) Big Mike's Performance Parts (BMPP) warrants to the original purchaser only that this product will be free of manufacturing defects in material and workmanship for the life of the product to the limitations and exclusions set forth below:
4 Return product to any authorized dealer. Contact BMPP for the dealer nearest you. Upon examination, BMPP or its representative will, at its sole option and expense, repair or replace any product found to be defective. If product to be replaced via mail, BMPP will return the repaired or replaced unit to you via its usual shipping method from the factory to your address in the United States of America or Canada only. Any shipping costs for addresses outside of the United States or Canada shall be the responsibility of the purchaser. This warranty is transferable when product is attached to a vehicle REMEDIES FOR BREACH OF WARRANTY. This Warranty does not include repair for damage caused by improper use or handling, including but not limited to damage caused by accident, mishandling, improper installation, abuse, negligence, or any defect caused by repair to the product by anyone other than BMPP. This warranty does not cover reimbursement for your costs of removing and transporting the product for warranty service evaluation, or installation of any replacement product provided under this warranty. This Warranty will be void if the product was not purchased from an authorized dealer or reseller. THE FOREGOING WARRANTIES ARE EXCLUSIVE AND IN LIEU OF ALL OTHER EXPRESSED AND IMPLIED WARRANTIES. ALL SUCH OTHER WARRANTIES, INCLUDING BUT NOT LIMITED TO IMPLIED WARRANTIES OF MERCHANTABILITY, FITNESS FOR A PARTICULAR PURPOSE AND NON- INFRINGEMENT, WITH RESPECT TO THE PRODUCT. TO THE MAXIMUM EXTENT PERMITTED BY LAW, BMPP SHALL NOT BE RESPONSIBLE FOR ANY INCIDENTAL OR CONSEQUENTIAL DAMAGES EXCEPT TO THE EXTENT PROVIDED (OR PROHIBITED) BY APPLICABLE LAW, EVEN IF BMPP HAS BEEN ADVISED OF THE POSSIBILITY OF SUCH DAMAGES. Notwithstanding the above, if you qualify as a consumer under the Magnuson-Moss Warranty Act, or applicable state laws, then you may be entitled to any implied warranties allowed by law for the Warranty Period. Further, some states do not allow limitations on how long an implied warranty lasts or allow the exclusion or limitation of consequential damages, so such limitations may not apply to you. This warranty gives you specific legal rights, and you may also have other rights which vary from state to state. For the name of your nearest authorized BMPP dealer, contact: Big Mike's Performance Parts at (831) or go to bigmikesperformanceparts.com


5 Fig 1 Fig 1a

6 Fig 2 Fig 2a

7 Fig3 Fig 4

8 Fig 5
Installation Procedures 2018 Mustang GT & EcoBoost SNS 135
 Installation Procedures 2018 Mustang GT & EcoBoost SNS 135 Warning: Please read directions completely before starting. If you have any questions, please contact BMPP before beginning your installation.
Installation Procedures 2015 Corvette C-7 Z06 With Carbon Fiber Kit SNS 50a
 Installation Procedures 2015 Corvette C-7 Z06 With Carbon Fiber Kit SNS 50a Warning: Please read directions completely before starting. If you have any questions please contact BMPP before beginning your
Installation Procedures Jaguar XF SNS 92
 Installation Procedures 2016-2017 Jaguar XF SNS 92 Warning: Please read directions completely before starting. If you have any questions please contact BMPP before beginning your installation. Also please
Installation Procedures For Corvette Basic/C-6 SNS 28
 Installation Procedures For 2005-2013 Corvette Basic/C-6 SNS 28 Warning: Please read directions completely before starting. If you have any questions please contact BMPP before beginning your installation.
Installation Procedures Maserati Gran Turismo Sport SNS 85
 Installation Procedures 2012-2017 Maserati Gran Turismo Sport SNS 85 Warning: Please read directions completely before starting. If you have any questions please contact BMPP before beginning your installation.
Installation Procedures Dodge Charger R/T Scat Pak, SRT/Hellcat. SNS 66a
 Installation Procedures 2015-2017 Dodge Charger R/T Scat Pak, SRT/Hellcat SNS 66a Warning: Please read directions completely before starting. If you have any questions please contact BMPP before beginning
Installation Procedures For 2013 Mustang V-6 and 5.0
 Installation Procedures For 2013 Mustang V-6 and 5.0 Warning: Please read directions completely before starting. If you have any questions please contact BMPP before beginning your installation.. Also
Installation Procedures Dodge Challenger SXT, R/T, Scat Pak, SRT & Hellcat SNS 1a
 Installation Procedures 2015-2017 Dodge Challenger SXT, R/T, Scat Pak, SRT & Hellcat SNS 1a Warning: Please read directions completely before starting. If you have any questions, please contact BMPP before
Spa & Hot Tub Necessities. Cover Removal System Installation & Use Manual
 Spa & Hot Tub Necessities Cover Removal System Installation & Use Manual SET-UP AND ASSEMBLY BEFORE BEGINNING ASSEMBLY, CAREFULLY READ THE FOLLOWING INFORMATION AND INSTRUCTIONS: Place all parts in a cleared
INSTRUCTION BOOK FOR. IDEA Screen & Panoramic for Nureva Span
 INSTRUCTION BOOK FOR IDEA Screen & Panoramic for Nureva Span Disclaimer Milestone and its affiliated corporations and subsidiaries (collectively "Milestone"), intend to make this manual accurate and complete.
Tilting, Swiveling & Rotating Flat Panel Wall Mount
 Tilting, Swiveling & Rotating Flat Panel Wall Mount Model: VXA980TC +5 to -5 +5 to -5 Supports most 0-80 Flat Panel TVs Maximum Weight Capacity: 32 lbs. Supports VESA Sizes up to 600x500 For technical
RPR-265. Power Rack (Cage)
") ASSEMBLY INSTRUCTIONS 3 3/4" RPR-5 50 3/4" 51 1/4" Power Rack (Cage) TuffStuff Fitness Equipment, Inc. 15 E. Franklin Avenue Pomona, CA 9166, USA Ph: 909-6-1600 Fax: 909-6-496 E-mail: service@tuffstuff.net
ASSEMBLY INSTRUCTIONS 3 3/4" RPR-5 50 3/4" 51 1/4" Power Rack (Cage) TuffStuff Fitness Equipment, Inc. 15 E. Franklin Avenue Pomona, CA 9166, USA Ph: 909-6-1600 Fax: 909-6-496 E-mail: service@tuffstuff.net
Instruction Sheet D-CPU. Secure CPU Holder
 Instruction Sheet D-CPU Secure CPU Holder I-00457 Rev A PARTS LIST NOTE: Select Security Components when a more secure application is desired. Mounting Track with Mounting Tape Security Bracket Assembly
Tilting Flat Panel Wall Mount Installation Guide
 Tilting Flat Panel Wall Mount Installation Guide Model: A580TM Easy installation Built-in level for easy positioning Safety bolts lock the TV on the mount Easy to adjust tilt angles: +5 to -15 degrees
PRIMO 56" FOOSBALL TABLE ASSEMBLY INSTRUCTIONS
 PRIMO 56" FOOSBALL TABLE ASSEMBLY INSTRUCTIONS NG1035 THANK YOU! Thank you for purchasing this product. We work around the clock and around the globe to ensure that our products maintain the highest possible
OPERATORS MANUAL WEEKENDER STEEL LADDER RACK
 OPERATORS MANUAL WEEKENDER STEEL LADDER RACK WWW.WEATHERGUARD.COM MODELS 1450 & 1475 1475 Shown INSTALLATION TIME Approximate installation time: 60 minutes (depending on truck equipment installation experience
Installation Instructions Kit, Base Rail Bracket Part # 31413
 Installation Instructions Kit, Base Rail Bracket Part # 31413 Dealer / Installer: End User: Provide a copy of these Instructions to the end user of this product. These Instructions provide important operating
Assembly Instructions and Parts Manual JPSF-1 Fence and JPSR Rail Set
 Assembly Instructions and Parts Manual JPSF-1 Fence and JPSR Rail Set WALTER MEIER (Manufacturing) Inc. 427 New Sanford Road LaVergne, Tennessee 37086 Part No. M-708482 Ph.: 800-274-6848 Revision C2 02/2013
Specifications. Important Safety Information
 Specifications Tire Rim Capacity 4 to 12 Rim Height 16 (2) Bead Breaker Handles 21 Long Includes Aluminum Centering Cone (2) Nylon Spacers Important Safety Information 1. Do not exceed max. tire capacity.
Powered by. For further installation assistance: prxperformance.com/pages/murphy-rack
 Powered by The 90 Fold-in Murphy Rack is made by the creators of the original Profile Folding Rack at PRx Performance and is Patent Pending. An up-to-date record of patents and patent pending items can
SS/SW3230RTA Assembly Instructions Ready to Assemble Multimedia Lectern
 650 Anthony Trail, Suite D, Northbrook, IL 60062 Phone: (800)267-5486 Fax: (800)267-5489 www.ampli.com - info@ampli.com SS/SW3230RTA Assembly Instructions Ready to Assemble Multimedia Lectern Thank you
THANK YOU FOR PURCHASING OUR STUDIO RTA CREATION STATION
 THANK YOU FOR PURCHASING OUR STUDIO RTA MODEL# 20672 IF YOU REQUIRE ANY ASSISTANCE WITH ASSEMBLY, PARTS, OR INFORMATION ON OTHER PRODUCTS, PLEASE VISIT OUR WEBSITE: www.studiorta.com OR CALL OR WRITE THE
Tilting & Swiveling Flat Panel Wall Mount Installation Guide Model: AXS2040
 Tilting & Swiveling Flat Panel Wall Mount Installation Guide Model: AXS2040 20-40 66 lbs. Supports VESA sizes up to: 200x200 For technical assistance or troubleshooting please call 1-855-994-2825 or visit
INSTALLATION INSTRUCTIONS
 INSTALLATION INSTRUCTIONS FLIP Flip-Down LCD Mount NORTH AMERICA 3130 East Miraloma Avenue Anaheim, CA 92806 USA USA and Canada Phone: 800-368-9700 Fax: 800-832-4888 EUROPE Swallow House, Shilton Industrial
AM500-U Installation Guide
 1321 S. State College Blvd., Fullerton, CA 92831 USA Included Components Maximum Flat Panel Weight: 500 lb. / 226.79 kg. Wall Mount Bracket (Qty 2) Cross Bar 5/16 Flat Washers (Qty 6) Universal Spacers
Security Products & Services...That Never Sleep. Sur-Lock. I/O 2000L Family of Exit Control Alarm Locks. Installation Instructions
 Security Products & Services...That Never Sleep Sur-Lock I/O 2000L Family of Exit Control Alarm Locks Installation Instructions IMPORTANT It is important that you read and follow these instructions carefully.
THANK YOU FOR PURCHASING OUR STUDIO RTA PROJECT STATION
 THANK YOU FOR PURCHASING OUR STUDIO RTA MODEL# 50040 BLACK/MAPLE, 50042 PEWTER/CHERRY IF YOU REQUIRE ANY ASSISTANCE WITH ASSEMBLY, PARTS, OR INFORMATION ON OTHER PRODUCTS, PLEASE VISIT OUR WEBSITE: www.studiorta.com
P4263TP. Installation Guide. Low-Profile Tilting Portrait Mount for Flat-Panels
 Low-Profile Tilting Portrait Mount for Flat-Panels 1321 S. State College Blvd., Fullerton, CA 92831 USA Weight Limit Maximum Flat Panel Weight: 175 lbs. Warning Statements THE WALL STRUCTURE MUST BE CAPABLE
HUSTLER 7' & 8' POOL TABLE ASSEMBLY INSTRUCTIONS
 HUSTLER 7' & 8' POOL TABLE ASSEMBLY INSTRUCTIONS Please Do Not Hesitate to Contact Our Consumer Hotline at 800-759-0977 with Any Questions That May Arise During Assembly or Use of This Product! NG2515PB/NG2520PB
Installation Manual Roof Zone Ladder Rack
 Installation Manual Roof Zone Ladder Rack 102113,E1346 Installation Time: About 90 minutes. Depending on truck and Do-it-Yourself experience level Tools Required: Electric Drill with 1/2 Chuck 1/2 & 7/32
Please Do Not Return This Product To The Store!
 MODEL NOS. T8512 TOURNAMENT SERIES 3 TABLE TENNIS TABLE OWNER'S MANUAL 1. Read this manual carefully before starting assembly. Read each step completely before beginning each step. 2. Some smaller parts
PAM-200 Universal Projector Mount
 INSTALLATION MANUAL PAM-200 Universal Projector Mount Sony Electronics 16540 West Bernardo Drive San Diego, CA 92127 www.sony.com IN-PAM200.R0 Table of Contents Parts List...- 3 - Installation Tools...-
Assembly Instructions and Parts Manual JPSF-1 Fence and JPSR Rail Set #
 Assembly Instructions and Parts Manual JPSF-1 Fence and JPSR Rail Set #1002493 JET 427 New Sanford Road LaVergne, Tennessee 37086 Part No. M-708482 Ph.: 800-274-6848 Revision C3 02/2014 www.jettools.com
Please Do Not Return This Product To The Store!
 MODEL NOS. T81 TABLE TENNIS TABLE OWNER'S MANUAL 1. Read this manual carefully before starting assembly. Read each step completely before beginning each step.. Some smaller parts may be shipped inside
1-CYLINDER TORNADO LIFT INSTALLATION MANUAL
 1-CYLINDER TORNADO LIFT INSTALLATION MANUAL Model: TORNADO LIFT 2K 2018 Edition PROVIDED FOR ASSEMBLY Foot Pads 12 sq. Square Tube Legs (optional) Cross Beams Side Beams 2.5 Dia. Cylinders (with hoses
INSTALL INSTRUCTIONS WELCOME TO THE NEWAGE PERFORMANCE CABINETRY SERIES NEWAGE STEEL WELDED CABINETRY
 NEWAGE STEEL WELDED CABINETRY WELCOME TO THE NEWAGE PERFORMANCE CABINETRY SERIES ALL CABINETS MUST BE MOUNTED TO STUDS ON A SECURE WALL, AS PER THESE INSTRUCTIONS. FAILURE TO DO SO MAY RESULT IN SERIOUS
Please visit for the latest version of these installation instructions.
 Please visit www.blueox.com for the latest version of these installation instructions. BX3785 Attachment Tab Height: 14-1/2 Serial Number Attachment Tab Width: 21 Please read BOTH these and the General
Installation Instructions Hinged Roof Rack
 Installation Instructions Hinged Roof Rack Application: Jeep Wrangler Unlimited 2004 - Current Part Number: 41435-01 www.bestop.com - We re here to help! Visit our web site and click on Ask a Question
One Shelf, Wall Mounted A/V Component Stand Installation Guide Model: EX101SS
 One Shelf, Wall Mounted A/V Component Stand Installation Guide Model: EX0SS For technical assistance or troubleshooting please call -855-994-3832. This product is intended for use only with Audio/Video
6-CYLINDER TORNADO LIFT INSTALLATION MANUAL
 6-CYLINDER TORNADO LIFT INSTALLATION MANUAL Model: TORNADO LIFT 18K 2018 Edition PROVIDED FOR ASSEMBLY (4) Foot Pads 16 sq. (4) Square Tube Legs (optional) (2) Cross Beams (2) Side Beams 2.5 Dia. Cylinders
25-A Shawnee Way Bozeman, MT Fed ID PH FAX
 25-A Shawnee Way Bozeman, MT 59715 Fed ID 81-0414516 PH 406-586-9393 FAX 406-585-7378 SkyBar Mount for UTV with 1 ¾ 2 Roll Bar Standard Mount (optional mount on page 3) This gun rack is supplied with brackets
VOLUME CONTROL CONNECTION TERMINAL
 INSTALLATION & USER GUIDE For Parallel Signal Distribution to Multiple Volume Controls VOLUME CONTROL CONNECTION TERMINAL V-T8 V-T8 VOLUME CONTROL CONNECTION TERMINAL TABLE OF CONTENTS Features...1 Product
For Precise Volume Adjustment with Programmable Muting in Any Room
 INSTALLATION & USER GUIDE For Precise Volume Adjustment with Programmable Muting in Any Room 12 STEP MUTING WALL MOUNT VOLUME CONTROL V-12M V-12M 12 STEP MUTING WALL MOUNT VOLUME CONTROL TABLE OF CONTENTS
Single Arm Pole Mount. Installation Manual Edition v1.01. For models: UNI-SA/14 UNI-SA/21.5 UNI-SA/26 UNI-SA01-MAN
 Pole Mount Installation Manual 2016 Edition v1.01 For models: UNI-SA/14 UNI-SA/21.5 UNI-SA/26 UNI-SA01-MAN Table of Contents 1 1 2 3 4 5 5 Introduction Customer Support Project Essentials Assembly: Steps
INSTALLATION INSTRUCTIONS
 INSTALLATION INSTRUCTIONS Universal Short Throw Projector Arm Model: UNI-STA/UNI-EXT NORTH AMERICA 3130 East Miraloma Avenue Anaheim, CA 92806 USA USA and Canada Phone: 1-800-368-9700 Fax: 1-800-832-4888
Installation and Assembly: Articulating Swivel Arm for 37" - 60" Flat Panel Displays
 Installation and Assembly: Articulating Swivel Arm for 37" - 60" Flat Panel Displays Models: PLA60, PLA60-S, PLAV60, PLAV60-S Max UL Load Capacity: 175 lb (79 kg) 2300 White Oak Circle Aurora, Il 60502
Please Do Not Return This Product to the Store!
 MODEL NO. B400W GS60 BASKETBALL SYSTEM O W N E R ' S M A N U A L 1. Read this manual carefully before starting assembly. Read each step completely before beginning each step.. Some smaller parts may be
4Post and 2Post Rails for Dell PowerEdge R810
 4Post and 2Post Rails for Dell PowerEdge R810 Patent(s) Pending 4Post Page 2 2Post Center Page 4 2Post Flush Page 6 Installation Instructions Kit P/N: 109-1737 109-1841 Kit Contents Kit Contents: (1) Right
INSTALLATION INSTRUCTIONS
 INSTALLATION INSTRUCTIONS CTM-MS1 Flat Panel Display Mount (26 to 37 ) NORTH AMERICA 3130 East Miraloma Avenue Anaheim, CA 92806 USA USA and Canada Phone: 800-368-9700 Fax: 800-832-4888 Other Locations
#27541 Mobile Laptop. Charging Station. Assembly Instructions
 1 #27541 Mobile Laptop Charging Station Assembly Instructions #27541 Mobile Laptop Charging Station Part Drawing Description Qty Part Drawing Description Qty Hardware List P-1 Left Leg Welded 1 EA A Phil
#27541 Mobile Laptop Charging Station
 1 #27541 Mobile Laptop Charging Station Assembly Instructions #27541 Mobile Laptop Charging Station Part Drawing Description Qty Part Drawing Description Qty Hardware List P-1 Left Leg Welded 1 EA A Phil
8150 Variable-Height Keyboard Slide
 Note: Rockler may not carry all products and/or sizes listed in this vendor's publication KNAPE 8150 Variable-Height Keyboard Slide KV 8150 Major Dimensions and Mounting Hole Locations 12" - 24837 14"
Tablet Arm for Wenger Playright Chairs
 Assembly Instructions Tablet Arm for Wenger Playright Chairs CONTeNTs Before You Begin..........................................................2 Warranty.................................................................2
INSTRUCTION MANUAL TAPER ATTACHMENT MODEL M1022. Phone: (360) On-Line Technical Support: FOR USE WITH MODEL M1019
 On-Line Technical Support: FOR USE WITH MODEL M1019") MODEL M1022 TAPER ATTACHMENT FOR USE WITH MODEL M1019 INSTRUCTION MANUAL Phone: (360) 734-3482 On-Line Technical Support: tech-support@shopfox.biz #6809BL COPYRIGHT DECEMBER, 2004 BY WOODSTOCK INTERNATIONAL,
MODEL M1022 TAPER ATTACHMENT FOR USE WITH MODEL M1019 INSTRUCTION MANUAL Phone: (360) 734-3482 On-Line Technical Support: tech-support@shopfox.biz #6809BL COPYRIGHT DECEMBER, 2004 BY WOODSTOCK INTERNATIONAL,
INSTALLATION INSTRUCTIONS
 CREATING POSITIVE CUSTOMER EXPERIENCES INSTALLATION INSTRUCTIONS Universal Low Profile Tilt Mount for 42 to 63 Flat Panels NORTH AMERICA 3130 East Miraloma Avenue Anaheim, CA 92806 USA USA and Canada Phone:
PRC-LA Installation Guide
 1321 S. State College Blvd., Fullerton, CA 92831 USA Weight Limit Maximum Flat Panel Weight: Warning Statements 50 lbs. THE WALL STRUCTURE MUST BE CAPABLE OF SUPPORTING AT LEAST FOUR TIMES THE WEIGHT OF
RESIDENTIAL MOTORIZED STORAGE UNIT
 BY V-BRO PRODUCTS RESIDENTIAL MOTORIZED STORAGE UNIT Model: GGR220 INSTALLATION AND OPERATING INSTRUCTIONS Distributed Exclusively by V-BRO PRODUCTS For technical questions and replacement parts, please
INSTRUCTION BOOK FOR. Parallax 0.8 Screen
 INSTRUCTION BOOK FOR Parallax 0.8 Screen Included Hardware Large Wall Bracket (47" Long) Installation screws not included Quantities vary by screen size: Screens 80" and smaller viewing width = 1 Screens
Installation Guide. Model VLS-TM1540. Universal Tilt/Pivot Wall Mount for use with Flat Panel Displays
 Installation Guide www.revenaproducts.com 4915 SW Griffith Drive Suite 302 Beaverton, OR 97005 Model VLS-TM1540 Universal Tilt/Pivot Wall Mount for use with 15-40 Flat Panel Displays Installation Guide
Instruction Sheet SNE SERIES. Cable Chase
 Instruction Sheet SNE SERIES Cable Chase THANK YOU Thank you for purchasing the SNE Series Cable Chase. Please read these instructions thoroughly before installing this product. PRODUCT FEATURES The 45
00108/00110 INSTRUCTION MANUAL
 00108/00110 INSTRUCTION MANUAL Removable and Adjustable Mudflap System IMPORTANT! Please Read this Instruction Booklet prior to assembly of your Rock Tamer Kit. IMPORTANT! Exhaust Systems Note: Any modifications
VAN STORAGE SOLUTIONS FOR THE WAY YOU WORK
 WWW.WEATHERGUARD.COM VAN STORAGE SOLUTIONS FOR THE WAY YOU WORK Weather Guard / KNAACK 420 E. Terra Cotta Ave. Crystal Lake, IL 60014 USA 800-456-7865 (Toll Free) 800-334-2981 (Fax) Knaack.OrderEntry@wernerco,.com
Installation Instructions SRC OFF ROAD ROOF RACK Wrangler,97-06 Wrangler,04-06 Unlimited Part # s 76711,76713,76715)
") NOTE: Please read this information entirely before installing. To obtain correct installation, we recommend you follow these step-by-step instructions carefully. Please take care when installing this product
NOTE: Please read this information entirely before installing. To obtain correct installation, we recommend you follow these step-by-step instructions carefully. Please take care when installing this product
Owner s Manual LSP38 38 Lawn Sweeper
 Owner s Manual LSP38 38 Lawn Sweeper Manual Contents Safety Instructions Assembly Operation Maintenance Parts Warranty 2 4-13 2 11 14-15 16 Your Lawn Sweeper Congratulations on your purchase of a new Precision
FIXED-POSITION WALL MOUNT FOR TVs in.
 INSTALLATION GUIDE FIXED-POSITION WALL MOUNT FOR TVs 19-39 in. NS-HTVMFAB For wood-stud, solid concrete wall, or concrete block installations Safety information and specifications..... 2 Tools needed.............................
BOUNCE TABLE TENNIS TABLE & ACCESSORIES ASSEMBLY INSTRUCTIONS
 BOUNCE TABLE TENNIS TABLE & ACCESSORIES ASSEMBLY INSTRUCTIONS NG2325 THANK YOU! Thank you for your purchase of our product. We work around the clock and around the globe to ensure that our products maintain
INSTRUCTION BOOK FOR. UTB Contour
 INSTRUCTION BOOK FOR UTB Contour Included Hardware Tools Required for Installation Large (47 ) (1) Screens under 104" in viewing width (2) Screens 104" and over in viewing width Phillips Screwdriver Pencil
Stop! Read This Important Information.
 Stop! Read This Important Information. Stop, Do Not Proceed, Read This This door replacement kit is designed for the replacement of doors on a Supertop ONLY! This door will not work on any other style
INSTALLATION INSTRUCTIONS
 CREATING POSITIVE CUSTOMER EXPERIENCES INSTALLATION INSTRUCTIONS PDS-PLUS Universal Projector Mount Model: NORTH AMERICA 3130 East Miraloma Avenue Anaheim, CA 92806 USA USA and Canada Phone: 1.800.368.9700
31082 INSTALLATION INSTRUCTIONS
 08 INSTALLATION INSTRUCTIONS Safety glasses should be worn at all times while installing this product. YEARS: 07-CURRENT MAKE: HONDA MODEL: RIDGELINE STYLE: TRUCK WARNING: NEVER EXCEED YOUR VEHICLE MANUFACTURER'S
SKID STEER STRAIGHT PLOW
 BOSS PRODUCTS A Division of Northern Star Industries, Inc. P.O. Box 787 Iron Mountain MI 49801-0787 www.bossplow.com SKID STEER STRAIGHT PLOW INSTALLATION & OWNER S MANUAL TABLE OF CONTENTS SAFETY PRECAUTIONS...
Prime Engineering Up-Rite Stander
 OWNER S MANUAL PRODUCT PHOTO PARTS LIST ASSEMBLY INSTRUCTIONS MAINTENANCE WARRANTY Prime Engineering Up-Rite Stander Manufactured By Prime Engineering A Division of Axiom Industries Industries, Inc. 4202
Owner s Manual Mobile Flat-Panel Floor Stand
 Owner s Manual Mobile Flat-Panel Floor Stand Model: DMCS3270XP Espanol 13 Francais 25 Русский 37 Deutsch 49 CAUTION: DO NOT EXCEED MAXIMUM LISTED WEIGHT CAPACIT. SERIOUS INJUR OR PROPERT DAMAGE MA OCCUR!
AST-2446 INSTALLATION INSTRUCTIONS
 AST-2446 Suspension Adapter AST-2446 INSTALLATION INSTRUCTIONS Single Stud Installation Step 1. Secure the ceiling plate to the ceiling structure (see WARNING). Step 2. Use suitable hardware (commercially
Manual Carton Closing Staplers
 Operator s Manual Manual Carton Closing Staplers SHB00-A Item No. 6400 -/8" Crown Carton Closing Stapler 5/8" and /4" (5mm and 8mm) Ask for Genuine INTERCHANGE A58 and A4 Staples SHB50-C Item No. 640 -/4"
Instruction Sheet. VRS Series. Vertical Rackmount system for multiple cable/satellite receivers
 Instruction Sheet VRS Series Vertical Rackmount system for multiple cable/satellite receivers THANK YOU Thank you for purchasing the VRS Vertical Rackmount System. Please read these instructions thoroughly
the slim retracting clothesline product manual
 &6 the slim retracting clothesline product manual for 4 and 6-line models HLS0046_4-6 line_owners Manual_v6.indd 1 2 Introduction Congratulations Congratulations on the purchase of your new Hills slim
RV 10 Interior Panels
 RV 10 Interior Panels Important Notice: This manual contains important information that may affect the safety of your aircraft. Read the Warranty / Agreement below. There is information in the Warranty
Spa & Hot Tub Necessities. Cover Butler Cover Lifter Installation & Use Manual
 Spa & Hot Tub Necessities Cover Butler Cover Lifter Installation & Use Manual The Cover Butler adjusts to fit most square/rectangular spas up to 99 in width. When assembled it forms a rectangular shape.
INSTALLATION INSTRUCTIONS
 INSTALLATION INSTRUCTIONS P4263F Universal Low Profi le Flat Mount for 42 to 63 Flat Panels NORTH AMERICA 3130 East Miraloma Avenue Anaheim, CA 92806 USA USA and Canada Phone: 1.800.368.9700 Fax: 1.800.832.4888
O W N E R S M A N U A L
 O W N E R S M A N U A L TABLE TENNIS TABLE MODEL NO. T1 Please Do Not Return This Product to the Store! Contact Escalade Sports customer service department at: Phone: 1-66-73-3 Toll-Free! Fax: 1-66-73-333
S-4VC/S-6VC. For Connecting Four/Six Pairs of Speakers to an Amplifier or Receiver, with Precise Volume Adjustment in any Zone
 INSTALLATION & USER GUIDE For Connecting Four/Six Pairs of Speakers to an Amplifier or Receiver, with Precise Volume Adjustment in any Zone SPEAKER SELECTORS WITH VOLUME CONTROLS S-4VC/S-6VC S-4VC / S-6VC
SawStop. T-GlideTM. Fence System- Professional Series II OWNER S MANUAL
 SawStop T-GlideTM Fence System- Professional Series II OWNER S MANUAL Warranty SawStop warrants to the original retail purchaser of a new T-Glide Fence System - Professional Series II from an authorized
Installation Instructions Tailgate Rack Bracket
 Installation Instructions Tailgate Rack Application: Jeep Wrangler 1986 Current Part Number: 41411 www.bestop.com - We re here to help! Visit our web site and click on Ask a Question. Click here for more
INSTALLATION INSTRUCTIONS
 INSTALLATION INSTRUCTIONS Universal Swingout Arm for 37 to 47 Flat Panels Model: AM80 NORTH AMERICA 3130 East Miraloma Avenue Anaheim, CA 92806 USA USA and Canada Phone: 1-800-368-9700 Fax: 1-800-832-4888
Aquatic Specialties Manufacturing. Cover Butler Installation & Use Manual
 Aquatic Specialties Manufacturing Cover Butler Installation & Use Manual The Cover Butler adjusts to fit most square/rectangular spas up to 99 in width. When assembled it forms a rectangular shape. The
Sloped Top Shop Desk and Cabinet Conversion Kit Assembly Instructions
 Sloped Top Shop Desk and Cabinet Conversion Kit Assembly Instructions IMPORTANT - PRODUCT LIABILITY INFORMATION Read all instructions before proceeding with installation. Vital product information pertaining
HT281 Dat e Code: 2 - HT WJ Purchase Date: PLEASE RETAIN THIS INSTRUCTION MANUAL FOR FUTURE REFERENCE. All Rights Reserved
 We strive to ensure that our products are of the highest quality and free of manufacturing defects or missing parts. However, if you have any problems with your new product, D O NOT RETURN IT TO THE STORE,
MAXIMIST HVLP TANNING SYSTEM
 L0941 12 10:Layout 1 16/12/10 09:03 Page 1 MAXIMIST HVLP TANNING SYSTEM DO NOT USE EQUIPMENT BEFORE READING THIS MANUAL This manual contains important warnings and instructions. Please read these instructions
PATRIOT DOCKS ASSEMBLY INSTRUCTIONS
 6/1/2008 PATRIOT DOCKS ASSEMBLY INSTRUCTIONS Congratulations on your new Patriot Dock purchase. This manual contains instructions to assemble basic dock configurations for use at typical shoreline application.
INSTALLATION GUIDE. Galaxy II
 INSTALLATION GUIDE Galaxy II IMPORTANT - READ THIS FIRST Inspect stair for any damage prior to installation. Stair is NOT to be installed while home is under construction and used as a construction stair.
OWNER S MANUAL with Assembly Instructions
 OWNER S MANUAL with Assembly Instructions VISIT E LIFETIME WEB SITE: WWW.LIFETIME.COM ** Do Not Contact the Store ** For Assistance, including missing or broken parts, Call Customer Service at: 1 (800)
Worktop. Weight Capacity. 100 lbs. 21 Corner Worktop. 48 Worktop. Fits over 2 Cabinets. 72 Worktop. Fits over 3 Cabinets. 200 lbs. 150 lbs.
 Bold.0 Warning: Excessive weight hazard! Use two or more people to move, assemble or install cabinets and locker to avoid back injury. Do not leave children unattended near cabinets. High risk of tipping
MaxLite Linear Strip ECO Series
 General Safety Information To reduce the risk of death, personal injury or property damage from fire, electric shock, falling parts, cuts/abrasions, and other hazards read all warnings and instructions
Assembly Instructions
 1 BLT-27565 FDB Stand Assembly Instructions BLT-27565 FDB Stand Part Drawing Description Qty Part Drawing Description Qty P-1 Top Shelf 1 EA P-10 LL Lower Leg 1 EA P-11 Middle Shelf 1 EA P-2 L-Upper Leg
NOVA-EXT Versatile Projector Mount Model: NOVA-EXT
 INSTALLATION MANUAL NOVA-EXT Versatile Projector Mount Model: NOVA-EXT NORTH AMERICA 3130 East Miraloma Avenue Anaheim, CA 92806 USA USA and Canada Phone: 800-368-9700 Fax: 800-832-4888 Other Locations
ASPEN OUTDOOR TABLE TENNIS
 ASPEN OUTDOOR TABLE TENNIS Replacement Parts Order direct at or call our Customer Service department at (800) 225-7593 8 am to :30 pm Central Standard Time January 201 UPC Code 7-19265-51830-3 Staple your
Models 2230 and 2240
 Models 2230 and 2240 Overview... 2 Tools Needed... 2 Hardware...3 Assembly... 4-13 Installation... 14 Drawer Removal... 15 Operation... 15 Maintenance... 15 Accessories... 16 Limited Warranty... 16 Perform
Owner s Manual AE PLUG AERATOR MANUFACTURING QUALITY LAWN CARE EQUIPMENT SINCE Made In CHINA REV
 MANUFACTURING QUALITY LAWN CARE EQUIPMENT SINCE 1945 Owner s Manual AE-48 48 PLUG AERATOR IMPORTANT Read and follow all Safety Precautions and Instructions Before Operating this Equipment. Made In CHINA
Please Do Not Return This Product To The Store!
 MODEL NO. B330 Goalrilla E BASKETBALL SYSTEM OWNER'S MANUAL. Read this manual carefully before starting assembly. Read each step completely before beginning each step.. Some smaller parts may be shipped