HANDLELESS RAIL SYSTEMS
|
|
|
- Anabel Gilbert
- 5 years ago
- Views:
Transcription

1 HANDLELESS RAIL SYSTEMS
2
3 CONTENTS RAIL PROFILE SYSTEMS 02 RECESSED RAIL SYSTEM 03 Product range overview 04 Base units 08 Wall cabinets 12 Appliance/larder unit 13 Appliance filler rail 15 End caps/corner joints 16 Applicable door ranges 19 Colour options 24 FLUSH RAIL SYSTEM 25 Product range overview 26 Base units 28 Wall cabinets 33 Vertical profiles 34 Top and mid profiles 36 Applicable door ranges 38 Colour options 40 KITCHEN FASCIA MATRIX 41 DOOR COMBINATIONS 42 Order online 01


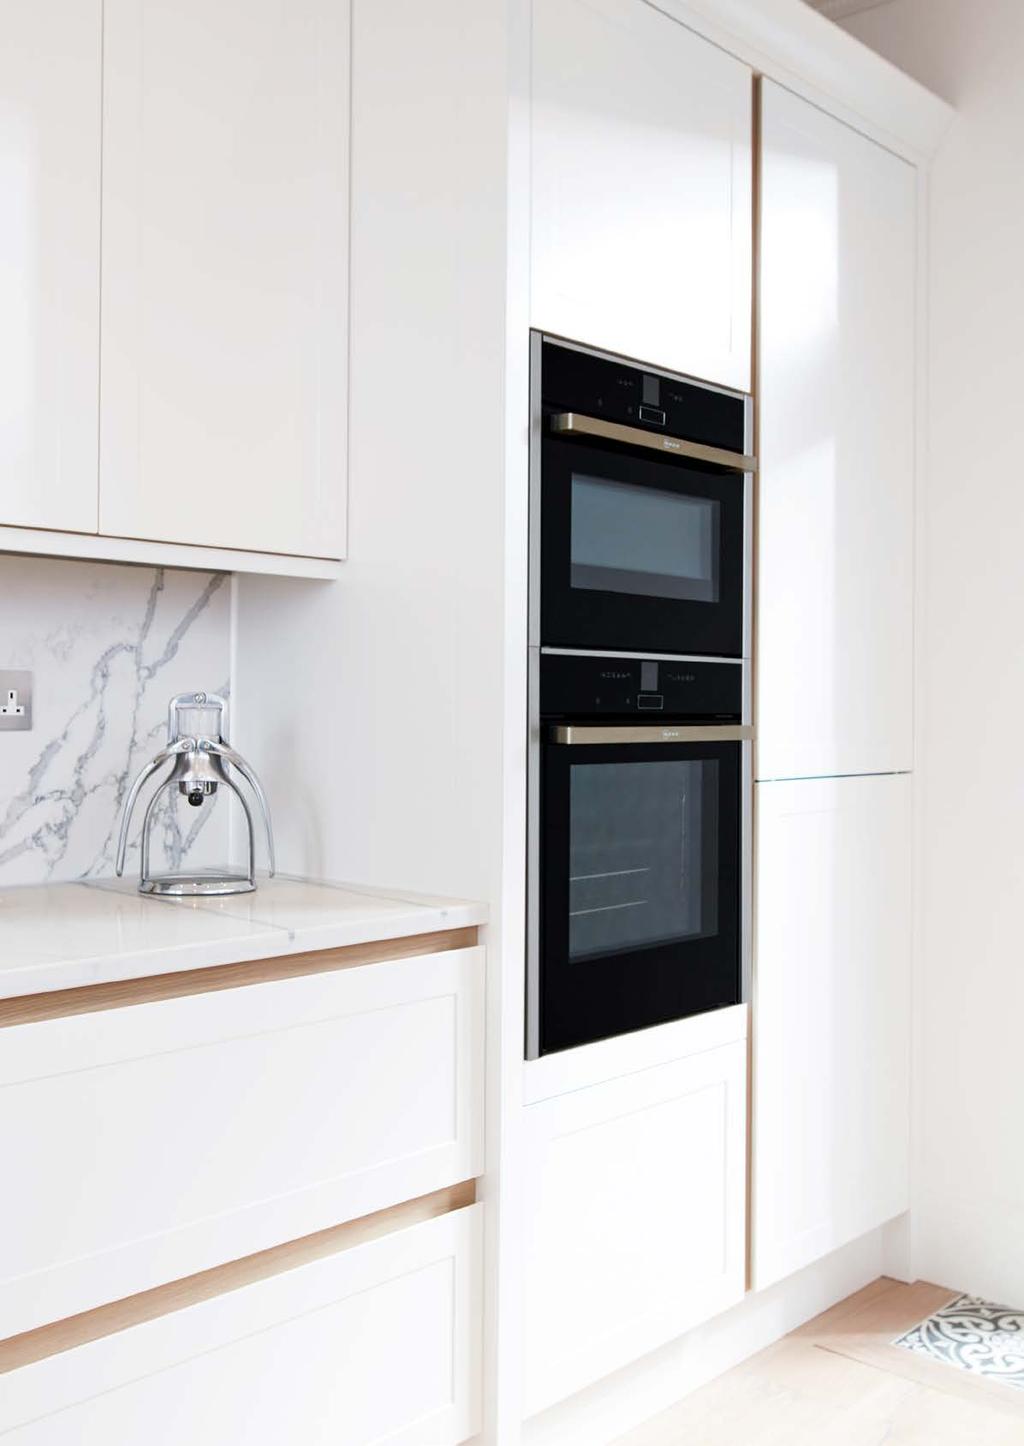
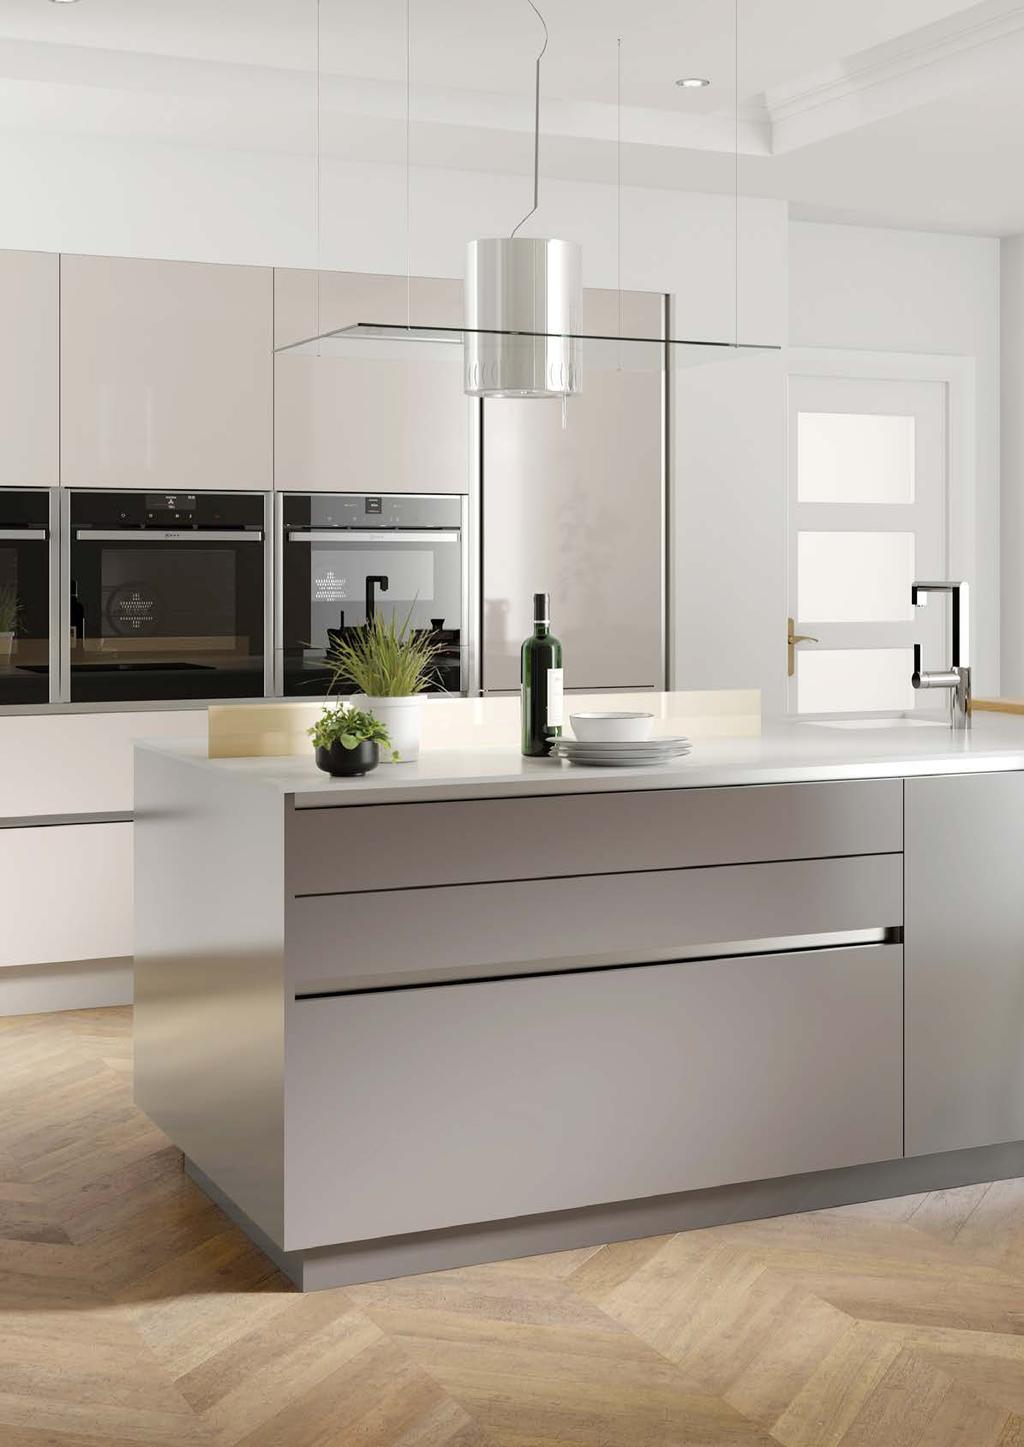
4 PWS offer two distinct rail systems that allow you to create true handleless kitchens Recessed and Flush. This document illustrates the difference between the two, where they can be used and how to fit them. RECESSED RAIL SYSTEM The recessed rail profile is designed to create a hand void behind the door. Cabinets need to be routered to accept the profile. FITTED RAIL DETAIL (top rail shown) FLUSH RAIL SYSTEM The flush rail profile is designed to sit flush to the front of the cabinet, using the same cabinet router detail as the recessed rail profile. It should only be specified on doors with a reverse chamfer. FITTED RAIL DETAIL (top rail shown) 02 T: (North) I 88 (South)

5 RECESSED RAIL SYSTEM 03
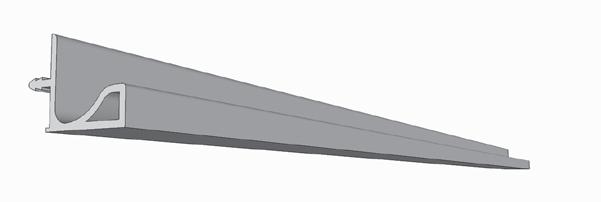
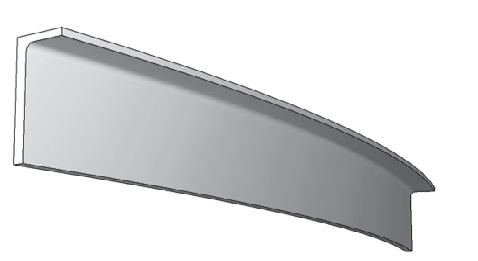
6 PRODUCT RANGE OVERIEW The recessed rail profile is designed to create a hand void behind the door. Designed for use with our Porter, Tomba, Reclaimed Oak and Character Graphite Feature Modern doors as well as our UNITY made to measure range. Cabinets need to be routered to accept the profile. TOP profiles for base units Code Description 1 GPT4100 Top profile for doors, 4100x56.5x27.2mm, aluminium 1 GPT4100MW Top profile for doors, 4100x56.5x27.2mm, matt white 1 GPT4100MG Top profile for doors, 4100x56.5x27.2mm, matt graphite 2 GPCTS560SDL Aluminium curved top profile for 300x560mm small curved base cabinet, left hand (cut down for 300x300 applications) 3 GPCTS560SDR Aluminium curved top profile for 300x560mm small curved base cabinet, right hand (cut down for 300x300 applications) 4 GPCTIC900 Aluminium curved top profile for 900 x 900mm internal curved corner base cabinet 5 GPTEND End caps for top profiles, pair, 1 left & 1 right hand, aluminium 5 GPTENDMW End caps for top profiles, pair, 1 left & 1 right hand, matt white 5 GPTENDMG End caps for top profiles, pair, 1 left & 1 right hand, matt graphite 6 GPTEX90 Top profile, external corner joint 90 degree, aluminium 6 GPTEX90MW Top profile, external corner joint 90 degree, matt white 6 GPTEX90MG Top profile, external corner joint 90 degree, matt graphite 7 GPTIN90 Top profile, internal corner joint 90 degree, aluminium 7 GPTIN90MW Top profile, internal corner joint 90 degree, matt white 7 GPTIN90MG Top profile, internal corner joint 90 degree, matt graphite 8 GPTJOINT Mid joint section for top profile, aluminium 8 GPTJOINTMW Mid joint section for top profile, matt white 8 GPTJOINTMG Mid joint section for top profile, matt graphite 9 GPFIXING Securing brackets for top and mid supports, black plastic, pk 2. Minimum order quantity of 25 MID profiles for base units 10 GPM4100 Mid profile for drawers, 4100x73x26mm, aluminium 10 GPM4100MW Mid profile for drawers, 4100x73x26mm, matt white 10 GPM4100MG Mid profile for drawers, 4100x73x26mm, matt graphite 11 GPMIN90 Mid profile, internal corner joint 90 degree, aluminium 11 GPMIN90MW Mid profile, internal corner joint 90 degree, matt white 11 GPMIN90MG Mid profile, internal corner joint 90 degree, matt graphite 12 GPMEND End caps for mid drawer profiles, pair, 1 left & 1 right hand, aluminium 12 GPMENDMW End caps for mid drawer profiles, pair, 1 left & 1 right hand, matt white 12 GPMENDMG End caps for mid drawer profiles, pair, 1 left & 1 right hand, matt graphite VERTICAL profiles for TALL units 13 GPV4200END Vertical profile (lateral), 4200x53.3x41mm, trim to size, aluminium 13 GPV4200ENDMW Vertical profile (lateral), 4200x53.3x41mm, trim to size, matt white 13 GPV4200ENDMG Vertical profile (lateral), 4200x53.3x41mm, trim to size, matt graphite 14 GPV4200MID Vertical a profile (intermediate), 4200x71.6x41mm, trim to size, aluminium 14 GPV4200MIDMW Vertical profile (intermediate), 4200x71.6x41mm, trim to size, matt white 14 GPV4200MIDMG Vertical profile (intermediate), 4200x71.6x41mm, trim to size, matt graphite 15 GPVAPPFILL Plug/filler for appliance fittings, 580mm, aluminium 15 GPVAPPFILLMW Plug/filler for appliance fittings, 580mm, matt white 15 GPVAPPFILLMG Plug/filler for appliance fittings, 580mm, matt graphite Profiles for wall units 16 GPW3900 Profile for wall cabinets, 3900x19.6x20mm, aluminium 16 GPW3900MW Profile for wall cabinets, 3900x19.6x20mm, matt white 16 GPW3900MG Profile for wall cabinets, 3900x19.6x20mm, matt graphite 17 GPCWS300SD Aluminium wall curved profile for 300x300mm small curved door 18 GPCWSIC600 Aluminium wall curved profile for 600x600mm internal curved wall unit Applicable 685mm high curved door sizes only available in Tomba. These products replac GPV2250MID and GPV2250END. The new specification includes a wider trim profile to allow easier opening of slab doors. Rail profiles are now supplied in lengths of 4.2m and now require a void of 35mm between adjacent cabinets. 04 T: (North) I 88 (South)


7 TOP profiles for base units MID profiles for base units VERTICAL profiles for TALL units Profiles for wall units STOCKED FINISHES Aluminium White Graphite * curved profiles only available in aluminium COMPATIBLE DOOR RANGES Porter Tomba Reclaimed Oak Character Graphite Unity Order online 05


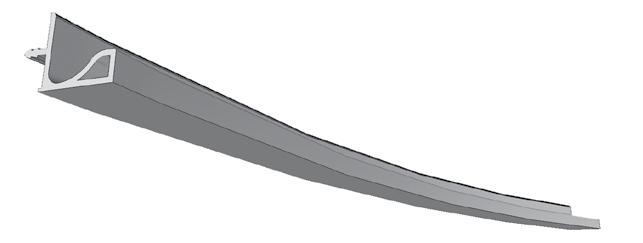
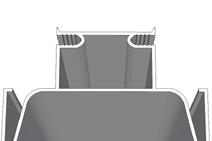


8 PRODUCT RANGE OVERVIEW A B E D C A WALL PROFILE FOR CABINETS Used for wall cabinet doors GPW x19.6x20mm D MID RAIL PROFILE Mid profile for drawers GPM x73x26mm B TOP RAIL PROFILE Top profile for doors GPT x56.5x27.2mm E INTERNAL CORNER JOINT 90 For top profile GPTIN90 External corner joint 90 C VERTICAL PROFILE Vertical profile (intermediate) GPV4200MID 4200x71.6x41mm 06 T: (North) I 88 (South)
 GPV4200MID 4200x71.")
 GPV4200END 4200x53.")
9 J H G F G I F F MID RAIL PROFILE Mid profile for drawers GPM x73x26mm I VERTICAL PROFILE Vertical profile (intermediate) GPV4200MID 4200x71.6x41mm trim to size G TOP RAIL PROFILE Top profile for doors GPT x56.5x27.2mm J VERTICAL PROFILE Vertical profile (lateral) GPV4200END 4200x53.3x41mm trim to size H VERTICAL PROFILE Appliance GPVAPPFILL 580x16x41, Set size Order online 07
 to fit the requested number of cabinets.")
, mid joint (GPTJOINT) an internal 90 corner (GPTIN90) and an")
 Worktop Top Rail Profile (GPT4100) Door/ drawer 18mm cabinet top panel Screw positions 32 22.5 4 R5 37 27 57.")
10 BASE UNITS TOP RAIL PROFILE GPT4100 The top rail profile for base unit doors/drawers is available in straight lengths of 4.1m and in set curved sections. Lengths are cut down to size (using a circular chop saw) to fit the requested number of cabinets. Securing brackets to fit rail profiles to the cabinets must be ordered separately in sets of 25 pairs (GPFIXING). A range of accessories are available for the top rail profile including end caps (GPTEND), mid joint (GPTJOINT) an internal 90 corner (GPTIN90) and an external 90 corner (GPTEX90). DIMENSIONS FITTED RAIL DETAIL ROUTING CABINET DETAIL Cabinet Top Panel Securing Brackets (GPFIXING) Worktop Top Rail Profile (GPT4100) Door/ drawer 18mm cabinet top panel Screw positions R OVERALL CABINET DIMENSIONS SEE PAGE 11 FOR DETAILS ON FITTING RAIL PROFILES TO CABINETS WITH SECURING BRACKETS (GPFIXING) T: (North) I 88 (South)
 to fit the requested number of cabinets.")
 and end cap (GPMEND) are available separately.")

11 BASE UNITS MID RAIL PROFILE GPM4100 The mid rail profile for base unit drawers is available in straight lengths of 4.1m. Lengths are cut down to size (using a circular/ chop saw) to fit the requested number of cabinets. Securing brackets to fit rail profiles to the cabinets must be ordered seperately in sets of 25 pairs (GPFIXING). An internal corner joint (GPMIN90) and end cap (GPMEND) are available separately. DIMENSIONS FITTED RAIL DETAIL ROUTING CABINET DETAIL 73 Securing Brackets (GPFIXING) Cabinet Door/drawer Trim (GPM4100) Door/drawer Screw positions R R5 OVERALL CABINET DIMENSIONS Order online 09

 should be fixed to the outer face of adjacent cabinets.")
 end caps to stop any gaps.")
12 BASE UNITS INTEGRATING UNDER COUNTER APPLIANCES The top rail profile (GPT4100) can be used when planning a dishwasher into base cabinets. XXL dishwasher models can not be used with rail profiles. It is recommended to use a dishwasher with a height range adjustment between mm for the appliance to sit under the rail. NOTE: We recommend setting the plinth at 155mm for extra clearance. INTEGRATED DISHWASHER DETAILS FITTED RAIL DETAIL Worktop Trim Securing Brackets (GPFIXING) * Dishwasher Door/ drawer min. 90 max. 220* Metal brackets (supplied with dishwasher) should be fixed to the outer face of adjacent cabinets. Please Note: an additional bracing baton may be required to the rear of the machine to help reduce movement. If a draw pack is situated beside an integrated appliance, we recommend using the (GPMEND or GPTEND) end caps to stop any gaps. UNDERMOUNTED OVEN APPLICATIONS A top rail profile can not be used in conjunction with an under-mounted oven. Rails must stop on each side of the appliance. They can be finished with GPTEND & GPMEND end caps. If using a freestanding appliance, end panels will need to be fitted either side of the appliance and the rail profile terminated against the panel. ILLUSTRATION SHOWS AN EXAMPLE OF HANDLELESS RAIL PROFILES (WITH END CAPS) TERMINATING AGAINST AN OVEN. 10 T: (North) I 88 (South)
 are required to fit both top and mid rail profiles to")
. FITTING TOP RAIL PROFILES 37 Screw positions 4 32 22.")


13 BASE UNITS SECURING BRACKETS FOR TOP AND MID RAIL PROFILES GPFIXING Securing brackets (GPFIXING) are required to fit both top and mid rail profiles to cabinets and must be ordered separately to the rail profiles (supplied in packs of 50). FITTING TOP RAIL PROFILES 37 Screw positions R Router cabinet gable ends for top rail profile and mark screw positions. Screw securing brackets into place. Slide H connector into runner on back of rail trim, sit rail on routed gable ends and slide connector to clip into the securing bracket and hold rail in place. FITTING MID RAIL PROFILES R R5 Router cabinet gable ends for mid rail profile and mark screw positions Screw securing brackets into place Slide H connector into runner on back of rail trim, sit rail on routed gable ends and slide connector to clip into the securing bracket and hold rail in place. Order online 11
 to fit between gables.")
 FITTING WALL RAIL PROFILES Cabinet Cabinet Base panel 20.8 Trend C143X1/4 TC 3.")

14 WALL CABINETS GPW3900 Rail profiles for wall units are available in straight lengths of 3.9m as well as curved rail sections. Single straight rail lengths are cut down to size (using a circular chop saw) to fit between gables. ROUTING CABINET DETAIL WALL RAIL PROFILE FITTED RAIL DETAIL Cabinet Routered Groove Door Trim (GPW3900) FITTING WALL RAIL PROFILES Cabinet Cabinet Base panel 20.8 Trend C143X1/4 TC 3.2mm (recommended slotting cutter) Fitted rail profile The base panel of the wall unit needs to be set back 20.8mm to accommodate the rail profile within the overall depth of the cabinet. A groove (3.2mm high, 8mm deep) must then be routed into the base panel using a slotting cutter. The rail profile then slots into the routed groove (clear silicone adhesive should be used to bind the rail with the panel). 12 T: (North) I 88 (South)


 36 20 72 When joining cabinets in")

15 APPLIANCE/ LARDER UNIT VERTICAL PROFILE (INTERMEDIATE) GPV4200MID The vertical intermediate profile should be used in the scenario where two opening doors meet. Due to the width and placement of the trims, a 35mm spacer is required at the back between the two cabinets to maintain the space created by the trim. The front of the gables on the cabinets need to be set back by 20mm for the trim to overlap behind the doors. The trim is securely fixed to the cabinets with 4 x 30mm countersunk screws. RAIL APPLICATION FITTING DETAIL RAIL APPLICATION BETWEEN TWO OPENING DOORS 35 Spacer (not supplied) When joining cabinets in larder runs, a spacer is needed at the back to maintain the 35mm void created by the trim profile. The spacer is screw fixed to the cabinets from the inside of each cabinet. TOP TIPS: 1. TRY TO POSITION THE SCREW HOLES IN THE CABINET SO THEY ARE CONCEALED (SUCH AS BEHIND HINGE PLATES) WHEN INTERNAL COMPONENTS ARE ADDED. 2. WHEN PLANNING APPLIANCE HOUSINGS DON T FORGET TO ALLOW 35MM BETWEEN UNITS WHERE ACCESS TO A HANDLE IS REQUIRED. Order online 13


 35 20 36 53 When joining cabinets in larder runs, a spacer is")
16 APPLIANCE/ LARDER UNIT VERTICAL PROFILE (LATERAL) GPV4200END The vertical lateral profile should be used in the scenario where you have an opening door to one side and don t require access to a handle on the opposite side. It can also be used to end a run where an end panel or accessory is fitted. Due to the width and placement of the trims, a 35mm spacer is required at the back between the two cabinets and 66mm between cabinet and end panel/feature post based on 50mm post and 18mm panel. The front of the gable on the cabinet needs to be set back by 20mm for the trim to overlap behind the door. The trim is securely fixed to the cabinets with 4 x 60mm countersunk screws. NOTE: THIS PRODUCT REPLACES GPV2250END. THE NEW SPECIFICATION INCLUDES A WIDER TRIM PROFILE TO ALLOW EASIER OPENING OF SLAB DOORS. RAIL PROFILES ARE NOW SUPPLIED IN LENGTHS OF 4.2M AND NOW REQUIRE A VOID OF 35MM BETWEEN ADJACENT CABINETS. RAIL APPLICATION FITTING DETAIL RAIL APPLICATION BETWEEN OPENING DOOR AND END PANEL/POST 66 Spacer (not supplied) When joining cabinets in larder runs, a spacer is needed at the back to maintain the 35mm void created by the trim profile. The spacer is screw fixed to the cabinets from the inside of each cabinet. TOP TIP: TRY TO POSITION THE SCREW HOLES IN THE CABINET SO THEY ARE CONCEALED (SUCH AS BEHIND HINGE PLATES) WHEN INTERNAL COMPONENTS ARE ADDED. 14 T: (North) I 88 (South)


17 APPLIANCE FILLER RAIL GPVAPPFILL Used to conceal the void behind an appliance when used in an appliance housing using vertical rail profiles Screw fixed into the cabinet gable 3No. pre-drilled, countersunk holes for ease of fitting Designed to fit seamlessly inside both Vertical Profiles GPV4200MID and GPV4200END Should the appliance require a screw fixing into the cabinet, the appliance filler can be drilled to accomodate the screws The trim can be cut down to suit different sized appliances and applications. When doing so, we recommend that the cut edge is treated with metal file to remove and sharp edges and is positioned out of the sight. APPLIANCE FILLER RAIL APPLIANCE FILLER RAIL SHOWN MOUNTED BEHIND APPLIANCE FITTING DETAIL DESIGNED TO MATCH BOTH VERTICAL PROFILES FOR A SEAMLESS LOOK AND SCREW-FIXED INTO THE CABINET Appliance Screw-fix into cabinet gable using 3No. 4x12mm screws before installation of the appliance. TOP TIPS: 1. IT IS POSSIBLE TO DRILL THROUGH THE TRIM IF THE APPLIANCE REQUIRES A SCREW-FIXING INTO THE CABINET. 2. APPLIANCE PLUG SHOWN SET DOWN FROM THE TOP OF THE APPLIANCE BY 10MM. WHEN STACKING APPLIANCES, WE RECOMMEND LEAVING A 10MM GAP TO THE TOP AND BOTTOM OF BOTH APPLIANCES. Order online 15
 GPTIN90 When applying a")


18 END CAPS/CORNER JOINTS TOP PROFILE INTERNAL CORNER JOINT 90 O (FOR USE WITH GPT4100) GPTIN90 When applying a corner post or internal corner doors, a top internal corner joint is required for two top profiles to run into. The internal corner joint section is supplied with two screws which when in position secure the joint to the rail profiles. TOP PROFILE EXTERNAL CORNER JOINT 90 O (FOR USE WITH GPT4100) GPTEX90 An external corner joint is available when running top rail profiles around an island or corner. The external corner joint is supplied with two screws, which when in position, secure the joint firmly to the rail profile. 16 T: (North) I 88 (South)
 End caps can be used when top rail trims come to an end (e.g.")

.")


19 END CAPS TOP PROFILE, PAIR, LH/RH (FOR USE WITH GPT4100) GPTEND (L/R pair) End caps can be used when top rail trims come to an end (e.g. against a wall, end panel next to appliances). A grub screw is supplied to attach the end cap firmly to the rail. TOP TIP: WHEN USING END CAPS, A 2MM SPACING MUST BE TAKEN IN TO ACCOUNT (WHEN CUTTING DOWN THE TRIM). MID JOINT SECTION FOR TOP PROFILE (FOR USE WITH GPT4100) GPTJOINT A mid joint section is available to hide joints in certain applications where two top rail profiles meet (e.g. when a straight rail profile meets a curved rail section or when you need to join the length). Front view 5mm Rear view TOP TIP: WHEN USING MID JOINTS, A 5MM SPACING MUST BE TAKEN INTO ACCOUNT WHEN CUTTING DOWN THE RAIL PROFILES THAT ARE BEING JOINED AT EITHER SIDE. Order online 17
 GPMIN90 When joining two mid rail profiles in a")


20 END CAPS/CORNER JOINTS MID PROFILE INTERNAL CORNER JOINT 90 O (FOR USE WITH GPM4100) GPMIN90 When joining two mid rail profiles in a corner application a mid profile internal corner joint is required for two mid profiles to run in to the internal corner joint. The internal corner joint is supplied with two screws which when in position secure the joint to the rail profiles. END CAPS FOR MID DRAWER PROFILE, PAIR, LH/RH (FOR USE WITH GPM4100) GPMEND End caps can be used when mid rail trims come to an end (e.g. against a wall next to an end panel or next to appliances). A grub screw is supplied to attach the end cap firmly to the rail. 18 T: (North) I 88 (South)
 PORCELAIN (PMN) CASHMERE (PMH)")
21 APPLICABLE DOOR RANGES Recessed rail profiles can be used with the following door ranges. PORTER STOCKED FINISHES Prefix code for door range/colour shown in brackets. MATT FEATURED IN: PRODUCT INFORMATION DOOR STYLE: DOOR THICKNESS: SPECIFICATION: FINISH : Slab 18mm MDF with melamine reverse Painted, matt/gloss lacquer WHITE (PMW) PORCELAIN (PMN) CASHMERE (PMH) DOVE GREY (PMV) SILVER GREY (PMS) DOOR FINISH ALABASTER BOARD MATCH Egger U104 BEIGE Egger U156, Kronospan U119 CASHMERE Egger U702 DOVE GREY Egger U708 GRAPHITE Egger U961 PORCELAIN Egger W1200, Kronospan 101 SILVER GREY Egger U765 WHITE Egger W1000 GRAPHITE (PMG) GLOSS WHITE (PW) PORCELAIN (PN) ALABASTER (PA) BEIGE (PB) CASHMERE (PH) DOVE GREY (PV) SILVER GREY (PS) GRAPHITE (PG) (for orders placed before 12 noon Wednesday cut off) Order online 19
 GLOSS WHITE SHOWN (for orders placed before 12 noon Wednesday cut off) 20 T: 01325 505599 (North) I")
22 DOOR RANGES OVERVIEW TOMBA AVAILABLE IN OUR PAINT-TO-ORDER PALETTE FEATURED IN: PRODUCT INFORMATION DOOR STYLE: DOOR THICKNESS: SPECIFICATION: FINISH : Handleless slab with reverse chamfer edge profile 22mm MDF, over-lacquered Painted, gloss lacquer (Matt & Gloss available in Paint-to-order) GLOSS WHITE SHOWN (for orders placed before 12 noon Wednesday cut off) 20 T: (North) I 88 (South)


23 FEATURE MODERN DOORS STOCKED FINISHES Prefix code for door range/colour shown in brackets. FEATURE DOORS FEATURED IN: PRODUCT INFORMATION DOOR STYLE: DOOR THICKNESS: SPECIFICATION: FINISH : Slab feature door 18mm MFC, textured laminated board Synchronised woodgrain effect (vertical grain direction) DOOR FINISH CHARACTER GRAPHITE RECLAIMED OAK BOARD MATCH Egger H3452 ST36 Egger H1180 ST37 CHARACTER GRAPHITE (CG) RECLAIMED OAK (OA) Order online 21


. Smoked Ash Woodgrain: Gloss PVC front face, silver matt reverse.")


24 UNITY FEATURED IN: COLOUR OPTIONS & FINISHES All available in made-to-measure sizes GLOSS COLOURS PRODUCT INFORMATION DOOR STYLE: Slab DOOR THICKNESS: 18mm MDF SPECIFICATION: PURE WHITE CASHMERE LIGHT GREY DAKAR COVERING MATERIAL/ FINISH Gloss Colours & Metallic: Acrylic front face with matching matt PVC reverse. Supermatt: Perfect Touch matt PVC front face, matching matt reverse (Steel Grey has acrylic front face). Smoked Ash Woodgrain: Gloss PVC front face, silver matt reverse. LAVA GRAPHITE GLOSS METALLIC FINISHES Notes: Metallic colours have a directional finish as indicated by arrows on the protective film. Arrows should all face in the same direction when fitting. Drilling must be specified left or right hand with metallic doors. EDGE OPTIONS UNITY made-to-measure is available in 2 edge options. FJORD METALLIC GRAPHITE METALLIC GOLD METALLIC GLOSS WOODGRAIN EFFECT Matching AirTech Edge Two-Tone 3D glass effect SMOKED ASH SUPERMATT COLOURS NOTES: Supermatt finishes are available in a matching edge only End panels are edged all 4 sides as standard and are supplied in matching edge only Pelmet & plinth are edged on one long side only with a matching edge. PURE WHITE CASHMERE LIGHT GREY STEEL GREY Made-tomeasure sizes Manufactured in the UK High gloss or fingerprint free supermatt 11 day lead time Fira Gold Certification 5 year guarantee LAVA GRAPHITE FJORD 22 T: (North) I 88 (South)
25 23


26 RECESSED RAIL SYSTEM COLOUR OPTIONS STOCKED FINISHES Aluminium White Graphite ALUMINIUM WHITE GRAPHITE 24 T: (North) I 88 (South)

27 FLUSH RAIL SYSTEM 25

28 PRODUCT RANGE OVERVIEW The Flush Rail Profile is designed to sit flush to the front of the cabinet, using the same cabinet router detail as the recessed handleless rail and should only be specified on doors with a reverse chamfer. TOP rail profile Code Description 1 ***TP3000 Flat Horizontal trim TOP profile for base units for use with chamfer door x57x26.5mm 1 ***TP3000RYE Flat Horizontal trim TOP profile for base units for use with chamfer door x57x26.5mm, rye oak MID rail profile 2 ***MP3000 Flat Horizontal trim MID profile for base units for use with chamfer door x72x26.5mm 2 ***MP3000RYE Flat Horizontal trim MID profile for base units for use with chamfer door x72x26.5mm, rye oak VERTICAL trim profiles 3 ***VPI3000 Vertical trim profile, Intermediate x71x41mm 3 ***VPI3000RYE Vertical trim profile, Intermediate x71x41mm, rye oak 4 ***VPL3000 Vertical trim profile, lateral x53x41mm 4 ***VPL3000RYE Vertical trim profile, lateral x53x41mm, rye oak When ordering use the following pre-fix codes: Colour Code pre-fix Chalk ELC Partridge Grey ELG Stone ELS STOCKED FINISHES Chalk Partridge Grey Stone Rye PAINT-TO-ORDER Primed DOOR RANGES * Flush Rail Profiles can also be used with our Tomba door range. Subject to designers discretion. Ellerton 26 T: (North) I 88 (South)


29 C D* B A A FLAT HORIZONTAL TRIM MID PROFILE For base units for use with chamfer doo MP x57x26.5mm C VERTICAL TRIM PROFILE Intermediate VPI x71x41mm B FLAT HORIZONTAL TRIM TOP PROFILE For base units for use with chamfer door TP x72x26.5mm D VERTICAL TRIM PROFILE Used between cabinet and feature end post or panel, on instances where the door is hinged on the opposite side. VPL x53x41mm * Not shown on image Order online 27
.")
30 BASE UNITS TOP RAIL PROFILE - HI - LINE MP3000 When using a standard base unit, the top panel and gables of the cabinet need to be modified from standard cabinet construction. The top panel needs to be set back by 27mm Both gables of the cabinet need to be routered (details shown below). We suggest using a 10mm router cutter in order to achieve the required 5mm internal radius. This corresponds to the radius on the flat Top Rail Profile. TOP RAIL PROFILE. CABINET DETAILS - HI-LINE When planning base units with a 685mm door, the top panel and gables of the cabinet need to be modified from the standard cabinet construction. The top panel needs to be set back by 27mm Both gables of the cabinet need to be routered (details shown below). We suggest using a 10mm router cutter in order to achieve the 5mm internal radius required. This radius corresponds to the radius on the Top Rail Profile. TOP RAIL CABINET SECTION DETAIL ROUTING CABINET DETAIL 34 Cabinet top panel set back by 27mm DOOR 720 DOOR 5mm Radius 28 T: (North) I 88 (South)
. We suggest using a 10mm router cutter in order to achieve the required 5mm internal radius.")
31 BASE UNITS MID RAIL PROFILES - DRAWER PACK MP3000 When using a standard base unit, the top panel and gables of the cabinet need to be modified from standard cabinet construction. The panel needs to be set back by 27mm Both gables of the cabinet need to be routered (details shown below). We suggest using a 10mm router cutter in order to achieve the required 5mm internal radius. This corresponds to the radius on the flat Mid Rail Profile. MID RAIL CABINET SECTION DETAIL ROUTING CABINET DETAIL *This illustration shows a 3 drawer set. For a 2 drawer, please replace the 160mm drawer fronts for 325mm drawer fronts. Modifications to the cabinet are the same as above. Both cabinet gables notched at the dimensions shown Cabinet top panel set back by 27mm 27 OR mm Radius Order online 29
32 BASE UNITS MID RAIL PROFILES - DRAWER PACK MP3000 When using a standard base unit, the top panel and gables of the cabinet need to be modified from standard cabinet construction. The top panel needs to be set back by 27mm Both gables of the cabinet need to be routered (details shown below). We suggest using a 10mm router cutter in order to achieve the required 5mm internal radius. This corresponds to the radius on the flat Mid Rail Profile. MID RAIL CABINET SECTION DETAIL ROUTING CABINET DETAIL Cabinet top panel set back by 27mm mm Radius 5mm Radius mm Radius Both cabinet gables notched at the dimensions 30 T: (North) I 88 (South)


33 BASE UNITS INTEGRATING UNDER COUNTER APPLIANCES INTEGRATED DISHWASHERS Integrating an under counter dishwasher requires consideration when selecting your appliance. XXL Dishwasher models can not be used with the Flush Rail Profiles. We recommend using dishwashers with a height range adjustment of between mm. TOP TIP: SET THE PLINTH AT 155MM AND WIND THE DISHWASHER DOWN TO THE LOWEST SETTING FOR EASE OF INSTALLATION. TOP RAIL CABINET SECTION DETAIL ROUTING CABINET DETAIL Worktop 598mm Adjacent cabinet gable Flush Top Rail Profile 550mm mm Appliance Frontal 685 x 597/447m 89mm Min 90mm Max 220mm Side elevation Wind legs down to lowest setting. Order online 31


, as")


34 BASE UNITS UNDERMOUNTED OVEN APPLICATION UNDER COUNTER APPLIANCES If the appliance permits, wind the legs down to the lowest setting and use with a 685mm door beneath the Flush Top Rail Profile. Note: Shown below as an integrated fridge/freezer. The same principles apply for washing machines and tumble dryers. APPLIANCE HOUSINGS If the appliance does not permit, we recommend incorporating the appliance into a housing and using with the Vertical Rail Profiles and a 715mm door (with vertical handle), as shown below. UNDER COUNTER OVENS For under counter oven applications, we recommend stopping the Flush Top Rail Profile where they meet the oven. A panel should be used either side of the oven which will protect any cut egdes of the rail. Front elevation 18mm End Panel 32 T: (North) I 88 (South)


35 WALL CABINETS There is no specific rail profile for wall units. Unlike the Recessed Rail profiles, there is no requirement to modify the base panel of the cabinet when using the Flush Rail system and should be treated as a standard lay-on doors. WALL UNIT DETAIL Side elevation Detail Door Cabinet Order online 33


36 VERTICAL PROFILES LATERAL VPL3000 When planning larder units and appliance housings, the cabinet gables need to be set back by 20mm, allowing the Vertical Rail Profiles to sit flush to the front of the cabinet. TOP TIP: IT IS NOT NECCESSARY TO MODIFY THE TOP OR BOTTOM PANEL OF THE CABINET. PLAN VIEW OF LARDER VERTICAL LATERAL RAIL PROFILE End panel Cabinet gable 20 Fl Ve Vertical Trim Profile, Lateral VERTICAL LATERAL TRIM PROFILE Stepping the gable back by 20mm allows the flat rail profile to fit flush to the front of the cabinet. *35mm spacing between cabinets T: (North) I 88 (South)


37 VERTICAL PROFILES INTERMIDIATE VPI3000 Both the Vertical Intermediate Rail Profile and Vertical Lateral Rail Profile should be installed using the same basic principles and tools. Simply locate the profile into the position and screw through the cabinet gable and into the rail profile to secure in place. TOP TIP: FOR A HIGH QUALITY FINISH, WE RECOMMEND HIDING THE SCREWS BEHIND HINGE PLATES WHERE THE SCREWS WILL NOT BE VISIBLE. PLAN VIEW OF LARDER VERTICAL INTERMIDIATE RAIL PROFILE Cabinet gable Cabinet gable 20 Vertical Trim Profile, Intermediate VERTICAL INTERMIDIATE TRIM PROFILE Stepping the gable back by 20mm allows the flat rail profile to fit flush to the front of the cabinet Order online 35


38 TOP AND MID PROFILE INSTALLATION All trim profiles featured in Ellerton can be installed using traditonal joinery methods and no specific fixing is required. We recommend using the following L shaped corner brackets: A162B A150 SP156 SP161 Bracket Shown - SP161 FLAT HORIZONTAL TRIM, TOP PROFILE FOR BASE UNITS Position the L shaped bracket at each side of the cabinet; flush with the front of the routered profile. Screw fix into the cabinet gable and then into the top profile. Alternatively, fix the bracket onto the reverse of the rail first and then screw fix into the cabinet. (View from inside the cabinet) FLAT HORIZONTAL TRIM, MID PROFILE FOR BASE UNITS Position the L shaped brackets at each side of the cabinet; flush with the front of the routered profile. Repeat this for the Mid Rail. Screw fix into the cabinet gable and then into the top and mid profiles. Alternatively, fix the brackets onto the reverse of the rails first and then srew fix into the cabinet. (View from inside the cabinet) 36 T: (North) I 88 (South)


39 VERTICAL PROFILE INSTALLATION TOP TIP: LOCATE THE PROFILE ONTO THE FRONT FACE OF THE CABINET AND WHERE POSSIBLE, HIDE THE SCREWS BEHIND THE HINGE PLATE FOR A CONCEALED FIXING - PILOT DRILL AND COUNTERSINK FOR THE SCREW HEAD. FIX IN PLACE USING NO 5 X 35MM, CSK SCREWS. CORNER DETAILS Internal and External corners should be mitred using Top and Mid Rail Profiles. INTERNAL CORNERS ASSEMBLED EXPLODED EXTERNAL CORNERS EXTE ASSEMBLED EXPLODED Order online 37
 SPECIFICATION: HDF with melamine reverse FINISH Smooth matt")
 (ELD) (for orders placed before 12 noon Wednesday cut off) 38 T:")
40 APPLICABLE DOOR RANGES Flush rail profiles can be used with the following door ranges. ELLERTON STOCKED FINISHES Prefix code for door range/colour shown in brackets. FEATURED IN: PRODUCT INFORMATION DOOR STYLE: One piece handleless Shaker with reverse chamfer DOOR THICKNESS: 18mm (shallow centre panel) SPECIFICATION: HDF with melamine reverse FINISH Smooth matt painted (primed door unfinished, ready to paint) DOOR FINISH BOARD MATCH CHALK (ELC) STONE (ELS) PARTRIDGE GREY (ELG) CHALK PARTRIDGE GREY Egger W980, Kronospan K101 We suggest a contrasting finish or walnut woodgrain effect board STONE We suggest a contrasting finish or walnut woodgrain effect board PRIMED (Ready to finish) (ELD) (for orders placed before 12 noon Wednesday cut off) 38 T: (North) I 88 (South)
 GLOSS WHITE SHOWN (for orders placed before 12 noon Wednesday cut off) Order online www.pws.co.")
41 TOMBA AVAILABLE IN OUR PAINT-TO-ORDER PALETTE FEATURED IN: PRODUCT INFORMATION DOOR STYLE: DOOR THICKNESS: SPECIFICATION: FINISH : Handleless slab with reverse chamfer edge profile 22mm MDF, over-lacquered Painted, gloss lacquer (Matt & Gloss available in Paint-to-order) GLOSS WHITE SHOWN (for orders placed before 12 noon Wednesday cut off) Order online 39


 40 T: 01325")
42 FLUSH RAIL SYSTEM COLOUR OPTIONS STOCKED FINISHES PAINT-TO-ORDER Chalk Partridge Grey Stone Rye Primed CHALK RYE STONE SILVER GREY (PTO) 40 T: (North) I 88 (South)
43 KITCHEN FASCIA MATRIX FOR HANDLELESS RAIL SIZES This matrix can be referred to when planning Porter, Porter PtO, Tomba and Ellerton. Availability varies between ranges. APPLIANCE HOUSING DOORS Ellerton and Tomba door ranges include doors with vertical handle profiles for use in appliance and larder applications. 41
44 DOOR COMBINATIONS FOR HANDLELESS RAIL Applicable to Porter, Tomba and Ellerton Suggested Gloss White Handleless door/drawer combinations to be used with appliances (600mm wide) Fridge/freezers at tall installation height Single oven with microwave or coffee Double oven at tall installation height Microwave, coffee maker or combination maker tall installation height oven at tall installation height TALL INSTALLATION HEIGHT (carcase) 150 (plinth) Single oven with microwave Fridge/freezers at medium installation height or coffee maker at medium Double oven at medium installation height Single oven, microwave, coffee maker or combination installation height oven at medium installation height MEDIUM INSTALLATION HEIGHT (carcase) (plinth) Vertical door/trim application Double oven, single oven and microwave at studio installation height Horizontal door/trim application Single oven, microwave, coffee maker or combination oven at studio installation height STUDIO INSTALLATION HEIGHT (plinth) (carcase) Only available in Porter Only available in Tomba Only available in Ellerton
45 NOTES 43
46 CONTACT US THE EASIEST WAY TO ORDER IS ON TRADEZONE - NORTHERN TEAM Telephone: Fax: north@pws.co.uk SOUTHERN TEAM Telephone: Fax: south@pws.co.uk OPENING HOURS 8am - 7pm Monday - Thursday 8am - 5pm Friday TRADE COUNTER OPEN 7am - 5pm Monday - Friday 44 Order online HANDTECH18

47 45
48 T: (North) I 88 (South)
Handleless Uni t Specification
 Handleless Uni t Specification QUALITY BRITISH CRAFTSMANSHIP 160 Handless Fitting Guide - Parts Index & Base Cabinet Section 1 150 325 DRAWER 870 870 870 73 73 720 720 DOOR 685 325 2 x
Section 1. Kitchen installation. Base cabinets
 Section 1 Kitchen installation Base cabinets Pre-build - Cabinet leg... page 16 Pre-build - Alternative cabinet leg... page 18 Pre-build - Cabinets.... page 19 Pre-build - Corner base cabinet centre upright
Section 2. Profiles - How to use
 Section s - How to use overview.... page 36 End larder profile - length 94mm/mm... page 37 Mid larder profile - length 94mm/mm... page 38 Worktop profile - length 3000mm.... page 39 Drawer profile - length
Kitchen Installation Manual
 Kitchen Installation Manual June 2018 www.howdens.com 2 www.howdens.com Section pages Introduction... page 4 Supplied products... page 4 Guide - Hints and tips... page 5 Cabinet installation fittings...
Section 7. Microwave/compact oven... page 185 Microwave/compact oven with warming drawer... page 187. Fridge or freezer option...
 Section 7 Midi tower shelf configurations Cabinet information How the cabinet is supplied... page 176 Additional shelf pack... page 177 Cabinet modifications... page 177 Hints and tips for installation..........................................
Section 9: Finishing Touches - Other Decor Units
 Section 9: Finishing Touches - Other Decor Units Butler Sink Units Important: This unit is designed to be used with either This unit is always used between other units. Level the units. Fix together and
 www.hafeleindia.com www.hafeleindia.com Silver Gold Rose Gold Graphite Dark Bronze PROFIN : ONE RANGE. MANY SOLUTIONS. 2. Stack Modular Shelving Pg. 23-32 3. Rail Door Profiles Pg. 33-41 1. Gola Profiles
Bathroom Installation Manual
 Bathroom Installation Manual MAKING SPACE MORE VALUABLE May 2016 1 2 Contents page 1. Introduction Page 4 2. Tools required / key Page 5 3. Fittings Page 6 4. 600 cistern unit Page 7 5. 600 vanity unit
All sizes are catered for without surcharges, carcass s and doors can be angled if required (to supplied angle and dimension details).
.") Bedrooms Wardrobes All sizes are catered for without surcharges, carcass s and doors can be angled if required (to supplied angle and dimension details). Robes are supplied flat pack due to size, all panels
Bedrooms Wardrobes All sizes are catered for without surcharges, carcass s and doors can be angled if required (to supplied angle and dimension details). Robes are supplied flat pack due to size, all panels
Media Brochure & Product Guide. Spring / Summer 2016 FURNITURE
 Media Brochure & Product Guide FURNITURE De-clutter your living space The Media range is a modular furniture system that provides all the elements you need to organise your available space and present
All our cabinets are handbuilt to order in the UK and benefit from a five year guarantee. Baseboard (to suit Floor Standing back panel) Continuous top
 Continuous top") Media Brochure & Product Guide De-clutter your living space The Media range is a modular furniture system that provides all the elements you need to organise your available space and present a flexible
Media Brochure & Product Guide De-clutter your living space The Media range is a modular furniture system that provides all the elements you need to organise your available space and present a flexible
Table and Furniture Base Fittings Plinth Adjusting Fittings
 Adjusting screw with M8 or M thread Rigid, for glide inserts, steel thread Finish/Colour: Black, thread galvanized Version: With acceptance Ø30 mm Thread M8 650.22.381 M 650.22.382 Packing: 1 or 0 pcs.
Bathroom Installation Guide
 Bathroom Installation Guide Please read instructions carefully and check products before starting. Products should be fitted/installed by an experienced and competent fitter, failure to do so may invalidate
Organisational Kitchen Fittings Kitchen Cabinet Accessories
 Kitchen waste bin systems Single waste bin, capacity 1 litres Carcase width: Min. 400 mm For door mounting: For left and right hand use Installation: Screw fixing to side panel Housing: Steel, plastic
Technical product descriptions WORKTOPS STANDARD SLIM LINE. 1. Material thickness 38 mm. 2. Core/substrate material Chipboard
 Technical product descriptions WORKTOPS I STANDARD 1. 38 mm 2. Chipboard 3. Surface material Laminate (CPL, HPL) 4. Laminate thickness 0,6-0,8 mm 5. Surface structure Wood pore or relief, matt, gloss 6.
Entrance Cabinet Plans
 Entrance Cabinet Plans www.andrewharriswoodwork.com Page 1 of 19 Introduction I have tried to ensure all steps are covered in these plans but if you find any errors in the plans or have a question then
MDF 1-Piece / 3D Laminate (RTF)
") MDF 1-Piece / 3D Laminate (RTF) Raw MDF Door & Drawer Front Construction and Ordering MDF doors and drawer fronts are constructed of premium, ¾" [19.1mm] or 1" [25.4mm] thick 48# MDF that is precision
MDF 1-Piece / 3D Laminate (RTF) Raw MDF Door & Drawer Front Construction and Ordering MDF doors and drawer fronts are constructed of premium, ¾" [19.1mm] or 1" [25.4mm] thick 48# MDF that is precision
Installation Instructions
 Supafold Slide Aside System Three Fold Room Divider Installation Instructions Distinctive Doors Ltd Supafold Slide Aside Internal Folding System IMPORTANT: Before proceeding with the installation, and
Section 8. Curved units. Curved units
 Section 8 Curved units Curved units Curved corner post... page 94 Curved base cabinet... page 95 Curved wall cabinet... page 96 Curved deep wall cabinet... page 97 Curved plinth - Joining... page 99 www.howdens.com
DUALCASE VERSATILE ALUMINIUM SIGN SYSTEM
 VERSATILE ALUMINIUM SIGN SYSTEM Universal Components Ltd. May 2007 Introduction Nothing beats DualCase for speed of fabrication, aesthetic appearance and easy maintenance. With the minium of components
Mid-Century Credenza Thoughtful details and modern joinery merge in this sleek design
 Mid-Century Credenza Thoughtful details and modern joinery merge in this sleek design BY LIBBY SCHRUM Mid-Century Modern furniture has not been wildly popular since, well, the mid-century. But fashion
Silverware Chest Plan
 Silverware Chest Plan 05L14.01 Introduction 1. Measure the space required for your cutlery before beginning this project to be sure that it will fit in the drawers and top compartment. The best way to
ALLORA SWING PANEL INSTALLATION INSTRUCTIONS
 ALLORA SWING PANEL INSTALLATION INSTRUCTIONS Before Installation Please check that your Allora Swing Panel is undamaged SEQUENCE OF INSTALLATION These instructions are also available from the Athena website:
T H E K I T C H E N C O L L E C T I O N 2ND ISSUE
 T H E K I T C H E N C O L L E C T I O N 2ND ISSUE When ordering our Standard range of furniture cabinets please use the ROU reference followed by the relevant 3 digits and for any of our upgrade cabinet
Deauville Installation Guide
 vjul16 (for Recessed Wall Profiles) DO NOT ASSEMBLE WITHOUT FULLY READING THESE INSTRUCTIONS Page 2 Thank you for purchasing this Deauville shower enclosure. Please study these instructions carefully before
Deauville Installation Guide
 vjul16 (for 17 or 24 mm Surface Wall Profiles) DO NOT ASSEMBLE WITHOUT FULLY READING THESE INSTRUCTIONS Page 2 Thank you for purchasing this Deauville shower enclosure. Please study these instructions
Hinge Mortising Jig. One of the make it or break it parts of building a. 6 ShopNotes No. 74
 Hinge Mortising Jig A Mortise for a Hinge. Quick, clean, and accurate that s the only way to describe the mortise you get with a trim router and this hinge mortising jig. One of the make it or break it
GE Monogram. Installation. Instructions. Microwave Oven. Under Cabinet Installation. and. JX827 Series Built-In Kit. Models.
 GE Monogram Installation Instructions Under Cabinet Installation and JX827 Series Built-In Kit Models ZEM200 Series CAUTION WARNING Before you begin Read these instructions completely and carefully. IMPORTANT:
Portofino Installation Guide
 vjul16 (for 17 or 24 mm Surface Wall Profiles) DO NOT ASSEMBLE WITHOUT FULLY READING THESE INSTRUCTIONS Page 2 Thank you for purchasing this Portofino shower enclosure. Please study these instructions
129 KITCHEN BASE CABINET 480
 129 KITCHEN BASE CABINET 480 There are two sorts of kitchen cabinets: base cabinets, which sit on the floor, and wall cabinets. Base cabinets provide both storage space and work surfaces. They often house
GROWING BETTER THROUGH DESIGN. 6ft Lean-To LEAN-TO. Assembly Instructions 04/02
 GROWING BETTER THROUGH DESIGN 6ft Lean-To LEAN-TO Assembly Instructions 04/02 6ft Lean-To Greenhouse Base Plan Introduction/Tools/Contents / / Contents This is a copy of our Lean-To greenhouse base plan.
SLIDING DOOR SYSTEM_ S34 PRODUCT LIST. System description Accessories
 SLIDING DOOR SYSTEM_ S34 PRODUCT LIST System description Accessories SLIDING DOOR SYSTEM_ S34 1.0_ System description_ page 03 2.0_ Profiles_ page 04 3.0_ Profile finishes_ page 08 4.0_ Panels_ page 09
Pivot-Door Downdraft Cabinet Plans
 Pivot-Door Downdraft Cabinet Plans Finished Cabinet Closed Open Exploded View Introduction This simple downdraft-style dust collection cabinet is a great way to keep your shop cleaner and keep your router
Remo Cashmere Gloss 2
 2017 2 Remo Cashmere Gloss CONTENTS We had an idea 4 Our Cabinets 5 Meet the collection 7 Impressions Milbourne 8 10 Porter 12 Remo 14 Mornington 16 Everything else Handles Internals & Accessories 18 20
Portofino Case2 Installation Guide
 Portofino Case2 Installation Guide vjun16 (for 17 or 24 mm Surface Wall Profile) DO NOT ASSEMBLE WITHOUT FULLY READING THESE INSTRUCTIONS Page 2 Thank you for purchasing this Portofino Case 2 shower enclosure.
The Yorkshire Pine Factory solid pine kitchens handmade in Yorkshire
 solid pine kitchens handmade in Yorkshire quality handmade kitchens made from solid wood without compromise on quality Quality handmade solid pine kitchens Our kitchens can be made from any type of wood
Technical Product Description
 Worktops 5. Thickness material structure Front edge Bottom face coating 40 mm, 50 mm Laminate according to standard: EN 438 Wood pore or relief, matt or gloss 2 x Radius 3 mm, 6 mm or 8 mm depending on
PROJECT PLAN TOOL CHEST
 BUILD IT WITH ROCKLER PROJECT PLAN TOOL CHEST FEATURING ROCKLER S BUILD QUESTIONS? Go to www.rockler.com or call 800-279-4441 Stock # Item 63420 1/4" x 24" x 30" Baltic Birch Plywood 63446 1/2" x 24" x
GE Monogram. Installation. Instructions. 27" Built-In Ovens. Models ZEK757WW ZEK757BW ZEK737WW ZEK737BW
 GE Monogram Installation Instructions 27" Models ZEK757WW ZEK757BW ZEK737WW ZEK737BW CAUTION WARNING Before you begin Read these instructions completely and carefully. IMPORTANT: Save these instructions
INSTALLATION GUIDE. 1. Overview. 2. Measuring. 3. Tools & fixings you will need B C. Opening Width. Opening Height
 INSTALLATION GUIDE Please take a few minutes to read through this guide before getting started. 1. Overview A Typical Sliding Wardrobe Door Layout A Frame - Top Liner (optional) B Top Track C Frame - Strike
CROWN IMPERIAL ASSEMBLY INSTRUCTIONS
 CROWN IMPERIAL ASSEMBLY INSTRUCTIONS Standard Drawer Box Page 1 of 14 Standard Drawer Box Parts Parts Supplied B C D A E F G Page 2 of 14 Part Letter Part Name Quantity 300-600 Deep Pan A Base Panel 1
Material Packing Brown Grey Pine Black White
 RTA Connectors Minifix Zinc alloy For housing: 12 or 18 Bolt hole: Ø 7 or 8, depending on choice of connecting bolt Drilling distance B: Distance from centre of Minifix housing to shelf front edge (24
Kitchen Visuals Plot 4
 Kitchen Visuals Plot 4 R3.70 MATT TOPO LAMINATE & R3.10 MATT MOUSSE LAMINATE - INTEGRATED HANDLE KRION WORKTOP PEARL (12MM) Kitchen Plans Plot 4 1. 600mm Tower Unit Int. Fridge / Int. Freezer / Door (RH)
USER GUIDE & SERVICE MANUAL
 & SERVICE MANUAL RIGHT PRODUCT. RIGHT PLACE. RIGHT TEMPERATURE. SINCE 1962. Modular 3000 Series 3024BEV 24" Beverage Center Contents Intro Installation Integrated Panel Dimensions Integrated Grille / Plinth
 SUPREME WALL GARDEN ASSEMBLY INSTRUCTIONS 24/08/16 www.hallsgreenhouses.com Please refer to website for the most up to date instructions. SAFETY WARNING 1. Always wear protective glasses, shoes, gloves
RLP Mini Low Profile V Track Hardware sliding door hardware/ barn door track
 Page 1 of 9 Installation Suggestions for: RLP Mini Low Profile V Track Hardware sliding door hardware/ barn door track Read these instructions to end before starting installation or ordering hardware.
Brochure & Product Guide
 Brochure & Product Guide July 2018 urbantop special features butchers block urbantop co-ordinated worktops It s all in the detail Our exciting new range of laminate worktops offers great value and a choice
metal sided pot drawer soft close
 Follow these instructions to install your parts and accessories. Things you need to know lways read the full instructions prior to installation. Make sure you leave plumbing and electrical work to qualified
Installation Guide Simplicity Alfresco. V1.9 Lu070318
 0333 305 5272 www.canoports.co.uk Installation Guide Simplicity Alfresco V1.9 Lu070318 Tools Required Below is a list of tools that you will require to install your the Simplicity Alfresco System. Cordless
ENTRÉ E : CABINETS FOR LIFE. Our stock cabinetry line with fast delivery and the fine styles and finishes you demand. DOOR STYLES 4-7 ACCESSORIES 8-11
 ENTREE : CABINETS FOR LIFE Our stock cabinetry line with fast delivery and the fine styles and finishes you demand. DOOR STYLES 4-7 ACCESSORIES 8-11 KEEP IT GREEN! 12 ADA COMPATIBLE 12 EXTRA BENEFITS 13
USER GUIDE 3060ZWC. 60 cm Wine Cellar Model. Modular 3000 Series RIGHT PRODUCT. RIGHT PLACE. RIGHT TEMPERATURE. SINCE 1962.
 RIGHT PRODUCT. RIGHT PLACE. RIGHT TEMPERATURE. SINCE 1962. Modular 3000 Series 3060ZWC 60 cm Wine Cellar Model Contents Intro Installation Integrated Panel Dimensions Integrated Grille / Plinth Dimensions
compile system INSTALLATION GUIDE Updated January 2019
 INSTALLATION GUIDE Updated January 09 compile system Table of Contents Panels 0 Quick Connect Clips 0 Lock Clips 0 Panel Trims 0 Privacy Glass 0 Post Base Covers 04 Electrical 04 Power Distribution Harness
Trunking Guide. Colour List... W White M Magnolia B Black. shape & size (wxh) colours available
 colours available") Trunking Guide Colour List... W White M Magnolia B Black A Aluminium O Oak Effect R Red P Premium Wood (stainable 22x22 only) F1 Light Oak Effect (22x22 only) illustrations not to scale shape & size (wxh)
Trunking Guide Colour List... W White M Magnolia B Black A Aluminium O Oak Effect R Red P Premium Wood (stainable 22x22 only) F1 Light Oak Effect (22x22 only) illustrations not to scale shape & size (wxh)
Installation Instructions
 Installation Instructions Alcove Enclosure Before Installation please check that your shower enclosure system is undamaged Please read these instructions carefully March 2015 TOOLS REQUIRED Electric or
Gardman Lean-to Greenhouse Assembly Instructions
 Page 1 Gardman Lean-to Greenhouse Assembly Instructions Our Help Line provides support and advice to customers of Summer Garden Buildings after ordering. For advice before you buy you can phone us free
Sauna & Steam. Traditional Sauna Installation Instruction Manual
 Traditional Sauna Installation Instruction Manual Oceanic Ltd, Pountney Street, Wolverhampton, WV2 4HX Phone: 01902 450 550 sales@oceanic-saunas.co.uk www.oceanic-saunas.co.uk Contents 1.Introduction................................................
ROOM FOLD SLIDING FOLDING INTERNAL DOORSET FITTING & FIXING GUIDELINES
 EDITION 7 ROOM FOLD SLIDING FOLDING INTERNAL DOORSET IMPORTANT You can only assemble these door configurations by using the frame provided. Your warranty will be invalid if other alternatives are used.
A New Dimension in Kitchen Design
 A New Dimension in Kitchen Design Contents Colour Options 4 Handle Collection 5 Stock Doors 6 Doors 10 Painted Door Options 14 Storage Solutions 15 Accessories 16 Lighting Solutions 17 All of our Kitchens
MDF 1-Piece / 3D Laminate (RTF)
") abinet Doors & s MDF 1-Piece / 3D Laminate (RTF) MDF 1-Piece Doors & - Standard Style: 500* Style: 501* Style: 500 Style: 501 Raised Panel Style: 518 Style: 521 Style: 522 Style: 580* See next page for
abinet Doors & s MDF 1-Piece / 3D Laminate (RTF) MDF 1-Piece Doors & - Standard Style: 500* Style: 501* Style: 500 Style: 501 Raised Panel Style: 518 Style: 521 Style: 522 Style: 580* See next page for
Kitchen Fittings Hanging Cabinets and Accessories
 Cabinet hanger Knock-in version, load bearing capacity 130 kg/pair Depth adjustment Finish: Galvanized Concealed mounting of cabinet hanger behind the rear panel (Min. 16 mm free space required) Mounting
TANDEM plus BLUMOTION
 TANDEM plus BLUMOTION Premium Concealed Runners for Wood Drawers TANDEM plus BLUMOTION TANDEM plus BLUMOTION brings together all of the features, innovations and benefits that Blum has developed since
Side Light Frame Pack Assembly Instructions
 Please read this complete set of assembly instructions before starting the installation and only when you understand the construction method start to follow the step by step guide. IDENTIFY THE PACK CONTENTS
Technical product data sheet
 Seite 1 von 9 Worktops I Standard 1) 38 mm 2) Chipboard 3) Surface material Laminate (CPL/HPL) 4) Laminate thickness 0,6-0,8 mm 5) Surface structure Wood pore or relief, matt, gloss 6) Front edge types
Chapter 17 - Porch Trim
 Chapter 17 - Porch Trim Contents Chapter 17 - Porch Trim... 17-1 Timing & Prerequisites... 17-2 Trim on Porch Beams (Volunteer)... 17-4 Smart Trim on the Bottom of the Beam... 17-4 Smart Trim on the Inside
USER GUIDE 3060ZWC. 60 cm Wine Cellar Model. Modular 3000 Series RIGHT PRODUCT. RIGHT PLACE. RIGHT TEMPERATURE. SINCE 1962.
 RIGHT PRODUCT. RIGHT PLACE. RIGHT TEMPERATURE. SINCE 1962. Modular 3000 Series 3060ZWC 60 cm Wine Cellar Model Contents Intro Installation Dimensions Integrated Grille / Plinth Dimensions Installation
XL JOINERY LTD LA PORTE VISTA MODULAR 3 ASSEMBLY INSTRUCTIONS
 XL JOINERY LTD LA PORTE VISTA MODULAR 3 2090mm High x 4687mm Wide ASSEMBLY INSTRUCTIONS READ AND UNDERSTAND THESE INSTRUCTIONS FULLY PRIOR TO STARTING INSTALLATION. IT IS STRONGLY RECOMMENDED THAT A COMPETENT
aluminium profile system
 aluminium profile system 63 AME System aluminium profiles overview series profiles introduction 80x80 x80 x80/180 x Aluminium profiles are provided with longitudinal grooves which can be used in conjunction
Ask your DIY store or carpenter to cut the required boards to size. Instructions. 1. Cut out the opening for the bottles
 KITCHEN TROLLEY Next time you're whipping up some magic in the kitchen, take advantage of our willing assistant. Fixed on rollers to provide easy mobility, our kitchen trolley can be stationed wherever
DIFFERENCE IS NATURAL. GIVING YOU THE FLEXIBILITY TO DESIGN AROUND IT, IS iflo ALIANO. Aliano See Page 143
 Basin Aliano See Page 143 DIFFERENCE IS NATURAL. GIVING YOU THE FLEXIBILITY TO DESIGN AROUND IT, IS iflo ALIANO. 132 (INCLUDING COUNTERTOP & SEMI-RECESSED BASINS) Make the most of your bathroom space with
S T A I R B A L U S T R A D E E L E M E N T S P R E - D R I L L E D R A I L S Y S T E M
 S T A I R B A L U S T R A D E E L E M E N T S P R E - D R I L L E D R A I L S Y S T E M The following instructions are for installing Richard Burbidge Elements pre-drilled rail Stair Balustrading. If you
SLIDING DOOR SYSTEM_ S42 PRODUCT LIST. System description Accessories
 SLIDING DOOR SYSTEM_ S42 PRODUCT LIST System description Accessories 1 SLIDING DOOR SYSTEM_ S42 1.0_ System description_ page 03 2.0_ Profiles_ page 04 3.0_ System description S1600 fixed panels_ page
Side Light Frame Pack Assembly Instructions
 Side Light Frame Pack Assembly Instructions Please read this complete set of assembly instructions before starting the installation and only when you understand the construction method start to follow
Alexandra Secondary College Refurbishment Project No: 1507 SECTION MANUFACTURED CASEWORK - SHOP BUILT 12300/1
 SECTION 12300 MANUFACTURED CASEWORK - SHOP BUILT 12300/1 PART I GENERAL 101 Scope The work of this Section covers the supply and installation of manufactured casework items. It includes but is not limited
ATLANTIS RAIL Contact Information
 ATLANTIS RAIL Contact Information Customer Service (800) 541-6829 (508) 732-9191 Spectrum System Installation Instructions Atlantis Rail s Spectrum System is an easy to install, universal cable railing
collection DESIGNED TO LOVE
 painted collection DESIGNED TO LOVE Love your Kitchen Welcome TO the painted collection What s your colour? The Painted Collection is a new range of timber ash painted doors from K Kitchens. There are
Project 11010EZ: Gun/Bookcase/Curio Cabinet
 Project 11010EZ: Gun/Bookcase/Curio Cabinet No man can be all things to all people, but this cabinet comes as close to fitting multiple uses as any inanimate object can. We ve pictured it as a gun cabinet
Classic Kitchen Island
 America s leading woodworking authority Step by Step construction instruction. A complete bill of materials. Classic Kitchen Island Exploded view and elevation drawings. How-to photos with instructive
Make a cupboard as a BCATS
 National Certificate in Building, Construction, and Allied Trades Skills (BCATS) Make a cupboard as a BCATS project Unit Standard 25921 Level 2, Credit 6 Name: Contents Reference Page What you need to
VCE VET FURNISHING (CABINET MAKING)
") Victorian Certificate of Education 2002 SUPERVISOR TO ATTACH PROCESSING LABEL HERE Figures Words STUDENT NUMBER Letter VCE VET FURNISHING (CABINET MAKING) Written examination Friday 1 November 2002 Reading
Victorian Certificate of Education 2002 SUPERVISOR TO ATTACH PROCESSING LABEL HERE Figures Words STUDENT NUMBER Letter VCE VET FURNISHING (CABINET MAKING) Written examination Friday 1 November 2002 Reading
Installation Guide Contemporary Alfresco V1.3 LU
 Installation Guide Contemporary Alfresco V1.3 LU 010818 Tools Required Below is a list of tools that you will require to install you're the Contemporary Alfresco System. Cordless Drill Mastic Gun Spirit
CURVED ROOF ASSEMBLY INSTRUCTIONS ATTACHED VERANDAH. Your supplementary guide to building an ATTACHED CURVED ROOF VERANDAH or PATIO BEFORE YOU START
 ROOF ATTACHED VERANDAH ASSEMBLY INSTRUCTIONS Your supplementary guide to building an ATTACHED ROOF VERANDAH or PATIO This set of instructions should be used in conjunction with the Stratco instruction
SLIDING MECHANISM TROLLEY CATCH TROLLEY ASSEMBLY FLOOR GUIDE
 Set A Set B P7001 Standard Kit Glass Door FITTING INSTRUCTIONS SUGGESTED TOOLS DRILL MITRE/CHOP SAW TAPE MEASURE (Image for reference only) HACKSAW POCKER DOOR KIT SHORT / LONG Z SECTION LONG Z SECTION
EDITION BATHROOM FURNITURE
 EDITION 18 BATHROOM FURNITURE BATHROOM FURNITURE PERLA INTEGRA FULLY FITTED AND FREESTANDING FURNITURE The Perla family of bathroom products are manufactured in the UK to the highest quality standards.
MDF 1-Piece / 3D Laminate (RTF)
") abinet Door & Drawer Front Options MDF 1-Piece / 3D Laminate (RTF) Raw MDF Door & Drawer Front onstruction and Ordering MDF doors and drawer fronts are constructed of premium, ¾" [19.1mm] or 1" [25.4mm]
abinet Door & Drawer Front Options MDF 1-Piece / 3D Laminate (RTF) Raw MDF Door & Drawer Front onstruction and Ordering MDF doors and drawer fronts are constructed of premium, ¾" [19.1mm] or 1" [25.4mm]
panels PANEL OVERVIEW ERGONOMIC HEIGHTS PANEL GASKET OVERVIEW PANEL SEGMENTATION PANEL FRAME STYLE SUMMARY OF BENEFITS...
 panels PANEL OVERVIEW.................................. 28 ERGONOMIC HEIGHTS............................... 29 PANEL GASKET OVERVIEW............................ 30 27 PANEL SEGMENTATION..............................
IF INSTALLING ANY OF THE PORTMAN SELF CLOSING SYSTEMS, PLEASE READ THE CORRESPONDING FITTING INSTRUCTIONS SUPPLIED WITH THE CLOSING SYSTEM FIRST
 Set A Set B PFD60 Fire Door Kit FITTING INSTRUCTIONS IF INSTALLING ANY OF THE PORTMAN SELF CLOSING SYSTEMS, PLEASE READ THE CORRESPONDING FITTING INSTRUCTIONS SUPPLIED WITH THE CLOSING SYSTEM FIRST SUGGESTED
Sauna & Steam. Vision Sauna Manual Wall Hung Heater Version (Covers all models)
") Vision Sauna Manual 14.7.18 Wall Hung Heater Version (Covers all models) Oceanic Ltd, Pountney Street, Wolverhampton, WV2 4HX Phone: 01902 450 550 sales@oceanic-saunas.co.uk www.oceanic-saunas.co.uk Table
Vision Sauna Manual 14.7.18 Wall Hung Heater Version (Covers all models) Oceanic Ltd, Pountney Street, Wolverhampton, WV2 4HX Phone: 01902 450 550 sales@oceanic-saunas.co.uk www.oceanic-saunas.co.uk Table
Next-Generation Router Table
 Next-Generation Router Table Make more accurate cuts with a flat, solid-surface top. by John English 2 AmericanWoodworker.com 9 Key Features 1. Hinged Top. Bit changes are much easier. 2. Pivot Control.
VCE VET FURNISHING (CABINET MAKING)
") Victorian Certificate of Education 2012 SUPERVISOR TO ATTACH PROCESSING LABEL HERE STUDENT NUMBER Letter Figures Words VCE VET FURNISHING (CABINET MAKING) Written examination Section Monday 12 November
Victorian Certificate of Education 2012 SUPERVISOR TO ATTACH PROCESSING LABEL HERE STUDENT NUMBER Letter Figures Words VCE VET FURNISHING (CABINET MAKING) Written examination Section Monday 12 November
A New Dimension in Kitchen Design
 A New Dimension in Kitchen Design Introduction The kitchen is the functional centre of the home, but at the same time the kitchen can be aesthetically pleasing, personalised and fashionable. Drawing on
From all of us, thank you for choosing. John McDonald, Founder
 Installation Manual From all of us, thank you for choosing This instruction manual was put together in the spirit of the Do-It-Yourself movement while simultaneously serving to help professionals understand
Robert Bosch GmbH. Wall organiser
 Wall organiser The organisational talent Wall organiser Say goodbye to messiness! The wall organiser is the ideal place to store everything that tends to lie around. 1 Introduction Wardrobes, drawers and
System 3000 specifications
 System 3000 specifications Scope: Materials: Type of Bookstack: This specification covers delivery and installation of steel library shelving of the bracket type. Height, depth and accessories shall be
COFFEE TABLE WITH RECESSED TRAY
 COFFEE TABLE WITH RECESSED TRAY Why not treat your guests to a tray laid with delicacies and then remove it from sight in your new coffee table. There's no easier way to show that you are a thoughtful
Installation Instructions Split Shake, Staggered Shake, Shingle, Perfection Shingle, and Shapes
 Installation Instructions Split Shake, Staggered Shake, Shingle, Perfection Shingle, and Shapes General Guidelines These instructions show one type of installation and are intended for the professional
Cable Cover Guide. Color List... W White B Black P Premium Wood (stainable Floor Trim only) shape & size (wxh) colors available
 shape & size (wxh) colors available") Cable Cover Guide Color List... W White B Black P Premium Wood (stainable Floor Trim only) illustrations not to scale Maxi TV Drop Mini Micro Floor Trim shape & size (wxh) colors available 2⅜ x 13/16 2
Cable Cover Guide Color List... W White B Black P Premium Wood (stainable Floor Trim only) illustrations not to scale Maxi TV Drop Mini Micro Floor Trim shape & size (wxh) colors available 2⅜ x 13/16 2
Imola 44. elmwood fine custom cabinetry. scroll for more information. General Specifications. Prime Center Panel. Additional Panel Options
 General Specifications Prime Center Panel 4.7 5. 5.7 Door Construction: 5 Piece MDF with 44 applied moulding around the outside of the rails. Center Panel Construction: 3/8 recessed panel. See drawings
INSTRUCTION SHEET U19
 U19 All Refrigerator and All Freezer Trim Kit Installation Product Line: U19 All Refrigerator and All Freezer Models Parts Included in Kit TRIMKITEZ1 (Part# 297333500): Single Trim Kit Components Single
Kreg Tool Co. All Rights Reserved.
 Version 1 p. 1 Materials: Lumber: Qty: Board 2 2x2s 3 ft. long 2 1x2s 8 ft. long 2 1x3s 8 ft. long 6 1x6s 10 ft. long INSTRUCTIONS: Supplies: 1 1 / 4" Kreg Screws (coarse thread for softwoods, fine thread
HOW TO INSTALL ELITE PANELED WAINSCOTING Using X-Rails with Either Raised, Flat or Beaded Panels
 HOW TO INSTALL ELITE PANELED WAINSCOTING Using X-Rails with Either Raised, Flat or Beaded Panels 1. First, remove the cover plates from all electrical outlets. All baseboards should also be removed; the