Assembly, Installation, Maintenance and Operation Instructions For
|
|
|
- Emil Roberts
- 5 years ago
- Views:
Transcription
1 Assembly, Installation, Maintenance and Operation Instructions For Spacefile LT Storage System January 2010 SPACEFILE INTERNATIONAL CORP FEWSTER DRIVE, MISSISSAUGA, ON, CANADA L4W 1A2 TOLL FREE PHONE FAX INFO@SPACEFILE.COM
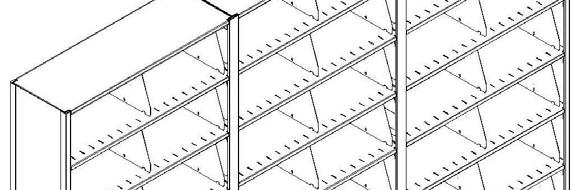
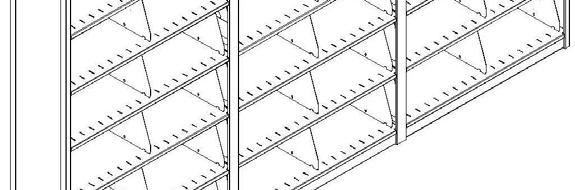
2 Spacefile LT Specifications Product Description: Spacefile LT Standard and Medium Duty Shelving offers exceptional strength and durability for a variety of storage applications. Spacefile LTshelving incorporates both L & T shaped uprights allowing for a variety of shelving configurations. Interlocking keyhole uprights combined with double rivet shelf supports are designed to offer maximum strength and durability with exceptional double entry (back to back storage) allowing for maximum filing/storage capacity with minimal floor intrusion. Shelves are available slotted to accept adjustable file dividers. All shelf units are designed for expansion and are available as mobile Spacefile LT Shelving is ready to Assemble with no special tools required. Open Uprights: Are 18 gauge cold rolled steel, roll formed into a 2 wide T upright with keyhole slot holes punched on 1 1/2 centers on inner wall of upright only. There are no holes on the exterior portion of the upright. Front and rear posts are joined together with a minimum of three 3 high 18 gauge spacers maintaining proper upright spacing along the entire length of the upright and adds rigidity and strength. The open L upright is typically used for row ends with Open T uprights used as a common upright between shelf units. All uprights include an identifiable pair of punched holes every 6 on center allowing a visual confirmation for proper shelf spacing. Closed Uprights: Includes same specifications as the Open Uprights except welded spacers are replaced with a welded 24 gauge full height closure sheet incorporating a 5/8 wide stiffener flange at the bottom of the closure sheet. Standard Duty Shelves: Shelves are formed of 22 gauge cold rolled steel with a ¾ flange on all sides. Front and Back top sides to include a 9/32 stiffener flange for added strength. Shelves are available plain or with slots punched on 2 centers to accept adjustable file dividers. Medium Duty Shelves: Include same specification as Standard Duty Shelving except shelves are formed of 18 gauge cold rolled steel. Heavy Duty Shelves: Shelves are formed of 18 gauge cold rolled steel with a 1 1/8 flange on all sides. Front and Back shelf sides to include a 9/32 stiffener flange for added strength. Shelves are available plain or with slots punched on 2 centers to accept adjustable file dividers. Shelf Support: Shelf supports are formed of 14 gauge (12 gauge for 42 and 48 widths) cold rolled steel ¾ high. Each support end is formed flat and includes two shoulder rivets with 7/16 diameter heads for attachment to corresponding keyholes in upright. Shelf supports are available with single or double rivets. All single rivet shelf supports are designed to sit flush with bottom of shelf upright Heavy Duty Shelf Support: Shelf supports are formed of 11 or 14 gauge (11 gauge on 42 & 48 widths only) cold rolled steel 1 1/8 high. Each support end is formed flat and includes two shoulder rivets with 7/16 diameter heads for attachment to corresponding keyholes in upright. Shelf supports are available with single or double rivets. All single rivet shelf supports are designed to sit flush with bottom of shelf upright Shelf Reinforcement: Shelf reinforcements are formed of 12 gauge cold rolled steel and formed into a channel shape. Shelf reinforcements are notched on each end and align with respective shelf support. Heavy Duty Shelf Reinforcement: Shelf reinforcements are formed of 13 gauge cold rolled steel and formed into a channel shape. Shelf reinforcements are notched on each end and align with respective shelf support. Back Stops: Back stops are formed of 18 gauge cold rolled steel with a 7/16 channel on the top and similar bend at the bottom and areslotted on the face. Slots on Back stops arepunched on same centersasthe the shelf and are used to accept back tab of adjustable file divider. Ends of Back stop include one shoulder rivet with 7/16 diameter head for attachment to corresponding keyholes in upright. Back stops are used for single entry shelving only. Center Stops: Center stops are formed of 20 gauge cold rolled steel with a 9/16 formed channel on the top and a 9/16 return bend on the bottom. Formed channels on the top are punched on same centers as the shelf and are used for back to back support of adjustable divider. The overall height of center stop is 4 and includes mounting holes on bottom flange for easy assembly using ¼ nuts and bolts. Center stops are used for double entry shelving only. Kick Plate: kick Plates are formed of 16 or 16 gauge cold rolled steel formed with a stiffener flange on top and bottom edge. Kick Plates are available in 2 and 4 heights. Adjustable File Dividers: File dividers are formed from 20 gauge cold rolled steel. Dividers are punched to include two tabs on the base and one located on the rear. File dividers can only be used with Back or Center stops.
3 Typical Components
4 Tools Required Rubber Mallet or Plastic Tip Hammer Phillips Screwdriver and Socket Wrench Step 1 Temporarily mount a shelf support to hold uprights into position. Use the rubber mallet to tap shelf support into bottom of keyholes Step 2 Depending on the configuration ordered, install the bottom shelf supports. Typically Combo Bases are used for static systems and a single rivet shelf support is used for Spacefile LT when the shelving is being placed on a mobile system Note that the L Upright is for the end of the shelving and the T Upright is for middle sections
5 Step 2 Depending on the configuration ordered, install the bottom shelf supports. Typically y Combo Bases are used for static systems and a single rivet shelf support is used for Spacefile LT when the shelving is being placed on a mobile system
6 Step 3 If required, install Shelf Reinforcements. Refer to following table to quantity of shelf reinforcements required for your configuration Number or Required Shelf Reinforcements Width of Shelving Depth of Shelving 24" 30" 36" 42" 48" 10" " " " " " " "
7 Step 4 Install shelf by tilting. On double wide systems that have center supports, install center support onto shelf before installing shelf
8 Step 5 If required, install back supports three full keyholes above shelf
9 Step 7 As the final step, install the dividers. Refer to layout for number of dividers provided per shelf
10
11 Single Entry Typical
12 Double Entry Typical Please contact the factory at with any questions. Please have Dealer Name and Order Number/Job bnumber available when calling.
4Post Shelving Assembly Instructions
 4Post Shelving Assembly Instructions ATTENTION: BEFORE STARTING ASSEMBLY, DETERMINE WHICH STYLE OF SHELVING IS TO BE BUILT AND FIND THE CORRESPONDING SECTION OF THE INSTRUCTIONS. READ ALL INSTRUCTIONS
4POST ASSEMBLY INSTRUCTIONS TOOLS REQUIRED FOR ASSEMBLY PARTS REQUIRED FOR ASSEMBLY OF SINGLE ENTRY ROW OF SHELVING. Top Cover
 TOOLS REQUIRED FOR ASSEMBLY OR Rubber Mallet Plastic Tip Hammer PARTS REQUIRED FOR ASSEMBLY OF SINGLE ENTRY ROW OF SHELVING Top Cover Slotted Closed "L" Upright Divider Back Stop (Single Entry Only) Reinforcement
TOOLS REQUIRED FOR ASSEMBLY. Rubber Mallet or Plastic Tip Hammer PARTS REQUIRED FOR ASSEMBLY OF SINGLE ENTRY STARTER.
 TOOLS REQUIRED FOR ASSEMBLY Rubber Mallet or Plastic Tip Hammer Top Cover Support PARTS REQUIRED FOR ASSEMBLY OF SINGLE ENTRY STARTER Back Stop Divider Closed 'L' Upright Slotted Reinforcement Support
4Post Trakslider Instructions
 4Post Trakslider Instructions FOR ASSEMBLY ASSISTANCE CONTACT CUSTOMER SERVICE AT 1-866-217-0330 (MONDAY THRU FRIDAY 8 AM - 5 PM EST) PAGE 1 OF 31 INST0083 REV2 WS 4/16/08 Tools Required for Assembly Or
Mobile Weapons Storage System Specifications
 Mobile Weapons Storage System Specifications Whatever your weapon storage needs, Hi-Density s customized Weapons Storage System will be designed to fit your unique specifications. We recognize that security
Franklin Mills Stackable Movable Lateral Instructions
 Franklin Mills Stackable Movable Lateral Instructions Table of Contents: Table of contents...1 Tools Required...2 Stationary Shelving Assembly...3-7 Mobile Shelving Assembly...8-16 Rail Assembly...8-11
Modular Bi-File Lateral
 Modular Bi-File Lateral Installation Instructions 920-563-6362 E-mail: ssc@spacesaver.com Internet: www.spacesaver.com Contents Hardware Identification..................................3 Pre-Installation........................................6
Assembly Instructions Above Worksurface Riser Shelf Systems and Back / End Stops
 Assembly Instructions Above Riser Shelf Systems and Back / End Stops Back Stops and End Stops Adjustable Riser Shelves Instrument Riser Shelves Stationary Riser Shelves IMPORTANT PLEASE READ THESE INSTRUCTIONS
L & T Open Shelf Filing System
 L & T Open Shelf Filing System Contemporary Styling Shelf covers shelf supports for a clean contemporary look. Sleek, Attractive Appearance With no exposed holes on uprights. Easy Assembly Shelf supports
Workbench Instructions for Assembly
 Workbench Instructions for Assembly FlexWorks is a trademark of Lista International Corporation. Making Workspace Work is a trademark of Lista International Corporation. Document Number: MD002A3 Print
Workbench Instructions for Assembly
 Workbench Instructions for Assembly Technical Electronic Workstations and Industrial Workbenches Includes: Cabinets Privacy Panels Stringers Bottom Shelves Table of Contents Tools Required for Assembly...
BOOKCASE WARNING. Illustration 1
 Illustration 1 Lower Back Panel Upper Back Panel Cam Connector Illustration 2 Left end Illustration 3 Cam Bolt Adjustable Shelf Left end Left End Panel Bottom/ Center Shelf Connector Cover Right End Panel
Storage Cabinets 9000 Series Assembly Instructions
 Storage Cabinets 9000 Series Assembly Instructions Thank you for selecting Salsbury s storage cabinets. We are confident that the quality and construction of the cabinets will prove to be a good investment.
Trak-Slider Instructions
 Trak-Slider Instructions 1/4-20 x 3/4" Hex Head Bolt 1/4-20 Flanged Hex Nut Gusset 1/4-20 x 1/2" Allen Cap Screw 1/4-20 Nylock Nut Rivet 1/4-20 x 3/8" Pan Head Phillips Machine Screw 1/4 USS Flat Washer
NetRack. Please take a moment to make sure that you received everything that s included with your order. Each product is described below.
 What You Should Have Received NetRack DECEMBER 2002 RM500A-R3 RM507-R2 RM501-R3 RM508-R3 RM502-R2 RM314 RM503-R3 RM315-R2 RM505A-R3 RM615-R2 RM506-R3 Please take a moment to make sure that you received
PRODUCT INFORMATION Penco Wide-Span Shelving
 PRODUCT INFORMATION Penco Wide-Span Shelving 2946 Larimer St. Denver, CO 80205 303-295-1100 / 800-373-7693 FAX 303-295-2464 Email info@snyderequipment.com www.snyderequipment.com Wide Span Shelving Penco
ADULT ASSEMBLY REQUIRED DUE TO THE PRESENCE OF SMALL PARTS, SHARP POINTS, SHARP EDGES
 ADULT ASSEMBLY REQUIRED DUE TO THE PRESENCE OF SMALL PARTS, SHARP POINTS, SHARP EDGES If you have any questions regarding assembly or if you are missing parts, do not return this item to the Sam s Wholesale
Interactive Monitor Arm
 Interactive Monitor Arm Tools Required -5mm Allen wrench -Phillips screwdriver -Plastic mallet There are two ways to attach a Monitor Arm to a Full Frame; with a Beam, or with a Post Mount. Both methods
Extensive cable management on a footprint that fits on a 24-inch floor tile.
 RM945A-R2 Elite Rack Manager Extensive cable management on a footprint that fits on a 24-inch floor tile. Holds up to 1000 pounds. Customer Support Information Order toll-free in the U.S.: Call 877-877-BBOX
System 3000 specifications
 System 3000 specifications Scope: Materials: Type of Bookstack: This specification covers delivery and installation of steel library shelving of the bracket type. Height, depth and accessories shall be
Installation Instructions Kit, Base Rail Bracket Part # 31413
 Installation Instructions Kit, Base Rail Bracket Part # 31413 Dealer / Installer: Provide a copy of these Instructions to the end user of this product. These Instructions provide important operating and
Installation Manual for Metal Emperor Lockers
 P a g e 1 Table of Contents Page General Notes and Tools Required 2-3 Assemble Shelves with Coat Hooks/Coat Rods 4 Fastening Chart 5 Knock Down Locker Assembly (Banks of Three) 6-12 Appendix A: Dress End
Linear Hook- on Worksurfaces
 Linear Hook- on Worksurfaces Linear Hook-On Worksurfaces come in three depths and seven lengths. Different worksurfaces have different reqirements for installation that are outlined below. 27 inch deep
HALLOWELL HI-TECH SHELVING
 LLOLL I-C SLVING i-ech Industrial grade steel shelving continues a tradition of quality established generations ago with the goal of providing a shelving line with the strength needed to handle most industrial
Copyright Black Box Corporation. All rights reserved Park Drive Lawrence, PA Fax
 Copyright 2003. Black Box Corporation. All rights reserved. 1000 Park Drive Lawrence, PA 15055-1018 724-746-5500 Fax 724-746-0746 JULY 2003 RM3010A RM315-R2 RM323-R2 RM329 RM451 RM457 RM3020A RM316 RM324-R2
Kawasaki Teryx 750 Cab Kit* Caution: Before using this product, read this manual and follow all Safety Instructions.
 Owner s Manual Model: Kawasaki Teryx 750 Kawasaki Teryx 750 Cab Kit* Caution: Before using this product, read this manual and follow all Safety Instructions. Safety Instructions Cab Kit Contents Hardware
AURORA SHELVING PLANNING GUIDE
 AURORA SHELVING PLANNING GUIDE TABLE OF CONTENTS THE AURORA SHELVING CONCEPT..........................1 Easy 5-Minute Assembly....................................2 The Aurora Shelving Family..................................3
WK9 WORKTOP KIT Assembly Guide
 WK9 WORKTOP KIT Assembly Guide Tools and supplies needed for assembly: Cordless drill with #2 Phillips bit 5/16" drill bit #2 Phillips screwdriver Bubble level Sharp felt tip marker 3/8" and 7/16" wrenches
Available on: Contract No. GS-28F-1040C
 Available on: Contract No. GS-28F-1040C Datum 4Post Shelving offers exceptional strength and durability for a variety of storage applications. 4Post Shelving incorporates both L & T shaped uprights allowing
INSTRUCTION MANUAL. FOR Stainless Steel Solid Rivet Shelving MODELS COVERED: LWS-1836/1848/2436/2448
 INSTRUCTION MANUAL FOR Stainless Steel Solid Rivet Shelving MODELS COVERED: LWS-1836/1848/2436/2448 VESTIL MANUFACTURING CORP. 2999 NORTH WAYNE STREET, P.O. BOX 507, ANGOLA, IN 46703 TELEPHONE: (260) 665-7586
F l a t S c r e e n A R M S I n s t a l l a t i o n
 ITEM NUMBERS (1) #TOACAORG16 (2) #TOACAORG20 (3) #TOACATRP24 (4) #TOACATRP30 (5) #TOACATRPDS (6) #TOACATRPSS TOOLS REQUIRED (1) 3/8 Wrench (not provided) (2) Phillips head screwdriver (not provided) (1)
R Form No MILLENNIUM GONDOLA / WALLCASE ASSEMBLY
 R06-19-06 - Form No.08335-0109 POST THIS WARNING PAGE IN A CONSPICUOUS PLACE, CLEARLY VISIBLE TO ALL STORE PERSONNEL READ BEFORE ASSEMBLING WARNING FOR YOUR SAFETY Install all shelving units according
BOLTLESS WORKSTATION
 BOLTLESS WORKSTATION MODEL NO: CWB450WS PART NO: 7637882 ASSEMBLY INSTRUCTIONS GC0416 INTRODUCTION Thank you for purchasing this CLARKE workstation. Before attempting to use this product, please read this
1. Show the following information with additional information necessary to indicate shop compliance with the requirements of this section.
 SECTION 12360 LIBRARY SHELVING PART 1 GENERAL 1.01 SUMMARY A. Related Sections: 1. 06100 - Carpentry. 2. 09200 - Metal Studs, Lath, Suspension Ceiling, Plaster and Stucco. 3. 09660 - Resilient Tile Flooring.
ADULT ASSEMBLY REQUIRED
 ADULT ASSEMBLY REQUIRED If you have any questions regarding assembly or if you are missing parts, do not return this item to the Retailer Store Please call our customer service number and have your instructions
INSTALL INSTRUCTIONS WELCOME TO THE NEWAGE PERFORMANCE CABINETRY SERIES NEWAGE STEEL WELDED CABINETRY
 NEWAGE STEEL WELDED CABINETRY WELCOME TO THE NEWAGE PERFORMANCE CABINETRY SERIES ALL CABINETS MUST BE MOUNTED TO STUDS ON A SECURE WALL, AS PER THESE INSTRUCTIONS. FAILURE TO DO SO MAY RESULT IN SERIOUS
TITAN INDUSTRIAL RACK 6-FOOT TALL / 4-SHELF
 TITAN INDUSTRIAL RACK 6-FOOT TALL / 4-SHELF DXST10000 IMPORTANT: Please read this manual carefully before assembling this storage rack and save it for reference INSTRUCTION MANUAL 3 TABLE OF CONTENTS
ASSEMBLY INSTRUCTIONS
 4-SHELF INDUSTRIAL BOLTLESS SHELVING MODEL NO: CS4600BO & CS41000BO PART NO: SEE TABLE PAGE 2 ASSEMBLY INSTRUCTIONS GC0815 INTRODUCTION Thank you for purchasing this CLARKE Shelving Unit. Before attempting
Installation Instruction
 Tools Needed for Assembly Stud finder (for wood stud wall) Pencil Mark Electric drill Wood Stud Wall Installation Step 1. Locate the Wood Studs Installation Instruction Drill bit (for wood stud wall) Masonry
Ford Pick Up Rear leaf Spring Kit Installation Instructions
 1948-1956 Ford Pick Up Rear leaf Spring Kit Installation Instructions 1-800-984-6259 www.totalcostinvolved.com Parts 48 inch leaf (2) springs (4) U-bolts 3/8-24 x l 1/4bolts (16) & nuts (2) 1/2-20 x 4
Cabinet Storage Products
 Assembly Instructions Storage Products (UltraStor, Acoustis, Adjustable Shelf, Cover Panels, Closure Panels) Wood Compartment Doors Full Wood Door Compartment Grille Doors Full Grille Door No Doors Contents
C-Series & S-Series Classic Frame with Transom (Single or Pair)
") 1. TOOLS REQUIRED Tape measure 6' magnetic level 3' magnetic level Safety Glasses Screw gun #2 Screwdriver tip #3 Screwdriver tip Philips Head screwdriver (Used to move frame on wall using oval slots on
1. TOOLS REQUIRED Tape measure 6' magnetic level 3' magnetic level Safety Glasses Screw gun #2 Screwdriver tip #3 Screwdriver tip Philips Head screwdriver (Used to move frame on wall using oval slots on
USSC LLC 4 ONE LLC FIELD MODIFICATION INSTRUCTIONS
 1 OF 17 A 1. PURPOSE: Instructions for in field replacement of 9004 mechanical suspension top pan 2. SCOPE: 9004 mechanical suspension with legacy two point LX back frame and current LX back frame 3. PROCEDURE:
Modular Drawer & Door Systems Installation Instructions Locking Drawers and Receding Doors
 Modular Drawer & Door Systems Installation Instructions ocking Drawers and Receding Doors Pre-Installation Before you begin installation: 1. Read through the installation procedure before starting the
MobileTrak5 Installation Instructions
 MobileTrak5 Installation Instructions PLEASE OPEN ALL BOXES & CHECK TO MAKE SURE YOU HAVE ALL PIECES REQUIRED READ ALL INSTRUCTIONS BEFORE STARTING Tools Required for Assembly 7/16, 1/2 Wrench Phillips
Equilibrium. Conference Table. Installation Instruction. Revision B 11/07/16
 Equilibrium Conference Table Installation Instruction Revision B 11/07/16 Equilibrium End User Agreement Enwork Equilibrium table bases must be installed directly onto a four inch minimum thickness concrete
Model 209 Fireback Replacement
 Model 209 Fireback Replacement Please read all the instructions before you begin the procedure. Confirm that you have all the necessary tools and materials. If you have any questions, technical support
TITAN INDUSTRIAL RACK 4-FOOT TALL / 3-SHELF
 TITAN INDUSTRIAL RACK 4-FOOT TALL / 3-SHELF DXST4500 IMPORTANT: Please read this manual carefully before assembling this storage rack and save it for reference INSTRUCTION MANUAL 3 TABLE OF CONTENTS TECHNICAL
Five Column Half Height Rack Base Rack. (Shown with Tabletop)
") Five Column Half Height Rack Base Rack (Shown with Tabletop) Congratulations! You have purchased the finest wine racking available anywhere. Properly assembled, these Vigilant wine racks will outlast even
Five Column Half Height Rack Base Rack (Shown with Tabletop) Congratulations! You have purchased the finest wine racking available anywhere. Properly assembled, these Vigilant wine racks will outlast even
π H-4408 ALUMINUM BLEACHERS 5-ROW x 15' PARTS uline.com TOOLS NEEDED
 π H-4408 1-800-295-5510 uline.com ALUMINUM BLEACHERS 5-ROW x 15' TOOLS NEEDED Square Tape Measure Rivet Gun 3/16" Drill Bit 1/2" Wrench Socket Wrench 1/2" Deep Well Socket #2 Phillips Bit Rubber Mallet
INDUSTRIAL BOLTLESS SHELVING Model No: CS5501
 INDUSTRIAL BOLTLESS SHELVING Model No: CS5501 Part No: 6600615 ASSEMBLY INSTRUCTIONS GC04/13 INTRODUCTION Thank you for purchasing this CLARKE Shelving Unit. Before attempting to use the product, it is
Manufacturing Process:
 Manufacturing Process: This document is an operations manual describing the steps taken in order to build the 12442 Haitian stove. Included is a list of materials and tools needed to complete the construction
- 2 JOINER ALIGNERS - 2 JOINING BRACKETS - 4 HEX BOLTS. Factory pre-installed mud flange TOOLS REQUIRED: Phillips screwdriver, 5/16 nut driver.
 - 2 JOINER ALIGNERS - 2 JOINING BRACKETS - 4 HEX BOLTS TruGroove Drywall A3 MOUNTING Ceiling INSTALLATION System Overview These instructions review how to install drywall trim versions of TruGroove recessed
FlexFrame - Storage Components and Skins
 FlexFrame - Storage Components and Skins 1/4 Square Drive Ball-Point Hex-Bit Socket 1/8 Short Hex, 1-1/2 Overall Length McMaster Part # 54075A44 Table of Contents Topic Page Storage Components 2 General
TITAN2-EDGE Public Access Computer Station Dual Track
 TITAN2-EDGE Public Access Computer Station Dual Track TITAN2-EDGE Rev A 6/17 Model TITAN2-EDGE ASSEMBLY AND ADJUSTMENT TITAN2-EDGE PARTS AND TOOLS PLEASE REVIEW these instructions before beginning the
INSTALLATION: D1-NOTCH DRYWALL TRIM FLANGE
 T F W 604.549.979 604.549.9555 fluxwerx.com INSTALLATION: D1-NOTCH DRYWALL TRIM FLANGE fixture housing endcap kit optic kit join kit notch 2 cross section notch 4 cross section 4 4" 4-11/2" 4 /8 (111)
Install Instructions. NewAge Steel Welded Tall Locker
 Kit Contains Full Width Adjustable Steel Shelves (4) Height-Adjustable Steel Leveling Legs (4) Aluminum Door Trim (2) 2.5 x ¼ Cabinet Mounting Lag Bolts (4) Large Zinc Plated Mounting Washers (4) 5/8 x
Spring Loaded SCREEN-PRO. All Season Roll-Up Doors IN-JAMB MOUNTING METHOD INSTALLATION INSTRUCTIONS READ THIS FIRST
 Spring Loaded SCREEN-PRO All Season Roll-Up Doors IN-JAMB MOUNTING METHOD INSTALLATION INSTRUCTIONS READ THIS FIRST Carefully examine the crate(s) for damage before opening. If the carton is damaged, immediately
Shelf Converter Drawer System
 Shelf Converter Drawer System Installation and Use Instructions IF THIS PRODUCT IS INSTALLED IN A UNIT THAT DOES NOT MEET THE MINIMUM SYSTEM REQUIREMENTS, INJURY COULD RESULT. (SEE PAGE 2) Shelf Converter
3/4 Rear DuraRac Installation Instructions
 3/4 Rear DuraRac Installation Instructions Ford Transit Low Roof 130 WB Frame Kit Part #: CRC 27-1010-001 V1.0.09.28.18 IMPORTANT INSTALLATION STEPS ARE DENOTED USING A STOP SIGN. THESE STEPS MUST BE PERFORMED
Top Closure Kit Accessory for Music Library System
 Assembly Instructions Top Closure Kit Accessory for Music Library System Contents Required Tools.....................................2 Installation Requirements............................2 Fasteners -
Bulk Storage Rack Assembly Instructions
 Bulk Storage Rack Assembly Instructions Upright Frame Assembly Determine which end of the post goes up. The keystone slots on the front face of the post are wider at the top than at the bottom (see diagram
CDAS CDAS39 SHELF UNIT
 BY CDAS CDAS39 SHELF UNIT 0708 IMPORTANT! Assembly may require the assistance of another person. Before you begin assembly: READ THE DIRECTIONS all the way through one time. This will speed up the process
ZODIAC 601 XL. Outside Flashing 6C3-3. Mark the no rivet zone for Extrusion Handle 6C3-8
 Outside Flashing 6C3-3 Mark the no rivet zone for Extrusion Handle 6C3-8 Cleco the inside and outside flashing to the canopy side frame before the canopy bubble is fitted. Ref. Front edge 50mm back from
ADULT ASSEMBLY REQUIRED DUE TO THE PRESENCE OF SMALL PARTS, SHARP POINTS, SHARP EDGES
 ADULT ASSEMBLY REQUIRED DUE TO THE PRESENCE OF SMALL PARTS, SHARP POINTS, SHARP EDGES If you have any questions regarding assembly or if you are missing parts, do not return this item to the retailer.
Shelving 4-POST & CASE-TYPE
 Shelving 4-POST & CASE-TYPE S H E L V I N G S Y S T E M S S t o r a g e S o l v e d MAXIMUM FLEXIBILITY Attractive, versatile and easy to access, Spacesaver 4-Post and Case-Type Shelving are highly adaptable,
PROFILE Flat Panel Console System Installation Manual
 PROFILE Flat Panel Console System Installation Manual Table of Contents Page Introduction... 2 Important Safety Information...3, 4 Installation Overview... 4, 5, 6 Single Sided/Single Unit... 7 Double
compile system INSTALLATION GUIDE Updated January 2019
 INSTALLATION GUIDE Updated January 09 compile system Table of Contents Panels 0 Quick Connect Clips 0 Lock Clips 0 Panel Trims 0 Privacy Glass 0 Post Base Covers 04 Electrical 04 Power Distribution Harness
INSTALLATION INSTRUCTIONS VENETIAN 84" SLIDING SHOWER DOOR SYSTEM (180º INSTALLATION)
") INSTALLATION INSTRUCTIONS VENETIAN 84" SLIDING SHOWER DO SYSTEM (180º INSTALLATION) 28539 Industry Drive, Valencia, CA 91355 Toll Free Phone: (877) 728-3874 Toll Free Fax: (888) 440-9567 Phone: (661) 775-1675
INSTALLATION INSTRUCTIONS VENETIAN 84" SLIDING SHOWER DO SYSTEM (180º INSTALLATION) 28539 Industry Drive, Valencia, CA 91355 Toll Free Phone: (877) 728-3874 Toll Free Fax: (888) 440-9567 Phone: (661) 775-1675
INSTALLATION INSTRUCTIONS - NSF WALK-IN COOLER/FREEZER Wall-Mounted Shelving System - No Blocking
 The components included with this shipment comprise a fully-adjustable, heavy-duty cantilever shelving system. Installed properly, they ll provide decades of superior value in your walk-in cooler or freezer.
NORTH AMERICAN STEEL INNOVATIVE STORAGE SOLUTIONS OUR S T R E N G T H IS OUR PEOPLE NORTH AMERICAN RACK
 NORTH AMERICAN STEEL INNOVATIVE STORAGE SOLUTIONS OUR S T R E N G T H IS OUR PEOPLE NORTH AMERICAN RACK NORTH AMERICAN RACK North American Rollformed Racking is compatible with Redirack and all major Canadian
P.O. Box 8400 Green Bay, WI (920)
") P.O. Box 8400 Green Bay, WI 54308-8400 (920) 468-2165 Change Notice No. 112 Implemented By: KI-Pembroke Notification By: Scott Vissers Date: 03/15/10 Component Product Title: Series XXI Lateral Filing
P.O. Box 8400 Green Bay, WI 54308-8400 (920) 468-2165 Change Notice No. 112 Implemented By: KI-Pembroke Notification By: Scott Vissers Date: 03/15/10 Component Product Title: Series XXI Lateral Filing
Assembly Instructions
 InTandem Table System November 20 InTandem Table System - Worksurface #4 x/" 4 wood screw power beam Tools Provided T-0 Extended Torx Driver T-25 Torx Driver Additional Tools Required Soft protective
Warnings. Description. Prior to Installation Tools Needed
 Warnings Failure to act in accordance with the following may result in death or personal injury. The JT Strong Arm Stabilizer System is intended to eliminate chassis movement in travel trailers and fifth
Rugged Ridge Engine Transmission Skid Plate JK
 Installation Time: 1-2 Hours Tools Required: Rugged Ridge Engine Transmission Skid Plate 2012-2017 JK Sockets: 16mm, 17mm, 18mm deep well Socket Wrench Wrenches: 16mm, 18mm Torque Wrench Drill ½ Drill
PH03 Comfort XL Front Assembly Replacement Instructions
 PH03 Comfort XL Front Assembly Replacement Instructions POLYJOHN USA PolyJohn Enterprises Corp 2500 Gaspar Ave. Whiting, IN 46394 Phone: 800-292-1305 Fax: 219-659-0625 www.polyjohn.com info@polyjohn.com
RBP-1215B-RX DODGE RAM QUAD CAB RX3
 RBP-1215B-RX3 2002-2017 DODGE RAM 15-3500 QUAD CAB RX3 Passenger side RX-3 Side Step Drill Template Passenger side rear Modular Bracket (6) L Support Brackets Driver side rear Modular Bracket Driver side
INSTALLATION INSTRUCTIONS 3"/4 BENT END SIDEBARS FORD F-150 SUPERCREW PART # DZ /DZ
 INSTALLATION INSTRUCTIONS 09-12 FORD F-150 SUPERCREW PART # DZ 372697/DZ 372699 PARTS LIST: 1 Driver/Left Sidebar 4 1/2 Lock Washers 1 Sidebar 4 12mm x 32mm OD x 3mm Flat Washers 1 Driver/Left Mounting
LAN Locker Adjustable Shelves
 Adjustable Shelves LAN LOCKER ADJUSTABLE SHELVES * Adjustable Shelves are available for LAN LOCKER widths: 24, 30, 48, 60, and 72. * When installing more than one Adjustable Shelf, it is recommended that
Assembly, Installation, Operation and Maintenance Instructions Kit, Base Rail Bracket Part # 31852
 . Assembly, Installation, Operation and Maintenance Instructions Kit, Base Rail Bracket Part # 31852 Dealer / Installer: Provide a copy of these instructions to the end user of this product. These instructions
DEPTH-KIT-785 Seat Depth Extension
 Parts Required: 2 x Seat Frame Plugs 1.5 or 3 1 x Elevation Rod 18.5 or 20 2 x Attachment Rods 18.5 or 20 3 x Vinyl Straps color and width specific Tools Used: Sissors 2 x ½ Wrench Soft Tip Hammer or Mallet
SPEEDFRAME T h e s p e e d y w a y t o b e i n d i v i d u a l
 SPEEDFRAME T h e s p e e d y w a y t o b e i n d i v i d u a l T h e a l l p u r p o s e c o n s t r u c t i o n k i t SPEEDFRAME All materials are kept close to hand in this specially designed Speedframe
K.D. DEFIANT II LOCKER ASSEMBLY INSTRUCTIONS
 K.D. DEFIANT II LOCKER ASSEMBLY INSTRUCTIONS These Instructions Cover GUARDIAN DEFIANT AND INVINCIBLE II DEFIANT SINGLE POINT LATCH LOCKERS CONTENTS General Instructions 1 Maj Locker Components Hardware
SINGLE TRACK BYPASS (patent pending) barn door hardware
 barn door hardware") SINGLE TRACK BYPASS (patent pending) barn door hardware Installation Manual What is included in your kit: Part number Part name Quantity 1 Inner door hanger 2 2 Outer door hanger 2 3 5/16 x 1.5 lag bolts
SINGLE TRACK BYPASS (patent pending) barn door hardware Installation Manual What is included in your kit: Part number Part name Quantity 1 Inner door hanger 2 2 Outer door hanger 2 3 5/16 x 1.5 lag bolts
LF Series Assembly Instructions
 LF Series Assembly Instructions 1998760 Revision A-10 Complete Series Master Packet 2010 Kimball International, Inc. T 800.482.1818 F 812.482.8300 Footprint Storage and Metal Filing Systems Assembly Instructions
RH-412 STEEL DOORS INSTALLATION INSTRUCTIONS
 RH-412 STEEL DOORS INSTALLATION INSTRUCTIONS By following the steps outlined below, the assembly, installation and adjustment of the steel doors, will be a simple process. Let s start with the Driver Side.
3/8-16 x 3/4 cap screw. 3/8-16 hex nut for above screws. 1/4-20 x 3/4 socket cap screw. 3/16 short arm hex key (not to scale)
") Super Slab Roller 24, 30 and 36 models Worktable Assembly Directions P.O. Box 89 Cheney, WA 99004 USA 509.235.9200/800.23.7896 Fax: 509.235.9203 www.northstarequipment.com Revised September, 2006. All
Super Slab Roller 24, 30 and 36 models Worktable Assembly Directions P.O. Box 89 Cheney, WA 99004 USA 509.235.9200/800.23.7896 Fax: 509.235.9203 www.northstarequipment.com Revised September, 2006. All
SAM. Model: STV-C65 LCD Mobile Visualized Stand Instruction Manual. Weight Capacity: 1251bs / 56.7kg Suits LCD Flat Panel Display: 42"-55" Page 20
 SAM Model: STV-C65 LCD Mobile Visualized Stand Instruction Manual Weight Capacity: 1251bs / 56.7kg Suits LCD Flat Panel Display: 42"-55" 20 Step 6 LCD Mobile Lift Stand Model: STV-C65 Cable management
PFW 6851 Display Wall Mount, Turn & Tilt 80 kg INSTALLATION INSTRUCTIONS
 Display Wall Mount, Turn & Tilt 80 kg INSTALLATION INSTRUCTIONS 9531-007-Z00-01 Table of Contents Warning Statements 2 Parts List 3 Installation Tools 3 Wood Stud Installation 5 Concrete Surface Installation
Installation Instructions Standalone or continuous run configurations - 2 JOINER ALIGNERS - 2 JOINING BRACKETS - 4 HEX BOLTS
 - 2 JOINER ALIGNERS - 2 JOINING BRACKETS - 4 HEX BOLTS TruGroove Drywall A3 MOUNTING Ceiling INSTALLATION System Overview These instructions review how to install trimless drywall versions of TruGroove
Wilsonstak. library bookstacks general specifications. Wilsonstak
 Wilsonstak library bookstacks general specifications Wilsonstak Scope This specification covers delivery and installation of Steel Bookstack Shelving of the bracket type only. Unit heights, depths and
INSTALLATION INSTRUCTIONS RH 412 STEEL DOORS
 By following the steps outlined below, the assembly, installation and adjustment of the steel doors, will be a simple process. Let s start with the Driver Side. Note: Having the hood open makes the job
LOCKER SPECIFIERS GUIDE. The standard of excellence for business, industry and institutions. Lockers Cabinets Shelving
 LOCKER SPECIFIERS GUIDE Lockers Cabinets Shelving The standard of excellence for business, industry and institutions FINISH GUIDE NANO METAL ROLLER LATCHING SYSTEM For unmatched security, nano metal roller
COCKPIT CORNER UNIT WARNING. Illustration 1. Read all instructions and review illustrations before installing. Tools required for assembly:
 Illustration 1 Illustration 2 Right side of Illustration 3 Right brace Right brace Read all instructions and review illustrations before installing. Tools required for assembly: Phillips screwdriver Rubber
RIVET-RAK STEEL SHELVING SOLUTIONS FOR STORAGE
 RIVET-RAK STEEL SHELVING SOLUTIONS FOR STORAGE RIVET-RAK STEEL SHELVING Tri-Boro delivers both ease of assembly and unobstructed access with RIVET-RAK. It is available in the widest range of sizes in the
121PB - PRO UNEVEN BARS
 Sales & Service sasportonline.com Head Office 135 Forestview Road P.O. Box 40 Orillia, Ontario Canada L3V 6H9 Toll Free (800) 563-6479 Phone (705) 325-2274 Fax (705) 325-1485 USA Office 7879 Will Rogers
FREE CLIMBER 4400 ASSEMBLY INSTRUCTIONS 27694B
 FREE CLIMBER 4400 ASSEMBLY INSTRUCTIONS 27694B 1 TOOLS REQUIRED: CLAW HAMMER KNIFE 1/2 WRENCH OR SOCKET 1. USE KNIFE TO REMOVE ALL PLASTIC STRAPS FROM AROUND PALLET AND CARTON. STRAP 2. USE CLAW HAMMER
INSTALLATION MANUAL. All Recessed Wall-Mount Modules Front-Loading, Rear-Loading, Parcel-Only, Collection Box, Trash/Recycling Bin
 INSTALLATION MANUAL All Recessed Wall-Mount Modules Front-Loading, Rear-Loading, Parcel-Only, Collection Box, Trash/Recycling Bin TABLE OF CONTENTS GENERAL INFORMATION AND ADVISORIES 3 USPS INSTALLATION
Wine Rack Assembly Instructions. Ten Column Display Rack
 Wine Rack Assembly Instructions Ten Column Display Rack Congratulations! You have purchased the finest wine racking available anywhere. Properly assembled, these Vigilant wine racks will outlast even your
Installation Instructions
 EZ Launch Accessible Transfer System Installation Instructions Models 500900L, 500900R, 500901L, 500901R 500890, 500906L, 500906R For questions about features, operation/performance, parts, accessories