Installation Guide. PrivacyShield Window Seal Kit Grenoble Road Richmond, VA Toll Free: For every environment of your life.
|
|
|
- Alan McGee
- 6 years ago
- Views:
Transcription


1 The following installation instructions are given as a general guide to avoid common errors. Installer should follow best practices for construction and workmanship. Acoustical Solutions bears no responsibility for installation or contractor selection. Please contact a sales representative if you have questions, concerns or specific project requirements. Be sure to inspect materials upon delivery. Please note any damage on the delivery ticket and notify Acoustical Solutions immediately. Materials should be stored in original packing in a clean, climate controlled environment free of moisture. should not commence until building is enclosed and under standard occupancy conditions and surfaces are of acceptable condition and properly prepared. Do not install materials of unacceptable quality. AS-PrivacyShield-Window-Seal-Kit--
.")
.")
 In-jamb mount = standard/inverted 15/16\" angle.")
2 Pre-Order, Pre-Order Steps: STEP 1: Determining the right mounting location (in-jamb, surface mount). In-jamb mount= installs on inside of the window jamb (cavity). Surface mount = installs on the outside surface of the window jamb (cavity). The right type of steel attachment system (standard angle, inverted,steel tape, etc...) In-jamb mount = standard/inverted 15/16" angle. Surface mount = standard/inverted 15/16" angle or steel tape. Window In-Jamb Surface Mount AS-PrivacyShield-Window-Seal-Kit--


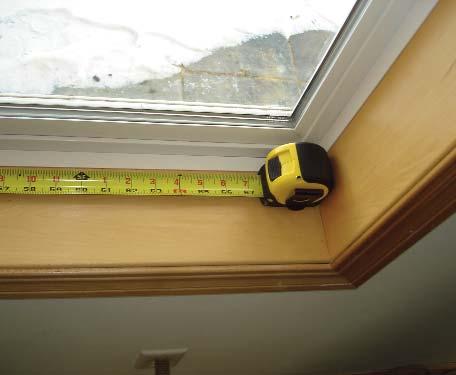
3 Pre-Order STEP 2: Proper Measuring (A-E & F & G if out-of-square) and form competition instructions. Measurements: A, B, & C are the top, middle, and bottom widths. Measurements: D & E are the left and right heights. The back of a tape measure has the width of the tape printed on it. It is best to take these measurements with the tape measure butted up against the window opening instead of rounding the tape to get your measurements. Take your opening measurements with the tape butted up and then add the dimensions on the back of the tape measure. Measurement A Measurement B Measurement C AS-PrivacyShield-Window-Seal-Kit--

4 Pre-Order Measurement C Measurement D AS-PrivacyShield-Window-Seal-Kit--

5 Items, Steps ITEMS INCLUDED SEAL INSERTS: PrivacyShield Window Seal with protective film on them in storage bags. Note: *Do not remove protective film from window seal insert*. Attachment angles. Weather-strip foam. Brillianize Acrylic cleaner and polisher. WYP-All reusable cleaning and polishing cloths. Items Needed for ITEMS NEEDED FOR INSTALLATION: Tape Measure. Utility knife. Pair of yellow handle "Wiss" brand tin snips. Caulk gun. Tube of window caulk. Screw gun with a #2 Phillips bit. or #6-3/4" self-tapping pan head screws. (if applicable) Rubber mallet and a small 1/2" thick block of wood, 4-6" long. PLEASE NOTE: Attachment angles may need to be cut to size during installation. Additionally,once the window insert has been dry fit, removing the protective film may require removal of the frame that houses the Plexiglas. AS-PrivacyShield-Window-Seal-Kit--


6 , Steps STEP 1: Preparing your steel angle (if applicable) with weather strip foam. Take the weather-strip foam and apply it along one edge of the attachment angle. Press down firm to adhere and to eliminate any air pockets from forming. Cut foam at the end with a utility knife. Then remove wax paper backing. Preparing Angle (if applicable) Preparing Angle (if applicable) Preparing Angle (if applicable) AS-PrivacyShield-Window-Seal-Kit--


7 : Steps STEP 2: Measuring and cutting your steel attachment angle. All attachment angles come longer than needed. Verify measurements of window opening before cutting attachment angle. Use tape measure to measure length on attachment angle and score the angle with a pen, pencil, or utility knife. Use a straight edge to mark lines and then cut off excess metal with yellow handle Wiss tin snips. Measuring and Cutting Measuring and Cutting Measuring and Cutting AS-PrivacyShield-Window-Seal-Kit--


8 STEP 4: Caulking of the seams. Apply a small of caulk to the backside of the attachment angle in all corners. Wipe excess caulk with a damp towel. : Steps STEP 3: of steel attachment angle. Horizontal attachment install. Place angle with weather-strip foam against window opening. Insert screws 3" in from each end and every inches. Vertical attachment install. Place angle with weather-strip foam against window opening. Insert screws 3" in from each end and every inches. Angle Angle Angle AS-PrivacyShield-Window-Seal-Kit--

9 : Steps STEP 5: Dry Fit of the PrivacyShield Window Seal. Do not remove protective film. Place PrivacyShield Window Seal into window opening by placing the bottom in first. Then ride the window up until the magnets have snapped into place. Now remove window to clean and polish acrylic. STEP 6: Polishing techniques. Lay window with magnet side up. Remove exterior facing protective film face only. Apply Brillianize cleaner liberally across acrylic surface. Now use three WYP-All cloths in a three step process. First, wipe in linear motions across the surface area to spread cleaner and pick up any debris that may be on the acrylic. Second, use the next cloth in the same linear motion to bring the remaining cleaner to a fine bead. Third, use another cloth in the same linear motion to dry the surface completely. Do not to leave the surface wet and allow to air dry, because this can leave a residue on the acrylic. STEP 7: Final fitting of the window seal Without removing inside protective film, place insert in window opening. Remove interior protective film. Repeat and complete cleaning process as stated in step 6. PLEASE NOTE: Removing the protective film may require removal of the frame that houses the Plexiglas. Dry Fit of PrivacyShield Window Seal AS-PrivacyShield-Window-Seal-Kit--
Pocket Door Installation Instructions
 Installation Instructions Before getting started: Read instructions thoroughly. Be sure that you have the necessary tools and materials before starting the installation. Consult your local building code
ULTRA WINDOW & DOOR EXPANDERS AND RECEIVERS INSTALLATION INSTRUCTIONS
 ULTRA WINDOW & DOOR S AND RECEIVERS INSTALLATION INSTRUCTIONS! CAUTION: *REMEMBER SAFETY FIRST* Proper Eye and! Hearing Protection must always be worn during installation of all window and door products.
INSTALLATION INSTRUCTIONS FRAMELESS CONTINUOUS HINGE SHOWER ENCLOSURE QCI5233
 INSTALLATION INSTRUCTIONS FRAMELESS CONTINUOUS HINGE SHOWER ENCLOSURE QCI5233 QCI5233 Rev 0 Page 1 Certified 06/20/2016 INSTALLATION NOTES: Unpack your unit carefully and inspect for freight damage. Lay
INSTALLATION INSTRUCTIONS FRAMELESS CONTINUOUS HINGE SHOWER ENCLOSURE QCI5232
 INSTALLATION INSTRUCTIONS FRAMELESS CONTINUOUS HINGE SHOWER ENCLOSURE QCI5232 QCI5232 Rev 0 Page 1 Certified 06/20/2016 INSTALLATION NOTES: Unpack your unit carefully and inspect for freight damage. Lay
STACKING MULTI-SLIDE DOOR SYSTEM INSTALLATION INSTRUCTIONS
 STACKING MULTI-SLIDE DOOR SYSTEM INSTALLATION INSTRUCTIONS 1290363 Revision 1 12/16 Page 1 Weather Shield Mfg., Inc. NOTICE CAUTION! Failure to install and maintain our product according to these instructions
4. Partially open the operating panel and tilt the top toward the interior of the door (Figure 4). Lift the panel off the sill and set it aside.
. Lift the panel off the sill and set it aside.") Effective Date: 10/1/2017 Tools Needed Kit Contents Hardware Kit Safety Glasses Cordless drill Phillips screw bit Two-step drill bit (3/8-1/8 ) utility knife Interior Mullion Exterior Mullion Cover clamps
Effective Date: 10/1/2017 Tools Needed Kit Contents Hardware Kit Safety Glasses Cordless drill Phillips screw bit Two-step drill bit (3/8-1/8 ) utility knife Interior Mullion Exterior Mullion Cover clamps
IDP Entry-Fit Steel Door Frames. Installation Instructions K2A and NK2A Series Frames
 IDP Entry-Fit Steel Door Frames Installation Instructions K2A and NK2A Series Frames IDP Inc 21300 W. 8 Mile Rd. Southfield, MI 48075 1-877-645-2770 www.idpframes.com email: info@idpframes.com K2A and
Block Frame Inovo Patio Door/Transom/Sidelite Field Mulling Instructions. simonton.com/installation. If mulling sidelites, skip to Step 5.
 Effective Date: 10/1/17 Tools Needed Kit Contents Safety Glasses Cordless Drill Phillips Screw Bit Two-step Drill Bit (3/8-1/8 ) Utility Knife Interior Mullion Exterior Mullion Cover Hardware Kit Clamps
Sliding Glass Door Assembly and Installation Guide
 Sliding Glass Door Assembly and Installation Guide Index Door System Components and Hardware The following components are needed to complete the installation of your Sliding Patio Door unit. Check all
675 Quick N Stall Neo Angle Framed Hinge Shower Enclosure
 INSTALLATION INSTRUCTIONS 675 Quick N Stall Neo Angle Framed Hinge Shower Enclosure Call Technical Dept @ 1-800-452-2726 QCI1003 Page 1 of 9 Certified 10/01/09 INSTALLATION NOTES: Unpack your unit carefully
3/16 OR 1/4 FRAMELESS SWING DOOR WITH SINGLE INLINE PANEL OR TWO INLINE PANELS
 / OR / FRAMELESS SWING DOOR WITH SINGLE INLINE OR TWO INLINE S This instruction sheet applies to the following units with a magnetic handle. C7, C7, C79 This instruction sheet also applies to the following
Aluminum Clad Wood Window Field Mulling and Stacking Instructions
 Aluminum Clad Wood Window Field Mulling and Stacking Instructions Mulling Stacking Mulling and Stacking IMPORTANT: Please read before you begin. TABLE OF CONTENTS AND TOOL / MATERIAL REQUIREMENTS START
Knock Down Patio Door Assembly Instructions Regular & Impact
 Knock Down Patio Door Assembly Instructions Regular & Impact 72 x 80 72 x 82 72 x 96 96 x 80 96 x 82 96 x 96 Impress the Weather KD Patio Door Regular & Impact Sizes 72 x 80 72 x 82 72 x 96 96 x 80 96
HR175 Sash Replacement Kit Installation Instructions
 HR175 Sash Replacement Kit Installation Instructions IMPORTANT: Please read before you begin. Weather Shield HR175 Sash Replacement Kits Important: Thoroughly read and follow these instructions, failure
Read guide from beginning to end before starting installation. Read all warnings and cautions during unit installation.
 Installation Guide for E-Series/Eagle High-Performance Mullion Windows with LVL Reinforcement and Installed Using Type B Clips Thank you for choosing Andersen. Instructions are for typical, new wood-framed
Picture Window and Welded Dead-Lite (Exterior) Tools: (Not Provided by Manufacturer) Fig Supplies: (Not Provided by Manufacturer) Fig.
 Tools: (Not Provided by Manufacturer) Fig Supplies: (Not Provided by Manufacturer) Fig.") Picture Window and Welded Dead-Lite (Exterior) Tools: (Not Provided by Manufacturer) Tape Measure Utility Knife Fig. 0-1 Drill Level Putty Knife Pry bar Square Foam Gun (Optional) Caulk Gun Hammer Safety
Picture Window and Welded Dead-Lite (Exterior) Tools: (Not Provided by Manufacturer) Tape Measure Utility Knife Fig. 0-1 Drill Level Putty Knife Pry bar Square Foam Gun (Optional) Caulk Gun Hammer Safety
NEPAL Installation procedure
 PART DESCRIPTION 1.- Door handle (1pc) 2.- Long tight bar (1pc) 3.- Short tight bar (1pc) 4.- Support block-lower (2pcs) 5.- Wall jamb cap (2pcs) 6.- Tight bar support (2 pcs) 7.- Acrilic base (1pc) 8.-
6400, 8400 and 9400 Series Sliding Patio Door
 Contemporary 3 Panel Classic 5 Panel French Panel 6400, 8400 and 9400 Series Sliding Patio Door (O) Fixed Panel Left (X) Operating / Mullion Panel Right (X) Operating / Lock Panel Left (O) Fixed Panel
window installation Guide wood FRaMinG New Construction
 window installation Guide wood FRaMinG New Construction IMPORTANT NOTICES AND INFORMATION Read these instructions in their entirety prior to installing windows. Any local building code requirements supersede
FRAMED PANEL / DOOR / PANEL CONTINUOUS HINGE SHOWER ENCLOSURE INSTALLATION INSTRUCTIONS
 FRAMED / DOOR / CONTINUOUS HINGE SHOWER ENCLOSURE INSTALLATION INSTRUCTIONS QCI5229 Rev 0 6 INSTALLATION NOTES: Unpack your unit carefully and inspect for freight damage. Lay out and identify all parts
3-LITE PATIO DOOR INSTALLATION INSTRUCTIONS
 3-LITE PATIO DOOR INSTALLATION INSTRUCTIONS IMPORTANT: Read the instructions and familiarize yourself with the door parts and pieces before beginning assembly and installation. TOOLS NEEDED: Tape Measure
QWALL 5.2 (2 Back Panels)
") QWALL 5. ( Back Panels) SHOWER ACRYLIC WALL INSTALLATION INSTRUCTIONS IMPORTANT DreamLine TM reserves the right to alter, modify or redesign products at any time without prior notice. For the latest up-to-date
QWALL 5. ( Back Panels) SHOWER ACRYLIC WALL INSTALLATION INSTRUCTIONS IMPORTANT DreamLine TM reserves the right to alter, modify or redesign products at any time without prior notice. For the latest up-to-date
Double Swing Door With Header QCI5114
 Double Swing Door With Header QCI5114 QCI5114 REV. 0 Page 1 of 9 Certified 06/22/2016 MAINTENANCE: Two primary materials are used to manufacture your new shower enclosure: tempered glass and anodized aluminum.
Effective February, 2015
 Effective February, 2015 Table of Contents Ensuring System Performance 1 Components 2 Frequently Asked Questions 3 List of Tools 3 Before you Begin Preparation 3 Quality Tips 4 Cold Weather Tips 4 Cleaning
890 SERIES PIVOT STEAM DOOR
 BATH ENCLOSURES An Alcoa Company Tel: 800-643-1514 Fax: 870-234-3181 www.alumaxbath.com INSTALLATION INSTRUCTIONS 890 SERIES PIVOT STEAM DOOR Copyright Alumax Bath Enclosures 1997. All rights reserved.
western window systems westernwindowsystems.com installation instructions non-pocket 2-1/4 panels
 series 2600 multi-slide non-pocket 2-1/4 panels windowsystems.com windowsystems.com movement, which can cause warping and other problems. Frame kit components: Each door will have a head assembly, a threshold
PREMIUM CONCRETE COUNTERTOP MIX INSTALLATION INSTRUCTIONS
 PREMIUM CONCRETE COUNTERTOP MIX INSTALLATION INSTRUCTIONS High Strength Fast Setting Pourable Helpful Items: TCC Materials February 09 Version 2.0 Tools Required: Concrete mixer or ½ drill (600 RPM or
Continuous Hinge Frameless Single Swing Shower Enclosure QCI-5214
 INSTALLATION INSTRUCTIONS Continuous Hinge Frameless Single Swing Shower Enclosure QCI-5214 QCI5214 Rev. 1 Page 1 of 8 Certified 09/19/18 MAINTENANCE: Two primary materials are used to manufacture your
SHOWER DOOR INSTALLATION & CARE GUIDE
 SHOWER DOOR INSTALLATION & CARE GUIDE For models: SD-AZ-0 Please Note: This is a two person job. The glass doors are extremely heavy and it is highly recommended to use professional installers. For any
QWALL 4 ACRYLIC SHOWER WALL INSTALLATION INSTRUCTIONS
 QWALL 4 ACRYLIC SHOWER WALL INSTALLATION INSTRUCTIONS IMPORTANT DreamLine TM reserves the right to alter, modify or redesign products at any time without prior notice. For the latest up-to-date technical
INSTALLATION INSTRUCTIONS FOR FORGENT SLIDING PATIO DOORS RECOMMENDATIONS FOR COMMON INSTALLATION OF SLIDING PATIO DOORS.
 INSTALLATION INSTRUCTIONS FOR FORGENT SLIDING PATIO DOORS RECOMMENDATIONS FOR COMMON INSTALLATION OF SLIDING PATIO DOORS. Installer: DO NOT DISCARD Please leave the Installation Guide with the home owner
4-lite Patio Door. Installation Instructions
 4-lite Patio Door Installation Instructions IMPORTANT: Read the instructions and familiarize yourself with the door parts and pieces before beginning assembly and installation. Note: Only the 5-0 x 6-8
SERIES 3070-T MULTI-SLIDE ASSEMBLY & INSTALLATION INSTRUCTIONS
 Table of Contents I. Care and Maintenance...2 II. Tools / Material & Sealant Requirements...2 III. Assembly and Installation...2 IV. Glazing Assembly...3 V. Panel Assembly...3 1. X Panel...3 2. O Panel...4
1/4 FRAMELESS CONTINUOUS HINGE SHOWER ENCLOSURE 1400A-1700A-1800A
 1/4 FRAMELESS CONTINUOUS HINGE SHOWER ENCLOSURE 1400A-1700A-1800A F AB GLASS AND MIRROR www.fabglassandmirror.com Call: +1 888-474-2221 Fax: (614)-334-4919 Office Timing: 8:30-18:00 EST info@fabglassandmirror.com
Flushglaze For Framed Openings and Horizontal Panels. Window System Installation Guide
 Flushglaze 4500 For Framed Openings and Horizontal Panels Window System Installation Guide January 2017 BENCHMRK Welcome to Kingspan, global leaders in the design and manufacture of insulated metal panels
Aluminum Clad Wood Window 1/2 Reinforced Field Mulling and Stacking Supplement
 Aluminum Clad Wood Window 1/2 Reinforced Field Mulling and Stacking Supplement 1 Aluminum Clad Wood Window 1/2 Reinforced Field Mulling and Stacking Supplement The following instructions are a supplement
tile redi redi DOOR Redi Redi Swing Slide g TM TM...Opening Doors to Stunning Showers! TM TM SERIES: CONFIGURATION: MOUNTING PACKAGE:
 redi DOOR INSTALLATION INSTRUCTIONS tile redi Redi Redi Swing Slide g TM TM...Opening Doors to Stunning Showers! TM TM SERIES: CONFIGURATION: MOUNTING PACKAGE: 1100 Door-Door Framed sliding doors RDQCI5023
Installation Guide for E-Series/Eagle Clad Mechanically Fastened Windows
 Guide for E-Series/Eagle Clad Mechanically Fastened Windows Thank you for choosing Andersen. Instructions are for typical, new wood-framed wall construction with weather protection in place. Instructions
FrameSaver Jamb Bottom Replacement Instructions
 FrameSaver Jamb Bottom Replacement Instructions 8817 West Market Street Colfax, NC 27235 800.334.2006 www.enduraproducts.com Utility Knife Straight Edge Circular Saw Reciprocating Saw Miter Saw Shims Screws
Effective April 1, 2013
 Effective April 1, 2013 Table of Contents Ensuring System Performance 1 Components 2 Frequently Asked Questions 3 List of Tools 3 Before you Begin Preparation 3 Quality Tips 4 Cold Weather Tips 4 Cleaning
Contemporary 3 Panel Classic 5 Panel French Panel
 Contemporary 3 Panel Classic 5 Panel French Panel (X) Operating / Lock Panel Left (O) Fixed Panel Right Note : Glazing Beads For All Panel Face To The Exterior 2 Panel XO Left Is Shown Above Opposite =
Phone # La Jolla Doors. Block Frame Installation Manual Aluminum Frame with either Vinyl or Aluminum Panels
 Phone # 800-440-8785 www.lajolladoors.com La Jolla Doors Block Frame Installation Manual Aluminum Frame with either Vinyl or Aluminum Panels Thank you for choosing La Jolla Doors In this manual you will
Installation Guide. for E-Series/Eagle Clad Hinged Inswing French Door
 Installation Guide for E-Series/Eagle Clad Hinged Inswing French Door Thank you for choosing Andersen. Instructions are for typical, new wood-framed wall construction with weather protection in place.
INSTALLATION INSTRUCTIONS. Deluxe Continuous Hinge Inline Door & Panel Shower Enclosure QCI5230
 INSTALLATION INSTRUCTIONS Deluxe Continuous Hinge Inline Door & Panel Shower Enclosure QCI5230 QCI5230 Rev 0 6 shower new QCI5230 Rev 0 Page 2 Certified 06/20/2016 Parts List A. Curb (w/ weep holes) (1)
UNIT No. 1415NP / 1715NP / 1815NP INFINITY FRAMELESS CONTINUOUS HINGE SHOWER ENCLOSURE WITH NO INLINE POST
 INSTALLATION INSTRUCTIONS UNIT No. 1415NP / 1715NP / 1815NP INFINITY FRAMELESS CONTINUOUS HINGE SHOWER ENCLOSURE WITH NO INLINE POST QCI0240 Page 1 of 13 Certified 8/2/10 INSTALLATION NOTES: Unpack your
NEW CONSTRUCTION PATIO DOOR INSTALLATION INSTRUCTIONS (WITH NAILING FLANGE)
") NEW CONSTRUCTION PATIO DOOR INSTALLATION INSTRUCTIONS (WITH NAILING FLANGE) Slim Line & Classic French Style Patio Doors Materials included: (2) #10 x 2-1/2" Phillips Pan head keeper s (2) 3/8" Hole plugs
NEW CONSTRUCTION PATIO DOOR INSTALLATION INSTRUCTIONS (WITH NAILING FLANGE) Slim Line & Classic French Style Patio Doors Materials included: (2) #10 x 2-1/2" Phillips Pan head keeper s (2) 3/8" Hole plugs
1/4 FRAMELESS CONTINUOUS HINGE SHOWER ENCLOSURE
 1/4 FRAMELESS CONTINUOUS HINGE SHOWER ENCLOSURE QCI5028 Rev 1 Page 1 Certified 09/19/2018 INSTALLATION NOTES: Unpack your unit carefully and inspect for freight damage. Lay out and identify all parts using
Unit No. 1413NP, 1713NP, 1813NP Infinity Continuous Hinge Frameless Door & Inline Panel with No Post Shower Enclosure
 INSTALLATION INSTRUCTIONS Unit No. 1413NP, 1713NP, 1813NP Infinity Continuous Hinge Frameless Door & Inline Panel with No Post Shower Enclosure QCI0239 Page 1 of 12 Certified 8/2/10 MAINTENANCE: Two primary
1/4 FRAMELESS DOOR WITH INLINE PANEL 1413A-1713A-1813A
 1/4 FRAMELESS DOOR WITH INLINE PANEL 1413A-1713A-1813A F AB GLASS AND MIRROR www.fabglassandmirror.com Call: +1 888-474-2221 Fax: (614)-334-4919 Office Timing: 8:30-18:00 EST info@fabglassandmirror.com
791 SERIES STIKSTALL TM SHOWER ENCLOSURE
 BATH ENCLOSURES a product of Alcoa Tel: 800-643-1514 Fax: 870-234-3181 www.alumaxbath.com 791 SERIES STIKSTALL TM SHOWER ENCLOSURE INSTALLATION INSTRUCTIONS Copyright Alumax Bath Enclosures 1997. All rights
AQUA ULTRA SHOWER DOOR & TUB DOOR INSTALLATION INSTRUCTIONS
 AQUA ULTRA SHOWER DOOR & TUB DOOR INSTALLATION INSTRUCTIONS IMPORTANT DreamLine TM reserves the right to alter, modify or redesign products at any time without prior notice. For the latest up-to-date technical
STACKING MULTI-SLIDE DOOR SYSTEM
 SMSD STACKING MULTI-SLIDE DOOR SYSTEM INSTALLATION INSTRUCTIONS READ THESE INSTRUCTIONS COMPLETELY BEFORE STARTING ANY INSTALLATION! CAUTION Lead-based paint may be present in older homes, and the removal
FRAMED SLIDING DOOR FOR TUB OR SHOWER ENCLOSURE 6150A-7150A
 FRAMED SLIDING DOOR FOR TUB OR SHOWER ENCLOSURE 6150A-7150A F AB GLASS AND MIRROR www.fabglassandmirror.com Call: +1 888-474-2221 Fax: (614)-334-4919 Office Timing: 8:30-18:00 EST info@fabglassandmirror.com
MANUFACTURING INC. Specifications
 Page 1 of 4 GENERAL 11 Aluminum security screen doors must be tested by a recognized testing laboratory to conform to SMA 6001-2002 Proposed American National Standard Specifications for Metal Protection
Installation Instructions
 Installation Instructions Follow these simple instructions to install your OneDayCab! IMPORTANT: Unpack and check shipment for damage. Verify color, size and parts before demolition. Installation of interiors
391 SERIES STIKSTALL TM SHOWER ENCLOSURE
 INSTALLATION INSTRUCTIONS 391 SERIES STIKSTALL TM SHOWER ENCLOSURE Copyright Alumax Bath Enclosures 1997. All rights reserved. LIMITED WARRANTY AND REMEDY ALUMAX BATH ENCLOSURES warrants to its dealers,
C-Series & S-Series Classic Frame with Transom (Single or Pair)
") 1. TOOLS REQUIRED Tape measure 6' magnetic level 3' magnetic level Safety Glasses Screw gun #2 Screwdriver tip #3 Screwdriver tip Philips Head screwdriver (Used to move frame on wall using oval slots on
1. TOOLS REQUIRED Tape measure 6' magnetic level 3' magnetic level Safety Glasses Screw gun #2 Screwdriver tip #3 Screwdriver tip Philips Head screwdriver (Used to move frame on wall using oval slots on
UNIT 5: EXTERIOR DOORS AND WINDOWS
 KEY CONCEPTS 1. Identify tools needed for exterior door and window installation 2. Last step to weather proofing the home 3. Steps to installing exterior doors and windows 4. Maintenance and safety of
794 SERIES STIKSTALL TM SHOWER ENCLOSURE INSTALLATION INSTRUCTIONS
 794 SERIES STIKSTALL TM SHOWER ENCLOSURE INSTALLATION INSTRUCTIONS Copyright Alumax Bath Enclosures 1997. All rights reserved. LIMITED WARRANTY AND REMEDY ALUMAX BATH ENCLOSURES warrants to its dealers,
FRAMED SLIDING DOOR FOR TUB OR SHOWER ENCLOSURE INSTALLATION INSTRUCTIONS
 FRAMED SLIDING DOOR FOR OR SHOWER ENCLOSURE INSTALLATION INSTRUCTIONS QCI5023 REV. 0 Page 1 Certified 06/22/2016 INSTALLATION NOTES: Unpack your unit carefully and inspect for freight damage. Lay out and
Sun Windows General Information New Construction Hinged Door Installation Instructions
 A G H F H H A. Apply Weather Resistive Barrier B. Apply Bottom Flashing Tape C. Install Sill Pan End Caps & Pan D. Caulk Sides & Top Nailing Surface, Set Door, Fasten E. Apply Side Flashing Tape F. Apply
Allora ALCOVE ENCLOSURE INSTALLATION BEFORE INSTALLATION CHECK THAT YOUR ALLORA SHOWER ENCLOSURE SYSTEM IS UNDAMAGED
 Allora ALCOVE ENCLOSURE INSTALLATION BEFORE INSTALLATION CHECK THAT YOUR ALLORA SHOWER ENCLOSURE SYSTEM IS UNDAMAGED ALCOVE SHOWER Your shower can be installed to open Left hand or Right hand by rotating
VITREO X SHOWER / TUB DOOR INSTALLATION INSTRUCTIONS
 VITREO X SHOWER / TUB DOOR INSTALLATION INSTRUCTIONS IMPORTANT DreamLine reserves the right to alter, modify or redesign products at any time without prior notice. For the latest up-to-date technical drawings,
Installation Instructions for Vista Air Vertically Folding Walls
 Installation Instructions for Vista Air Vertically Folding Walls Use these instructions in conjunction with your shop drawings to see the specifics that are particular to the model you are installing.
VYTEX PREMIUM SLIDING GLASS DOOR. Table of Contents. Precautions and Safety 2. Tools Required...3. Inspect and Prepare Door...4
 VYTEX PREMIUM SLIDING GLASS DOOR Table of Contents Precautions and Safety 2 Tools Required...3 Inspect and Prepare Door...4 Hardware and Parts Check List....4 Master Frame Assembly 5 Master Frame Installation..7
Vinyl Windows and Doors
 Vinyl Windows and Doors Manufactured by Pella Corporation Installation Instructions for Replacement of Aluminum Sliding Doors in Hard Coat Stucco Applications. Part Number: V981555 2009 Pella Corporation
*** All chrome surfaces should be cleaned using a clean damp cloth. *** No abrasive cleaning agents or materials should be used.
 Cleaning *** All chrome surfaces should be cleaned using a clean damp cloth. *** No abrasive cleaning agents or materials should be used. *** No chemical cleaners can be used on the glass use only mild
Deluxe Continuous Hinge Framed Door & Inline Panel with Return Panel Shower Enclosure
 INSTALLATION INSTRUCTIONS Deluxe Continuous Hinge Framed Door & Inline Panel with Return Panel Shower Enclosure QCI0235 Page 1 of 11 Certified 08/20/10 MAINTENANCE: Two primary materials are used to manufacture
INOVO 2-LITE SLIDING PATIO DOOR
 INOVO 2-LITE SLIDING PATIO DOOR ASSEMBLY AND INSTALLATION INSTRUCTIONS IMPORTANT: READ THE INSTRUCTIONS AND FAMILIARIZE YOURSELF WITH THE DOOR PARTS AND PIECES BEFORE BEGINNING ASSEMBLY AND INSTALLATION.
Unit No. 6150, 7150 Deluxe Framed Sliding Tub/Shower Enclosure
 INSTALLATION INSTRUCTIONS Unit No. 6150, 7150 Deluxe Framed Sliding Tub/Shower Enclosure QCI0023 Rev. 1 Page 1 of 8 Certified 8/20/10 MAINTENANCE: Two primary materials are used to manufacture your new
PRIME SHOWER ENCLOSURE INSTALLATION INSTRUCTIONS
 PRIME SHOWER ENCLOSURE INSTALLATION INSTRUCTIONS IMPORTANT DreamLine reserves the right to alter, modify or redesign products at any time without prior notice. For the latest up-to-date technical drawings,
Casement/ Casement Picture Pocket Installation (Interior) Tools: (Not Provided by Manufacturer) Fig Supplies: (Not Provided by Manufacturer)
 Tools: (Not Provided by Manufacturer) Fig Supplies: (Not Provided by Manufacturer)") Casement/ Casement Picture Pocket Installation (Interior) Tools: (Not Provided by Manufacturer) Tape Measure Utility Knife Fig. 0-1 Drill Level Putty Knife Pry bar Square Caulk Gun Hammer Safety Glasses
Casement/ Casement Picture Pocket Installation (Interior) Tools: (Not Provided by Manufacturer) Tape Measure Utility Knife Fig. 0-1 Drill Level Putty Knife Pry bar Square Caulk Gun Hammer Safety Glasses
MASON SHOWER DOOR INSTALLATION
 SKU(s): 939728, 939729 MASON SHOWER DOOR INSTALLATION BEFORE YOU BEGIN We recommend consulting a professional if you are unfamiliar with installing this type of product. Signature Hardware accepts no liability
INSTALLATION INSTRUCTIONS. UNIT No. 160/760 THIN-LINE SHOWER ENCLOSURE
 INSTALLATION INSTRUCTIONS UNIT No. 160/760 THIN-LINE SHOWER ENCLOSURE QCI0011 Rev. 0 Page 1of 10 Certified 10/18/2006 MAINTENANCE: Two primary materials are used to manufacture your new Basco enclosure;
Vinyl Sliding Glass Door Assembly Instructions
 Vinyl Sliding Glass Door Assembly Instructions SERIES SGD 5470/5570 Para instrucciones en español, visite: http://bit.ly/pgtassemblyinstructions Parts List ITEM 4 5 6 7 8 9 0 4 5 6 7 8 SGD 5470/5570 PARTS
CIRRUS AIRPLANE MAINTENANCE MANUAL MODELS SR22 AND SR22T CHAPTER 56-30: DOOR GENERAL. Door 56-30: DOOR. 1. General
 CIRRUS AIRPLANE MAINTENANCE MANUAL Door CHAPTER 56-30: DOOR GENERAL 56-30: DOOR 1. General The cabin door windows are manufactured of acrylic and adhesive bonded to the door structure. Replacement is accomplished
Sash Replacement Guide for Andersen 400 Series Tilt-Wash Transom Windows
 for Andersen 400 Series Tilt-Wash Transom Windows Read all instructions carefully before attempting this procedure. If you have any questions about your ability to complete this procedure, call Andersen
Vinyl Windows Manufactured by VPI Quality Windows
 Vinyl Windows Manufactured by VPI Quality Windows Part Number: 531&591 Installation 531 & 591 SERIES SLIDING AND HUNG WINDOW INSTALLATION INSTRUCTIONS Installation Instructions for Typical Construction.
Non-Reinforced Joining Guide (1-Way Vertical or Horizontal) for Andersen 200 Series Tilt-Wash Double-Hung Windows and Complementary Products
 for Andersen 200 Series Tilt-Wash Double-Hung Windows and Complementary Products") (1-Way Vertical or Horizontal) for Andersen 200 Series Tilt-Wash Double-Hung Windows and Complementary Products Non-Reinforced Joining Guide Congratulations! You have just purchased one of the many fine
(1-Way Vertical or Horizontal) for Andersen 200 Series Tilt-Wash Double-Hung Windows and Complementary Products Non-Reinforced Joining Guide Congratulations! You have just purchased one of the many fine
Eagle clad double-hung window installation instructions
 Eagle clad double-hung window installation instructions These instructions are for typical installation in new typical wood frame wall construction. These instructions and methods are not intended for
Unit No. 1400, 1700, 1800 Infinity Continuous Hinge Frameless Swing Door Shower Enclosure
 INSTALLATION INSTRUCTIONS Unit No. 1400, 1700, 1800 Infinity Continuous Hinge Frameless Swing Door Shower Enclosure QCI0028 Rev. 2 Page 1 of 10 Certified 06/05/09 MAINTENANCE: Two primary materials are
YES 600 Thermal Clip Storefront System Installation Manual
 Installation Manual 2004 YKK AP America Inc. is a subsidiary of YKK Corporation of America. TABLE OF CONTENTS Installation Notes........................................ Page ii Frame Types............................................
794 series stikstall tm shower enclosure
 INSTALLATION INSTRUTIONS 794 series stikstall tm shower enclosure 662-454-7993 LIMITED WARRANTY AND REMEDY Baymont Bathware warrants to its dealers, customers, and all subsequent purchasers and users,
Contents. Stage 1. Preparation of the aperture 9. Interior finishing 25
 Installation Manual Pitchglaze Roof Window Contents Contents and introduction 2 Delivery 3 Pre Installation 4 Installation 8 Stage 1. Preparation of the aperture 9 Stage 2. Fitting the Pitchglaze 11 Stage
Heavy Wall Applied Stop Tube Frame and Door Installation
 INSTALLATION INSTRUCTIONS Heavy Wall Applied Stop Tube Frame and Door Installation Read all instructions before beginning installation. These instructions are provided to help prevent installation problems
Termination Procedure
 Connector Piece Parts Contact/Connector Head Twist On Nut MX MX Boot Procedure Chart Procedure Tool Required Tool Part Number Cable Preparation & Fiber Cleaning Jacket Stripper 86710-0004 Cable Preparation
RV ENTRY DOOR REMOVAL AND SHIPPING BLOCK INSTALLATION AND ALIGNMENT
 RV ENTRY DOOR REMOVL ND SHIPPING BLOCK INSTLLTION ND LIGNMENT Purpose This document provides the steps to remove, reinstall and align an RV entry door for motorized and towable units. Moving parts can
Installation Instructions Stainless Steel Wall Panels
 Please read all instructions before installing wall panels. Always plan before you place! 1. Before installation: a. Acclimate Stain Steel Panels, Trim, adhesives and wall substrates to room temperature
(Non Handed Kits) Slotted Hand Screwdriver. Power Driver & Bits. Work Gloves
 Slotted Hand Screwdriver. Power Driver & Bits. Work Gloves") Patio Door Kit Assembly Instructions -- 2-Panel Patio Door with Non-Assembled Frame and Assembled Sash Panels. (Non Handed Kits) Project Requirements: ~ This door was manufactured for installation into
Patio Door Kit Assembly Instructions -- 2-Panel Patio Door with Non-Assembled Frame and Assembled Sash Panels. (Non Handed Kits) Project Requirements: ~ This door was manufactured for installation into
INSTALLATION INSTRUCTIONS IMPERVIA SLIDING PATIO DOOR WITH FINS
 2008 Pella Corporation Part Number: 803V0101 INSTALLATION INSTRUCTIONS IMPERVIA SLIDING PATIO DOOR WITH FINS Installation Instructions for Typical Wood Frame Construction. These instructions were developed
INSTALLATION INSTRUCTIONS FOR REPLACEMENT FORGENT WOOD GLASTRA WINDOWS RECOMMENDATIONS FOR COMMON INSTALLATION OF ALL REPLACEMENT WINDOWS.
 INSTALLATION INSTRUCTIONS FOR REPLACEMENT FORGENT WOOD GLASTRA WINDOWS RECOMMENDATIONS FOR COMMON INSTALLATION OF ALL REPLACEMENT WINDOWS. Installer: DO NOT DISCARD Please leave the Installation Guide
VALENCIA CORNER DOOR WITH RETURN
 VALENCIA CORNER DOOR WITH RETURN INSTALLATION GUIDE SEALANT REQUIRED TO COMPLETE THIS INSTALLATION: ( not supplied) Sika Silaflex NG To seal the WHITE shower door and returns to the shower tray. Usage:
Framed Single Swing Shower Enclosure Steam Continuous Hinge
 INSTALLATION INSTRUCTIONS Framed Single Swing Shower Enclosure Steam Continuous Hinge QCI-5111 NEED INS TA LLA TIO N HELP? Cal l 1-800-45-BAS C O (452-2726 ) M on da y - Fr iday 8 :00 A.M. - 4:30 PM..
Window with Nail fin (New construction)
") Window with Nail fin (New construction) Disclaimer: Improper installation and care may void warranty. These instructions are a basic/general recommendation for installation, but may not be utilized in
Window with Nail fin (New construction) Disclaimer: Improper installation and care may void warranty. These instructions are a basic/general recommendation for installation, but may not be utilized in
Chapter 12 - Windows and Doors
 Chapter 12 - Windows and Doors Contents Chapter 12 - Windows and Doors... 12-1 Timing & Prerequisites... 12-2 Verifying Windows and Doors Orders... 12-3 Windows... 12-4 Prepare the Window Openings... 12-4
Installation Guide for Andersen Frenchwood Patio Door Sidelights and Transoms
 for Andersen Frenchwood Patio Door Sidelights and Transoms Congratulations! You have just purchased one of the many fine Andersen products. Proper assembly, installation and maintenance are essential if
INOVO 4-LITE SLIDING PATIO DOOR ASSEMBLY AND INSTALLATION INSTRUCTIONS
 INOVO 4-LITE SLIDING PATIO DOOR ASSEMBLY AND INSTALLATION INSTRUCTIONS IMPORTANT: READ THE INSTRUCTIONS AND FAMILIARIZE YOURSELF WITH THE DOOR PARTS AND PIECES BEFORE BEGINNING ASSEMBLY AND INSTALLATION.
Non-Reinforced Joining Guide (2-Way Horizontal and Vertical Joining) for Andersen 200 Series Tilt-Wash Double-Hung and Transom Windows
 for Andersen 200 Series Tilt-Wash Double-Hung and Transom Windows") (2-Way Horizontal and Vertical Joining) for Andersen 200 Series Tilt-Wash Double-Hung and Transom Windows Congratulations! You have just purchased one of the many fine Andersen products. Proper assembly,
(2-Way Horizontal and Vertical Joining) for Andersen 200 Series Tilt-Wash Double-Hung and Transom Windows Congratulations! You have just purchased one of the many fine Andersen products. Proper assembly,
ELEGANCE SHOWER DOOR/ENCLOSURE INSTALLATION INSTRUCTIONS. Style A Style B Style C Style D
 ELEGANCE SHOWER DOOR/ENCLOSURE INSTALLATION INSTRUCTIONS IMPORTANT DreamLine reserves the right to alter, modify or redesign products at any time without prior notice. For the latest up-to-date technical
394 SERIES STIKSTALL TM SHOWER ENCLOSURE
 INSTALLATION INSTRUCTIONS 394 SERIES STIKSTALL TM SHOWER ENCLOSURE Copyright Alumax Bath Enclosures 1997. All rights reserved. LIMITED WARRANTY AND REMEDY ALUMAX BATH ENCLOSURES warrants to its dealers,