Assembly Instructions. Funbrella Palm
|
|
|
- Garey Barton
- 6 years ago
- Views:
Transcription


1 Assembly Instructions Funbrella Palm Please read all assembly/installation instructions before the installation or removal of this product. EVANSVILLE, IN Sold by Aquatic Technology, Inc. Phone: Fax: Quality, Craftsmanship and Service since 892 EC 3529 FunPalm 008
2
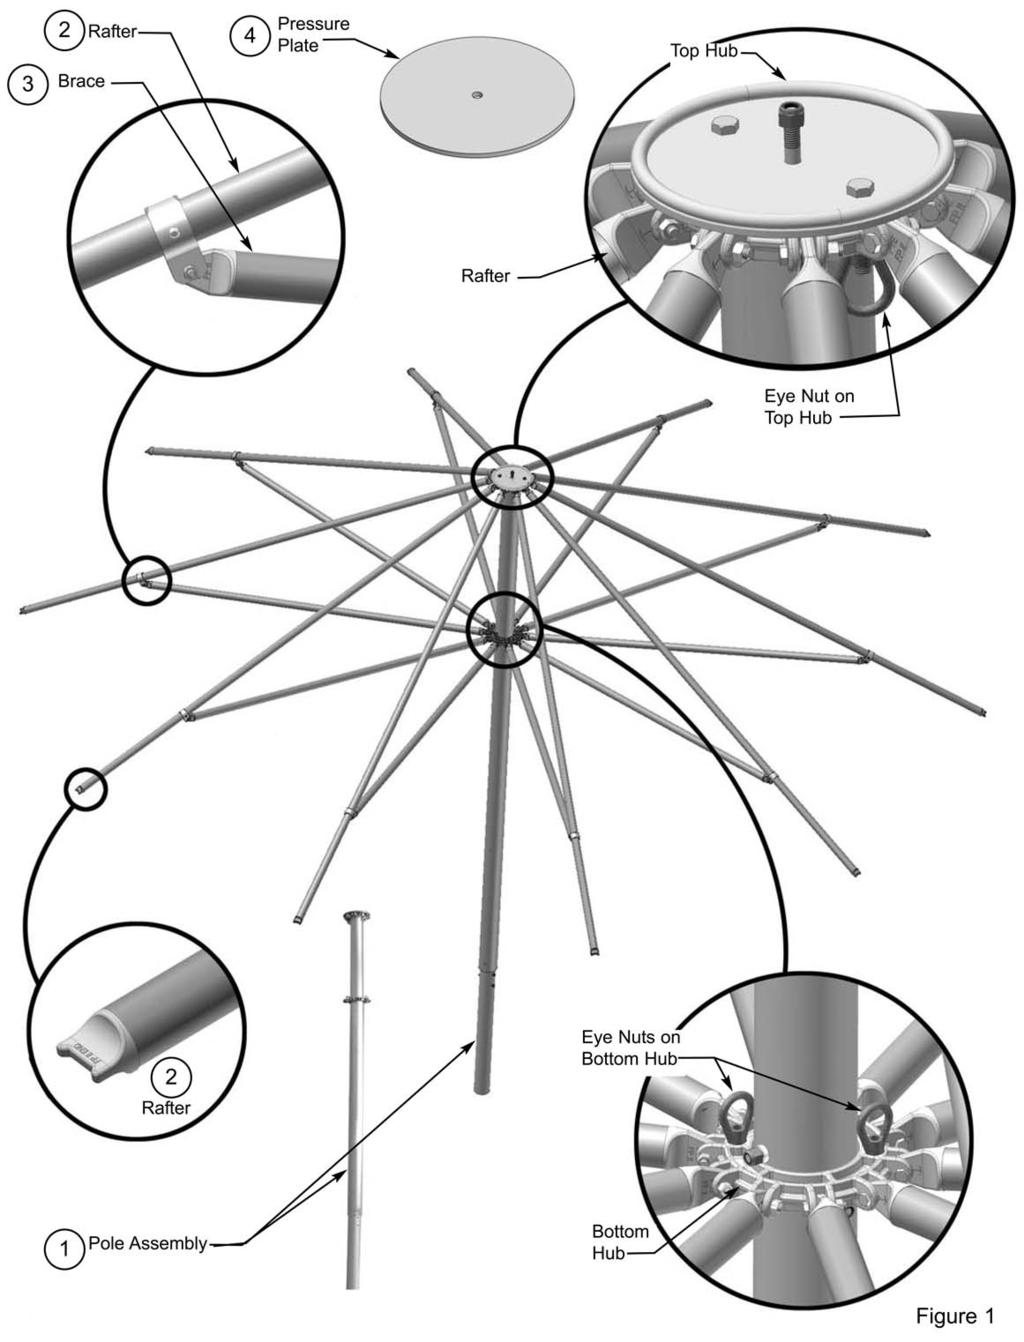
3 FUNBRELLA PALM PARTS LIST ITEM NO. QUANTITY DESCRIPTION Pole Assembly 2 0 Rafters Rafter in Open Position. 3 0 Braces 4 Pressure Plate /8 x 3/4 Hex Head Bolt 6 0 3/8 x /4 Hex Head Bolt /8 Lock Nut Bottom Hub in Open Position. Brace in Open Position 8 2 3/8 x 5 /2 Hex Head Bolt 9 2 3/8 ID Flat Washer 0 2 3/8 Hex Nut 2 3/8 Cap Nut CenterPole Rafter in Closed Position. 3-6 MANPOWER REQUIRED Two experienced installers should be able to assemble a Funbrella Palm top & frame in two hours. INSPECT SITE - CAUTION Consult local Utility Company prior to installation. Prior to assembly be sure to look around for obstacles, pipes, wires and etc. Brace in Closed Position. Finish Grade Bottom Hub in Closed Position Ground Sleeve LAYOUT & CHECK Use parts list for a quick identification and check list for proper quantities. 0-0 TOOLS REQUIRED 9/6 Wrench 5/8 Wrench 3/4 Wrench (2) 0 Stepladders () 6 Extension Ladder Post Hole Digger (optional...required only to dig hole for ground sleeve) (2) Cable Come-A-Longs (minimum 800 lb. rating, minimum 0-0 pull) - sold separately Figure A Warning: Do not install groundsleeve or center pole where they may be in contact with water from swimming pool or any other body of water. SET GROUND SLEEVE (SOLD SEPARATELY) Dig a -3 minimum diameter hole 3 - deep or as required by soil conditions or local code. Add 3 of gravel. Insert ground sleeve with 6 square plate on bottom. Ground sleeve is marked with red tape indicating finished grade level. (Figure B) Plumb sleeve and brace into position during concrete pour. Fill concrete to cover red tape. Allow to dry for 72 hours before mounting Funbrella Palm center pole. Figure B 2
 (Figures a & b) After raising pole, remove bolt, nut and spacers under bottom hub and set aside for later use. Carefully slide the hub to the bottom of the pole.")
 and 3/8 Nuts (Item 7). Figure 2b Important: Install last two rafters at the same time.")
4 STEP Set Center Pole Assembly into ground sleeve and secure with (2) 3/8 x 5 /2 Bolts, (2) 3/8 Flat Washers, (2) 3/8 Hex Nuts and (2) 3/8 Cap Nuts. (Items # 8, 9, 0 & on Parts List - Page 2.) (Figures a & b) After raising pole, remove bolt, nut and spacers under bottom hub and set aside for later use. Carefully slide the hub to the bottom of the pole. Pole Assembly Top hub Bottom Hub See Figure b Figure a Ground Sleeve 0 Figure 2a 2 Hub on Pole Assembly 8 9 Figure b STEP 2 Using extension ladder, install rafters to top hub with 3/8 x 3/4 Bolts (Item 5) and 3/8 Nuts (Item 7). Figure 2b Important: Install last two rafters at the same time. To avoid interference, insert Bolt (Item 5) into hole, thru rafter with end of bolt flush to edge of casting. ( Figure 2a) Then, insert last bolt into last hole and thru rafter. ( Figures 2b & 2c) Figure 2c Now place nuts on bolts and tighten - do not over-tighten. (Figure 2d) Examine bottom hub to be sure it is rotated so that eyenuts on bottom hub are in-line with eyenuts on top hub. Repeat the installation process with braces ( Items 3) onto bottom hub on pole assembly. 3 Figure 2d

.")

5 STEP 3 Assemble rafters (Item 2) to braces (Item 3) using 3/8 x 3/4 Bolts ( Item 6) & Nuts (Item 7). See Figure 3. Assemble all ten Rafters to Braces Figure 3 STEP 4 Snap (2) Ratchet Come-A-Longs (purchased separately) to the eyebolts on top hubs and to the eyebolts on bottom hub (Figure 4a). Ratchets should be set close to bottom hub ( Figure 4b). Caution: Be certain that ratchet is securely connected to top & bottom hubs to prevent bottom hub from falling - Injury could occur. Top Hub Come-A-Long Snaps to Eye Bolts on Top Hub. Figure 4a Come-Along Snaps to Eye Bolts on Bottom Hub. Figure 4b 4
 Center hole in top fabric on pin, and let fabric drop (Figure 5). Line up seams with rafters.")
.")

6 STEP 5 Using extension ladder, climb to top of pole and remove nut from pin at top of pole assembly. Climb down ladder and carry pressure plate, 3/4 wrench, nut and fabric bundle to top of pole. ( Do Not unroll fabric bundle until it is on top of pole.) Center hole in top fabric on pin, and let fabric drop (Figure 5). Line up seams with rafters. When hole is centered and seams are aligned, place pressure plate on pin and tighten nut with wrench. Fabric bundle STEP 6 Position 2 persons at end of one of the rafters. Pull fabric seam off to side of rafter and insert hook on bottom of fabric in hole on bottom side of the corresponding rafter (Figure 6). While one person pulls fabric down, other person should line up strap to fit between nubs on end of rafter. Continue this process until fabric is secured all the way around. Figure 5 Rafter Strap w/hook at bottom of fabric top. Note: Fabric top has been designed smaller than frame to allow for the taut look of the Palm. If strap does not reach nubs after pulling, let go of fabric and let top relax for 0 seconds. Then repeat until installed. STEP 7 You are now ready to raise the rafters. Using 2 persons, ratchet lower hub up in unison. Persons may be able to stand on the ground until the hub is raised too high and then step ladders will be required. ( Figure 7) When hub is ratcheted to its highest point, retrieve Bolt and Nut and spacers (set aside at step 4). Install them back into the center pole as they were prior to lowering the bottom hub. Come-A-Long Figure 6 Caution: Bolt/nut & spacers must be installed to prevent bottom hub with rafters from sliding down center pole. You may now remove the Come-A-Longs. Your funbrella Palm is now ready for use. 5 Figure 7
7 IMPORTANT Proper installation suitable to site conditions is the responsibility of the installer. For removal of pole, reverse steps through 7 to prevent frame damage. CAUTION: When high wind conditions are expected, use Come-A-Longs to lower Funbrella Palm and remove top. Then either raise frame and insert bolt/nut/spacer assembly to hold bottom hub in place - or - remove rafters and braces. FUNBRELLA PALM MAINTENANCE Maintenance should be performed on the frame and top at least once a year. Frame:. Check bolts fastening top hub casting to center pole. Tighten or replace if worn. 2. Inspect condition of top and bottom aluminum hub castings. There should be no cracks in the hinge ears or excessive wear in the bolt holes. 3. Check flat ends of bows and braces. There should be no breaks in the metal or excessive wear to the bolt holes. 4. Check all bolts fastening bows and braces to the castings for wear. Lock nuts are to be tightened so at least one and one half threads are exposed beyond the nut. Over-tightening can result in frame damage. Fabric Top:. Store fabric top in a cool, dry area. If prolonged storage is anticipated, clean with warm water and mild soap. Never store while wet or damp. 2. Contact with organic solvents, halogens, cleaning solutions or highly acidic substances may reduce the service life of the fabric and void the warranty. IMPORTANT FUNBRELLA PALM NOTICE WARNING: Do not install groundsleeve or center pole where they may be in contact with water from swimming pool or any other body of water. Fabric should be removed from frame when frame is lowered for an extended period of time. After fabric is removed, either raise frame and insert bolt/nut/spacer assembly to hold bottom hub in place - or - remove rafters and braces. Accelerated wear of fabric, rafters and braces will occur if unit is lowered for any period of time. The Funbrella Palm Frame and Top are designed for years of extended wear when these instructions are carefully followed. 6
8 EVANSVILLE, INDIANA PHONE NUMBER FAX NUMBER Anchor products are of superior design and operate best within the parameters of these instructions. It is imperative that the instructions be carefully read and COMPLETELY FOLLOWED. Please read installation instructions before the installation or removal of this product. Installation instructions are available online at or by calling CAUTION:. For each installation, the installer is solely responsible for evaluating the site and the proper securing method determined. Some soils require different staking or securing than that provided with the tent. Due to this variety of soil conditions, these are the manufacturer s suggested sequence of installation procedures. Anchor s responsibility is limited to the manufacture of the tent parts and materials. We are not responsible for methods that installers may choose to erect and secure the tent to the ground. 2. The mounting method suggested in the installation instructions does not necessarily meet all or any relevant codes on the site of the installation. The method suggested will, in many cases, keep the structure erected, however, due to various soil conditions; this method may be insuffi cient to keep the structure secure in high winds. It is the installer s responsibility, not the manufacturer, to determine the appropriate method of securing the structure to meet the necessary wind loads on the site. Regardless of the mounting method we suggest, we make no representation or warranty as to whether the mounting method suggested will meet the local code. Anchor does not, nor can it make any suggestions, representation, or warranties about the adequate mounting required at each specifi c installation site. 3. Inasmuch as the weather is unpredictable, good judgment and common sense must be incorporated within installation guidelines. It is the responsibility of the tent installer/maintainer to determine the severity of the weather, proper time and method of installation and/or erection and disassembly. Note: We recommend that snow and ice be removed from the tent surface as soon as possible because accumulation will damage the tent or fabric structure. Please consult with our Engineering Department about the maximum loads for each product. This product has been manufactured for use as a temporary sunshade structure. For the safety of all occupants, evacuation is recommended if threatening weather occurs, or if there is any doubt concerning the safe use of this product. 4. Proper safety equipment should be used at all times to insure a safe installation and take down. We suggest a careful evaluation be made to determine safety equipment needed, such as hard hats, steel-toe shoes, safety glasses and other as required. It is our desire that all installations are safe. Please be aware of hidden dangers both underground, i.e., gas lines, water lines, electrical lines, etc. and above the tent such as power lines and telephone lines. 5. Anchor stands behind its products in accordance with its standard Terms and Conditions of sale. A copy of our Terms and Conditions of Sale can be obtained by contacting Anchor at the telephone number and/or address on this document. 28. Alternate
Assembly Instructions
 Assembly Instructions Funbrella Classic Funbrella Shark Funbrella Classic Funbrella Shark 12 and 20 Diameter Please read all assembly/installation instructions before the installation or removal of this
Fiesta. Assembly Instructions. Patio Canopy. Quality, Craftsmanship and Service since 1892
 Assembly Instructions w Fiesta Patio Canopy SALES OFFICES: 1100 BURCH DR. P.O. BOX 3477 EV ANSVILLE, IN 47'733 USA PRODUCTION FACILITIES; BRADENTON, FL EVANSVILLE, IN FPAT-396 Quality, Craftsmanship and
INSTALLATION INSTRUCTIONS
 INSTALLATION INSTRUCTIONS SPORTSMAN WINCH MOUNT GRILLE GUARD APPLICATION: 2016-2018 Toyota Tacoma PART NUMBER: 40-93885, 45-93880, 46-23885 ITEM QUANTITY DESCRIPTION TOOLS NEEDED 1 1 WINCH TRAY 15MM SOCKET
ASSEMBLY INSTRUCTIONS FOR 2B3004 DELUXE EURO CLUB SOCCER GOAL
 Most Kwik Goal products carry a Lifetime Guarantee. For details or claims, visit kwikgoal.com or contact customer service at 1-800-531-4252. ASSEMBLY INSTRUCTIONS FOR 2B3004 DELUXE EURO CLUB SOCCER GOAL
20 x 20 / 3.35M x 6M EVENT CANOPY Assembly Manual
 0 x 0 / 3.35M x 6M EVENT CANOPY Assembly Manual -0700803 Parts: (8) PCS PIPE (9) PCS PIPE (8) PCS 3 PIPE (8) PCS PIPE SWEDGED () PCS 5 PIPE () PCS 5A PIPE (6) 3WAY FITTING A (6) PCS WAY FITTING B (8) FOOT
ClearSpan PolyMax Windbreak Wall
 ClearSpan PolyMax Windbreak Wall Photo may show a different but similar model. 2007 ClearSpan All Rights Reserved. Reproduction is prohibited without permission. Revision date: February 2007ldg STK# DIMENSIONS
flex Installation multiflex
 flex Installation Manual12m multiflex Table of Contents Page# Bolts........................................................................ 3 General Information.........................................................
INSTALLATION INSTRUCTIONS
 INSTALLATION INSTRUCTIONS R5 STEP BOARD APPLICATION: 2009-2017 Dodge Ram 1500 Quad / Crew Cab 2010-2017 Dodge Ram 2500/3500 Crew Cab PART NUMBER: 28-51040, 28-51045, 28-51050, 28-51055 ITEM QUANTITY DESCRIPTION
ARCH SERIES CANOPY. Installation Instructions
 ARCH SERIES CANOPY Installation Instructions AVI Care Care LLC 297 Kingsbury Grade, Suite 1064-4470 Lake Tahoe, NV 89449-4470 Toll Free (888) 628-8682 www.autovacinc.com C010-0021A_Arch Series Canopy Install
Assembly Instructions
 8' x 6' x 6'6" Professional Growers Greenhouse Assembly Instructions Description Model # 8' x 6' x 6'6" Professional Growers Greenhouse PGG68 350351 Please read instructions COMPLETELY before assembly.
ASSEMBLY INSTRUCTIONS FOR 2B3001 DELUXE EUROPEAN CLUB GOAL
 Most Kwik Goal products carry a Lifetime Guarantee. For details or claims, visit kwikgoal.com or contact customer service at 1-800-531-4252. ASSEMBLY INSTRUCTIONS FOR 2B3001 DELUXE EUROPEAN CLUB GOAL 1.
11 x 20 ALL SEASON GARAGE / 3.35M x 6M Carport Assembly Manual
 x 0 ALL SEASON GARAGE / 3.35M x 6M Carport Assembly Manual Parts: (8) PCS PIPE (9) PCS PIPE (8) PCS 3 PIPE (4) PCS 4 PIPE 3WAY FITTING (6) 4WAY FITTING (6) COVER 0 LONG SIDEWALLS () ENDWALL () (8) FOOT
CRITICAL INFORMATION:
 IMPORTANT ALERT: GM uses a very strong thread-locking compound on all body bolts. Use of an air assisted impact ratchet can cause damage to the threads on factory body mount bolts and the internal nut
1. Layout. Step 1. Step 2. Step 3. Fig. 1
 1-3/8 Panel Clamp Tools You Will Need: Tape Measure, Mason s String, Stakes, Hole Digger, Shovel, Level, Wheelbarrow, Wrenches or Adjustable Wrench, Hacksaw, Pliers, Cutting Pliers, Fence Stretcher and
10 x 20 / 3.35M x 6M Carport Assembly Manual
 0 x 0 / 3.35M x 6M Carport Assembly Manual -0700800 Parts: (8) PCS PIPE (9) PCS PIPE (8) PCS 3 PIPE 3WAY FITTING (6) 4WAY FITTING (6) COVER (8) FOOT PADS BOLTS & NUTS BALL BUNGEES Step : Organize Pipes
50 W ide. Future Trac G able E nd. Installation Instructions AIGE
 G able E nd W ide TopTec Products, LLC 7601 Highway 221 Moore, SC 29369 Phone: (800) 845-2830 Fax: (800) 921-77 e-mail: sales@toptecproducts.com www.toptecproducts.com AIGE 2003915 General Information
IMPORTANT GOAL SAFETY INSTRUCTIONS READ CAREFULLY
 IMPORTANT GOAL SAFETY INSTRUCTIONS READ CAREFULLY 1. Check for structural integrity and proper connecting hardware before every use. Replace damaged or missing parts or fasteners immediately. 2. Safety/Warning
10' W x 8' H or 10' H Round Style Shelter Assembly Instructions
 10' W x 8' H or 10' H Round Style Shelter Assembly Instructions Description 10' x 8' x 8' Round Style Shelter - Gray 10' x 8' x 10' Round Style Shelter - Gray Recommended Tools Please read instructions
ADJUSTABLE BASKETBALL SYSTEM ASSEMBLY INSTRUCTIONS AND OWNER'S MANUAL
 IRONCLAD SPORTS, INC HIGHLIGHT HOOPS ADJUSTALE ASKETALL SYSTEM ASSEMLY INSTRUCTIONS AND OWNER'S MANUAL MODEL: HIL885!! WARNING FAILURE TO COMPLY WITH ANY OF THE WARNINGS IN THESE INSTRUCTIONS MAY RESULT
INSTRUCTIONS INSTRUCCIONES CONSIGNES
 AUTOMOTIVE PRODUCTS, INC. INSTRUCTIONS INSTRUCCIONES CONSIGNES APPLICATION: 2007-2010 CHEVY/GMC SILVERADO/SIERRA 2500/3500 (EXCLUDES CLASSIC) APP PART #46-23715, 40-92315/45-92310 MAX WINCH TRAY, SPORTSMAN
Hip Roof Canopy Instructions
 Hip Roof Canopy Instructions - PUT SAFETY FIRST. NOT COMPLYING WITH THE PROCEDURES AND PRECAUTIONS OUTLINED IN THIS MANUAL MAY RESULT IN PERSONAL INJURY AND WILL INVALIDATE THE WARRANTY.. Before attempting
6a. Eight Steps to Chain-Link Fence Installation
 6a. Eight Steps to Chain-Link Fence Installation Before You Start You will need the following tools to install your chain-link fence: Post hole digger Wheelbarrow, shovel and hoe for mixing concrete Tape
DASHLEY COLLECTION GAZEBO
 DASHLEY COLLECTION GAZEBO MODEL NO. 088-1760-6 INSTRUCTIONS Toll-free: 1-888-670-6684 IMPORTANT: Please read this manual carefully before beginning assembly of this product. Keep this manual for future
Peak Style Shelter Assembly Instructions
 6' x 10' x 6'6" Shed-in-a-Box Peak Style Shelter Assembly Instructions Description Model # 6' x 10' x 6'6" Shed-in-a-Box - Gray 70403 Recommended Tools Please read instructions COMPLETELY before assembly.
High End Residential In-Ground Basketball System Owners Manual
 High End Residential In-Ground Basketball System Owners Manual Customer Service Center N53 W24700 South Corporate Circle Sussex, WI 53089 U.S.A. Write Model Number From Box Here: READ AND UNDERSTAND OPERATOR'S
400A 40113V, 401A 40120V, & 401AL 40120VL ALUMINUM VERTICAL 4000 LB LIFT INCLUDES SCREW LEG ASSEMBLY INSTRUCTIONS
 12/11/07 PAGE 1 OF 12 400A 40113V, 401A 40120V, & 401AL 40120VL ALUMINUM VERTICAL 4000 LB LIFT INCLUDES SCREW LEG ASSEMBLY INSTRUCTIONS Thank you for purchasing our product! *Please read these instructions
U.S. Rack, Inc Falcon Drive, Madera, CA APR17 INSTALLATION AND USE INSTRUCTIONS for SIDE-MOUNT LADDER RACK
 U.S. Rack, Inc. 2850 Falcon Drive, Madera, CA 93637 15APR17 INSTALLATION AND USE INSTRUCTIONS for SIDE-MOUNT LADDER RACK WARNING: Do NOT attempt to install or use this rack without following all instructions.
6' x 8' x 6'6" Quad-Vent Greenhouse-in-a-Box Assembly Instructions
 6' x 8' x 6'6" Quad-Vent Greenhouse-in-a-Box Assembly Instructions Description Model # 6' x 8' x 6'6" Quad-Vent Greenhouse-in-a-Box 70652 Recommended Tools Please read instructions COMPLETELY before assembly.
ClearSpan Attached-Style Awning
 ClearSpan Attached-Style Awning Photo may show a different but similar model. 2007 ClearSpan All Rights Reserved. Reproduction is prohibited without permission. Revision date: July 2007ldg STK# DIMENSIONS
INSTALLATION INSTRUCTIONS
 INSTALLATION INSTRUCTIONS PROTRAXX OVAL STEP BAR APPLICATION: 2009-2017 Dodge Ram 1500 Crew/Quad Cab 2010-2017 Dodge Ram 2500/500 Crew Cab PART NUMBER: 21-550, 21-555, 21-50, 21-55 AUTOMOTIVE PRODUCTS,
26 GARDEN CART ASSEMBLY & OPERATING INSTRUCTIONS. Rev 07/03
 GARDEN CART 304 ASSEMBLY & OPERATING INSTRUCTIONS 3 Rev 07/03 THANK YOU for choosing a HARBOR FREIGHT TOOLS product. For future reference, please complete the owner s record below: Model Serial No. Purchase
MERRY GO ROUND ITEM NO: 8030
 MERRY GO ROUND ITEM NO: 8030 OWNER S MANUAL CAUTION: This unit is designed to be used safely by up to 4 children between the ages of 3 years to 8 years old with a maximum weight of 00 pounds (45.4 kgs)
ClearSpan End Frame Kit 26' Wide x 12' High
 ClearSpan End Frame Kit 26' Wide x 12' High Diagram shows the end frame kit for an end wall without a door. (Door and end panel are purchased separately.) Rafter and struts shown in the above diagram are
HANDLING AND ASSEMBLY INSTRUCTIONS FOR TRUE FOCUS 3.0M, 3.8M AND 4.2M ANTENNAS WITH POLAR MOUNT
 HANDLING AND ASSEMBLY INSTRUCTIONS FOR TRUE FOCUS 3.0M, 3.8M AND 4.2M ANTENNAS WITH POLAR MOUNT Introduction SECTION 1 Thank you for purchasing one of our fine True Focus products. This manual covers the
GroundControl. Follow instructions contained in this manual. Incorrect installation could result in serious injury or damage to property.
 GroundControl TM use supplied hardware Use only hardware supplied in your GroundControl kit or supplied by an authorized YAKIMA dealer. Use of unauthorized parts in the GroundControl system could result
SHADOWBOX INSTALLATION FOR: Standard 6 H x 8 W Shadowbox Fence 5 x 5 Routed Posts Dog Ear or Straight-Edge Pickets 1.75 x 3.5 Rail
 SHADOWBOX INSTALLATION FOR: Standard 6 H x 8 W Shadowbox Fence 5 x 5 Routed Posts Dog Ear or Straight-Edge Pickets 1.75 x 3.5 Rail Storage and Handling Fence Preparation and Layout Locate and Set Posts
A Huffy Sports Company In-Ground Basketball System Owners Manual. Customer Service Center N53 W24700 South Corporate Circle Sussex, WI U.S.A.
 A Huffy Sports Company In-Ground Basketball System Owners Manual Customer Service Center N53 W2400 South Corporate Circle Sussex, WI 53089 U.S.A. Write Model Number From Box Here: WARNING! REQUIRED TOOLS
Pergola PR100N1. Assembly Instructions. Systems Trading Corporation Customer service: (877)
") FABRIC Pergola PR00N Assembly Instructions Systems Trading Corporation Customer service: (8)82 82 of 20 Introduction Thank you for purchasing the Pergola PR00N. When properly assembled and maintained,
FABRIC Pergola PR00N Assembly Instructions Systems Trading Corporation Customer service: (8)82 82 of 20 Introduction Thank you for purchasing the Pergola PR00N. When properly assembled and maintained,
Football Goal Posts MODEL SERIES: FGP400 and FGP600 series
 Football Goal Posts MODEL SERIES: FGP400 and FGP600 series Installation and Maintenance Instructions Please read all instructions before attempting installation of these units SAVE THESE INSTRUCTIONS FOR
Installation Instructions
 Installation Instructions For Models: Model Number / Description File Name 1540 Classic Series P-Lam Toilet Partitions 1540.pdf 1 INSTALLATION INSTRUCTIONS LAMINATED PLASTIC TOILET PARTITIONS 1540 Classic
Garage-in-a-Box SUV/Truck 13' x 20' x 12' Peak Style Shelter Assembly Instructions
 Garage-in-a-Box SUV/Truck 13' x 20' x 12' Peak Style Shelter Assembly Instructions Description Model # Garage-in-a-Box SUV/Truck 13' x 20' x 12' - Green 62694 Recommended Tools Please read instructions
Installation Manual. Solid Plastic Toilet Partitions. IN CANADA & AREAS OTHER THAN U.S.A.: IN THE U.S.A.:
 Installation Manual Solid Plastic Toilet Partitions Toilet Partitions & Lockers IN THE U.S.A.: Hadrian Inc., 7420 Clover Avenue, Mentor, OH 44060 Telephone: 440-942-9118 Fax: 440-942-9618 U.S. toll free
Gazebo GZ3584 Aluminum Composite Roof Panels
 Gazebo GZ8 Aluminum Composite Roof Panels Assembly Instructions 7 9 2 9 8 0 2 2 Systems Trading Corporation Customer service: (877)782 82 Email: easygrow@stcaustin.com of Introduction Thank you for purchasing
ClearSpan Grab Bag Canopy
 ClearSpan Grab Bag Canopy Photo may show a different but similar model. 2008 ClearSpan All Rights Reserved. Reproduction is prohibited without permission. STK# DIMENSIONS 104385 10 W x 20 L 1 YOU MUST
INSTALLATION INSTRUCTIONS CHAIN-LINK FENCE AND GATE
 INSTALLATION INSTRUCTIONS CHAIN-LINK FENCE AND GATE 1 BEFORE YOU START, IT S IMPORTANT TO CHECK......That fence footings do not exceed legally established property lines. If uncertain, refer to real estate
BISON GOOSENECK FOOTBALL 1 PAIR OF GOAL POSTS
 Instruction Manual BISON GOOSENECK FOOTBALL 1 PAIR OF GOAL POSTS Customer Service (800) 247-7668 P A R T S L I S T Item Qty Description Item Qty Description A 2 GOOSENECK POLE I 4 UPRIGHTS B 2 BAND CLAMP
Assembly Instructions
 18' W x 10' H or 12' H Peak Style Frame Assembly Assembly Instructions Before you start: 2+ individuals recommended for assembly, approximate time 3 hours. Recommended tools: Power Drill, Safety Glasses,
Gared Pro-S Portable Backstop
 Models: 9616 & 9618 Installation, Operation and Maintenance Instructions Please read all instructions before attempting installation or operation of these units SAVE THESE INSTRUCTIONS FOR FUTURE USE PUBLICATION
12'W x 10'H RoundTop Frame Assembly Please read and understand instructions completely before assembly.
 12'W x 10'H RoundTop Frame Assembly Please read and understand instructions completely before assembly. Layout out frame parts as shown and match up items with quantity to make sure no parts are missing.
INSTALLATION MANUAL WEEKENDER STEEL LADDER RACK
 TRUCK STORAGE SOLUTIONS SECURING YOUR REPUTATION INSTALLATION MANUAL WEEKENDER STEEL LADDER RACK STEEL & ALUMINUM SIDE BOX WITH PACK RAT DRAWER UNITS MODELS ATTENTION: PLEASE READ AND UNDERSTAND ALL INSTRUCTIONS
WeatherShield Covered Walkway and Connect-A-Building
 WeatherShield Covered Walkway and Connect-A-Building Photo may show a different but similar model. 2014 ClearSpan All Rights Reserved. Reproduction is prohibited without permission. STK# DIMENSIONS 104303
Installation Manual for Metal Toilet Partitions Standard Series
 For Video instructions http://www.hadrian-inc.com/tech-data/installation/toilet-partitions.aspx P a g e 1 Table of Contents Page General Notes and Tools Required 3 STEP 1: Establish Floor Bracket Locations
ClearSpan End Frame Kit 30' Wide x 11' High
 ClearSpan End Frame Kit 30' Wide x 11' High Diagram shows the end frame kit for an end wall without a door. (Door and end panel are purchased separately.) Rafter and mounting feet shown in the above diagram
WeatherShield Daddy Long Legs Canopy
 WeatherShield Daddy Long Legs Canopy Photo may show a different but similar model. 2010 ClearSpan All Rights Reserved. Reproduction is prohibited without permission. Revision date: 06.210 STK# 1220RV10W10
11 x11 Pergola. Assembly Instructions. Paragon Group USA cm cm cm
 FABRIC x Pergola Assembly Instructions 0cm 9 2cm 0cm 0 20cm Paragon Group USA Customer Service:(8) 82 82 Email:cs-outdoors@paragongroupusa.com Introduction Thank you for purchasing the x Pergola. When
Be sure any accessory used will fit with the soft upper doors before installing. Not all accessories will be compatible.
 Company Name: Spike Power Sports Vehicle Name: Polaris General 2P Product Description: Soft Upper Doors Part Number: 58-1600 Revision: R01 09/19/2018 Contents: 655 Elm Ridge Ave, Canal Fulton OH, 44614
ClearSpan PolyMax Windbreak Wall
 ClearSpan PolyMax Windbreak Wall Photo may show a different but similar model. 2007 ClearSpan All Rights Reserved. Reproduction is prohibited without permission. Revision date: April 2007ldg STK# DIMENSIONS
CABANA / PAVILION ASSEMBLY ALUMINUM FRAME MODELS
 Assembled cabanas are large & heavy. Assemble at place of use. CABANA / PAVILION ASSEMBLY ALUMINUM FRAME MODELS Step 1 CAUTION: To avoid damage to the finish of your Cabana frame, prepare a smooth, non-scratch
Heritage Solar Lamp Post
 Heritage Solar Lamp Post Instruction Manual 23108 Thank you very much for choosing a Nature Power product! For future reference, please complete the owner s record below: Model: Purchase Date: Save the
22'W x 13'H Peak Style Shelter Frame Assembly Instructions
 22'W x 13'H Peak Style Shelter Frame Assembly Instructions Recommended Tools Please read instructions COMPLETELY before assembly. This shelter MUST be securely anchored. THIS IS A TEMPORARY STRUCTURE AND
Elo Touch Solutions Wallmounting Kit for the 7001L IDS Touchmonitors
 Installation Manual Elo Touch Solutions Wallmounting Kit for the 7001L IDS Touchmonitors SW602083 Rev E Table of Contents Chapter 1: Safety Warning... 3 Chapter 2: Kit Contents... 4 Included in Kit...
GrowSpan Round Premium High Tunnels
 GrowSpan Round Premium High Tunnels Photo may show a different but similar model. 2016 Growers Supply All Rights Reserved. Reproduction is prohibited without permission. STK# PB01680R4 PB01690R4 DIMENSIONS
ROUND TOP RV SHELTER
 ROUND TOP RV SHELTER 94182 ASSEMBLY AND OPERATING INSTRUCTIONS Visit our website at: http://www.harborfreight.com Read this material before using this product. Failure to do so can result in serious injury.
INSTALLATION INSTRUCTIONS
 AUTOMOTIVE PRODUCTS, INSTALLATION INSTRUCTIONS PLATINUM 4 OVAL STEP BAR (90 BENT END) APPLICATION: 2010-2015 Dodge Ram 2500/3500 Mega Cab PART NUMBER: 21-3570, 21-3575, 23-3570, 23-3575, 25-3570, 25-3575,
INSTALLATION INSTRUCTIONS
 INSTALLATION INSTRUCTIONS SNYPER TUBULAR FENDERS APPLICATION: 2007-2017 Jeep Wrangler JK PART NUMBER: 62-1005, 62-1015 ITEM QUANTITY DESCRIPTION TOOLS NEEDED 1,2 2 FRONT FENDERS, DRIVER (1) AND PASSENGER
YUKON PATIO COVER INSTALLATION INSTRUCTIONS
 YUKON PATIO COVER INSTALLATION INSTRUCTIONS Before You Begin: Consult your local building department for any required permits You may be required to obtain a building permit for this structure. Contact
Installation, Assembly, and Operation Manual: Multi-Section Prestige Flagpole
 Installation, Assembly, and Operation Manual: Multi-Section Prestige Flagpole We are honored that you have selected a Trident Support Prestige Flagpole from which to proudly fly the flag of your choice.
ALUMINUM FOOTBALL GOALS INSTRUCTIONS WARNING WARNING Upright. Upright. Flag. Flag. Offset Pole.
 ALUMINUM FOOTBALL GOALS INSTRUCTIONS 800-67-090 Flag Flag Ground Sleeve Anchor Kit WARNING Football goals are shipped unassembled. Read all instructions thoroughly before attempting to assemble this equipment.
Cottage Style Dock Instructions
 Cottage Style Dock Instructions Table of Contents 1. Dock Assembly and Set-Up 1.1 Quick Start 1.2 Positioning Quick Clips 1.3 Installing Dock Legs 1.4 Installing Foot Pads 1.5 Installing Cross Braces 1.6
ClearSpan 20' Wide Free-Standing Building
 ClearSpan 20' Wide Free-Standing Building Photo may show a different but similar model. 2018 ClearSpan All Rights Reserved. Reproduction is prohibited without permission. STK# PB00580R3/R4 PB00582R3/R4
RULTRACT RETRACTOR CABLE REPLACEMENT INSTRUCTIONS. Rultract, Inc. is the ONLY authorized service center in the U.S.A.
 RULTRACT RETRACTOR CABLE REPLACEMENT INSTRUCTIONS Rultract, Inc. is the ONLY authorized service center in the U.S.A. When your Rultract instrument needs repair or service, contact Rultract Inc. or Rultract
FENCE INSTALLATION GUIDE 8 HIGH WALLS
 FENCE INSTALLATION GUIDE 8 HIGH WALLS 1.866.648.9336 www.simtekfence.com INSTALLATION GUIDE These instructions are designed to assist both professional installers and do-it-yourselfers of SimTek decorative
Installation Guide. Capped Cellular PVC Fencing. Table of Contents. Storage and Handling Tools Needed Fence Layout and Locating Posts
 Capped Cellular PVC Fencing Installation Guide Table of Contents Storage and Handling Tools Needed Fence Layout and Locating Posts Installation instructions 4 x 4 Over Sleeve Post - 3.5 Rail Privacy Shadowbox
MTS-SP100. RENOGY Pole Mount System E Philadelphia St, Ontario, CA Version: 1.2
 MTS-SP100 RENOGY Pole Mount System 2775 E Philadelphia St, Ontario, CA 91761 1-800-330-8678 1 Version: 1.2 Important Safety Instructions Please save these instructions. This manual contains important safety,
PRIVACY INSTALLATION FOR: Standard 6 H x 8 W Privacy Fence 4 x 4 Post Sleeve & Brackets Dog Ear or Straight-Edge Pickets 1.75 x 3.
 PRIVACY INSTALLATION FOR: Standard 6 H x 8 W Privacy Fence 4 x 4 Post Sleeve & Brackets Dog Ear or Straight-Edge Pickets 1.75 x 3.5 Rail Storage and Handling Fence Preparation and Layout Locate and Set
Free Standing Frame and Canopy
 Patriot Docks Free Standing Frame and Canopy Required Tools: Cordless Drill, 3/8 drill bit, 17mm wrench, 18mm wrench, 6mm hex key (included), 8mm hex key (included) Helpful Tips: Assembling and installing
MPA-9000 Universal Ceiling Projector Mount Kit
 I N S T R U C T I O N M A N U A L Universal Ceiling Projector Mount Kit The Universal Ceiling Projector Mount provides a unique, simplified method of ceiling mounting your inverted projector. This low
Outdoor Water Solutions, Inc. Small Backyard Windmill. Installation Manual
 Outdoor Water Solutions, Inc. Small Backyard Windmill Installation Manual Customer Service: 1-866-471-1614 Website: www.outdoorwatersolutions.com Springdale, Arkansas 72764 Phone: 1-866-471-1614 Fax: 1-479-750-9178
Aluminum Lake Truss Dock Instructions
 Table of Contents Aluminum Lake Truss Dock Instructions 1. Dock Assembly and Set-Up 1.1 Quick Start 1.2 Positioning Quick Clips 1.3 Installing Dock Legs 1.4 Installing Foot Pads 1.5 Installing Cross Braces
ATV STORM CHASER PLOW PUSH TUBE KIT
 ATV STORM CHASER PLOW PUSH TUBE KIT P/N 33-0070 OWNER S MANUAL Application MID-BODY ATV MOUNT NO. 15-XXXX, ALL MOUNT NO. 15-0050 ATTENTION DEALER: CUSTOMER MUST RECEIVE A COPY OF THIS MANUAL AT THE TIME
INSTALLATION INSTRUCTIONS and OPERATIONS & MAINTENANCE MANUAL for SUPER SIMPLEX DISAPPEARING STAIRWAYS
 INSTALLATION INSTRUCTIONS and OPERATIONS & MAINTENANCE MANUAL for SUPER SIMPLEX DISAPPEARING STAIRWAYS Precision Ladders, LLC P. O. Box 2279 Morristown, TN 37816-2279 Phone: (423) 586-2265 Fax: (423) 586-2091
ASSEMBLY INSTRUCTIONS FOR 2J102 RUGBY GOAL
 Most Kwik Goal products carry a Lifetime Guarantee. For details or claims, visit kwikgoal.com or contact customer service at 1-800-531-4252. ASSEMBLY INSTRUCTIONS FOR 2J102 RUGBY GOAL 1. Unpack all parts
ClearSpan Hydroponic Table Kit
 ClearSpan Hydroponic Table Kit Hydroponic Table Kit (The 109314 (4' x 16') model is shown.) Designed to grow healthy plants without soil using mineral-nutrient solutions. 2009 ClearSpan All Rights Reserved.
Installation Manual Roof Zone Ladder Rack
 Installation Manual Roof Zone Ladder Rack 102113,E1346 Installation Time: About 90 minutes. Depending on truck and Do-it-Yourself experience level Tools Required: Electric Drill with 1/2 Chuck 1/2 & 7/32
Manual for Shelter W3,5xL8,0xH3,8m
 Manual for Shelter W3,5xL8,0xH3,8m 22-11-2016 Congratulations on your purchase of our instant shelter. This unit is a combination of excellent manufacturing and design. It is comprised of a rigid frame
INSTALLATION INSTRUCTIONS
 INSTALLATION INSTRUCTIONS SOLID PHENOLIC TOILET PARTITIONS 1080 DuraLine Series 1180 DuraLine Series Class-A Fire Rated IMPORTANT: Review these instructions thoroughly prior to installation. FLOOR ANCHORED
10x10 Trellis Pergola
 0x0 Trellis Pergola ASSEMBLY GUIDE Ver.0-7 Table of Contents PAGE Introduction & Overview...................................................... Pergola Materials Overview..............................................................
TM12 ASSEMBLY INSTRUCTIONS
 TM12 ASSEMBLY INSTRUCTIONS Congratulations on purchasing the finest purple martin house available. Nature House Brand houses are the proven leader in aluminum martin housing for over half a century. After
Now available at participating Feeney (2/14) AF# A. Stores. 1/8'' Stainless Steel Cable Assemblies to Enhance Any Railing and Any View!
 AF# A. Stores. 1/8'' Stainless Steel Cable Assemblies to Enhance Any Railing and Any View!") 2014 Feeney (2/14) AF# 2009-236A Now available at participating Stores 1/8'' Stainless Steel Cable Assemblies to Enhance Any Railing and Any View! Easy-to-install, prefabricated cable assemblies are an
2014 Feeney (2/14) AF# 2009-236A Now available at participating Stores 1/8'' Stainless Steel Cable Assemblies to Enhance Any Railing and Any View! Easy-to-install, prefabricated cable assemblies are an
ClearSpan Mini Grab Bag Shelters
 ClearSpan Mini Grab Bag Shelters Photo may show a different but similar model. Baseboard is not included. 2008 ClearSpan All Rights Reserved. Reproduction is prohibited without permission. STK# DIMENSIONS
Essex Gazebo. Assembly Instructions. Model No
 Essex Gazebo Model No. 088-1336-8 Instructions Toll-free: 1-877-483-6759 IMPORTANT: Please read this manual carefully before beginning assembly of this product. Keep this manual for future reference. Made
SHELTER ASSEMBLY MANUAL Model # 3085GL-17P
 SHELTER ASSEMBLY MANUAL Model # 3085GL-17P Strongly ask to remove snow from the roof immediately. Do not leave any snow load on the roof. Keep both sides and two ends on the ground clear all the times.
ClearSpan Mini Grab Bag Shelters
 ClearSpan Mini Grab Bag Shelters Photo may show a different but similar model. Baseboard is not included. 2008 ClearSpan All Rights Reserved. Reproduction is prohibited without permission. STK# DIMENSIONS
A 1 Vertical Pole I 1 BA47/47A/47P Backboard (2 req d on Model BA872)
") Instruction Manual BA871, BA872 Ultimate Playground Basketball System Instructions Customer Service (800) 247-7668 P A R T S L I S T Item Qty Description Item Qty Description A 1 Vertical Pole I 1 BA47/47A/47P
Instruction Manual BA871, BA872 Ultimate Playground Basketball System Instructions Customer Service (800) 247-7668 P A R T S L I S T Item Qty Description Item Qty Description A 1 Vertical Pole I 1 BA47/47A/47P
Side-of-Pole Mount for 4 Modules (SPM4) For Module Type B ASSEMBLY INSTRUCTIONS. step-by-step assembly and installation
 For Module Type B ASSEMBLY INSTRUCTIONS. step-by-step assembly and installation") Side-of-Pole Mount for 4 Modules (SPM4) For Module Type B ASSEMBLY INSTRUCTIONS step-by-step assembly and installation Version 1, Rev A SP3358-2 PCN 060712-5 Side-of-Pole Mount for 4 Modules (SPM4) For
Side-of-Pole Mount for 4 Modules (SPM4) For Module Type B ASSEMBLY INSTRUCTIONS step-by-step assembly and installation Version 1, Rev A SP3358-2 PCN 060712-5 Side-of-Pole Mount for 4 Modules (SPM4) For
ClearSpan Mini Cold Frames
 ClearSpan Mini Cold Frames Photo may show a different but similar model. 2009 ClearSpan All Rights Reserved. Reproduction is prohibited without permission. STK# DIMENSIONS 105152 6' W x 5' H x 6' L 105153
SUMMERHOUSE PERGOLA ASSEMBLY INSTRUCTIONS. Toll-free: MODEL NO
 SUMMERHOUSE PERGOLA MODEL NO. 088-1759-2 INSTRUCTIONS Toll-free: 1-888-670-6684 IMPORTANT: Please read this manual carefully before beginning assembly of this product. Keep this manual for future reference.
Estate EXTERNAL HALYARD GROUND SET FLAGPOLE INSTALLATION INSTRUCTIONS
 Estate EXTERNAL HALYARD GROUND SET FLAGPOLE INSTALLATION INSTRUCTIONS Read these instructions completely before any installation is started. Pay close attention to all safety concerns. In the unlikely
SHOREMASTER CANOPY TABLE OF CONTENTS
 SHOREMASTER CANOPY PAGE TABLE OF CONTENTS SECTION OWNERS MANUAL Canopy Models: 1684, 16108, 2596, 30108, 40108, 40120, 50120, 20855, 30966, 40966,401066, 501066, 701066. All Hydraulic Lifts 2 Introduction
INSTALLATION INSTRUCTIONS
 AUTOMOTIVE PRODUCTS, INSTALLATION INSTRUCTIONS ROCK SLIDERS APPLICATION: 2007-2017 Jeep Wrangler JK 2 Door PART NUMBER: 42-7005 ITEM QUANTITY DESCRIPTION TOOLS NEEDED 1,2 2 ROCK SLIDER ASSEMBLY, DRIVER