Built of a Rattan Indian Style Bow
|
|
|
- John Ray
- 6 years ago
- Views:
Transcription
1 Built of a Rattan Indian Style Bow Author: Rolf Gerschwinat Translation and drawing: Roland Sawicki Introduction: For quite a while now the material gained some ground as a bow building material. Rattan (also known as Manau) is a liana with nearly unlimited availability at affordable prices. Rattan is readily available on the market in diameters between 25 mm (1") to 45 mm (1.77") and lengths of up to 3 meters (118"). Rattan bows are especially suitable for kid's bows. The material can be easily worked even by laymen. It is very forgiving with tiller errors especially for bows with low strengths (up to 20 #). According to my opinion it would be unfair to use Rattan only for kid's bows. I want to share these instructions to build an Indian style bow or horse bow with strengths up to 40-50# and a draw of up to 32". These bows do not lack aesthetics and efficiency. You can buy Rattan polished (outer skin removed) or unpolished (outer skin still remaining). Both can be used to build a bow but I believe the unpolished variation will give your bow more speed Using this instruction I built several bows with strength beyond 45# and an arrow speeds up tp 145fps. Materials and tools you would need: 1 Rattan cane, > 40 mm (1.57") in diameter with a length not more than 150 cm (59 ") A planer A knife A work bench with a vise or a couple of clamps Various files and rasps A tiller board A spring scale Sanding paper 80 to 240 grid For the finish and decoration: Leather for the handle Pieces for fur as a silencer Needle and thread Varnish and brush Horn or antler of the tip overlays (0ptional) For the bow string Dacron B50 Serving string For the tiller and steam bend of the tips: Patience Page 1 of 13
.")

2 Step 1: Measure, mark and plane Measure the dry Rattan cane and mark the center line along the length of the cane and the grip area. Pay attention to the natural bend of the cane and include in your design (the canes are not always perfectly straight). For a short bow like this move the grip section towards the lower bow limb with a ratio not more than 3/5 to 2/5 otherwise the bow would look too asymmetrical. Apply all the markings at the side of the stave. For beginners it is highly recommended to achieve a rectangular cross section over the entire length of the bow limbs. To avoid twist the bows limbs should be rather wide and flat than thick and narrow. For a bow with a recurved length of ~ 130 cm (51"), the median thickness of the limbs should be between 1,5 cm (0.59") and 2,2 cm (0.86"). Of course these measures determine the bow strength. I took theses measures from a bow I built with 57# and a draw of 28". Now clamp the cane and plane from the grip section towards the end of the bow. Stay away about 3 cm (1.18") from your grip markings. You will get to a width of about 38 mm (1.5") at the ends. Repeat this on both limbs and at the back and belly of the bow. The result should look like two flat truncated wedges attached to the grip. The thickness of the flat ends at the bow tips should not be more than 15 mm (0.59" Pictures: 1, 2 ) Page 2 of 13
3 Drawing 1: Layout Page 3 of 13
 but not more than 1,8 cm (0.79\") wide. Now mark the outline of the bow, connect the center marks to the line drawn before.")
4 Step 2: Plane the outlines Transfer the markings for the grip to the back and belly of the bow. Mark a line from the end of the bow. The distance is about 1/4 of the length of the bow limb. Mark a center section at front end of your limbs about 1.5 cm (0.59") but not more than 1,8 cm (0.79") wide. Now mark the outline of the bow, connect the center marks to the line drawn before. Plane away the side sections. Smooth the sides and start rounding the edges at the bows belly. You will not touch the grip section. You now have a bow with flat limbs and pyramidal ends. Now you can cut the nocks for the bow string at the sides of the limb. Cut them about 1,5 cm (0.59") away from the ends at about 45. Do not cut into the back of the bow. Pictures 4 and 5 Page 4 of 13
.")
5 Step 3 Make the bow string I make the bow string in my preferred way using a Flemish splice. The yarn used is Dacron B50. For a bow with a planned strength of 45# a bow string with 12 strands would be required. To avoid splicing errors and of course it's also looking good I use two different colors of yarn (e.g. black and white). You can vary the combinations of mixing the colors 2 bundles of while and 1 bundle black, one bundle white one bundle black or completely mixed up. The bow string should be about 1.4 times the length of the bow. A loop at one end and a bowyers knot at the other end. This way you can use the bows final sting to tiller the bow. Picture 6: looped end of bow string Page 5 of 13

6 Step 4 Rough tiller of the bow Carefully align the bows grip section to the outline of your bows limbs. You can use a rasp or a sharp knife for the job. Optionally you can make an arrow shelf between grip and upper fade out. The shelf is not a real requirement although the arrow will move closer to the center bow when used. Now put the string in the bows notches. The string should fit lightly without any tension. Check your bow at the tiller board for the curvature. Start tiller your bow at the belly side of the bow. Carefully remove material with a rasp and also pre-round the still sharp corners of the bow especially at the belly of the bow. Be patient do not remove to much material at one pass, its better to check more often. Every time material is removed draw the bow about times to get the materials used to bending (be careful do not fully draw the bow immediately) The result should be a consistent round curve from the grip to the bows tips. The strength after the first tiller passes should be about 40#. Rattan has fibers and when mechanically worked with a plane or rasp these fibers will stand up. Don't let yourself carry away pulling these fibers out of the stave. Almost certain you will pull out more material out of the stave and create ugly grooves. If you don't like the fibers slightly sand them away. Picture 7 Page 6 of 13
7 Step 5 Steam bend the recurves and deflex Now the time has come to bend the recurves to give your bow the longed for strength and arrow speed. I use an old electrical water kettle (but any old pot with a heat source will do as well). The pot/kettle should hold enough water to produce enough steam needed for steaming the brecurves. I fill the pot about with water about 2" below the top and bring it to a boil. Place the tips of your bow (yes you can already call it a bow at this stage) over the boiling water. Make sure that the section where the bend will be is exposed to the steam Cover everything with an old kitchen cloth to trap the steam around the bow. Steam the tips between 5 and 15 minutes. The time required is depends on the quality of the Rattan and the thickness of the tips of your bows limbs. It is important to always keep the water at a boil to have a constant flow of steam. After about 10 minutes take the bow from the steam and bend the recurves. Be careful the Rattan will be very hot. I take an old cloth or some leather gloves to protect my hands but still be able to have enough feeling in my hands in the contact to the bow. Bend the recurves towards the bows back at an angle of about to the bows limbs. The recurves should have a length of about 10cm - 15 cm (4" - 6"). Press the tips of the limb carefully and without force to the floor. Now increase the pressure until the recurves bend. Hold until cooled down. Bear in mind that the recurves flex back about 10%-20% The bend should be round and smooth without any sharp bends. The recurves shall also be static. If unpolished Rattan is used no compression creases shall be visible at the bows back When both limbs are recurved it is time now to steam bend the middle of the bow. The same process is used as for the recurves only now a slight deflex is bend into the bow. This deflex is useful at the final tiller stage of the bow. Without the deflex the bows recurves might tend to flip or twist sideways when strung up. On the other hand a deflex makes for a smoother draw. Page 7 of 13


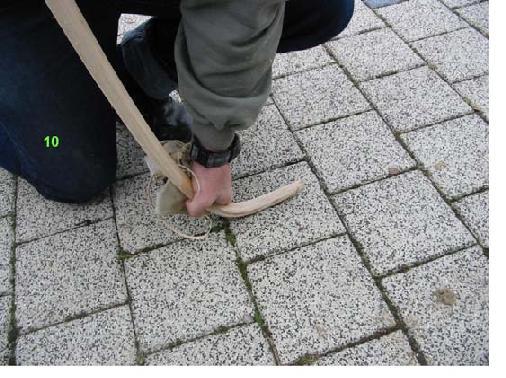
8 Pictures: 8, 9, 10 Page 8 of 13
9 Step 6 Final Tiller Let the bow sit overnight at a warm place so it will loose the moisture it took up during the steam bends. Now the final tiller stage of the bow can start. Shorten the bow string using a bowyers knot until you can string to bow to desired bracing height It might or will happen that the bow twists if you attempt to build. But Rattan has a great advantage. Possible twists / limbs misaligned from the center line can be easily straightened using steam. Again once more the advice the wider (and flat) the limbs the less the risk of twists. The final tiller can be achieved by rounding the limbs at the belly and removing material as "stiff" sections. If material has been removed draw the bow times so the material gets used to bending and to make changes in the curve visible. (Rattan is no different than wood in this regards) If the bows strength is too weak shorten the bows length to about 140 cm (55"). This step can be done after tempering the bow. Picture 11 Page 9 of 13
10 Step 7: Tempering When the bow has reached the desired strength the final finish can be started. An additional 5# - 10# of strength can be achieved by tempering the bow. Tempering means "baking" the material. There are 2 prove methods that are explained here. One watch out with tempering: the longer the bow is heated the more brittle it will get. 1. In the oven The limbs can be tempered using a forced air oven at about 120 C C (248 F F). The oven door needs to be covered with kitchen cloth to trap the heat in. Starting with a temperature of 100 C (212 F) the temperature needs to be slowly increased in steps of 10 C (50 F) to avoid longitudinal cracks in the grip section. These cracks are not dangerous but unsightly and also avoidable. Do not temper longer than 10 minutes. Also treat both limbs with the same temperature and duration. 2. Using a hot air gun If no oven large enough is available a standard hot air gun can be used to temper. It is important to control the heat so no scorch or brown marks will develop on the surface. So be careful! One advantage of this method is that soft sections in the limb can be selectively tempered. Also with this method it is important that the temperature and time exposure of both limbs is the same. Now overlays made of horn or antler can be glued to the tips. Use epoxy glue showed best results and of course glue after the heat treatment to avoid the risk that the glues softens and loosens in the heat. Page 10 of 13

11 Picture 12,13 Page 11 of 13


12 Step 8 Finishing touches Now it is time to give the bow the final touches tough these might not be necessary if you worked thoroughly during the previous steps. In any case from now on only use a scrape or sandpaper. Sand the bow with a 80 grid sandpaper to remove all scratches, rasp marks or grooves Finally sand the bow by gradually using finer sandpaper up to a grid of 240. After dust removal the first layer of varnish can be applied. I prefer varnish. Varnish prevents the Rattan fibers from sticking out when the bow is drawn. It basically binds the fibers and keeps a smooth surface. But I also know bowyers that oil their Rattan bows. When the varnish is dried sand the bow with 240 grid (or finer) sandpaper to remove the fibers that will stick out after the first application of varnish. Now the second layer of varnish can be applied. If necessary repeat sanding and varnishing one more time. Now the bow should have a golden shimmer. To apply the silencers string the bow and mark the string about cm (6" - 7") from both tips. Use some Dacron B50, a needle, roll the fur pieces around your bow string at the marks and stitch the fur to the string making about 3 passes thru the string. At last wrap the grip leather and the center serving of the string Pictures 14,15 Page 12 of 13

13 Although I have some fine bows made of yew, osage orange and hickory in my collection it is always fun to shoot the lightweight but still fast Rattan bows. Have fun building bows using these instructions Regards Rolf Gerschwinat Broken Arrow Page 13 of 13
Bows and Arrows, Homemade
 Bows and Arrows, Homemade A pictorial guide Copyright 2011 Paul Carpenter Learn how to make a long Bow a flat bow Plus the all important arrows and bow string Published by Lulu.com ISBN number 978-1-4709-4008-9
Building instructions ARTEMIS Sailing Canoe Day Five Version 1.0 Brian Pearson & Dr. Axel Schmid Day Five. Assembly of Planks and Frames
 Building instructions ARTEMIS Sailing Canoe Version 1.0 Brian Pearson & Dr. Axel Schmid 2016 Assembly of Planks and Frames Steps: Assembling hull plansk with wire Install frames Align and check keel rocker
3Insert the second rod no. 4
 Yamato: Step-by-step 37 The stern block and searchlight control towers a b c d e f Recommended tools and materials Wood glue Sandpaper (no. 800 grain) Metal file Putty Craft knife For metal: Super Glue
Building the Circular Tower
 Building the Circular Tower You will need to fill this mold 18 times to have enough blocks to build the circular tower. Be sure the blocks are completely dry before gluing them together. For detailed instructions
REVISION LIST CHAPTER 25: AFT WINDOWS. The following list of revisions will allow you to update the Legacy construction manual chapter listed above.
 REVISION LIST CHAPTER 25: The following list of revisions will allow you to update the Legacy construction manual chapter listed above. Under the Action column, R&R directs you to remove and replace the
Building Tips This model can be built using the following types of adhesives:
 Page 1 Building Tips This model can be built using the following types of adhesives: Epoxy (with or without microballons) Odorless cyanoacrylate (CA) with accelerator UHU Creativ for Styrofoam (or UHU
1Smooth pieces 4, 5 and 6, using
 Yamato: Step-by-step 109 Machine-guns, anti-aircraft guns and decking h e f a b c g d e f a Anti-aircraft gun base x 2 b Anti-aircraft gun (bottom) x 2 c Anti-aircraft gun (top) x 2 d Machine-gun base
Agricultural Mechanics and Technology Power Tool Safety Rules
 Agricultural Mechanics and Technology Power Tool Safety Rules Name: BAND SAW Use: Cutting curves, circles and irregular shapes. 1. Use clean SHARP blades. 2. The teeth should always point DOWN. 3. Adjust
WHEATHAMPSTEAD ARCHERY CLUB
 The Bow Beginner s Course Notes There are several types of bow available to the modern archer including recurve, compound, and longbow. Of these the recurve is the most common and is the type of bow that
Sabre Series 2 Inspired Design Precision Engineering
 Sabre Series 2 Inspired Design Precision Engineering USER INSTRUCTIONS Thank you for choosing the Keencut Sabre Series 2. Every effort has been made to bring you a precision engineered product with the
COFFEE TABLE WITH RECESSED TRAY
 COFFEE TABLE WITH RECESSED TRAY Why not treat your guests to a tray laid with delicacies and then remove it from sight in your new coffee table. There's no easier way to show that you are a thoughtful
5If the protruding part is. 6Place 1 as is shown in the. 7Place what was assembled
 Yamato: Step-by-step 49 The base of the bridge and strakes a c b d a Base of the bridge b Base of the bridge c Base of the bridge d Strakes x 10 THE BASE OF THE BRIDGE 1Smooth 1 to 3, first using the metal
3Position the hull of the ship as
 Yamato: Step-by-step 25 The hull and stern deck c b d a b d c e e f a Rear frame b Stern deck x 2 c Stern deck x 2 d Side wall x 2 Wood glue Sandpaper (no. 400 grain) Craft knife Pliers d Side wall x 2
STRING MAKING DACRON B-50 FASTFLIGHT KEVLAR BCY 450
 STRING MAKING Introduction Bow strings are probably the easiest thing that can be manufactured or customised for a bow. The most commonly used string is the continuous loop that most people are using for
The Convex or Half-Round surfaces of SR-1 and SR-2
 Sole and Bar Rasp Directions 7-17-13 p.1 How to Use Evolutionary Hoof Care s New Contouring Bar & Sole Rasps TM The SR-1 Rasp Tooth (white handle) and SR-2 Knife Tooth (black handle) See video at: www.evohoofcare.com
SAW-PIERCING. 79. Fig. 29. Placing new blade in saw-frame.
 SAW-PIERCING. 79 First make a full-size drawing of the hinge, then by means of transfer paper transfer the design of the butt end to the copper or brass. Then lay out the knuckles as shown in Fig. 28,
Grade 11 Woods Lift Lid Coffee Table. Based on Under the big Top from Popular Mechanics Website
 Grade 11 Woods Lift Lid Coffee Table Based on Under the big Top from Popular Mechanics Website TABLE TOP 1. Select enough lumber to construct a top that is between 22 ½ and 24 wide after jointing. Ensure
1Use the metal file to smooth
 Yamato: Step-by-step 85 Parts of the bridge and the hull a b c d e f a Part of the bridge b Part of the bridge c Part of the bridge d Radar x 2 e Part of the bridge x 2 f Wire Recommended tools and materials
My own personal suggestion is that you use native timbers for the construction of your Psaltery. These are often the cheapest and most economical.
 In making this design freely available I am granting a license for you to make one for yourself or to sell. All I ask in kind is that you somewhere include the authorising label on this page as acknowledgement.
I use turning a magic wand as the example but much of the same applies to other relatively long, thin spindles such as conductor's batons.
 HOW I TURN LONG, THIN SPINDLES John K Jordan jordanjk@gmail.com Turning long, thin spindles can be a challenge. The shaft can flex, chatter, and vibrate causing lots of problems and perhaps even breaking.
This whole process can take some hours and you really need to be methodical about what you do.
 Bow Tuning Centre Shot Version 0.3 Setting the Centre Shot When you release the arrow at full draw, there is no way a human can get their fingers out of the way of the string before it starts to move,
Kentucky 4H Wood Science Plans Notebook. Plans Level 1
 Kentucky 4H Wood Science Plans Notebook Plans Level 1 MATERIALS NEEDED: 1 piece wood 3/4" x 2 x 2 1 piece wood 3/4" x 3 x 3 1/2" 1 wooden spring-type clothespin 2-1 1/2" nails 1-1/2 woodscrew Wood Glue
Page 1. LION BRAND TRELLIS Dreidl Napkin Rings
 Page 1 LION BRAND TRELLIS Dreidl Napkin Rings Pattern from Lion Brand Yarn Page 2 Skill Level: Beginner LION BRAND TRELLIS Holiday Twist Napkin Rings SIZE: One Size 1¾ inches [4.5 cm] tall, 4½ inches [10
Equipment and Tuning
 CHAPTER_10 Equipment and Tuning Good equipment and a well tuned bow are essential for good performance, but it is important to recognize that equipment is only supplementary and not ultimate. This chapter
How to repair a wall or ceiling FREE
 How to repair a wall or ceiling FREE How to repair a wall or ceiling This guide shows how to repair walls and ceilings throughout the guide we only refer to walls but the same principles apply to ceiling
SASKATOON, Saskatchewan
 CONSTRUCTION GUIDE AVRO ARROW (CONTEST VERSION) Copyright, Bill Jones, 2004 SASKATOON, Saskatchewan This is a work in progress, so there are a couple of rough areas ( I ll point out those that I m aware
Mountain Girl Bracelet
 Mountain Girl Bracelet by Regina Payne Supply List: 1 50-65mm Marquise Stone 2 12-16mm Cabochons or buttons 2 10-14mm Cabochons or buttons 6-8 DiscDuo beads 12 16 Tila Beads 26 32 Half Tila Beads 10 inches
Trebuchet Construction Instructions
 Trebuchet Construction Instructions Follow these instructions step by step to create your trebuchet. Materials: Trebuchet Template (6 pages cardstock) Trebuchet Template (1 page paper) One unsharpened
Big Oz. Rocket. User Guide V0313
 Big Oz Rocket User Guide 59824 V0313 Materials Included The Big Oz Rocket Kit should include the following materials. If something is missing, contact Customer Service at 800-358-4983. 20-ounce plastic
Small Scraping Plane 05P29.50
 Small Scraping Plane 05P29.50 U.S. Des. Pat. D609,548 The Veritas Small Scraping Plane is used for the final smoothing of small, flat surfaces, even if they are highly figured, or small areas of difficult
Tools and Tips: ( 1 )
") Tools and Tips: As you build instructions will show in my many picture manual how to assemble. You can use your own methods as you desire, my results are very good. A smooth, flat work surface is very
Tools and Tips: As you build instructions will show in my many picture manual how to assemble. You can use your own methods as you desire, my results are very good. A smooth, flat work surface is very
Dash Recover Trim Fitting Instructions
 Tools required. We use a spray trim/carpet adhesive but a brush on contact glue will work just as well. Good scissors, very sharp knife, bradawl/scriber and hot air gun/hair dryer. Also carrying out this
PAT installation of a Sun Dome over a in-ground
 PAT. 3766573 Installation of Sun Domes for in-ground pool GENERAL INSTRUCTIONS: STEP 1. Read thru the entire instructional materials before beginning any installation. You will find that the installation
1Take the keel (3) and
 and") 1 The hull and the bridge 1Take the keel (3) and apply PVA wood glue in the second slot from the left: a toothpick may make it easier. Take care: the left end is the one that has a projection. THE HULL
1 The hull and the bridge 1Take the keel (3) and apply PVA wood glue in the second slot from the left: a toothpick may make it easier. Take care: the left end is the one that has a projection. THE HULL
For Barrel Tapers. Installation and Operating Instructions for use with table saws and large disk sanders
 Tim s Taper Tool For Barrel Tapers Installation and Operating Instructions for use with table saws and large disk sanders Your taper tool is capable of making barrel tapered shafts. The term barrel is
Building an Unfeathered Paddle with a Wood Shaft and Carbon Fiber Blades
 Building an Unfeathered Paddle with a Wood Shaft and Carbon Fiber Blades by Duane Strosaker Choosing the Wood Two 3/4" pieces of Sitka spruce laminated with epoxy for an unfeathered one-piece paddle. For
The Virgo/Libra Steam Engine
 The Virgo/Libra Steam Engine Congratulations on becoming the owner of a Virgo or Libra Steam Engine. With careful use and maintenance it will give many years of satisfying performance. Contents 1) Notes
Coffee table with recessed tray
 Coffee table with recessed tray Dinner is served Coffee table with recessed tray This coffee table has it all: it contains a recessed tray, so that you can treat your guests to various delicacies. 1 Introduction
Building the Gothic Church
 Building the Gothic Church Mold #54 does not contain all of the blocks to build this church. You will need extra regular blocks (1/2" x 1/2" x 1") and square blocks (1/2" x 1/2" x 1/2"). These blocks can
About.com :
 http://woodworking.about.com/gi/dynamic/offsite.htm?sit...//www.popularwoodworking.com/features/fea.asp%3fid=1088 (1 of 8)1/28/2004 12:05:01 AM Modern Storage Tower The last thing I want to do when starting
F-F-Fiddle Assembly Instructions
 F-F-Fiddle Assembly Instructions Bout Bridge Neck Machine Heads/Tuners Truss Rod Strings An open-source FFF 3d-printable electric violin. 1. Assemble materials 5 3 8 1 9,10, 11 7 4 2 6 PARTS 1. Bout part
Javelin Integra Inspired Design Precision Engineering
 Javelin Integra Inspired Design Precision Engineering USER INSTRUCTIONS Thank you for choosing the Keencut Javelin Integra. Every effort has been made to bring you a precision engineered product with the
SCULL HANDLES AND GRIPS INSTRUCTION BOOKLET
 SCULL HANDLES AND GRIPS INSTRUCTION BOOKLET Contents Section I: Scull Grip Replacement: Fixed Handle or 10 cm Length Adjustment System Refer to this section if you need to replace the grips on your fixed
Rack 'Em Up. Materials: Tools
 Rack 'Em Up Nice rack! Most Canadian residences are closetunderprovided. Solve this chronic rack-lack by making your own pegged coat rack. You can give it a carved, antiqued finish and add character by
FREE-FORM WIRE BROOCH Get in Touch. Leave your pliers on your bench and work your wire by hand. by Karen Rakoski
 beginner wire FREE-FORM WIRE BROOCH Get in Touch with Your Leave your pliers on your bench and work your wire by hand. by Karen Rakoski FCT-MWON0216_ART39 lay as you make this brooch! The novelty of working
shine to by Jana Roberts Benzon
 intermediate/ advanced polymer clay Taking a shine to polymer clay Give polymer clay a glossy surface with sandpaper and a quick buffing. FCT-CRON0216_ART30 The featured pendant s intricate cane pattern
Cardboard Model Buildings
 Cardboard Model Buildings Get more model kits from http://www.modelbuildings.org PRINTING & ASSEMBLY TIPS: These OO designs can easily be resized by reducing the print percentage as follows: OO scale is
Finishing a Kite Ornament
 Finishing a Kite Ornament These instructions have been written to aid in finishing the kite ornament shown in Needlepoint Now, September/October 2017, Volume XIX, No..5 Materials Stitched kite ornament
The Park Hotel Instructions for Assembly
 The Park Hotel Instructions for Assembly Kit Contents: 280 ea. Laser Cut Acrylic Parts. 1 ea. 6" Plastic Coated Wire. 5 ea. Sidewalk Parts. 14 ea. Cast Resin Dormers. 12 ea. Window Glass Templates, 12
Board Stiff. Tools. Materials: 25-1"x2" maple strips 32" long Carpenters glue Mineral oil or butcher block oil
 Board Stiff Everyone needs a decent chopping board in the kitchen, but almost no one has one. So how about designing your own custom chopping board and hand-crafting it for the cool people on your Christmas
THE SWALLOW. An interesting, simple, all-balsa speedster of crashproof design. by MALCOLM J. ABZUG
 THE SWALLOW An interesting, simple, all-balsa speedster of crashproof design. by MALCOLM J. ABZUG DESIGNED primarily for the purpose of testing a new type of monocoque fuselage design, the Swallow proved
Step by Step Wing Bagging
 Step by Step Wing Bagging By Evan Shaw 073 589 9339 evanevshaw@gmail.com Preparing the Leading Edge 1. Cut cores. (Cutting of wing cores is covered in another article elsewhere) 2. Sand the LE to a nice
By Dale Karch & Todd Smith L
 By Dale Karch & Todd Smith L et s say your shop is getting ready to carry traditional gear, or you already have it but want to offer more in the way of service. We ll lead you through the process of setting
Pumpkins. by Pamela Cox
 Pumpkins by Pamela Cox Project Overview Fall is here! This seasonal change brings, crisp air, colorful leaves, hand-picked apples and pumpkins! Pumpkins always decorate our front door steps lighting a
A Unique Cutting Board
 A Unique Cutting Board When I was asked to make a cutting board as a special gift, I wanted to do something new and eye-catching. Tired of squares and straight lines, I envisioned curving accents not shallow
Assembly instructions
 Nerdy Gurdy Assembly instructions This manual describes how to assemble a Nerdy Gurdy. Go to http://www.nerdygurdy.nl for more info about these instruments. Jaap Brand The Netherlands January 2018 General
September 10, 2009 Page 1 PRODUCT DESCRIPTION PRODUCT FEATURES
 September 10, 2009 Page 1 PRODUCT FEATURES BASIC USES/RELATED USES Interior decorative tile. Architectural tile for decorative wall surfaces, backsplashes and other applications. Custom architectural and
6043 DESIGN AND TECHNOLOGY
 UNIVERSITY OF CAMBRIDGE INTERNATIONAL EXAMINATIONS GCE Ordinary Level www.xtremepapers.com MARK SCHEME for the October/November 2008 question paper 6043 DESIGN AND TECHNOLOGY 6043/01 Paper 1 (Technology),
San Felipe: Step by Step Pack 3
 Pack 3 Your parts Bulwarks Gun port covers x 2 Tools and equipment Wood glue Sandpaper Brushes Wood stain Hammer Pin pusher/nails Razor saw a Remove the longer bulwark and test-fit it in place at the bow
Tutorial: A Sling With a Knotted Pouch. c Thomas Gartmann 2012
 Tutorial: A Sling With a Knotted Pouch c Thomas Gartmann 2012 1 1 You Need: around 30 m of string (length depending on thickness of the string) a knife or scissors a sewing needle and sewing thread 2 Getting
Engineering Directive
 Thing-a-ma-Jig Finishing To Finish a model means to apply paint and other decorations to complete the look of your model. Meaning to apply a finish. That is what we will discuss in this section. Applying
Tools and Tips: ( 1 )
") Tools and Tips: As you build instructions will show in my many picture manual how to assemble. You can use your own methods as you desire, my results are very good. A smooth, flat work surface is very
Tools and Tips: As you build instructions will show in my many picture manual how to assemble. You can use your own methods as you desire, my results are very good. A smooth, flat work surface is very
Table of Contents. Pom-Pom Bookmark Yarn covered Pencil Holder Yarn Hangers... Yarn Hair Bows
 1 Table of Contents Pom-Pom Bookmark... 3-5 Yarn covered Pencil Holder... 6-8 Yarn Hangers... 9-11 Yarn Hair Bows... 12-14 Tassel Necklace or Gift Wrapping... 15-17 No Knit Infinity Scarf... 18-20 Braided
BUILD YOUR OWN DOG SLED
 Page 1 of 15 BUILD YOUR OWN DOG SLED Note: I have lost track of Charlie Yeager. His old email address is yeagerc@server.greatlakes.k12.mi.us, but it no longer functions. National Mine School, Ishpeming,
How To Inspect Combat Archery Bows & Crossbows Revision May 5, 2016
 How To Inspect Combat Archery Bows & Crossbows Revision May 5, 2016 This is a quick reference guide for inspecting combat bows and crossbows. This is not a replacement for the information in the Combat
Fryer's Trebuchet Paper Kits
 Fryer's Trebuchet Paper Kits Things you will need 7 sheets of card approx. 0.3 mm or 0.01 inches thick 1 sheet of paper to print out to download. 2 x 6-7 mm dowel or pencils 1 paper clip String 6 cms (2.5
WESTERN PISTOL.22 CALIBER SINGLE SHOT. Entire pamphlet Copyrighted by JACO Designs 1972
 WESTERN PISTOL.22 CALIBER SINGLE SHOT Entire pamphlet Copyrighted by JACO Designs 1972 This pamphlet contains the plans and instructions necessary to construct the Western pistol. This pistol breaks open
Crochet Beading. Bead size
 Crochet Beading To say I enjoy working with beads is a bit of an understatement. I can't resist their sparkle and love the extra colour and texture they add to my work. I always use beads from the Debbie
For Barrel Tapers. Installation and Operating Instructions For use with small combination belt & disk sanders. Assembled Taper Tool
 Tim s Taper Tool For Barrel Tapers Installation and Operating Instructions For use with small combination belt & disk sanders Assembled Taper Tool Your taper tool is capable of making barrel tapered shafts.
By Laurie Pessetto. Create your pattern. The decorative fabric will be on the edges of the circle layers.
 By Laurie Pessetto Create an elegant, soft, travel pouch to protect jewelry from damage and keep it organized even when your suitcase gets tossed into a plane or trunk! Skill Level Good sewing skills,
TECHNIQUE. Because of the flexibility of the woven paper elements, this necklace moves nicely when worn. BEGINNER PAPER/WOOD. facetjewelry.
 TECHNIQUE FCT-SR-09248-03 BEGINNER PAPER/WOOD Because of the flexibility of the woven paper elements, this necklace moves nicely when worn. 203 Kalmbach Publishing Co. This material may not be reproduced
Royal System (1948) Designed by Poul Cadovius INSTALLATION GUIDE
 Designed by Poul Cadovius INSTALLATION GUIDE") Royal System (1948) Designed by Poul Cadovius INSTALLATION GUIDE ROYAL SYSTEM Congratulations on your new furniture from dk3. The Royal System bookcase was designed in 1948 by legendary Danish designer
Royal System (1948) Designed by Poul Cadovius INSTALLATION GUIDE ROYAL SYSTEM Congratulations on your new furniture from dk3. The Royal System bookcase was designed in 1948 by legendary Danish designer
Shoulder Plane. dovetailed. fine tools. Make an heirloom tool and learn the secret to creating double dovetails in metal it s easier than you think.
 fine tools dovetailed Shoulder Plane Make an heirloom tool and learn the secret to creating double dovetails in metal it s easier than you think. I ve always been fascinated by old, metal hand planes.
Hollow metal clay forms are typically built over organic cores like. Coreless Construction: Rethinking the Metal Clay
 PROJECT INTERMEDIATE METAL CLAY Coreless Construction: Rethinking the Metal Clay Build this four-sided pendant using forethought and a 3-D template. by Cindy Ambrose FCT-MWON0216_ART17 Hollow metal clay
Christmas Bell Ornament
 Christmas Bell Ornament This is an easy Christmas ornament idea I cabbaged from a friend and skilled turner, Curt Fuller, from Utah. I kind of adapted it to my style but I still got the idea from him.
Wanderlust Suitcase Vanity
 Wanderlust Suitcase Vanity If you re like me, you re always up for an adventure. When I saw some examples of DIY reclaimed suitcases, paired with the exciting new Wanderlust embroidery design collection,
Working with Wood & Tools. Marking and Measuring. Tools you will need:
 Marking and Measuring English Measure If you want to make pieces of a certain size, you will have to measure and mark them before you do any cutting. Examine a rule and find an inch mark. The mark (")
Jewellery in a concrete look made out of FIMOair light
 Jewellery in a concrete look made out of FIMOair light Urban lifestyle design Concrete is a highly popular material at the moment for furniture, home deco accessories and jewellery. Casting concrete yourself
#70 grit sand Putty knives, sized as needed #1 fine gray sand Corner tools Milestone acrylic liquid
 Countertops Supplies Tools White and/or gray Milestone cement 12 inch steel trowel #70 grit sand Putty knives, sized as needed #1 fine gray sand Corner tools Milestone acrylic liquid Hock Universal tints
 Allied Tool is a freelance model of a small manufacturing company that grew from production in a home basement to a new building. Assume a gentleman starts assembling gauges in his basement and the business
BUILDING A STORM DOOR
 BUILDING A STORM DOOR BY NEAL BARRETT Illustrations by George Retseck If you're in the market for a storm door, you probably know that there are many styles and models available. However, most of them
Contents. pages 20-24: Installing Edge sinks into. custom laminate countertops page 8: Installing Edge sinks into postform laminate countertops
 Contents pages 2-8: Installing Edge sinks into custom laminate countertops page 8: Installing Edge sinks into postform laminate countertops pages 9-14: Installing Acrylic sinks into custom laminate countertops
Cobra X Q Construction Tips Construction: Bel y pan
 Cobra X Q Construction Tips : The white plastic in this kit is high impact styrene. It can be painted with most types of coatings if light coats are applied this is necessary due to the thickness of the
Materials: Preparing your materials: Use your towel to protect your work surface. Layout one length of bubblewrap, bubbles facing up.
 These instructions show the layout and techniques for making flat circular art pieces. Follow these basic steps used to create a strong, even, wool felt surface. This is the base or canvas, open to embellishment
Name: Class: Monster Doll. Grading Rubric
 Name: Class: Monster Doll Grading Rubric Grade yourself on the skills listed below. (0 being the lowest, and 5 being the highest.) Once you have graded yourself in each area, pin your grading sheet to
Square Edge Jig SE-77 (SE-76)
") Square Edge Jig SE-77 (SE-76) PLANE IRONS WOOD CHISELS Max width 77 mm (3") Max thickness 9 mm (⅜") SE-77 is a further development of SE-76. The jig now has an adjustable side. Positioning of Machine Grinding
Square Edge Jig SE-77 (SE-76) PLANE IRONS WOOD CHISELS Max width 77 mm (3") Max thickness 9 mm (⅜") SE-77 is a further development of SE-76. The jig now has an adjustable side. Positioning of Machine Grinding
Assembly Instructions for Busted Bricks Marble Machine #1
 Assembly Instructions for Busted Bricks Marble Machine #1 Ver. 2 instructions Page number 1 Required for assembly: Wood glue (PVA or aliphatic resin recommended) and/or Cyanoacrylate (CA) glue Clamps or
Cold-connect Silver &
 PROJECT COVER STORY INTERMEDIATE METAL/PLASTIC Cold-connect Silver & ACR YLI C in a Layered Ring Learn to work with modern, lightweight acrylic sheet to introduce transparent color to your work. by Maria
Stainless Instrument Cluster Cover Installation MK1
 Stainless Instrument Cluster Cover Installation MK1 Stainless Instrument Cluster Cover Installation MK1 The installation of an instrument cluster cover in a MK1/NA MX5 requires the removal of the 1. binnacle,
Be sure to oil your machine as instructed below. To avoid spotting on garments being embroidered, oil the machine sparingly.
 OILING THE MACHINE Oiling is important for maintaining the machine performance over an extended period of time. Turn the power off when lubricating the embroidery machine. Be sure to oil your machine as
Laying out the spiral lines
 Hollow spiral turnings seem to have a mysticism about them. The complexity of their appearance makes it seem as though only the highly skilled craftsman could possibly take up the challenge. Although they
MIXED-MEDIA LINKS. With three different paisley-shaped links and four ways to embellish. Combine woven wire and polymer clay to make bold links.
 Soldered wire frames are the backbone of each link in the bracelet. 8½ x 1¼ in. (21.6 x 3.2cm). WIRE AND POLYMER CLAY BRACELET MIXED-MEDIA LINKS Combine woven wire and polymer clay to make bold links.
Golden angels in an elegant design
 Golden angels in an elegant design The magic of advent these modern-looking, golden-gowned angels are simply perfect for giving your home a festive Christmas feel. Made using the clay-like FIMOair basic
HOW TO PULL STRINGER
 Devardi Glass And The Hothead Torch. :*:. Tutorial Series. :*:. HOW TO PULL STRINGER How To Pull Stringer Inside and Outside Of The Flame TUTORIAL OVERVIEW In this tutorial you will learn two ways to pull
INSTRUCTION MANUAL. Force Transducer Output Tube Repair Kit
 INSTRUCTION MANUAL Model 400-TR Force Transducer Output Tube Repair Kit June 4, 2004, Revision 5 Copyright 2004 Aurora Scientific Inc. Aurora Scientific Inc. 360 Industrial Pkwy. S., Unit 4 Aurora, Ontario,
Scratchbuild A Backwoods Water Tank Part V - Making the Frost Box and Hanging the Water Spout
 Scratchbuild A Backwoods Water Tank Part V - Making the Frost Box and Hanging the Water Spout By Dwight Ennis In this section, we're going to make the Frost Box, and we'll build the Spout Hanger Assembly
WEBELOS CRAFTSMAN SUGGESTED DEN ACTIVITIES
 SUGGESTED DEN ACTIVITIES Visit furniture factory, lumber mill or lumberyard. Some local home centers offer special weekend classes for Webelos age children. Invite someone to give a demonstration on the
Making a Greenland Paddle - New Zealand style
 Making a Greenland Paddle - New Zealand style ~by Sandy Ferguson The following describes how to make a paddle reasonably easily and with as little wastage as possible. This could be your first Greenland
UNPACK & ASSEMBLY. Done! CAUTION! THE MILL WILL BE VERY HEAVY - GET ASSISTANCE Pepe Tools.
 PARTS DIAGRAM T Bar Height adjustment Wooden hand grip Height adjustment gears Frame Height adjustment screws Top roller End Gears cover Handle Brass Bushes (Each side) Bottom roller 4:1 Gearbox Mounting
DATE: January, 01, 2011 AUTHOR: Craig Macomber TOPIC: Making and operating a model onager
 DATE: January, 01, 2011 AUTHOR: Craig Macomber TOPIC: Making and operating a model onager INTRODUCTION This guide will walk you through the construction and operation of a hand held scale Roman Onager,