53guy USMC Heavy Lift Inc.
|
|
|
- Dale Ramsey
- 6 years ago
- Views:
Transcription
 Welcome, 5-90. You last visited: 29 Minutes Ago at 10:00 Private Messages: Unread 0, Total 175.")
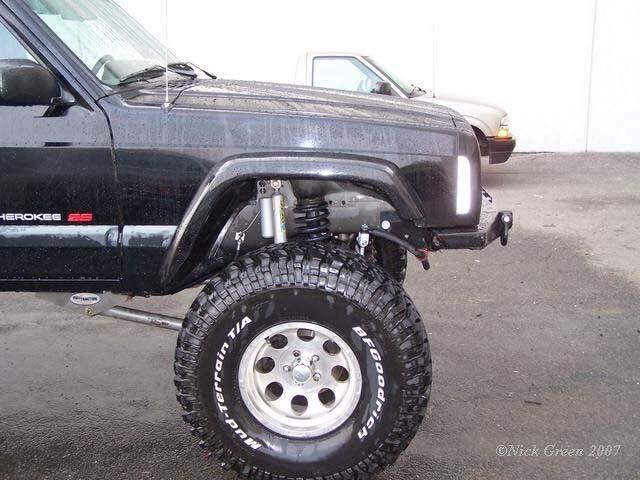
1 NAXJA TITANIUM SPONSOR: Tom Woods Custom Drive Shafts NAXJA Forums -::- North American XJ Association > NAXJA's Technical Forums > FAQ; Frequently Asked Questions Front Fender Trim Write Up (Retaining the stock flare) Welcome, You last visited: 29 Minutes Ago at 10:00 Private Messages: Unread 0, Total 175. User CP FAQ Users List Calendar New Posts Search Quick Links Log Out HOME Member FAQ Sponsor Info Rules Donate Bylaws Store Members Chat FAQ; Frequently Asked Questions FAQ topics on common and frequently posted issues. No posting or replies allowed. Thread Tools Search this Thread Rate Thread Display Modes #1 53guy USMC Heavy Lift Inc. Join Date: Mar 2005 Location: Fredericksburg, VA Posts: 1,930 Front Fender Trim Write Up (Retaining the stock flare) Well, running 35's was a pain without trimming as I seemed to rub everwhere. I couldn't get myself to be happy with TJ flares and I really liked the stock look, so when I searched for it, I couldn't find anything about installing stock flares on a trimmed fender so I looked into it myself. Upon looking into it, I really only needed a few inches removed from the fender to clear the tires. So this was my project at work today, trimming my fenders and keeping the stock flares. It turned out much better than I thought and it looks very stock. I had a few guys take a look and compare my fenders to a stock jeep and they couldn't point out that I trimmed until I pointed it out to them. I also compared my fenders to those with TJ flares and I netted about the same amount removed and I think the stock flares look much better, so here's the writeup... Tools needed: 10mm deep well socket 1/4 drive ratchet 8mm deep well socket torx drivers philips head screw driver cutting tool (angle grinder, dremel, etc) cleaning spray rags or paper towels hammer paint Stock without trimming 1 of 28 11/14/ :02
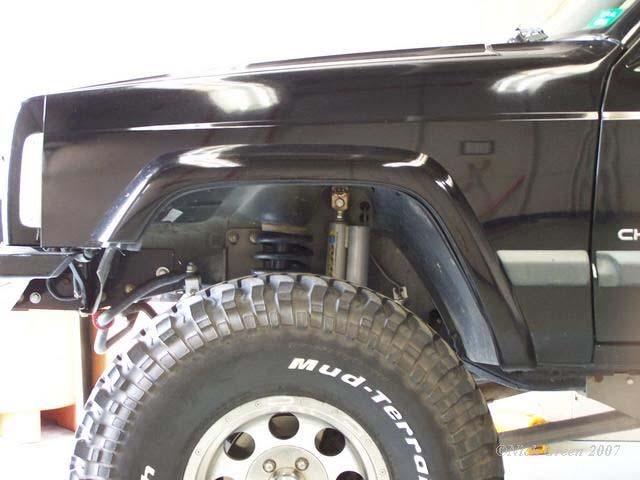
2 2 of 28 11/14/ :02

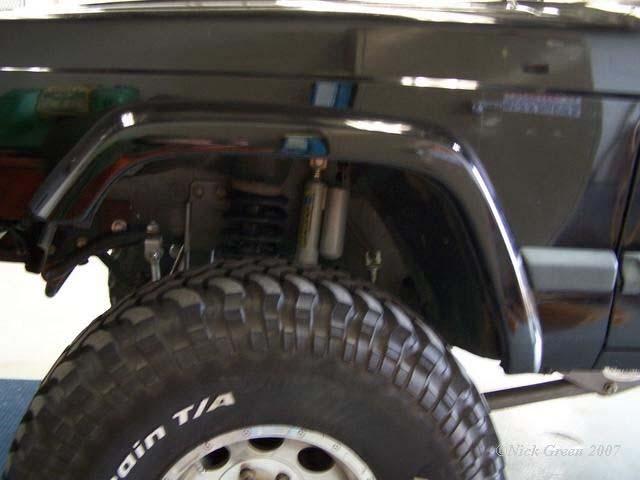
3 Step 1. Take photos because you'll probably never have stock fenders again! Step 2. Remove the fender flares. 8mm bolts hold the flare to the bottom on the rocker panel, remove both those bolts and throw them away. 10mm nuts hold the flares on and are pretty easy to remove if you use a boxed end 10mm to break torque then a socket to remove it all the way. Once all the nuts are removed, you should be able to pull the fender away without any trouble. To those with fender liners still. Pull the liner out or just swing it out of the way as you'll be wanting to get into the wheel well later on. 3 of 28 11/14/ :02

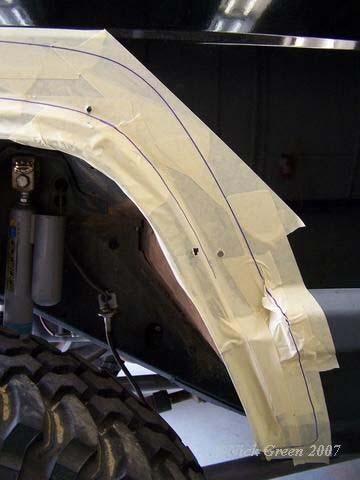
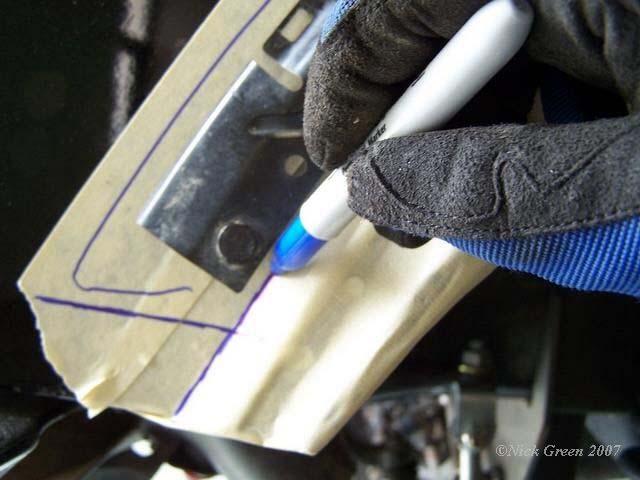
4 Step 3. With masking tape, tape off the entire area around the wheel well opening. This will give you a place to write on and put some ideas down without messing the fenders up. It also provides a level of protection to the sourouning paint. Step4. At this point, you'll have to decide if flare positioning is important to you or not. If its not, just start cutting and figure it out later, but if its important to you like it was to me, read on. With the stock flare and mounting hardware still in one peice and the fender taped off, you'll want to figure out where you want your flare to line up. I wanted mine close to the body line so that I could get the most room as well as look nice. Once you figure out where you want it, find some paint and paint the tips of the bolts on the flare mounting hardware. This will give you a good idea as to where you want to drill the holes to remount the flares. Once you have your flare in position, use tape or something else to hold it up, step back and make sure its where you want it. 4 of 28 11/14/ :02


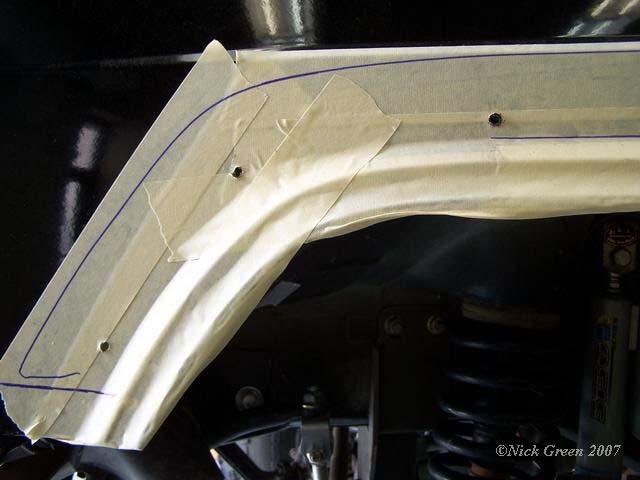
5 Mounting hardware Step 5. Remove the fender flare and now you should have dots where you are to drill to mount the brackets to. Depending on how high you mount your flare will determine how you modify your brackets. I found that the higher I 5 of 28 11/14/ :02

6 mounted the flares, the less I had to modify the brackets. On both sides I had to trim the rear mount slighty and remove a bolt, redrill a hole and reuse the bolt. On the drivers side I had to also completly trim off a bolt because I couldn't get a nut between the fender and the washer reservoir. The rear mount where I had to trim the bolt off bolt and redrilled hole 6 of 28 11/14/ :02


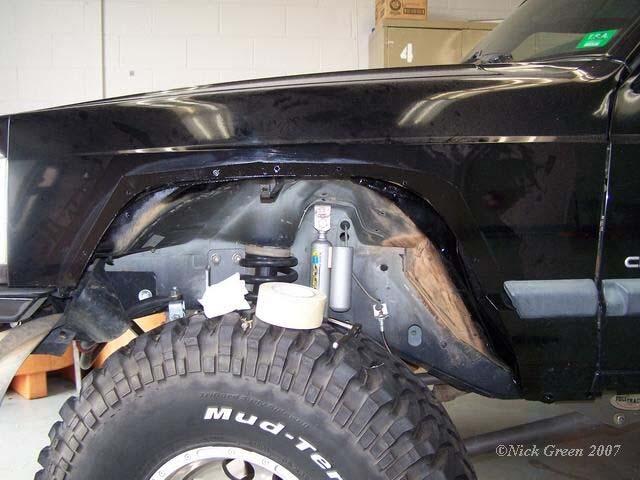
7 Step 6. Now its time to drill the holes. On the passanger side, just go at it, you're not going to hit a thing. On the drivers side however, be very careful as your washer reservoir is behind the fender. My drill stop didn't work and you may end up looking like me with washer fluid all over the place. Its about this time that you say to yourself "damn it to hell!" Its an easy fix, so don't fret. The bottle won't leak very 7 of 28 11/14/ :02

8 fast, so go find a sheet metal screw and some RTV. With your fingers, screw the screw in partially, enought to stop the leak. At this point, dry off the area and put some RTV around the screw and then proceed to tighten until it seems flush. DON'T STRIP THE HOLE OR IT WILL LEAK AGAIN!! This is the bolt that I cut off because the bottle was in the way. Step 7. Once all the holes are drilled, verify that the mounting brackets will fit in the holes and see if you're happy with their positions. They may not sit flush at the moment, but when you trim the fender and then reinstall the flare, you can tighten them down and they will sit much better. 8 of 28 11/14/ :02
9 9 of 28 11/14/ :02

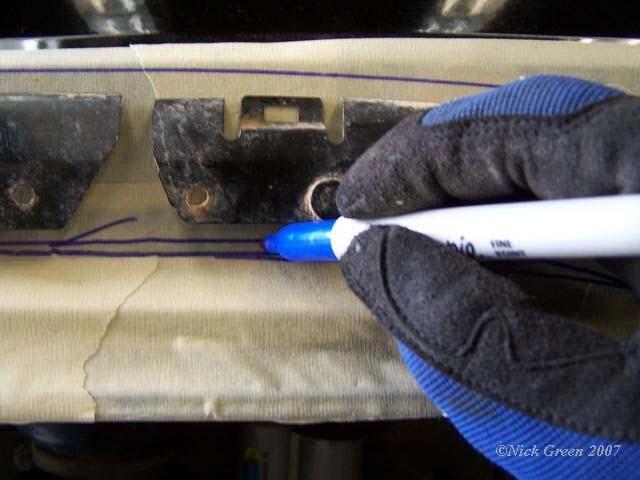
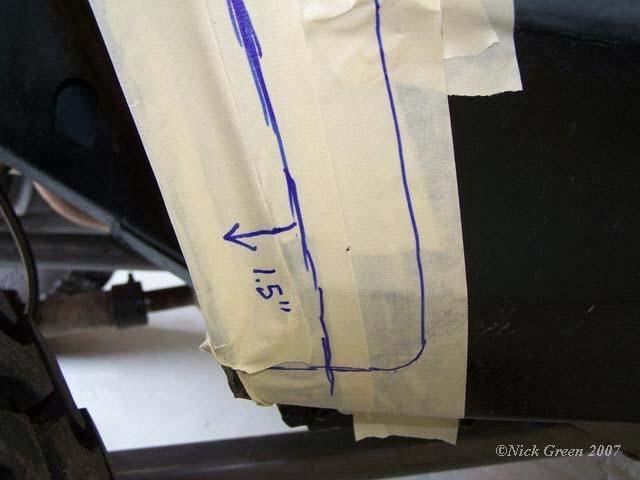
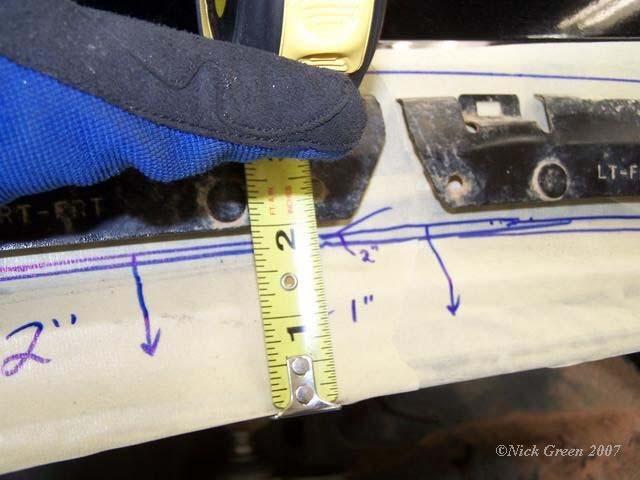
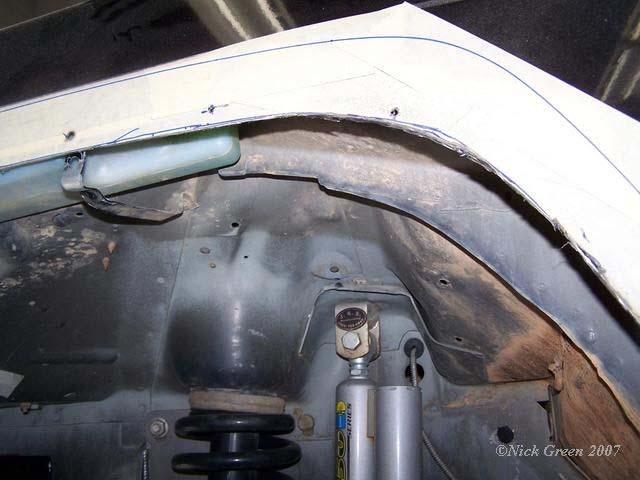
10 guy USMC Heavy Lift Inc. #2 Join Date: Mar 2005 Location: Fredericksburg, VA Posts: 1,930 Re: Front Fender Trim Write Up (Retaining the stock flare) Step8. Now that you have the holes lined up and everything is cool, you will now need to mark where you will trim the fenders. With the mounting hardware still in the fender, mark with a marker where you will want to trim. I found that about 1/4" from the mounting hardware was a good distance to trim. 10 of 28 11/14/ :02
11 11 of 28 11/14/ :02


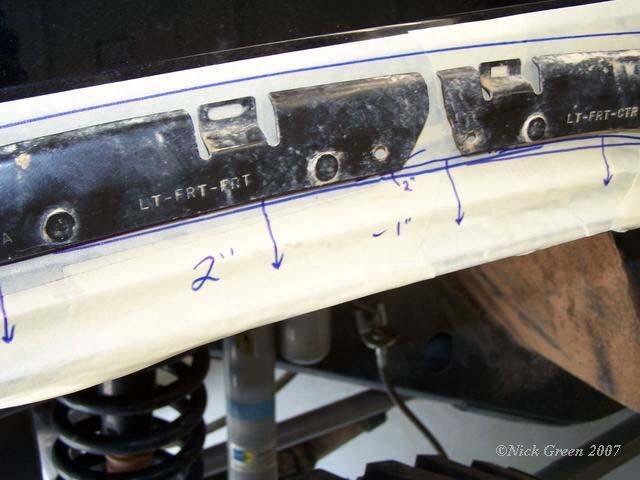
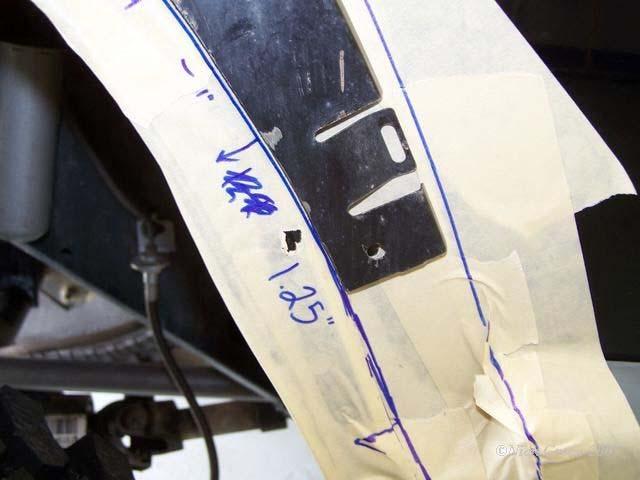
12 I ended up with about 1 3/4" trimmed in the front, 2" on the top, 1 1/4" from the 2 o'clock position, and 1 1/2" from the rear. 12 of 28 11/14/ :02
13 13 of 28 11/14/ :02
14 #3 14 of 28 11/14/ :02

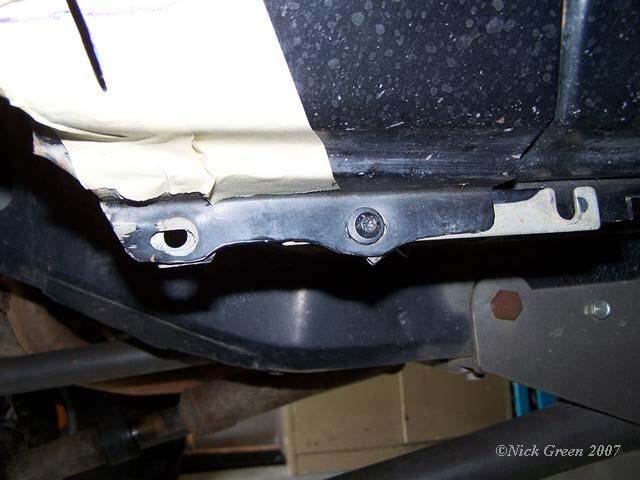
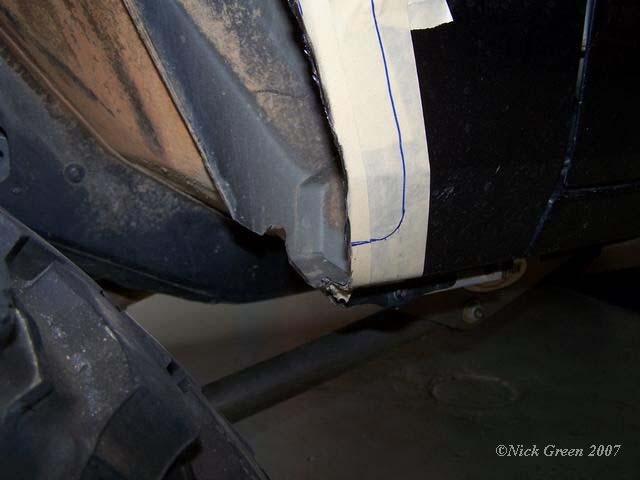
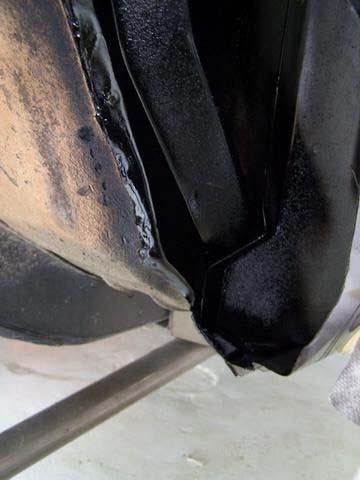
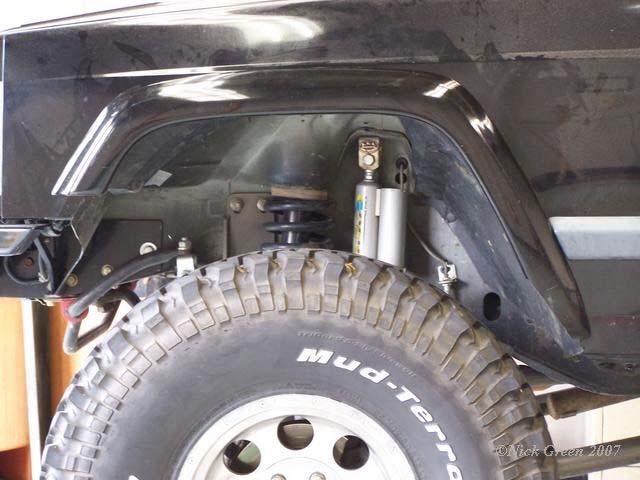
15 53guy USMC Heavy Lift Inc. Join Date: Mar 2005 Location: Fredericksburg, VA Posts: 1,930 Re: Front Fender Trim Write Up (Retaining the stock flare) Step 9. Now its time to trim. Using your prefered method of eye protection and your favorite cutting tool, go at it. I used a 4" angle grinder with a cutting wheel. You'll have to get creative in the rear and figure out how you'll want to trim around the fender bolts. I cut one off and it seems to be holding up fine. I retained the fender spacer with the rear bolt and just cut the front off. You may also want to be libral with a hammer and bend any protruding metal away from the wheel well so as not to cut your tires on full stuff. Another note is that there is fender support at the 12 o'clock position that you may or may not decide to retain. I reused it by bending it up and using a bolt from the fender flare to tighten it up. 15 of 28 11/14/ :02
16 16 of 28 11/14/ :02
17 17 of 28 11/14/ :02

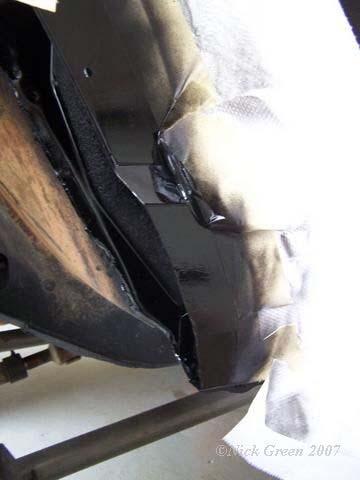
18 Step 10. Now that you've trimmed up the fender, you are almost done. If you wish, it is a good idea to sand the edge of the metal to get rid of burrs or sharp peices of the fender. Also, you might be interested in sanding a bit of the paint away that is near the edge that may have become chipped while cutting. Once you are done sanding, remove the masking tape and clean the area very well (make sure you only clean the cut area and the area to be painted. Be VERY carefull not to touch the body where there is dust. That dust is metal flakes and fibers from the cutting wheel and will scratch you paint). Get your paper towels or bags and tape and mask off the area you are going to paint. Secure the paper towels around the area to be painted to prevent over spray and paint away. 18 of 28 11/14/ :02
19 19 of 28 11/14/ :02


20 Step 11. Let the paint dry. Once the paint is dry, reinstall the fender flare and make sure that everything attaches properly. Do not tighten the flare up yet. You'll want to trim some of the flare off at the bottom so that it conturs to the body lines. Take patience and remove only a little at a time as this will be showing when you're done. 20 of 28 11/14/ :02
21 #4 21 of 28 11/14/ :02

22 53guy USMC Heavy Lift Inc. Join Date: Mar 2005 Location: Fredericksburg, VA Posts: 1,930 Re: Front Fender Trim Write Up (Retaining the stock flare) Step 12. Once you're all trimmed up and the flare looks the way you want, tighten the flare up using your 10mm and ratchet and go do the other side. Step 13. Tighten everything up and you're done! Go find a hose and spray all that dust and metal flakes off your Jeep and go flex it out and make sure it doesn't rub anywhere you don't want it to. ENJOY!! OPTIONAL Step 14. Trimming the fender liner is more custom work than anything else, so you'll have to postion it in the wheel well and secure it somehow and trim away. I found that sheet metal shears worked very well at cutting the liner and zip ties worked well at holding it up. Be creative and it will look very profesional when done and it will keep a bit of mud and muck out of the engine bay and your door. FINISHED!! 22 of 28 11/14/ :02
23 23 of 28 11/14/ :02

24 24 of 28 11/14/ :02


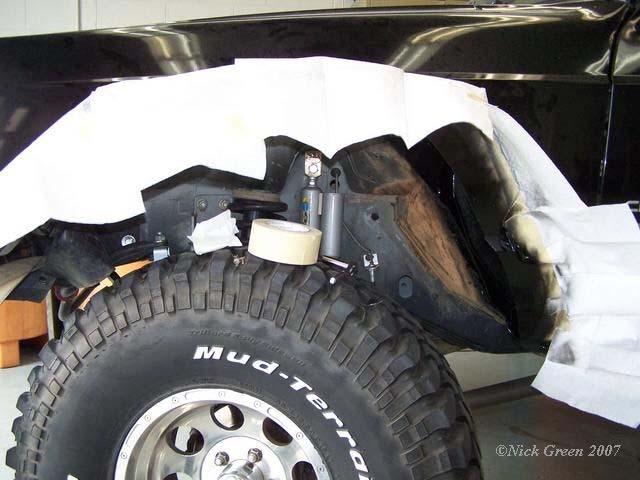
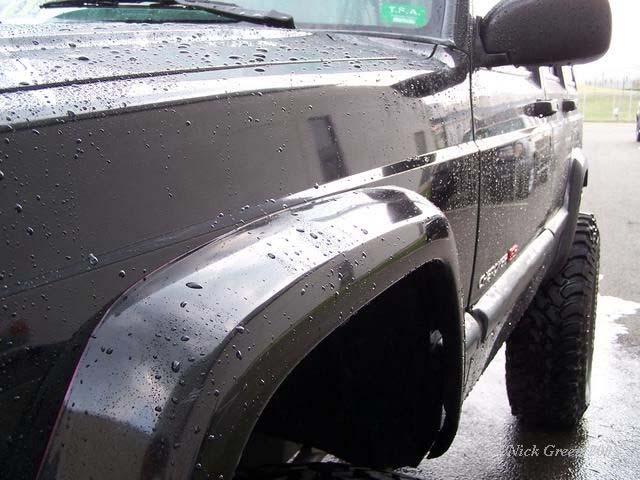
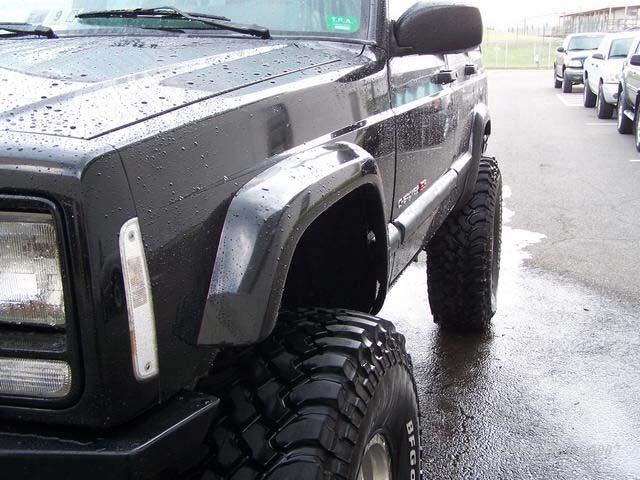
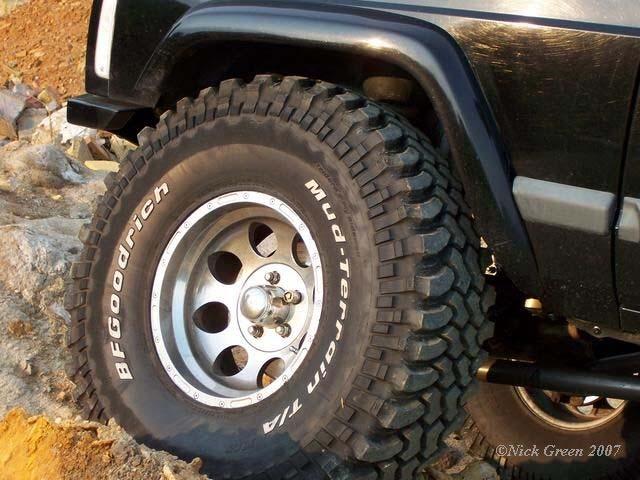
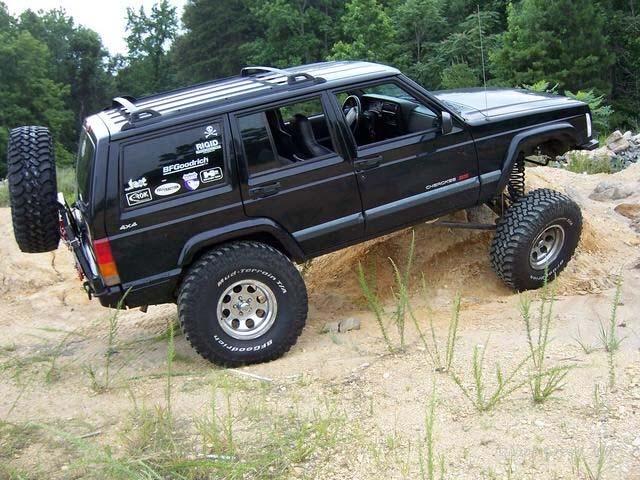
25 Room with new trimming. These are 35x12.50 tires on a 15x8" wheel with about 6" of lift. Your results will vary based on lift/tires/wheel/trimming combo. 25 of 28 11/14/ :02
26 26 of 28 11/14/ :02


27 More pictures at Front Original Thread: Front Trim Write up 27 of 28 11/14/ :02
28 Rear Original Thread: Rear Trim Write up «Previous Thread Next Thread» Currently Active Users Viewing This Thread: 1 (1 members and 0 guests) 5-90* Posting Rules You may not post new threads You may not post replies You may not post attachments You may edit your posts vb code is On Smilies are On [IMG] code is On HTML code is Off Forum Jump FAQ; Frequently Asked Questions 6 Go Similar Threads Thread Thread Starter Forum Replies Last Post Rear Fender Trim Write-up, retaining the stock flare (Fender Trim Part 2) Front Fender Trim Write Up (Retaining the stock flare) 53guy Modified Tech Discussion :32 53guy Modified Tech Discussion :28 Stock Fender Flare Please mavrick SoCal Chapter :06 seeking a stock tierod and fender flare offroadjeepin28 Wanted: Private Party Only :55 All times are GMT -8. The time now is 10:29. Contact Us - North American XJ Association - Archive - Privacy Statement - Top Powered by vbulletin Version Copyright , Jelsoft Enterprises Ltd. NAXJA and NAXJA logo's TM NAXJA. All content/images Copyright NAXJA of 28 11/14/ :02
INSTALLATION INSTRUCTIONS: ULTRA FRONT FENDER FLARES
 INSTALLATION INSTRUCTIONS: ULTRA FRONT FENDER FLARES Thank you for your purchase of Crawler Conceptz Ultra Series Front Fender Flares. While these flares are easily installed with basic hand tools and
JK Front Crusher Flares
 INSTALLATION INSTRUCTIONS INST-17-03-030_A JK Front Crusher Flares IMPORTANT: Thank you for purchasing this Poison Spyder product. Please read through this entire document before proceeding with installation.
JK FRONT FENDER FLARE INSTALLATION INSTRUCTIONS
 JK FRONT FENDER FLARE INSTALLATION INSTRUCTIONS TOOLS NEEDED 3/16 Allen Wrench 1/2 Socket or wrench 10mm Socket Flat head screwdriver HARDWARE 5/16 x 3/4 button heads (14) 5/16 x 1 button heads (8) 5/16
Jeep Cherokee 4-Door XJ Set Part # Rev
 Jeep Cherokee 4-Door XJ Set Part # 10911 Rev-14 04-05-10 Step 1: Prior to Installation: A) Bushwacker only approves installing the flares according to these written instructions with the hardware provided.
Toyota Tacoma Extended Cab/Standard Cab Set Part # Rev
 Toyota Tacoma Extended Cab/Standard Cab Set Part # 31919 Rev-7 06-23-10 Step 1: Prior to Installation: A) Bushwacker only approves installing the flares according to these written instructions with the
Toyota Cut-Out TM Fender Flares Set of 4
 Toyota Cut-Out TM Fender Flares Set of 4 STEP 1 PRIOR TO INSTALLATION A) Bushwacker only approves installing the fl ares according to these written instructions with the hardware provided. WARNING: Failure
Ford F150 Front Bumper
 2009-2011 Ford F150 Front Bumper Warning! Read the instructions completely before beginning the installation. Before tightening bolts, drilling or cutting where required, check to make sure that there
Included in Hardware Kit. Jeep Cut-Out Fender Flare Set of 4 Set Part # Rev STEP 1 PRIOR TO INSTALLATION
 Jeep Cut-Out Fender Flare Set of 4 Set Part #10926-07 Rev-01 09-11-12 STEP 1 PRIOR TO INSTALLATION A) Bushwacker only approves installing the flares according to these written instructions with the hardware
Jeep Cherokee Door XJ Set Part # Revision J
 Jeep Cherokee 84-96 4 Door XJ Set Part # 10911 Revision J 6-5-06 Step 1: Prior to Installation: A) Fit: Verify the fit of the flares to vehicle. (Some filing, sanding, or cutting may be necessary to ensure
YJ DeFenders. These installation instructions apply to the following Poison Spyder products:
 INSTALLATION INSTRUCTIONS INST-13-02-070_A YJ DeFenders IMPORTANT: Thank you for purchasing this Poison Spyder product. Please read through this entire document before proceeding with installation. If
FENDER FLARE INSTALLATION
 Customer Support TM FENDER FLARE INSTALLATION TG-FF8C4108 IMPORTANT TYGER only approves the installation according to our instructions with the hardware provided. WARNING Failure to complete the installation
GENERATION II FENDERS
 INSTALLATION INSTRUCTIONS FOR 97-06 JEEP TJ GENERATION II FENDERS *Thank you for your purchase of our Generation II Fenders! We hope that you will love the new look and function of your Jeep with the addition
All Terrain Flares 2014 Chevy Silverado
 Page 1/8 Components: 1. Front Flares (2) 2. Rear Flares (2) Tools required: - Utility knife - #2 Phillips driver - Socket wrench - 13 mm Socket - 6 mm Allen Wrench - T-15 Torx bit - Trim Removal Tool -
Bushwacker Jeep Flat Style Fender Flares Rear Pair (JK Wrangler 2dr)
") Bushwacker Jeep Flat Style Fender Flares Rear Pair (JK Wrangler 2dr) Note: These instructions involve cutting parts of your vehicle. Please read all instructions prior to starting. Installation Time: 3-4
Bushwacker Jeep Flat Style Fender Flares Rear Pair (JK Wrangler 2dr) Note: These instructions involve cutting parts of your vehicle. Please read all instructions prior to starting. Installation Time: 3-4
Ford Cut-Out Fender Flares Set of 4
 Ford Cut-Out Fender Flares Set of 4 STEP 1 PRIOR TO INSTALLATION A) Bushwacker only approves installing the flares according to these written instructions with the hardware provided. WARNING: Failure to
All Terrain Flares 09+ Ford F150
 Page 1/5 Components: 1. Front Flares (2) 2. Front Flare Inner Pieces (2) 3. Rear Flares (2) Tools required: - Utility knife - Electric Drill - 1/4 Drill Bit - #2 Phillips driver - Socket wrench Hardware
Installation Instructions
 86-95 Suzuki Samurai LROR Sport Cage Front (SKU# SRC-SCF) Installation Instructions Front and Rear Cage Combined CAUTION: Safety glasses should be worn at all times when working with vehicles and related
Bushwacker Jeep Flat Style Fender Flares Front Pair
 Bushwacker Jeep Flat Style Fender Flares Front Pair Note: These instructions involve cutting parts of your vehicle. Please read all instructions prior to starting. Installation Time: 3-4 Hours Tools Required:
Rugged Ridge Engine Transmission Skid Plate JK
 Installation Time: 1-2 Hours Tools Required: Rugged Ridge Engine Transmission Skid Plate 2012-2017 JK Sockets: 16mm, 17mm, 18mm deep well Socket Wrench Wrenches: 16mm, 18mm Torque Wrench Drill ½ Drill
Jeep. Cut-Out Fender Flares Set of 4. Included in Hardware Kit: Set Part # Rev-8 06/29/16 STEP 1 PRIOR TO INSTALLATION
 STEP 1 PRIOR TO INSTALLATION A) Bushwacker only approves installing the flares according to these written instructions with the hardware provided. WARNING: Failure to install according to these instructions
Rubber Grommet, 36 pcs. 3/4 Screw, 10 pcs. Nut, 10 pcs
 Jeep Cherokee ZJ Set Part #10916-07 Rev-2 03-11-10 THESE INSTRUCTIONS INVOLVE CUTTING THE FENDERS OF THE VEHICLE. IT IS IMPORTANT TO READ ALL INSTRUCTIONS PRIOR TO THE CUTTING AND INSTALLATION OF THESE
1/4 Rubber Spacer, 26 pcs. M5-.8 Machine Screw, 26 pcs 13. Female Wire Connector, 4 pcs
 97-06 Jeep Wrangler TJ Set Part #10920-07 Rev-3 12-15-08 A) B) C) D) E) F) G) STEP 1 - PRIOR TO INSTALLATION Bushwacker only approves installing the fl ares according to these written instructions with
BPF Toyota Tundra Mesh Installation Guide
 BPF 2007-2009 Toyota Tundra Mesh Installation Guide www.bpfabricating.com Tools Required Philips Screw Driver Flat Head Screw Driver Dremel or Rotary Tool Hand Saw or Multi Max Adjustable Square Tape Measure
2010+ Dodge Ram 2500/3500 Front Bumper Install Instructions
 2010+ Dodge Ram 2500/3500 Front Bumper Install Instructions Warning! Read the instructions completely before beginning the installation. Before tightening bolts, drilling or cutting where required, check
PROVEN WORLDWIDE SNORKEL FOR CHEVY COLORADO NEW PRODUCT
 AEV30272AC Last Updated: 10/09/18 PROVEN WORLDWIDE SNORKEL FOR CHEVY COLORADO NEW PRODUCT Please visit www.aev-conversions.com to view the most current installation guide for this product. This is a new
Chevrolet Cut-Out Fender Flares Set of 4
 Chevrolet Cut-Out Fender Flares Set of 4 STEP 1 PRIOR TO INSTALLATION A) Bushwacker only approves installing the fl ares according to these written instructions with the hardware provided. WARNING: Failure
INSTALLATION INSTRUCTIONS
 INSTALLATION INSTRUCTIONS Accessory Application Publications No. 2003 ACCORD AII 24040 4-DOOR CARGO NET P/N 08L96-SDA-100 Issue Date AUG 2002 PARTS LIST Cargo net 2 Anchors TOOLS AND SUPPLIES REQUIRED
Included in Hardware Kit 2. FLAT STYLE FENDER FLARE. Jeep Wrangler YJ. Set Part # Rev STEP 1 PRIOR TO INSTALLATION
 Jeep Wrangler YJ Set Part #10924-07 Rev-0 05-05-11 A) B) C) D) E) STEP 1 PRIOR TO INSTALLATION Bushwacker only approves installing the fl ares according to these written instructions with the hardware
Jeep. Cut-Out Fender Flares Set of 4. Included in Hardware Kit: Set Part # Rev-6 7/20/15 For complete fitment info visit :
 Jeep Cut-Out Fender Flares Set of 4 STEP 1 PRIOR TO INSTALLATION A) Bushwacker only approves installing the fl ares according to these written instructions with the hardware provided. WARNING: Failure
Chevrolet Cut-Out Fender Flares Set of 4
 Chevrolet Cut-Out Fender Flares Set of 4 STEP 1 PRIOR TO INSTALLATION A) Bushwacker only approves installing the fl ares according to these written instructions with the hardware provided. WARNING: Failure
Jeep. Cut-Out Fender Flares Set of 4. Included in Hardware Kit:
 STEP 1 PRIOR TO INSTALLATION A) Bushwacker only approves installing the fl ares according to these written instructions with the hardware provided. WARNING: Failure to install according to these instructions
Jeep. Flat Style Fender Flares Set of 4. Included in Hardware Kit: STEP 1 PRIOR TO INSTALLATION. Set Part # Rev-3 1/11/2016
 STEP 1 PRIOR TO INSTALLATION A) Bushwacker only approves installing the fl ares according to these written instructions with the hardware provided. WARNING: Failure to install according to these instructions
JEEP XJ CRUSADER ROCK SLIDERS INSTALL INSTRUCTIONS
 JEEP XJ CRUSADER ROCK SLIDERS INSTALL INSTRUCTIONS Please read the mounting instructions below carefully before attempting to install. Thank you for purchasing your new armor from JcrOffroad! Checkout
Ford Cut-Out Fender Flares Front Pair
 Ford Cut-Out Fender Flares Front Pair STEP 1 PRIOR TO INSTALLATION A) Bushwacker only approves installing the fl ares according to these written instructions with the hardware provided. WARNING: Failure
Jeep. Flat Style Fender Flares Front Pair. Included in Hardware Kit:
 Jeep Flat Style Fender Flares Front Pair STEP 1 PRIOR TO INSTALLATION A) Bushwacker only approves installing the fl ares according to these written instructions with the hardware provided. WARNING: Failure
5/16 Hex Head Bolt, 16 pcs. Plastic Push Retainer, 6 pcs. Alcohol Wipe, 2 pcs. Side Refl ex Reflector, 2 pcs
 STEP 1 PRIOR TO INSTALLATION A) Bushwacker only approves installing the fl ares according to these written instructions with the hardware provided. WARNING: Failure to install according to these instructions
Chevrolet Cut-Out Fender Flares Front Pair
 Chevrolet Cut-Out Fender Flares Front Pair STEP 1 PRIOR TO INSTALLATION A) Bushwacker only approves installing the fl ares according to these written instructions with the hardware provided. WARNING: Failure
Included in Hardware Kit: Pocket Style Extended Coverage Fender Flares Front Pair. Jeep
 Jeep Pocket Style Extended Coverage Fender Flares Front Pair STEP 1 PRIOR TO INSTALLATION A) Bushwacker only approves installing the fl ares according to these written instructions with the hardware provided.
Ford Cut-Out Fender Flares Front Pair
 Ford Cut-Out Fender Flares Front Pair STEP 1 PRIOR TO INSTALLATION A) Bushwacker only approves installing the fl ares according to these written instructions with the hardware provided. WARNING: Failure
Chevrolet Cut-Out Fender Flares Set of 4
 Chevrolet Cut-Out Fender Flares Set of 4 STEP 1 PRIOR TO INSTALLATION A) Bushwacker only approves installing the fl ares according to these written instructions with the hardware provided. WARNING: Failure
Cut-Out Fender Flares Rear Pair. Jeep. Included in Hardware Kit:
 Jeep Cut-Out Fender Flares Rear Pair STEP 1 PRIOR TO INSTALLATION A) Bushwacker only approves installing the fl ares according to these written instructions with the hardware provided. WARNING: Failure
FENDER FLARE INSTALLATION
 TG-FF8T4178: Fit 2014-UP Toyota Tundra PRIOR TO INSTALLATION IMPORTANT Tyger only approves the installation according to our instructions with the hardware provided. WARNING Failure to complete the installation
METRICFATS.COM Thank you for purchasing your new Stealth Rear Turn Signals for your Yamaha Raider.
 METRICFATS.COM Thank you for purchasing your new Stealth Rear Turn Signals for your Yamaha Raider. The instructional sheets that follow are thoroughly detailed and should be studied BEFORE picking up a
Chevy Colorado. INSTALLATION GUIDE Front Bumper
 Chevy Colorado INSTALLATION GUIDE Front Bumper FIG 1A First, we ll start by removing the small allen bolts from the inside fender wells that hold the stock front bumper in place. FIG 1B You will also need
Flat Style Fender Flares Front Pair. Jeep. Included in Hardware Kit:
 Jeep Flat Style Fender Flares Front Pair STEP 1 PRIOR TO INSTALLATION A) Bushwacker only approves installing the fl ares according to these written instructions with the hardware provided. WARNING: Failure
Rugged Ridge Front Bumper Winch Plate JK
 Rugged Ridge Front Bumper Winch Plate 13-17 JK Note: These instructions involve cutting parts of your vehicle. Please read all instructions prior to starting. Installation Time: 2-3 Hours Tools Required:
Toyota FJ Cruiser 2006-Up Set Part # Revision A
 Toyota FJ Cruiser 2006-Up Set Part # 31924 Revision A 03-31-08 Step 1: Prior to Installation: A) Fit: Verify the fit of the flares to vehicle. (Some filing, sanding, or cutting may be necessary to ensure
Ford Cut-Out Fender Flares Front Pair
 Ford Cut-Out Fender Flares Front Pair STEP 1 PRIOR TO INSTALLATION A) Bushwacker only approves installing the fl ares according to these written instructions with the hardware provided. WARNING: Failure
Chevrolet Cut-Out Fender Flares Front Pair
 STEP 1 PRIOR TO INSTALLATION A) Bushwacker only approves installing the fl ares according to these written instructions with the hardware provided. WARNING: Failure to install according to these instructions
Jeep Wrangler JK & 4-Door Front Pair Part # Revision H
 Jeep Wrangler JK 2007 2 & 4-Door Front Pair Part # 10045 Revision H 03-25-09 Step 1: Prior to Installation: A) Bushwacker only approves installing the flares according to these written instructions with
GMC Cut-Out Fender Flares Set of 4
 GMC Cut-Out Fender Flares Set of 4 STEP 1 PRIOR TO INSTALLATION A) Bushwacker only approves installing the fl ares according to these written instructions with the hardware provided. WARNING: Failure to
THIS KIT INCLUDES: 8 M8-1.25X40MM BOLTS WITH WASHERS 8 M8-1.25X30MM BOLTS WITH WASHERS RIGHT AND LEFT HINGE
 Sal es@lambodoorscanada. com 2407A Kal adarave,ottawa,on K1V 8B9 THIS KIT INCLUDES: 8 M8-1.25X40MM BOLTS WITH WASHERS 8 M8-1.25X30MM BOLTS WITH WASHERS RIGHT AND LEFT HINGE 2 SHOCKS 565 PSI 2 SHOULDER
Included in Hardware Kit: Jeep. Pocket Style Extended Coverage Fender Flares Front Pair
 STEP 1 PRIOR TO INSTALLATION A) Bushwacker only approves installing the fl ares according to these written instructions with the hardware provided. WARNING: Failure to install according to these instructions
GMC Cut-Out Fender Flares Set of 4
 GMC Cut-Out Fender Flares Set of 4 STEP 1 PRIOR TO INSTALLATION A) Bushwacker only approves installing the fl ares according to these written instructions with the hardware provided. WARNING: Failure to
INSTALLATION INSTRUCTIONS INS T A L L A TIO N INS T R U C TIO N S THE MAVERICK HANGER R H
 INS T A L L A TIO N INS T R U C TIO N S THE MAVERICK HANGER 10.6.2016 PARTS INSTALLATION SPECIFICATIONS AND TOOLS INSTRUCTIONS 2-1/4" 2-7/8 11-3/8" 1/4" 2-1/8 PARTS INSTALLATION AND INSTRUCTIONS TOOLS
CORVETTE CORVETTE REV: Made in USA U.S. PATENT #6,808,223; #6,845,547; #7,140,075; #7,059,655 and other patents pending.
 CORVETTE 2005-2006 CORVETTE 2005-2007 REV: 7-2-07 Made in USA U.S. PATENT #6,808,223; #6,845,547; #7,140,075; #7,059,655 and other patents pending. Page 1 of 12 CORVETTE C6 2005-2007 THIS KIT INCLUDES:
Flat Style Fender Flares Front Pair. Jeep. Included in Hardware Kit:
 Jeep Flat Style Fender Flares Front Pair STEP 1 PRIOR TO INSTALLATION A) Bushwacker only approves installing the fl ares according to these written instructions with the hardware provided. WARNING: Failure
PLEASE READ INSTRUCTIONS THOROUGHLY BEFORE PROCEEDING
 Part No. 8870 -or Part No. 9100-9110 Front Fender Flares Flat Panel Design 07-09 Jeep JK, 2/4 Dr. PLEASE READ INSTRUCTIONS THOROUGHLY BEFORE PROCEEDING We have provided complete instructions and specific
Included in Hardware Kit 2. FLAT STYLE FENDER FLARE. Jeep Wrangler YJ Fronts. Set Part # Rev STEP 1 PRIOR TO INSTALLATION
 Jeep Wrangler YJ Fronts Set Part #10067-07 Rev-0 05-05-11 A) B) C) D) E) STEP 1 PRIOR TO INSTALLATION Bushwacker only approves installing the fl ares according to these written instructions with the hardware
Plastic Push. 5/16 Hex Head Bolt, 20 pcs. Retainer, 20 pcs. Female Bullet Connector, 4 pcs. Side Refl ex Refl ector, 2 pcs
 A) B) C) D) E) F) G) STEP 1 - PRIOR TO INSTALLATION Bushwacker only approves installing the fl ares according to these written instructions with the hardware provided. WARNING: Failure to install according
TOOLS REQUIRED FOR INSTALLATION: AIR RACHET, GRINDER AND CUTTER.
 THIS KIT INCLUDES: 16 M8-1.25X30MM BOLTS WITH WASHERS 2 SHOCKS 565 PSI RIGHT AND LEFT HINGE ASSEMBLY 2 SHOULDER BOLTS 2 PINS TOOLS REQUIRED FOR INSTALLATION: AIR RACHET, GRINDER AND CUTTER. 7/23, 10MM,
JK REAR DAGGER BUMPER INSTALLATION INSTRUCTIONS
 JK REAR DAGGER BUMPER INSTALLATION INSTRUCTIONS TOOLS NEEDED 3/4" wrench or socket 9/16" wrench or socket 17mm wrench or socket 16mm wrench or socket 1/2" drill bit Drill Sawzall, Torch, Grinder with cut
Barricade Trail Force HD Rear Bumper w/ Tire Carrier installation (07-16 Wrangler JK)
") Barricade Trail Force HD Rear Bumper w/ Tire Carrier installation (07-16 Wrangler JK) Installation Time: 2-3 Hours Tools Required: Tire iron Ratcheting socket set (ratchet plus 13, 16, 19mm sockets) Open
Barricade Trail Force HD Rear Bumper w/ Tire Carrier installation (07-16 Wrangler JK) Installation Time: 2-3 Hours Tools Required: Tire iron Ratcheting socket set (ratchet plus 13, 16, 19mm sockets) Open
Jeep Wrangler JK Door Rear Pair Part # Revision E
 Jeep Wrangler JK 2007 4-Door Rear Pair Part # 10044 Revision E 03-25-09 Step 1: Prior to Installation: A) Bushwacker only approves installing the flares according to these written instructions with the
FENDER FLARE INSTALLATION
 Part#: TG-FF8G4158 FOR 2007-2013 GMC Sierra 1500 Pickup Truck (Exclude 69.3inch Short Bed Models) FENDER FLARE INSTALLATION Hardware Kit Included IMPORTANT TYGER only approves the installation according
RAM Pocket Style Fender Flares Set of 2 (Rear)
") STEP 1 PRIOR TO INSTALLATION A) Bushwacker only approves installing the flares according to these written instructions with the hardware provided. WARNING: Failure to install according to these instructions
STEP 1 PRIOR TO INSTALLATION A) Bushwacker only approves installing the flares according to these written instructions with the hardware provided. WARNING: Failure to install according to these instructions
GMC Cut-Out Fender Flares Front Pair
 STEP 1 PRIOR TO INSTALLATION A) Bushwacker only approves installing the fl ares according to these written instructions with the hardware provided. WARNING: Failure to install according to these instructions
Jeep. Flat Style Fender Flares Front Pair Front Part # Rev-9 02/23/2016 For complete fitment info visit :
 STEP 1 PRIOR TO INSTALLATION A) Bushwacker only approves installing the fl ares according to these written instructions with the hardware provided. WARNING: Failure to install according to these instructions
How-to: SPL Fender Brace Install by Milo (SATX) of San Antonio TX. Originally Sourced on 300zxclub.com, and stored with all permissions
 of San Antonio TX. Originally Sourced on 300zxclub.com, and stored with all permissions") How-to: SPL Fender Brace Install by Milo (SATX) of San Antonio TX. Originally Sourced on 300zxclub.com, and stored with all permissions The 300ZX is a unibody vehicle and a great one at that BUT like many
How-to: SPL Fender Brace Install by Milo (SATX) of San Antonio TX. Originally Sourced on 300zxclub.com, and stored with all permissions The 300ZX is a unibody vehicle and a great one at that BUT like many
JK Rear Crusher Flares
 INSTALLATION INSTRUCTIONS INST-17-05-010_A JK Rear Crusher Flares IMPORTANT: Thank you for purchasing this Poison Spyder product. Please read through this entire document before proceeding with installation.
Jeep. Flat Style Fender Flares Rear Pair. Included in Hardware Kit:
 Jeep Flat Style Fender Flares Rear Pair STEP 1 PRIOR TO INSTALLATION A) Bushwacker only approves installing the fl ares according to these written instructions with the hardware provided. WARNING: Failure
INS T A L L A TIO N INS T R U C TIO N S HORSESHOE W/ BAR HANGER
 INS T A L L A TIO N INS T R U C TIO N S HORSESHOE W/ BAR HANGER 6-1/2" 5" 2-7/16" 3-7/16" Ø2-7/8" 4-7/8" 11" 2" 3/16" 1/2" HORSESHOE W/ BAR S P ECIFICATIONS PARTS AND TOOLS Tools Needed Tape Measure Pencil
2016 Current Toyota Tacoma HoneyBadger Front Bumper Installation Instructions
 2016 Current Toyota Tacoma HoneyBadger Front Bumper Installation Instructions PREPARATION 1. Disconnect the negative terminal on the battery. Park the vehicle on level ground and set the emergency brake.
Bulkhead Model Number and
 Bulkhead Model Number 96141-3-01 and 96142-3-01 Installing your ProMaster bulkhead is very clear cut following these instructions. Before cutting or drilling in the floor, verify the location of you gas
Toyota Pocket Style Fender Flares Set of 4 STEP 1 PRIOR TO INSTALLATION
 Toyota Pocket Style Fender Flares Set of 4 STEP 1 PRIOR TO INSTALLATION Front Part #30922-02 Rev-1 7/18/2016 A) Bushwacker only approves installing the flares according to these written instructions with
Rugged Ridge Body Armor Guard Kit, 5 Pieces, Black (07-Current JK 4-door)
") Rugged Ridge Body Armor Guard Kit, 5 Pieces, Black (07-Current JK 4-door) Installation Time: 60 Minutes Tools Required: Notes: Phillips head screwdriver 3/8 socket or Flat head screwdriver 1/2 socket 7
Rugged Ridge Body Armor Guard Kit, 5 Pieces, Black (07-Current JK 4-door) Installation Time: 60 Minutes Tools Required: Notes: Phillips head screwdriver 3/8 socket or Flat head screwdriver 1/2 socket 7
JK Brawler Rockers. *Includes ONE of the Hardware Kits (not both)
") INSTALLATION INSTRUCTIONS INST-17-08-200_A JK Brawler Rockers IMPORTANT: Thank you for purchasing this Poison Spyder product. Please read through this entire document before proceeding with installation.
INSTALLATION INSTRUCTIONS INST-17-08-200_A JK Brawler Rockers IMPORTANT: Thank you for purchasing this Poison Spyder product. Please read through this entire document before proceeding with installation.
Installation Instructions
 Contents Page General Information and Installer Tips.......... 2 Panels & Posts............................. 3 Enclosure Description..................... 4 Hinge Door Hardware................... 4-5 Step-by-Step
JEEP JK ( 3 DOOR ) SLIMLINE II - FULL TRAY EXTREME RACK KIT
 SLIMLINE II - FULL TRAY EXTREME RACK KIT") JEEP JK ( 3 DOOR ) SLIMLINE II - FULL TRAY EXTREME RACK KIT FAJK004 / KRJW016T INSTALL TIME: 2 Hours NOTE: Your Jeep JK (3 Door) Extreme Roof Rack Kit consists of four boxes. (1) the Tray, (2) the Roll
JEEP JK ( 3 DOOR ) SLIMLINE II - FULL TRAY EXTREME RACK KIT FAJK004 / KRJW016T INSTALL TIME: 2 Hours NOTE: Your Jeep JK (3 Door) Extreme Roof Rack Kit consists of four boxes. (1) the Tray, (2) the Roll
Bolt-On/Rugged Fender Flares GMC Sierra 1500/2500/3500 (14-ON) Important: Please read instructions entirely before installing this product.
 Important: Please read instructions entirely before installing this product.") Important: Please read instructions entirely before installing this product. Hardware Included QTY Hardware Included QTY Bolt Kit Included Extrusion 30.5ft (Bolt-On look flare only) QTY U CLIP.6mm 6 Nuts
Important: Please read instructions entirely before installing this product. Hardware Included QTY Hardware Included QTY Bolt Kit Included Extrusion 30.5ft (Bolt-On look flare only) QTY U CLIP.6mm 6 Nuts
Included in Hardware Kit: Jeep Pocket Style Fender Flare Set of 4. Set Part # Rev-0 3/15/2013 TOOLS FOR EASY INSTALLATION:
 STEP 1 PRIOR TO INSTALLATION A) Bushwacker only approves installing the fl ares according to these written instructions with the hardware provided. WARNING: Failure to install according to these instructions
CLUB-SPORT ROLL BAR: Volkswagen Mk4 Golf
 HPA Motorsports Inc. 604-888-7274 www.hpamotorsport.com CLUB-SPORT ROLL BAR: Volkswagen Mk4 Golf Congratulations on the purchase of your Club-Sport Roll Bar from HPA Motorsports! The engineering elements
WAREHOUSE HANGER INSTALLATION INSTRUCTIONS R H INS T A L L A TIO N INS T R U C TIO N S
 INS T A L L A TIO N INS T R U C TIO N S WAREHOUSE HANGER NOTE: Due to the size and weight of the Warehouse Hanger it is recommended that this Hanger be installed on 3 4 or wider doors. 10.11.2016 2-3/16"
INSTALLATION INSTRUCTIONS INS T A L L A TIO N INS T R U C TIO N S ROD IRON SCROLL HANGER R H
 INS T A L L A TIO N INS T R U C TIO N S ROD IRON SCROLL HANGER 10.5.2016 2-1- 3/16" 11/16" 8" 8 O 2-7/8 Ø2-7/8" 3-1/2 3-1/2" 12-9/16 12-9/16" PLEASE NOTE: These instructions are specific to a particular
Ford Pocket Style Fender Flares Set of 4
 Ford Pocket Style Fender Flares Set of 4 STEP 1 PRIOR TO INSTALLATION A) Bushwacker only approves installing the fl ares according to these written instructions with the hardware provided. WARNING: Failure
GMC Pocket Style Fender Flares Set of 4
 STEP 1 PRIOR TO INSTALLATION A) Bushwacker only approves installing the fl ares according to these written instructions with the hardware provided. WARNING: Failure to install according to these instructions
Ford F150 Rear Flares Set Part # Revision
 Ford F150 Rear Flares Set Part # 20074 Revision 1 04-01-09 Step 1: Prior to Installation: A) Bushwacker only approves installing the flares according to these written instructions with the hardware provided.
TOYOTA TACOMA LED BED LIGHTS Preparation
 Preparation Part Number: PT948-35160 Kit Contents Item # Quantity Reqd. Description 1 1 Hardware Kit 2 1 Driver Side LED assembly 3 1 Passenger Side LED assembly 4 1 Main Wire Harness Hardware Bag Contents
Ford Pocket Style Fender Flares Set of 4
 Ford Pocket Style Fender s Set of 4 STEP 1 PRIOR TO INSTALLATION Set Part #20942-02 Rev-4 07/05/2018 A) Bushwacker only approves installing the flares according to these written instructions with the hardware
Explorer Wiring Kit (assembled)
") Explorer Wiring Kit (assembled) For Vintage, Firestorm & Standard Series Please Read All Instructions Before Beginning. Tools you will need: Soldering Iron (35 watt preferably) Solder Wet Sponge Wire Clippers
Explorer Wiring Kit (assembled) For Vintage, Firestorm & Standard Series Please Read All Instructions Before Beginning. Tools you will need: Soldering Iron (35 watt preferably) Solder Wet Sponge Wire Clippers
JK Crusher Corners. *Includes ONE of the Hardware Kits (not both)
") INSTALLATION INSTRUCTIONS INST-18-05-020_A JK Crusher Corners IMPORTANT: Thank you for purchasing this Poison Spyder product. Please read through this entire document before proceeding with installation.
INSTALLATION INSTRUCTIONS INST-18-05-020_A JK Crusher Corners IMPORTANT: Thank you for purchasing this Poison Spyder product. Please read through this entire document before proceeding with installation.
IMPORTANT WARRANTY & INSTALLATION INSTRUCTIONS ATTACHED
 IMPORTANT WARRANTY & INSTALLATION INSTRUCTIONS ATTACHED Please Forward All Attached Information to Consumer Warranty Not Valid Unless Returned to Volant Performance STOP Please be sure to review the enclosed
The build should take around 2 to 3 hours. However, by leaving yourself more time you can go at a relaxed pace and be sure not to miss anything.
 Before We Start Before we jump into building your Picade, make sure you have everything to hand. I know you're eager to jump right into the construction, but we need to get set up properly first! 1. Prepare
CUT OUT FLARES INSTALLATION INSTRUCTIONS FOR 20017, 20018, F100-F150 F250-F350 P.U. & BRONCO CUT OUTS
 20017 04/22/03 REV-A CUT OUT FLARES INSTALLATION INSTRUCTIONS FOR 20017, 20018, F100-F150 F250-F350 P.U. & BRONCO CUT OUTS Tools Required for Installation: (A) 3/16 Drill Bit (B) Pop-Rivet Gun (C) Air
SAFETY. Read and understand all safety precautions and instructions before installing this product.
 SAFETY Your safety and the safety of others is very important. In order to help you make informed decisions about safety, we have provided installation instructions and other information. These instructions
GENUINE PARTS INSTALLATION INSTRUCTIONS
 GENUINE PARTS INSTALLATION INSTRUCTIONS DESCRIPTION: APPLICATION: PART NUMBER: REAR SPOILER KIT - CARBON FIBER INFINITI Q60 T99J1 5CH0B KIT CONTENTS: Item Qty. Part Description A 1 Spoiler Assembly B 4
TOOL LIST FOR TAILGATE HIDDEN LATCH & LINK ASSY FOR FORD FLARESIDE TRUCKS
 TOOL LIST FOR TAILGATE HIDDEN LATCH & LINK ASSY FOR 53-87 FORD FLARESIDE TRUCKS Vise Grip Clamps C-clamps Sharpie Marker Ball Peen Hammer Center Punch 3/8 or 1/2 Drill 5/32, 7/32, 9/32, and 3/8 Drill Bits
10" E-Series D-Series - Pair. kit includes (14) (4) (4) It is strongly recommended that this product be installed by a professional.
 (4) (4) It is strongly recommended that this product be installed by a professional.") 2014 GMC 1500 grille installation instructions 10" E-Series D-Series - Pair kit includes (14) (14) (4) 5 /16-18x 5 /8 Button Socket 5 /16-18 Low Profile Nylock Nut M6-1.0x30mm Button Head Socket (14) (4)
2014 GMC 1500 grille installation instructions 10" E-Series D-Series - Pair kit includes (14) (14) (4) 5 /16-18x 5 /8 Button Socket 5 /16-18 Low Profile Nylock Nut M6-1.0x30mm Button Head Socket (14) (4)
Obtained from Omarshauntedtrail.com
 DaveintheGrave's Halloween Props Animated Crawling Skeleton Build a life-size skeleton torso that realistically crawls across the lawn one arm at a time. 1. Motor Base and Linkage Assembly BASE - I used
Intercooler Shroud and Belt Cover for WRX
 Intercooler Shroud and Belt Cover for 2015+ WRX 2016-05-18 Thank you for purchasing this PERRIN product for your car! Installation of this product should only be performed by persons experienced with installation