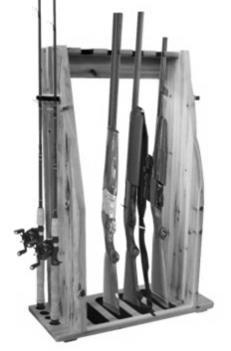
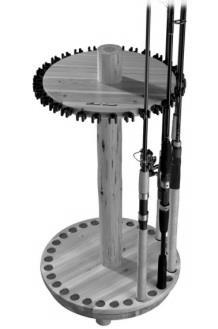
6-Rod Horizontal/ Vertical Rod Wall Rack
|
|
|
- Melissa Lambert
- 6 years ago
- Views:
Transcription


1 Item # Rod Horizontal/ Vertical Rod Wall Rack Please keep this instruction manual for future reference If you have any problems with your new product, please visit our website for the fastest expedited service possible for your replacement part ordering needs. Please have a copy of your receipt of purchase. For any technical support or warranty issues, please contact Rush Creek Creations at or us at productsupport@rushcreekcreations.com 02/16/2016


2 Log Furniture Facts As with all rustic and log furniture, some cracking (or checking) may develop during the log drying process. Cracking occurs mainly on the your furniture. Some cracking is to be expected and it is a natural characteristic of all log furniture. Cracking usually occurs from the center of the log, cracking outward in one direction as the wood releases moisture. The degree of cracking will vary from log to log. Some cracks will be wider than others, depending upon the diameter of the log. Typically, logs that are larger in diameter will have larger cracks. This natural process adds to the unique rustic appeal of your log furniture. All Rush Creek Creations products include a 90-day warranty on all parts. Cracking or checking is not considered a defect and is not subject to the warranty. If you have any questions or concerns about cracking (or checking) on your Rush Creek Creations log furniture, please contact us at or (414) Or, us at productsupport@rushcreekcreations.com.
3 90-Day Rush Creek Creations Product Warranty All Rush Creek Creations products have a 90-day from date of purchase warranty. This warrants the retail purchaser for any Rush Creek Creations product purchased to be free from any defect in materials and construction for 90 days from the date of purchase. Manufacturer Defects: Defective parts will be replaced at no cost to you. Please send an to productsupport@rushcreekcreations.com including photos of the defective part(s) and we will send replacements. PLEASE NOTE: Cracks in logs are not defects. They may develop during the log drying process and do not affect the stability of the piece in any way, and add to the rustic appeal of your log furniture. If your product needs service, please be advised that Rush Creek Creations reserves the right to decline service when the product is found to be excessively worn, altered in any way, or when damage is caused by acts other than defective workmanship or materials. This warranty is void if the product has been subject to abuse. For service under this warranty, please contact Rush Creek Creations. Please provide your receipt as proof of purchase. A PURCHASE RECEIPT (or other proof of purchase date) will be required before any warranty service is initiated. All requests for warranty service can be submitted by , in writing or by contacting our Customer Service Department at: or us at productsupport@rushcreekcreations.com. IMPORTANT NOTICE! Please contact us before returning the product to the store. Care: Apply lemon oil with a soft cotton cloth. Do not use products with silicones. This may cause damage to the finish. Never let the wood get in contact with any type of paint remover. Connections: Changes in temperature and humidity will cause the wood to dry out possibly causing the bolts loosen. Check the bolts periodically to make sure they are still tight. DO NOT put your wood piece directly against hot radiators or sources of heat. Doing this may cause the wood to dry and crack.
4 Parts List Assembly Tips: Attention: If you are using an electric screw driver in assembly, please set at low torque and do not over tighten the hardware. When assembling individual parts, loosely tighten screws until all screws are inserted, then tighten completely. Mounting Instructions : Step 1. Find the wall studs in the area you want to hang your rack. Step 2. Hold the lower section of the rod holder (#2) on the wall and use a level to even it horizontally from side to side. Mark the mounting hole positions with a pencil as a reference for drilling. Step 3. Hold the upper section of the rod holder (#1) in place with your hand, level from side to side and mark the mounting points. Make sure the top and bottom section of the holder are in line with each other. Step 4. Drill pilot holes with a drill. Insert wall anchors(#5) into the holes. Tighten screws (#4) into the wall with screwdriver. Now you are ready to hang your rack.


5 Assembly Instructions Horizontal Wall Mount Vertical Wall Mount


6 Be sure to check out all the exciting products Rush Creek Creations has to offer. Visit our website at: Rush Creek Creations W Lincoln Ave. West Allis, WI Rush Creek Creations. All Rights Reserved.
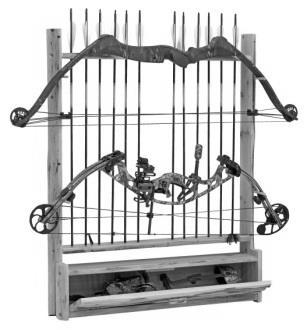
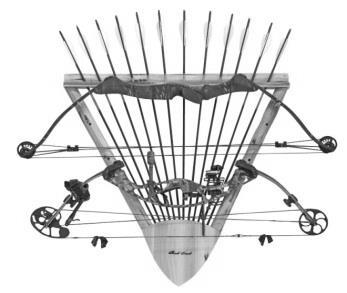
2-Bow, 12 Arrows Bow Rack
 Item # 37-0038 2-Bow, 12 Arrows Bow Rack Please keep this instruction manual for future reference If you have any problems with your new product, please visit our website www.rushcreekcreations.com for
3-gun Wall Rack. Please keep this instruction manual for future reference
 Item # 37-0099 3-gun Wall Rack Please keep this instruction manual for future reference If you have any problems with your new product, please visit our website www.rushcreekcreations.com for the fastest
Item # GUN, 12 PISTOL CABINET WITH STORAGE
 Item # 37-0046 9-GUN, 12 PISTOL CABINET WITH STORAGE Tools Needed For Assembly: Screwdriver Drill Assembly Tips: If you are using an electric screwdriver for assembly, set it at low torque and do not over-tighten
IMPORTANT Carefully remove all the parts from the carton and place them individually on a soft cloth to prevent scratches or other damag
 IMPORTANT 20 05520 0772 Carefully remove all the parts from the carton and place them individually on a soft cloth to prevent scratches or other damage. Carefully and strictly follow these assembly instructions
Desk/Wall-Mount Rack
 Desk/Wall-Mount Rack Patent(s) Pending Installation Instructions Post P/N: 119-1752 119-1781 119-1782 119-4014 Frame P/N: 119-1591 119-1754 119-1755 Kit Contents (2) Frames (4) Posts Assembly Hardware
4-Piece Table Tennis Table
 Item# 45-6074 4-Piece Table Tennis Table Please keep this instruction manual for future reference If you have any problems with your new product, please contact Triumph Sports USA at 1-866-815-4173, or
Closet Wall Hanging Unit
 IMPORTANT 88 5531 772 Carefully remove all the parts from the carton and place them individually on a soft cloth to prevent scratches or other damage. Carefully and strictly follow these assembly instructions
OWNER'S MANUAL BENCH NOTE: THIS INSTRUCTION BOOKLET CONTAINS IMPORTANT SAFETY INFORMATION PLEASE READ AND KEEP FOR FUTURE REFERENCE.
 OWNER'S MANUAL BENCH MODEL #: NOTE: THIS INSTRUCTION BOOKLET CONTAINS IMPORTANT SAFETY INFORMATION PLEASE READ AND KEEP FOR FUTURE REFERENCE. RECEIPT OF PURCHASE: DATE OF PURCHASE: ATTACH HERE UPC CODE:
Convertible Crib and Changer (M661/662)
") Model No.: M661/662 PO #: Serial #: Convertible Crib and Changer (M661/662) THIS PRODUCT IS NOT INTENDED FOR INSTITUTIONAL OR COMMERCIAL USE. If you have any questions or missing parts, please contact
Model No.: M661/662 PO #: Serial #: Convertible Crib and Changer (M661/662) THIS PRODUCT IS NOT INTENDED FOR INSTITUTIONAL OR COMMERCIAL USE. If you have any questions or missing parts, please contact
Panel & Shelf Identification
 4 to 8 Aromatic Cedar Closet Model # 801 1 PLEASE READ INSTALLATION INSTRUCTIONS BEFORE ASSEMBLING Rev. C IF YOU ARE MISSING PARTS OR HAVE QUESTIONS PLEASE CONTACT: customerservice@cedargreen.net Tools
Expandable Bar Cabinet CF4001
 Expandable Bar Cabinet CF4001 Congratulations! You have purchased a stylish piece of Crosley Furniture. We strive to provide fine furniture products, built with quality materials and hand finished details.
Mount to the Wall INSTALLATION MANUAL
 Mount to the Wall 15 Locate the Wooden Studs This step applies to wooden stud wall installation only. Determine and mark the exact locations of two stud centers on the wall. Wooden studs should be spaced
2 Pack CH Dining Chairs
 DOREL ASIA 2 Pack CH Dining Chairs Model No: UPC CODE: 0-65857-16961-4 NOTE: THIS INSTRUCTION BOOKLET CONTAINS IMPORTANT SAFETY INFORMATION. PLEASE READ AND KEEP FOR FUTURE REFERENCE. Lot number: (TAKEN
Installation Instructions
 TS SERIES Traditional Square Accessories Installation Instructions " TOWEL BAR.0 " TOWEL BAR.0.90 DOUBLE ROBE HOOK.0.0 " HANDLE. " HANDLE.0 Thank you for selecting American-Standard...the benchmark To
Tilting Wall Mount Fits 37" to 70" Flat Panel TVs Model No: DCD13020
 THIS INSTRUCTION BOOKLET CONTAINS IMPORTANT SAFETY INFORMATION. PLEASE READ AND KEEP FOR FUTURE REFERENCE. Lot Number: Date: Tilting Wall Mount Fits 37" to 70" Flat Panel TVs Model No: DCD1300 MIN:7.87
31082 INSTALLATION INSTRUCTIONS
 08 INSTALLATION INSTRUCTIONS Safety glasses should be worn at all times while installing this product. YEARS: 07-CURRENT MAKE: HONDA MODEL: RIDGELINE STYLE: TRUCK WARNING: NEVER EXCEED YOUR VEHICLE MANUFACTURER'S
Please read these instructions before use and keep for future reference
 Wardrobe Assembly Guide Allen Key Provided (if required) Philips Screwdriver Required Hammer Required Please read these instructions before use and keep for future reference Caution! Two Person Assembly
PWM-T210 Installation Instructions UNIVERSAL FLAT PANEL MOUNT
 UNIVERSAL FLAT PANEL MOUNT IN-PWMT210.R0 TABLE OF CONTENTS Warning Statements 3 Parts List 4 Installation Tools 4 Locating the Center of the 5 Mounting Bracket Positioning 5 Securing the Mounting Brackets
HUSTLER 7' & 8' POOL TABLE ASSEMBLY INSTRUCTIONS
 HUSTLER 7' & 8' POOL TABLE ASSEMBLY INSTRUCTIONS Please Do Not Hesitate to Contact Our Consumer Hotline at 800-759-0977 with Any Questions That May Arise During Assembly or Use of This Product! NG2515PB/NG2520PB
OWNER'S MANUAL 5 PC DINING SET DATE OF PURCHASE: NOTE: MODEL #: DASE3583 UPC CODE: RECEIPT OF PURCHASE: ATTACH HERE NEED HELP!
 OWNER'S MANUAL 5 PC DINING SET MODEL #: NOTE: THIS INSTRUCTION BOOKLET CONTAINS IMPORTANT SAFETY INFORMATION PLEASE READ AND KEEP FOR FUTURE REFERENCE. RECEIPT OF PURCHASE: DATE OF PURCHASE: ATTACH HERE
Base Cabinet w/drawers
 Base Cabinet w/drawers WSBC-4C Dark Cherry finish WSBC-4W White finish ADULT ASSEMBLY REQUIRED DUE TO THE PRESENCE OF SMALL PARTS, SHARP POINTS, SHARP EDGES AS RECEIVED Pacific Standard Time: 8:30 a.m.
Ridgefield Hardware. Step by Step Installation Instructions. Customer Service or visit us online at smithnoble.com
 americas leading resource for window treatments TM Step by Step Installation Instructions Ridgefield Hardware Customer Service 800.780.8889 or visit us online at smithnoble.com Th a n k y o u for purchasing
Basic Spring Motor Roller Shades
 Basic Spring Motor Roller Shades ATTENTION!!! READ CAREFULLY! This shade has a reliable long-lasting Spring Motor. The Spring Motor must have proper tension in order to function as intended. Handling in
PRIMO 56" FOOSBALL TABLE ASSEMBLY INSTRUCTIONS
 PRIMO 56" FOOSBALL TABLE ASSEMBLY INSTRUCTIONS NG1035 THANK YOU! Thank you for purchasing this product. We work around the clock and around the globe to ensure that our products maintain the highest possible
Worktop. Weight Capacity. 100 lbs. 21 Corner Worktop. 48 Worktop. Fits over 2 Cabinets. 72 Worktop. Fits over 3 Cabinets. 200 lbs. 150 lbs.
 Bold.0 Warning: Excessive weight hazard! Use two or more people to move, assemble or install cabinets and locker to avoid back injury. Do not leave children unattended near cabinets. High risk of tipping
DOREL ASIA KITCHEN CART
 DOREL ASIA Model No: WM6545N (Natural) WM6545W (White) UPC CODE: 0-65857-16525-8 (Natural) 0-65857-16526-5 (White) NOTE: THIS INSTRUCTION BOOKLET CONTAINS IMPORTANT SAFETY INFORMATION. PLEASE READ AND
INSTALL INSTRUCTIONS WELCOME TO THE NEWAGE PERFORMANCE CABINETRY SERIES NEWAGE STEEL WELDED CABINETRY
 NEWAGE STEEL WELDED CABINETRY WELCOME TO THE NEWAGE PERFORMANCE CABINETRY SERIES ALL CABINETS MUST BE MOUNTED TO STUDS ON A SECURE WALL, AS PER THESE INSTRUCTIONS. FAILURE TO DO SO MAY RESULT IN SERIOUS
ASSEMBLY INSTRUCTIONS ITEM NO. D S
 ASSEMBLY INSTRUTIONS ITEM NO. D0-0S GIA ROUND DINING TABLE GIA DINING HAIR (SET INLUDES HAIRS) This page lists all the contents included in the Box. Please take time to identify the hardware as well as
C. Side Panel 1 pc. B. Side Panel. 1 pc. J2. Shelf. 4 pcs. Adjustable Pin 24 pcs. (+1 extra) M3.5x16 Wood Screw 20 pcs. (+1 extra) 2 pcs.
 M3.5x16 Wood Screw 20 pcs. (+1 extra) 2 pcs.") IMPORTANT 20 05180 0307 Hutch Carefully remove all the parts from the carton and place them individually on a soft cloth to prevent scratches or other damage. Carefully and strictly follow these assembly
IMPORTANT 20 05180 0307 Hutch Carefully remove all the parts from the carton and place them individually on a soft cloth to prevent scratches or other damage. Carefully and strictly follow these assembly
Hardware Box 1 1/4 Diameter x 3/4 Long Bolts 24 1/4 Nylon Lock Nut 24 1/4 Diameter x 3 Long Lag Bolt 8 1/4 Washers 56
 Warning: Excessive weight hazard! Use two or more people to move, assemble or install overhead rack to avoid back or other injury. Do not leave children unattended near overhead rack. High risk of injury
S214 / S215 ASSEMBLY INSTRUCTIONS. Assembly tools required : Hammer, Phillips # 2, #3 and regular screwdriver, 10 and 17mm wrenches
 S14 / S15 ASSEMBLY INSTRUCTIONS Assembly tools required : Hammer, Phillips #, #3 and regular screwdriver, 10 and 17mm wrenches Special Notes : To make the assembly simple and well done, you have to be
INSTALLATION INSTRUCTIONS
 INSTALLATION INSTRUCTIONS CTM-MS1 Flat Panel Display Mount (26 to 37 ) NORTH AMERICA 3130 East Miraloma Avenue Anaheim, CA 92806 USA USA and Canada Phone: 800-368-9700 Fax: 800-832-4888 Other Locations
INSTRUCTION MANUAL TWIN WOODEN DAYBED MODEL NO: UPC CODE: NOTE: Lot number: Date of purchase: / / WM6394E ESPRESSO WM6394W WHITE WM6394B BLACK
 INSTRUCTION MANUAL TWIN WOODEN DAYBED MODEL NO: WM6394E ESPRESSO WM6394W WHITE WM6394B BLACK UPC CODE: 0-65857-16370-4 ESPRESSO 0-65857-16371-1 WHITE 0-65857-16890-7 BLACK NOTE: THIS INSTRUCTION BOOKLET
ASSEMBLY INSTRUCTIONS ABST-101-BK SPEAKER STAND ACST-101-BK CENTER CHANNEL STAND
 ABST-101-BK SPEAKER STAND ACST-101-BK CENTER CHANNEL STAND ASSEMBLY INSTRUCTIONS Safety Instructions 1. General information Please read and follow these safety instructions. Keep them safe for future reference.
Black or White Classic Country Chair Item Number Black Chair: BH Item Number White Chair: BH
 ASSEMBLY INSTRUCTIONS Black or White Classic Country Chair Item Number Black Chair: BH10-084-90-1 Item Number White Chair: BH10-084-90-14 CUSTOMER SERVICE INFORMATION If parts are missing, DO NOT return
Closet Wall Drawer Unit
 IMPORTANT 88 5531 752 Carefully remove all the parts from the carton and place them individually on a soft cloth to prevent scratches or other damage. Carefully and strictly follow these assembly instructions
Performance 2.0 Series
 Performance. Series Warning: Excessive weight hazard! Warning: Excessive weight hazard! Use two or more people to move, assemble, or install cabinets and locker to avoid back injury. Do not leave children
13243 INSTALLATION INSTRUCTIONS
 INSTALLATION INSTRUCTIONS Safety glasses should be worn at all times while installing this product. YEARS: 0 MAKE: LAND ROVER MODEL: RANGE ROVER SPORT STYLE: SUV WARNING: NEVER EXCEED YOUR VEHICLE MANUFACTURER'S
DOREL ASIA KIDDY TABLE & CHAIR SET NEED HELP! Model No.: DA6133 (Dry Erase Top) DA6227 (Chalkboard Top)
 DA6227 (Chalkboard Top)") DOREL ASIA KIDDY TABLE & CHAIR SET Model No.: DA6133 (Dry Erase Top) DA6227 (Chalkboard Top) UPC CODE: 0-65857-16120-5 Dry Erase Top 0-65857-16121-2 Chalkboard Top NOTE: THIS INSTRUCTION BOOKLET CONTAINS
DOREL ASIA KIDDY TABLE & CHAIR SET Model No.: DA6133 (Dry Erase Top) DA6227 (Chalkboard Top) UPC CODE: 0-65857-16120-5 Dry Erase Top 0-65857-16121-2 Chalkboard Top NOTE: THIS INSTRUCTION BOOKLET CONTAINS
INSTALLATION INSTRUCTIONS
 CREATING POSITIVE CUSTOMER EXPERIENCES INSTALLATION INSTRUCTIONS Universal Low Profile Tilt Mount for 42 to 63 Flat Panels NORTH AMERICA 3130 East Miraloma Avenue Anaheim, CA 92806 USA USA and Canada Phone:
HAINSWORTH WRITING DESK ASSEMBLY INSTRUCTIONS
 Item# BP-HSWD52-W8 HAINSWORTH WRITING DESK ASSEMBLY INSTRUCTIONS IF PARTS ARE MISSING OR DAMAGED, DO NOT RETURN TO STORE To order missing or replacement parts, contact us via e-mail parts@officestar.net,
Full Motion TV Mount - 23" to 42" Installation and Operating Instructions
 Full Motion TV Mount - " to " Installation and Operating Instructions Full-motion/articulating universal LCD/Plasma TV wall-mount TV size: " - " Tilt angle: 0- degrees Max load capacity:00 lbs Wall distance:.75"
Stop! Read This Important Information.
 Stop! Read This Important Information. Stop, Do Not Proceed, Read This This door replacement kit is designed for the replacement of doors on a Supertop ONLY! This door will not work on any other style
Cosmopolitan Grand Hardware
 STEP BY STEP INSTALLATION INSTRUCTIONS Cosmopolitan Grand Hardware Wall Mount Single Rod Set Everything You Need Table of Contents Step 1 - Getting Started...3 Overview - Wall Mount Single Rod Set...4
PROTECT HOME & FAMILY LOCK IT UP WITH OUR ADVANCED PET DOOR SECURITY COVER INSTALLING YOUR NEW WATCHDOG SECURITY PET DOOR COVER TOOLS NEEDED
 PROTECT HOME & FAMILY LOCK IT UP WITH OUR ADVANCED PET DOOR SECURITY COVER INSTALLING YOUR NEW WATCHDOG SECURITY PET DOOR COVER WE ALWAYS RECOMMEND INSTALLING YOUR WATCHDOG SECURITY PET DOOR COVER ON THE
Everything. You Need. GeoMod Hardware. Step 1 Parts & Tools. Wall Mount. Brackets & Rod Chart. Care & Cleaning. A Smooth Set-Up.
 Step 1 Parts & Tools Brackets & Rod Chart Installation Instructions QTY QTY WIDTH 1 2 24" 48" SCREWS (3 PER ) 1 2 481/8" 72" 1 3 721/8" 96" 2 4 *961/8" 108" 2 4 *1081/8" 144" 2 5 *1441/8" 192" GeoMod Hardware
Flat Sheer Shade owner's handbook
 Flat Sheer Shade owner's handbook INSTALLATION INSTRUCTIONS Step 1. Check Package Contents Mounting hardware kit includes the following: Part a.mounting Brackets Quantity 2 for shades up to 45 wide 3 for
11431 INSTALLATION INSTRUCTIONS
 INSTALLATION INSTRUCTIONS Safety glasses should be worn at all times while installing this product. YEARS: 0-PRESENT MAKE: FORD MODEL: FOCUS ST STYLE: HATCHBACK WARNING: NEVER EXCEED YOUR VEHICLE MANUFACTURER'S
Everything SINGLE BRACKET
 Parts & Tools Brackets & Rod Chart Installation Instructions QTY QTY WIDTH 1 2 24" 48" SCREWS (3 PER ) 1 2 481/8" 72" 1 3 721/8" 96" 2 4 *961/8" 108" 2 4 *1081/8" 144" *Note: Width determines if rod comes
INSTALLATION INSTRUCTIONS
 1300 YEARS: 014-PRESENT 018-PRESENT Safety glasses should be worn at all times while installing this product. INSTALLATION INSTRUCTIONS MODEL: HIGHLANDER RX350L/RX450hL MAKE: TOYOTA LEXUS STYLE: SUV WARNING:
BOUNCE TABLE TENNIS TABLE & ACCESSORIES ASSEMBLY INSTRUCTIONS
 BOUNCE TABLE TENNIS TABLE & ACCESSORIES ASSEMBLY INSTRUCTIONS NG2325 THANK YOU! Thank you for your purchase of our product. We work around the clock and around the globe to ensure that our products maintain
Wall Mounting Bracket
 OWNER S MANUAL Wall Mounting Bracket Please read this manual carefully before operating your set and retain it for future reference. LSW100B LSW100BG P/NO : MFL63640503 (1101-REV03) www.lg.com * 1 Year
ASSEMBLY INSTRUCTION FOR WYTHE BURLED WOOD BAR
 ASSEMBLY INSTRUCTION FOR WYTHE BURLED WOOD BAR IMPORTANT SAFETY INSTRUCTIONS: Please read all instructions carefully before assembling. For your safety, assembly by two or more adults is strongly recommended.
Cosmopolitan Grand Hardware
 STEP BY STEP INSTALLATION INSTRUCTIONS Cosmopolitan Grand Hardware Wall Mount Single Corner Rod Set Everything You Need Table of Contents Step 1 - Getting Started...3 Overview - Wall Mount Single Corner
Full Motion Gas Spring TV Wall Mount - 24" to 55" Installation Instructions
 Full Motion Gas Spring TV Wall Mount - 24" to 55" Installation Instructions 04-1102A Caution Prior to installation of this product, the installation instructions should be read and completely understood.
INS T A L L A TIO N INS T R U C TIO N S. Ceiling Mount Track System
 Ceiling Mount Track System 10.26.2016 Specifications Ceiling Post: Unassembled 2-7/8 Assembled 1-11/16 7/8 7-9/16 5-7/8 3/8 2 Tubes 1/2 2-3/8 5 Parts and Tools Tools Needed Tape Measure Pencil Drill with
DOREL ASIA COUNTER HEIGHT DESK NEED HELP! Model No: WM3514 UPC CODE:
 DOREL ASIA COUNTER HEIGHT DESK Model No: UPC CODE: 0-65857-15762-8 NOTE: THIS INSTRUCTION BOOKLET CONTAINS IMPORTANT SAFETY INFORMATION. PLEASE READ AND KEEP FOR FUTURE REFERENCE. Lot number: (TAKEN FROM
Installation Instructions For Custom Roman Shades
 Roman Shade Installation Guide Installation Instructions For Custom Roman Shades Step 1. Check Package Contents Missing part? Call 800-264-1190 Mounting hardware kit includes the following: Part Quantity
Tilting & Swiveling Plasma/LCD Flat Panel Wall Mount Installation Guide Model: A380SM
 Tilting & Swiveling Plasma/LCD Flat Panel Wall Mount Installation Guide Model: A380SM Easy installation Built-in level for easy positioning Corrective leveling adjustments after installation Forward /
Full-Motion TV Mount - 47" to 90" Installation Guide
 Full-Motion TV Mount - 47" to 90" Installation Guide Full-motion Articulating LCD/Plasma TV Wall-mount TV size: 47" - 90" Tilt angle: +/- 12 degrees Max load capacity: 200 lbs / 90 kg Wall distance (at
Owner s Manual. FT100X. 4ft Folding Football Table. Manual version 2.1
 Owner s Manual. FT100X 4ft Folding Football Table www.viavito.com Manual version 2.1 Congratulations on purchasing your very own FT100X Folding Football Table You have chosen a high-quality, safe and innovative
Worktop INDEX eight Capacity Unpacking
 Pro.0 Series Warning: Excessive weight hazard! Use two or more people to move, assemble or install cabinets and locker to avoid back injury. Do not leave children unattended near cabinets. High risk of
INSTALLATION INSTRUCTIONS
 INSTALLATION INSTRUCTIONS P4263F Universal Low Profi le Flat Mount for 42 to 63 Flat Panels NORTH AMERICA 3130 East Miraloma Avenue Anaheim, CA 92806 USA USA and Canada Phone: 1.800.368.9700 Fax: 1.800.832.4888
PRODUCT DESCRIPTION Camille Gents Wardrobe H183 x W96.5 x D52cm
 PRODUCT DESCRIPTION Camille Gents Wardrobe H183 x W96.5 x D52cm DEAR CUSTOMER Thank you for purchasing your new piece of furniture from Dunelm. We put a lot of effort in the design and construction of
Installation Instructions Hustler Collinear Two Meter Fixed Station Antenna Master Gainer Model G6-144B
 Installation Instructions Hustler Collinear Two Meter Fixed Station Antenna Master Gainer Model Warning INSTALLATION OF THIS PRODUCT NEAR POWER LINES IS DANGEROUS. FOR YOUR SAFETY, FOLLOW THE INSTALLATION
AM95 Installation Guide
 1321 S. State College Blvd., Fullerton, CA 92831 USA Included Components: Maximum Flat Panel Weight: 95 lb. / 43.1 kg. M4 X 25mm M5 X 25mm M6 X 12mm (Qty 2) M6 X 25mm M8 X 25mm Allen Key Plastic Cover
DANVER MOBILE KITCHEN CART AND COCINA ASSEMBLY INSTRUCTIONS PARTS LIST Description Qty. A. Top* 1 B. Front/Back Skirt 2 C. Towel Bar Skirt** 1 D. Uten
 DANVER MOBILE KITCHEN CART AND COCINA ASSEMBLY INSTRUCTIONS PARTS LIST Description Qty. A. Top* 1 B. Front/Back Skirt 2 C. Towel Bar Skirt** 1 D. Utensil Hanger Skirt 1 E. Legs 4 F. Shelves 2 G. Towel
Owner s Manual. PT100X. Folding Pool Table. Manual version: 2.1
 PT100X Folding Pool Table Owner s Manual. Manual version: 2.1 Congratulations on purchasing your very own PT100X Folding Pool Table You have chosen a high-quality, safe and innovative product, and we are
COPPER / FIBER MANAGER RACK INSTALLATION INSTRUCTIONS PX Standard Release A March 2008
 COPPER / FIBER MANAGER RACK INSTALLATION INSTRUCTIONS PX101425 Standard Release A March 2008 A UPON RECEIPT OF YOUR Copper / Fiber Manager Rack Great care has been taken to insure that your Copper / Fiber
Should you experience any missing or damaged parts, do not return to the store. Please contact us directly at
 Congratulations! You have purchased a stylish piece of Crosley Furniture. We strive to provide fine furniture products, built with quality materials and hand finished details. Please carefully follow the
6 Drawer Dresser. Style #: Lot: Date:
 Read all instructions before assembly and use. KEEP INSTRUCTIONS FOR FUTURE USE. ADULT ASSEMBLY REQUIRED Due to the presence of small parts during assembly, keep out of reach of children until assembly
INSTALLATION INSTRUCTIONS
 YEARS: 0 Safety glasses should be worn at all times while installing this product. INSTALLATION INSTRUCTIONS MAKE: CHEVROLET MODEL: SPARK STYLE: HATCHBACK WARNING: NEVER EXCEED YOUR VEHICLE MANUFACTURER'S
PFW 6875 Installation Guide Installationsanleitung, Guía de Instalacíon, Guida de Installazione, Guide d Installation, Installatie gids
 Maximum Flat Panel Weight: 160 lb. / 72.57 kg. Included Components Wall Mount (Qty 1) Extension Brackets (Qty 2) Bracket (Qty 1 Pair) 5/16 Flat Washers (Qty 4) Universal Spacers (Qty 8) M5 Allen Driver
Swing Gate Fits opening size 62cm to 102cm
 Superior Swing ate Fits opening size 62cm to 102cm IMPORTANT! READ AND FOLLOW TESE INSTRUCTIONS CAREFULLY AND EEP FOR FUTURE REFERENCE This product complies with EN1930:2011 Standard. AFTER SALES SUPPORT
HO610500TX Rymark Corner Wall Mount Desk
 HO610500TX Rymark Corner Wall Mount Desk Assembly Instructions For assistance with assembly contact: Southern Enterprises Inc. Customer Service 1-800-633-5096 service@seidal.com www.seifurniturestore.com
ASSEMBLY INSTRUCTIONS ITEM NO. D S
 ASSEMLY INSTRUTIONS ITEM NO. D435-60S MILO RETANGLE DINING TALE MILO DINING HAIR (SET INLUDES 4 HAIRS, ENH) This page lists all the contents included in the ox. Please take time to identify the hardware
THANK YOU FOR PURCHASING OUR STUDIO RTA PROJECT STATION
 THANK YOU FOR PURCHASING OUR STUDIO RTA MODEL# 50040 BLACK/MAPLE, 50042 PEWTER/CHERRY IF YOU REQUIRE ANY ASSISTANCE WITH ASSEMBLY, PARTS, OR INFORMATION ON OTHER PRODUCTS, PLEASE VISIT OUR WEBSITE: www.studiorta.com
DOREL ASIA FULL/QUEEN WOOD HEADBOARD. Model No.: WM3837Q UPC CODE:
 DOREL ASIA FULL/QUEEN WOOD HEADBOARD Model No.: UPC CODE: 0-65857-15661-4 NOTE: THIS INSTRUCTION BOOKLET CONTAINS IMPORTANT SAFETY INFORMATION. PLEASE READ AND KEEP FOR FUTURE REFERENCE. Lot number: (TAKEN
Installation Instructions
 Installation Instructions Curved Glass Screen Installation Instructions Important Information Please read these instructions carefully before starting installation and keep for future reference. Remove
Installation Instruction
 Tools Needed for Assembly Stud finder (for wood stud wall) Pencil Mark Electric drill Wood Stud Wall Installation Step 1. Locate the Wood Studs Installation Instruction Drill bit (for wood stud wall) Masonry
Balishutters. INSTALLATION guide FOR L-FRAME MOUNT INSTALL OPTIONS B OR C
 Balishutters INSTALLATION guide FOR L-FRAME MOUNT INSTALL OPTIONS B OR C Tools needed for installation Drill Phillips bit 1/8" drill bit 4. Hammer (preferably hard plastic) 5. Level 6. Phillips-head screwdriver
Storage Island. M3x25 Wood Screw for Side Panels 4 pcs. (+1 extra) Adjustable Pin 12 pcs. (+1 extra)
 Adjustable Pin 12 pcs. (+1 extra)") IMPORTANT 88 5531 923 Storage Island Carefully remove all the parts from the carton and place them individually on a soft cloth to prevent scratches or other damage. Carefully and strictly follow these
IMPORTANT 88 5531 923 Storage Island Carefully remove all the parts from the carton and place them individually on a soft cloth to prevent scratches or other damage. Carefully and strictly follow these
Installation Instructions
 Installation Instructions Bespoke Glass Design In A Box Typical Installation Guidance Installation Instructions Important Information Please read these instructions carefully before starting installation
Office Partitions WARNING. Assembly Instructions. Customer Service A S S E M B LY HARDWARE H1 H2 H3 H4 H5 H8 H9 H10 H11 H12
 Customer Service 1-800-645-2986 Assembly Instructions WARNING In order to prevent structural failure, instability, t i p - o v e r, and/or serious injury, please follow i n s t ructions care f u l l y.
ASPEN OUTDOOR TABLE TENNIS
 ASPEN OUTDOOR TABLE TENNIS Replacement Parts Order direct at or call our Customer Service department at (800) 225-7593 8 am to :30 pm Central Standard Time January 201 UPC Code 7-19265-51830-3 Staple your
J. Shelf 4 pcs. L. Door. K. Door. 1 pc. Magnet. 2 pcs. Adjustable Pin. 16 pcs. (+1 extra)
") 88 5523 61 Buffet IMPORTANT Carefully remove all the parts from the carton and place them individually on a soft cloth to prevent scratches or other damage. Carefully and strictly follow these assembly
88 5523 61 Buffet IMPORTANT Carefully remove all the parts from the carton and place them individually on a soft cloth to prevent scratches or other damage. Carefully and strictly follow these assembly
INSTRUCTION BOOK FOR. Parallax 0.8 Screen
 INSTRUCTION BOOK FOR Parallax 0.8 Screen Included Hardware Large Wall Bracket (47" Long) Installation screws not included Quantities vary by screen size: Screens 80" and smaller viewing width = 1 Screens
THIS PRODUCT IS NOT INTENDED FOR INSTITUTIONAL OR COMMERCIAL USE. COLOR
 BENTLEY 6 DRAWER DRESSER READ ALL INSTRUCTIONS BEFORE ASSEMBLY AND USE. KEEP INSTRUCTIONS FOR FUTURE USE. ADULT ASSEMBLY REQUIRED DUE TO THE PRESENCE OF SMALL PARTS DURING ASSEMBLY, KEEP OUT OF REACH OF
Dual Arm Tilt LCD Mount
 Installation Manual model # 51324 M o u n t i n g S y s t e m s Dual Arm Tilt LCD Mount Fits Displays 13 to 32 Supports Up to 50 lbs (23 kgs) Projection from Wall from 3 to 17 Meets VESA Standards 50/75/100,
STOP. Performance Plus 2.0 Series. hazard! ATTENTION: Is your cabinet damaged?
 Performance Plus. Series Warning: Excessive Warning: Excessive weight hazard! weight hazard! Use two or more people to move, assemble, or install cabinets and locker to avoid back injury. Do not leave
THIS PRODUCT IS NOT INTENDED FOR INSTITUTIONAL OR COMMERCIAL USE. Style #: Lot: Date:
 Read all instructions before assembly and use. KEEP INSTRUCTIONS FOR FUTURE USE. ADULT ASSEMBL REQUIRED Due to the presence of small parts during assembly, keep out of reach of children until assembly
Assembly Instructions & User s Manual 6 Piece Folding Dining Set FSMVPT2084
 & User s Manual 6 Piece Folding Dining Set FSMVPT2084 Please keep this instruction manual for future reference Customer Service: (888) 922-2336 7:00 am to 12:00 am CST (daily) Live Chat at: www.academy.com
MANCHESTER VANITY BASE
 MANCHESTER VANITY BASE INSTALLATION INSTRUCTIONS Questions? Call our customer service department at 1-855-995-5578, 8:30 a.m. - 5 p.m., EST, Monday - Friday or e-mail: contactus@magickwoods.com. Models:
SHOWER SCREEN INSTALLATION GUIDE WET ROOMS MADE EASY
 SHOWER SCREEN INSTALLATION GUIDE WET ROOMS MADE EASY IMPORTANT INFORMATION TOOLS & PARTS REQUIRED Please read these instructions carefully before starting installation and keep for future reference. Remove
Video Wall Installation Instructions 2W X 3H, 3W X 3H
 Video Wall Installation Instructions 2W X 3H, 3W X 3H www.microndisplaysolutions.com Table of Contents Important Safety Instructions... 3 Configuration... 4 Package Contents, included and optional items...
VANITY CABINET + MIRROR VANITY SET: LV1-30 INSTALLATION INSTRUCTIONS. Version 1.1
 INSTALLATION INSTRUCTIONS Version 1.1 READ ALL INSTRUCTIONS BEFORE UNPACKING THE PRODUCT 2 PEOPLE ARE REQUIRED TO LIFT AND DURING ENTIRE INSTALLATION OF THIS PRODUCT INSTALLATION OF LESSCARE PRODUCTS BY
INSTALLATION INSTRUCTIONS CJ-5 M38A PART # With Doors
 INSTALLATION INSTRUCTIONS CJ-5 M38A1 1955-1975 PART #109-011 With Doors Thank you for purchasing Specialty s Convertible Top for your Jeep vehicle. It has been designed for great fit and long wear. Please
Maintenance and other important non-personal injury and non-material damage instructions or statements that should be observed.
 VIGO INDUSTRIES INSTALLATION GUIDE FOR SHOWER ENCLOSURE ()! SAFETY PRECAUTIONS This Installation Guide uses the following symbols to indicate important information. Always observe the instructions indicated
Half Door Installation Instructions
 Half Door Installation Instructions For: CJ5 (1955-1975), CJ6 (All), M38-A1 (1955-1971) Part Number: 53025 Congratulations on your purchasing decision. Bestop designed these Doors to give you years of
ROCKWELL. Two Panel Door. Half X Door. Double X Door. Z Combination Door
 ROCKWELL 4 in 1 DOOR Choose between four door styles with this Door Kit. Our versatile Rockwell Door Kit is very easy to assemble. All materials and hardware needed to assemble any of the four styles are