BARCLAY SPIRAL STAIRCASE SPECIFICATIONS
|
|
|
- Buck Atkinson
- 6 years ago
- Views:
Transcription
1

2 BARCLAY SPIRAL STAIRCASE Congratulations on your purchase of our Barclay 5' Spiral Staircase! Modeled on the structure of a staircase salvaged from a paper mill in the Ottawa Valley, the Barclay's decorative details are similar to much of the cast iron decoration that appeared in commercial stairways during the middle of the 19th century. The tread surface is solid with a deep embossed pattern that imitates the riser design. The Barclay is strong and heavy and very rigid giving a structurally sound spiral staircase. Each complete riser is composed of three castings which bolt together to create an elegant yet substantial structure. The staircase is supplied in kit form compromising of treads, risers, side panels, balusters, handrail, and centre pole. The complete staircase includes an extended top tread bolting to the landing, a centre pole ball, and an end scroll for the lower end of the handrail. All hardware is included. For full assembly instructions, please flip page. SPECIFICATIONS Diameter: 5' (1524mm) Clockwise Ascending Stair Rise: 8.125" (206mm) Weight: 85 lbs. (38.6 kg) per complete riser 0 0 Rotation: Each tread = ; 13 treads = 360 Standard Finish: Polyester Powder coat in Satin Black Premium Finish: Now available in Gun Metal Pewter & Dark Satin Bronze Legend A. Riser Panel B. Tread Panel C. Bottom Side Panel D. Side Panel E. Georgian Baluster F. Centre Pole A NOTE ABOUT BUILDING CODES Codes vary from across the country. Consult your local authority. Steptoe&Wife Antiques Ltd. guarantees the Steptoe TM staircase for materials only, there is no representation or warranty other than for the quality of the materials supplied. We are not responsible for incorrect or inappropriate installation. (F) CENTRE POLE 3rd RISER PANEL (E) GEORGIAN BALUSTER 2nd TREAD PANEL (D) SIDE PANEL 2nd RISER PANEL (B) TREAD PANEL (C) BOTTOM SIDE PANEL (A) RISER PANEL page one


 2. Slide the first riser over the pole and place in the starting position of the staircase.")


 7.")
3 BARCLAY SPIRAL STAIRCASE ASSEMBLY INSTRUCTIONS Stairs are supplied in kit form comprising of treads, risers, side panels, balusters, handrail, and centre pole. The complete staircase includes an extended top tread for bolting to the existing landing, centre pole, and end scroll for the handrail. 1. Install the Fabricated Spiral Landing to the top floor (if necessary). Place the pole in the exact centre of the well, this can first be done with a plumb line or simply place the centre pole in the groove of the landing. (Note: The pole can be rested on the surface of the floor, or set into concrete but this is not strictly necessary as all the weight of the staircase is taken on the bottom tread.) 2. Slide the first riser over the pole and place in the starting position of the staircase. Now slide the tread over the pole and rest it on the riser. Align the holes. The first bottom side panel fits under the outer edge of the tread. The hole in the side panel aligns with the riser panel. The three parts fasten by passing first bottom threaded rod through the holes. The first bottom riser must be raised slightly to secure the nut of the first baluster. 3. Slide the second riser over the pole and align the hole with the hole on the back edge of the first tread. Continue by sliding the second tread over the pole and positioning it in the same manner as the first tread. Similarly position the second side panel as the first. Be sure to align the holes. The second baluster will fasten all 5 component parts. 4. Continue building all the complete risers in this fashion until the full height of the staircase is achieved. 5. The extended top tread is bolted to the landing above securing the staircase in position. The staircase can be supported during the building operation with supports under the treads or by someone holding the centre pole vertical. 6. The handrail may now be screwed to the bottom baluster. (see handrail instructions) 7. When the handrail has been fitted, tighten all the baluster nuts to create a completely rigid structure. Note A The matching handrail is supplied undrilled. The balusters are supplied with 12" x 1/2" threaded rods. Note B Centre Pole is capped to form a newel post for start of upper railing. Additional matching balusters may be used. Spacing is at your discretion. Each baluster has a saddle at the upper end for fitting to the handrail, and comes with a threaded rod or lag screw at the bottom. page two


 5.")

4 BARCLAY SPIRAL STAIRCASE ASSEMBLY INSTRUCTIONS: Install the Fabricated Spiral Landing to the top floor and place the pole in the exact centre of the well 2. Slide the first riser over the pole and place in the starting position. Then slide the tread followed by the bottom side panel. Secure with first baluster. 3. When reached the top, bolt the top tread to the landing above, holding the staircase in position The handrail may now be screwed to the bottom baluster (see handrail instructions) 5. Adjust the second balusters to ensure it is vertical and screw it to the handrail. Proceed with third balusters (if necessary) 6. Tighten the nuts on the bottom of the balusters. Install end scroll & finial ball, and proceed with necessary railing. page three


 5.")


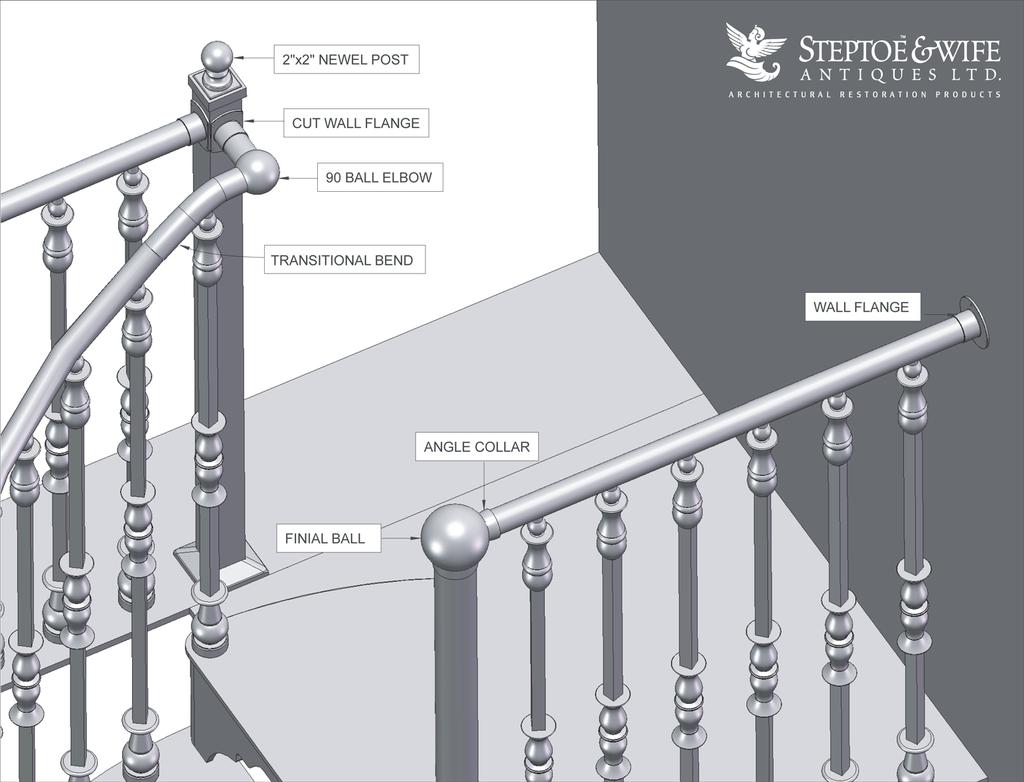
5 TUBULAR SPIRAL HANDRAIL ASSEMBLY INSTRUCTIONS COMPONENTS: Curved sections of tubular handrail (Brass/Steel) Internal Splicing Tube to connect curved handrail sections. Cover Band to cover the gap between the handrail sections. 1. Balusters should only be hand tightened to permit ample movement. 2. Lay the first section of handrail on the baluster saddles. You want to make sure the curve and pitch follow the staircase. Each section will cover 6-7 risers. 3. Screw the first baluster on each tread into the handrail, making sure that you leave 6"-8" extension beyond the first baluster. 4. With the next section of handrail make sure the connection into the first section is a smooth transition. You may need to cut the handrail to make this happen. (extra handrail is always provided) 5. Insert the splicing tube into the second section of handrail. Remember to slide the cover band on before connecting the sections together. Continue to attach the first baluster on each tread. (if you are installing more than one baluster per tread, attach the handrail to all the first balusters on the tread, then all the second, then all the third). 6. The first balusters are then tightened at the acorn nut after the saddles are secure. 7. Attach the end scrolls or transitional bend following the completion of the handrail. Some filing may be required to remove burrs on the inside of the handrails. Note: THE SPIRAL HANDRAIL IS A LARGE SPRING HELD IN PLACE UNDER SOME TENSION. A LITTLE MUSCLE MAY BE REQUIRED. IF EXTENSION RAILINGS ARE RUNNING FROM THE CENTRE POLE, AN ANGLE COLLAR IS SUPPLIED. THIS WILL ATTACH TO THE FINIAL BALL. BE SURE TO ATTACH THIS BEFORE SLIDING THE FINIAL BALL ONTO THE CENTRE POLE. (FLIP TO BACK FOR ANGLE COLLAR ASSEMBLY) page four

6 TUBULAR SPIRAL HANDRAIL ANGLE COLLAR ASSEMBLY DRILL HOLE IN FINIAL BALL NUT 1.5 " HANDRAIL ANGLE COLLAR CENTRE POLE page five
Fortress Railing Overview ACTUAL FREIGHT CHARGES APPLY TO ALL FORTRESS RAIL ORDERS
 Fortress Railing Overview 4 3 1 Fe 26 Iron Railing Systems Fortress Use the steps below for the following pages to complete your rail Vertical Cable and Glass Options Available Fortress Iron Railing System
Determine the proper ground fixing stair position, by using, as a reference, the landing tread [Fig. 7].
![Determine the proper ground fixing stair position, by using, as a reference, the landing tread [Fig. 7].](/thumbs/82/86224479.jpg "Determine the proper ground fixing stair position, by using, as a reference, the landing tread [Fig. 7].") METAL SPIRAL STAIR MOUNTING INSTRUCTIONS - ENGLISH - PRELIMINARY OPERATIONS Prior to fitting your staircase, please check the packaging content. You then place all components onto a wide surface in order
METAL SPIRAL STAIR MOUNTING INSTRUCTIONS - ENGLISH - PRELIMINARY OPERATIONS Prior to fitting your staircase, please check the packaging content. You then place all components onto a wide surface in order
Spiral Stairs Endeman s Ironcraft Ltd PH/FAX:
 Spiral Stairs-2014 Endeman s Ironcraft Ltd PH/FAX:519-941-2876 info@endemansironcraft.com www.endemansironcraft.com Our Stairs Endeman s Ironcraft Ltd manufactures custom interior and exterior spiral staircases.
Salter Industries Spiral Stair
 Salter Industries Spiral Stair The Leader in Spiral Staircases Continuous Sleeve Stair Installation Instructions TOOLS NEEDED: 1. Electric drill with hex chuck and Phillips bit 2. Drill bits 1/8", 1/4",
This manual will aid in the assembly of the FireBall V90 and FireBall X90. The assembly of both machines will be identical, unless specified.
 This manual will aid in the assembly of the FireBall V90 and FireBall X90. The assembly of both machines will be identical, unless specified. Step #1 Lay all parts out to verify quantities. (2) 2 x 25-1/4
Installation of Balustrade Systems
 Installation of Balustrade Systems IMPORTANT: Be sure to mark the center point of each newel post's location prior to installation to insure proper spacing. All product interfaces must use PL Premium Adhesive
Stair Parts Installation. Tricks
 Stair Parts Installation Tips & Tricks Introduction Your DIY staircase guide Welcome to the Stairpart home installation guide. Your stairway is both a functional and focal point in your home, so keeping
AXXYS Stairparts Fitting Instructions
 These Fitting Instructions are for use with the AXXYS range with metal balusters within B&Q These instructions are not for use with any other ranges outside the AXXYS range. If you are using our glass
A Step-by-Step How To Guide
 HOW TO REMODEL YOUR STAIR A Step-by-Step How To Guide Add new life to your staircase and achieve professional results. 1 Renovating your staircase is more than a remodel, it s a transformation of your
Shetland Stalls Installation Instructions
 Shetland Stalls Installation Instructions RAMM Horse Fencing and Stalls 13150 Airport Hwy. Swanton, OH 43558-9615 1-800-434-8456 Rev. 1/9/18 Before you start Kit can accommodate up to 12 wide stall front
Continuous Handrail Kit Installation Instructions
 Continuous Handrail Kit Installation Instructions ALUMINUM RAILING SYSTEM Canadian Version Wall Application (see page 2) Railing Application (see page 7) Wall anchors not provided Hardware included: 1x
Graz. Flexible modular staircase
 Attic ladders Space saving staircases Modular staircases Spiral staircases Graz Flexible modular staircase Main staircases Metal support Rise Treads Shape Banister Height Packaging Grey (RAL 9007) 18,5-22,5
CONTENTS TOOL LIST U P S I D E I N N O V A T I O N S, L L C RAMP AND STEP SYSTEM ASSEMBLY INSTRUCTIONS. Revised: June 2013
 U P S I D E I N N O V A T I O N S, L L C RAMP AND STEP SYSTEM ASSEMBLY INSTRUCTIONS TOOL LIST Required Tools: - Reciprocating Saw with Metal Cutting Blade - Drill - 7/16 Drill Bit for Metal Drilling -
INSTALLATION INSTRUCTIONS INS T A L L A TIO N INS T R U C TIO N S ROD IRON SCROLL HANGER R H
 INS T A L L A TIO N INS T R U C TIO N S ROD IRON SCROLL HANGER 10.5.2016 2-1- 3/16" 11/16" 8" 8 O 2-7/8 Ø2-7/8" 3-1/2 3-1/2" 12-9/16 12-9/16" PLEASE NOTE: These instructions are specific to a particular
Mount to the Wall INSTALLATION MANUAL
 Mount to the Wall 15 Locate the Wooden Studs This step applies to wooden stud wall installation only. Determine and mark the exact locations of two stud centers on the wall. Wooden studs should be spaced
Balustrade Systems / Installation Instructions
 A. PARTS AND SUPPLIES NEEDED FOR INSTALLATION Hardware included for each 10 section of rail: 2 3 x 1-1/2 L-brackets 4 1-3/4 x 3/16 Blue hex-head screws for anchoring the L-brackets to the newel cap, column
Clearview Railing System Installation Instructions
 Clearview Railing System Installation Instructions Disclaimer: AGS Stainless, Inc. has its Clearview Railing Systems designed by a professional engineer to meet the requirements of the latest national
LOFT DOOR HANGER BARN DOORS & HARDWARE. Hardware Installation Instructions. Page
 LOFT DOOR HANGER Page 1 Specifications 2 7/16" 3/8" 1-1/2 1-3/4 Ø3 3 7/8" 11-1/16 Page 2 Parts and Tools Tools Needed Tape Measure Pencil Drill with 1/8, 1/4 and 3/8 bits, 1 spade bit and Phillips bit
ROCKWELL. Two Panel Door. Half X Door. Double X Door. Z Combination Door
 ROCKWELL 4 in 1 DOOR Choose between four door styles with this Door Kit. Our versatile Rockwell Door Kit is very easy to assemble. All materials and hardware needed to assemble any of the four styles are
PARTS INCLUDED IN FIXED STAIR CABLE RAIL KIT:
 175 SERIES FIXED STAIR CABLE RAIL - INSTALLATION INSTRUCTIONS PARTS INCLUDED IN FIXED STAIR CABLE RAIL KIT: FIXED STAIR TOP RAIL (1) A FIXED STAIR BOTTOM RAIL (1) B D UPPER SADDLE BRACKET (1) C BRACKET
x2 1/4 (6mm) Floor Anchor
 Floor Anchor") INSTALLATION GUIDE Main Components x1 Rail x5 Wall Spacer x2 Anti-jump Block x2 Straight Strap x1 Right Stopper x1 Left Stopper x5 5/16 (8mm x 60mm) Carriage Bolt x5 5/16 (8mm x25mm) Anchor x5 5/16 (8mm
INSTALLATION GUIDE Main Components x1 Rail x5 Wall Spacer x2 Anti-jump Block x2 Straight Strap x1 Right Stopper x1 Left Stopper x5 5/16 (8mm x 60mm) Carriage Bolt x5 5/16 (8mm x25mm) Anchor x5 5/16 (8mm
Heavy-Duty Bypass Track System
 Heavy-Duty Bypass Track System Please Note: This track system must be installed with the screws going into a solid surface such as studs or a header. Due to the spacing of the holes on these Brackets,
TREX ENHANCE RAILING (Also Applies to Trex Select Railing) Installation Instructions
 Installation Instructions") TREX ENHANCE RAILING (Also Applies to Trex Select Railing) NOTE: All Enhance Railing lengths are manufactured at CLEAR SPAN dimensions (spanning between space of posts): 7" for 6' clear span. Note that
TREX ENHANCE RAILING (Also Applies to Trex Select Railing) NOTE: All Enhance Railing lengths are manufactured at CLEAR SPAN dimensions (spanning between space of posts): 7" for 6' clear span. Note that
Straight Stringer Installation Instructions
 Straight Stringer Installation Instructions Floor-to-Wall Installation F L I G H T P L A N Unpack: What s included? Your Stringer Tread Screws (8) per tread (1) Torque Wrench (1) Socket (for the brackets
Build Outdoor Stairs. Stair Building Terms There are five basic design elements you'll need to consider when planning outdoor stairs:
 Build Outdoor Stairs Stair Building Terms There are five basic design elements you'll need to consider when planning outdoor stairs: The Total Run (Fig. 1) is the total horizontal distance covered by the
Open Up Your View With CABLE SYSTEMS
 Open Up Your View With CABLE SYSTEMS PRESENTED BY CROWN HERITAGE Our Cable Multiple options to accomodate any deck or stair design Marine Grade 316 stainless steel Swaging is the term used for attaching
ATLANTIS RAIL Contact Information
 ATLANTIS RAIL Contact Information Customer Service (800) 541-6829 (508) 732-9191 Spectrum System Installation Instructions Atlantis Rail s Spectrum System is an easy to install, universal cable railing
Oxford Stalls Installation Instructions
 Oxford Stalls Installation Instructions RAMM Horse Fencing and Stalls 13150 Airport Hwy. Swanton, OH 43558-9615 1-800-434-8456 Rev. 8/15/17 Before You Start Typical stall sizes are 10 x 10, 12 x 12 or
GENERAL INSTALLATION GUIDE: WARRANTY: PRODUCT INFORMATION T F
 GENERAL INSTALLATION GUIDE: Unless otherwise indicated, all Seven Oaks M.U. Architectural Products materials are to be used for decorative purposes only. All products must be installed using ample amount
T A P N T W I S T INSTALLATION GUIDE
 T A P N T W I S T a dynamite way to install balusters INSTALLATION GUIDE T A P N T W I S T a dynamite way to install balusters Your Beautiful New Staircase is Just Steps Away! Tools You Need: Tape Measure
ASSEMBLY & INSTALLATION GUIDE
 ASSEMBLY & INSTALLATION GUIDE APPLICATION GM Truck (Full-size Trucks) PART # 74805-00A (Silver) 74805-0A(Black) INSTALLATION TIME Hour SKILL LEVEL 2 3 4 = Easy TOOLS REQUIRED Phillips screw driver Torx
x2 1/4 (6mm) Floor Anchor
 Floor Anchor") Main Components x1 Rail x5 Wall Spacer x2 Anti-jump Block x2 Bent Strap x1 Right Stopper x1 Left Stopper x5 5/16 (8mm x 60mm) Carriage Bolt x5 5/16 (8mm x25mm) Anchor x5 5/16 (8mm x 90mm) Wall Screw x2
Main Components x1 Rail x5 Wall Spacer x2 Anti-jump Block x2 Bent Strap x1 Right Stopper x1 Left Stopper x5 5/16 (8mm x 60mm) Carriage Bolt x5 5/16 (8mm x25mm) Anchor x5 5/16 (8mm x 90mm) Wall Screw x2
IMPORTANT: Read all sections before you start
 1 IMPORTANT: Read all sections before you start For the most up to date information please visit our website @ www.newtechwood.com Prior to installing the railing, please consult local zoning laws in regards
INSTALLATION INSTRUCTIONS PRAVOL DURA-SHIELD COMPOSITE DECK RAILINGS
 INSTALLATION INSTRUCTIONS PRAVOL DURA-SHIELD COMPOSITE DECK RAILINGS Important: Read all sections before you start Prior to installing railing, please consult local zoning laws in regards to load requirements
External Timber Stairs
 Terminology Stairs: An assembly of steps or flights including all necessary landings, balustrades etc. constructed for the easy, convenient and safe passage from one floor to another. Step: A combination
EASY POOL STEP (NE113)
") EASY POOL STEP (NE113) FOR USE WITH: EASY POOL STEP (NE113) (1 CARTON) EASY POOL STEP WITH OUTSIDE LADDER (NE126) EASY POOL STEP ENTRY SYSTEM (NE138) (With Gate) (4 CARTONS) Above are the options available
EASY POOL STEP (NE113) FOR USE WITH: EASY POOL STEP (NE113) (1 CARTON) EASY POOL STEP WITH OUTSIDE LADDER (NE126) EASY POOL STEP ENTRY SYSTEM (NE138) (With Gate) (4 CARTONS) Above are the options available
TREX SELECT RAILING Installation Instructions
 RAILING NOTE : All Trex Select Railing lengths are manufactured at ON CENTER dimensions (spanning from center of each post): 67-5/8" (76.8 cm) for 6' (.83 m) on center, and 9-5/8" (35.3 cm) for 8' (.44
SUREWOOD ~ LNL. How to build a staircase like a pro. Post-To-Post Staircase System. Identify Your Type of Post-to-Post Staircase: Landing Newel Post
 How to build a staircase like a pro. 1 Identify Your Type of Post-to-Post Staircase: Post-To-Post Staircase System Post Post SUREWOOD ~ LNL Rake Wall Rail Level Run Open Staircase with Square Top alusters
Desk/Wall-Mount Rack
 Desk/Wall-Mount Rack Patent(s) Pending Installation Instructions Post P/N: 119-1752 119-1781 119-1782 119-4014 Frame P/N: 119-1591 119-1754 119-1755 Kit Contents (2) Frames (4) Posts Assembly Hardware
Chapter 17 - Porch Trim
 Chapter 17 - Porch Trim Contents Chapter 17 - Porch Trim... 17-1 Timing & Prerequisites... 17-2 Trim on Porch Beams (Volunteer)... 17-4 Smart Trim on the Bottom of the Beam... 17-4 Smart Trim on the Inside
CABANA / PAVILION ASSEMBLY ALUMINUM FRAME MODELS
 Assembled cabanas are large & heavy. Assemble at place of use. CABANA / PAVILION ASSEMBLY ALUMINUM FRAME MODELS Step 1 CAUTION: To avoid damage to the finish of your Cabana frame, prepare a smooth, non-scratch
WAREHOUSE HANGER INSTALLATION INSTRUCTIONS R H INS T A L L A TIO N INS T R U C TIO N S
 INS T A L L A TIO N INS T R U C TIO N S WAREHOUSE HANGER NOTE: Due to the size and weight of the Warehouse Hanger it is recommended that this Hanger be installed on 3 4 or wider doors. 10.11.2016 2-3/16"
INSTALLATION INSTRUCTIONS INS T A L L A TIO N INS T R U C TIO N S THE MAVERICK HANGER R H
 INS T A L L A TIO N INS T R U C TIO N S THE MAVERICK HANGER 10.6.2016 PARTS INSTALLATION SPECIFICATIONS AND TOOLS INSTRUCTIONS 2-1/4" 2-7/8 11-3/8" 1/4" 2-1/8 PARTS INSTALLATION AND INSTRUCTIONS TOOLS
TREX SELECT RAILING. Installation Instructions PARTS
 RAILING NOTE : All Trex Select Railing lengths are manufactured at ON CENTER dimensions (spanning from center of each post): 67-5/8" (76.8 cm) for 6' (.83 m) on center, and 9-5/8" (35.3 cm) for 8' (.44
MM750 Installation Instructions
 MM750 Installation Instructions IMPORTANT SAFETY INSTRUCTIONS - SAVE THESE INSTRUCTIONS Please read this entire manual before you begin. Do not unpack any contents until you verify all requirements on
P a r k c o n s o l e s i n k a s s e m b l y i n s t r u c t i o n s
 P a r k c o n s o l e s i n k a s s e m b l y i n s t r u c t i o n s Before You Begin: Professional installation by two-person crew is required for this fixture. Install water supply and drain piping
PAK Drum Roll Top Assembly Instructions. Note: 2 people will be required to assemble roll top
 PAK901 4 Drum Roll Top Assembly Instructions Note: 2 people will be required to assemble roll top PLEASE READ ASSEMBLY INSTRUCTIONS CARFULLY Tools required: 5/8 Socket & Ratchet 9/16 Deep Well Socket &
CXT PRO RAILING INSTALLATION INSTRUCTIONS For Installations Using Aluminum and Glass Balusters Sold Separately
 CXT PRO RAILING INSTALLATION INSTRUCTIONS For Installations Using Aluminum and Glass Balusters Sold Separately CCRR-0171 PFS AA-652 Drill/power screwdriver Assorted drill bits Hammer Miter or circular
STAIRSERVICE.COM. Stair system design and selection catalog. A step ahead, a step above 1 (800) Fax (408)
 Fax (408)") STAIRSERVICE.COM A step ahead, a step above Stair system design and selection catalog. 1 (800) 940-1057 1545 Berger Drive San Jose, CA 95112 Fax (408) 920-0109 Sales@stairservice.com Step by step Design
STAIRSERVICE.COM A step ahead, a step above Stair system design and selection catalog. 1 (800) 940-1057 1545 Berger Drive San Jose, CA 95112 Fax (408) 920-0109 Sales@stairservice.com Step by step Design
Mobile Weapons Storage System Specifications
 Mobile Weapons Storage System Specifications Whatever your weapon storage needs, Hi-Density s customized Weapons Storage System will be designed to fit your unique specifications. We recognize that security
BARN DOOR HARDWARE KIT
 INSTALLATION GUIDE Main Components x1 Rail x5 Wall Spacer x2 Anti-jump Block x2 Bent Strap x1 Right Stopper x1 Left Stopper x5 5/16 (8mm x 60mm) Carriage Bolt x5 5/16 (8mm x25mm) Anchor x5 5/16 (8mm x
Chain Drive Vise. Installation Instructions. (revised 05/04/2016)
") Chain Drive Vise Installation Instructions (revised 05/04/2016) Lie-Nielsen Chain Drive Vise Instructions Table of Contents page About Your Chain Drive Vise 3 Parts List 4 Exploded Parts Diagram 5 step
Chain Drive Vise Installation Instructions (revised 05/04/2016) Lie-Nielsen Chain Drive Vise Instructions Table of Contents page About Your Chain Drive Vise 3 Parts List 4 Exploded Parts Diagram 5 step
Assembly Instructions for model: VMPR1
 Assembly Instructions for model: VMPR1 Congratulations on your purchase! The VMPR1 ceiling mount provides a unique, simplified method of ceiling mounting inverted LCD/DLP projectors. Its low profile design
PURE VIEW GLASS RAILING
 PURE VIEW GLASS RAILING SIMPLIFIED Gloss Black Aluminum (Preslotted & Full Glass), Iron (Preslotted) Limited Manufacturer Antique Bronze (Iron Preslotted) Lifetime Warranty White Aluminum (Preslotted &
F-5-1a. Concrete Bollards (Detail 1 of 2) WEIGHT: 166kg. WEIGHT: 227kg. WEIGHT: 113kg. WEIGHT: 212kg
 WEIGHT: 166kg. WEIGHT: 227kg. WEIGHT: 113kg. WEIGHT: 212kg") Contents F-5-1a Concrete Bollards F-5-1b Concrete Bollards F-5-2 Concrete Bollards with City Logo F-5-3 Cast Iron Bollards F-5-4 Decorative Steel Bollard F-5-5 Swivel P Gate Steel Bollard F-5-6 Steel Bollard
Contents F-5-1a Concrete Bollards F-5-1b Concrete Bollards F-5-2 Concrete Bollards with City Logo F-5-3 Cast Iron Bollards F-5-4 Decorative Steel Bollard F-5-5 Swivel P Gate Steel Bollard F-5-6 Steel Bollard
FIRST TEAM SPORTS, INC.
 FIRST TEAM SPORTS, INC. INVADER EZ-CRANK PORTABLE BASKETBALL GOAL ASSEMBLY INSTRUCTIONS Revised - 08/04/10 BILL OF MATERIALS (1) BASE TANK (1) BACKBOARD MOUNT (2) 5/16 X ¾ HEX BOLT (1) LOWER POST (2) SPRING
2-PIECE STAIRWAY ASSEMBLY
 REVISED 2/12/15 2-PIECE STAIRWAY ASSEMBLY STEP 1: LAY OUT THE RIGHT AND LEFT SIDE TOP AND BOTTOM RISER PANELS AS SHOWN IN FIGURE 1. BOLT THE SPLICE PLATE (#15114C for OSHA F SERIES; #15412C for BOCA U
STAIRCASE JIG P a g e 1 o f 9
 Unika Color Products Ltd. Unika House New York Way New York Industrial Park Newcastle Upon Tyne NE27 0QF Helpline Tel: 0191 2597876 STAIRCASE JIG P a g e 1 o f 9 Stair jig Contents 1. 12mm thick stair
The Festival Assembly Instructions
 The Festival Assembly Instructions Toll Free: 866.768.8465 Hours: 9-5 Monday-Friday EST www.homeplacestructures.com Package ships as shown CONTACT INFORMATION: HomePlace Structures 301 Commerce Drive New
TABLE OF CONTENTS REQUIRED TOOLS
 TABLE OF CONTENTS SECTION SECTION TITLE PAGE NO. 1 2 3 4 5 Assembling Mounting Structure Installing Bicycle Supports Mounting Rack to Wall Adding Sections Customizing Rack Configuration REQUIRED TOOLS
BRACKET FIX SYSTEM FITTING INSTRUCTIONS
 Whether building a new staircase or replacing old banisters, the patented Bracket Fix stair balustrading system will enable you to complete the work quickly and easily. The Richard Burbidge patented Bracket
Installation Instructions for. Handrail Component System
 Handrail STEP-BY-STEP Installation Instructions for Handrail Component System Rise in Inches Run in Inches 8 8.5 9 9.5 10 10.5 11 11.5 12 12.5 13 13.5 14 14.5 15 8.5 47 45 43 42 40 39 38 36 35 34 33 32
TELESCOPIC GATE MANUFACTURING AND INSTALLATION MANUAL.
 TELESCOPIC GATE MANUFACTURING AND INSTALLATION MANUAL. Telescopic gates have been manufactured for many years essentially in the same way they are largely today. In recent years hardware suppliers have
distinctive by design distributed by Leeper's Stair Products 2100 E. Artesia Blvd, Long Beach, CA (800) (562)
 (562)") Leeper's Stair Products 2100 E. Artesia Blvd, Long Beach, CA 90805. 1(800) 775-1173 1(562) 422-9916 info@usa-fusion.com www.usa-fusion.com a new concept in stair balustrading... Leeper s Stair Products
Leeper's Stair Products 2100 E. Artesia Blvd, Long Beach, CA 90805. 1(800) 775-1173 1(562) 422-9916 info@usa-fusion.com www.usa-fusion.com a new concept in stair balustrading... Leeper s Stair Products
Dublin Stalls Installation Instructions
 Dublin Stalls Installation Instructions RAMM Horse Fencing and Stalls 13150 Airport Hwy. Swanton, OH 43558-9615 1-800-434-8456 Rev. 9/13/17 Part Identification Round Track Bracket (4) (Not Painted) Round
ROCKWELL 4-IN-1 DOOR. Two Panel Door. Half X Door. Z Combination Door. Double X Door
 ROCKWE 4-IN-1 DOOR Two Panel Door Half X Door Double X Door Z Combination Door Choose between four door styles with this Door Kit. Our versatile Rockwell Door Kit is very easy to assemble. All materials
I N S T A L L A T I O N I N S T R U C T I O N S. RailEasy MARINER
 I N S T A L L A T I O N I N S T R U C T I O N S RailEasy MARINER Atlantis Rail Systems 2007 Atlantis Rail Mariner Installation Guide Atlantis Rail Systems December 2, 2008 Atlantis Rail Systems Contact
TO O L K IT. Public Bike Repair
 TO O L K IT Public Bike Repair The Dero Tool Kit includes all the necessary tools to perform most routine maintenance and adjustments on most bikes. All the tools are securely fastened with stainless steel
Balustrade System Installation - Cambridge & Huntington
 A. PARTS AND SUPPLIES NEEDED FOR INSTALLATION Hardware included for each 10 section of rail: 2 3 x 1-1/2 L-brackets 4 1-3/4 x 3/16 Blue hex-head screws for anchoring the L-brackets to the newel cap, column
Baby Grande or Grande Crank Shade with Cables and Housing Installation Instructions
 Baby Grande or Grande Crank Shade with Cables and Housing Installation Instructions Tools Needed Drill 3/8 Metal Drill Bit Screwdriver (Flat & Phillips) Measuring Tape Pencil 4 Level Plumb Line ¼ Masonry
LJ ⅝ (270 mm) LJ All above are 1 x 10½ or 11½ (25 mm x 267 mm or 292 mm)
 LJ All above are 1 x 10½ or 11½ (25 mm x 267 mm or 292 mm)") Starting Steps for use with Box Newels Our LJ-8030 and LJ-8050 steps are for use with any of our Box Newels. LJ-8030 Single Bullnose Starting Step LJ-8050 Double Bullnose Starting Step WALL LJ-8030 8⅞
Starting Steps for use with Box Newels Our LJ-8030 and LJ-8050 steps are for use with any of our Box Newels. LJ-8030 Single Bullnose Starting Step LJ-8050 Double Bullnose Starting Step WALL LJ-8030 8⅞
WIRE BALUSTRADE SYSTEMS Edition 1
 WIRE BALUSTRADE SYSTEMS Edition 1 2 Stainless Wire Cable hammersmith.com.au 1 x 19 316 grade stainless steel suitable for both interior and exterior application. Rigid, non flexible, minimum stretch. Higher
PARTS SIDE PLATE TOP MOUNT BLOCK BOTTOM MOUNT FIRST TREAD SUPPORT TREAD INTERMEDIATE PANEL UPPER CABLE BALUSTER INTERMEDIATE CABLE
 ARTS 1 2 3 BLOCK SIDE LATE TO MOUNT 4 5 6 BOTTOM MOUNT FIRST TREAD SUORT TREAD 7 8 9 LOWER ANEL BALUSTER INTERMEDIATE ANEL BALUSTER UER ANEL BALUSTER 10 11 12 LOWER CABLE BALUSTER INTERMEDIATE CABLE BALUSTER
Installation instructions for FC17 Forward Controls for Triumph Rocket III Roadster
 Installation instructions for FC17 Forward Controls for Triumph Rocket III Roadster It is highly recommended that you use a thread lock compound such as Loctite brand on all threads to keep them from vibrating
SECTION 19: Endwood Fusion Welded Gate Installation Guide
 SECTION 19: Endwood Fusion Welded Gate Installation Guide ASSEMBLY AND INSTALLATION FOR: Fusion Welded Gates Gate Frame with Full Size Pickets Privacy & Board on Board California & Shadowbox Gate width
MM540 Installation Instructions IMPORTANT SAFETY INSTRUCTIONS - SAVE THESE INSTRUCTIONS
 MM50 Installation Instructions IMPORTANT SAFETY INSTRUCTIONS - SAVE THESE INSTRUCTIONS Please read this entire manual before you begin. Do not unpack any contents until you verify all requirements on PAGE.
INSTALLATION SUGGESTIONS LEVEL APPLICATION LIMITED WARRANTY
 INSTALLATION SUGGESTIONS LEVEL APPLICATION LIMITED WARRANTY L.J. Smith, Inc. issues the following Limited Warranty: The product(s) furnished hereunder are warranted to be free from defects in material
Figure 1. RAILING INSTALLATION The following instructions describe the installation of three types of railing sections: Line, Stair, and Angled
 Veranda Railing System Veranda railing systems are designed to work with a number of different decking materials and surfaces. Before initiating any project, obtain a copy of your local building codes
A-SL-1 A-SL-1 HAND RAIL STAIRS STRUCTURE/ ARCH SLIDE FOUNDATION 12" ROUND PIER 20" SQUARE PIER CAP DRILL AND EPOXY BOLTS *SEE FOUNDATION DETAILS
 2X2 SQUARE TUBING /" WALL ON STRUCTURAL FRAME /8" WALL RAFTERS & INFILL NO. ISSUE HOUSE # GALVANIZED STEEL STAIRS SLIDE 2 GA SS POLISHED FINSHED LASER CUT FOUNDATION 2" ROUND PIER 20" SQUARE PIER CAP DRILL
Installation Instructions for. Before You Begin TOOLS REQUIRED
 Composite Railing System STEP-BY-STEP Installation Instructions for Spectrum Composite Railing Virtually maintenance free 20-year warranty EverNew Spectrum Railing system is designed to work with a number
Stag Hanger ASSEMBLY INSTRUCTIONS
 Stag Hanger ASSEMBLY INSTRUCTIONS STAG HANGER Recommended Tools Drill with 1/8, 1/4, and 3/8 Drill Bits, 1-1/8 Forstner Bit or 1-1/8 Spade Bit, and Phillips Bit 9/16 and 5/8 Combination Wrench Socket Wrench
The following instructions will guide you through the installation of your new vinyl railing stair kit.
 Installation Guide Vinyl Standard Stair Railing Tools Required Protective eye glasses Tape measure Variable speed drill/screwdriver Rotary hammer or hammer drill and masonry percussion bit recommended
Junglenastix. Instruction Manual. Technical Support: Riaan Prinsloo Do-It-Yourself Jungle Gym Kits
 Junglenastix Do-It-Yourself Jungle Gym Kits Instruction Manual Technical Support: Riaan Prinsloo 0828039217 Thank you for choosing Junglenastix as your way to make a very positive contribution to your
SUREWOOD ~ LNL. How to build a staircase like a pro. Post-To-Post Staircase System. Identify Your Type of Post-to-Post Staircase: Landing Newel Post
 How to build a staircase like a pro. 1 Identify Your Type of Post-to-Post Staircase: Post-To-Post Staircase System Post Post SUREWOOD ~ LNL Wall Rail Square Top alusters Shoe rail Open Staircase with Square
Contour Hanger ASSEMBLY INSTRUCTIONS
 Contour Hanger ASSEMBLY INSTRUCTIONS CONTOUR HANGER Recommended Tools Drill with 1/8, 1/4, and 3/8 Drill Bits, 1-1/8 Forstner Bit or 1-1/8 Spade Bit, and Phillips Bit 9/16 and 5/8 Combination Wrench Socket
PORCH-LOC INSTALLATION INSTRUCTIONS
 PORCH-LOC INSTALLATION INSTRUCTIONS 2017 HB&G Building Products, Inc. Porch-Loc Installation Instructions NOTE: DISCARD THE INSTALLATION INSTRUCTIONS AND HARDWARE THAT CAME IN YOUR PERMAPOST PACKAGING
Industrial Hanger ASSEMBLY INSTRUCTIONS
 Industrial Hanger ASSEMBLY INSTRUCTIONS INDUSTRIAL HANGER Recommended Tools Drill with 1/8, 1/4, and 3/8 Drill Bits, 1-1/8 Forstner Bit or 1-1/8 Spade Bit, and Phillips Bit 9/16 and 5/8 Combination Wrench
Spoked GARRICK HANGER
 Spoked GARRICK HANGER ASSEMBLY INSTRUCTIONS SPOKED GARRICK HANGER Recommended Tools Drill with 1/8 and 1/4 Drill Bits, 1-1/8 Forstner Bit or 1-1/8 Spade Bit, and Phillips Bit 9/16 and 5/8 Combination Wrench
INSTALLATION INSTRUCTIONS FOR HAND OPERATED MODELS: 170, 171-R, 171-N, 172, 260
 INSTALLATION INSTRUCTIONS FOR HAND OPERATED MODELS: 170, 171-R, 171-N, 172, 260 I. SUSPENDED INSTALLATIONS NOTE: MODEL 260 FENSTEEL TRACK IS ASSEMBLED IN THE SAME MANNER AS DESCRIBED BELOW WITH THE EXCEPTION
STAIR PARTS SECTION 2 INDEX. hhmillworks.com
 hhmillworks.com 1937 Troup Valley Road Mt. Pleasant Mills, PA 17853 570-539-2611 800-326-9873 Fax 570-539-2379 800-718-4463 STAIR PARTS SECTION 2 INDEX Product Page Effective Date Revised Date Pre-finishing
Ready To Go SimpleSpec tm. Installation Manual. For more information, please visit 3-form.com or call
 Contents Overview ( 1) 3/8" Varia Panel = Cable Tensioner with Cover Plate KIT Stainless Steel: 3-15-1636-K Black Oxide: 3-15-2005-K Cable Tensioner with Cover Plate SS: 3-15-1636 BO: 3-15-2005 + M8 Thread
AQUA DELUXE Slide Instructions
 AQUA DELUXE Slide Instructions Please read the entire instruction before beginning installation. Watch the video at www.poolslide.com If you call us, please use these names to describe these parts. Barrier
LOWLINE SINGLE FOLD DOWN WALL BEDS
 ASSEMBLY INSTRUCTIONS LOWLINE SINGLE FOLD DOWN WALL BEDS Tools Required For Assembly No 2 & No 4 Phillips Head Screwdrivers No 2 Slot Head Screwdriver Hammer Electric Drill (Hammer Drill for Masonry) 6.5mm
EZ-Lock Assembly Manual
 ABM International, Inc. EZ-Lock Assembly Manual 1 ABM International, Inc. Series: 1018/1022/1026 V1.0 EZ-Lock Parts List - Structural frame profiles Slotted beam: (Qty. 2) 15.75 Commercial Parts - Liner
2015 Feeney (8/15) # D. Aluminum Railing Systems
 # D. Aluminum Railing Systems") 2015 Feeney (8/15) #2012-425D Aluminum Railing Systems Aluminum Railing Systems Searching For a Complete Railing System? Look No Further. DesignRail by feeney aluminum railing frame systems combine the
2015 Feeney (8/15) #2012-425D Aluminum Railing Systems Aluminum Railing Systems Searching For a Complete Railing System? Look No Further. DesignRail by feeney aluminum railing frame systems combine the
ALL SEASON PATIO COVER
 ALL SEASON PATIO COVER 61 Where the All Season Patio Cover is to be attached to the home, create a level line showing where the top of the mounting rail is to be located. Install each section with the
AUXILIARY FRAMING AND ACCESSORIES
 CUSTOM CABINETS & RACKS STRUT AND ACCESSO- RIES JUNCTION KITS ANGLE AND BRACE KITS SPLICE KITS BRACE KITS INSTALLATION KITS WALL ANGLE KITS RUBBER END CAPS SUPPORT INSTALLATION AND SUPPORT KITS STANCHION
TOOLS REQUIRED Metal Wood Wood and Metal Screws. #16 Drill #12-24 Tap. 1/8 Drill
 DEVICES COVERED IN THIS DOCUMENT: 4700S Surface Vertical Rod Device 4700SF Fire Exit Surface Vertical Rod Device TOOLS REQUIRED Metal Wood Wood and Metal Screws Sex Bolts #7 Drill ¼ -20 Tap #16 Drill #12-24
MOLOKAI ENTRY SYSTEM
 AC 30473 OUTSIDE LADDER FOR USE WITH: MOLOKAI ENTRY SYSTEM This enclosed ladder will attach to the universal step (AC 30163). Please open the step carton and assemble the step per the instructions. Refer
3. Use base plate as template (see FIG. 4-1) to mark location for fasteners.
 to mark location for fasteners.") Plan the layout of the railing it is the beginning of a successful project. Getting Started... 1. Completely read the application instructions before starting the installation of the railing. 2. Properly
Plan the layout of the railing it is the beginning of a successful project. Getting Started... 1. Completely read the application instructions before starting the installation of the railing. 2. Properly