10 Steps to Performing a Roof Inspection Class. Ben Gromicko InterNACHI nachi.org/class
|
|
|
- Marjorie Lloyd
- 6 years ago
- Views:
Transcription
1 10 Steps to Performing a Roof Inspection Class Ben Gromicko InterNACHI ben@internachi.org nachi.org/class 1
2 In this class, we ll learn the ten steps to performing a roof inspection. After this live class, me at ben@internachi.org and request the link to the final exam. You ll need an InterNACHI username and password. If you re not a member of InterNACHI, I ll provide you with a free student membership (via another link). After taking the final exam, you ll be able to download a Certificate of Completion. Because the exam is online, you may take the exam over and over until you pass. No two exams will be the same. There are no exam fees. Exams are instantly graded.
3 The objective of this class is to teach good practice for inspecting the roof covering. After successful completion of this class, you will be able to report upon two things: 1. the installation of the roof covering and underlayment complies with common building standards or the general recommendations of most shingle manufacturers; and 2. the installation is such that water intrusion should be prevented. Because more than three-quarters of all U.S. homes use asphalt roof shingles, we ll be focused primarily on that type of roof. And this class teaches you how to inspect components that are not required to be inspected during a home inspection performed according to InterNACHI s Standards of Practice. For example, this classes teaches about underlayment (which is beyond the scope of the inspector).

4 The scope of this training class does not cover identifying and evaluating the apparent bad conditions of the asphalt covering like cracking, bubbling, curling, physical damage, and wear and tear - those things are relatively discernible and self-evident.
5 According to the InterNACHI Residential Standards of Practice ( the inspector shall inspect from ground level or eaves: the roof-covering materials; gutters; downspouts; the vents, flashing, skylights, chimney, and other roof penetrations; and the general structure of the roof from the readily accessible panels, doors or stairs. The inspector shall describe: the type of roof-covering materials. III. The inspector shall report as in need of correction: observed indications of active roof leaks. NY Title 19, Section , Roof Systems
6 nachi.org/visible We often see clauses in inspection reports that take this form: No visible evidence of [insert applicable defect]. We have concerns about the words visible and evidence. Recommended: I did not observe any indications of [insert defect] during my inspection. An inspector s duty isn t to report on everything visible, but rather only those defects he/she observed and deems to be a material defect. 6

7 Do not walk upon any roof surface. 7
8 Home inspectors are not code inspectors. We do not inspect for code violations during a typical residential property inspection. However, we should understand that there are international building standards with which common building practices are designed to comply.
9 This training will refer to the some recommended best practices and the International Residential Code for the following items: roof covering materials, asphalt shingles, flashing, fasteners, and underlayment application. Building code is silent on many aspects of roof covering. The manufacturer s installation instructions (typically found on the packaging of the roof bundles) is the single best source for many of the requirements for the correct protection provided by the roof coverings.
10 10 Steps to Performing a Roof Inspection 1. Check the roof covering 10
11 10 Steps to Performing a Roof Inspection 1. Check the roof covering 2. Check the fasteners 11
12 10 Steps to Performing a Roof Inspection 1. Check the roof covering 2. Check the fasteners 3. Check the deck sheathing 12
13 10 Steps to Performing a Roof Inspection 1. Check the roof covering 2. Check the fasteners 3. Check the deck sheathing 4. Check the slope and underlayment 13
14 10 Steps to Performing a Roof Inspection 1. Check the roof covering 2. Check the fasteners 3. Check the deck sheathing 4. Check the slope and underlayment 5. Check the ice barrier 14
15 10 Steps to Performing a Roof Inspection 1. Check the roof covering 2. Check the fasteners 3. Check the deck sheathing 4. Check the slope and underlayment 5. Check the ice barrier 6. Check the drip edge 15
16 10 Steps to Performing a Roof Inspection 1. Check the roof covering 2. Check the fasteners 3. Check the deck sheathing 4. Check the slope and underlayment 5. Check the ice barrier 6. Check the drip edge 7. Check for an offset pattern 16
17 10 Steps to Performing a Roof Inspection 1. Check the roof covering 2. Check the fasteners 3. Check the deck sheathing 4. Check the slope and underlayment 5. Check the ice barrier 6. Check the drip edge 7. Check for an offset pattern 8. Check the roof valley flashing 17
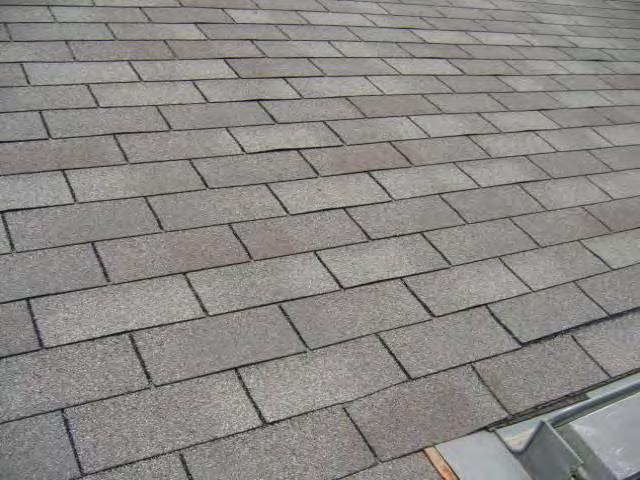
18 10 Steps to Performing a Roof Inspection 1. Check the roof covering 2. Check the fasteners 3. Check the deck sheathing 4. Check the slope and underlayment 5. Check the ice barrier 6. Check the drip edge 7. Check for an offset pattern 8. Check the roof valley flashing 9. Check the nail penetration into the deck sheathing 18
19 10 Steps to Performing a Roof Inspection 1. Check the roof covering 2. Check the fasteners 3. Check the deck sheathing 4. Check the slope and underlayment 5. Check the ice barrier 6. Check the drip edge 7. Check for an offset pattern 8. Check the roof valley flashing 9. Check the nail penetration into the deck sheathing 10. Check the flashing areas. 19
20 Let s take a pre-assessment quiz to see how much you know prior to starting this class. Let s go to Pre-Assessment. 20
21 Before we proceed step-by-step, let s first go over a few basic concepts: shedding water, reinforcement, shapes, top lap, end lap, slope or pitch, self-sealing strips, open valley, and closed valley. 21
22 Asphalt shingles are designed to be layered. The layering is designed to shed water. An asphalt shingle roof is water-resistant not waterproof. A shingle roof essentially relies on the slope of the roof to shed the water. 22
23 Asphalt shingles are reinforced. They are referred to as either organic-reinforced asphalt shingles or glass-fiber-reinforced asphalt shingles. Most of the shingles you ll see will be glass-fiber-reinforced. The organic ones you may see will probably be old and they ll be comparatively really thick. 23
24 There are three shapes (or types) of asphalt shingles: strip shingles, laminated strip shingles, or individual shingles. 24

25 Strip shingles are generally longer in width than height. Common dimensions are 12 by 36 inches. Shingles called 3-tab and laminated are all categorized as strip shingles. Strip shingles are self-adhering they have adhesive seal strips on them that bond the shingles to the other lapped shingle courses. 25

26 LAMINATED STRIP shingles are called architectural or dimensional shingles. These shingles have additional laminated material to give the shingle a random thickness and a dimensional, architectural appearance. They are also self-adhering. 26
27 INDIVIDUAL shingles are smaller than strip shingles. You need more of them to cover the same area. They are typically shaped including diamond, octagon, scalloped, and fish scale patterns. Some are interlocking. Individual shingles are mostly no longer available. 27

28 The term TOP LAP is the lap of the underlayment that runs parallel to the eaves. 28

29 The term END LAP is the lap of the underlayment at the end of the roll. 29
30 The terms SLOPE or PITCH indicate the incline of a roof, expressed as a proportion of the vertical to the horizontal. They do not mean the same thing. 30
31 The illustration above shows a simple gable roof and the general relationship between rise, run and span. Roof framing is a practical application of geometry, and roof slope is based largely on the properties of a right triangle. 31
32 In roof framing, the base of the right triangle is called the run. The run is the distance from the outside of the wall's top plate to a point directly below the center of the ridge. The vertical leg of the triangle is called the rise, which is the distance the roof rafter board extends upward above wall's top plate. 32
33 Slope Slope is the incline of the roof expressed as a ratio of the vertical rise to the horizontal run, where the run is some portion of the span. This ratio is always expressed as inches per foot. Slope Ratio A roof that rises 4 inches for every 1 foot or 12 inches of run is said to have a 4 in 12 slope. If the rise is 6 inches for every 12 inches of run, then the roof slope is 6 in 12. The slope can be expressed numerically as a ratio. The slope ratio represents a certain amount of vertical rise for every 12 inches of horizontal run. For example, a 4 in 12 slope can be expressed as the ratio of 4:12. A 6 in 12 slope is expressed as 6:12. 33

34 The triangular symbol above the roof line in this architectural elevation provides information on the roof's slope. Slope is expressed: as a ratio; and in inches per foot. 34
35 35
36 A conventional roof can have a slope of 4:12, which means that when 12 units are measured horizontally, the roof surface rises vertically 4 units. 36
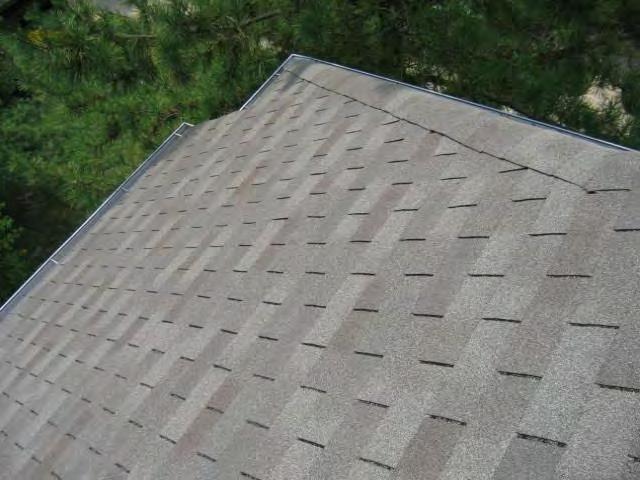
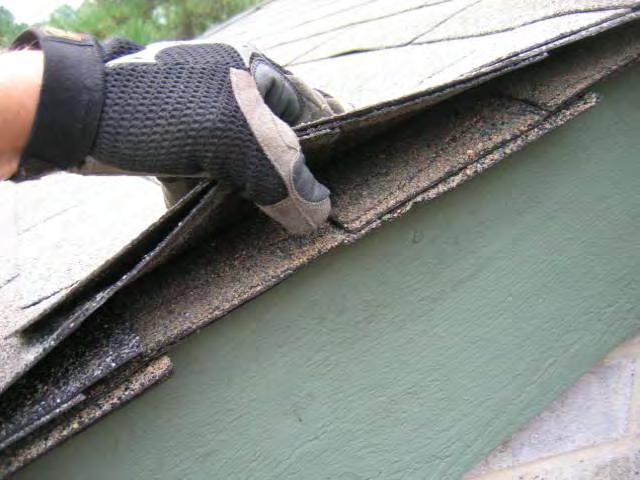
, and the lining is exposed (metal flashing is typically used in the valley).")
37 SELF-SEALING STRIPS refers to the adhesive on a shingle that is placed so that the lapped shingle will adhere to it. The adhesive helps in resisting uplift caused by strong winds. An OPEN VALLEY is one in which the roof covering abuts the valley lining (or flashing), and the lining is exposed (metal flashing is typically used in the valley). A CLOSED VALLEY is one in which the roof covering covers the valley lining (or flashing) and the lining is not exposed. 37
38 Okay. Those were a few basic concepts. Now, let s go to the 10 STEPS. There are 10 steps to inspecting the roof covering. Let s go over them step-by-step. 38
39 STEP #1: Check the roof covering. Determine if the roof covering is designed to provide a weather barrier. The purpose of the roof covering is to protect the structure underneath from water intrusion and water damage. The design of the roof system must take into account the underlayment requirements, the type of roof geometry, the weather conditions based upon location, and the type of roof covering materials. 39

40 40
41 The roof covering provides a first line of defense against the elements. It also tends to be the most exposed component of a building s exterior envelope. Therefore, roof coverings should be selected, detailed, and installed to provide durable resistance to water penetration. The 2015 International Residential Code states: R903.1 General. Roof decks shall be covered with approved roof coverings secured to the building or structure... Roof assemblies shall be designed and installed in accordance with this code and the approved manufacturer s installation instructions such that the roof assembly shall serve to protect the building or structure. 41
42 Building codes don t address many of the details required for a complete and proper installation of the many available roofing products. If you look to code to provide information about what to inspect at the roof system, you won t find much detail. When the code says something like in accordance with the manufacturer s installation instructions that should not be taken lightly. A home inspector will have to do some research about the common installation guidelines or industry best practices and recommendations these are important things to research. There are many manufacturers of asphalt shingles, and most (if not all of them) have websites with technical installation guidelines available for free downloading. 42
43 In short, the thicker and heavier the shingle is the better. Heavier weighted shingles, laminated or textured shingles, tend to perform and appear better. 43

44 Inspection Tip: I like to look at the edges of the roof covering to see how many asphalt shingle layers there are. It s fairly easy to see if there are two layers of shingles installed when you look at the rake edge. 44
45 45
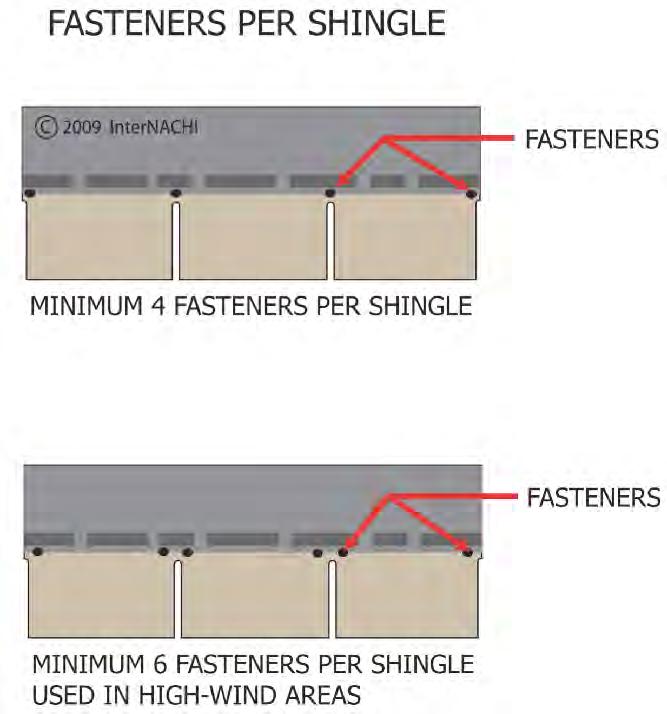
46 46
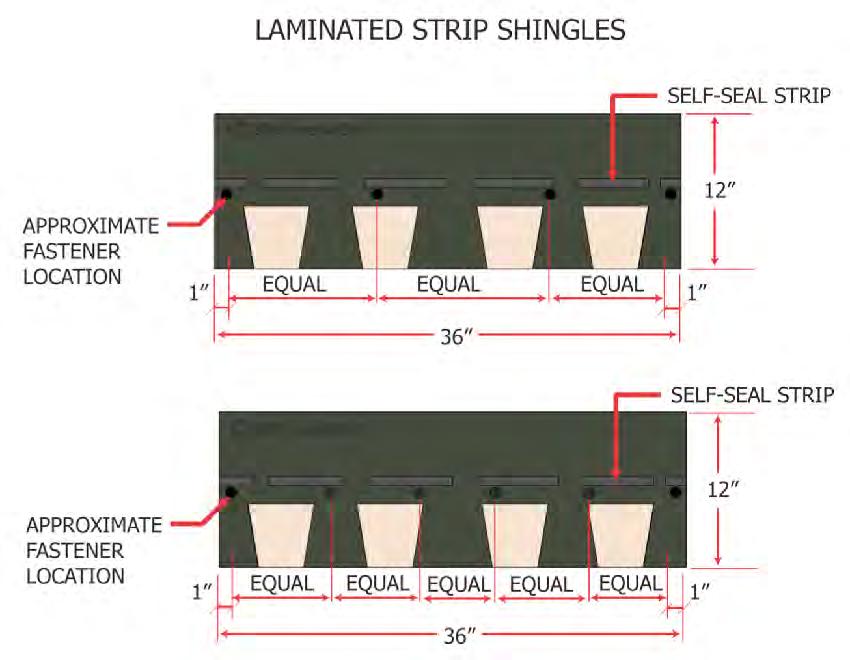
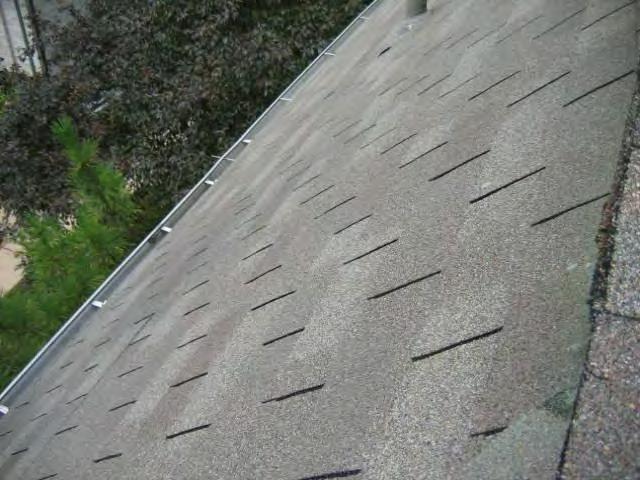
47 With only a few exceptions, a second layer of roof covering (or a new roof covering) should NOT be installed without first removing the existing roof covering. This is especially important where any of the following conditions exist: Where the existing roof is water-soaked or has deteriorated to the point that the existing roof is not adequate as a base for the second layer. Where the existing roof covering is wood shake, slate, clay, cement or asbestos-cement tile. Where the existing roof has two or more layers of any type of roof covering. For asphalt shingles, when the house is in an area that has severe hail storms. 47


48 When the 2nd roof covering is installed, the flashing must be redone. The flashing should be reconstructed for that layer. If I m on an asphalt shingle roof, and there s a second layer installed, I ll go the step flashing area and check to see of the step flashing has been redone or re-installed. I like to see that the step flashing has been installed with the 2nd layer of asphalt shingles. If it hasn t been, I report it has an unreliable condition, and I recommend correction and further evaluation by a professional. So, that s Step #1. Check the roof covering. Let s go to Step #2. 48
49 49
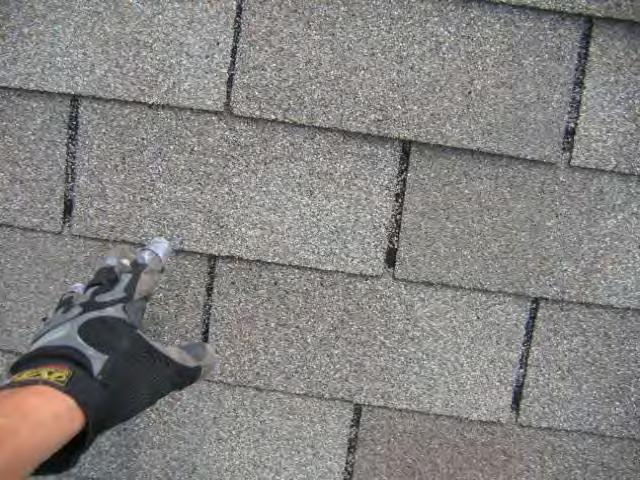
.")
50 Step #2. Check the fasteners. There is good fastening and bad fastening. During a typical home inspection, checking the fasteners from the roof surface will be almost impossible (and it s not required). However, there are a few things that every inspector should know: 50
51 In general, roofing nails for asphalt shingles should be driven straight, flush and snug to the surface of asphalt shingles. To avoid the complete loss of a shingle, the roofing fasteners should not be over-driven (meaning that the head damages or tears the shingle). Attention to fastening quality is equally important for other roofing materials such as tile and metal. 51
52 Fasteners for asphalt shingles should be nails corrosion resistant - galvanized steel, stainless steel, aluminum or copper. The nails must be corrosion resistant to keep them from rusting away and leaving holes for water to seep through or wind to blow off shingles because of the lack of attachment. 52

53 They should have a minimum nominal shank diameter of 12-gauge (0.015 ) with a minimum head diameter of 3/8-inch. 53
54 The nailing of hips, ridges and some roof accessories may require the use of longer nails, because the fasteners may have to go through more layers of roofing and other material. For full-width shingles, a minimum of four nails should be used per shingle. Six nails may be required by building codes in some high-wind areas. 54

55 Check out the illustration. You can see where the approximate locations of shingle fasteners are. 55
56 56
57 57
58 Fasteners should not appear in the 5-inch area of exposure of the shingle. Typical exposure for standard-size strip shingles is 5 inches (125 mm) and for metric size strip shingles is 5 and 5 8 inches (143 mm). I often find roofing nails that have been misplaced or installed in the wrong location, and they are exposed with the nail head in the field of the exposure area of the shingle. I report it as a potential water entry point and recommend correction and further evaluation. Nails should never be visibly exposed or weathered. 58
59 Home inspectors are not required to determine conformance with the manufacturer s installation recommendations or compliance with local building codes and regulations. However, there are many standards and building practices that could be checked during a typical home inspection. For example, most (if not all) asphalt composition shingle manufacturers will void the warranty if shingles are installed on a roof with a slope less than a 2:12 slope. Asphalt shingles should not be installed on a roof slope 2:12 or less, unless some waterproofing design details are applied. 59
60 60
61 Home inspectors should know: The importance of roof slope minimums for the various roof coverings; Underlayment installations are related to slope, roof type, and weather conditions. They are not readily visible for existing homes, but can be inspecting during a construction period of time; and Life expectancies are valuable information for an inspector to refer to when inspecting the roof. The fact that a system is near, at or beyond the end of the normal useful life is not by itself a material defect. 61
62 Check out the following table about roof coverings, slopes and service life. 62
63 Step #3: Determine if the roof is solidly sheathed. This is a little difficult, and can get technical and exhaustive. But for us home inspectors, what we really need to know are two things: 1. the application of the asphalt shingles requires a solid surface, and 2. if the roof is not solidly sheathed, the asphalt shingles will not provide the proper, correct protection from the weather. The roof covering is only as strong as the substrate to which it is attached. 63
64 During an inspection of the roof, before the underlayment and roofing go on, you can check for proper installation of the roof sheathing. Timing the inspection is critical, because the underlayment is sometimes installed by the framing contractor immediately after putting on the roof sheathing, 64
65 Asphalt shingles are typically applied onto two types of decking materials: (1) wood panels (which can be plywood or oriented strand board or OSB), and (2) wood planks or wood boards. You may come across other types of roof deck material (like metal, concrete, gypsum, cementitious wood fiber, or other non-wood materials). In each situation (no matter what) the roof needs a nailable substrate that provides adequate support. Now there s proper thickness, design loads (including wind uplift), span of supporting framing members that are important, but we re not going to get into those details. 65
66 Nearly all sheathing problems are due to improper installation. So, here are 5 quick inspection tips for checking the roof deck sheathing. 66
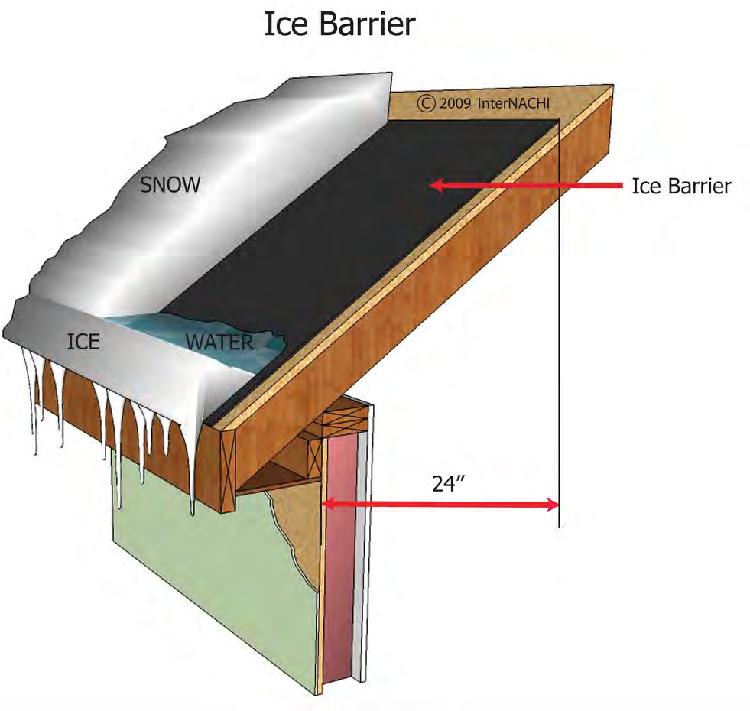
67 1. Sheathing should be fastened with a minimum of 8d common nails (or deformed shank nails) spaced at most 6 inches on center at supported panel ends and edges. At intermediate support areas, the fasteners should be at 12 inches on center. 2. There should be a 1/8-inch space at the panel ends and edges. A 16d common nail could be used as a gauge. 3. The long dimension should be perpendicular to the supports. Each piece should be continuous over at least two spans. The panel should be at least 24-inches wide. 4. Panel spacer-type edge clips (H clips) could be installed and recommended by some manufacturers. 5. End joints of each adjacent piece of decking should be staggered. 67
68 68

69 Plywood panels should be laid with the face grain perpendicular to the rafter boards. The panels should be installed over two or more spans, with the long dimension or strength axis oriented across the rafter boards or truss cords. In the above image, the contractor is laying down the plywood panel with the face grain perpendicular to the trusses. Staggering panels by at least two supports is recommended. During the installation of OSB, the rough surface side should be facing up. This rough side is a screened or skid-resistant coated side. 69
70 The four most common sheathing attachment mistakes include: 1. Using the wrong size fasteners, 2. Missing the framing members when installing fasteners, 3. Overdriving nails, and 4. Using too many or too few fasteners. Alight, that 3 steps! Let s go to Step #4. 70
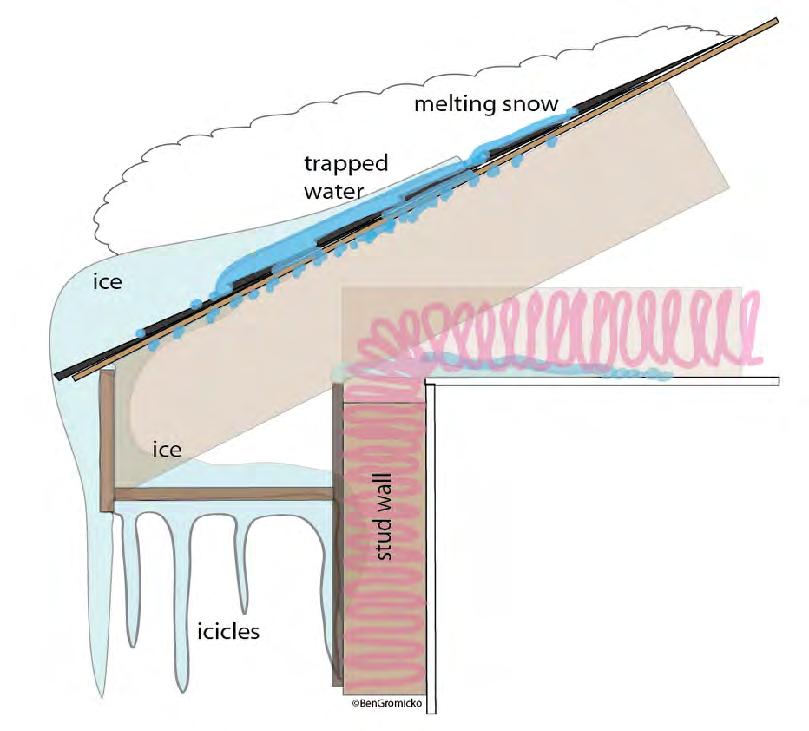
71 Step #4: Check the slope and underlayment. Inspecting the underlayment is all but impossible at an existing roof. However, there are a few essential concepts about underlayment that should be understood by all inspectors in order to evaluate the past performance of the roof covering that you re inspecting. Underlayment does three things: (1) it provides protection from weather for a limited time until the roof covering is installed; (2) it provides a secondary weatherproofing barrier under the shingles; and (3) it separates the roof covering and the substrate. Underlayment must be installed under an asphalt shingle roof system. 71
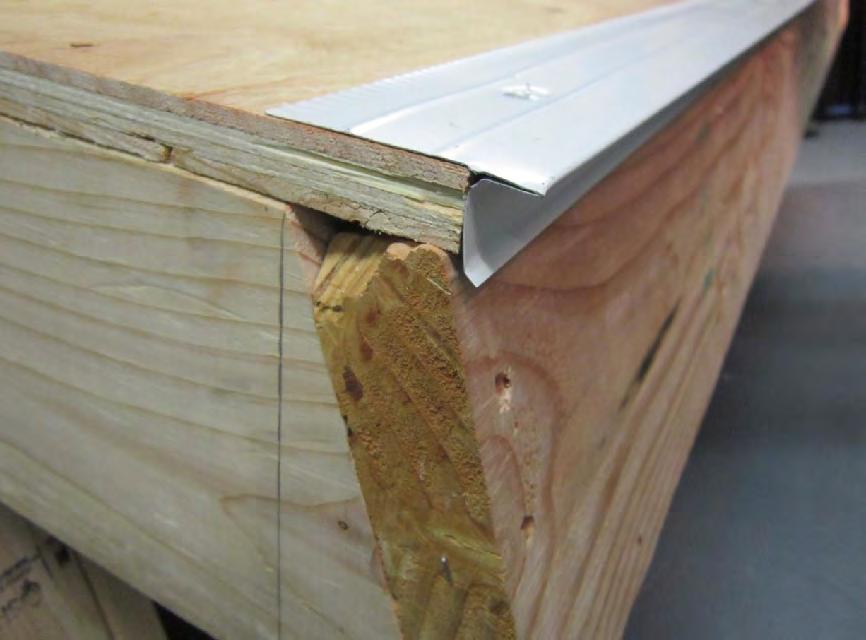
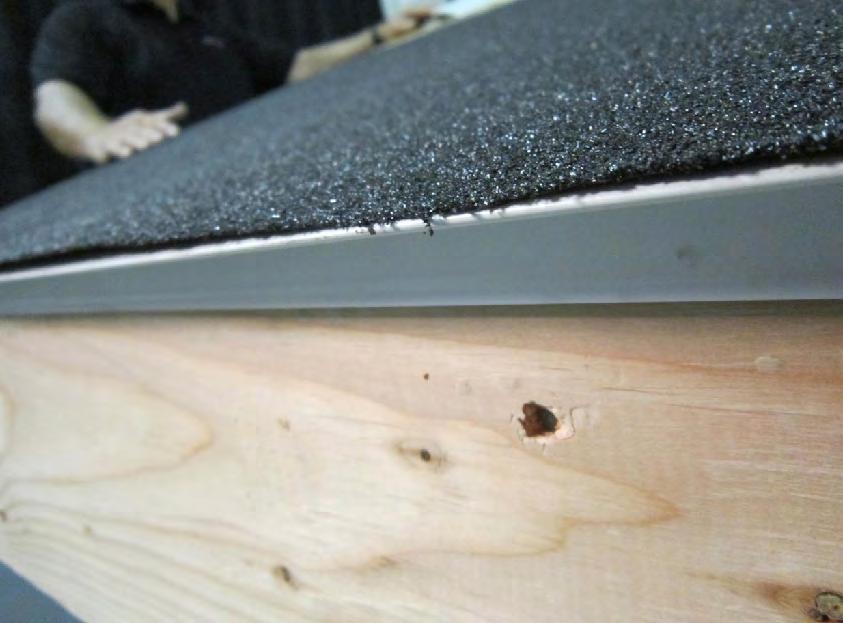
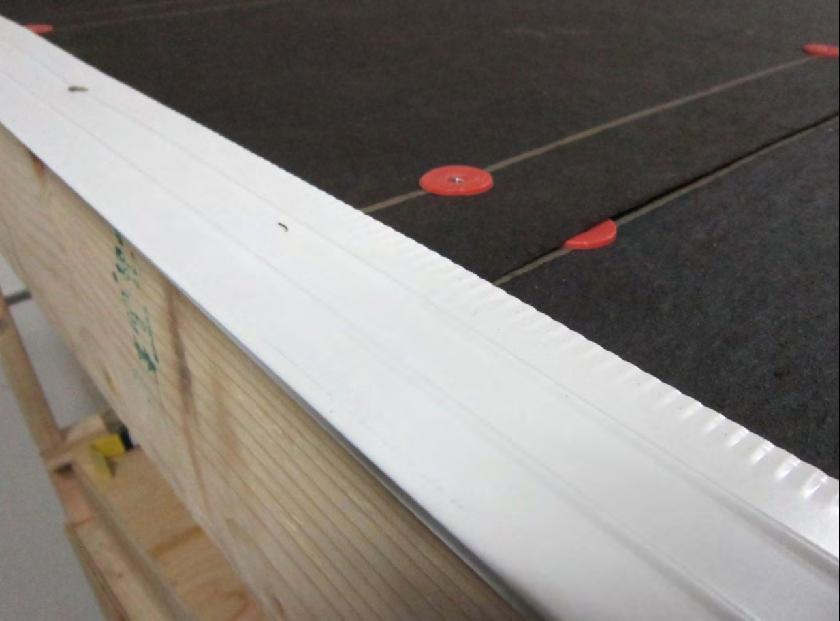
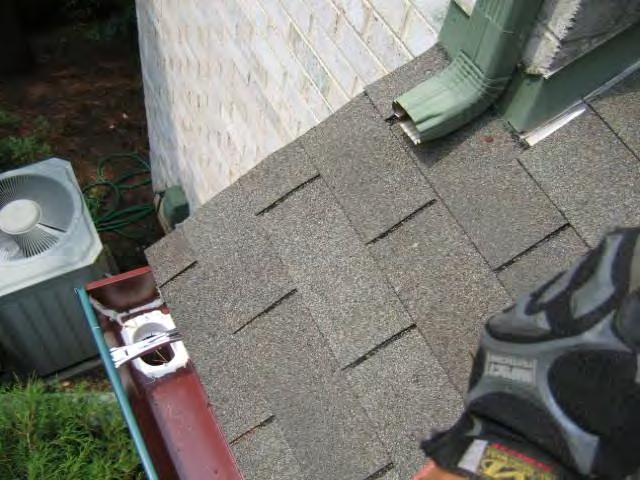
72 Underlayment is also necessary to: comply with local building codes; maintain a fire rating for the roof assembly; and meet requirements for the manufacturer s warranty. You can classify underlayment in three ways: 1. As a single layer of underlayment; 2. As a single layer of self-adhering underlayment; and 3. As a double layer of underlayment. 72
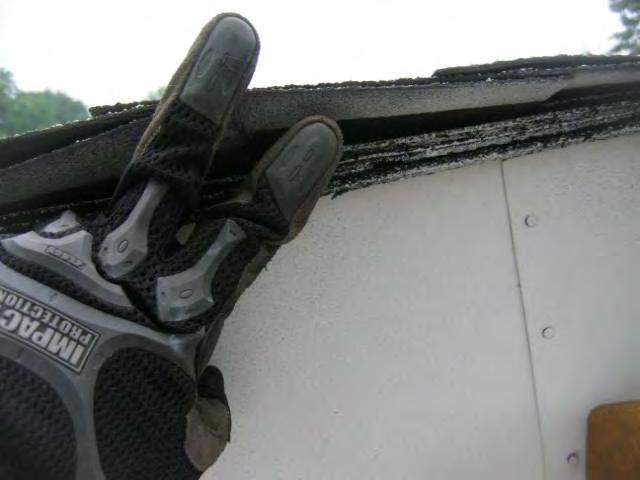
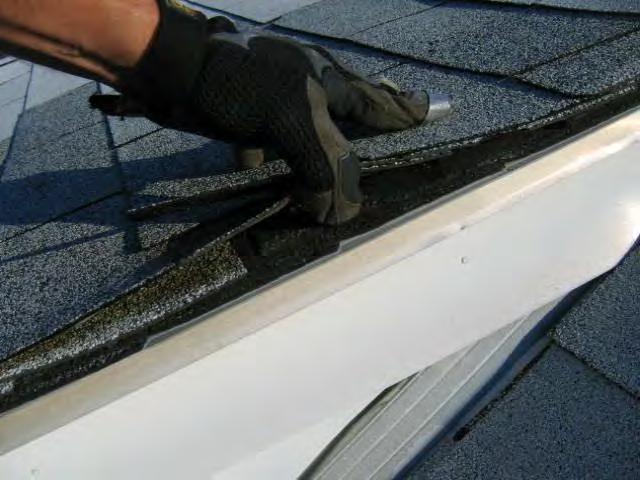
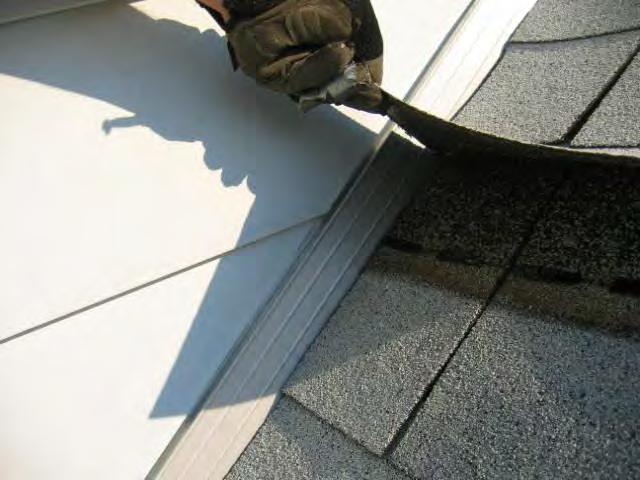
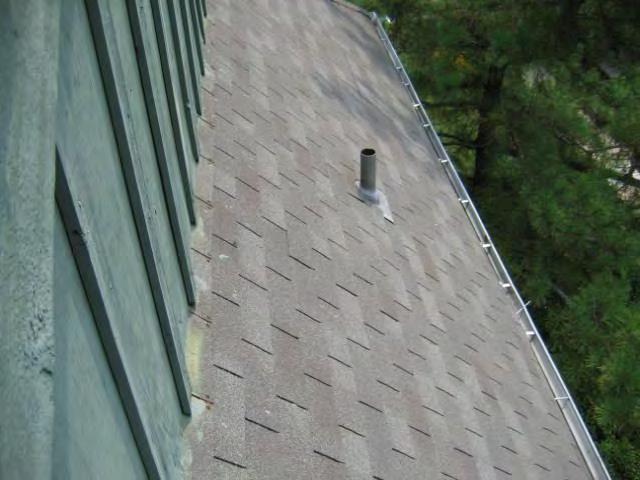
73 A water and ice-dam protection membrane (or sometimes called an ice and water shield) is a particular type of underlayment. It provides additional protection along the eaves, at penetrations, elevation changes, and in valleys where a lot of water or ice dams could occur. This type of underlayment is usually just a single layer of polymermodified bitumen underlayment that is sticky or self-adhering. For areas that have an average temperature in January of 30 or less, a water and ice-dam protection membrane is a recommended best practice (recommended by NRCA). 73
74 Underlayment is installed in relation to roof slopes. For roof slopes at 4:12 or greater, there should be a minimum single-layer of underlayment applied horizontally in shingle fashion. For roof slopes between 2:12 and 4:12, a single layer of selfadhering polymer-modified bitumen underlayment or a minimum double-layer underlayment should be installed. 74
75 Low-slope roof covering systems are designed as WATERPROOF roof systems, and they use roof coverings designed for slopes as low as 1 4:12. Low-slope roofs are commonly known as flat roofs, but an actual FLAT roof surface is a design mistake. Inspection Tip: If you ever find a flat roof that is actually flat with no slope that s a roof with a problem. There should always be SOME slope to a roof. 75
76 Step #5: Check the ice barrier. There is a phrase used when describing self-adhering underlayment. The phrase is a point at least 24 inches inside the exterior wall line of the building. What this means can be easily seen in this illustration. 76
77 77
78 In areas where there has been a history of ice forming along the eaves causing a backup of water, an ice barrier that is made up of at least two layers of underlayment cemented together or a selfadhering polymer modified bitumen sheet, should be used in lieu of normal underlayment and extend from the lowest edges of all roof surfaces to a point at least 24 inches inside the exterior wall line of the building. 78
79 79
80 Ice dams can form along an eave. Therefore, the underlayment must be modified to prevent ice dams from forcing water under the roof covering. Beyond the 24-inch point, such special underlayment is considered unnecessary because the warmth of the interior will prevent ice dams from forming above the heated space. Similar attention is needed for roof coverings of roll roofing, slate, wood shingles and wood shakes not just asphalt shingles. For slopes less than 4:12 and in locations with heavy snow fall, a best practice would be to extend the underlayment a minimum of 36 inches from the inside of the exterior wall line of a building. (NRCA recommendation) Alright! That was 5 steps of the inspection. We re halfway there. Let s go to Step #6. 80
81 Step #6: Check the drip edge. Drip edge metal should be installed at the rake and eaves. It provides a means of terminating the underlayment and asphalt shingles nicely. It provides an efficient method of shedding water. 81

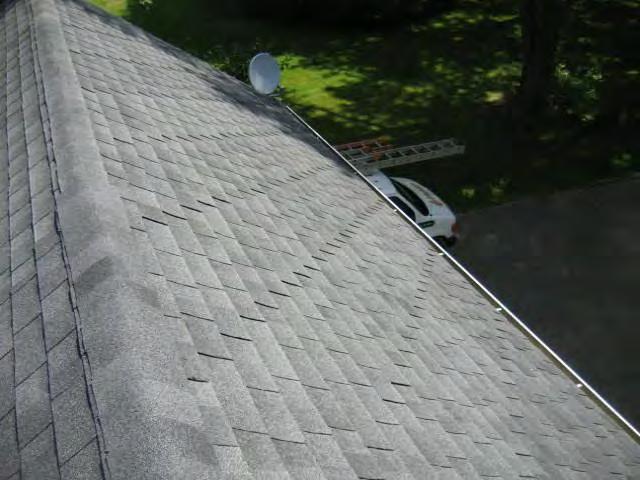
82 Inspection Tip: I always take a picture of the drip edge area. I take the picture as I go up the ladder (at the top of the ladder). Sometimes there s no drip edge. Sometimes there s major structural damage. And a secondary benefit of looking there is to count the ply s or measure the thickness of the decking. Most codes require drip edge metal to be installed. It is most commonly installed for asphalt shingles. 82

83 There are two configurations for drip edges (Type L and Type T). Bottom right is a T. Top right is an L. But that s not really important. 83
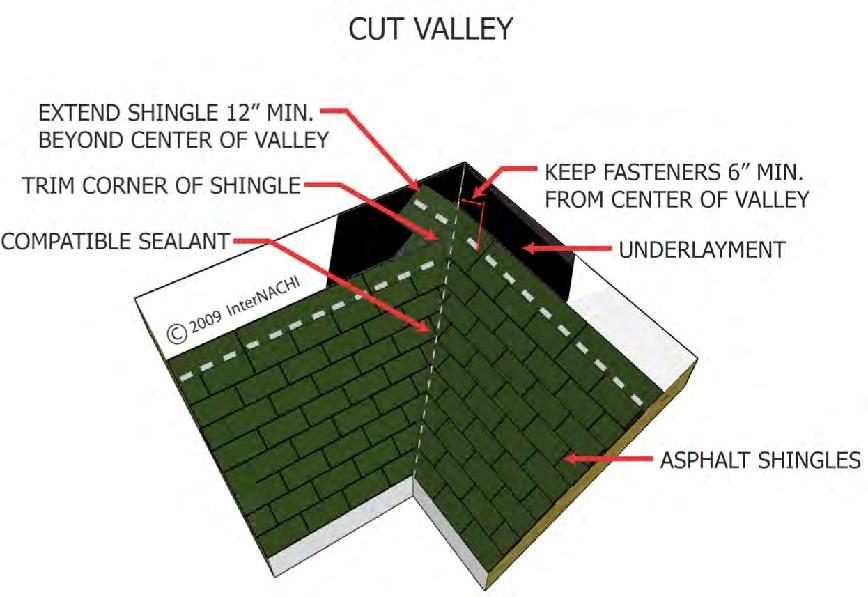
84 What s important to know about the drip edge is the following five things: 1. the installation and material of drip edges usually depends on local practices; 2. the drip edge at the rake goes over the underlayment; 3. the drip edge at the eaves goes under the underlayment; 4. drip edge should be fastened every 12 inches normally, and could be every 6 inches for high-wind areas; and 5. a recommended best practice at the eaves is to have the bottom edge of the underlayment extend 1 4 to 3/8 of an inch beyond and overhang the edge of the metal drip edge (Asphalt Roofing Manufacturer s Association). 84
85 85
86 86
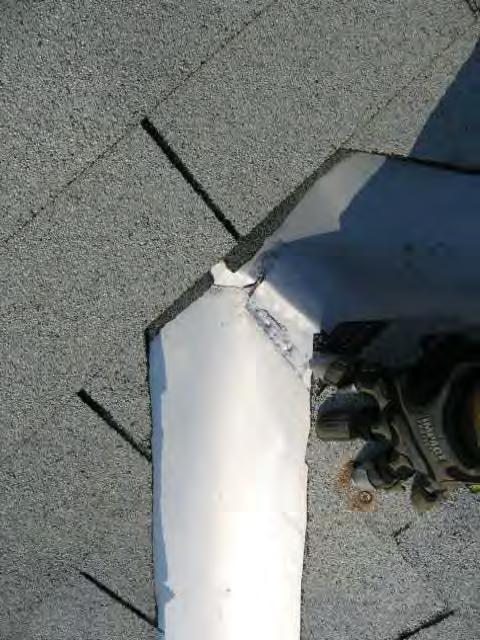
87 87
88 88
89 Step #7: Check for an offset pattern. There are a few offset patterns in the shingle installation to look for: 1. One common to the application of square-end, three-tab strip shingles is the 6-inch pattern, which will cause the cutouts to align in every other course. The consecutive shingle course is offset by 6 inches. 2. A more random visual effect can be made by using an offset pattern called the 5-inch method, which is achieved by removing about 5 inches (5-5/8 ) from each consecutive course. 89

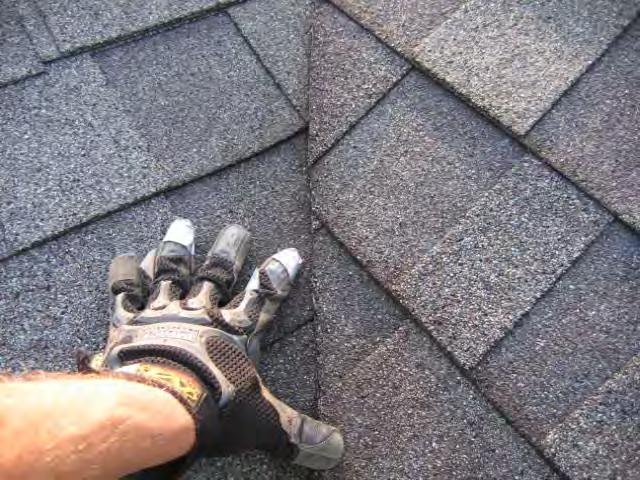
90 Racking (or vertical installation of shingles) is generally not recommended for asphalt shingles. There are some exceptions for some manufacturers. Each manufacturer has their own guideline about offsetting. 90
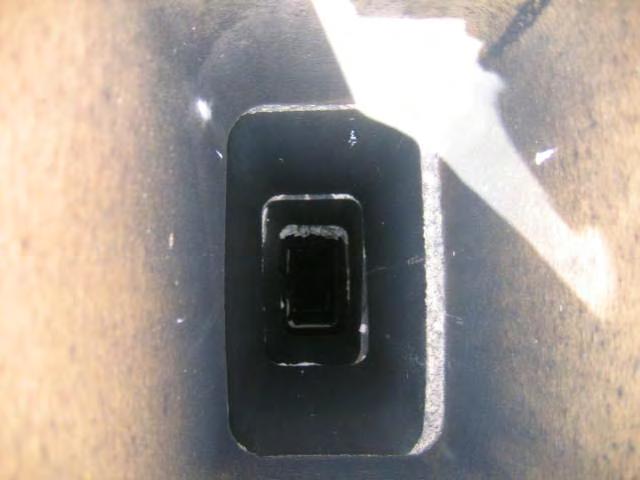
91 STEP #8: Check the roof valley flashing. A valley is created at the intersection of two down-sloping roof planes. The valley is vulnerable to water intrusion because of the high volume of water and the lower slope along the valley line. For example, where two 4:12 roof planes make a valley, the valley is about a 3:12 it s lower in slope than the two planes. So, it s more vulnerable to water problems. 91
92 Inspection Tip: Use the valley. I like to climb upon the roof at the valley area because the valley has a lower slope than the rest of the roof. Ideally, I ll be able to position my ladder at inside the corner where the bottom of the valley is. Remember, the Standards of Practice do not require a home inspector to walk upon any roof surface. Don t. 92
93 For asphalt shingle roofs, there are three basic types of valleys: (1) open, (2) closed-cut, and (3) woven. 93
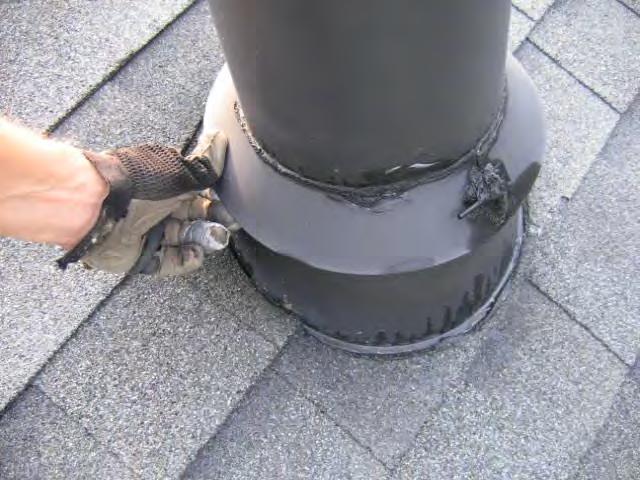
94 OPEN valleys. Here s what you need to know about open valleys: An open valley is when shingles are lapped onto both sides of the valley flashing metal, leaving an open space between the roof covering materials; A minimum 36-inch-wide layer of polymer-modified bitumen membrane or self-adhering underlayment should be in the valley, under the metal flashing; The metal valley flashing should be a minimum of 24 inches wide (NRCA); and The asphalt shingles should lap onto the flange of the metal flashing at least 4 inches. 94
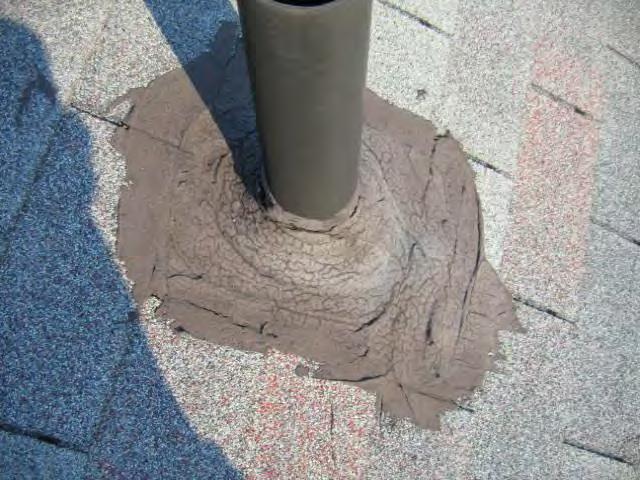
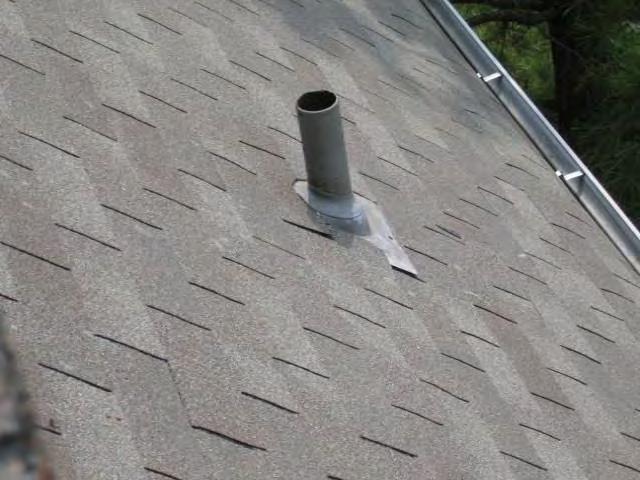
95 95
96 Here s what you need to know about a CLOSED-CUT valley: there are shingles on one side of the valley installed across the valley; the shingles from the other side are cut above, 2 inches short of the centerline of the valley; no nails should be located within 6 inches of the centerline of the valley; the upper corner of each end shingle should be trimmed (or dog-eared) this helps to divert the water away; and a bead of roof cement could be put at the end of the cut shingles. 96
97 97
98 98
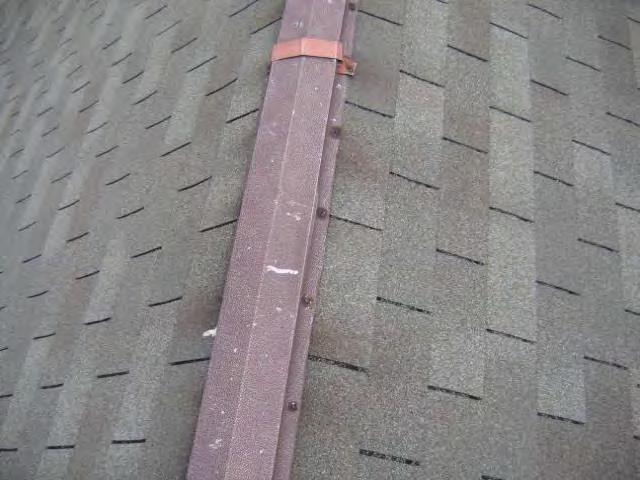
99 A WOVEN valley is when shingles are simply woven to form a closed valley. They are usually created with 3-tab shingles and not laminated ones. 99
100 Step #9. Check the nail penetration into the deck sheathing. If the thickness of the deck sheathing is more than 3 4 inch, the nails must be long enough to penetrate 3 4 of an inch INTO it. If the thickness of the sheathing is 3 4 inch or less, the nails for asphalt shingles must be long enough to penetrate THROUGH it about 1/8 of an inch may extend through the deck sheathing and may be visible for inspection from the attic space. 100
101 In this illustration, you can see that the roofing nail (fastener) does not penetrate enough into the decking material. That s bad. The double-layer of shingles (in this illustration), caused by a second layer of shingles being installed over a lower layer, requires the use of a nail with a longer length. 101
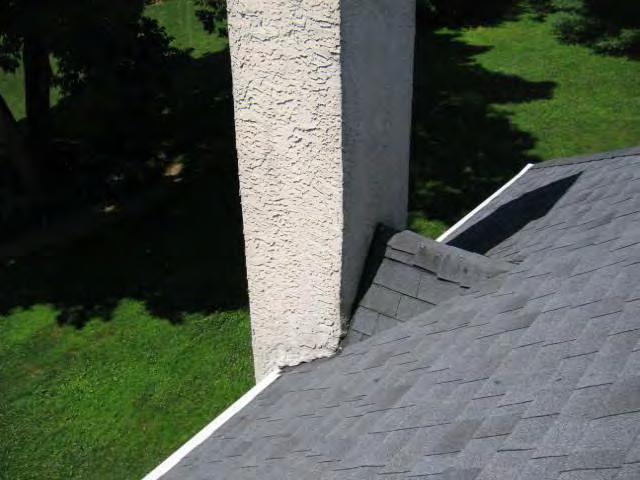
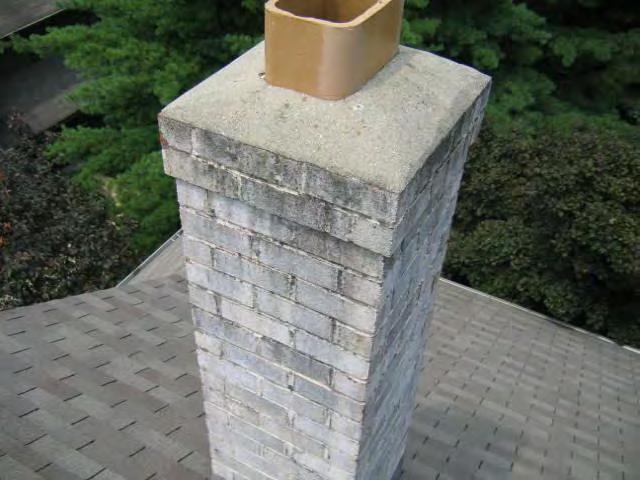
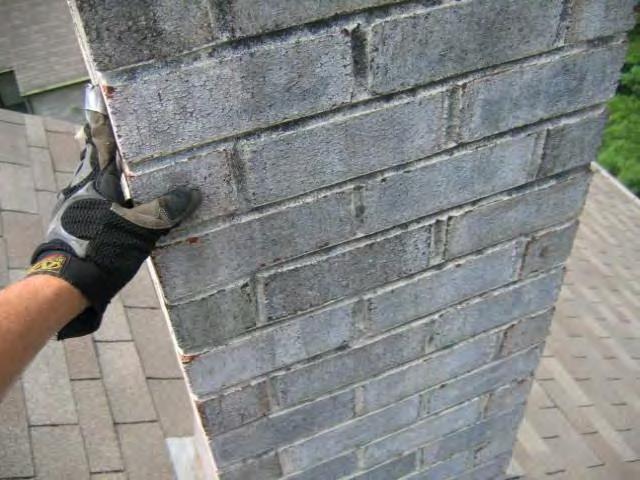
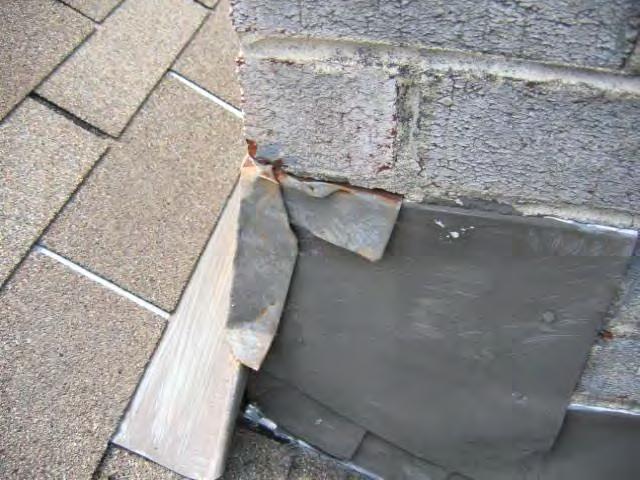
102 Inspection Tip: At a roof over, where you have two layers of asphalt shingles, I like to gently tug on the shingles to see how well they are attached. 102
103 Step #10: Check the flashing areas. There are 4 types of flashing: 1. penetration flashings; 2. vertical surface flashings; 3. skylight flashings; and 4. steep- to low-slope transition flashings (sometimes called headwall flashing). 103
104 For PENETRATION flashings, you should check the following items: (1) vent pipes; (2) exhaust vents; (3) exhaust fans; (4) furnace or water heater flue pipes; (5) electrical stand pipes; and (6) all other penetrations. The penetration flashing is usually supplied by a manufacturer or could be made in the field by a contractor. 104
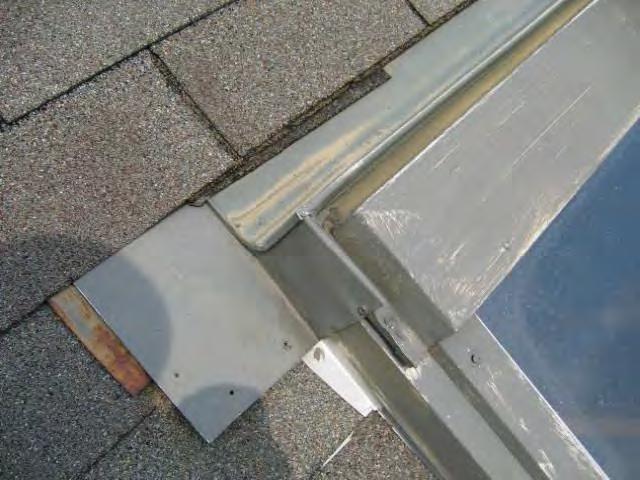
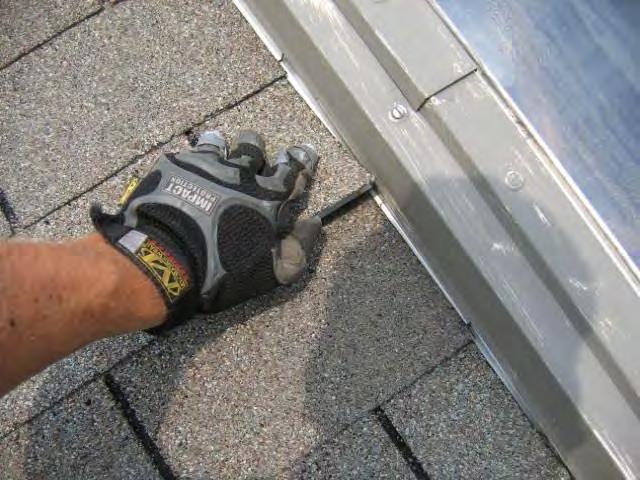
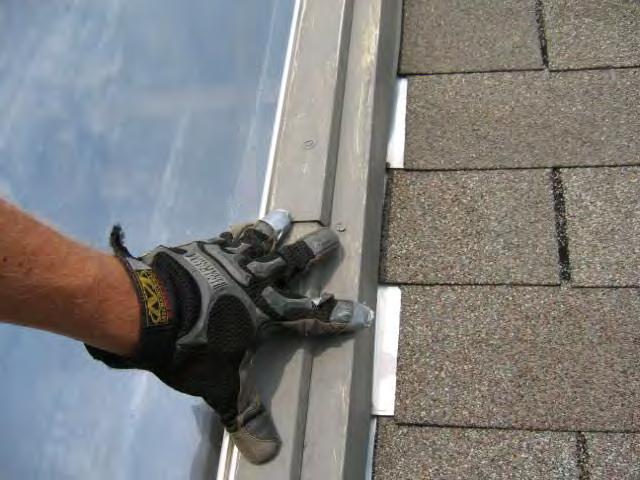
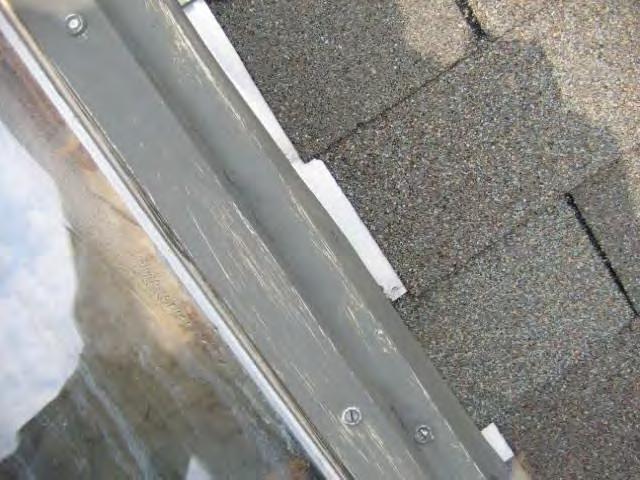
105
106 106

107
108 There are 4 types of VERTICAL SURFACE flashings. In your report, you should use these following terms to describe the flashing components that you are inspecting. They are: (1) apron flashing; (2) step flashing; (3) cricket or backer flashing; and (4) counter flashing. 108
109 APRON flashing is installed where a roof intersects a head wall. Common locations for an apron flashing is at the front side (or downslope side) of a dormer, chimney, and anywhere there s a transition between a horizontal and a vertical. 109

110 STEP flashing is installed where the roof intersects a vertical sidewall. The step flashings are the small individual pieces of metal installed with each shingle course. They step with each course. 110
111 CRICKET or BACKER flashing is installed when the roof intersects a chimney or a curbed roof penetration. The cricket diverts water around, while the backer flashing provides a weatherproofing transition material right where the backside of some type of penetration intersects the roof. An example of a backer flashing would be a chimney that is not very wide (say only 20 inches wide), and there s no requirement for a cricket a backer flashing would be installed on the upslope backside of that stack. By the way, a recommended best practice is to install a cricket when a chimneystack is more than 30 inches wide (NRCA recommends 24 inches wide). 111
112 112

113 COUNTER FLASHING is flashing material that covers and protects the top edges of all the other types of flashing to prevent water intrusion. 113

114 SKYLIGHT FLASHINGS are very much like chimney flashings - with apron, step and backer flashings involved. In most installations, the skylight unit itself acts at the counter flashing. 114

115 STEEP- TO LOW-SLOPE TRANSITION FLASHINGS are installed where the sloped shingle roof intersects and drains onto a low-sloped or membrane flat roof. In many situations, the lowest course of shingles acts as the counter flashing. Ideally, there would be metal flashing installed. Inspection Tip: Be careful not to step at this intersection or transition area. You could easily damage the roof and flashing materials that are installed there. 115
116 Congratulations! In this online class, we learned the 10 steps to performing a roof inspection. They are: 1. Check the roof covering 2. Check the fasteners 3. Check the deck sheathing 4. Check the slope and underlayment 5. Check the ice barrier 6. Check the drip edge 7. Check for an offset pattern 8. Check the roof valley flashing 9. Check the nail penetration into the deck sheathing 10. Check the flashing areas 116
117 nachi.org/mastering-roof-inspections 117
118

119

120
121

122
123
124
125
126

127
128

129
130

131
132

133
134
135

136

137
138

139
140
141
142

143
144
145
146
147
148

149
150
151
152

153

154
155
156

157

158
159

160
161

162

163
164 10 Steps to Performing a Roof Inspection Class Ben Gromicko InterNACHI ben@internachi.org nachi.org/class nachi.org/newyork 164
165 165
1 Exam Prep NRCA Roofing Manual: Steep-Slope Roof Systems 2013 Tabs and Highlights
 1 Exam Prep NRCA Roofing Manual: Steep-Slope Roof Systems 2013 Tabs and s These 1 Exam Prep Tabs are based on the National Roofing Contractors Association (NRCA) manual listed below: Steep-Slope Roof Systems
ROOFING City of Grand Rapids Building Safety Division
 ROOFING City of Grand Rapids Building Safety Division 218-326-7601 www.cityofgrandrapidsmn.com This handout is intended only as a guide and is based in part on the 2015 Minnesota State Building Code, Grand
PROJECT INSTRUCTIONS Roofing
 PROJECT INSTRUCTIONS Roofing This handout outlines some basic regulations contained within the 2015 Minnesota State Building Code, as well as other good building practices. However, this handout is not
SG-30 A P P L I C A T I O N I N S T R U C T I O N S. Directions For Application
 1 2 3 General Instructions NOTICE: THESE SHINGLES MUST BE APPLIED TO CONFORM WITH ALL APPLICABLE BUILDING CODES. THESE DIRECTIONS REPRESENT COMMON AND ACCEPTED ROOFING PRACTICES. DEVIATIONS FROM THESE
ROOFING APPLICATION STANDARD (RAS) No. 115 STANDARD PROCEDURES FOR ASPHALTIC SHINGLE INSTALLATION
 No. 115 STANDARD PROCEDURES FOR ASPHALTIC SHINGLE INSTALLATION") ROOFING APPLICATION STANDARD (RAS) No. 115 STANDARD PROCEDURES FOR ASPHALTIC SHINGLE INSTALLATION 1. Scope 4. Underlayment 2. 1.1 This roofing application standard has been developed to provide a responsive
ROOFING APPLICATION STANDARD (RAS) No. 115 STANDARD PROCEDURES FOR ASPHALTIC SHINGLE INSTALLATION 1. Scope 4. Underlayment 2. 1.1 This roofing application standard has been developed to provide a responsive
SECTION SLATE SHINGLES. 1.1 SUMMARY A. Section Includes: 1. Slate shingles over underlayment nailed to roof sheathing.
 SECTION 07 31 26 SLATE SHINGLES SPEC WRITER NOTES: Delete text between // // not applicable to project. Edit remaining text to suit project. PART 1 - GENERAL 1.1 SUMMARY A. Section Includes: 1. Slate shingles
ROOFING APPLICATION STANDARD (RAS) No. 115 STANDARD PROCEDURES FOR ASPHALTIC SHINGLE INSTALLATION
 No. 115 STANDARD PROCEDURES FOR ASPHALTIC SHINGLE INSTALLATION") ROOFING APPLICATION STANDARD (RAS) No. 115 STANDARD PROCEDURES FOR ASPHALTIC SHINGLE INSTALLATION 1. Scope 4. Underlayment 2. 1.1 This roofing application standard has been developed to provide a responsive
ROOFING APPLICATION STANDARD (RAS) No. 115 STANDARD PROCEDURES FOR ASPHALTIC SHINGLE INSTALLATION 1. Scope 4. Underlayment 2. 1.1 This roofing application standard has been developed to provide a responsive
DIRECTIONS FOR APPLICATION
 Instructions 1 General NOTICE: THESE SHINGLES MUST BE APPLIED TO CONFORM WITH ALL APPLICABLE BUILDING CODES. THESE DIRECTIONS REPRESENT COMMON AND ACCEPTED ROOFING PRACTICES. DEVIATIONS FROM THESE DIRECTIONS
DIRECTIONS FOR APPLICATION
 Instructions 1 General NOTICE: THESE SHINGLES MUST BE APPLIED TO CONFORM WITH ALL APPLICABLE BUILDING CODES. THESE DIRECTIONS REPRESENT COMMON AND ACCEPTED ROOFING PRACTICES. DEVIATIONS FROM THESE DIRECTIONS
eco-shake INSTALLATION INSTRUCTION
 1 eco-shake INSTALLATION INSTRUCTION NOTE: Shuffling the eco-shakes during installation may be necessary to obtain a uniform color throughout the roof. Due to the natural wood content in the ecoshakes,
DIRECTIONS FOR APPLICATION
 Instructions 1 General NOTICE: THESE SHINGLES MUST BE APPLIED TO CONFORM WITH ALL APPLICABLE BUILDING CODES. THESE DIRECTIONS REPRESENT COMMON AND ACCEPTED ROOFING PRACTICES. DEVIATIONS FROM THESE DIRECTIONS
Turada Hardwood Shingles and Shakes Installation instructions
 1. General 1.1 Maximum Exposure: Maximum exposure for wood shingles and shakes shall comply with Table 1 herein, unless specifically specified in the roof assemblies Product Approval. 1.2 Solid and Spaced
Inspire Slate Starter Piece Hip and Ridge. 13 1/2" Height: 13 ½" Width: 12" Squares/ Pallet. Bundles/ Square
 December 2017 Classic Slate Application Guidelines Only Basic Roofing Tools Required Hand fastened or fastened with a pneumatic nail gun Utility knife or a standard circular saw Tape measure, pry bar,
A P P L I C A T I O N I N S T R U C T I O N S
 1 2 3 General Instructions NOTICE: THESE SHINGLES MUST BE APPLIED TO CONFORM WITH ALL APPLICABLE BUILDING CODES. THESE DIRECTIONS REPRESENT COMMON AND ACCEPTED ROOFING PRACTICES. DEVIATIONS FROM THESE
Inspire Aledora Slate Application Guidelines
 July 2014 Inspire Aledora Slate Application Guidelines Only Basic Roofing Tools Required Hand fastened or fastened with a pneumatic nail gun Utility knife or a standard circular saw Tape measure, pry bar,
Slate Shingle Specifications
 Slate Shingle Specifications California Slate is a proud member of the Slate Roofing Contractors Association of North America, Inc. (SRCA) which publishes Section 07310 Slate Shingles setting forth architectural
PREMIUM LAMINATED ASPHALT SHINGLES Dallas, TX Tuscaloosa, AL Phillipsburg, KS
 Application Instructions for FORMERLY 50 THESE ARE THE MANUFACTURER S APPLICATION INSTRUCTIONS FOR THE ROOFING CONDITIONS DESCRIBED. TAMKO BUILDING PRODUCTS, INC. ASSUMES NO RESPONSIBILITY FOR LEAKS OR
F-WAVE REVIA SYNTHETIC ROOFING SHINGLES
 F-WAVE REVIA SYNTHETIC ROOFING SHINGLES Installation Manual for Steep-Slope Residential Installations For support with all other Steep-Slope Installations, please call F-Wave Technical Support at 888-GO-FWAVE.
PREMIUM LAMINATED ASPHALT SHINGLES Frederick, MD
 Application Instructions for FORMERLY 50 THESE ARE THE MANUFACTURER S APPLICATION INSTRUCTIONS FOR THE ROOFING CONDITIONS DESCRIBED. TAMKO BUILDING PRODUCTS, INC. ASSUMES NO RESPONSIBILITY FOR LEAKS OR
HERITAGE LAMINATED ASPHALT SHINGLES Frederick, MD
 Application Instructions for FORMERLY 30 THESE ARE THE MANUFACTURER S APPLICATION INSTRUCTIONS FOR THE ROOFING CONDITIONS DESCRIBED. TAMKO BUILDING PRODUCTS, INC. ASSUMES NO RESPONSIBILITY FOR LEAKS OR
SECTION WOOD SHINGLES
 SECTION 07 31 29.13 WOOD SHINGLES SPEC WRITER NOTES: 1. Delete text between // // not applicable to project. Edit remaining text to suit project. 2. This guide specification does not include requirements
RED DIAMOND SHINGLES Roof Installation Introduction:
 RED DIAMOND SHINGLES Roof Installation Introduction: The guidelines set forth in this manual are intended for use with the application of Red Diamond shingles. Wallaba specie (Eperua Falcata) shingles
3-Tab Shingle Instructions DURA-SEAL 20 DURA-SEAL 25
 3-Tab Shingle Instructions DURA-SEAL 20 DURA-SEAL 25 1 Directions For Applying Malarkey 3-Tab Shingles GENERAL INSTRUCTIONS Install Malarkey 3-tab shingles according to building code and local amendments.
StormMaster Slate General Instructions 1.) GENERAL INSTRUCTIONS 2.) ROOF DECK VENTILATION 3.) ROOF DECK
 GENERAL INSTRUCTIONS 2.) ROOF DECK VENTILATION 3.) ROOF DECK") StormMaster Slate General Instructions IMPORTANT: THE STATEMENTS EXPRESSED ON THIS PAGE ARE THE RECOMMENDATIONS FOR THE APPLICATION OF THE ROOFING PRODUCTS AS OUTLINED AND ILLUSTRATED. ANY DEVIATION FROM
StormMaster Slate General Instructions IMPORTANT: THE STATEMENTS EXPRESSED ON THIS PAGE ARE THE RECOMMENDATIONS FOR THE APPLICATION OF THE ROOFING PRODUCTS AS OUTLINED AND ILLUSTRATED. ANY DEVIATION FROM
AIA Specification. Section Slate Shingles PART 1 GENERAL
 AIA Specification Section 07315 Slate Shingles PART 1 GENERAL 1.1 RELATED DOCUMENTS A. Drawings and general provisions of the Contract, including General and Supplementary Conditions and Division 1 Specification
ROOFING APPLICATION STANDARD (RAS) No. 130 INSTALLATION CRITERIA FOR WOOD SHINGLES AND SHAKES APPLICATION
 No. 130 INSTALLATION CRITERIA FOR WOOD SHINGLES AND SHAKES APPLICATION") ROOFING APPLICATION STANDARD (RAS) No. 130 INSTALLATION CRITERIA FOR WOOD SHINGLES AND SHAKES APPLICATION 1. 2. 3. Scope 1.1 This application standard provides the minimum installation criteria for wood
ROOFING APPLICATION STANDARD (RAS) No. 130 INSTALLATION CRITERIA FOR WOOD SHINGLES AND SHAKES APPLICATION 1. 2. 3. Scope 1.1 This application standard provides the minimum installation criteria for wood
The new steep-slope manual
 The new steep-slope manual The latest NRCA roofing manual addresses steep-slope roof system design, materials and application by Maciek Rupar In January, NRCA released The NRCA Roofing Manual: Steep-slope
C e r t a i n T e e d S h i n g l e A p p l i c a t o r s M a n u a l. and Carriage House STEEP. Slope Application. (over 21/12)
") C e r t a i n T e e d S h i n g l e A p p l i c a t o r s M a n u a l Grand Manor 16 and Carriage House YOUR OBJECTIVE: To learn the correct method of installing each of these roofing products. These shingles
C e r t a i n T e e d S h i n g l e A p p l i c a t o r s M a n u a l Grand Manor 16 and Carriage House YOUR OBJECTIVE: To learn the correct method of installing each of these roofing products. These shingles
Hatteras Shingles. CertainTeed Shingle Applicator s Manual. YOUR OBJECTIVE: To learn the correct procedures for installing Hatteras shingles
 CertainTeed Applicator s Manual Hatteras s 14 YOUR OBJECTIVE: To learn the correct procedures for installing Hatteras shingles HATTERAS SHINGLES Hatteras shingles are a premium oversize (18" x 36") roofing
SECTION 9: ROOF STRUCTURE, ROOFING MATERIALS AND FLASHING, GUTTER, DOWNSPOUTS, AND SKYLIGHTS. Background
 Background SECTION : ROOF STRUCTURE, ROOFING MATERIALS AND FLASHING, GUTTER, DOWNSPOUTS, AND SKYLIGHTS There are two basic types of roofs, flat and pitched. These two types have numerous variations. The
LAMINATED SHINGLES CERTAINTEED SHINGLE APPLICATOR S MANUAL SUPPLEMENT
 15 CERTAINTEED SHINGLE APPLICATOR S MANUAL SUPPLEMENT LAMINATED SHINGLES 90 YOUR OBJECTIVE: To learn the correct procedure for installing Laminated shingles. ENGLISH DIMENSIONS LANDMARK SERIES WOODSCAPE
ONDUVILLA. The Attractive Alternative to Shingles I N S T A L L A T I O N I N S T R U C T I O N S
 ONDUVILLA The Attractive Alternative to Shingles I N S T A L L A T I O N I N S T R U C T I O N S 1 INSTALLATION INSTRUCTIONS Even though ONDUVILLA is easy to install, it is important to read through these
ROOFING APPLICATION STANDARD (RAS) No. 130
 No. 130") ROOFING APPLICATION STANDARD (RAS) No. 130 1. Scope 1.1 This application Standard provides the minimum installation criteria for wood shingles and shakes. 2. Definitions 2.1 For definitions of terms used
ROOFING APPLICATION STANDARD (RAS) No. 130 1. Scope 1.1 This application Standard provides the minimum installation criteria for wood shingles and shakes. 2. Definitions 2.1 For definitions of terms used
Wood shakes and wood shingles
 Wood shakes and wood shingles Material description Wood shakes and wood shingles are manufactured from western red cedar, cypress, pine and redwood trees. Shakes are split from logs and reshaped by manufacturers
SECTION ASPHALT SHINGLES
 SECTION 07311 ASPHALT SHINGLES PART 1 GENERAL 1.01 SUMMARY A. Section Includes: 1. Asphalt shingle roofing. 2. Flexible sheet membranes for eave protection, underlayment, and valley protection. 3. Associated
Laminated Shingles. Landmark Series and Landmark TL. CertainTeed Shingle Applicator s Manual
 CertainTeed Shingle Applicator s Manual Laminated Shingles 12 Landmark Series and Landmark TL YOUR OBJECTIVE: To learn the correct procedure for installing Laminated shingles. LANDMARK SERIES AND LANDMARK
Installation Guide. Step 3. Valley Flashing. Step 7. Transition Flashings and Accessories. Step 6. Hip and Ridge Installation
 Step 7. Transition s and Accessories Step 3. Valley Step 6. Hip and Ridge Installation Step 2. Rake Trim Step 5. Installing the Shingles Step 1. Eave Starter Installation Step 4. Endwall s Installation
Grand Manor Carriage House and Centennial Slate 16 YOUR OBJECTIVE: To learn the correct method of installing each of these roofing products.
 CertainTeed Shingle Applicator s Manual Grand Manor Carriage House and Centennial Slate 16 YOUR OBJECTIVE: To learn the correct method of installing each of these roofing products. 90 STEEP Slope Application
GlassMaster General Instructions - Ardmore, OK & Hampton, GA <br /> Atlas Roofing
 GlassMaster General Instructions - Ardmore, OK & Hampton, GA (For Metric Size Franklin, OH Instructions Click Here) IMPORTANT: THE STATEMENTS EXPRESSED ON THIS WRAPPER ARE THE RECOMMENDATIONS FOR THE APPLICATION
COMPOSITE SIDING INSTALLATION GUIDE
 CENTURY HOME LIVING COMPOSITE SIDING INSTALLATION GUIDE Read all instructions prior to installing any siding product. Failure to install and finish this product in accordance with all local building codes,
DIVISION: THERMAL AND MOISTURE PROTECTION SECTION: ASPHALT SHINGLES REPORT HOLDER: IKO INDUSTRIES LIMITED
 0 Most Widely Accepted and Trusted ICC-ES Report ICC-ES 000 (800) 423-6587 (562) 699-0543 www.icc-es.org ESR-3532 Reissued 01/2017 This report is subject to renewal 01/2019. DIVISION: 07 00 00 THERMAL
b) Symphony comes pre-packaged in color and width blends. There is no need to mix Symphony at the job site. Currently Symphony is available in the
 Symphony comes pre-packaged in color and width blends. There is no need to mix Symphony at the job site. Currently Symphony is available in the") PART 1 GENERAL 1) DESCRIPTION a) CertainTeed Symphony TM composite slate is an innovative roofing product that simulates the appearance, texture, and contours of traditional natural slate. It is a carefully
PART 1 GENERAL 1) DESCRIPTION a) CertainTeed Symphony TM composite slate is an innovative roofing product that simulates the appearance, texture, and contours of traditional natural slate. It is a carefully
Multi-Width Shake. Widths: 9", 8", 7", 6", 4" Length: 22" Thickness at butt: 5/8" Single-Width Shake. Widths: 9" Length: 22" Thickness at butt: 5/8"
 N DaVinci Shake Multi-Width Shake Single-Width Shake INSTALLATION GUIDE DaVinci polymer shakes are carefully engineered to provide the authentic look of hand-split shakes with dramatically increased durability
B. Related Sections: The following Sections contain requirements that relate to this Section:
 SECTION 07311 - ASPHALT SHINGLES PART 1 - GENERAL 1.1 RELATED DOCUMENTS A. Drawings and general provisions of the Contract, including General and Supplementary Conditions and Division 1 Specification Sections,
Shingle Installation Guidelines
 Shingle Installation Guidelines General Guidelines Materials to be used Key definitions Cost of roofing Preparation of the roofing deck Materials used for roofing should conform to approved norms and regulations
Best Materials LLC distributes backer rod, caulking and sealants for all types of EIFS joints and penetration sealing applications.
 Best Materials LLC distributes backer rod, caulking and sealants for all types of EIFS joints and penetration sealing applications. EXTERIOR INSULATION & FINISH SYSTEM CONSTRUCTION Data Published Courtesy
installation guide Villa
 installation guide Villa Table of Contents Introduction............................. 2 Safety................................... 2 Tools.................................... 2 Codes & Requirements....................
The chimney must extend at least 2 above any part of the roof within 10 of it. A fireplace must have an intake combustion air duct installed to plan.
 ROOF ASSEMBLY FURNACE VENT In the utility room or where the furnace is located, there is an access panel to inspect the furnace chimney pipe for gas fired units. Remove the cover and check to see that
SECTION PVC THATCH SHINGLE ROOFING SYSTEM PART 1 GENERAL 1.01 SUMMARY
 SECTION 07312 PVC THATCH SHINGLE ROOFING SYSTEM PART 1 GENERAL 1.01 SUMMARY A. This Section Includes the following: 1. Endureed Dominica PVC thatch shingles. 2. Self- adhering sheet underlayment. B. Related
STORMMASTER SHAKE GENERAL INSTRUCTIONS
 STORMMASTER SHAKE GENERAL INSTRUCTIONS IMPORTANT: THE STATEMENTS EXPRESSED ON THIS PAGE ARE THE RECOMMENDATIONS FOR THE APPLICATION OF THE ROOFING PRODUCTS AS OUTLINED AND ILLUSTRATED. ANY DEVIATION FROM
HERITAGE LAMINATED ASPHALT SHINGLES Tuscaloosa, AL
 Application Instructions for THESE ARE THE APPLICATION INSTRUCTIONS FOR THE ROOFING CONDITIONS DESCRIBED. TAMKO BUILDING PRODUCTS, INC. SHALL NOT BE RESPONSIBLE FOR LEAKS OR OTHER ROOFING PROBLEMS RESULTING
Ekoroof LiteTile Dimensions
 Ekoroof LiteTile Dimensions 7 3 3.5 Height 40 Width 20 Length Weight per Panel: 3 kg / 6.61 lbs 2 2 Area per panel 800 in / 5.55 ft 2 Panels per Square: 20 (including overlap, for a 100 ft covered area)
1.04 QUALITY ASSURANCE
 SECTION 07312 ARCHITECTURAL ASPHALT SHINGLES PART 1 GENERAL 1.01 RELATED DOCUMENTS A. Drawings and general provisions of the Contract, including General and Supplementary Conditions and Division 1 Specification
SECTION ASPHALT SHINGLES
 SECTION 073110 - ASPHALT SHINGLES PART 1 - GENERAL 1.1 SUMMARY A. This Section includes the following: 1. Asphalt shingles. 2. Felt underlayment. 3. Self-adhering sheet underlayment. 4. Ice Shield Underlayment
Re-Roofing Policy SPECIAL REQUIREMENTS AND NOTES
 CITY OF MANTECA COMMUNITY DEVELOPMENT DEPARTMENT 1001 West Center Street Manteca, CA 95337 FAX (209) 923-8949 Building Safety Division (209) 456-8550 Planning Division (209) 456-8500 Public Works/Engineering
Timberline and Sovereign Expanded Fastener Placement Area
 Timberline and Sovereign Expanded Fastener Placement Area Information Sheet Updated: 2004 Quality You Can Trust Since 1886... From North America s Largest Roofing Manufacturer Less Fastening Hassles! Announcing
Capstone Application Instructions
 Capstone Application Instructions Information Sheet Updated: 2007 Quality You Can Trust Since 1886... From North America s Largest Roofing Manufacturer L IFETIME D ESIGNER S HINGLES APPLICATION INSTRUCTIONS
SECTION ASPHALT SHINGLES
 (Specifier Note: The purpose of this guide specification is to assist the specifier in correctly specifying glass-fiber-reinforced asphalt shingle products for sloped roofing applications. The specifier
4. Metal roof jacks at penetrations and attachments
 - - - - - - - - - - - - - - - - - - - - - - - - - - - - - - - - - - - - - - - - - - - - - - - - - - - - - - - - - - - - - - - - - - - - - - SECTION 07 61 00 METAL SHINGLE ROOFING - - - - - - - - - - -
1 Roof Substrate (Deck) OWENS CORNING BERKSHIRE SHINGLES INSTALLATION INSTRUCTIONS
 OWENS CORNING BERKSHIRE SHINGLES INSTALLATION INSTRUCTIONS") General This Installation Instruction document for Owens Corning Berkshire roofing shingles is to be read in conjunction with the Installation information printed on each packet of shingles along with
General This Installation Instruction document for Owens Corning Berkshire roofing shingles is to be read in conjunction with the Installation information printed on each packet of shingles along with
StormMaster Shake GENERAL INSTRUCTIONS For Spanish Instructions Click Here (Para las Instrucciones Españolas Haga Clic Aquí)
") StormMaster Shake GENERAL INSTRUCTIONS For Spanish Instructions Click Here (Para las Instrucciones Españolas Haga Clic Aquí) IMPORTANT: THE STATEMENTS EXPRESSED ON THIS PAGE ARE THE RECOMMENDATIONS FOR
StormMaster Shake GENERAL INSTRUCTIONS For Spanish Instructions Click Here (Para las Instrucciones Españolas Haga Clic Aquí) IMPORTANT: THE STATEMENTS EXPRESSED ON THIS PAGE ARE THE RECOMMENDATIONS FOR
Table of Contents. Fasteners... 4 Venting Preparation Installation with Battens - DECRA Tile & DECRA Shake 1
 Table of Contents DECRA Tile & Shake Roof Overview... 2 Introduction... 3 Safety... 3 Tools.... 3 Estimating Sheets... 4 Codes & Requirements... 4 Roof Slope... 4 Underlayment... 4 Deck Preparation....
Asphalt Shingle Installation at Roof Edges, Intersections and Valleys
 & Asphalt Shingle Installation at Roof Edges, Intersections and Valleys Abstract This updated document is intended to provide additional guidance and options for asphalt shingle installations at roof edges,
INSTALLATION GUIDE LEARN MORE AT DECRA.COM
 Villa Tile INSTALLATION GUIDE LEARN MORE AT DECRA.COM Table of Contents DECRA Villa Tile Roof Overview... 2 Introduction... 3 Safety... 3 Tools.... 3 Estimating Sheet... 3 Codes & Requirements... 3 Roof
BARDOLINE INSTALLATION INSTRUCTIONS
 BARDOLINE INSTALLATION INSTRUCTIONS www.onduline.com CONTENTS General conditions Material requirements Terms Estimating shingle requirements Roof preparation Shingle application 9 GENERAL CONDITIONS ONDULINE
Shapes Siding. Perfection Shingles. Chalk Line
 Snap a Chalk Line Shapes Siding Perfection Shingles Chalk Line To establish a straight reference line to guide the positioning of the starter strip and the first course of siding, snap a chalk line. starter
Brava Old World Slate Installation Guide
 Brava Old World Slate Installation Guide Brava Roof Tile Phone: 844-290-4196 www.bravarooftile.com This document includes the recommended and suggested installation procedures for Brava Old World Slate
ICC-ES Evaluation Report Reissued September 1, 2012 This report is subject to renewal September 1, 2013.
 ICC-ES Evaluation Report www.icc-es.org (800) 423-6587 (562) 699-0543 ESR-1790 Reissued September 1, 2012 This report is subject to renewal September 1, 2013. A Subsidiary of the International Code Council
Cambridge English Application Instructions
 Cambridge English Application Instructions ROOF SLOPE: Never apply asphalt shingles to roof slopes less than 2:12. For slopes 2:12 to 4:12 (LOW SLOPE), see special underlayment requirements outlined below.
Installation Guide. Cedar Shake. Distributed by: BEST MATERIALS LLC, Phoenx AZ
 RPM ROOFING Installation Guide Cedar Shake Distributed by: BEST MATERIALS LLC, Phoenx AZ 602-272-8128 800-474-7570 www.bestmaterials.com Table of Contents OVERVIEW... 1 CAUTION... 1 DISCLAIMER... 1 PRODUCT
Application Guidelines - Shake General Information
 Application Guidelines - Shake General Information No Special Tools Required hand fastened or fastened with a pneumatic nail gun utility knife or a standard circular saw tape measure, pry bar, tin snips
ESR-1129 Reissued June 1, 2011 This report is subject to renewal in two years.
 ICC-ES Evaluation Report ESR-1129 Reissued June 1, 2011 This report is subject to renewal in two years. www.icc-es.org (800) 423-6587 (562) 699-0543 A Subsidiary of the International Code Council DIVISION:
HUB REV 9/18 ROOF INSTALLATION MANUAL ZIPSYSTEM.COM
 ROOF INSTALLATION MANUAL ZIPSYSTEM.COM 2 ATTENTION: This installation guide is intended to provide general information for the designer and end user. The following guidelines will help you safely and properly
Laminate Shingle Installation Instructions
 Laminate Shingle Installation Instructions WWW.MALARKEYROOFING.COM Directions for Applying Malarkey Laminate Shingles GENERAL INSTRUCTIONS Install Malarkey laminate shingles according to adopted building
6 STEP INSTALLATION GUIDE BY DCI
 6 STEP INSTALLATION GUIDE BY DCI STEP 1 (Ensure metal drip edge was previously installed.) Begin by cutting a slit 1 wide (or a series of 1 ¾ holes 3 on center) into the roof decking 6 to 7 up from the
3-Tab Shingle Installation Instructions
 3-Tab Shingle Installation Instructions WWW.MALARKEYROOFING.COM Directions for Applying Malarkey 3-Tab Shingles GENERAL INSTRUCTIONS Install Malarkey 3-tab shingles according to adopted building code and
The City of Winnipeg SHINGLE ROOF REPLACEMENT Section Replacement of Shingle Roof - Louis Riel Library Page 1 of 5 Bid Opp. No.
 Replacement of Shingle Roof - Louis Riel Library Page 1 of 5 PART 1 GENERAL 1.1 SCOPE OF WORK.1 Total roof area approximately 1,312 m 2. The Work includes, but is not limited to:.1 Removal and disposal
Tapersawn Shake Installation Instructions
 Smart-Shingle TM System Tapersawn Shake Installation Instructions INSTALLATION GUIDE MARKS Shake-Strip 0 1 2 3 4 5 6 7 8 9 10 11 12 13 14 15 16 17 18 19 20 21 22 23 24 25 26 27 28 29 30 31 32 33 34 35
Table of Contents. Roof to Head Wall w/ Side Flashing DECRA Shake XD Roof Overview Roof Penetration - Pipes & Vents...
 Table of Contents DECRA Shake XD Roof Overview.... 2 DECRA Shingle XD Roof Overview.... 3 Introduction... 4 Safety... 4 Tools.... 4 Estimating Sheet... 4 Codes & Requirements... 4 Roof Slope... 4 Underlayment...
ZIP System Roof Sheathing INSTALLATION MANUAL A REVOLUTION IN ROOFING
 A REVOLUTION IN ROOFING FROM THE CREATORS OF ZIP System Roof Sheathing INSTALLATION MANUAL Sales Office: 10925 David Taylor Dr., Suite 300 Phone: 800-933-9220 zipsystem.com Charlotte, NC 28262 Fax: 704-547-9228
Installation Manual. Future Roof Shingle / Slate Products
 Installation Manual Future Roof Shingle / Slate Products REVISED 14/09/2010 Future Roof Shingle Installation Manual is a component of Future Roof, Inc. and as such is intended to be used with Future Roof
SmartVent Eave Edge Installation Instructions
 SmartVent Eave Edge Installation Instructions STEP 1: Cut a slit 1 wide (or a series of 1 ¾ holes at 3 on center) into the roof decking 6 to 7 up from the drip edge. SmartVent is rated 9NFA. Ensure drip
REPORT HOLDER: ISAIAH INDUSTRIES, INC. EVALUATION SUBJECT:
 0 Most Widely Accepted and Trusted ICC ES Evaluation Report ICC ES 000 (800) 423 6587 (562) 699 0543 www.icc es.org ESR 1360 Reissued 08/2018 This report is subject to renewal 08/2019. DIVISION: 07 00
Installation Instructions for Old Mill Shingle and Designer Shake Lap Siding
 Installation Instructions for Old Mill Shingle and Designer Shake Lap Siding Includes: Cove, Craftsmen Staggered, Diamond, Fish Scale, Octagon, Round and Old Mill Shingle Lap Important: Read and understand
Installation Instructions for Standard Lap and Self-Aligning Lap Siding
 Installation Instructions for Standard Lap and Self-Aligning Lap Siding 7/16 in. Standard Laps Include: All Old Mill Widths, Cedar Shake Lap and Smooth Lap 1/2 in. Self-Aligning Include: 8 in. and 12 in.
OWENS CORNING LAMINATE SHINGLES INSTALLATION INSTRUCTIONS
 General This Installation Instruction document for Owens Corning asphalt roofing shingles is to be read in conjunction with the Installation information printed on each packet of shingles along with the
Architrave: The molded from or ornament surrounding a window, door or other rectangular opening.
 Section 8. Definitions. Architrave: The molded from or ornament surrounding a window, door or other rectangular opening. Bay Window: A window that projects out from the surface of an exterior wall and
APRON FLASHING NOTES: SHEET METAL APRON FLASHING WITH HEMMED EDGE RAGGLE SEALANT UNDERLAYMENT TURNED UP WALL
 SHEET METAL APRON FLASHING WITH HEMMED EDGE SEALANT SHEET METAL COUNTERFLASHING (SEE NOTE No.1) RAGGLE UNDERLAYMENT TURNED UP WALL SHEET METAL STEP FLASHING SOLDER OR SEAL CORNERS ASPHALT SHINGLES NOTES:
Barrel Vault Counter Batten and Batten
 Barrel Vault Counter Batten and Batten INSTALLATION GUIDE www.gerardusa.com INSTALLATION NOTIFICATION The installation procedures demonstrated in this manual are recommended methods for the installation
RESIDENTIAL ROOFS ADDENDUM NUMBER ONE. August 28, 2017
 RESIDENTIAL ADDENDUM NUMBER ONE August 28, 2017 The following additions to, deletions from, and clarifications of the Contract Documents govern insofar as they apply and shall take precedence over those
TECHNICAL BULLETIN NEW ICC ES EVALUATION REPORT
 TECHNICAL BULLETIN NEW ICC ES EVALUATION REPORT [March 25, 2015] Malarkey recently received our new, updated ICC ES Evaluation Report (ESR 3150) which includes the additions of Windsor shingles and all
Application Guidelines - Slate General Information
 No Special Tools Required Application Guidelines - Slate General Information hand fastened or fastened with a pneumatic nail gun utility knife or a standard circular saw tape measure, pry bar, tin snips
MIAMI-DADE COUNTY PRODUCT CONTROL SECTION DEPARTMENT OF REGULATORY AND ECONOMIC RESOURCES (RER)
") MIAMI-DADE COUNTY PRODUCT CONTROL SECTION DEPARTMENT OF REGULATORY AND ECONOMIC RESOURCES (RER) 11805 SW 26 Street, Room 208 BOARD AND CODE ADMINISTRATION DIVISION Miami, Florida 33175-2474 T (786) 315-2590
MIAMI-DADE COUNTY PRODUCT CONTROL SECTION DEPARTMENT OF REGULATORY AND ECONOMIC RESOURCES (RER) 11805 SW 26 Street, Room 208 BOARD AND CODE ADMINISTRATION DIVISION Miami, Florida 33175-2474 T (786) 315-2590
RIDGEMASTER PLUS CAUTION INSTALLATION INSTRUCTIONS ALWAYS WEAR SAFETY GLASSES TOOLS NEEDED GENERAL GUIDELINES FOR RIDGEMASTER PLUS AND HIPMASTER
 INSTALLATION INSTRUCTIONS RIDGEMASTER PLUS CAUTION Before beginning installation read all general guidelines, special notes and installation steps thoroughly and be sure to check and follow all your local
Roof Systems. Ching, F. D. K. & Adams, C. (2001). Building construction illustrated (3 rd ed.). New York: Wiley & Sons.
. Building construction illustrated (3 rd ed.). New York: Wiley & Sons.") Roof Systems References: Ching, F. D. K. & Adams, C. (2001). Building construction illustrated (3 rd ed.). New York: Wiley & Sons. Jefferis, A. & Madsen, D. A. (2005). Architectural drafting and design
Roof Systems References: Ching, F. D. K. & Adams, C. (2001). Building construction illustrated (3 rd ed.). New York: Wiley & Sons. Jefferis, A. & Madsen, D. A. (2005). Architectural drafting and design
9Upgrades to Windproof Your Roof
 9Upgrades to Windproof Your Roof Nail down the details to keep asphalt shingles where they belong By Mike Guertin Asphalt shingles are getting better all the time, but the elements can still get the best
Product Information & Installation Instructions
 Product Information & Installation Instructions TUFF-STRAND TM OSB Sheathing OSB Structural Panels from MARTCO Installation Instructions: Site-Built and Modular Construction Important Notice to Buyers
Installation Instructions Split Shake, Staggered Shake, Shingle, Perfection Shingle, and Shapes
 Installation Instructions Split Shake, Staggered Shake, Shingle, Perfection Shingle, and Shapes General Guidelines These instructions show one type of installation and are intended for the professional
FASTENERS BUILDING DEPARTMENT
 FASTENERS BUILDING DEPARTMENT 952-446-1660 WWW.CITYOFMINNETRISTA.COM This handout is intended only as a guide and is based in part on the 2015 Minnesota Residential Code, Minnetrista City ordinances, and
ForceField Air & Water Barrier System. installation instructions
 ForceField Air & Water Barrier System installation instructions Protection and Performance inside and out The ForceField air and water barrier system consists of engineered wood sheathing panels laminated