Tormach CNC Mill PCNC1100
|
|
|
- Patrick Reed
- 6 years ago
- Views:
Transcription

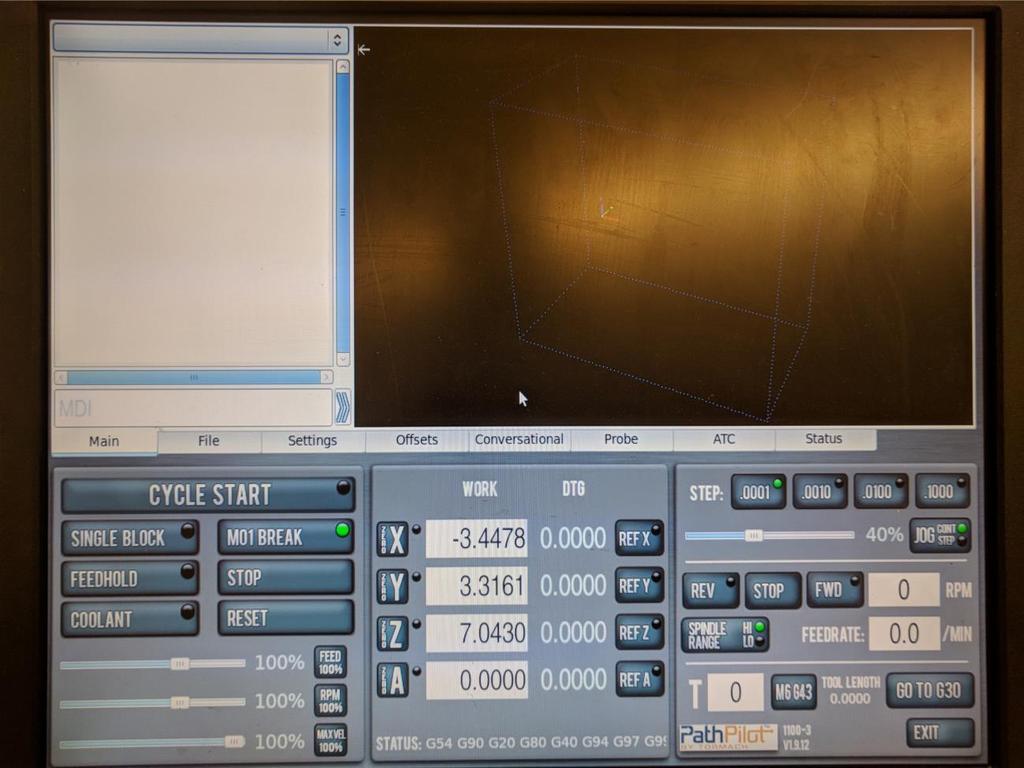
1 Tormach CNC Mill PCNC1100 Machine Purpose: CNC machine used for precision cutting, drilling & forming Safety: Must wear safety glasses while operating machine. Keep. Beware of objects that dangle and could get caught in cutting tool. Beware of flying metal chips. KEEP DOORS CLOSED WHILE OPERATING. Materials: Metals, Plastics, Synthetic Machine Specs: 18 x9 bed size, 1.5 hp motor,.5 tooling, 110 IPM, 5100 rpm spindle Tooling: Located in red tool check next to machine, lista cabinets on wall in front of machine Accessories: Smartcool Coolant system, Floor/Air/Mist Coolant, 10 ATC, TTS tool setter, 4 vice with soft jaw capability, sacrificial mounting plates CAM Post: tormach.cps Tormach Path Pilot Interface software: Path Pilot Instruction Required: 2 Class Checkout, Group Class Followed by Individual Instruction
 5. Click reset on screen (should be flashing) Machine Reference Procedure 1. Make sure there is no tooling in the way of the bed and spindle door is closed.")
2 TORMACH MACHINE INSTRUCTIONS Start Up Procedure 1. Make sure estop (big red button) is depressed 2. Turn on Mains power 3. After software loads, release e stop button 4. Press green button (should hear a cachunk) 5. Click reset on screen (should be flashing) Machine Reference Procedure 1. Make sure there is no tooling in the way of the bed and spindle door is closed. 2. On Screen Click REF Z 3. On Screen Click REF X 4. On Screen Click REF Y. Work Offset Set up With Tool Setter 1. Physical Fixture your work surface on the bed, vice or sacrificial surface 2. Position Tool Setter on Zero Plane of work surface, Plug in tool setter 3. Double check Tool setter is stable on work surface 4. Double check tool setter is fully connected by depressing top and making sure the red light (both on screen and on the unit ignites) 5. Navigate to Offsets > Work 6. Make Sure Spindle is Empty, Collet is closed and Tool 0 listed as in spindle 7. Press Move & Set Work Offset. Now you Z offset has been set relative to your zero plane 8. Insert Heimer probe into the spindle. 9. Enter "50" into the tool in spindle box 10. Make sure step increments are set to Using the keyboard/jog controller Jog/dial the probe tip near your x zero line. 12. Slowly move the probe until the dial reads both 0 at the top dial and bottom smaller dial. 13. Click Zero X to zero your X position 14. Repeat steps for your Y zero position 15. Now your work is set in the X/Y/Z
3 Loading Tools into the ATC - Skip if only using 1 tool 1. Navigate to ATC Menu 2. Delete all tools in ATC menu 3. Physically Remove any tools from spindle 4. Make sure Tool in Spindle is listed as 0 5. Click Go To Load position 6. Physically Insert Tool into ATC Fork 7. Assign tool numbers as tools are placed in ATC - Click insert 8. Tray Rev/Fwd to turn ATC and load up to 10 tools, remember to click insert and assign tool numbers as you load 9. Click Retract to Move ATC to home position and clear the spindle 10. Position Tool Setter on Zero Plane & Plug into control box 11. Test Tool Setter Connection by depressing top and making the red light both physically and digitally comes on. 12. Once Tool Setter is tested and in position under spindle center click touch off entire tray. This will grab all tools loaded in order and touch them off to the setter.
4 Tool Offset Setup Option 2 - Single Tool Program/Manual Tool Change 1. Load tool into spindle using the lock/release buttons on the spindle head 2. Enter tool number in Current tool window in PathPilot 3. Connect tool setter, making sure secure connection (step 11^) place on zero plane 4. Setting Tool Length a. Tool Setter: Plug in the tool setter, place below the spindle i. Machine Offset: With spindle empty and collet locked, go to WorkOffset Screen -> Move and set work offset ii. Tool Length Offset: Tool in spindle, Offsets-> Tool window press "Move & Tool offset" to use the tool setter b. Manually Enter Length: Measure the length from the face of the holder to the tip of the tool using the granite block, enter length in tool offset sheet for tool number c. Manually Touch Off: Using a touch off block/shim/gauge block, use the jog/increment wheel to touch off with tool in spindle. Enter the block/shim/gauge thickness in the window and click touch z
. 8. Your code and 3D model of your part should automatically load in Main Tab.")
5 Loading Your Program 1. Put usb drive into slot on left side of screen 2. Goto File tab in path pilot 3. Click on USB on the desktop screen (the Center of the screen). 4. Find your file. 5. Click "copy from USB" 6. Find your G-code in the left side of the screen 7. Click Load G-Code (on the top of the screen). 8. Your code and 3D model of your part should automatically load in Main Tab. Review accordingly. 9. Confirm the tools you are using are noted appropriately in the G-Code. (Scroll until you see a T_ for example T5 and your tool is in the T5 slot.) If the G-Code is noted as the incorrect tool, adjust in the code accordingly. 10. Confirm the Heimer indicator is no longer in the machine. 11. Using the sliders (on the bottom, left of the desktop screen), adjust the MAXVEL from 100% to 20%. This allows the process to slow down enough for you to clearly see it. 12. Make sure doors are closed. 13. Click Cycle Start. (on the left side of the screen). 14. Use "M01 break" if you want to automatically pause the run cycle between tool changes. If selected you will need to manually click "cycle start" before each tool change.
6

7 Turn Off Procedure: 1. Unload your tools from the tool tray 2. Make sure no tools are in the spindle. 3. Press E-stop button 4. Click Exit in PathPilot 5. Click ok to power off 6. Turn off Mains Power
8 Main Controls Cycle Start: Starts any code loaded on the main screen Single Block: Runs your code line by line Feed Hold: Stops movement in the XYZ while a program is running but does not stop the spindle, and pauses location in the code. Click cycle start to resume. Coolant: Turns flood coolant on and off. Typing M08 into the MDI will turn on flood coolant. Typing M07 will turn on the Mist (or air if knob is adjusted) M01 Break: Pauses a running program between tool changes. You will need to click cycle start after pauses. Stop: Stops the program and movement entirely. You will loose your position in the code if you need to restart. Reset: Used to reset digital communication after a power off Estop Button (physical): Kills all power and air to the machine. You will lose all position data and have to restart from beginning of tool path.
9 Zero X/Y/Z/A: used to zero the current G home to the location of the offset point. A is not currently used on our machine (for turning) Ref X/Y/Z/A: Sends the bed and spindle to their home positions. Used when referencing after powering down or E stopping. Work #: Tool Tip position relative to work offset position. DTG #: Distance to go to end of current movement from tool path or MDI entry. Step (.0001,.0010,.0100,.1000): Step size increment used with incremental movement. Click to change. Recommended to leave on.0001 Slider %: Percent of max jog speed when using continuous movement. Job Con/Step: Changes keyboard arrow movement type. Increment: movement length based on step per click, 1 arrow press=movement of step distance Rev/Stop/Fwd: Turns the spindle on CCW/Stops/CW #RPM: spindle speed you want the spindle to run manually Spindle Hi/Low: Current physical set up (our machine is default to HI) Feedrate #: Inchs per minute for manual gcode movement Go to g30: Goes to the work offset home position (x:0, y:0, z:0) specific to tool length currently programmed in. T# (bottom right corner) - Identifies the tool currently in the spindle, also used to fetch and store tools Tool 0 is an empty spindle If you change from a 0 to a number in the ATC it will fetch that tool If you change from a 0 to a number not in the ATC it will think it's holding that tool If you change from a tool number stored in the ATC to a number stored in the ATC it will put away the current tool in the ATC and Fetch the new tool number entered. Entering zero will put away the current tool and leave an empty spindle. If you change from a tool number stored in the ATC to a number not stored in the ATC it will put away the current tool in the ATC and allow you to load the new tool
10 ATC Menu Insert Number Box - Assigning a tool being inserted into the 3 o'clock position in the ATC Delete All - Deletes all saved saved tools in the digital ATC (careful as path pilot no longer knows where tools are stored Delete - Deletes just the tool in the 3 o'clock position from the digital ATC, or current tool in spindle from software. Tray Rev/Tray FWD - Turns the ATC clockwise/ccw so you can load the forks. Go to tray load position - Moves the spindle head out of way and ATC under the spindle, opening the ATC gate. Retract - Moves the spindle head up, and ATC to the home position, Closing the ATC Gate Draw Bar On/Off - Opens the drawbar. (careful if a tool is loaded it will drop) Blast- Shoots air down the collet Ref Tool Tray - References the ATC turned position upon initiation after start up SET TC Pos - Used for calibrating the ATC rotation position --/++ - Used in calibration of the ATC rotation position
11 Remove/Number Box - Used to delete ATC stored tool number entered, The ATC will fetch tool entered and remove digital home from carousel, you must remove tool from spindle/machine manually following this button. ATC Rev/ATC FWD - Will fetch the next tool stored in the spindle in fwd or rev Touch off Entire Tray - used in conjunction with the tool setter, will cycle through the entire tray to measure each tools Store Current Tool - Will use the ATC to store the tool currently in the spindle to its home in the ATC T# (bottom right corner) - Identifies the tool currently in the spindle, also used to fetch and store tools Tool 0 is an empty spindle If you change from a 0 to a number in the ATC it will fetch that tool If you change from a 0 to a number not in the ATC it will think it's holding that tool If you change from a tool number stored in the ATC to a number stored in the ATC it will put away the current tool in the ATC and Fetch the new tool number entered. Entering zero will put away the current tool and leave an empty spindle. If you change from a tool number stored in the ATC to a number not stored in the ATC it will put away the current tool in the ATC and allow you to load the new tool
CNC Turning. Module 3: CNC Turning Machine. Academic Services PREPARED BY. January 2013
 CNC Turning Module 3: CNC Turning Machine PREPARED BY Academic Services January 2013 Applied Technology High Schools, 2013 Module 3: CNC Turning Machine Module Objectives Upon the successful completion
Table of Contents. Table of Contents. Preface 11 Prerequisites... 12
 Table of Contents Preface 11 Prerequisites... 12 Basic machining practice experience... 12 Controls covered... 12 Limitations... 13 The need for hands -on practice... 13 Instruction method... 13 Scope...
Award recommendations highlighted in yellow. Rapid City, SD Quote # Quantity Description of Item Tormach Inc. $48,870.00
 Tormach 15L Slant-Pro Deluxe Education Package shall be as follows, and shall include: 1 3 Tormach 15L Slant-Pro CNC Lathe: - 15 Swing over bed diameter - 3HP Spindle - 1.53 Spindle Bore 8-Station Turret
Automatic Tool Changer (ATC) for the prolight A Supplement to the prolight 1000 User s Guide
 for the prolight A Supplement to the prolight 1000 User s Guide") Automatic Tool Changer (ATC) for the prolight 1000 A Supplement to the prolight 1000 User s Guide 1 1995 Light Machines Corporation All rights reserved. The information contained in this supplement (34-7221-0000)
Automatic Tool Changer (ATC) for the prolight 1000 A Supplement to the prolight 1000 User s Guide 1 1995 Light Machines Corporation All rights reserved. The information contained in this supplement (34-7221-0000)
HAAS LATHE PANEL TUTORIAL
 HAAS LATHE PANEL TUTORIAL Safety First Never wear loose clothing or long hair while operating lathe Ensure that tools and workpiece are clamped securely Don't touch a rotating workpiece If something isn't
Standard. CNC Turning & Milling Machine Rev 1.0. OM5 Control Software Instruction Manual
 Standard CNC Turning & Milling Machine Rev 1.0 OM5 Control Software Instruction Manual Legacy Woodworking Machinery 435 W. 1000 N. Springville, UT 84663 Standard CNC Machine 2 Content Warranty and Repair
CNC Turning Training CNC MILLING / ROUTING TRAINING GUIDE. Page 1
 CNC Turning Training www.denford.co.uk Page 1 Table of contents Introduction... 3 Start the VR Turning Software... 3 Configure the software for the machine... 4 Load your CNC file... 5 Configure the tooling...
Mill OPERATING MANUAL
 Mill OPERATING MANUAL 2 P a g e 7/1/14 G0107 This manual covers the operation of the Mill Control using Mach 3. Formatting Overview: Menus, options, icons, fields, and text boxes on the screen will be
CNC Router Tutorial Jeremy Krause
 CNC Router Tutorial Jeremy Krause Jeremy.Krause@utsa.edu Usage prerequisites: Any user must have completed the machine shop portion of the Mechanical Engineering Manufacturing course (undergraduate, sophomore
Congratulations on your decision to purchase the Triquetra Auto Zero Touch Plate for All Three Axis.
 Congratulations on your decision to purchase the Triquetra Auto Zero Touch Plate for All Three Axis. This user guide along with the videos included on the CD should have you on your way to perfect zero
527F CNC Control. User Manual Calmotion LLC, All rights reserved
 527F CNC Control User Manual 2006-2016 Calmotion LLC, All rights reserved Calmotion LLC 21720 Marilla St. Chatsworth, CA 91311 Phone: (818) 357-5826 www.calmotion.com NC Word Summary NC Word Summary A
Setting Part Zero and Setting Cutting Tool for Wheel Lathe
 There are three sections in this document: A: Setting Tool #1 and Tool #2 on center line height to the spindle which are explained in steps 1 thru 3 B: Setting Part 0 for X & Z and setting X & Z reference
1640DCL Digital Control Lathe
 1640DCL Digital Control Lathe MACHINE SPECIFICATIONS Multiple Function CNC Lathe 1. Manual Hand wheel Operation 2. CNC G-Code Operation 16.1 swing over bed, 8.6 swing over cross-slide 2.05 diameter hole
CNC: The Machine. Sullivan Fabrication Studio Version 5.1 (beta)
") CNC: The Machine Sullivan Fabrication Studio Version 5.1 (beta) TABLE OF CONTENTS Initial Setup... About the Knowledge Base........... Techno CNC Router... Mounting Material... Install Router Bit... Set
CNC: The Machine Sullivan Fabrication Studio Version 5.1 (beta) TABLE OF CONTENTS Initial Setup... About the Knowledge Base........... Techno CNC Router... Mounting Material... Install Router Bit... Set
Ladybird Project - Vacuum Mould
 - Vacuum Mould Prerequisite Mould drawn and saved as an STL file in SolidWorks Focus of the Lesson On completion of this exercise you will have: Opened an STL file Set Machining Constraints Set up Tools
Conversational CAM Manual
 Legacy Woodworking Machinery CNC Turning & Milling Machines Conversational CAM Manual Legacy Woodworking Machinery 435 W. 1000 N. Springville, UT 84663 2 Content Conversational CAM Conversational CAM overview...
Getting Started. Terminology. CNC 1 Training
 CNC 1 Training Getting Started What You Need for This Training Program This manual 6 x 4 x 3 HDPE 8 3/8, two flute, bottom cutting end mill, 1 Length of Cut (LOC). #3 Center Drill 1/4 drill bit and drill
VBXC CONFIGURATION AND PROCESS CONTROL MANUAL
 VBXC CONFIGURATION AND PROCESS CONTROL MANUAL SOFTWARE VERSION 2.4 DOCUMENT #D10008 REVISION: A OCTOBER 2018 All rights reserved. No patent liability is assumed with respect to the use of the information
Dozuki. Written By: Dozuki System. Guide to calibrating the Haas wireless intuitive probing system. How to Calibrate WIPS
 Dozuki How to Calibrate WIPS Guide to calibrating the Haas wireless intuitive probing system. Written By: Dozuki System 2017 www.dozuki.com Page 1 of 22 INTRODUCTION Getting Started On initial setup or
CNC Machines Assembly Guide
 CNC Machines Assembly Guide Contents Warnings 3 General Safety 3 Emergency Stop Restart Procedure 3 Before you start 4 Matrix Micro CNC Kits & Machines Modules 4 Assembly Notes 5 Small and Large Retaining
Techno LC Series 4848 CNC Router Tutorial
 What is the CNC Router? Techno LC Series 4848 CNC Router Tutorial The CNC (Computer Numerically Controlled) Router is a digitally driven, coordinate based prototyping and production machine. The CNC router
Care and Maintenance of Milling Cutters
 The Milling Machine Care and Maintenance of Milling Cutters The life of a milling cutter can be greatly prolonged by intelligent use and proper storage. Take care to operate the machine at the proper speed
How to Calibrate a CNC Machine's Positioning System
 How to Calibrate a CNC Machine's Positioning System Guide to calibrating the Haas wireless intuitive probing system. Written By: Kim Payne 2018 gunnerautomotive.dozuki.com/ Page 1 of 20 INTRODUCTION Attention:
so you want to get to know Onsrud... Onsrud1 : machine set up
 so you want to get to know Onsrud... Onsrud1 : machine set up What does CNC mean? CNC: Computer Numerical Control The router is controlled by a computer, that tells the router where to go through a series
Tutorial 1 getting started with the CNCSimulator Pro
 CNCSimulator Blog Tutorial 1 getting started with the CNCSimulator Pro Made for Version 1.0.6.5 or later. The purpose of this tutorial is to learn the basic concepts of how to use the CNCSimulator Pro
CNC Using the FlexiCam CNC and HMI Software. Guldbergsgade 29N, P0 E: T:
 CNC Using the FlexiCam CNC and HMI Software Guldbergsgade 29N, P0 E: makerlab@kea.dk T: +46 46 03 90 This grey box is the NC controller. Let s start by turning the red switch to the ON position, then press
CNC Chucker Lathe P/N 6600, 6610, and 6620
 WEAR YOUR SAFETY GLASSES FORESIGHT IS BETTER THAN NO SIGHT READ INSTRUCTIONS BEFORE OPERATING PRODUCT DESCRIPTION 6600 CNC Chucker w/3c headstock, ball screws, high-torque stepper motors & PC w/4-axis
Table of Contents. Preface 9 Prerequisites 9. Key Concept 1: Know Your Machine From A Programmer s Viewpoint 13. Table of Contents
 Preface 9 Prerequisites 9 Basic machining practice experience 9 Controls covered 10 Limitations 10 Programming method 10 The need for hands -on practice 10 Instruction method 11 Scope 11 Key Concepts approach
Computation & Construction Lab. Stinger CNC 3D Milling Workflow
 Computation & Construction Lab Stinger CNC 3D Milling Workflow 3D Single Sided Milling Guidelines - The following steps will guide the user on how to transfer digital work from a design software to setting
LinuxCNC Help for the Sherline Machine CNC System
 WEAR YOUR SAFETY GLASSES FORESIGHT IS BETTER THAN NO SIGHT READ INSTRUCTIONS BEFORE OPERATING LinuxCNC Help for the Sherline Machine CNC System LinuxCNC Help for Programming and Running 1. Here is a link
Using the Monarch Introduction Monarch Overview Dials, Controls and Switches, or "How do I turn this thing on?" Turning the machine on Feed.
 Using the Monarch Introduction The Product Realization lab has one 10" Model "EE" Monarch Precision Toolmakers Lathe. It is a vintage 1950's precision lathe - but don't let the age fool you. The Monarch
Mill Operator Users Guide. Mike Cope Product Technical Specialist
 Mill Operator Users Guide Mike Cope Product Technical Specialist copem@hurco.com Table of Contents Performing a Tool Change Clear the Tool in Spindle Tool Touch-off Without touch probe With touch probe
OmniTurn Start-up sample part
 OmniTurn Start-up sample part OmniTurn Sample Part Welcome to the OmniTum. This document is a tutorial used to run a first program with the OmniTurn. It is suggested before you try to work with this tutorial
INDEX A FAGOR. 1. MC Training Manual. 2. Additional Simple Cycles. 3. USB Interface. 4. Installation. 5. Electrical Drawings
 KNEE MILL PACKAGE INDEX 1. MC Training Manual 2. Additional Simple Cycles 3. USB Interface 4. Installation 5. Electrical Drawings 1 800 4A FAGOR * This information package also includes 8055 CNC Training
NZX NLX
 NZX2500 4000 6000 NLX1500 2000 2500 Table of contents: 1. Introduction...1 2. Required add-ins...1 2.1. How to load an add-in ESPRIT...1 2.2. AutoSubStock (optional) (for NLX configuration only)...3 2.3.
OPERATOR S MANUAL CNC Lathes Equipped with the GE Fanuc 18T Control
 OPERATOR S MANUAL TP1421 CNC Lathes Equipped with the GE Fanuc 18T Control Manual No. M-321A Litho in U.S.A. Part No. M A-0009500-0321 April, 1997 - NOTICE - Damage resulting from misuse, negligence, or
When the machine makes a movement based on the Absolute Coordinates or Machine Coordinates, instead of movements based on work offsets.
 Absolute Coordinates: Also known as Machine Coordinates. The coordinates of the spindle on the machine based on the home position of the static object (machine). See Machine Coordinates Absolute Move:
Cosmic 2000-in-1 Multiplay Arcade Machine
 Cosmic 2000-in-1 Multiplay Arcade Machine User guide to common procedures Contents 1. 1. 2. 2. 3. 3. Unscrew Feet. Switching On The Machine. Adjust Audio Volume. Menu Navigation. Add Credit. Disable Freeplay
15L Slant-PRO TM CNC LATHE
 15L Slant-PRO TM CNC LATHE INDEX Product Overview p. 2 Specifications p. 3 Options p. 4 Workholding pp. 5-8 Toolholding pp. 9-12 Warranty p. 16 ENABLING YOUR IDEAS Tormach 15L Slant-PRO CNC Lathe PRODUCT
QUEST 6/42 QUEST 8/51 QUEST 10/65
 OPERATOR S MANUAL TP6793 QUEST 6/42 QUEST 8/51 QUEST 10/65 MULTI-TASKING CNC Lathes Equipped with the GE Fanuc 16i-T, 18i-T, or 21i-T Control Revised: January 18, 2008 Manual No. M-392D Litho in U.S.A.
2016 Motorized Shades Basic Programming
 About Motorized Shades: 2016 Motorized Shades Basic Programming A. THE (DUAL VOLTAGE) TWO WIRE 25TE MOTOR REQUIRES 120V AC OR 240V AC. B. BATTERIES ARE (NOT INCLUDED) FOR 12V 25CE BATTERY MOTORS. EACH
Make It: Bottle Light. Making Bottle Lights with the Westmont Library Makery
 Make It: Bottle Light Making Bottle Lights with the Westmont Library Makery Introduction Welcome to the Westmont Library s Make It: Bottle Light program! We re very pleased to have you. In this program,
VisualCAM 2018 TURN Quick Start MecSoft Corporation
 2 Table of Contents About this Guide 4 1 About... the TURN Module 4 2 Using this... Guide 4 3 Useful... Tips 5 Getting Ready 7 1 Running... VisualCAM 2018 7 2 About... the VisualCAD Display 7 3 Launch...
Quick Guide to Gift and Jewelry Engraving
 Quick Guide to Gift and Jewelry Engraving Engraving a Pewter Tankard (Cylindrical Metal Objects) Cylindrical Engraving of Metal Objects Tools required for Cylindrical Engraving *1. The optional 1/8 (c2
WINMAX LATHE OPTIONS Dual-screen and Max Consoles for Hurco Turning Centers
 WINMAX LATHE OPTIONS Dual-screen and Max Consoles for Hurco Turning Centers May 2015 704-0115-409 Revision A The information in this document is subject to change without notice and does not represent
SHOP NOTES. GPocket Guide and Reference Charts. for CNC Machinists. Made in the U.S.A.
 SHOP NOTES GPocket Guide and Reference Charts for CNC Machinists Made in the U.S.A. WHAT S INSIDE THIS BOOKLET? Decimal Equivalent Chart / Millimeter to Inch Chart Haas Mill G-Codes / Haas Mill M-Codes
Prasanth. Lathe Machining
 Lathe Machining Overview Conventions What's New? Getting Started Open the Part to Machine Create a Rough Turning Operation Replay the Toolpath Create a Groove Turning Operation Create Profile Finish Turning
HAFCO METALMASTER HM-51. Turret Milling Machine. (X) 600mm (Y) 220mm (Z) 310mm. Product Brochure
 600mm (Y) 220mm (Z) 310mm. Product Brochure") Product Brochure M576 HAFCO METALMASTER HM-51 Turret Milling Machine (X) 600mm (Y) 220mm (Z) 310mm Page 1 of 5 Specifications & Prices are subject to change without notification - 2018-06-26 M576.pdf Left
Product Brochure M576 HAFCO METALMASTER HM-51 Turret Milling Machine (X) 600mm (Y) 220mm (Z) 310mm Page 1 of 5 Specifications & Prices are subject to change without notification - 2018-06-26 M576.pdf Left
CAMWorks How To Create CNC G-Code for CO2 Dragsters
 Objective: In this chapter we will show how to mill out the axle holes for this CO2 Dragster from the left side. VI.1. Open the previously created file: Dragster axle hole 001.sldprt. VI.2. Select the
CAMWorks How To Create CNC G-Code for CO2 Dragsters. III.1. Save the rough tool path for the bottom of the CO2 Dragster as Dragster bottom 001 rough.
 In this chapter we will create the smooth G-Code tool path for the bottom of our CO2 Dragster. The smooth tool path is necessary to create a finish that requires minimal work to for the designer to later
TechCut 5 PRECISION HIGH SPEED SAW. Product Brochure. Quality Products for Metallographic Sample Preparation & Analysis
 Product Brochure TechCut 5 PRECISION HIGH SPEED SAW A VERSATILE, PROGRAMMABLE SECTIONING MACHINE DESIGNED TO CUT A WIDE VARIETY AND SIZE OF MATERIALS Quality Products for Metallographic Sample Preparation
AIM AXIS ALUMINIUM PROFILE PROCESSING CENTER
 AIM 4410 4-AXIS ALUMINIUM PROFILE PROCESSING CENTER Page 1/ 20 CONTENTS 1. OVERVIEW 4 2. TECHNICAL INFORMATION 4 2.1 GENERAL FEATURES 4 2.2 TECNİCAL FEATURES.. 5 3. FEATURES OF PROCESSING CENTER.. 7 4.
Turning Hardinge Super-Precision Quest GT 27 Turning Center
 Turning Hardinge Super-Precision Quest GT 27 Turning Center Quotation to: ABMNameAlpha Quotation Number: SOHDocumentOrderInvoice Contact: Contact Name Address: ShipToAddressLine1 ShipToAddressLine2 ShipToAddressLine3
Quick Start Guide. Contents
 1 Quick Start Guide Contents Powering on the Machine Login/Password Entry Jaw Set Up High Security Cut by Code High Security Jaw Set Up Edge Cut Cut by Code Edge Cut Cut by Decode Cutter Replacement Tracer
Apple Photos Quick Start Guide
 Apple Photos Quick Start Guide Photos is Apple s replacement for iphoto. It is a photograph organizational tool that allows users to view and make basic changes to photos, create slideshows, albums, photo
reference guide reference guide reference guide
 hp photosmart 240 series reference guide reference guide reference guide contents 1 welcome..................................... 1 find more information.............................. 1 what s in the box.................................
User s Manual Cycle Programming TNC 320. NC Software
 User s Manual Cycle Programming TNC 320 NC Software 340 551-04 340 554-04 English (en) 9/2009 About this Manual The symbols used in this manual are described below. This symbol indicates that important
CNC Quick Guide for Haas Mills
 CNC Quick Guide for Haas Mills Torbjorn Bergstrom Printable PDF Edition Copyright Engineering Media Productions LLC. 2015 Worcester, Massachusetts, USA ISBN: 978-0-692-32693-0 Page i Foreword This guide
Toothbrush Holder Project 2D Machining
 Toothbrush Holder Project 2D Machining Prerequisite Toothbrush Holder drawn and saved as a DXF file in SolidWorks Focus of the Lesson On completion of this exercise you will have: Used the Techsoft 2D
Fixed Headstock Type CNC Automatic Lathe
 Fixed Headstock Type CNC Automatic Lathe MSY The BNE series is renowned for its high rigidity, heavy cutting capability and outstanding precision. The new MSY model extends the ability of the BNE series
CNC Router Part 2 Training Tutorial
 CNC Router Part 2 Training Tutorial Prepared by Steve Pilon - Version 1.1 September 2017 A Index B - Intro A- Index B- Intro C- Objective D- Required Items E- Opening CamBam and Loading a DXF F- Preparing
ENGI 7962 Mastercam Lab Mill 1
 ENGI 7962 Mastercam Lab Mill 1 Starting a Mastercam file: Once the SolidWorks models is complete (all sketches are Fully Defined), start up Mastercam and select File, Open, Files of Type, SolidWorks Files,
Engraving with a Rigid Tool Engraving Tool Feeds and Speeds
 Engraving with a Rigid Tool Engraving Tool Feeds and Speeds Material 3000 RPM 6000 RPM 7500 RPM 10000 RPM Aluminum/Aluminum Alloys 6 12 15 20 Brass/Bronze 6 12 15 20 Copper/Copper Alloys 6 12 15 20 Cast
Vinyl Cutter Instruction Manual
 Vinyl Cutter Instruction Manual 1 Product Inventory Inventory Here is a list of items you will receive with your vinyl cutter: Product components (Fig.1-4): 1x Cutter head unit complete with motor, plastic
The new generation with system accessories. Made in Germany!
 1 The new generation with system accessories. Made in Germany! For face, longitudinal and taper turning, thread-cutting. For machining steel, brass, aluminium and plastic. Mounting flange for fastening
Kitchen and Bath Design Tutorial
 Kitchen and Bath Design Tutorial This tutorial continues where the Interior Design Tutorial left off. You should save this tutorial using a new name to archive your previous work. The tools and techniques
Precision made in Germany. As per DIN The heart of a system, versatile and expandable.
 1 Precision made in Germany. As per DIN 8606. The heart of a system, versatile and expandable. Main switch with auto-start protection and emergency off. Precision lathe chuck as per DIN 6386 (Ø 100mm).
Tinker Tuesday Project - Drinking Glasses
 Tinker Tuesday Project - Drinking Glasses 1. Open CorelDRAW and create a new document. Near the top left corner of the screen, click File, and then click Import on the resulting menu. Select an image from
CNC Router. Cnc Course
 CNC Router A CNC Router is a computer numerically-controlled machine where the tool paths are controlled via computer. It can cut and mill various hard materials, such as wood, composites, aluminium, plastics,
Fusion 360 Part Setup. Tutorial
 Fusion 360 Part Setup Tutorial Table of Contents MODEL SETUP CAM SETUP TOOL PATHS MODEL SETUP The purpose of this tutorial is to demonstrate start to finish, importing a machineable part to generating
GANESH GBM-6024 CNC Bed Mill With Class-7 Super-Precision Fafnir Spindle Bearings and Box Ways
 20869 Plummer St. Chatsworth, CA 91311 Toll Free: 888-542-6374 (US only) Phone: 818-349-9166 I Fax: 818-349-7286 www.ganeshmachinery.com GANESH GBM-6024 CNC Bed Mill With Class-7 Super-Precision Fafnir
PROGRAMMING January 2005
 PROGRAMMING January 2005 CANNED CYCLES FOR DRILLING TAPPING AND BORING A canned cycle is used to simplify programming of a part. Canned cycles are defined for the most common Z-axis repetitive operation
Finding Offsets for Multiple Spindles/Air Drills
 888-680-4466 ShopBotTools.com Finding Offsets for Multiple Spindles/Air Drills Copyright 2016 ShopBot Tools, Inc. page 1 Copyright 2016 ShopBot Tools, Inc. page 2 Introduction This document explains how
Cobra Series CNC Lathes
 OPERATOR S MANUAL TP1480B TP3264 TP2580 Cobra Series CNC Lathes Equipped with the GE Fanuc 21T Control Revised: February 21, 2001 Manual No. M-313C Litho in U.S.A. Part No. M C-0009500-0313 October, 1998
DuraTurn Series. CNC Lathe. для получения подробной информации, пожалуйста, напишите нам на почту
 DuraTurn 2030 DuraTurn 2050 DuraTurn 2550 CNC Lathe DuraTurn Series Durable Universal Reliable Affordable Accurate CNC Lathe with Excellent Operability and Machining Capability The DuraTurn series, which
for SUNNEN TUBE HONING MACHINES HTC SERIES Version: VC-40 50/ VCSC11 30, V -6.43/44b File: CME-V643 Date: 15 March, 2006
 I-HTC-120 Control MANUAL for SUNNEN TUBE HONING MACHINES HTC SERIES Version: VC-40 50/ VCSC11 30, V -6.43/44b File: CME-V643 Date: 15 March, 2006 READ THE FOLLOWING INSTRUCTIONS THOROUGHLY AND CAREFULLY
Tevo Tarantula Auto Level Instructions. By ArcadEd. Mounting the Sensor:
 Tevo Tarantula Auto Level Instructions By ArcadEd Mounting the Sensor: First off, the kit does not seem to come with a screw for mounting the sensor. Maybe it does now, but at the time I got my kits, it
Printing for Professionals
 Océ cm550 Printing for Professionals User s Guide Enlarge Display Operations Introduction Introduction Thank you for choosing this machine. The cm550 User s Guide [Enlarge Display Operations] contains
Figure 1: NC Lathe menu
 Click To See: How to Use Online Documents SURFCAM Online Documents 685)&$0Ã5HIHUHQFHÃ0DQXDO 5 /$7+( 5.1 INTRODUCTION The lathe mode is used to perform operations on 2D geometry, turned on two axis lathes.
GANESH GBM-2616 CNC Bed Mill With Class-7 Super-Precision Spindle Bearings and Box Ways
 20869 Plummer St. Chatsworth, CA 91311 Toll Free: 888-542-6374 (US only) Phone: 818-349-9166 I Fax: 818-349-7286 www.ganeshmachinery.com GANESH GBM-2616 CNC Bed Mill With Class-7 Super-Precision Spindle
CNC Mill Setup
 Western Technical College 31420326 CNC Mill Setup Course Outcome Summary Course Information Description Career Cluster Instructional Level Total Credits 1.00 Total Hours 36.00 The setup of CNC (Computer
200S READOUTS REFERENCE MANUAL
 200S READOUTS REFERENCE MANUAL 200S Key Layout 1 Display Area 2 Soft keys 3 Power Indicator light 4 Arrow Keys: Use the UP/DOWN keys to adjust the screen contrast. 5 Axis Keys 6 Numeric Keypad 7 ENTER
Datuming And Tool Setting Instructions for Renishaw Tool Touch Probe
 Datuming And Tool Setting Instructions for Renishaw Tool Touch Probe Used on the Hardinge CONQUEST T42 CNC Chucker and Bar Machines Equipped with a GE Fanuc 18T Control Unit Hardinge Inc. One Hardinge
MAXYM Mortiser Operating Manual
 MAXYM Mortiser Operating Manual Rev 2.112/16/02 Copyright MAXYM Technologies Inc. Table of Contents Visual Tour 1-2 Operating the Maxym Mortiser 3 Starting the Mortiser 3 Touch Screen Description 3 Mortise
VUE READOUTS REFERENCE MANUAL
 VUE READOUTS REFERENCE MANUAL VUE Key Layout 1 Display Aera 2 Soft keys 3 Page Indicator light 4 UP/DOWN arrow keys are also used to adjust the screen contrast 5 Axis Keys 6 Numeric Keypad 7 ENTER key
Performance. CNC Turning & Milling Machine. Conversational CAM 3.11 Instruction Manual
 Performance CNC Turning & Milling Machine Conversational CAM 3.11 Instruction Manual Legacy Woodworking Machinery 435 W. 1000 N. Springville, UT 84663 Performance Axis CNC Machine 2 Content Warranty and
1.3 Using Your BoXZY
 1.3 Using Your BoXZY This manual will explain how to use your BoXZY Written By: BoXZY 2017 boxzy.dozuki.com Page 1 of 14 INTRODUCTION By beginning this manual we assume you have read and understood the
Warehouse Instruction Guide
 Warehouse Instruction Guide Review Equipment & Supplies page 2 Set-Up Access Point page 6 Register Scanners page 8 Place Fixture Stickers/Enter Ranges page 10 Scanning Basics and Additional Keyboard Functions
HIGH PERFORMANCE TRAVELING COLUMN VERTICAL MACHINING CENTER
 HIGH PERFORMANCE TRAVELING COLUMN VERTICAL MACHINING CENTER 1 With the installation of dividing wall in the working area, the TCV series can implement machining and set up workpiece simultaneously. It
Getting Started. Click the Start New Measurement Button. Select Year. Select Make. Select Model. If correct vehicle is selected, click next.
 Revised 05/04/2006 Index Getting Started 3 Choose point to measure From 4 Choose point to measure To 5,6 Selecting points under hood 6 Measuring 7 Calibrate Tram 8 Follow LCD Screen/Tram Operation 8,9
DXXX Series Servo Programming...9 Introduction...9 Connections HSB-9XXX Series Servo Programming...19 Introduction...19 Connections...
 DPC-11 Operation Manual Table of Contents Section 1 Introduction...2 Section 2 Installation...4 Software Installation...4 Driver Installastion...7 Section 3 Operation...9 D Series Servo Programming...9
Chief Architect X3 Training Series. Layers and Layer Sets
 Chief Architect X3 Training Series Layers and Layer Sets Save time while creating more detailed plans Why do you need Layers? Setting up Layer Lets Adding items to layers Layers and Layout Pages Layer
GANESH GBM-4020 Heavy-Duty CNC Bed Mill With Class-7 Super-Precision Spindle Bearings and Box Ways
 20869 Plummer St. Chatsworth, CA 91311 Toll Free: 888-542-6374 (US only) Phone: 818-349-9166 I Fax: 818-349-7286 www.ganeshmachinery.com GANESH GBM-4020 Heavy-Duty CNC Bed Mill With Class-7 Super-Precision
ARCHICAD Introduction Tutorial
 Starting a New Project ARCHICAD Introduction Tutorial 1. Double-click the Archicad Icon from the desktop 2. Click on the Grey Warning/Information box when it appears on the screen. 3. Click on the Create
ideamaker Manual
 ideamaker Manual Using ideamaker... 2 1 Basic information... 2 1.1 What is ideamaker?... 2 1.2 Where to download ideamaker?... 2 2 Install ideamaker... 3 3 Let s Print!... 6 4 How to use ideamaker?...
CAMWorks How To Create CNC G-Code for CO2 Dragsters
 Creating the Left Side Smooth Finish Tool Path. This chapter will focus on the steps for creating the left side smooth finish tool path. The objective of this chapter is to create to an accurate and highly
The ideal K-12 science microscope solution. User Guide. for use with the Nova5000
 The ideal K-12 science microscope solution User Guide for use with the Nova5000 NovaScope User Guide Information in this document is subject to change without notice. 2009 Fourier Systems Ltd. All rights
Instruction Manual. B Series Program Mode (BLDC Servos)
") Introduction Instruction Manual Congratulations on the purchase of the HFP-30. The HFP-30 is designed to program all Hitec Digital Programmable Servos (D Series, 5xxx/7xxx, and Brushless) as well as test
Introduction Instruction Manual Congratulations on the purchase of the HFP-30. The HFP-30 is designed to program all Hitec Digital Programmable Servos (D Series, 5xxx/7xxx, and Brushless) as well as test
KTM-16/20 TECHNICAL DATA
 TECHNICAL DATA Table Diameter : 1,600mm Max. Turning Diameter : 2,000mm Max. Turning Height : 1,750mm Table Indexing Degree : 0.001mm CNC Controller : FANUC 18i-TB ** Bed The bed has symmetrical structure
Touch Probe Cycles itnc 530
 Touch Probe Cycles itnc 530 NC Software 340 420-xx 340 421-xx User s Manual English (en) 4/2002 TNC Models, Software and Features This manual describes functions and features provided by the TNCs as of