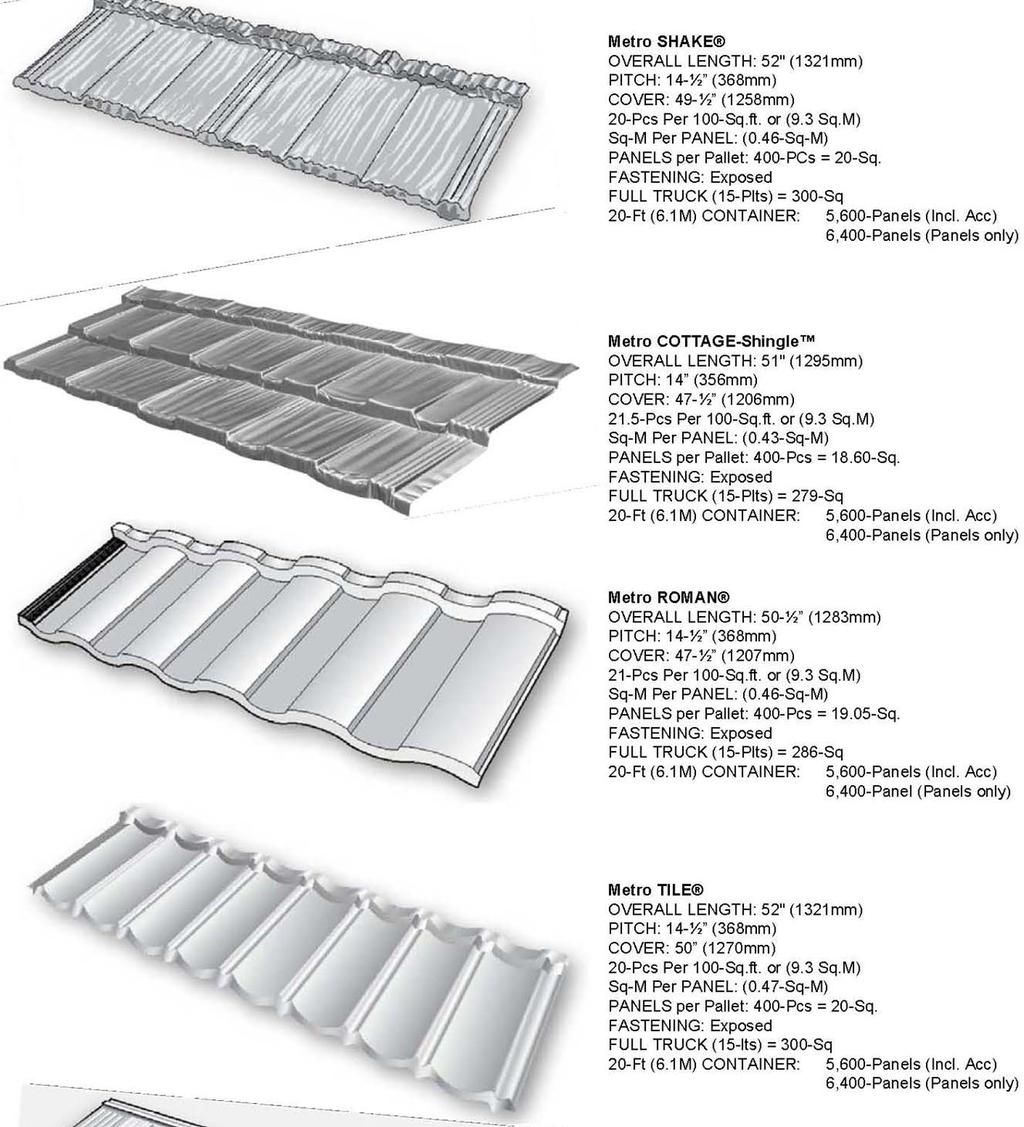
METRO PANELS (EXPOSED
|
|
|
- Lucas Hart
- 6 years ago
- Views:
Transcription
1 METRO PANELS 001EX-METRO-PANELS.VSD
2 STARTER EAVE Detail Metro V-Bat RISER METAL (1) PANELS (2) FASTENERS (5) BOTTOM ROW fastening 0.75in. (4) METRO RISER Metal, With Integral Batten Riser & Locator-Lip. (3) METRO FL-DRIP EDGE Metal ROMAN Tile Bird-Stop Riser GENERAL: Metro RISER detail uses a 2-part system of a painted Drip Edge and stone-coated Riser Metal at the fascia eave area as shown above. This detail provides a ¾ reveal from the fascia to ensure water shed away from trim boards. For High Wind (HVHZ) areas fastener spacing on perimeter metals shall be 6-inches o/c. (1) MetroSHAKE, MetroTILE, MetroROMAN & MetroCOTTAGE Shingle panels installed directly onto the rood deck as shown. Normal installs use four (4) fasteners in the back flange and four (4) in the front down-turn nose of each panel. For High Wind (HVHZ) areas, FIELD, PERIMETER & CORNER panels are fastened with six (6) in the back flange and six (6) in the front down-turn nose per panel. Stone-Coated Surface (2) All fasteners to be a minimum of 1,000hr Corrosion Resistant. Panels & Accessories fastened with #10 X 2-inch Hex Head Screw or 2-3/8-inch X.131-inch Dia. Ring Shank Black nails. (3) METRO painted 2-½-inch FL-DRIP EDGE Installed with #10 X 2-inch HH Screws or 2-3/8-inch Ring Shank Black nails. Fastened 12-inches o/c or as above for HVHZ areas. For metal roof deck framing use of metal cleat and site fabricated Drip Edge hooked onto the cleat is acceptable. 2-Dimensional Not To Scale. (4) METRO RISER METAL (Stone-Coated) installed with #10 X 2-inch HH Screws or 2-3/8-inch Ring Shank Black nails. Fastened 12-inches o/c or as above for HVHZ areas. (5) BOTTOM ROW TOP FASTENING ONLY! At the first course along the fascia space fasteners approx., 12-inches o/c, out of the panels water channels or as above for HVHZ areas. 002EX-STARTER-EAVE-V-BAT-RISER-METAL.VSD
3 RAKE GABLE Detail Metro RAKE CHANNEL Metal 2.75in. (1) PANELS (3) RAKE CHANNEL Underlay (4) DRIP EDGE METAL Solid sheathing (2) FASTENERS (5) V-Bat Riser Metal & Fascia (Stone-Coated) GENERAL: (1) METRO PANELS: The panels are fitted into the Rake Channel as shown. Panels are installed direct-to-deck in a batten-less method as shown. Normal installs use four (4) fasteners in the front down-turn nose of each panel & four (4) fasteners in the back flange of the panel. For High Wind (HVHZ) areas, FIELD, PERIMETER & CORNER areas require; Six (6) #10 X 2" HH Screws per panel in the front down-turn nose of each panel & Six (6) fasteners in the back flange of the panel. Rake Channel Profile (2) FASTENERS: All exposed fasteners to be a minimum of 1,000hr Corrosion Resistant. Panels & Accessories fastened with #10 X 2-inch Hex Head Screw or 2-3/8-inch X.131- inch Dia. Ring Shank Black nails. (3) RAKE CHANNEL (Rake): The formed RAKE CHANNEL is stone-coated to match the Metro roof. These parts must be notched to fit together so the trough section sheds water & lapped a minimum of 1-1/2-inches from the fascia to the ridge. Fasten to the roof deck or counter-batten every 12-inches o/c on the inside of the weather- V as shown. Metro Locator-Lip design for perfect alignment & weather protection up rake edge. (4) DRIP EDGE METAL (Rake): Standard painted or Stone-Coated drip edge may be used as shown. For metal roof deck framing use of metal cleat and site fabricated Drip Edge hooked onto the cleat is acceptable. (5) RISER METAL (Fascia): A pre-formed V-Bat Riser metal is available that fits over a standard drip edge or stone-coated fascia. The Riser metal uses Metro s unique Locator- Lip detail for added weather security. 003EX-RAKE-GABLE-RAKE-CHANNEL.VSD
4 ROOF-to-SIDEWALL Detail Metro Sidewall UNDERPAN Metal & Z-BAR (3) Z-BAR COUNTER FLASHING 2-½ Legs (1) PANELS (5) SEALANT Bead along top of Side-Wall Underpan metal as shown GENERAL: Metro panel is cut to Side-Wall Underpan metal as shown. Standard Z- Bar metal is used to counter-flash over the Side-Wall Underpan metal. (1) PANELS: Metro panels installed directly onto the rood deck as shown. Normal installs use four (4) fasteners in the back flange and four (4) in the front down-turn nose of each panel. For High Wind (HVHZ) areas, FIELD, PERIMETER & CORNER panels are fastened with six (6) in the back flange and six (6) in the front down-turn nose per panel. (4) SIDE-WALL UNDER-PAN (2) FASTENERS: All fasteners to be a minimum of 1,000hr Corrosion Resistant. Panels & Accessories fastened with #10 X 2-inch Hex Head Screw or 2-3/8-inch X.131-inch Dia. Ring Shank Black nails. (3) METRO Stone-Coated Z-BAR COUNTER FLASHING. installed as shown. Z-Bar metal is positioned onto a backing block approximately 3-½ high to support Z-Bar metal. Exterior building paper & Siding material is flashed over Z-Bar metal as shown. Not To Scale. (4) METRO Side-Wall Under-Pan installed as shown up under counterflashing or Z-Bar metal.. (5) ROOFING SEALANT. A bead of sealant is applied to the top of the Side-Wall Underpan for added weather protection in severe climates. 004EX-ROOF-TO-SIDEWALL-METRO-UNDERPAN-&-Z-BAR.VSD
5 ROOF-to-HEADWALL Detail Metro COUNTER Flashing (3) COUNTER FLASHING w/ Sealant bead beneath (1) PANELS GENERAL: Metro panel is cut to Head-Wall as shown. (1) PANELS: Metro panels installed directly onto the rood deck as shown. Normal installs use four (4) fasteners in the back flange and four (4) in the front down-turn nose of each panel. For High Wind (HVHZ) areas, FIELD, PERIMETER & CORNER panels are fastened with six (6) in the back flange and six (6) in the front down-turn nose per panel. (2) FASTENERS: All fasteners to be a minimum of 1,000hr Corrosion Resistant. Panels & Accessories fastened with #10 X 2-inch Hex Head Screw or 2-3/8-inch X.131-inch Dia. Ring Shank Black nails. (3) METRO Stone-Coated COUNTER Flashing. installed up under siding as shown & fastened through sealant bead. Exterior building paper & Siding material is flashed over Counter flashing. A bead of Roofing sealant is applied across cut panel and Metro Counter flashing installed & fastened as shown. 005EX-ROOF-TO-HEADWALL-METRO-COUNTER-FLASHING.VSD
6 ROOF-to-HEADWALL Detail Metro Panels BENT-UP (3) PANEL BENT-UP (2-In) w/ Sealant bead across top as shown (1) PANELS GENERAL: Metro panel last course at Head-Wall is cut & Bent as shown. (1) PANELS: Metro panels installed directly onto the rood deck as shown. Normal installs use four (4) fasteners in the back flange and four (4) in the front down-turn nose of each panel. For High Wind (HVHZ) areas, FIELD, PERIMETER & CORNER panels are fastened with six (6) in the back flange and six (6) in the front down-turn nose per panel. (2) FASTENERS: All fasteners to be a minimum of 1,000hr Corrosion Resistant. Panels & Accessories fastened with #10 X 2-inch Hex Head Screw or 2-3/8-inch X.131-inch Dia. Ring Shank Black nails. (3) METRO Panel. Cut & Bend panels up (min-2-inches (50-mm) against head-wall as shown. Apply a bead of roofign sealant across panel and refasten siding. Exterior building paper & Siding material is flashed over bent-up panel. 006EX-ROOF-TO-HEADWALL-METRO-PANELS-BENT-UP.VSD

7 CHIMNEY SKYLIGHT Detail 007EX-CHIMNEY-SKYLIGHT.VSD
8 VENT PIPE Detail Metro SMARTjack Sandwhich Detail (1) X Fastening pattern on Metro BATTEN-LESS installs is shown below. (4) (2) (3) Metro SMARTjack GENERAL: The Sandwich method shown uses a Metro Under-Pan to support the roof jack flashing (SMARTjack) and another Metro panel used as a Cover section to further protect the roof jack (SMARTjack) flashing. This method conceals the roof jack flashing completely. The assembly is as shown. A) Metro Under-Pan cut around pipe. B) Metro SMARTjack (or Vent jack) installed over pipe C) Metro Cover panel cut tight to pipe & sealed Metro Under-Pan (1) PANELS Metro Stone-Coated Steel (Glavalume AZ-50 Steel base) panels and accessories. (2) FASTENERS: All fasteners shall be a min of 1,000-hr Salt Spray corrosion resistant to ASTM-B-117. Nails 8-d (2-3/8" X.131" dia) Ring Shank w/super Black coating. Screws - #10 X 2" Hex Head (No washer) sharp pt. wood grip type colored to match panel. (3) METRO SMART-jack: Available in two (2) sizes to fit pipes from 1-¼ - 4" inch dia. SMARTjacks incorporate a self-sealing rubber gasket collar that eliminates the need for sealant. The entire SMART-jack is stone-coated to blend perfectly with the surrounding Metro panels. ROMAN Tile SMARTjacks have a 18" X 18" base to allow dressing to the contours of the panel. (4) METRO Under-Pan These are universal and can be used with Metro Roman, Shake, Tile or Shingle panels. They are corrugated to prevent wind driven rain from flowing sideways across the base to the roof deck. Metro Under-Pan Sealant around pipe & Cover panel as shown Metro 2 nd top (Cover) panel Metro SMARTjack WARNING! DISSIMILAR METALS COPPER & LEAD flashings should not be used with and accessories,. (Refer to Metro SMARTbrief Technical Bulletin #02004). 008EX-VENT-PIPE-METRO-SMART-JACK-SANDWHICH.VSD
9 VENT PIPE Cover Detail Metro SMART-sleeve Detail (2) Metro SMART-sleeve (1) (3) Metro SMART-jack GENERAL: The SMART-sleeve is Galvalume steel stone-coated pipe-cover to match perfectly with the SMART-jack and surrounding panels on the roof. It merely slides over the pipe penetration and is held in place by a screw through the back into the pipe. (1) PANELS: Metro Stone-Coated Steel (Glavalume AZ-50 Steel base) panels and accessories. (2) METRO SMART-sleeve: Available in one size to fit pipes from 1- inch to 4-inch dia. SMART-sleeves have a critter guard over the top to prevent rodents form entering the pipe. (3) METRO SMART-jack: Available in two (2) sizes 3-1 & 3-4 to fit pipes from 1-¼ - 4" inch dia. SMART-jacks incorporate a self-sealing rubber gasket flange that eliminates the need for sealant. The entire SMART-jack is stone coated to blend perfectly with the surrounding Metro panels. WARNING! DISSIMILAR METALS COPPER & LEAD flashings should not be used with and accessories,. (Refer to Metro SMARTbrief Technical Bulletin #02004). 009EX-VENT-PIPE-COVER-SMART-SLEEVE.VSD
10 VALLEY Detail Metro SMART-Valley 2-pc w/valley Cover Metro Valley Cover (2a) (3a) (1) (3) (4) (1) PANELS: Metro Stone-Coated Steel (Glavalume AZ-50 Steel base) panels and accessories. (2) FASTENERS: All fasteners shall be a min of 1,000-hr Salt Spray corrosion resistant to ASTM-B-117. Nails 8-d (2-3/8" X.131" dia) Ring Shank w/super Black coating. Screws - #10 X 2" Hex Head (No washer) sharp pt. wood grip type colored to match panel. (2a) VALLEY FASTENERS: Screws - #10 X 1-1/2" Hex Head w/ Rubber Washer under a Dome Cap, sharp pt. wood grip type. (3) VALLEY COVER: Installed directly over the center line of the two (2) SMART-Valley sections as shown. Do NOT penetrate the valley pan with panel screws. (3a) VALLEY SEAL STRIP: Install a strip of butyl tape down center of valley before fastening the Valley Cover. Secure using Stitch or Zip screws that do not penetrate the valley. (4) SMART-Valley METAL: 18" Inch Double V SMART-Valley uses 2-pcs to form an 18-inch wide valley and 1-pc of stone-coated valley cover as shown above. 010EX-VALLEY-SMART-2-PC-VALLEY-W-VALEY-CVR.VSD
11 VALLEY Detail Metro 20-in Dbl-V-Valley (1) (2) (2a) (3a) (3) Open Valley (4) NOTE: Valley cut & bent sections that lay over the valley metal must be secured top & bottom by stitch or Zip screws. No fasteners are to penetrate the valley. It may also be beneficial to use long valley cut sections to ensure the valley cut sections are securely fastened to the roof deck where they are past the valley metal. (3) ½ (1) PANELS: Metro Stone-Coated Steel (Glavalume AZ-50 Steel base) panels and accessories. (2) FASTENERS: All fasteners shall be a min of 1,000-hr Salt Spray corrosion resistant to ASTM-B-117. Nails 8-d (2-3/8" X.131" dia) Ring Shank w/super Black coating. Screws - #10 X 2" Hex Head (No washer) sharp pt. wood grip type colored to match panel. 1-¼ Valley Cut sections of Metro panels to be tapered as shown 1-¼ to ½ on each course. (2a) VALLEY FASTENERS: Screws - #10 X 1-1/2" Hex Head w/ Rubber Washer under a Dome Cap, sharp pt. wood grip type. (3) VALLEY CUT SECTIONS: Panels intersecting with Valley are cut and bent down into the valley. It is important to ensure valley cuts fit against outer V ribs as shown. The Valley Bend-Down must be tapered as shown from 1-¼ to ½ on each course. If the cut is not tapered it may trap debris in the side opening between the over-lap of each course. (3a) VALLEY COVER: Installed directly over the center-line of the Valley Metal as shown. Secure using Stitch or Zip screws that do not penetrate the valley. (4) VALLEY METAL: 20" Inch Double V-Valley as shown. 011EX-VALLEY-20-IN-DBL-V-VALLEY-PANELS-BENT-DOWN.VSD
12 HIP Detail Battens Side by Side (EXPOSED Fastened panels - MetroSHAKE, MetroTILE, MetroROMAN & Trim Cap fasteners Fasten each course (14-½ on either side with one (1) #10 X 2" HH Screw 5.0in. Metro Panel HIP Support Batten Rip from 1X4 batten to fit flush on either side of 2X2 batten as shown. (Plan View) Panel Bent Up at HIP Panels are cut & bent up against hip board as shown. FASTENERS Exposed fasteners must meet or exceed ASTM B-117 Salt Spray Corrosion Resistance testing. 5.0in. 012EX-HIP-DETAIL-BATTENS-SIDE-BY-SIDE.VSD
13 HIP Detail Metro SMART-Battens w/xp-foam Tape Trim Cap fasteners Fasten each cap with two (2) #10 X 1" HH screws on either side. Metro Panel 5.0in. SMART-Batten Installed with screws as shown through SMART-XP-Foam Tape & into roof deck outside edges to measure 5-inches to accept Metro V or barrel Trim Caps. Metro SMART-XP-Foam Tape applied to onto each SMART-Batten as shown, when fastened to panel below XP-Foam tape is compressed to form a seal at the Hip or Ridge. Metro PANELS Mitered or overlapped at the hip & sealed using the SMART-XP-Foam Tape. (Plan View) 5.0in. 14-½ in. FASTENERS Exposed fasteners must meet or exceed ASTM B-117 Salt Spray Corrosion Resistance testing. Metro PANELS Mitered or overlapped at the hip & sealed using the SMART-XP- Foam Tape. 013EX-HIP-DETAIL-METRO-SMART-BATTENS-XP-FOAM.VSD
14 HIP Detail Metro COTTAGE-12-in wide Cap w/xp-foam Tape Metro COTTAGE Cap 12-inches wide by 12-inches long Metro SMART-XP-Foam Tape applied 3-in from centerline on both sides of hip as shown below. Metro COTTAGE Cap fasteners same as panel fasteners to ensure roof deck penetration. Metro Panel Metro PANELS Mitered or overlapped at the hip (Plan View) 3.0in. (75mm) 3.0in. (75mm) FASTENERS: All exposed fasteners to be a minimum of 1,000hr Corrosion Resistant. Panels & Accessories fastened with #10 X 2-inch Hex Head Screw or 2-3/8- inch X.131-inch Dia. Ring Shank Black nails. Metro XP-Foam Tape 3-inches from Hip centerline as shown. Metro PANELS Mitered or overlapped at the hip. 014EX-HIP-DETAIL-METRO-COTTAGE-CAP-XP-FOAM.VSD
15 HIP Detail BATTENS Vertical Stack Trim Cap fasteners Fasten each cap with one (1) #10 X 2" HH screw or 2-3/8" Ring Shank nail through the front nose of each trim cap. Metro Panel (Plan View) Panel Bent Up at HIP Panels are cut & bent up against hip board as shown. FASTENERS: All exposed fasteners to be a minimum of 1,000hr Corrosion Resistant. Panels & Accessories fastened with #10 X 2-inch Hex Head Screw or 2-3/8-inch X.131-inch Dia. Ring Shank Black nails. 2X2 HIP Batten Stacked vertically as shown 015EX-HIP-DETAILS-VERTICAL-STACK-BATTENS.VSD
16 RIDGE Detail BATTENS Side by Side 5.0in. Trim Cap fasteners Fasten each cap with two (2) #10 X 2" HH screws on either side. Metro Panel Top Course is random based on rafter length RIDGE Support Batten Ridge support 1X4 batten on either side of ridge as shown. NOTE OK to allow 1X4 to create a ledge for bent up ridge panel to seat onto. (Plan View) 14-½ in. Top Course is Random 5.0in. FASTENERS: All exposed fasteners to be a minimum of 1,000hr Corrosion Resistant. Panels & Accessories fastened with #10 X 2-inch Hex Head Screw or 2-3/8-inch X.131- inch Dia. Ring Shank Black nails. 016EX-RIDGE-DETAIL-BATTENS-SIDE-BY-SIDE.VSD
17 RIDGE Detail Metro SMART-Battens w/xp-foam V-Cap Trim Cap fasteners Fasten each cap with two (2) #10 X 1" HH screws on either side. Metro Panel 5.0in. SMART-Batten Installed with screws as shown through XP-Foam & into roof deck outside edges to measure 5-inches to accept Metro Trim Caps. XP-FOAM Tape either side of centerline under SMART-batten to seal ridge. Metro PANELS (TILE-II or SHAKE-II) panels butted or overlapped at the ridge & sealed with peel-n-stick 3-Inch wide min tape. (Plan View) 5.0in. FASTENERS: All exposed fasteners to be a minimum of 1,000hr Corrosion Resistant. Panels & Accessories fastened with #10 X 2-inch Hex Head Screw or 2-3/8-inch X.131-inch Dia. Ring Shank Black nails. XP-FOAM Tape either side of centerline under SMART-batten to seal ridge. 017EX-RIDGE-DETAIL-SMART-BATTENS-FOAM-TAPE-V-CAP.VSD
18 RIDGE Detail BATTENS Stacked Vertically Metro Panel Top Course is random based on rafter length 2X2 RIDGE Battens Stacked Vertically as shown Trim Cap fasteners Fasten each cap with one (1) #10 X 2" HH screw or 2-3/8" Ring Shank nail through the front nose of each trim cap. (Plan View) Top Course Random FASTENERS: All exposed fasteners to be a minimum of 1,000hr Corrosion Resistant. Panels & Accessories fastened with #10 X 2-inch Hex Head Screw or 2-3/8-inch X.131-inch Dia. Ring Shank Black nails. 2X2 RIDGE Battens Stacked Vertically as shown 018EX-RIDGE-DETAIL-VERTICAL-STACK-BATTENS-V-CAP.VSD 10/7/2014
19 RIDGE Detail Metro COTTAGE-Cap w/xp-foam Trim Cap fasteners Fasten each cap with two (2) #10 X 1" HH screws on either side. Metro COTTAGE-Cap 12-inches wide by 12-inches long Metro Panel XP-FOAM Tape 3-inches either side of ridge centerline. Metro PANELS (TILE-II or SHAKE-II) panels butted or overlapped at the ridge & sealed with peel-n-stick 3-Inch wide min tape. (Plan View) 3.0in. FASTENERS: All exposed fasteners to be a minimum of 1,000hr Corrosion Resistant. Panels & Accessories fastened with #10 X 2-inch Hex Head Screw or 2-3/8-inch X.131-inch Dia. Ring Shank Black nails. XP-FOAM Tape 3-inches either side of centerline under SMART-batten to seal ridge. 019EX-RIDGE-DETAIL-COTTAGE-CAP-XP-FOAM.VSD
20 RIDGE Detail CONTINUOUS RIDGE VENT w/cottage-cap Metro COTTAGE-Cap 12- inches wide by 12-inches long Trim Cap fasteners Fasten each cap with two (2) #10 X 1" HH screws on either side. Metro Panel XP-FOAM Tape under Continuous Ridge Vent as shown to seal ridge vent across Metro panel Metro PANELS Cut to edge of sheathing to allow ventilation of attic through vent material. CONTINUOUS RIDGE VENT Material 11-½-inches wide (Plan View) FASTENERS: All exposed fasteners to be a minimum of 1,000hr Corrosion Resistant. Panels & Accessories fastened with #10 X 2-inch Hex Head Screw or 2-3/8-inch X.131-inch Dia. Ring Shank Black nails. XP-FOAM Tape under Continuous Ridge Vent as shown to seal ridge vent across Metro panel 020EX-RIDGE-VENT-CONTINIOUS-DETAIL-COTTAGE-CAP-XP-FOAM.VSD
21 RIDGE Detail CONTINIOUS RIDGE VENT w/vertical Ridge Board (1) Fasteners Barrel Trim (2) Adjust Build-Up To Suit Roof Pitch. (3) Venting Material 1"in. Underlayment Air Flow 1-½ in. Metro Roof Panel (Batten-Less) Rafter GENERAL: Barrel or V Trim caps can be used as shown. Ridge battens are shown stacked vertically, Install info is for standard installs up to 120-mph wind areas, for HVHZ wind areas refer to Metro HVHZ install details. (High Velocity Hurricane Zone). Air Flow 'V' Trim Solid Sheathing (1) FASTENERS: All fasteners shall be a min of 1,000-hr Salt Spray corrosion resistant to ASTM-B-117. NAILS 8-d (2-3/8" X.131" dia) Ring Shank w/super Black coating. SCREWS - #10 X 2" Hex Head (No washer) sharp pt. wood grip type colored to match panel. Air Flow Air Flow (2) BATTENS: Detail shows Direct-to-Deck Batten-Less install. Use 2 X 2 nominal wood battens for Ridge build-up. Steel Hat or C shaped sections can be used. Fasten with 3-¼ X.131" framing nails or equivalent screws. 1"in. (3) VENTING MATERIAL: Trimline rigid 1" inch thick corrugated plastic vent strip (PN# 20460) is fastened to each side of the ridge board as shown. A 1" inch wide slot shall be cut along the ridge board on each side to allow for ventilation exhaust. Code requires the net free ventilating area (NFVA) to be not less than 1 to 150 of the area of the space ventilated. Proper ventilation includes sharing the open vented space between the eave & ridge of a building. Trimline PN #20460 = 1-½ High X 1" thick X 48" long. Each lineal foot on either side of the ridge board provides 9.5 Sq. Inches of NFVA per lineal foot. 021EX-RIDGE-DETAIL-CONTINIOUS-VENT-VERTICAL-RIDGE-BOARD-TRIMLINE-QUARRIX.VSD Air Flow
22 RAKE Detail TRIM CAP on Rake 4.0in. Metro Panel Bent up against 2X2 Rake Batten as shown 2X2 RAKE Batten Position 4-inches in from the outside edge of the roof as shown. The Trim Cap is fastened on each side as shown with 1- #10 X 2" HWH Screw or.131"inch Dia Ring Shank BLACK nail. V-BAT RISER Metal Available in Stone-Coated finish. Seats onto Drip Edge metal with Metro Locator-Lip connection. Std. DRIP EDGE Metal Installed onto roof deck under V-Bat Riser Metal. Tile-Rake Metal Designed for easy install of Rake Trim Caps using the ledge for alignment. Available in Stone- Coated finish with 2- inch top flange to meet FL req. FASTENERS: All exposed fasteners to be a minimum of 1,000hr Corrosion Resistant. Panels & Accessories fastened with #10 X 2-inch Hex Head Screw or 2-3/8-inch X.131-inch Dia. Ring Shank Black nails. 022EX-TRIM-CAP-ON-RAKE-2X2-BATTEN.VSD
23 VENT PANEL Detail Metro SMARTvent Panels 2.00in. Standard Metro panel Side-Lap 52.00in in in. (1) 42.50in. Hatched area is perforated to allow air to exhaust. Holes are 3/16" Dia,. GENERAL: Metro SMART-vent detail shown is applicable to all Metro profiles. Net Free Vent Area (NFVA) is approximately 82 Sq inches. There are a total of four (4) parts to every Metro SMART-vent. A) Metro Slave Panel B) Rain-Wind Diverter C) Stealth Vent unit D) Bug Screen (1) SMART-vent PLAN VIEW: SMART-vents are fabricated using a Stealth vent fastened by poprivets to a slave Metro blank panel. The detail above shows a Metro SHAKE panel as the slave. ¾ in. 2-½ in. 2" in in. WARNING! To prevent rodents and other vermin from entering the attic space, the roof deck ventilation hole should be covered with ¼-inch square wire mesh. (2) 8" in. Exhaust Air 14-½ in. 5-½ in. (2) SMART-vent CROSS- SECTION: The dotted line is the exhaust area of the SMART-vent. (3) FASTENING of SMART-Vents: Metro SMART-Vents are fastened as regular panels. In either a Batten-Less or Battened method. For HVHZ areas follow the same fastening pattern for Metro panels. Internal Rain Wind Diverter with 1" high up-stand as shown. Roof Slope Cross-Hatch area is a Bug-Screen installed after Stone-Coating at Metro. 7" inch X 30" inch opening slot in bottom of SMART-vent. 023EX-VENT-PANEL-DETAIL-SMART-VENTS.VSD 9/30/2006
MetroCOTTAGE Shingle
 Batten-less Installation Sept. 14, 2017 INSTALLATION WARNING! These install details are provided to demonstrate a recommended installation method for Metro Roof panels and accessories. used in the United
INSTALLATION DETAILS
 INSTALLATION DETAILS Front Issued January 23rd, 2005 These install details are provided to demonstrate the recommended installation method for Metro Roof products and accessories. The details and information
Metro Batten Installation Details
 R R R MetroTILE MetroSHAKE MetroROMAN Issued June 22, 2013 Revised September 1, 2013 INSTALLATION WARNING! These install details are provided to demonstrate a recommended installation method for Metro
INSTALLATION WARNING! These install details are provided to demonstrate a recommended installation method for Metro Roof panels and accessories.
 Issued December 29, 2005 evised July 5, 2013 INSTALLATION WANING! These install details are provided to demonstrate a recommended installation method for Metro oof panels and accessories. practices used
Barrel Vault Counter Batten and Batten
 Barrel Vault Counter Batten and Batten INSTALLATION GUIDE www.gerardusa.com INSTALLATION NOTIFICATION The installation procedures demonstrated in this manual are recommended methods for the installation
BARRELL VAULT BATTENLESS
 i BARRELL VAULT BATTENLESS INSTALLATION GUIDE INSTALLATION NOTIFICATION The installation procedures demonstrated in this manual are recommended methods for the installation of the Gerard Barrel Vault battenless
Table of Contents. Fasteners... 4 Venting Preparation Installation with Battens - DECRA Tile & DECRA Shake 1
 Table of Contents DECRA Tile & Shake Roof Overview... 2 Introduction... 3 Safety... 3 Tools.... 3 Estimating Sheets... 4 Codes & Requirements... 4 Roof Slope... 4 Underlayment... 4 Deck Preparation....
ROOFING APPLICATION STANDARD (RAS) No. 130 INSTALLATION CRITERIA FOR WOOD SHINGLES AND SHAKES APPLICATION
 No. 130 INSTALLATION CRITERIA FOR WOOD SHINGLES AND SHAKES APPLICATION") ROOFING APPLICATION STANDARD (RAS) No. 130 INSTALLATION CRITERIA FOR WOOD SHINGLES AND SHAKES APPLICATION 1. 2. 3. Scope 1.1 This application standard provides the minimum installation criteria for wood
ROOFING APPLICATION STANDARD (RAS) No. 130 INSTALLATION CRITERIA FOR WOOD SHINGLES AND SHAKES APPLICATION 1. 2. 3. Scope 1.1 This application standard provides the minimum installation criteria for wood
ROOFING APPLICATION STANDARD (RAS) No. 130
 No. 130") ROOFING APPLICATION STANDARD (RAS) No. 130 1. Scope 1.1 This application Standard provides the minimum installation criteria for wood shingles and shakes. 2. Definitions 2.1 For definitions of terms used
ROOFING APPLICATION STANDARD (RAS) No. 130 1. Scope 1.1 This application Standard provides the minimum installation criteria for wood shingles and shakes. 2. Definitions 2.1 For definitions of terms used
Ekoroof LiteTile Dimensions
 Ekoroof LiteTile Dimensions 7 3 3.5 Height 40 Width 20 Length Weight per Panel: 3 kg / 6.61 lbs 2 2 Area per panel 800 in / 5.55 ft 2 Panels per Square: 20 (including overlap, for a 100 ft covered area)
ROOFING APPLICATION STANDARD (RAS) No. 115 STANDARD PROCEDURES FOR ASPHALTIC SHINGLE INSTALLATION
 No. 115 STANDARD PROCEDURES FOR ASPHALTIC SHINGLE INSTALLATION") ROOFING APPLICATION STANDARD (RAS) No. 115 STANDARD PROCEDURES FOR ASPHALTIC SHINGLE INSTALLATION 1. Scope 4. Underlayment 2. 1.1 This roofing application standard has been developed to provide a responsive
ROOFING APPLICATION STANDARD (RAS) No. 115 STANDARD PROCEDURES FOR ASPHALTIC SHINGLE INSTALLATION 1. Scope 4. Underlayment 2. 1.1 This roofing application standard has been developed to provide a responsive
Turada Hardwood Shingles and Shakes Installation instructions
 1. General 1.1 Maximum Exposure: Maximum exposure for wood shingles and shakes shall comply with Table 1 herein, unless specifically specified in the roof assemblies Product Approval. 1.2 Solid and Spaced
SLATE & SHINGLE INSTALLATION
 EAVE EDGE Apply a small strip of roofing paper to the bottom of eave. Eave flashing is attached to substrate with roofing nails every 9". Install underlayment over entire roof. (See Fig. 1) PAGE 1 Bend
SmartVent Eave Edge Installation Instructions
 SmartVent Eave Edge Installation Instructions STEP 1: Cut a slit 1 wide (or a series of 1 ¾ holes at 3 on center) into the roof decking 6 to 7 up from the drip edge. SmartVent is rated 9NFA. Ensure drip
eco-shake INSTALLATION INSTRUCTION
 1 eco-shake INSTALLATION INSTRUCTION NOTE: Shuffling the eco-shakes during installation may be necessary to obtain a uniform color throughout the roof. Due to the natural wood content in the ecoshakes,
Tuff-Rib Install Guide
 Install Guide bestbuymetalroof.com Page 2 of 27 Page 3 of 27 1. Page 4 2. a. Installation Guide b. Panel Squaring Pages 5, 6 Pages 7, 8 3. Pages 9, 10 4. a. Fascia (optional) b. Eave / 1.5x3.5 Angle c.
REGAL. Installation Manual
 REGAL Installation Manual General Information The details shown on the following pages are suggestions or guidelines for installing the Regal system. The installation details shown here are proven methods
installation guide Villa
 installation guide Villa Table of Contents Introduction............................. 2 Safety................................... 2 Tools.................................... 2 Codes & Requirements....................
Table of Contents. Roof to Head Wall w/ Side Flashing DECRA Shake XD Roof Overview Roof Penetration - Pipes & Vents...
 Table of Contents DECRA Shake XD Roof Overview.... 2 DECRA Shingle XD Roof Overview.... 3 Introduction... 4 Safety... 4 Tools.... 4 Estimating Sheet... 4 Codes & Requirements... 4 Roof Slope... 4 Underlayment...
Granite Ridge Shingle Guardian Shingle
 Allmet Installation Manual Shingle Profiles Granite Ridge Shingle Guardian Shingle March 2017 This Installation Manual is designed as an instructional tool to clearly depict to the contractor, installer,
Inspire Slate Starter Piece Hip and Ridge. 13 1/2" Height: 13 ½" Width: 12" Squares/ Pallet. Bundles/ Square
 December 2017 Classic Slate Application Guidelines Only Basic Roofing Tools Required Hand fastened or fastened with a pneumatic nail gun Utility knife or a standard circular saw Tape measure, pry bar,
INSTALLATION GIUDE.
 INSTALLATION GIUDE INTRODUCTION The instructions and drawings included here are intended only as a guide for the installation of ECO Roofing Systems Spanish and Modern profiles. The materials and methods
Installation Manual. For Gerard Shingle Products
 Installation Manual For Gerard Shingle Products Gerard Shingle Installation Manual is a component of Gerard roofing products and as such is intended to be used with Gerard products only. All information
Inspire Aledora Slate Application Guidelines
 July 2014 Inspire Aledora Slate Application Guidelines Only Basic Roofing Tools Required Hand fastened or fastened with a pneumatic nail gun Utility knife or a standard circular saw Tape measure, pry bar,
Installation Manual. Future Roof Shingle / Slate Products
 Installation Manual Future Roof Shingle / Slate Products REVISED 14/09/2010 Future Roof Shingle Installation Manual is a component of Future Roof, Inc. and as such is intended to be used with Future Roof
Gerard Installation Manual Shingle Profiles
 Gerard Installation Manual Shingle Profiles Granite Ridge Shingle Guardian Shingle March 2017 This Installation Manual is designed as an instructional tool to clearly depict to the contractor, installer,
INSTALLATION GUIDE LEARN MORE AT DECRA.COM
 Villa Tile INSTALLATION GUIDE LEARN MORE AT DECRA.COM Table of Contents DECRA Villa Tile Roof Overview... 2 Introduction... 3 Safety... 3 Tools.... 3 Estimating Sheet... 3 Codes & Requirements... 3 Roof
Installation Manual. Future Shingle Products
 Installation Manual Future Shingle Products TITLE REVISED 7/4/2011 Future Shingle Installation Manual is a component of Future Roof, Inc. and as such is intended to be used with Future Roof products only.
Installation Guide. Step 3. Valley Flashing. Step 7. Transition Flashings and Accessories. Step 6. Hip and Ridge Installation
 Step 7. Transition s and Accessories Step 3. Valley Step 6. Hip and Ridge Installation Step 2. Rake Trim Step 5. Installing the Shingles Step 1. Eave Starter Installation Step 4. Endwall s Installation
CertainTeed. Shake / Slate Installation Guide
 CertainTeed Shake / Slate Installation Guide Table of Contents System Components... 2 General Conditions, Safety and Roof Preparations... 3... 4 Eave/Drip Edge... 5 Inner Gable... 6 Outer Gable... 7 Open
ONDUVILLA. The Attractive Alternative to Shingles I N S T A L L A T I O N I N S T R U C T I O N S
 ONDUVILLA The Attractive Alternative to Shingles I N S T A L L A T I O N I N S T R U C T I O N S 1 INSTALLATION INSTRUCTIONS Even though ONDUVILLA is easy to install, it is important to read through these
6 STEP INSTALLATION GUIDE BY DCI
 6 STEP INSTALLATION GUIDE BY DCI STEP 1 (Ensure metal drip edge was previously installed.) Begin by cutting a slit 1 wide (or a series of 1 ¾ holes 3 on center) into the roof decking 6 to 7 up from the
DECRA Shingle Installation Guidelines
 Installation Guide DECRA Shingle Installation Guidelines General Instructions Failure to use these guidelines may void the product warranty. Local building codes may require additional application techniques
Brava Old World Slate Installation Guide
 Brava Old World Slate Installation Guide Brava Roof Tile Phone: 844-290-4196 www.bravarooftile.com This document includes the recommended and suggested installation procedures for Brava Old World Slate
1 Exam Prep NRCA Roofing Manual: Steep-Slope Roof Systems 2013 Tabs and Highlights
 1 Exam Prep NRCA Roofing Manual: Steep-Slope Roof Systems 2013 Tabs and s These 1 Exam Prep Tabs are based on the National Roofing Contractors Association (NRCA) manual listed below: Steep-Slope Roof Systems
RED DIAMOND SHINGLES Roof Installation Introduction:
 RED DIAMOND SHINGLES Roof Installation Introduction: The guidelines set forth in this manual are intended for use with the application of Red Diamond shingles. Wallaba specie (Eperua Falcata) shingles
DIRECTIONS FOR APPLICATION
 Instructions 1 General NOTICE: THESE SHINGLES MUST BE APPLIED TO CONFORM WITH ALL APPLICABLE BUILDING CODES. THESE DIRECTIONS REPRESENT COMMON AND ACCEPTED ROOFING PRACTICES. DEVIATIONS FROM THESE DIRECTIONS
Steel Shingle Installation Guide
 Page THESE ARE THE MANUFACTURER S APPLICATION INSTRUCTIONS FOR THE ROOFING CONDITIONS DESCRIBED. TAMKO BUILDING PRODUCTS, INC. ASSUMES NO RESPONSIBILITY FOR LEAKS OR OTHER ROOFING DEFECTS RESULTING FROM
Installation Guide. Cedar Shake. Distributed by: BEST MATERIALS LLC, Phoenx AZ
 RPM ROOFING Installation Guide Cedar Shake Distributed by: BEST MATERIALS LLC, Phoenx AZ 602-272-8128 800-474-7570 www.bestmaterials.com Table of Contents OVERVIEW... 1 CAUTION... 1 DISCLAIMER... 1 PRODUCT
IRONWOOD SHAKE & FLASHING SPECIFICATIONS
 3 1-51 3-3/4 1 IRONWOOD SHAKE & FLASHING SPECIFICATIONS 6 1-13- 1-1-1/4 2-1.5 Drip Edge 2.5 Drip Edge 2-7/8 1-1-1/4 3/4 1 2-1 IRONWOOD SHAKE Overall Length 51 Length of Coverage 48 Width of Coverage 1
Guardian Shingle Granite Ridge Shingle
 Installation Manual Shingle Profiles Guardian Shingle Granite Ridge Shingle Shingle Installation Manual This Installation Manual is designed as an instructional tool to clearly depict to the contractor,
DIRECTIONS FOR APPLICATION
 Instructions 1 General NOTICE: THESE SHINGLES MUST BE APPLIED TO CONFORM WITH ALL APPLICABLE BUILDING CODES. THESE DIRECTIONS REPRESENT COMMON AND ACCEPTED ROOFING PRACTICES. DEVIATIONS FROM THESE DIRECTIONS
Terrabella Shake & Shingle Znap Ver. 2.0
 Terrabella Shake Znap Actual length = 52.6 Actual Width = 16.33 Coverage length = 49.7 Coverage width = 14 Terrabella Shingle Znap Actual Length = 52.375 Actual Width = 15.25 Coverage Length = 49.375 Coverage
Stone coated steel roof tile INSTALLATION GUIDE
 Stone coated steel roof tile INSTALLATION GUIDE Ⅰ. Introduction These installation details are provided to demonstrate recommended installation methods for KD One roof products and accessories. Consult
ICC-ES Evaluation Report Reissued September 1, 2012 This report is subject to renewal September 1, 2013.
 ICC-ES Evaluation Report www.icc-es.org (800) 423-6587 (562) 699-0543 ESR-1790 Reissued September 1, 2012 This report is subject to renewal September 1, 2013. A Subsidiary of the International Code Council
Steel Roofing & Siding INSTALLATION GUIDE
 Steel Roofing & Siding INSTALLATION GUIDE Your Authorized Dealer is: WASHINGTON Auburn (800) 700-7228 WASHINGTON Spokane (866) 321-5954 www.nuraymetals.com CALIFORNIA Redlands (800) 806-8729 CONTENTS BEFORE
AIA Specification. Section Slate Shingles PART 1 GENERAL
 AIA Specification Section 07315 Slate Shingles PART 1 GENERAL 1.1 RELATED DOCUMENTS A. Drawings and general provisions of the Contract, including General and Supplementary Conditions and Division 1 Specification
DIRECTIONS FOR APPLICATION
 Instructions 1 General NOTICE: THESE SHINGLES MUST BE APPLIED TO CONFORM WITH ALL APPLICABLE BUILDING CODES. THESE DIRECTIONS REPRESENT COMMON AND ACCEPTED ROOFING PRACTICES. DEVIATIONS FROM THESE DIRECTIONS
StormMaster Slate General Instructions 1.) GENERAL INSTRUCTIONS 2.) ROOF DECK VENTILATION 3.) ROOF DECK
 GENERAL INSTRUCTIONS 2.) ROOF DECK VENTILATION 3.) ROOF DECK") StormMaster Slate General Instructions IMPORTANT: THE STATEMENTS EXPRESSED ON THIS PAGE ARE THE RECOMMENDATIONS FOR THE APPLICATION OF THE ROOFING PRODUCTS AS OUTLINED AND ILLUSTRATED. ANY DEVIATION FROM
StormMaster Slate General Instructions IMPORTANT: THE STATEMENTS EXPRESSED ON THIS PAGE ARE THE RECOMMENDATIONS FOR THE APPLICATION OF THE ROOFING PRODUCTS AS OUTLINED AND ILLUSTRATED. ANY DEVIATION FROM
Installation Guide. Titan Old World Slate REV Titan Manufacturing Phone: (407) Fax: (866)
 Fax: (866)") Installation Guide Titan Old World Slate REV70908 Titan Manufacturing Phone: (407) 587-5492 Fax: (866) 741-2147 www.titanroofsystems.com This document includes the recommended and suggested installation
Installation Guide Titan Old World Slate REV70908 Titan Manufacturing Phone: (407) 587-5492 Fax: (866) 741-2147 www.titanroofsystems.com This document includes the recommended and suggested installation
IRONSTONE SLATE & FLASHING SPECIFICATIONS IRONSTONE SLATE
 8 5/8" A) 1 5/8" 5/8" 1 10" 10 1 5 50" 9 7/8" IRONSTONE SLATE & FLASHING SPECIFICATIONS IRONSTONE SLATE 1/8" 1 B) 3/8" 2 7/8" 1 3/8" 3/8" 3/8" 3/8" 1" 1 5/8" 1 5/8" 1 2 1 8.3" 3/4" Overall Length 52 Length
Installation Instructions
 Installation Instructions ROLL VENT STANDARD / METRIC Page Installation Considerations 3 Roll Vent Standard General Installation 4 Roll Vent Metric General Installation 5 Steep Pitch Guidelines 6 Asphalt
HERITAGE LAMINATED ASPHALT SHINGLES Frederick, MD
 Application Instructions for FORMERLY 30 THESE ARE THE MANUFACTURER S APPLICATION INSTRUCTIONS FOR THE ROOFING CONDITIONS DESCRIBED. TAMKO BUILDING PRODUCTS, INC. ASSUMES NO RESPONSIBILITY FOR LEAKS OR
PROJECT INSTRUCTIONS Roofing
 PROJECT INSTRUCTIONS Roofing This handout outlines some basic regulations contained within the 2015 Minnesota State Building Code, as well as other good building practices. However, this handout is not
Tuff-Rib. Installation Manual. Nationwide supplier of quality metal roofing. Toll-Free (800) S. Lee Hwy. Cleveland, TN 37311
 S. Lee Hwy. Cleveland, TN 37311") Installation Manual Nationwide supplier of quality metal roofing. 65 S. Lee Hwy. Cleveland, TN 7.. www.bestbuymetals.com Toll-Free (800) 78-00 IMPORTANT NOTICE This manual contains suggestions and guidelines
Installation Manual Nationwide supplier of quality metal roofing. 65 S. Lee Hwy. Cleveland, TN 7.. www.bestbuymetals.com Toll-Free (800) 78-00 IMPORTANT NOTICE This manual contains suggestions and guidelines
b) Symphony comes pre-packaged in color and width blends. There is no need to mix Symphony at the job site. Currently Symphony is available in the
 Symphony comes pre-packaged in color and width blends. There is no need to mix Symphony at the job site. Currently Symphony is available in the") PART 1 GENERAL 1) DESCRIPTION a) CertainTeed Symphony TM composite slate is an innovative roofing product that simulates the appearance, texture, and contours of traditional natural slate. It is a carefully
PART 1 GENERAL 1) DESCRIPTION a) CertainTeed Symphony TM composite slate is an innovative roofing product that simulates the appearance, texture, and contours of traditional natural slate. It is a carefully
TABLE OF CONTENTS A-1
 TABLE OF CONTENTS PAGE NUMBER: DETAIL DESCRIPTION A-1...TABLE OF CONTENTS A-2...GENERAL NOTES B-1...GENERAL INFORMATION C-1...EAVE DRIP DETAIL C-2...EAVE DRIP with GUTTER DETAIL C-3 & C-4...FIXED RIDGE
SG-30 A P P L I C A T I O N I N S T R U C T I O N S. Directions For Application
 1 2 3 General Instructions NOTICE: THESE SHINGLES MUST BE APPLIED TO CONFORM WITH ALL APPLICABLE BUILDING CODES. THESE DIRECTIONS REPRESENT COMMON AND ACCEPTED ROOFING PRACTICES. DEVIATIONS FROM THESE
COMPOSITE TILE INSTALLATION MANUAL
 COMPOSITE TILE INSTALLATION MANUAL Product Description Quarrix Composite Tile is a lightweight molded composite of a mixture of polyethylene polymer and inorganic proprietary additive materials that gives
F-WAVE REVIA SYNTHETIC ROOFING SHINGLES
 F-WAVE REVIA SYNTHETIC ROOFING SHINGLES Installation Manual for Steep-Slope Residential Installations For support with all other Steep-Slope Installations, please call F-Wave Technical Support at 888-GO-FWAVE.
Slate Shingle Specifications
 Slate Shingle Specifications California Slate is a proud member of the Slate Roofing Contractors Association of North America, Inc. (SRCA) which publishes Section 07310 Slate Shingles setting forth architectural
Best Buy Metals Toll Free / Phone / Fax
 DETAIL MANUAL for Vertical Seam Best Buy Metals Toll Free 1-800-728-4010 / Phone 423-479-6382 / Fax 423-728-3066 www.bestbuymetals.com Vertical Seam Roofing Panels Fig. 2 Vertical Seam Has 1-3/4" high
Best Materials LLC distributes backer rod, caulking and sealants for all types of EIFS joints and penetration sealing applications.
 Best Materials LLC distributes backer rod, caulking and sealants for all types of EIFS joints and penetration sealing applications. EXTERIOR INSULATION & FINISH SYSTEM CONSTRUCTION Data Published Courtesy
A P P L I C A T I O N I N S T R U C T I O N S
 1 2 3 General Instructions NOTICE: THESE SHINGLES MUST BE APPLIED TO CONFORM WITH ALL APPLICABLE BUILDING CODES. THESE DIRECTIONS REPRESENT COMMON AND ACCEPTED ROOFING PRACTICES. DEVIATIONS FROM THESE
PREMIUM LAMINATED ASPHALT SHINGLES Dallas, TX Tuscaloosa, AL Phillipsburg, KS
 Application Instructions for FORMERLY 50 THESE ARE THE MANUFACTURER S APPLICATION INSTRUCTIONS FOR THE ROOFING CONDITIONS DESCRIBED. TAMKO BUILDING PRODUCTS, INC. ASSUMES NO RESPONSIBILITY FOR LEAKS OR
TIOGA Table of Contents
 Table of Contents TABLE OF CONTENTS Product Data Sheet...2 Engineering Data...3 General Information...4 Handling...5 Roof Preparation...5 Fastening Recommendations...6 Field Cutting...7 Touch-up Paint...7
Table of Contents. Notes to Designer/User Map of Typical Roof Conditions Fastener Placement Fastener Selection...
 Table of Contents Section Page Notes to Designer/User... 2-3 Map of Typical Roof Conditions... 4 Fastener Placement... 5 Fastener Selection... 6 Ridge/Hip Flashing... 7 Valley Flashing... 8 Eave Flashings...
DETAIL MANUAL for Standing Seam / Image II
 DETAIL MANUAL for Standing Seam / Image II Best Buy Metals Toll Free 1-800-728-4010 / Phone 423-479-6382 / Fax 423-728-3066 www.bestbuymetals.com Best Buy Metals Standing Seam Roofing Panels Fig. 2 Standing
DIVISION: THERMAL AND MOISTURE PROTECTION SECTION: METAL SHINGLES SECTION: METAL ROOF TILES REPORT HOLDER:
 0 Most Widely Accepted and Trusted ICC ES Evaluation Report ICC ES 000 (800) 423 6587 (562) 699 0543 www.icc es.org ESR 1754 Reissued 11/2017 This report is subject to renewal 11/2018. DIVISION: 07 00
ROOFING City of Grand Rapids Building Safety Division
 ROOFING City of Grand Rapids Building Safety Division 218-326-7601 www.cityofgrandrapidsmn.com This handout is intended only as a guide and is based in part on the 2015 Minnesota State Building Code, Grand
Table of Contents Light Gauge Metal Roof & Wall Panels
 Table of Contents Light Gauge Metal Roof & Wall Panels Installation Guide for Delta Rib, Nor-Clad, Strata Rib & 2-1/2 Corrugated Introduction Important Notice Notes: April 2008 Minimum Recommended Tools
DETAIL MANUAL. For R-Panel / PBR Panel. Metal Roofing Wholesalers
 Metal Roofing Wholesalers DETAIL MANUAL For R-Panel / PBR Panel 1178 Topside Rd Louisville, TN 37777 Picture of Gulf Coast Figure 1 Metal Roofing Plant PBR/R-Panel The 26-gauge R-Panel is a strong, durable,
 TremLock T-138 INSTALLATION MANUAL T-138 www.tremcoroofing.com 3735 Green Road Beachwood, Ohio 44122 1.800.852.6013 50 Beth Nealson Drive Toronto, Ontario M4H 1M6 1.800.668.9879 7241 6/8/18 TABLE OF CONTENTS
Pipe penetration refer CT15. Viking CertainTeed Shingles General Roof details
 Vented ridge refer CT02 Substrate Viking SuperStrand or F11 Roofing ply Pipe penetration refer CT15 Valley details refer CT07 and CT08 refer CT17 and CT18 for requirements Drip-edge refer CT01 Barge detail
Installation Instructions
 Installation Instructions RAPID RIDGE STANDARD / 7 / METRIC Page Installation Considerations 3 Rapid Ridge Standard General Installation 4 Rapid Ridge Metric General Installation 5 Rapid Ridge 7 General
SECTION SLATE SHINGLES. 1.1 SUMMARY A. Section Includes: 1. Slate shingles over underlayment nailed to roof sheathing.
 SECTION 07 31 26 SLATE SHINGLES SPEC WRITER NOTES: Delete text between // // not applicable to project. Edit remaining text to suit project. PART 1 - GENERAL 1.1 SUMMARY A. Section Includes: 1. Slate shingles
C e r t a i n T e e d S h i n g l e A p p l i c a t o r s M a n u a l. and Carriage House STEEP. Slope Application. (over 21/12)
") C e r t a i n T e e d S h i n g l e A p p l i c a t o r s M a n u a l Grand Manor 16 and Carriage House YOUR OBJECTIVE: To learn the correct method of installing each of these roofing products. These shingles
C e r t a i n T e e d S h i n g l e A p p l i c a t o r s M a n u a l Grand Manor 16 and Carriage House YOUR OBJECTIVE: To learn the correct method of installing each of these roofing products. These shingles
4. Metal roof jacks at penetrations and attachments
 - - - - - - - - - - - - - - - - - - - - - - - - - - - - - - - - - - - - - - - - - - - - - - - - - - - - - - - - - - - - - - - - - - - - - - SECTION 07 61 00 METAL SHINGLE ROOFING - - - - - - - - - - -
DW HORIZONTAL INSTALLATION
 AR-PJ-01-DW2H 2" HORIZONTAL PANEL JOINT AR-PJ-02-DW2H 2" VERTICAL PANEL JOINT AR-PJ-03-DW2H 3" HORIZONTAL PANEL JOINT AR-PJ-04-DW2H 3" VERTICAL PANEL JOINT AR-PJ-05-DW2H CUSTOM REVEAL AR-PJ-06-DW2H DW-2000S
900 SERIES WALL PANELS
 CI-DS-01-900 CI-PP-01-900 CI-PJ-01-900 CI-PJ-02-900 CI-PJ-03-900 CI-BS-01-900 CI-BS-02-900 CI-BS-03-900 CI-BS-04-900 CI-BS-05-900 CI-OC-01-900 CI-OC-02-900 CI-IC-01-900 CI-FO-01-900 CI-FO-02-900 CI-FO-03-900
Table of Contents. Installation Guide for Profile with Hidden Fasteners 3. Installation Steps 4, 5. Prestige Series Moldings 6, 7. Other Accessories 8
 1 Table of Contents Page(s) Installation Guide for Profile with Hidden Fasteners 3 Installation Steps 4, 5 Prestige Series Moldings 6, 7 Other Accessories 8 Trims & Accessories 9 Eave Starters 10 Gableboards
SECTION SHEET METAL FLASHING AND TRIM
 SECTION 07620 PART 1 - GENERAL 1.1 SUMMARY A. Section Includes: 1. Formed roof drainage sheet metal fabrications. 2. Formed low-slope roof sheet metal fabrications. 1.2 SUBMITTALS A. Shop Drawings: Show
Hatteras Shingles. CertainTeed Shingle Applicator s Manual. YOUR OBJECTIVE: To learn the correct procedures for installing Hatteras shingles
 CertainTeed Applicator s Manual Hatteras s 14 YOUR OBJECTIVE: To learn the correct procedures for installing Hatteras shingles HATTERAS SHINGLES Hatteras shingles are a premium oversize (18" x 36") roofing
METAL ROOFING INSTALLATION GUIDE
 METAL ROOFING INSTALLATION GUIDE STANDING SEAM ROOFING PANELS Horizon 16 and Climaguard 16 Regardless of whether your roofing project is a new installation or a re-roof, and whether your building is residential,
DIVISION: THERMAL AND MOISTURE PROTECTION SECTION: METAL SHINGLES SECTION: METAL ROOF TILES REPORT HOLDER:
 0 Most Widely Accepted and Trusted ICC ES Evaluation Report ICC ES 000 (800) 423 6587 (562) 699 0543 www.icc es.org ESR 1754 Reissued 11/2017 This report is subject to renewal 11/2018. DIVISION: 07 00
Cambridge English Application Instructions
 Cambridge English Application Instructions ROOF SLOPE: Never apply asphalt shingles to roof slopes less than 2:12. For slopes 2:12 to 4:12 (LOW SLOPE), see special underlayment requirements outlined below.
Shingle Installation Guidelines
 Shingle Installation Guidelines General Guidelines Materials to be used Key definitions Cost of roofing Preparation of the roofing deck Materials used for roofing should conform to approved norms and regulations
Application Guidelines - Shake General Information
 Application Guidelines - Shake General Information No Special Tools Required hand fastened or fastened with a pneumatic nail gun utility knife or a standard circular saw tape measure, pry bar, tin snips
ASPHALT T E C H N O L O G I E S
 ASPHALT T E C H N O L O G I E S Evaluation of Active Ventilation Products Inc. Aura-D (AV-24) Ventilator in Accordance With FLORIDA BUILDING CODE PROTOCOL TAS 100(A)-95 TEST PROCEDURE FOR WIND AND WIND
Gerard Battenless Profiles
 Manual Gerard Battenless Profiles Canyon Shake Barrel Vault NB Tile January 2015 This Manual is designed as an instructional tool to clearly depict to the contractor, installer, distributor and architect,
1 Roof Substrate (Deck) OWENS CORNING BERKSHIRE SHINGLES INSTALLATION INSTRUCTIONS
 OWENS CORNING BERKSHIRE SHINGLES INSTALLATION INSTRUCTIONS") General This Installation Instruction document for Owens Corning Berkshire roofing shingles is to be read in conjunction with the Installation information printed on each packet of shingles along with
General This Installation Instruction document for Owens Corning Berkshire roofing shingles is to be read in conjunction with the Installation information printed on each packet of shingles along with
PREMIUM LAMINATED ASPHALT SHINGLES Frederick, MD
 Application Instructions for FORMERLY 50 THESE ARE THE MANUFACTURER S APPLICATION INSTRUCTIONS FOR THE ROOFING CONDITIONS DESCRIBED. TAMKO BUILDING PRODUCTS, INC. ASSUMES NO RESPONSIBILITY FOR LEAKS OR
The chimney must extend at least 2 above any part of the roof within 10 of it. A fireplace must have an intake combustion air duct installed to plan.
 ROOF ASSEMBLY FURNACE VENT In the utility room or where the furnace is located, there is an access panel to inspect the furnace chimney pipe for gas fired units. Remove the cover and check to see that
ICC-ES Evaluation Report Issued February 1, 2011 This report is subject to re-examination in one year.
 ICC-ES Evaluation Report www.icc-es.org (800) 423-6587 (562) 699-0543 ESR-3098 Issued February 1, 2011 This report is subject to re-examination in one year. A Subsidiary of the International Code Council
Table of Contents. Important Notices 3. Residential Roofing Application 4. Trims & Accessories 5. Trim Glossary 6, 7, 8. Estimating Material 9
 Table of Contents Page(s) Important Notices 3 Residential Roofing Application 4 Trims & Accessories 5 Trim Glossary 6, 7, 8 Estimating Material 9 Eave Trim Installation 10 Connecting Eavestarters 10 Gable
Installation Instructions
 Installation Instructions SHARK VENT XLP / XTRA Page Installation Considerations 3 Shark Vent XLP & Xtra General Installation 4 Steep Pitch Guidelines 5 Asphalt Shingles Detail 6 Ridge Beam Detail 7 Hip
3-Tab Shingle Instructions DURA-SEAL 20 DURA-SEAL 25
 3-Tab Shingle Instructions DURA-SEAL 20 DURA-SEAL 25 1 Directions For Applying Malarkey 3-Tab Shingles GENERAL INSTRUCTIONS Install Malarkey 3-tab shingles according to building code and local amendments.
Grand Manor Carriage House and Centennial Slate 16 YOUR OBJECTIVE: To learn the correct method of installing each of these roofing products.
 CertainTeed Shingle Applicator s Manual Grand Manor Carriage House and Centennial Slate 16 YOUR OBJECTIVE: To learn the correct method of installing each of these roofing products. 90 STEEP Slope Application
Application Guidelines - Slate General Information
 No Special Tools Required Application Guidelines - Slate General Information hand fastened or fastened with a pneumatic nail gun utility knife or a standard circular saw tape measure, pry bar, tin snips