Colonial Washstand Circa 1760
|
|
|
- Brandon McDaniel
- 6 years ago
- Views:
Transcription

1 Colonial Washstand Circa 1760 I found the original of this piece while on vacation on Jekyll Island in Georgia. It was one of a pair in a conference room at the Jekyll Island Club Hotel, part of the island's historic district, and was probably made during the middle of the eighteenth century. It was, as ours is, made from pine. The patina was a lovely buttery color. Close inspection failed to reveal traces of any finish other than many years of wax polishing. Most
2

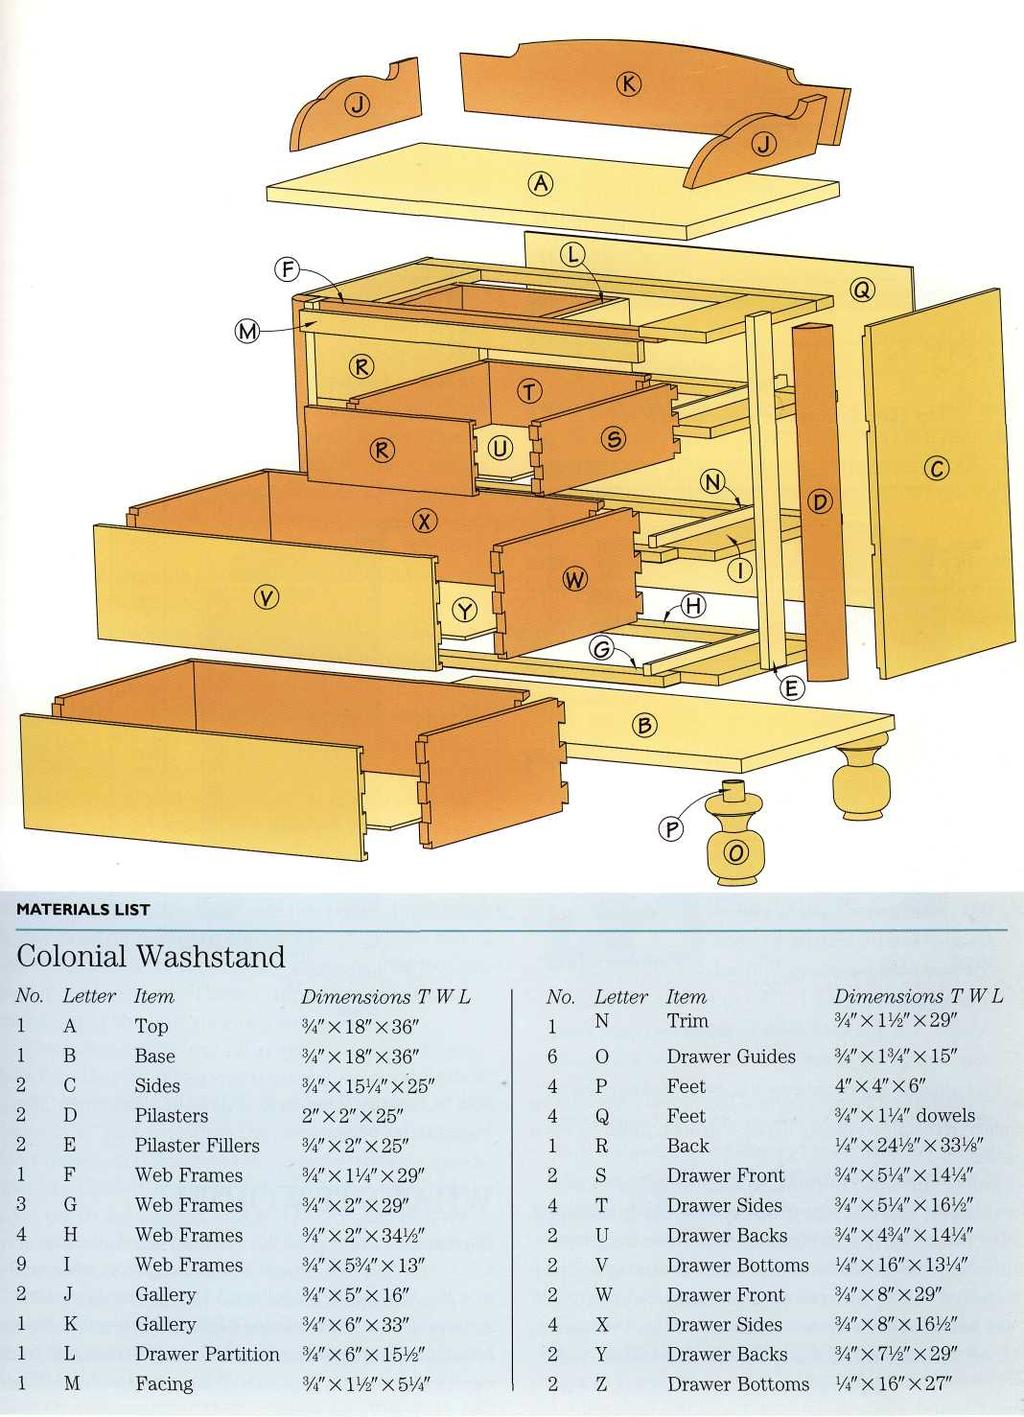
3 pieces like this, however, would have been painted. I've chosen a scrubbed finish, a look I've seen often on such pieces. Before the advent of hot and cold running water, washstands like this one would have been an essential part of most early and Victorian American bedroom suites. Towels, washcloths and other linens would have been kept in the drawers while the galleried top would have been home to a large ceramic bowl and water jug. It's a look that's often duplicated to good effect today. This washstand is a faithful copy of the one I found on Jekyll Island. I've searched the books but have not been able to find anything quite like it. In other words, it seems to be unique.

4 CONSTRUCTION OUTLINE At first glance this is a simple piece, but first glances can often be misleading. To make it you will need to use almost every tool in the shop. When it's finished it will provide you with a unique piece, as well as a real sense of achievement. Basically, this is a small chest of drawers with turned feet, a nicely shaped gallery and rounded quarter pilasters. The web frames are offset to accommodate the pilaster and attached to the sides with glue and biscuits (dowels would work just as well). The top is made from furniture-grade pine a full 1" thick. The kicker is also a solid piece of stock, nominally 1" thick, upon which the carcass sits. There were no dust panels in the original. The drawers were constructed using lap joints, but, as I felt this was a quality piece, I've taken a liberty and used dovetails. The feet are glued and doweled to the kicker. There are a couple of tricky areas: the pilasters and the construction of the carcass. The pilasters are made from two pieces of stock, 25" long X 2" wide X 2" thick. The trick here is how to achieve the quarter-round cross-section. I did it by taking pieces of stock 36 1/2" long X 4" wide X 2" thick and gluing them together only the first six inches at either end to make a piece 4" X 4". I then placed the piece in the lathe and turned off the corners to give me what was essentially an eight-sided piece four flats and four rounded corners. At that point I removed the stock from the lathe and cut off the first six inches at either end, thus the middle section split into two halves. From there it was simply a matter of cutting one of the two halves down the middle to give me the pilasters. The two six-inch 4" X 4" sections? These I turned on the lathe to make two of the four required feet. The carcass itself is fairly simple to construct; just take care that the offset web frames are accurately measured, made and dadoed into the sides. Note: One web frame is 3/4" narrower than the other three. Attaching the pilasters and fillers to the carcass, however, needs special attention. First you'll glue and screw the spacers, edge on, to the carcass (see top photo page 80), then glue and screw the pilasters to the spacers (see bottom photo page 80). Quite simple really. The gallery or splash-back, as it's often called, is cut from furniture-grade pine, a full 1" thick, and angled to slope away at 6. The ends of the galleries are lap-jointed and secured together with glue and cut-steel masonry nails for authenticity. The hardware, which is also faith- ful to the original washstand, was bought from the Woodworker's Store. BUILDING THE WASHSTAND STEP 1. Cut and shape the pilasters (see Shop Tip below). STEP 2. Cut the rest of the required pieces to size. STEP 3. Run all the edges through the jointer. STEP 4. Build the boards that will make the top, kicker (base) and two sides. STEP 5. Build the four web frames as laid out in the drawing. Be careful to make one 3/4" narrower than the other three; this one will go at the top of the carcass. Also, be careful to make the offsets accurately as laid out in the drawing. STEP 6. Take the two pieces of stock that will make the sides and cut rabbets 3/4" wide x 1/4" deep at the top and bottom edges to take the top and bottom web frames. Next, cut a rabbet down one long edge of each side 1/4" deep to receive the back make sure you have a left and right side.


5 STEP 11. Cut the biscuit slots to the pilasters and side panels STEP 12. Glue, biscuit and clamp the pilasters to the side panels and screw the spacers to the pilasters STEP 13. Set the piece of stock to be used for the top trim in place against the narrower web frame and mark for biscuits. STEP 14. Cut the biscuit slots, then glue and clamp it in place. STEP 15. Build the drawer guide by gluing and clamping the 3/4" X 3/4" facing strip to the end grain of the piece that measures 15 3/4 X 6 3/4". Glue, assemble and clamp the carcass. Note how the front center clamp is set at an angle to pull the structure square. Glue and clamp the trim piece in place on the upper web frame, then fasten the two spacers in place on the web offsets using no. 6 screws. STEP 7. Cut dadoes in the two side pieces as laid out in the drawing 3/4" wide x 1/4" deep to take the two center web frames. STEP 8. Glue, assemble and clamp the four web frames to the two ends make sure the narrower web is at the top. Square the structure, then set it aside to cure overnight. STEP 16. Glue and screw the drawer partition in place as laid out in the drawing and top photo page 82. You can screw downward through the upper web and upward through the one below. The partition will also double as the two center drawer guides. STEP 17. Build the drawer guides STEP 18. Glue and screw the drawer guides to the carcass. STEP 19. Turn the feet to the dimensions shown in the drawing. STEP 20. Bore a 3/4" hole, 1" deep, in the top center of each foot to take the dowel that will secure the foot in place on the bottom of the washstand. STEP 21. Using a 1/2" bit in your router, round over the front and side edges of the two boards that will be the top and kicker. STEP 22. Bore four 3/4" holes at each corner of the kicker as laid out in the drawing. STEP 23. Using one of the new polyurethane glues and four pieces of 3/4" x 1 3/4" dowel, assemble the feet to the kicker. Clamp and set aside overnight to fully cure. STEP 24. Remove the excess glue from around the feet. STEP 25. Take the three pieces that will make the gallery and cut one end of both of the short sections and both ends of the long piece to an angle of 10 as laid out in the drawing. STEP 9. Glue and screw the spacers to the webs as you see in photo above. STEP 1O. Set the pilasters in place between the spacers and the sides and mark them and the sides for biscuit slots.


, and set aside overnight to fully cure.")
 to the lower web frame of the carcass.")
6 Once the spacers are securely fastened to the carcass, set the pilasters in place and mark them, one side only, and the carcass for biscuit slots. Cut the biscuit slots to the pilasters and side panels Take extra care to ensure the plate jointer is square to the work when milling the biscuit slots to the pilasters. STEP 26. Using either your jointer or table saw, cut the bottom edges of all three pieces to 10 to give the gallery the desired tilt. Make sure you have a left and right section with the angle at the back. STEP 27. Using the scale drawings, cut the details to the upper edges of the three gallery sections. The angle should be at the back of both end sections. STEP 28. Cut rabbets 3/8" deep X 3/4" wide to the ends of the back section of the gallery as you see in the drawing. STEP 29. Glue, nail with cut-steel nails and clamp the side of the gallery to the back (make sure the assembly is square), and set aside overnight to fully cure. Glue the pilasters in place to the sides of the carcass and, from the inside, using glue and no. 6 screws, secure the pilasters to the spacers already screwed in place. STEP 30. From the inside, screw the kicker (base) to the lower web frame of the carcass. Elongate the holes in the carcass and use small washers under the heads of the screws to allow for movement in the kicker. STEP 31. Set the gallery in position on the top and mark the outline lightly with a pencil. STEP 32. Remove the gallery from the top and, using the pencil lines as a guide, bore pilot holes through the top at an angle of 10 to line up with the angle of the tilted gallery. STEP 33. Replace the gallery and secure it place with screws from the underside.

.")

7 STEP 34. Set the top in place on the carcass and secure with screws from the underside of the top web frame. Elongate the holes and put small washers under the heads of the screws to allow the top room to breathe. STEP 35. Set the back in place inside the rabbets and secure in place with a few brads. STEP 36. To build the drawers follow the procedure as laid out in the Shop STEP 37. Go to finishing. Using a #20 biscuit, fasten the face piece to the front edge of the drawer divider; note the offset. FINISHING I chose a scrubbed pine look for this piece (see chapter three). First you'll need to finish sand the entire piece, then do a little light distressing and finally apply some stain. I used Minwax's Golden Pecan. It gives the pine a delicate patina that shows through the polyurethane/ paint solution quite nicely for a really authentic look. When you apply the finish, simply wipe it on and then wipe it off again, leaving only the barest film of pigment over the stain. Use 3/4/" dowel and one of the new polyurethane glues to fasten the feet to the kicker.


8 If You Enjoyed This Plan, You ll LOVE The Full Plan At TedsWoodworking Want to get the FULL complete plan to this project? You ll get: All-Inclusive Blueprints & Plans Step-By-Step Photos Detailing Every Step Along The Way Illustrated Drawings and Sketches Metric and Imperial Measurements Complete Easy-To-Follow Instructions Insider tips, tricks, tactics and techniques that professionals use so you can cut corners, and get the job done faster 16,000 More Woodworking Plans! Order TedsWoodworking today and get full access to all the details of this plan PLUS 16,000 step-by-step woodworking plans. This package will blow your mind because it s filled with everything you need to complete any woodworking project you could ever imagine! Get Full Access To 16,000 Plans Now!
Nineteenth-Century Dough Box
 Nineteenth-Century Dough Box T he dough box was a functional piece found in many a country kitchen. The idea was that the cook would make a large batch of bread dough, knead it on the large work surface
The first step is to cut all wood to proper size. Refer to the cutting schedule and Details 1 and 2 for further instructions.
 CHILD S ARMOIRE 275 THIS CHILD'S ARMOIRE will make it easy for kids to keep their rooms neat and orderly. Its six drawers and two shelves provide enough storage space to house a substantial wardrobe. By
MAKING THE TV RISER CUTTING A STOPPED GROOVE ON THE TABLE SAW
 TV RISER Cherry 19 MAKING THE TV RISER First, the material that will make up the riser is glued together. Then, dress down the glued-up panel to a flat surface and a consistent thickness. In a shop with
ARTS AND CRAFTS CHAIR
 ARTS AND CRAFTS CHAIR 491 MATERIALS LIST--DINING CHAIR Key No. Size and description (use) A 2 1-3/4 x 1-3/4 x 16-1/4'' oak (front leg) B 2 1-3/4 x 3-3/4 x 40-1/2'' oak (rear leg) C 1 1-3/4 x 3-3/16 x 15''
GARDEN SCREEN FENCE 232
 GARDEN SCREEN FENCE 232 233 Materials List--Privacy Screen Key No. Size and description (use) A 16 3/4 x 1 x 53" cedar (horizontal slat) B 14 3/4 x 1 x 72" cedar (vertical slat) C 4 3/4 x 2-1/2 x 53" cedar
Project 13586EZ: Writing Desk. Writing Desk Materials List
 Project 13586EZ: Writing Desk This writing desk will make a handsome addition to just about any room in the house. The one shown is made of cherry, a logical choice for a piece like this, but mahogany
You Can Build a Bedside Table
 You Can Build a Bedside Table Jeff Branch WOODWORKING If you like making panels, you ll love this project. By JEFF BRANCH M y current home is a modest one. But it is a big improvement over our small starter
Jeff Branch WOODWORKING YOU CAN BUILD A. By adding subtle design elements, a traditional furniture style becomes decidedly modern.
 Jeff Branch WOODWORKING YOU CAN BUILD A By adding subtle design elements, a traditional furniture style becomes decidedly modern. Jeff Branch WOODWORKING Publisher: Jeff Branch Editor: Jeff Branch Art
Project Skill Level: INTERMEDIATE Plywood Used: CANPLY EXTERIOR Good Two Sides (G2S) or precision sanded Aspen
 or precision sanded Aspen") Project Skill Level: INTERMEDIATE Plywood Used: CANPLY EXTERIOR Good Two Sides (G2S) or precision sanded Aspen MATERIALS LIST: (1) ¾" x 4 ft x 8 ft plywood panel (20) #8 x 2" Robertson or Phillips wood
Project Skill Level: INTERMEDIATE Plywood Used: CANPLY EXTERIOR Good Two Sides (G2S) or precision sanded Aspen MATERIALS LIST: (1) ¾" x 4 ft x 8 ft plywood panel (20) #8 x 2" Robertson or Phillips wood
Materials. Special Tools and Techniques Chisel Long pipe clamps Miters Router with 1/2" rabbet cutter Rabbets Dadoes. Hardware
 D esk Our executive desk was built with specific needs in mind. We wanted a large desktop, large drawers, and a cubbyhole to house a rollaway hanging file cabinet. We are thrilled with our finished project.
antebellum home in Eutaw, Alabama, built in 1860 (Google it for photos).
.") You Can Build the Kirkwood Bookcase By Jeff Branch A vid readers will tell you they often need a new way to store all of their books. I ve seen some pretty creative ways to stockpile books - in some instances
You Can Build the Kirkwood Bookcase By Jeff Branch A vid readers will tell you they often need a new way to store all of their books. I ve seen some pretty creative ways to stockpile books - in some instances
under the bottom shelf and along the top shelf should do the trick.
 w Bookshelves in a Day BY ST E V E L A T T A Iget the most pure enjoyment from reproducing 18th-century furniture, but every now and then it s nice to break out of that mode and dive into a project that
Making a Massive Bookcase Step-by-Step
 Making a Massive Bookcase Step-by-Step Jeff Branch WOODWORKING The only thing challenging about this project is its huge size. By JFF BRANCH A t right is a rendering of my first woodworking project completed
Simple Dresser. Premium Plan. In this plan you ll find: America s leading woodworking authority
 America s leading woodworking authority Premium Plan In this plan you ll find: Simple Dresser Step-by-step construction instruction. A complete bill of materials. Construction drawings and related photos.
Classic Kitchen Island
 America s leading woodworking authority Step by Step construction instruction. A complete bill of materials. Classic Kitchen Island Exploded view and elevation drawings. How-to photos with instructive
rmoire This attractive and practical two-door armoire takes up very little floor space in a bedroom but provides lots of storage. Because it is only
 A rmoire This attractive and practical two-door armoire takes up very little floor space in a bedroom but provides lots of storage. Because it is only a little over 1 foot deep, it s easy to incorporate
Birdhouse Plan Combo Pack
 Birdhouse Plan Combo Pack Two Quick and Creative Projects for Your Yard PROJECT 17 Old Plane Birdhouse BY CHRISTOPHER SCHWARZ Every woodworker should spruce up the yard (or the shop) with this simple birdhouse.
This tailor s cabinet was brought to my attention by a customer
 So what if you don t sew? This authentic Shaker case piece is drop-dead gorgeous in any room. This tailor s cabinet was brought to my attention by a customer who wanted one just like it. She had seen the
 America s leading woodworking authority To download these plans, you will need Adobe Reader installed on your computer. If you want to get a free copy, visit: http://adobe.com/ reader. Having trouble downloading
Shutter At The Thought
 Shutter At The Thought Dive into the dump and come up a winner. Building projects using reclaimed materials is good for the soul. Materials: Old shutters Lazy Susan hardware Tools Drill/driver Drill bits
Flamingo. That s what I looked
 Plans N O W w w w. P l a n s N O W. c o m flip-seat Storage Bench Flamingo. That s what I looked like as I stood in the doorway perched on one leg, with my other foot raised so that I could untie the laces
Apartment Dining Table
 Jeff Branch WOODWORKING You Can Build an Apartment Dining Table By JEFF BRANCH H ave you ever found yourself wanting a new piece of furniture, but everything you see in stores is too big? Big furniture
The frame sections of the china hutch are assembled with the aid of glue and spiral dowels. Dowel centers are recommended to
 60 CHINA HUNT 282 ARE YOU LOOKING for a showpiece china hutch to display your elegant chinaware, antique vase, or collectibles? Here's the perfect cabinet for you, with lots of transparent glass to show
This photo more clearly shows how locating pins are used to transfer the dowel holes from the edge to front of frame. Use bar clamps till glue dries.
 CHINA HUTCH 266 The frame sections of the china hutch are assembled with the aid of glue and spiral dowels. Dowel centers are recommended to ease matching of dowel holes. gant chinaware, antique vase,
Cabinetmaking & Millwork CIP Task Grid
 1 Secondary Task List 100 FOLLOW RULES FOR WORKING IN THE CABINETMAKING LAB. 101 Review and discuss school rules. 102 Review and demonstrate knowledge of cabinetmaking lab rules. 103 Complete all theory
Classic Mitered Jewelry Box
 America s leading woodworking authority Premium Plan In this plan you ll find: Step-by-step construction instruction. A complete bill of materials. Construction drawings and related photos. Tips to help
Dress up your dining room with this Southern delicacy. that was used to serve drinks after a hunt. Breeches and jodhpurs are optional.
 Dress up your dining room with this Southern delicacy that was used to serve drinks after a hunt. Breeches and jodhpurs are optional. Huntboard Classic Six-Legged My dad has been making this six-legged
How to Build a Recessed Medicine Cabinet
 How to Build a Recessed Medicine Cabinet See post for install info http://www.hertoolbelt.com/recessed-medicine-cabinet/ Materials 6 Inset Cabinet Door Hinges 3 Latches 1 sheet Beadboard or 1/4 plywood
Trestle Table and Benches Materials List
 Project 18444EZ: Trestle Table and Benches In the early days of our country, trestle tables were popular because they could easily be disassembled and moved out of the way when not in use no small advantage
Burning For It. The world's easiest table doubles as a workbench, a laundry counter, a project table and, in a pinch, a spare bunk bed.
 Burning For It The world's easiest table doubles as a workbench, a laundry counter, a project table and, in a pinch, a spare bunk bed. If you're like me, you need more surface area. And I'm not talking
Nojo Design: Large Step Cabinet: February 2012
 Nojo Design: Large Step Cabinet: February 2012 The largest single piece of furniture I ve ever made is this stepped cabinet. Finished piece is 8! tall and over 10 long. This project has been great, although
irdhouse Table Special Tools and Techniques Materials and Supplies Hardware
 B irdhouse Table This whimsical table is one of our favorite projects, because it never fails to produce a smile on the faces of our backyard guests. Not only is it cheerful to behold but the glass top
YOU CAN BUILD THE JACKSON DRESSER. Combining traditional styling with rustic materials leads to a classic, yet casual look.
 YOU CAN BUILD THE JACKSON DRESSER Combining traditional styling with rustic materials leads to a classic, yet casual look. Jeff Branch CONTENTS Jeff Branch Publisher: Jeff Branch Editor-in-Chief: Jeff
Kentucky 4H Wood Science Plans Notebook. Plans Level 3
 Kentucky 4H Wood Science Plans Notebook Plans Level 3 MATERIALS: 2 pieces wood 3/4 x 10 x 4 1 piece wood 3/4 x 12 x 4 2 pieces wood 3/4 x 3 x 2 5 1/2" 2 pieces wood 3/4 x 3 x 1 8 1 piece wood 2 x 4 x
Total Test Questions: 74 Levels: Grades Units of Credit:.50. Identify career opportunities in the furniture and cabinetmaking industries.
 DESCRIPTION Furniture Design and Manufacturing (522) is the second instructional course in a sequence that prepares students to apply technical knowledge and skills to prepare and execute furniture design
Shaker Lap Desk. The classic Shaker lap desk, designed two centuries ago to. Celebrate pen and ink with this quintessential case
 Shaker Lap Desk Celebrate pen and ink with this quintessential case BY CHRISTIAN BECKSVOORT The classic Shaker lap desk, designed two centuries ago to function as a miniature traveling office, was the
Cabinetmaking & Millwork CIP Task Grid
 1 Secondary Task List 100 DEMONSTRATE PERSONAL SAFETY. 101 Demonstrate knowledge of general safety rules for working in the cabinetmaking lab. 102 Identify cabinetmaking lab tools and equipment. 103 State
Shaker Classic Change the legs to change the look
 Shaker Classic Change the legs to change the look 2 Ways B Y C H R I S T I A N BECKSVOORT not long ago, a couple ordered a set of cherry side tables from me, one for each side of their pencil-post bed.
A Shaker Sewing Stand
 America s leading woodworking authority Step by Step construction instruction. A Shaker Sewing Stand A complete bill of materials. Exploded view and elevation drawings. How-to photos with instructive captions.
Performance Rating Scale: Limited Skills... Moderate Skills..High Skills
 PERFORMANCE STANDARD EVALUATION CHECKLIST Student Name Instructor s Name School District Performance Rating Scale: 1 2 3 4 5 6 7 8 9 10 Limited Skills..... Moderate Skills..High Skills Performance assessments
An Inner Hive Cover. In the Beekeeper s Work Shop. Building a Bee Hive: The Inner Hive Cover. by Stephen E. Tilmann
 An Inner Hive Cover In the Beekeeper s Work Shop The project for this article is an inner hive cover. The inner cover sits on top of the topmost hive body (super) and underneath the telescoping top cover
A Classic Case. Floating-tenon joinery and curly cherry update a traditional Arts and Crafts design
 A Classic Case Floating-tenon joinery and curly cherry update a traditional Arts and Crafts design B Y G R E G O R Y P A O L I N I Anyone familiar with American furniture would immediately identify this
Cedar 2-Drawer Desktop Storage Cube
 Cedar 2-Drawer Desktop Storage Cube 5 ½ Dimensions 5 ½ 5 ½ 2 2 1 7/8 4 ¼ 4 ½ Author s Notes: Build a Cedar 2-Drawer Desktop Storage Cube from just 1 cedar fence picket. No angles, special cuts or rips
135 ROLLTOP DESK 515
 135 ROLLTOP DESK 515 For the person who hates to clear off a desk, who wants to leave everything where it is overnight yet still have the clutter hidden, a rolltop desk is a godsend. The tambour hides
Chest of Drawers Plans
 Chest of Drawers Plans www.andrewharriswoodwork.com Page 1 of 15 Introduction This plan makes a chest of drawers that is 50 inches at the widest point, 19 inches deep and 40.75 inches high. I have tried
Copyright WilkerDos.com Dining Table. Project Designed By April Wilkerson - Plan Created By Jay Bates (jayscustomcreations.
 Copyright WilkerDos.com 2017 Project Designed By April Wilkerson - Plan Created By Jay Bates (jayscustomcreations.com) Layout & Shopping List Page 2 of 12 Layout & Shopping List Item Quantity Description
Silverware Chest Plan
 Silverware Chest Plan 05L14.01 Introduction 1. Measure the space required for your cutlery before beginning this project to be sure that it will fit in the drawers and top compartment. The best way to
Project 11010EZ: Gun/Bookcase/Curio Cabinet
 Project 11010EZ: Gun/Bookcase/Curio Cabinet No man can be all things to all people, but this cabinet comes as close to fitting multiple uses as any inanimate object can. We ve pictured it as a gun cabinet
World. Old. Dining Table YOU CAN BUILD AN
 YOU CAN BUILD AN Old World Dining Table This design combines heavy oak timbers with period specific elements. The result brings an old world look to a modern sized dining table. Publisher: Jeff Branch
Total Test Questions: 74 Levels: Grades Units of Credit:.50
 DESCRIPTION The third in a sequence of assessments, Cabinetmaking prepares students to apply technical knowledge and skills to set up and operate industrial woodworking machinery and to use such machinery
Here are the tools and materials we used for the project:
 When we began our kitchen remodel, we knew we were going to have to do something about the trash can-- our old one was stained and dented and just had to go. While we would have loved to have had room
WOOD MANUFACTURING 30
 WOOD MANUFACTURING 30 Description This course is designed to introduce to the student the processes and techniques of leg and rail construction. Student skills will be developed through tool and machine
It can be either a 2½ seater bench seat (2 adult and a kid), or a 5 seater picnic table.
, or a 5 seater picnic table.") Page 1 Folding picnic table in both bench-seat and picnic table mode Introduction Description A single bench seat that can be changed into a picnic table with ease. This 'Bench come Picnic Table' is ideal
Page 1 Folding picnic table in both bench-seat and picnic table mode Introduction Description A single bench seat that can be changed into a picnic table with ease. This 'Bench come Picnic Table' is ideal
Modern Farmhouse Printer Cabinet. Addicted2DIY.com
 Modern Farmhouse Printer Cabinet Addicted2DIY.com Before beginning this project please read through all of the plans as well as the blog post associated with this project. Always use safety precautions
World. Old. Dining Table YOU CAN BUILD AN
 YOU CAN BUILD AN Old World Dining Table This design combines heavy oak timbers with period specific elements. The result brings an old world look to a modern sized dining table. Publisher: Jeff Branch
DOCUMENT CHEST. Curly Maple, White Pine
 25 DOCUMENT CHEST Curly Maple, White Pine 100 MAKING THE DOCUMENT CHEST After the stock has been thicknessed, ripped to width, and cut to length, plough a 1/4" X 3 /8" groove on the inside faces of the
BUILDING A STORM DOOR
 BUILDING A STORM DOOR BY NEAL BARRETT Illustrations by George Retseck If you're in the market for a storm door, you probably know that there are many styles and models available. However, most of them
Robert Bosch GmbH. Wall organiser
 Wall organiser The organisational talent Wall organiser Say goodbye to messiness! The wall organiser is the ideal place to store everything that tends to lie around. 1 Introduction Wardrobes, drawers and
Traditional glass-pane and wood-muntin doors highlight this free-standing piece.
 Bookcase Traditional glass-pane and wood-muntin doors highlight this free-standing piece. As the saying goes, there's nothing like good books. But they can present some storage problems--especially if
1 ¼-inch Pocket Screws Brad Nailer or Hammer 1 ¼-inch Brad Nails Clamps
 MATERIALS: TOOLS: (4) 2 x 6 x 8 Ft. Boards Tape Measure (2) 2 x 4 x 8 Ft. Boards Carpenter s Square (7) 1 x 4 x 8 Ft. Boards Pencil (2) 1 x 3 x 8 Ft. Boards Drill (1) Half Sheet of ¾-inch Thick Plywood
BUTCHER BLOCK MICROWAVE OVEN STAND
 BUTCHER BLOCK MICROWAVE OVEN STAND 828 The butcher block has fallen out of favor in recent years, replaced by the countertop cutting board in an attempt to save space. This design, however, makes the butcher
You Can Build an Architectural Bookcase
 Jeff Branch WOODWORKING You Can Build an Architectural Bookcase Heavy moldings bring this project to life. By JEFF BRANCH I am drawn to architecture. In particular, I like the orderly nature of Palladian
Computer Desk. Project designed by April Wilkerson
 Project designed by April Wilkerson Copyright WilkerDos.com 2018 Project plan Desk Page 2 of 16 Page 3 of 16 File cabinet Page 4 of 16 Metal base Page 5 of 16 Glue up Get started by gluing up boards for
DIY Full-Size Captain s Bed with Storage. Addicted2DIY.com
 DIY Full-Size Captain s Bed with Storage Addicted2DIY.com Before beginning this project Please read through all of the plans as well as the blog post associated with this project. Always use safety precautions
WAYNESBORO AREA SCHOOL DISTRICT CURRICULUM MATERIALS AND MANUFACTURING IV
 UNIT: Safety NO. OF DAYS: 20 KEY LEARNING(S): Safe and proper use of tools and machines UNIT : How do I safely work in materials and manufacturing lab & How to apply machines and tools? 3.4.10. D2. Diagnose
Router Table-Mate. Everything you'd want in a router table for just $50.
 Router Table-Mate Everything you'd want in a router table for just $50. Commercially made router tables are everywhere these days. Some of them come with more gizmos and gadgets than a 59 Edsel. By the
Butterfly Leaf Dining Table Plans
 Butterfly Leaf Dining Table Plans Part 1 An attractive dining table with a secret: the leaf folds and stores inside the table. Season 1, Episode 7 P a g e 2 I first saw a butterfly leaf table in a back
Plans. Easy-to-Build Full-size Deluxe Murphy Bed Plan. For more plans, tools and hardware visit rockler.com
 Easy-to-Build Full-size Deluxe Murphy Bed Plan Build a full-size Deluxe Murphy Bed complete with decorative molding and matching side cabinets! Plans For more plans, tools and hardware visit rockler.com
Kitchen Base Cabinet: Multiple Drawers Cabinets from Scratch
 Kitchen Base Cabinet: Multiple Drawers by Cabinets from Scratch Our Home from Scratch LLC Page 1 Disclaimer Our Home from Scratch LLC and its legal owners cannot be held responsible for any loss, damage,
Mail Truck Bank Plan. Rockler Mail Truck Bank Plan
 Mail Truck Bank Plan Build this nostalgic Mail Truck Bank and capture the imagination of a child! This easy-to-build plan uses our Solid Brass Mailbox Door (#55358) to commemorate the stalwart little truck
Iearn my living by making cabinetry not cookie-cutter
 Supporting Shelves Five methods for installing by Stephen Winchester Iearn my living by making cabinetry not cookie-cutter kitchens, but one-of-a-kind pieces and custom built-ins. Every cabinet I build
Hudson Dresser [1] Hudson Dresser Published on Ana White ( Submitted by dan-k [2] on Fri, :43 [1]
![Hudson Dresser [1] Hudson Dresser Published on Ana White ( Submitted by dan-k [2] on Fri, :43 [1]](/thumbs/90/102626096.jpg "Hudson Dresser [1] Hudson Dresser Published on Ana White ( Submitted by dan-k [2] on Fri, :43 [1]") [1] Submitted by dan-k [2] on Fri, 2011-03-11 11:43 [1] If you plan on staining this piece, it is recommended that you stain all of the drawer face materials before assembly for a more professional look.
[1] Submitted by dan-k [2] on Fri, 2011-03-11 11:43 [1] If you plan on staining this piece, it is recommended that you stain all of the drawer face materials before assembly for a more professional look.
Project 13519EZ: Shaker Sewing Desk
 Project 13519EZ: Shaker Sewing Desk This fine example of a Shaker sewing desk was measured and photographed at Hancock Shaker Village in Hancock, Massachusetts. On the original, the legs and various frame
Redwood 3. Install the chair back Finishing A d i r o n d a c k C h a i r Grades Materials For Adirondack Chair Quantity Size Length 4.
 Adirondack Chair Adirondack Chair BUILD THE CHAIR FRAME The rounded wooden slats, oversized armrests and inviting slant-back design identify the classic Adirondack chair. Born a century ago in upstate
Fright Research Spooky Sign
 Fright Research Spooky Sign Instruction Manual September 2018, Rev - - 1 - http://www.frightresearch.com Spooky Sign Parts List INCLUDED 1 Main Sign 24.5 x 18 1 Bottom Sign 16 x 4 1 Chain link 8 Eye hooks
Perkins Statewide Articulation Agreement. Documentation item: Secondary Competency Task List Coversheet
 Perkins Statewide Articulation Agreement Documentation item: Secondary Task List Coversheet The Secondary School agrees to: A. Implement the approved PDE Program(s) of Study. B. Provide assessment of student
Build a Stout Workbench
 Build a Stout Workbench Tail vise is at the heart of this versatile bench by chris gochnour I ve done a fair amount of handplaning during my 32 years as a professional furniture maker, and I ve found that
ining Table Materials *Notes on Materials
 D ining Table We looked around for the perfect table for the dining room. Some were too big, some too small, and most were just too expensive. So we built this one, and we are happy with the result. It
Framework joints FABRICATION - WOOD JOINTS. Corner joints. Tee joints. Worksheet 15a. Cable Educational Ltd
 FABRICATION - WOOD JOINTS The word: fabricate means to join together. Most wooden products are held together with adhesive. Adhesive works very well when the edge of a piece of wood is being glued to the
Materials and Tools: Printer s Triple Console Cabinet. Free Plans to build a Triple Console Cabinet
 Materials and Tools: Materials: 3 sets euro style bottom corner mount drawer slides, 16 length 3 sets inset hinges 24 cup style handles 8 2x2 @ 8 feet long 6 1x3 @ 8 feet long 6 1x2 @ 8 feet long 1 sheet
leaf table Leaves dropped, this traditional oak table makes an ideal kitchen island. Leaves extended, it s a small breakfast table
 leaf table Leaves dropped, this traditional oak table makes an ideal kitchen island. Leaves extended, it s a small breakfast table The drop-leaf table is a traditional favourite, but the one I ve designed
Dining Table with Two-Way Drawers
 Dining Table with Two-Way Drawers DOUBLE-FRONTED DRAWERS MAKE THIS PIECE UNIQUE With two drawer fronts, a center beam, plywood bottoms, and custom pulls, these drawers are both distinctive and durable.
Project 17884EZ: Shaker End Table
 Project 17884EZ: Shaker End Table With its clean, simple lines, this piece is unmistakably Shaker style. Ours is made from cherry, a wood commonly used by Shaker craftsman, but we ve also seen this piece
The WoodWorker s Edge
 The WoodWorker s Edge Draw-leaf Game Table 1. 2. Layout the area for the tenons. The tenons are 3/8 thick x 4-1/2 long x 1-1/4 deep and offset to the inside. Create the tenons using the step method to
Media Center Woodworking Plans Our Home from Scratch
 Media Center Woodworking Plans by Our Home from Scratch Our Home from Scratch LLC Page 1 Disclaimer Our Home from Scratch LLC and its legal owners cannot be held responsible for any loss, damage, injury
Kitchen Upper Cabinet: Single Door Cabinets from Scratch
 Kitchen Upper Cabinet: Single Door by Cabinets from Scratch Our Home from Scratch LLC Page 1 Disclaimer Our Home from Scratch LLC and its legal owners cannot be held responsible for any loss, damage, disappointment,
rmoire Materials Hardware
 A rmoire No house ever has enough storage space, and I built this armoire to satisfy a couple of needs. Inside the armoire is a shelf large enough for the television. Under the shelf are six drawers that
Kitchen Upper Cabinet: Double Doors Cabinets from Scratch
 Kitchen Upper Cabinet: Double Doors by Cabinets from Scratch Our Home from Scratch LLC Page 1 Disclaimer Our Home from Scratch LLC and its legal owners cannot be held responsible for any loss, damage,
Mid-Century Credenza Thoughtful details and modern joinery merge in this sleek design
 Mid-Century Credenza Thoughtful details and modern joinery merge in this sleek design BY LIBBY SCHRUM Mid-Century Modern furniture has not been wildly popular since, well, the mid-century. But fashion
Empire Dresser Plans
 1 Empire Dresser Plans Materials 1 sheet 3/4" plywood (cabinet grade 4' x 8') 1 sheet 5 mm (3/16") underlayment plywood 4'x 8', buy another 1/2 sheet if you want to put a back on the dresser. 1-2" x 4"
Project 11355EZ: Wall Cabinet with Louvered Doors and Shelf
 Project 11355EZ: Wall Cabinet with Louvered Doors and Shelf This Early American style cabinet will look good in any room, although it seems particularly well suited for the kitchen or bathroom. To make
REINFORCING THE CORNERS OF FLAT FRAMES
 REINFORCING THE CORNERS OF FLAT FRAMES There are a number of different methods that may be used to join flat frame sides together. As most Woodworkers know, end grain glue joints are not nearly as strong
DOWNLOAD PDF HOW TO BUILD KITCHEN CABINETS, ROOM DIVIDERS, AND CABINET FURNITURE
 Chapter 1 : How To Build Kitchen Cabinets Room Dividers Furniture Donald Brann DIY ebay How to Build Kitchen Cabinets, Room Dividers, and Cabinet Furniture [Donald R. Brann] on blog.quintoapp.com *FREE*
National 5 Practical Woodwork
 Exercise C. The legs of a chair are turned on the wood lathe. (a) (i) Sketch and name the tool used to produce the square shoulder shown at A. Name of tool: Sketch and name the tool used to check the diameter
Copyright 2010 Springbok Publishing All Rights Reserved- Page 1
 Copyright 2010 Springbok Publishing All Rights Reserved- www.woodensaddlerackplans.com Page 1 Legal Information All contents copyright 2010 by Springbok Publishing. All rights reserved. No part of this
Hardware Cabinet. Part 3
 Hardware Cabinet Part 3 The vertical dividers are the next task on the cabinet and a bit of a trick to get right. The horizontal dividers are only ½ thick pine spanning the 31 width of the cabinet and
Poppy Table. Before developing the rectilinear Craftsman style, Gustav Stickley experimented with curvaceous Art Nouveau designs.
 Poppy Table b y r o b e r t w. l a n g Before developing the rectilinear Craftsman style, Gustav Stickley experimented with curvaceous Art Nouveau designs. Fresh look from an old design. This small tea
Chief s Shop: Simple Woodworking Bench
 Chief s Shop: Simple Woodworking Bench Be sure to read the instructions and review the illustrations and accompanying video for this project BEFORE you start. Follow ALL SAFETY GUIDELINES AND RECOMMENDATIONS
Can-Do Can Crusher. America s leading woodworking authority. Step by Step construction instruction. A complete bill of materials.
 America s leading woodworking authority Can-Do Can Crusher Step by Step construction instruction. A complete bill of materials. Exploded view and elevation drawings. How-to photos with instructive captions.
ULTIMATE ROUTER TABLE PLANS. By Dan Phalen
 ULTIMATE ROUTER TABLE PLANS By Dan Phalen January 2017 Ultimate Router Table Plans. Copyright 2012-2017 by Daniel Phalen. Published by Creston Hall Publishing Company. All rights reserved. No part of this