Castle Hoarding Kit Assembly Directions. by Ben Pope, DBA Vatican Enterprises June 30, 2012
|
|
|
- Morris Stanley
- 6 years ago
- Views:
Transcription

1 Castle Hoarding Kit Assembly Directions by Ben Pope, DBA Vatican Enterprises June 30, 2012
2 Directions for Gluing the Laser Cut Parts Together Dry fit the parts first, before gluing to understand how they go together. Use a medium viscosity instant super glue to assemble the laser cut wood parts. Use a super glue kicker spray to set the glue quickly. Use a small applicator tip to avoid over applying the glue. Avoid gluing your fingers together, or to the model. Acetone or finger nail polish remover can be used to remove excess glue from your fingers, or the model. Questions or problems? Contact ben@wargamescenics.com.

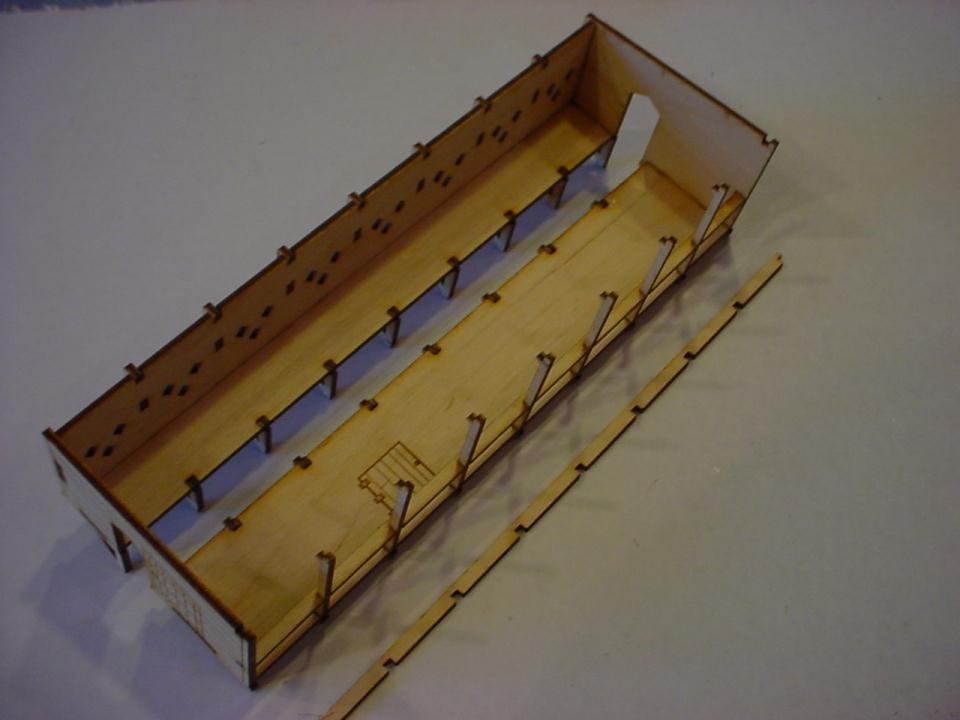
3 Note: The hoardings are based off historical research, but some artistic license has been taken to create a product that is ideally suited to gaming. They are a touch over the 25 mm scale of the castle to allow for 25-28mm figures and provide room for most miniature bases and poses. Using GW 28mm figures, up to 36 can fit a standard wall hoarding and 15 in the tower. Actual figures that can fit will depend on the style, basing, equipment and poses.
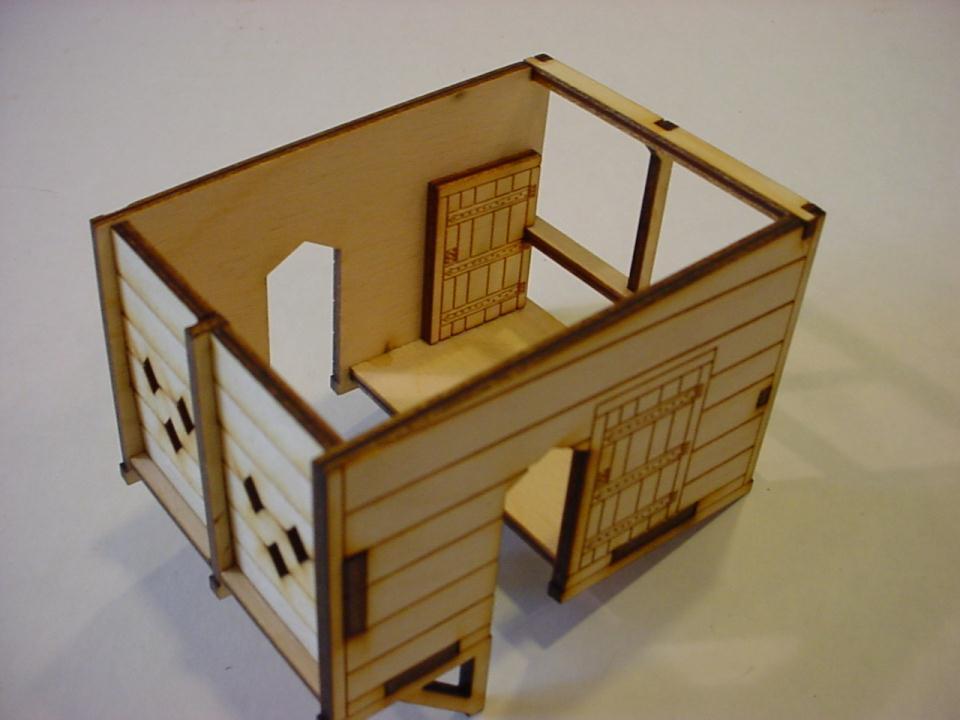
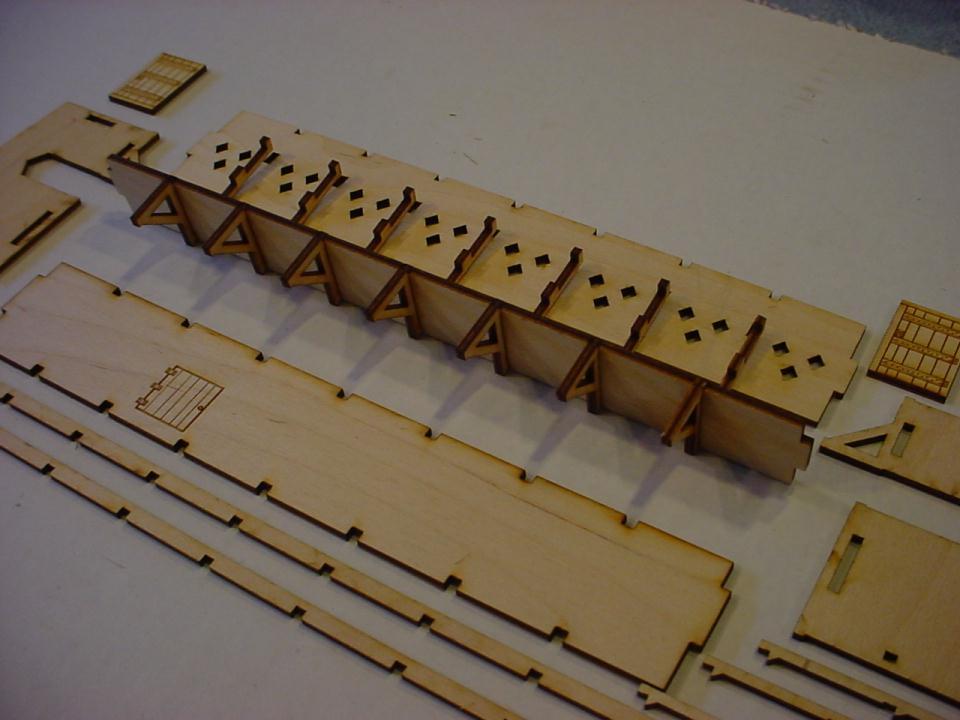
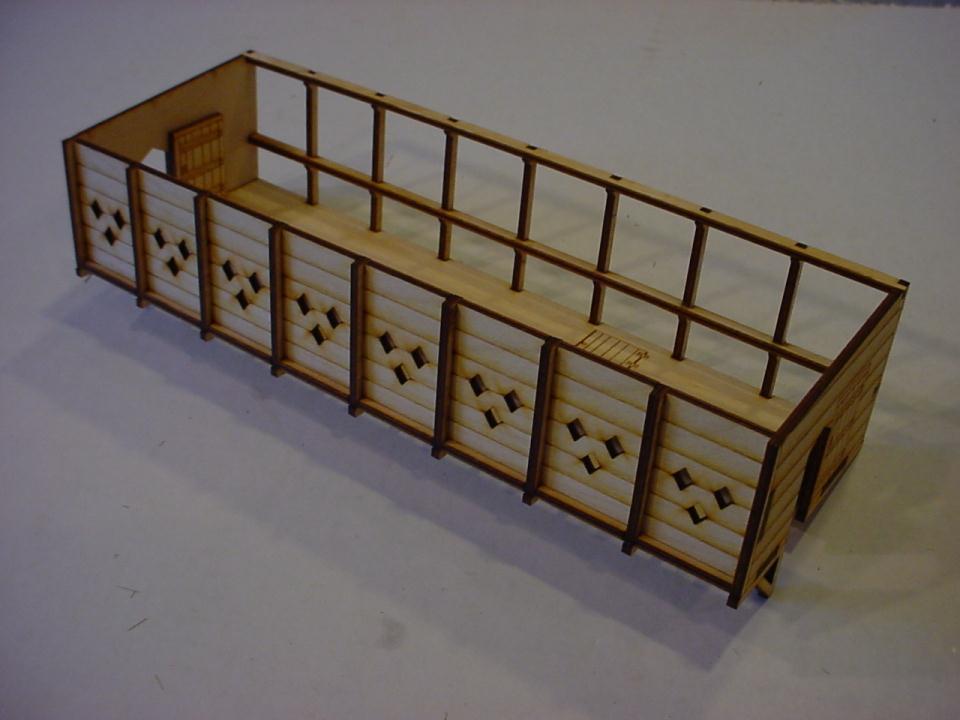
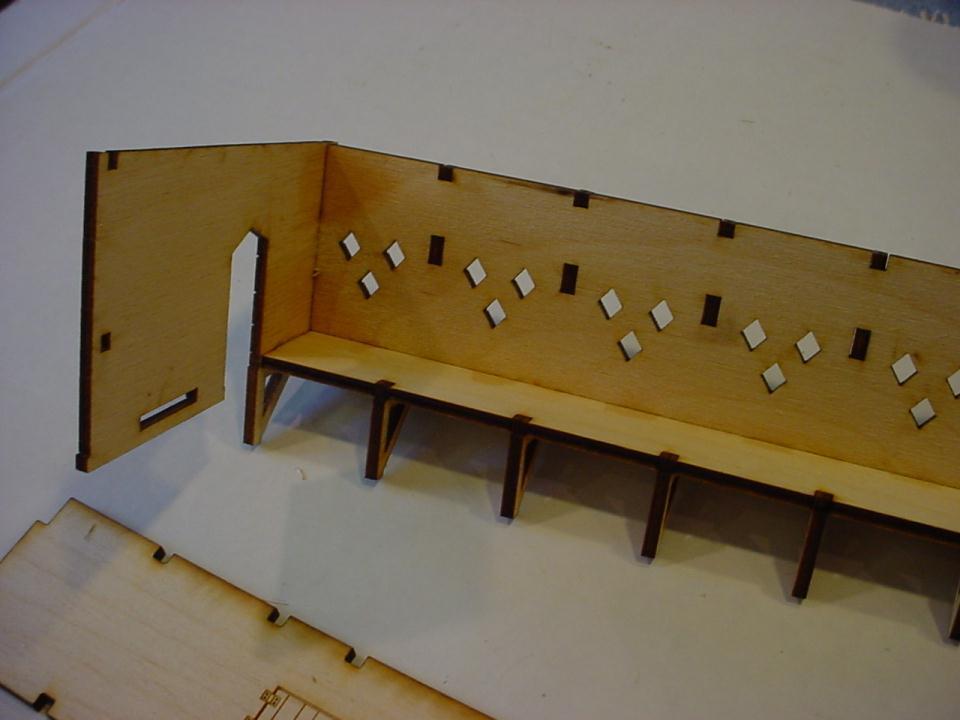
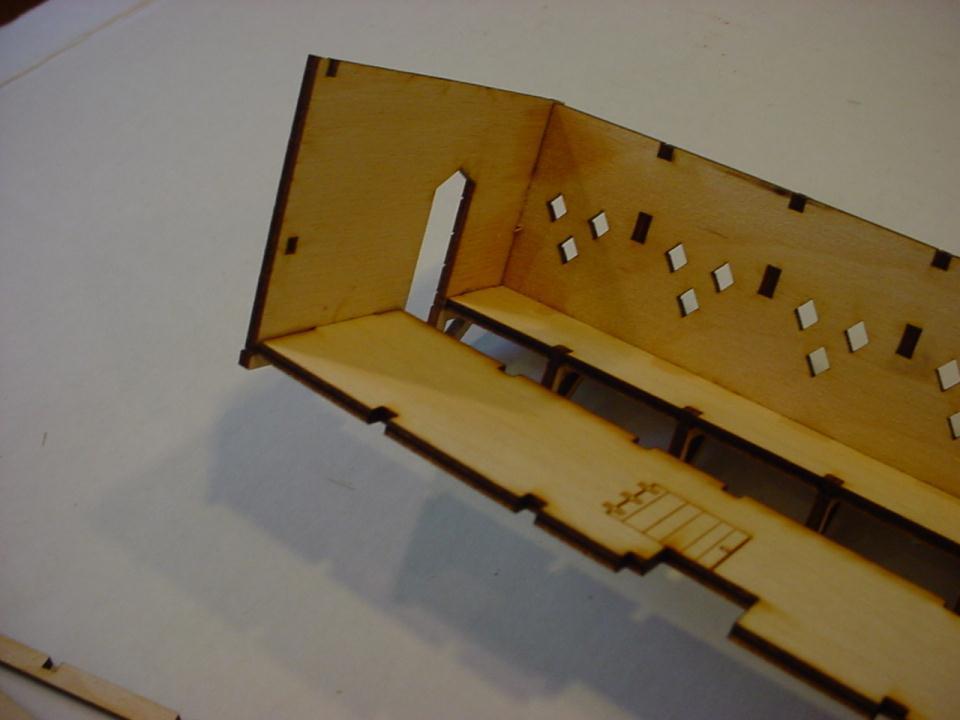
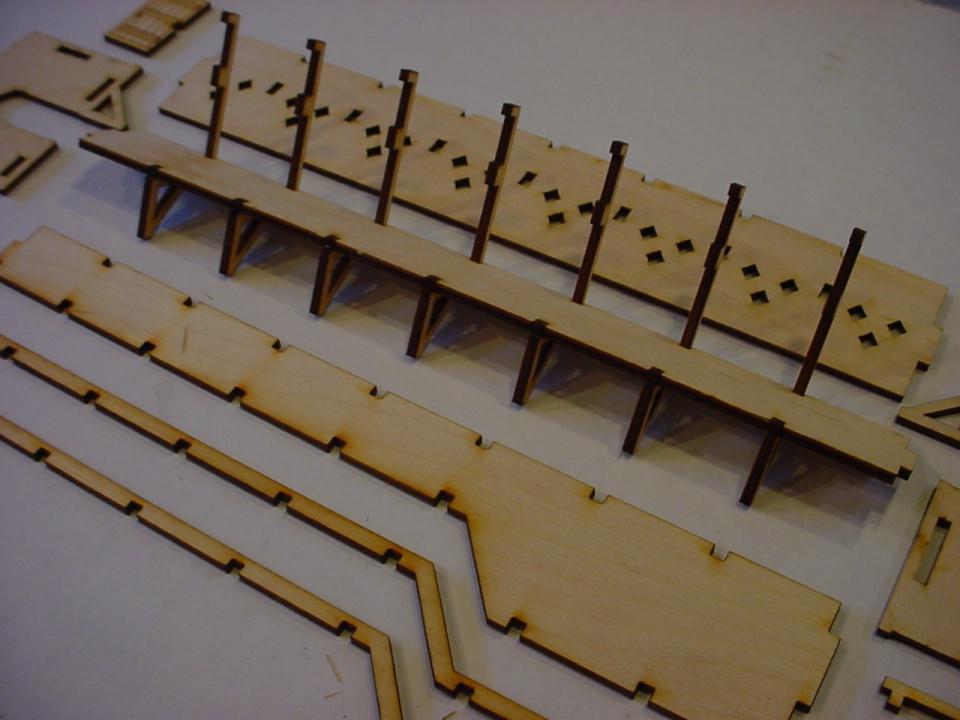
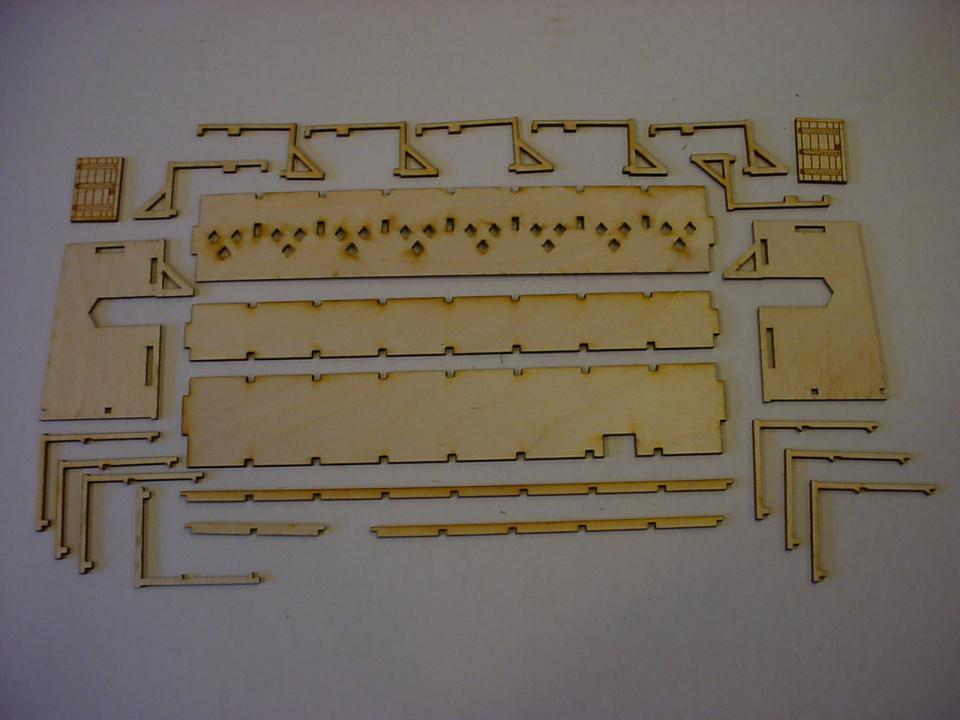
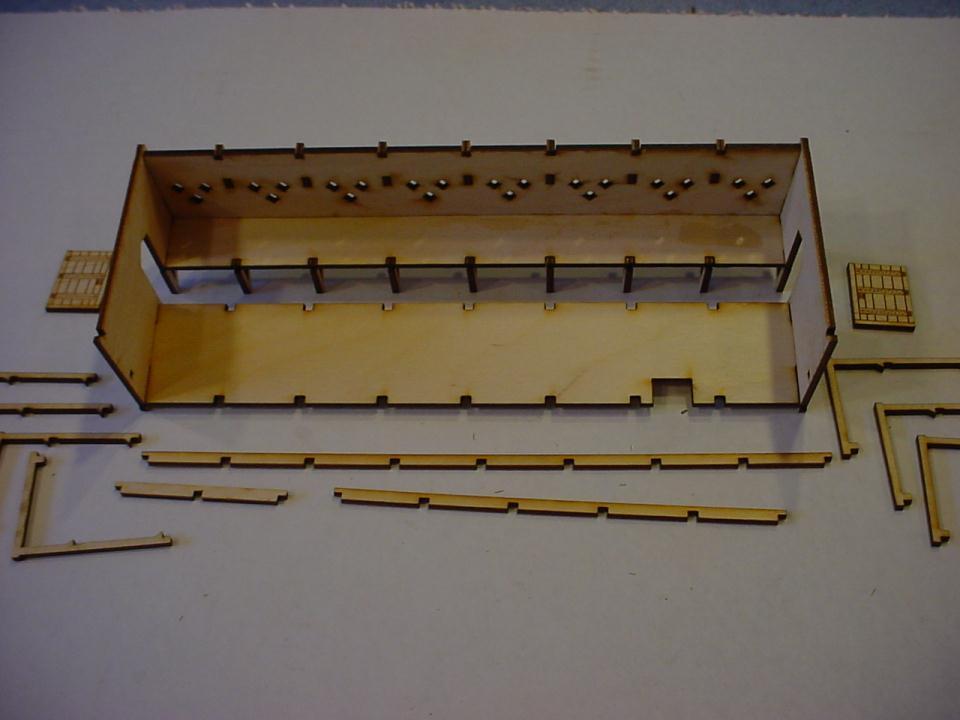
4 Main Gate Hoarding Assembly Assembly is typical for all wall hoarding sections.
5

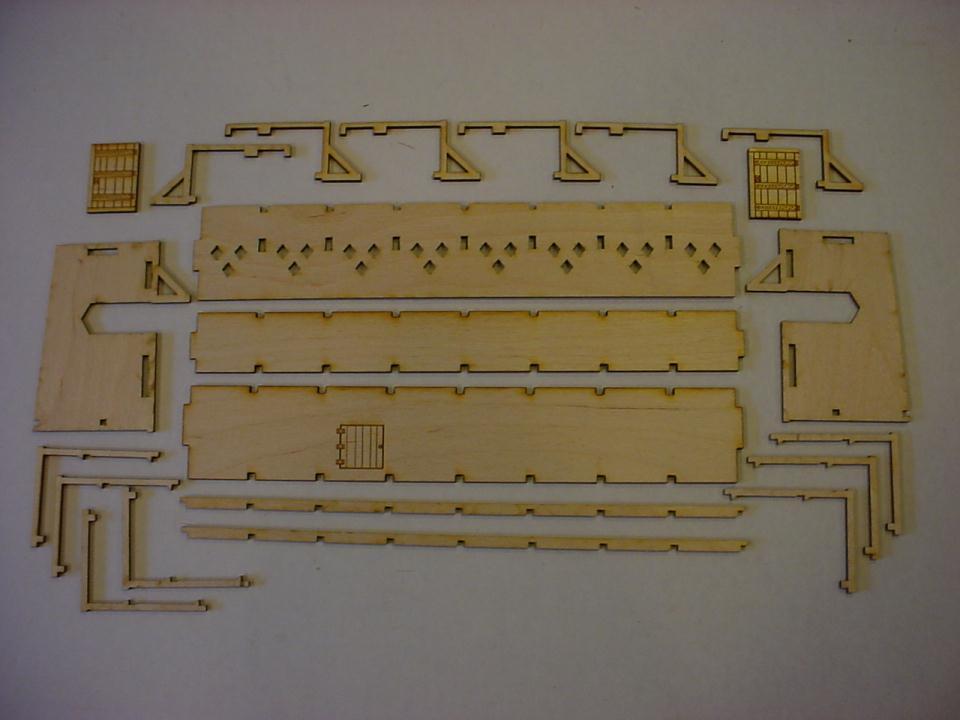
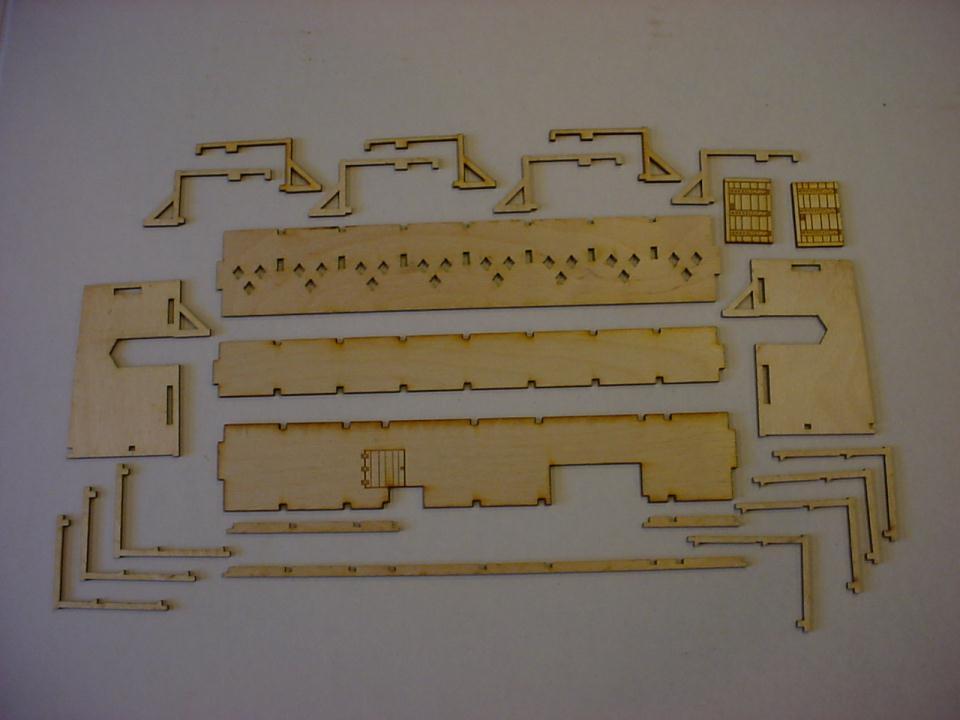
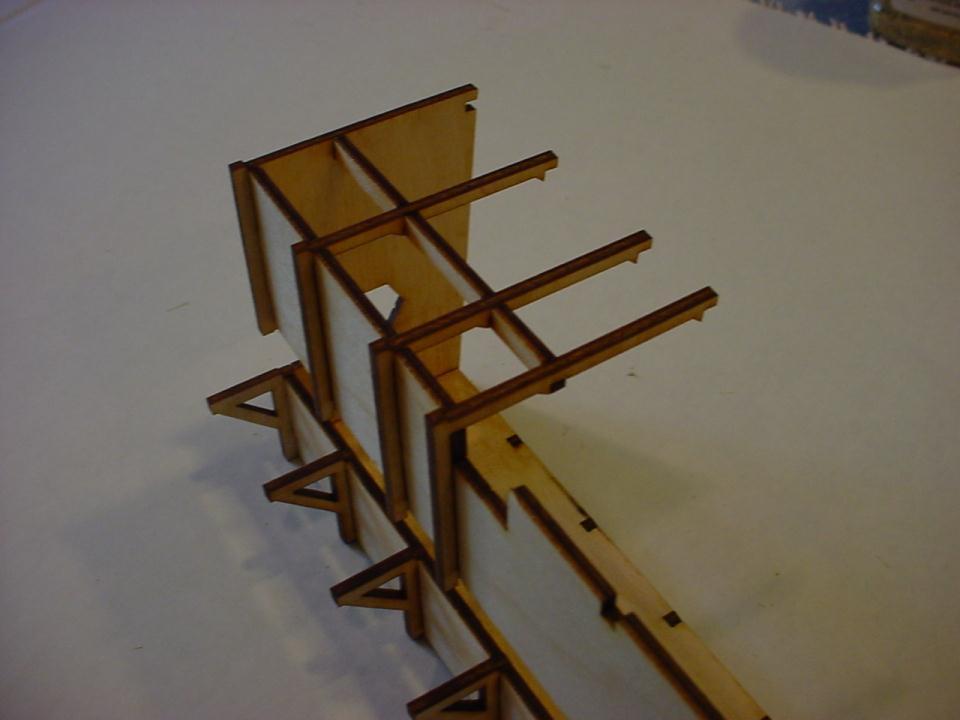
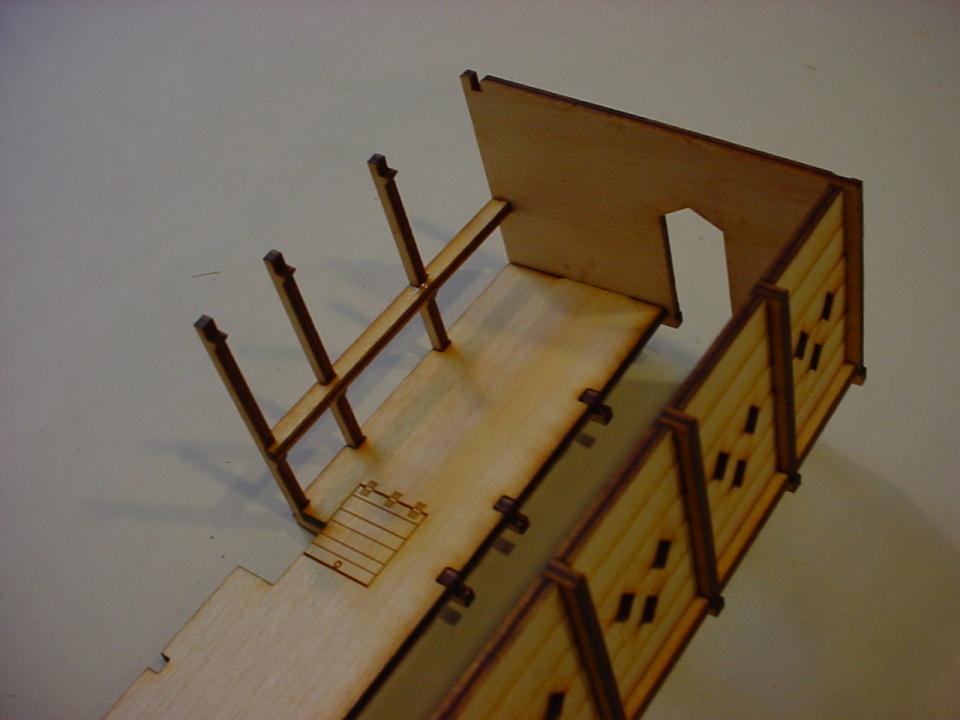
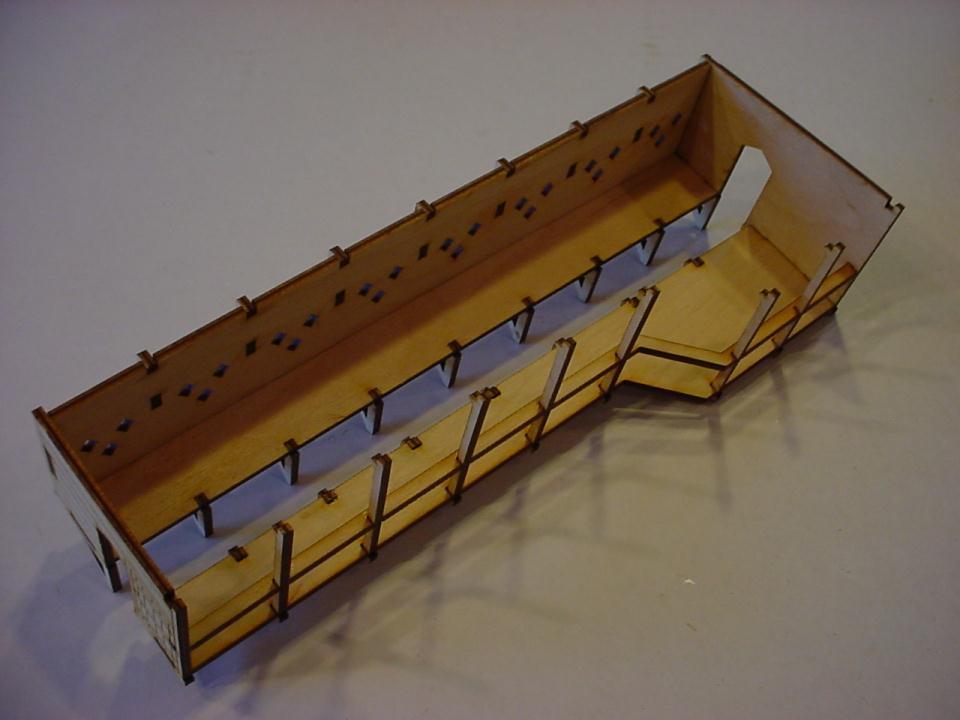
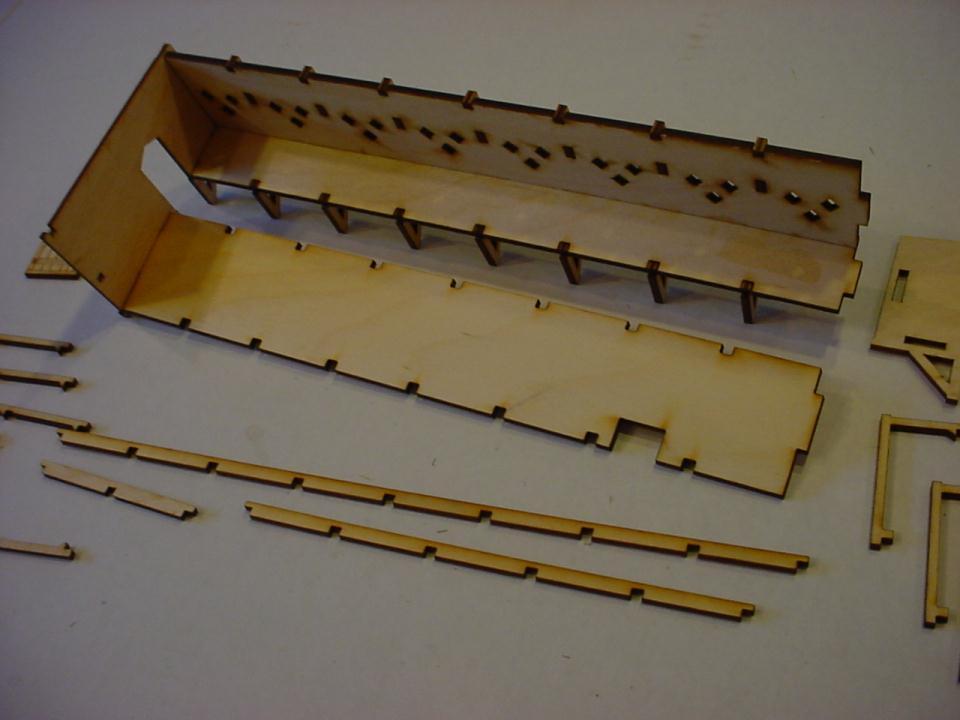
6 Rear Rails End Facade End Facade Front Facade Rearward truss Forward truss Rearward Platform Forward Platform
 when glued. Shown on the small main hoarding section for clarity.")
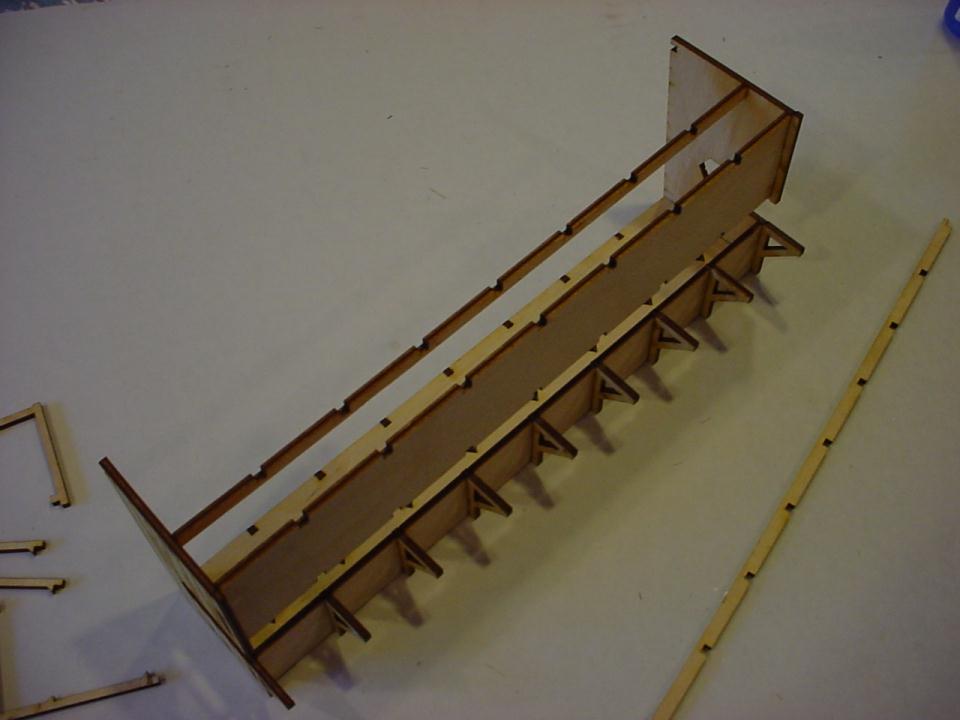
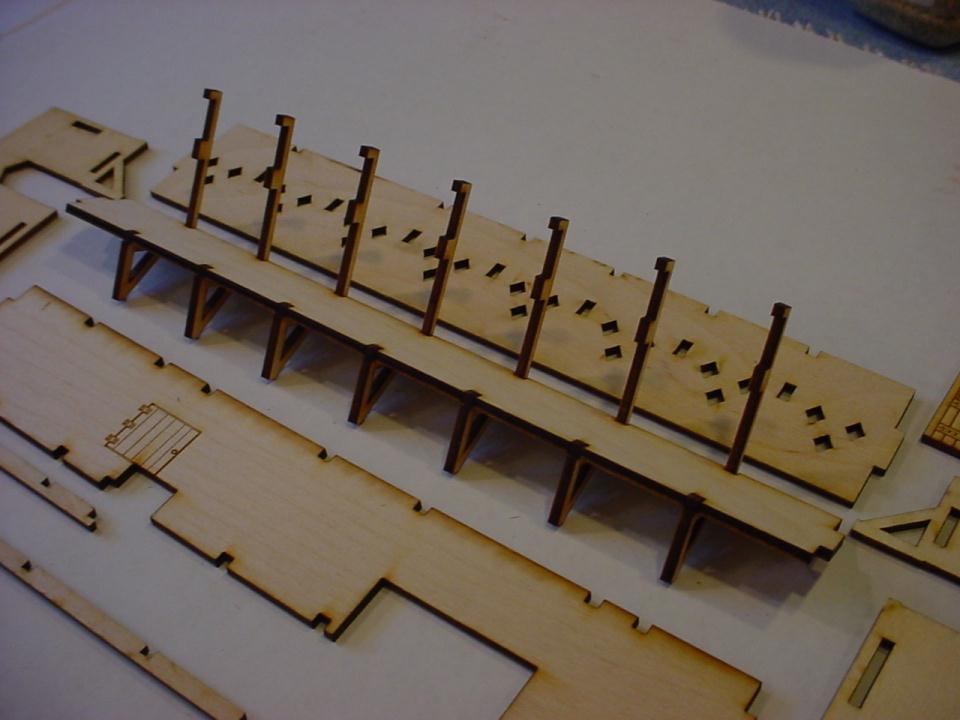
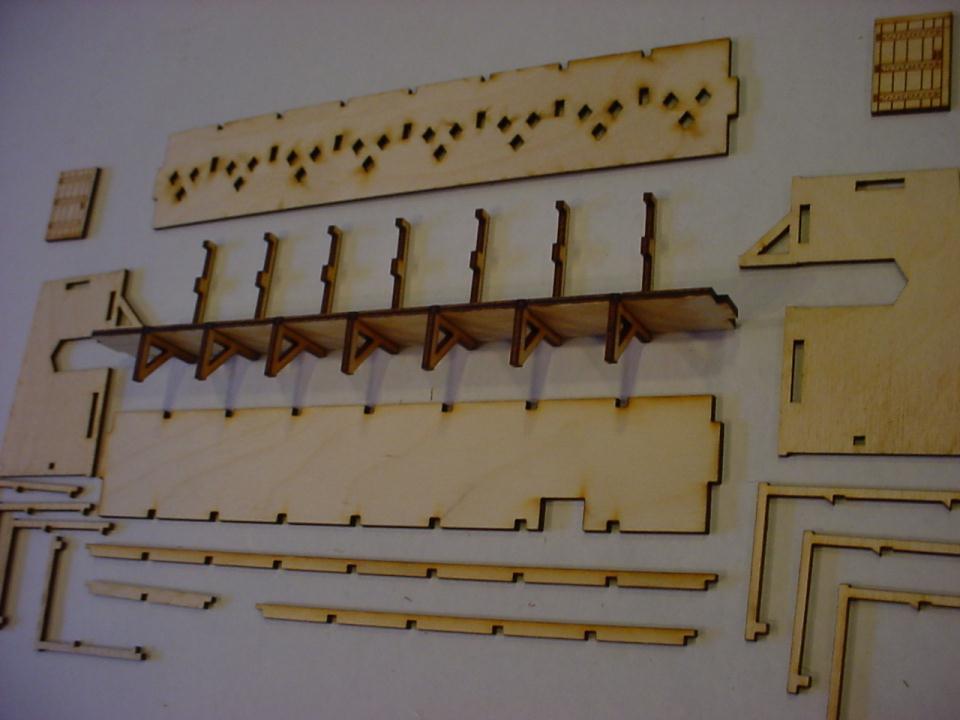
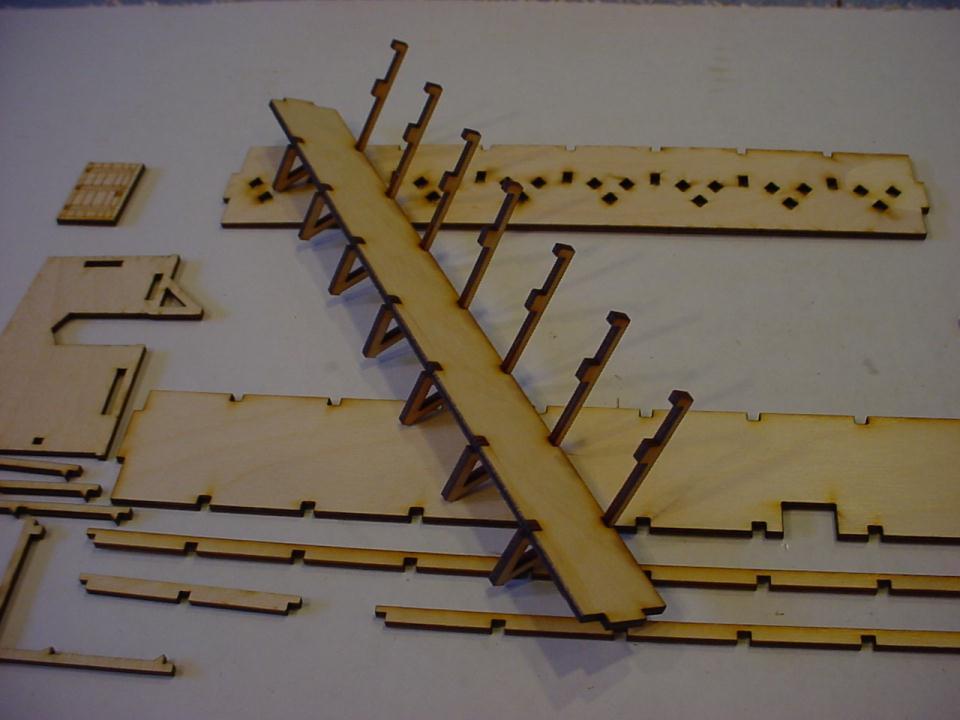
7 1 Glue the front vertical trusses on to the forward platform. Insert this end first and then rotate the vertical truss into place. Use this method to attach all the vertical truss pieces. Make sure this is 90 o (square) when glued. Shown on the small main hoarding section for clarity. Assembly is typical for all hoarding sections.

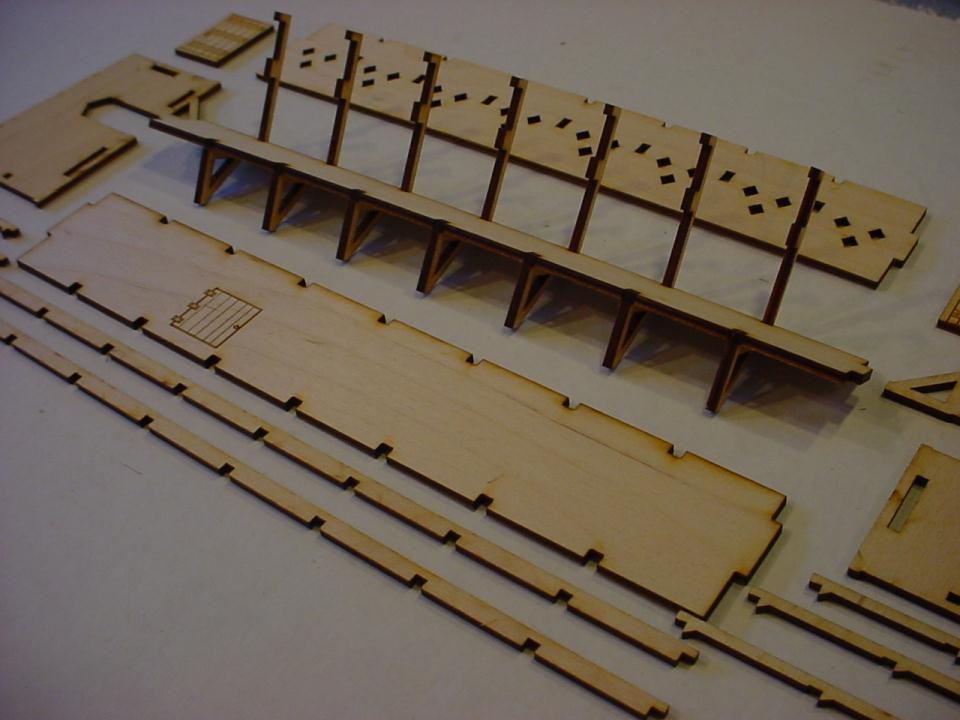
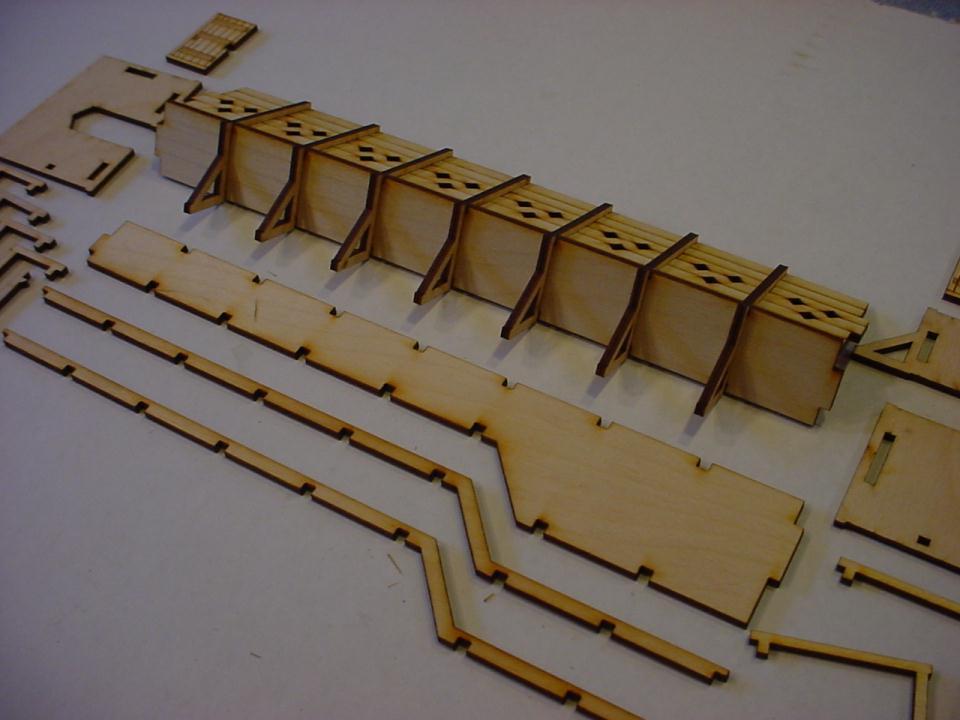
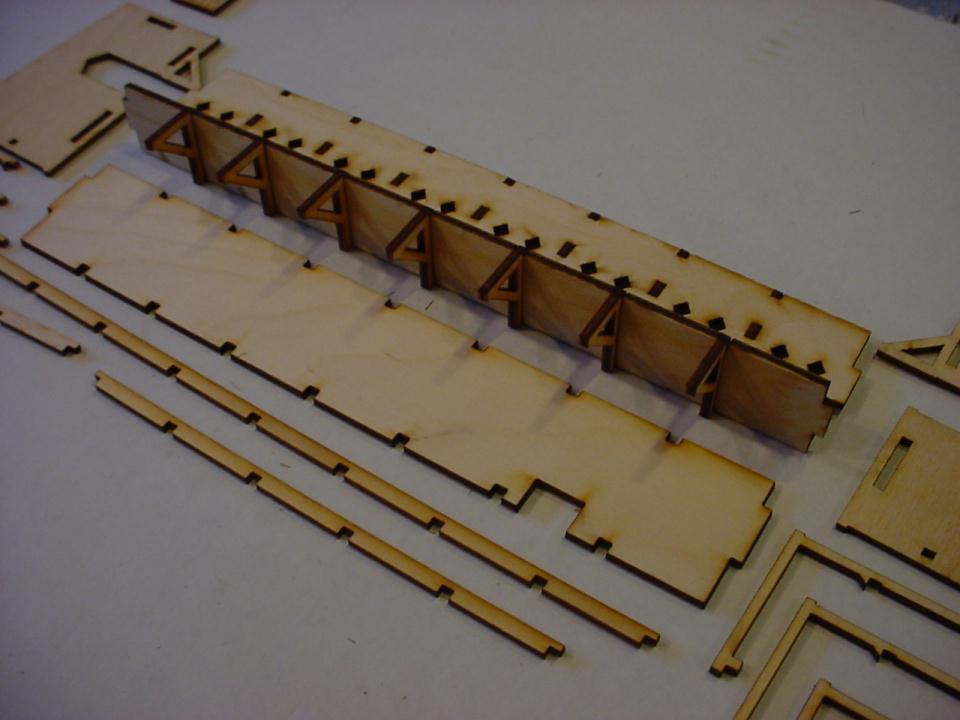
8 2 Insert and glue the front façade from the inside.

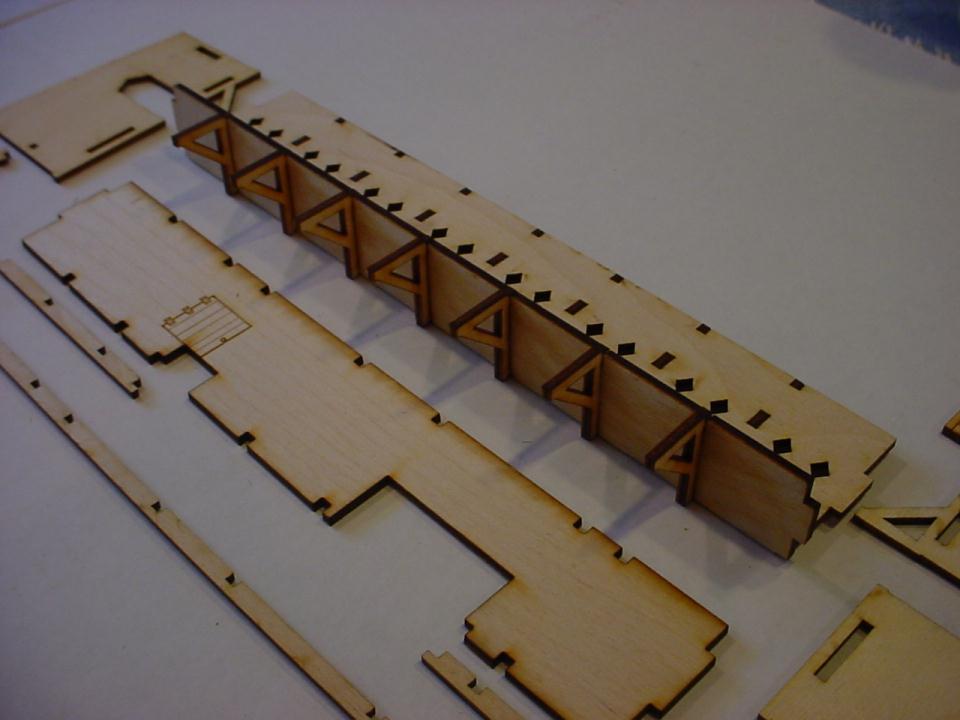
9 3 Glue an end façade on.
 to the end wall.")
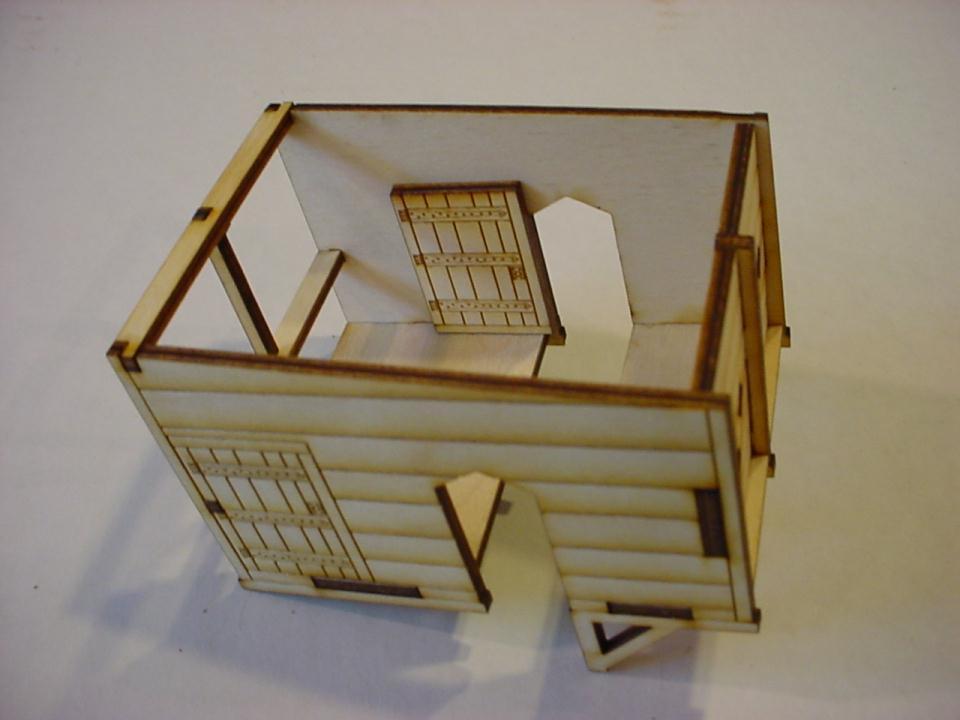
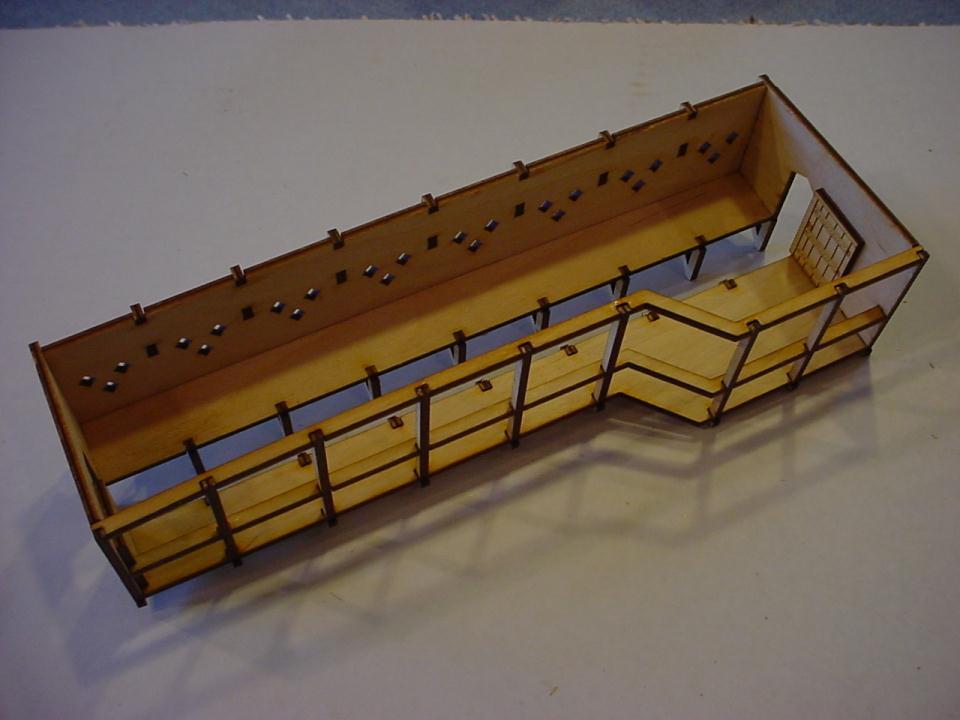
10 4 Glue the rear platform and lower rear rail on. Make sure they are 90 o (square) to the end wall.

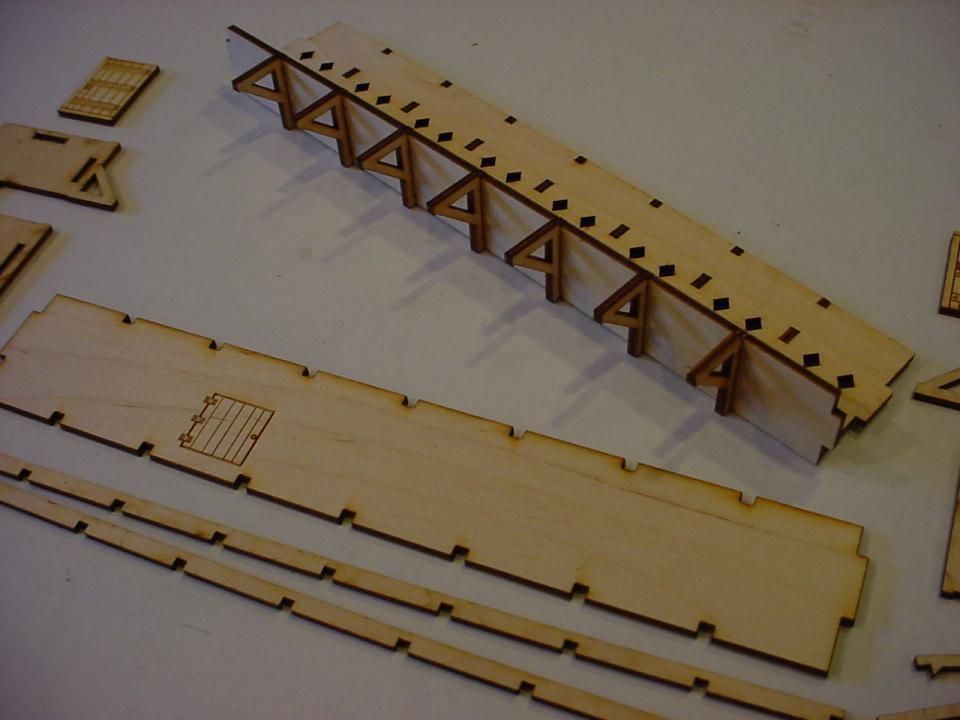
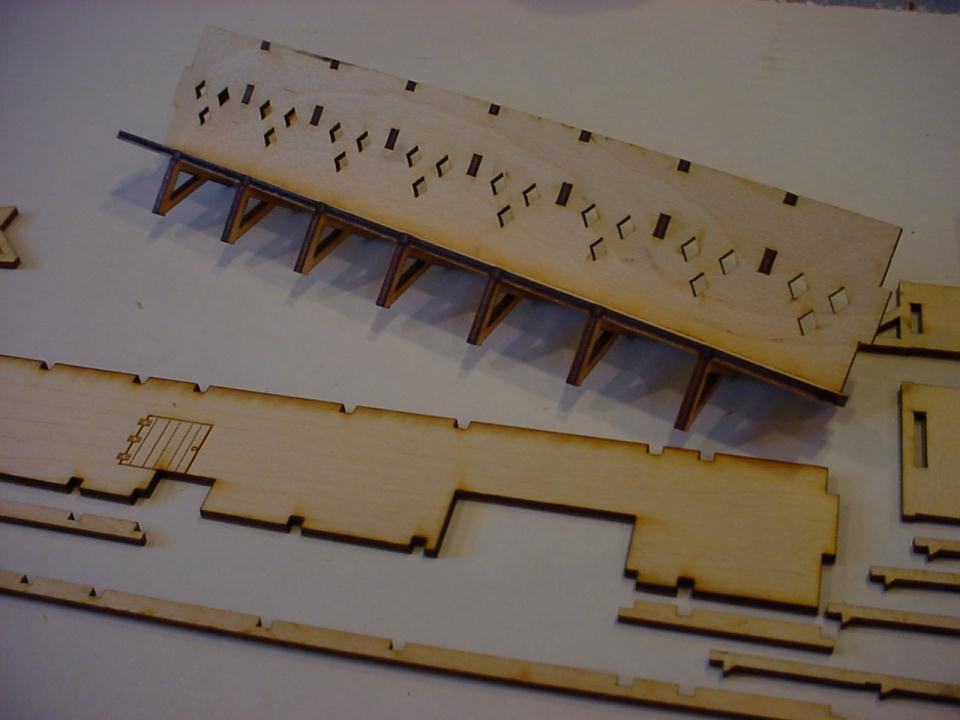
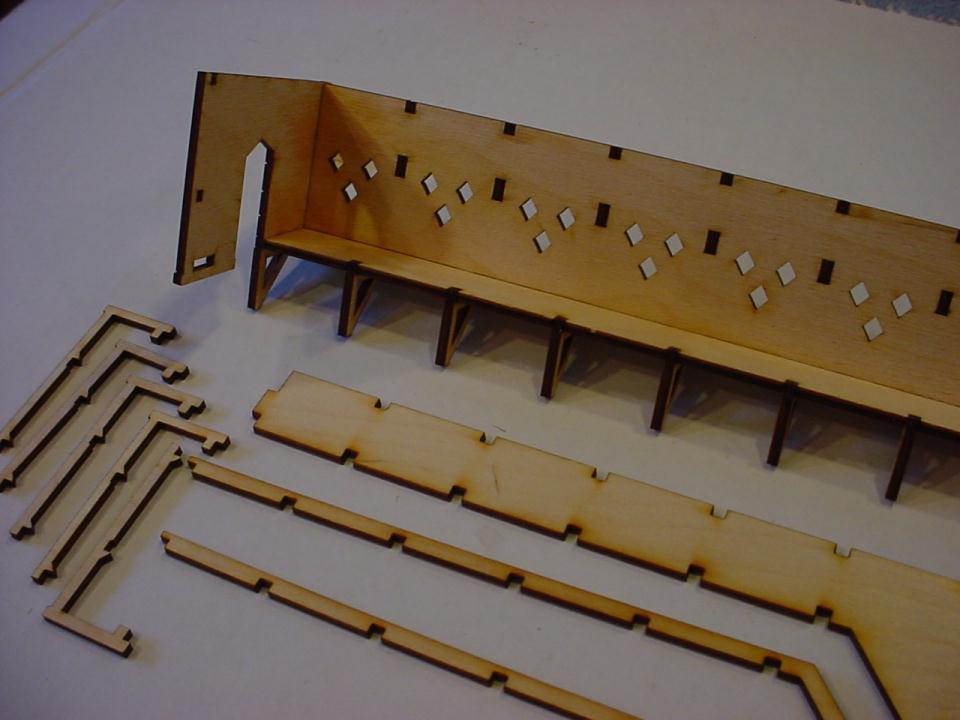
11 5 Glue the other Façade end on.

12 6 Glue the rear vertical trusses in place. Make sure they are 90 o (square).

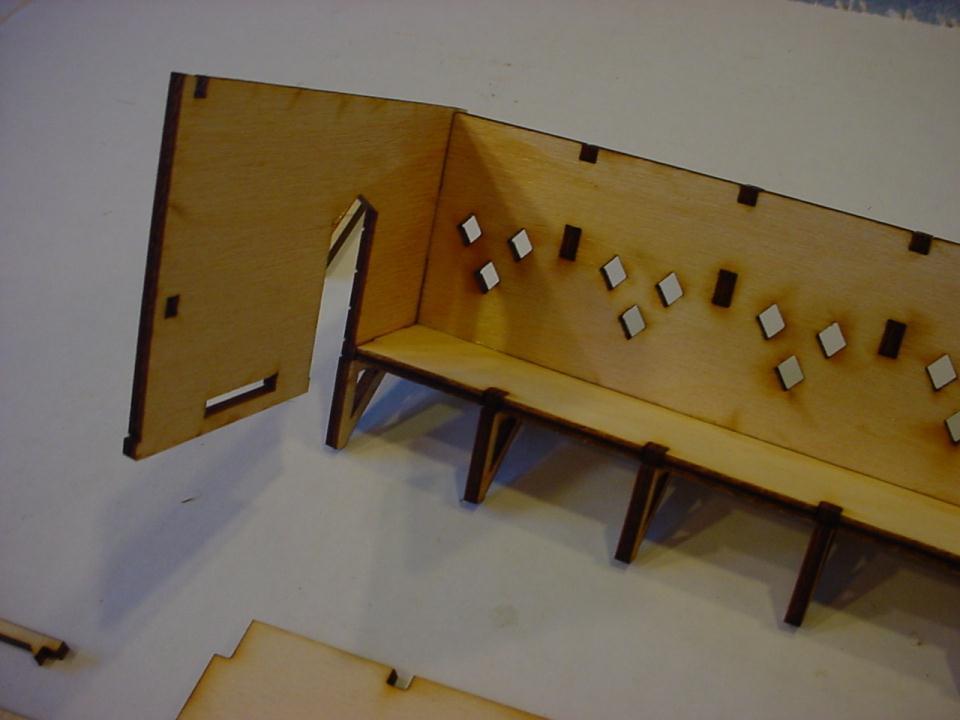
13 7 Glue the top rear rail in place.

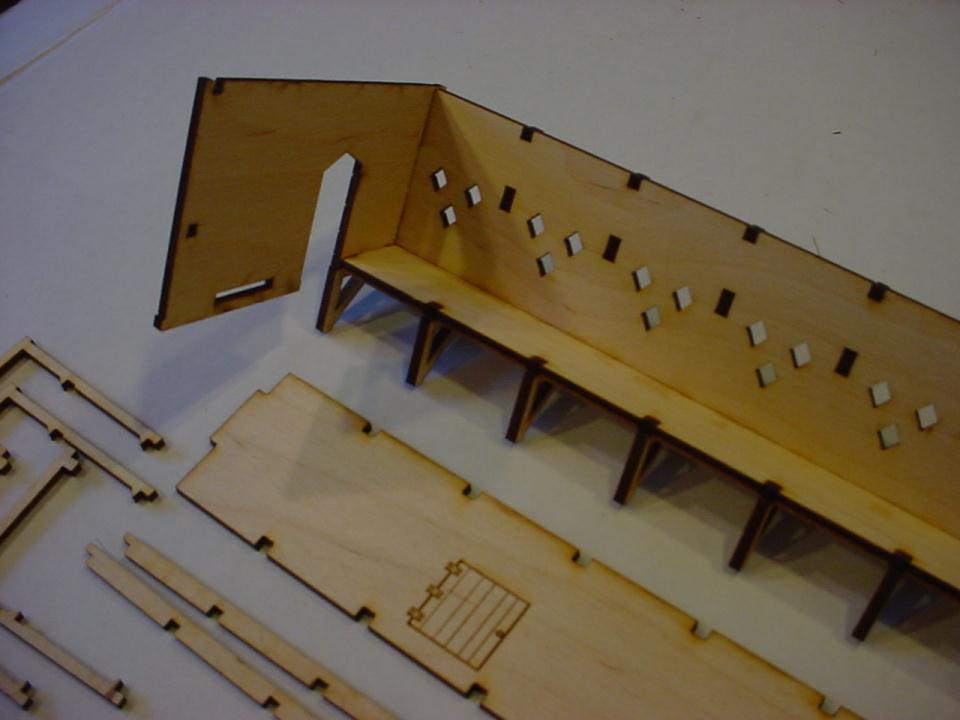
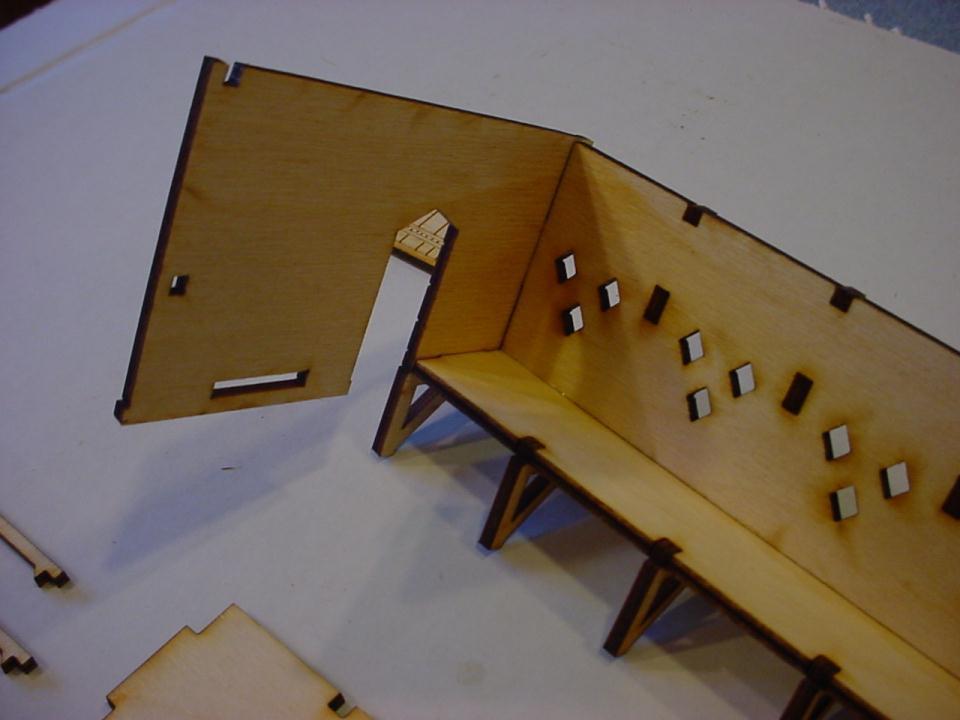
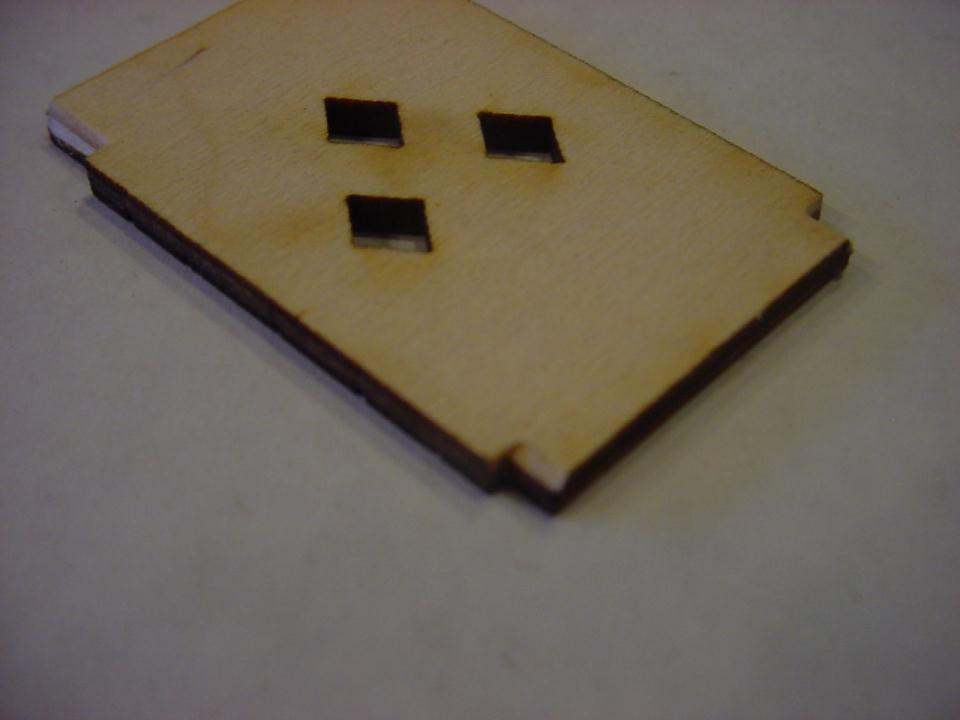
14 5 Glue the inside doors in place. Make sure to line up the hinges and orient the doors correctly.
15

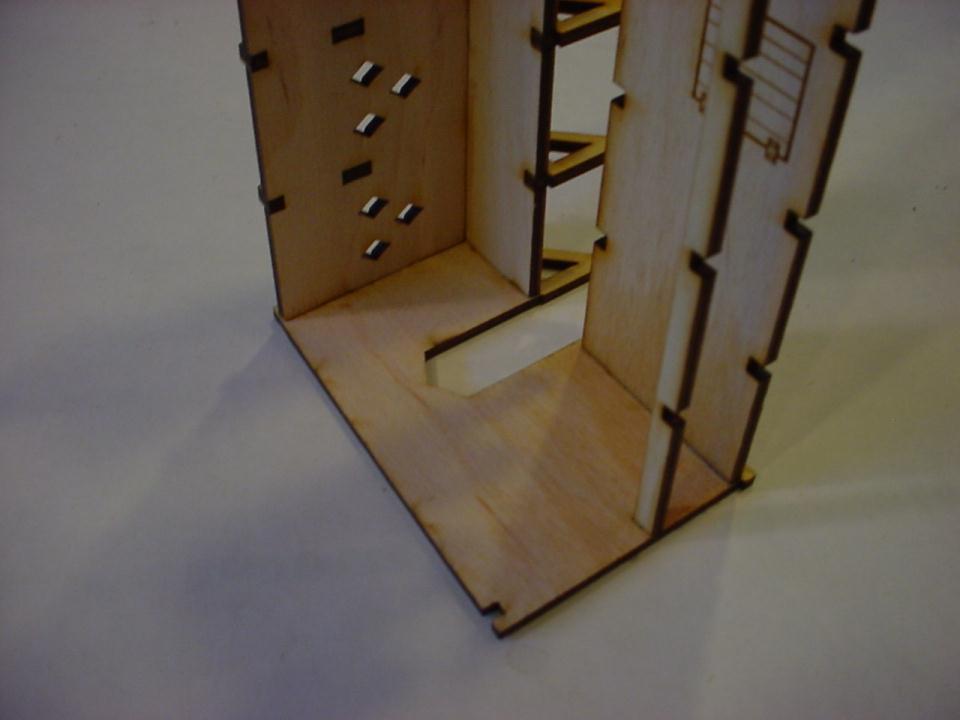
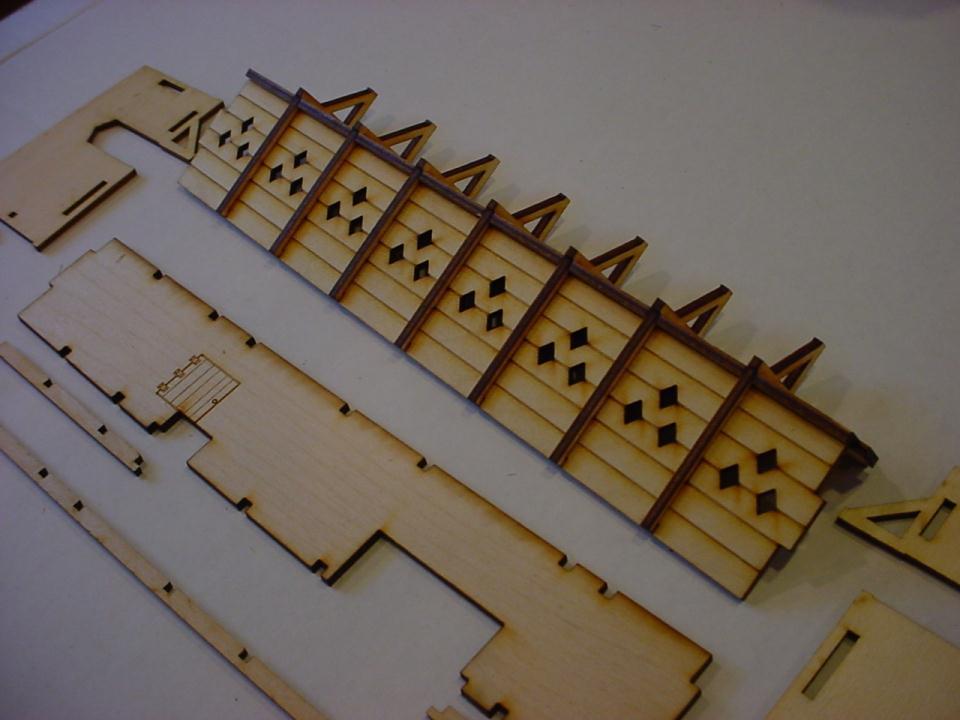
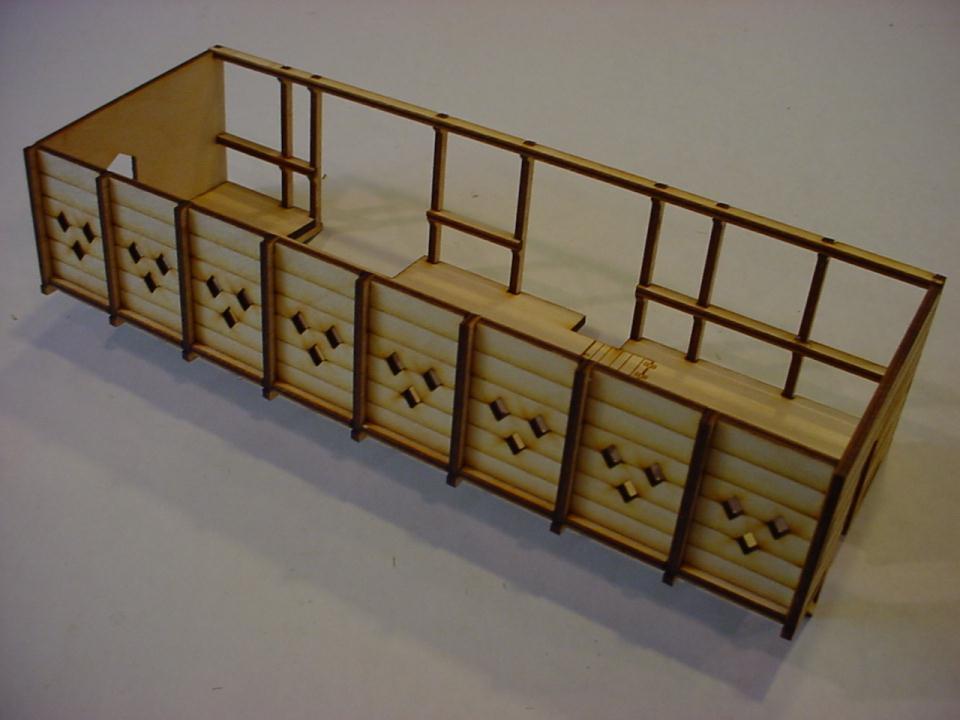
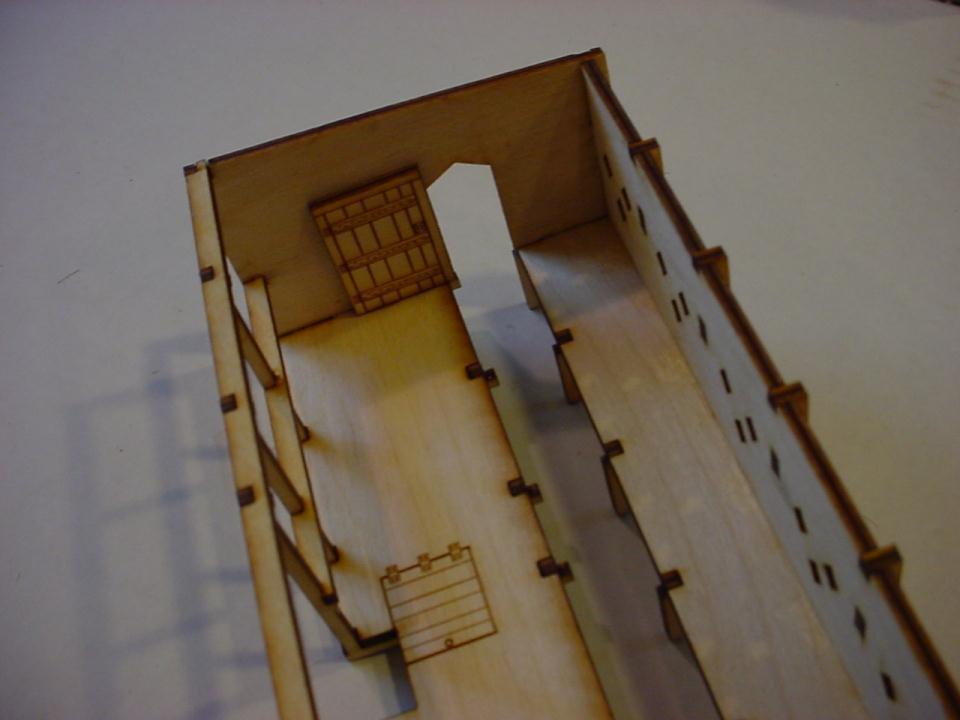
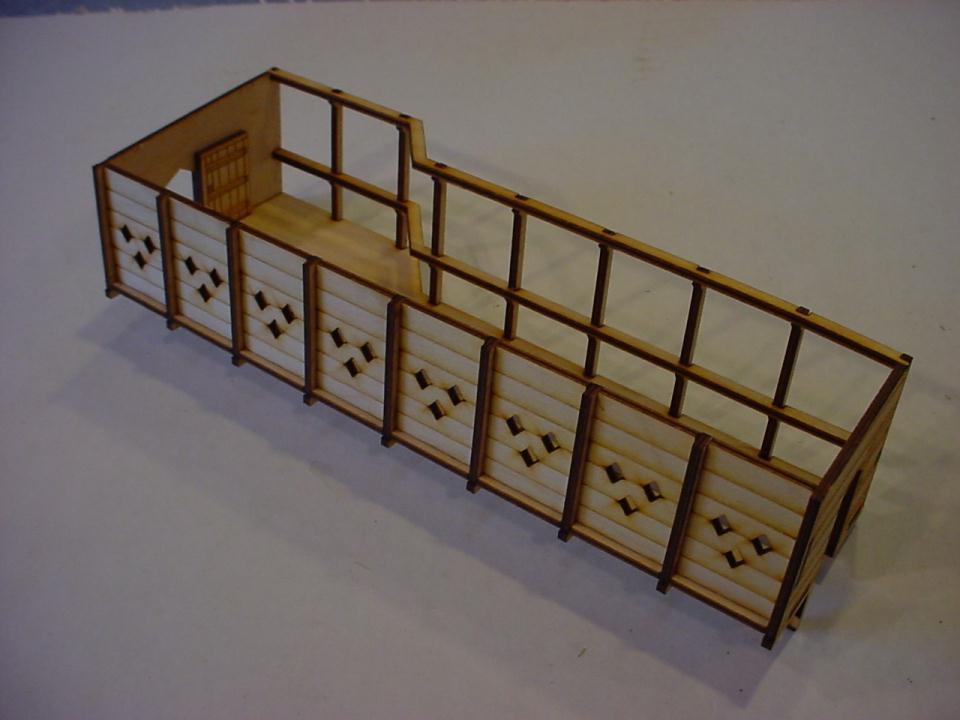
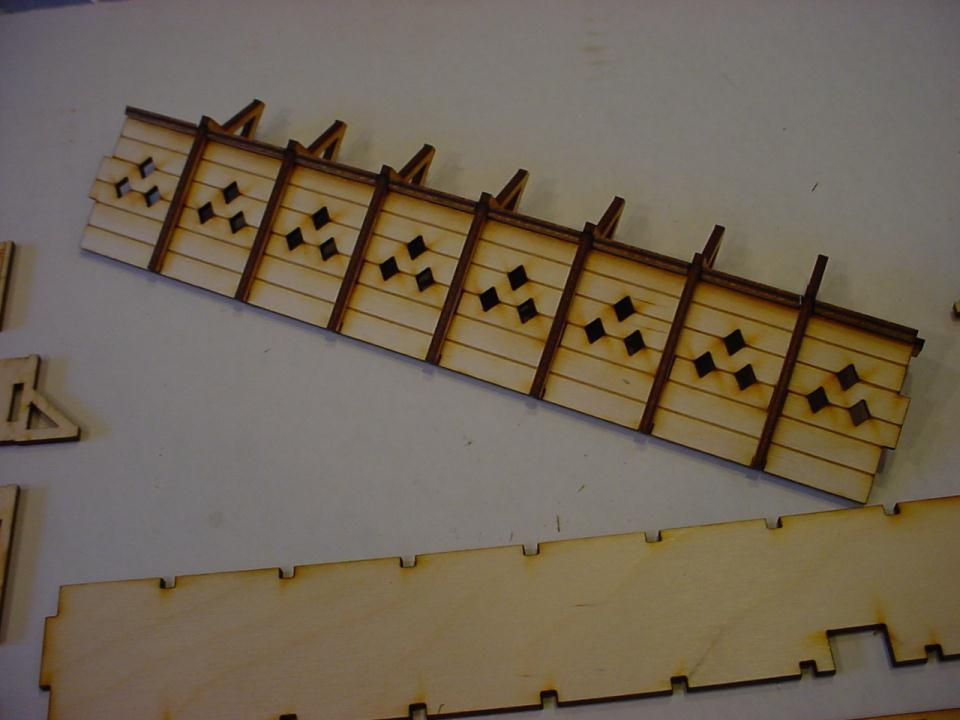
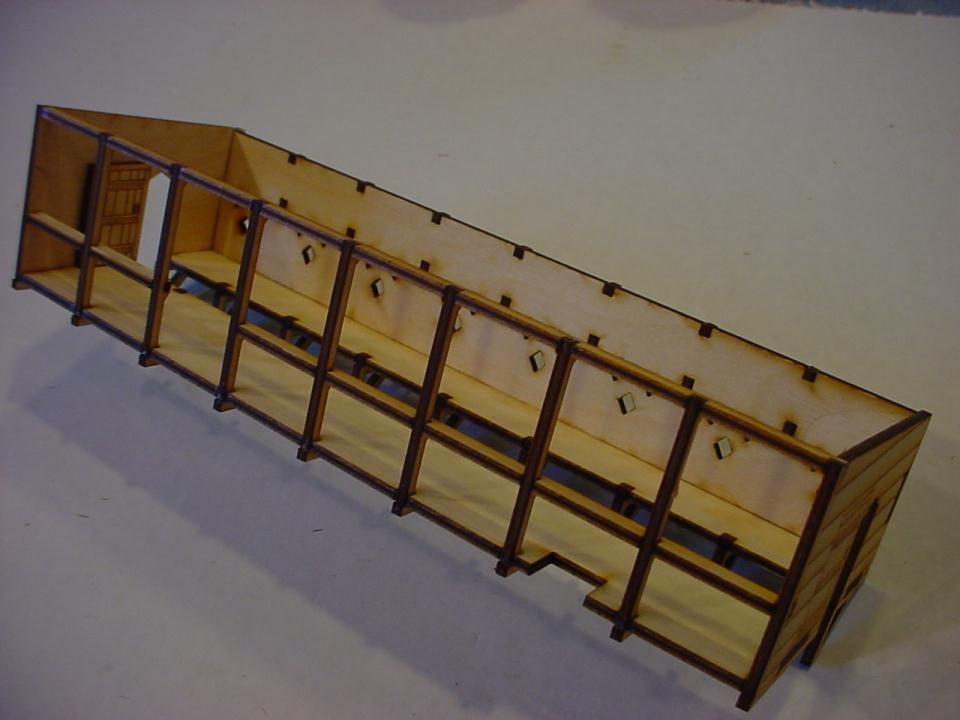
16 Fitting the hoarding sections: The castle wall models are created through expansion of a foam material in rubber molds. As such, the wall dimensions can vary slightly from part to part and casting to casting. The hoarding kits are designed to accommodate the variances in the castle wall models. After assembly, carefully file, grind, or sand the touch points (examples circled in red) as needed to vary the opening and custom fit the hoarding for a wall section.
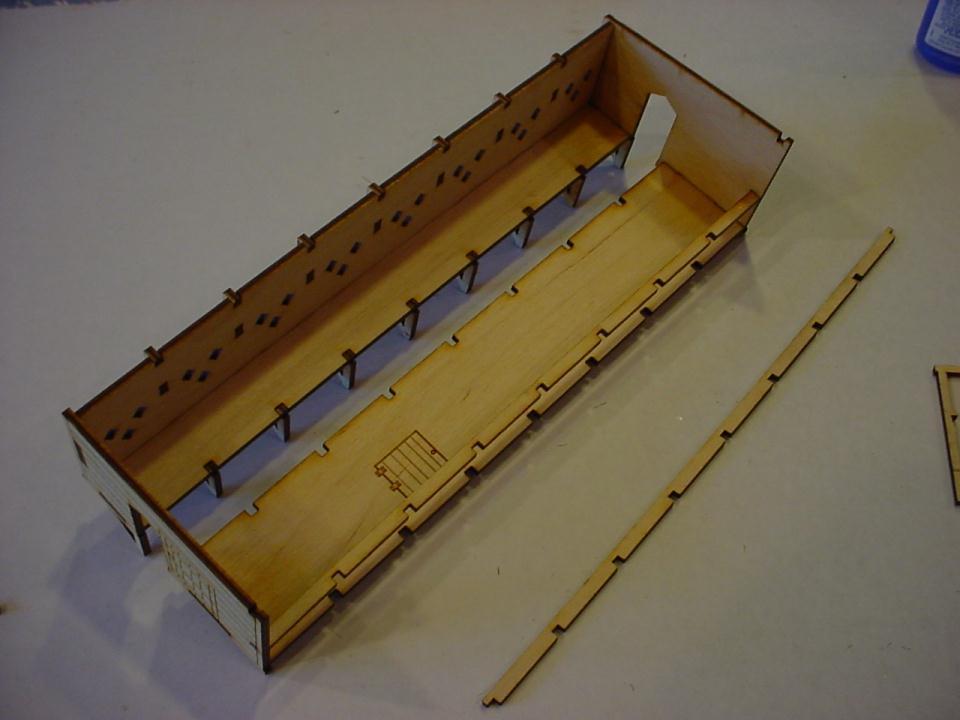
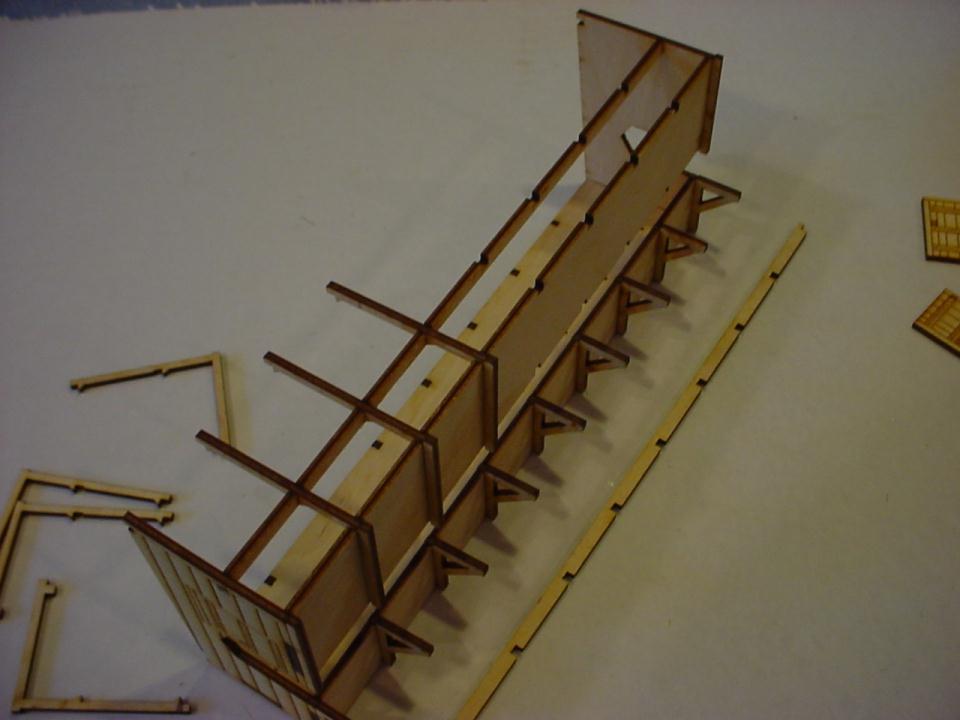
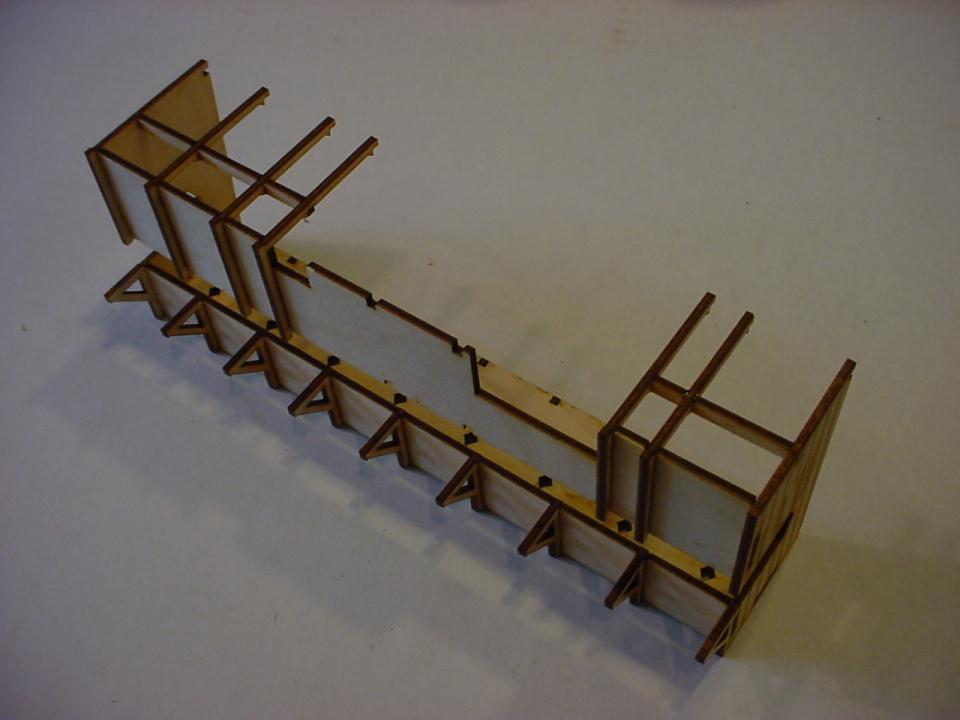
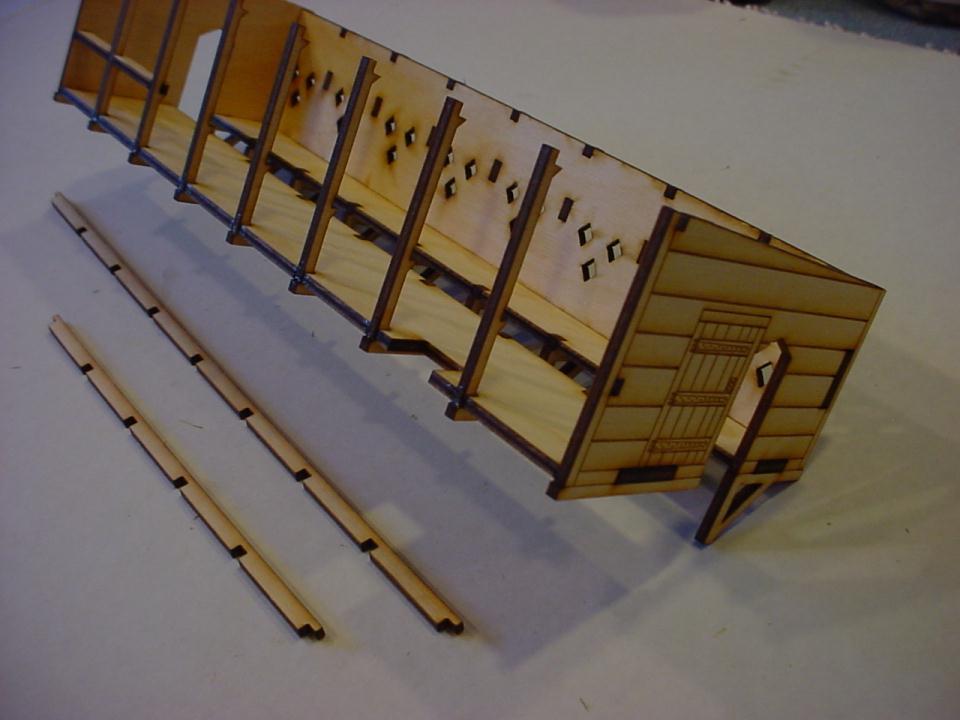
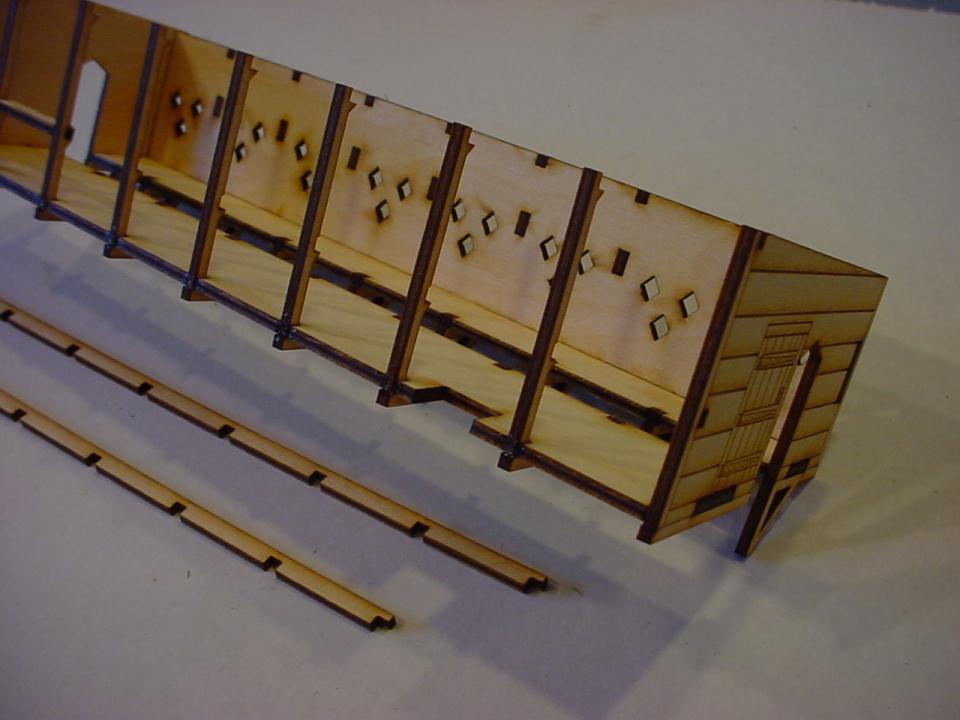
17 Standard Wall Hoarding Assembly Assembly is typical as for the smaller main gate section. Reference that section for annotations.
18
19
20
21
22
23
24

25
26
27
28
29
30
31 Parapet Hoarding Assembly Assembly is typical as for the smaller main gate section. Reference that section for annotations.
32
33

34
35
36
37
38
39
40
41

42
43
44
45
46
47
48
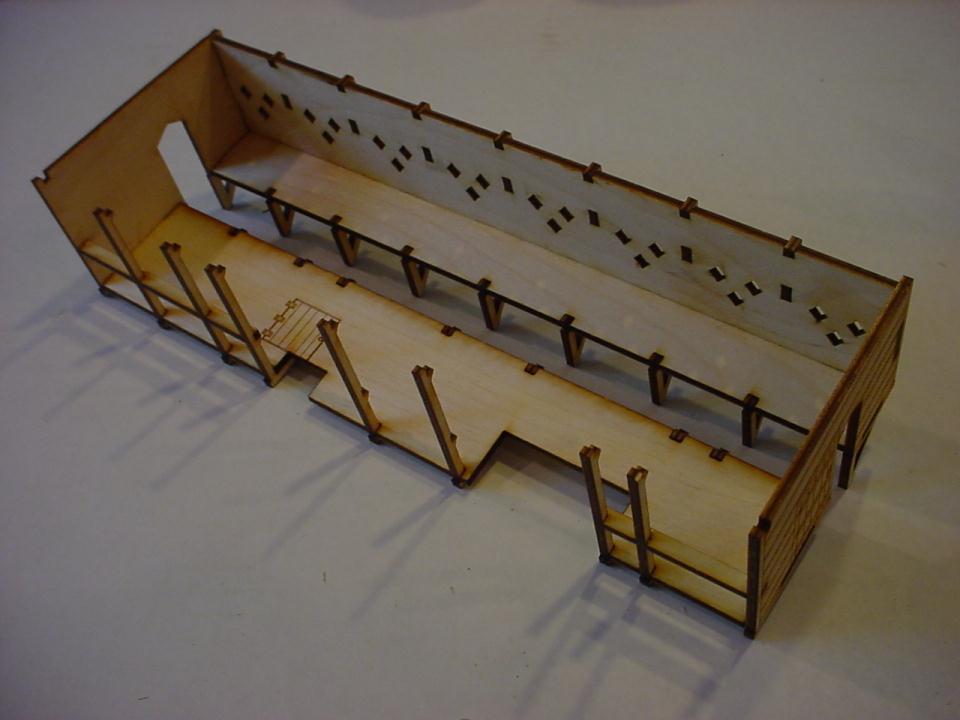
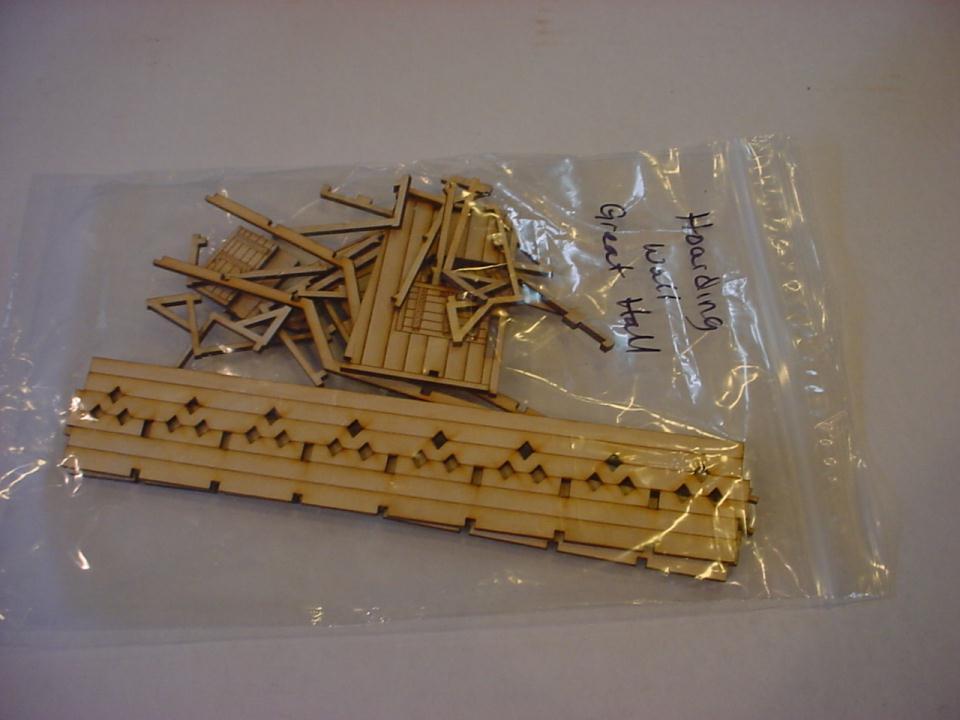
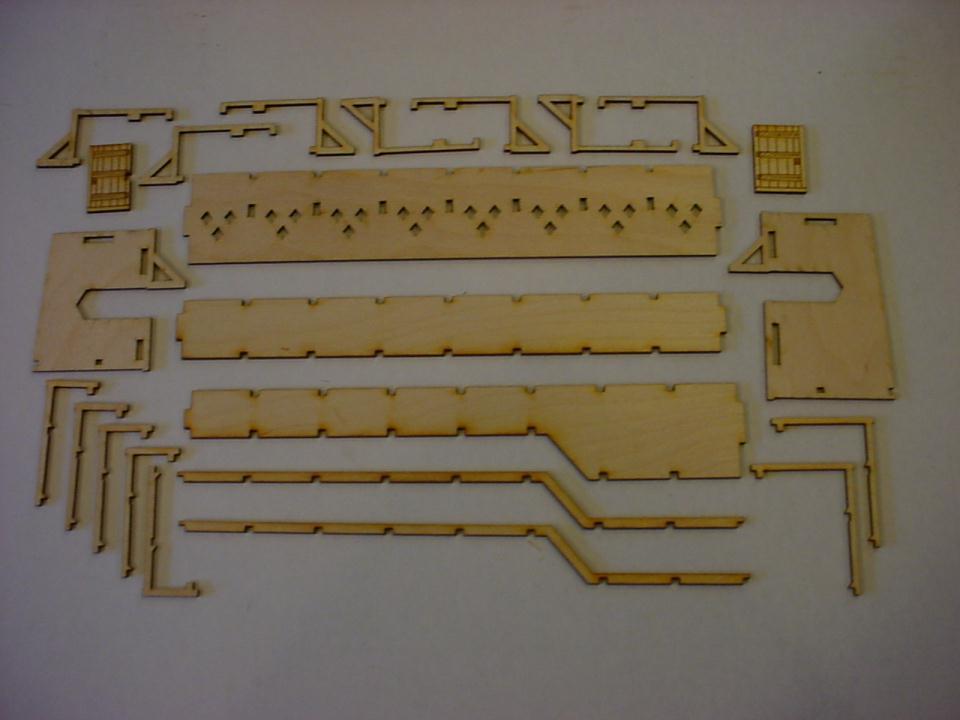
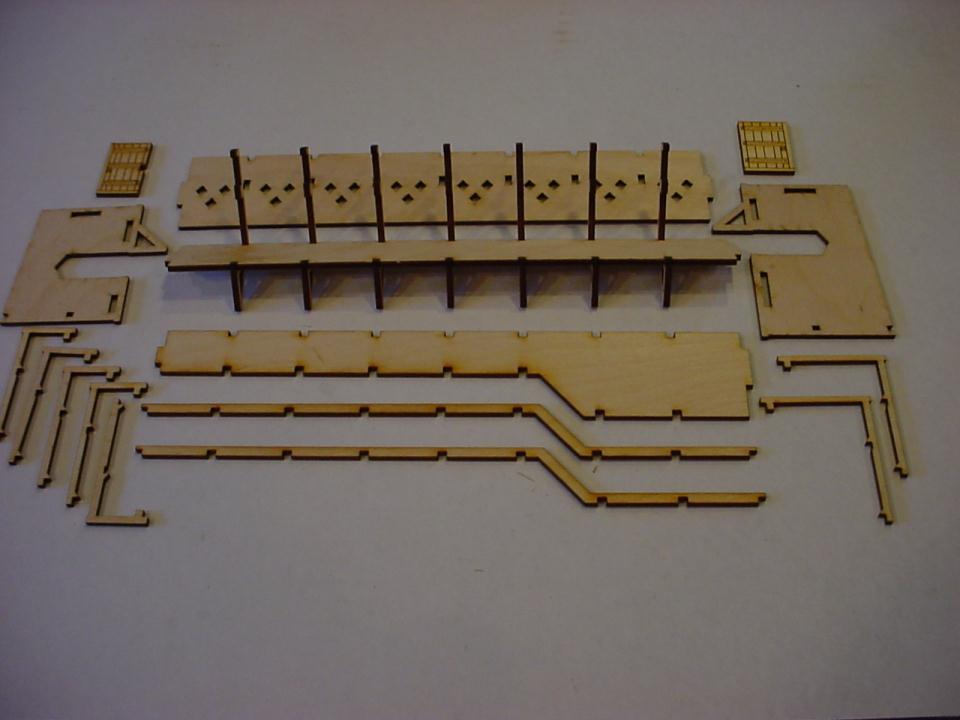
49 Great Hall Hoarding Assembly Assembly is typical as for the smaller main gate section. Reference that section for annotations.
50
51
52
53
54
55
56
57
58
59
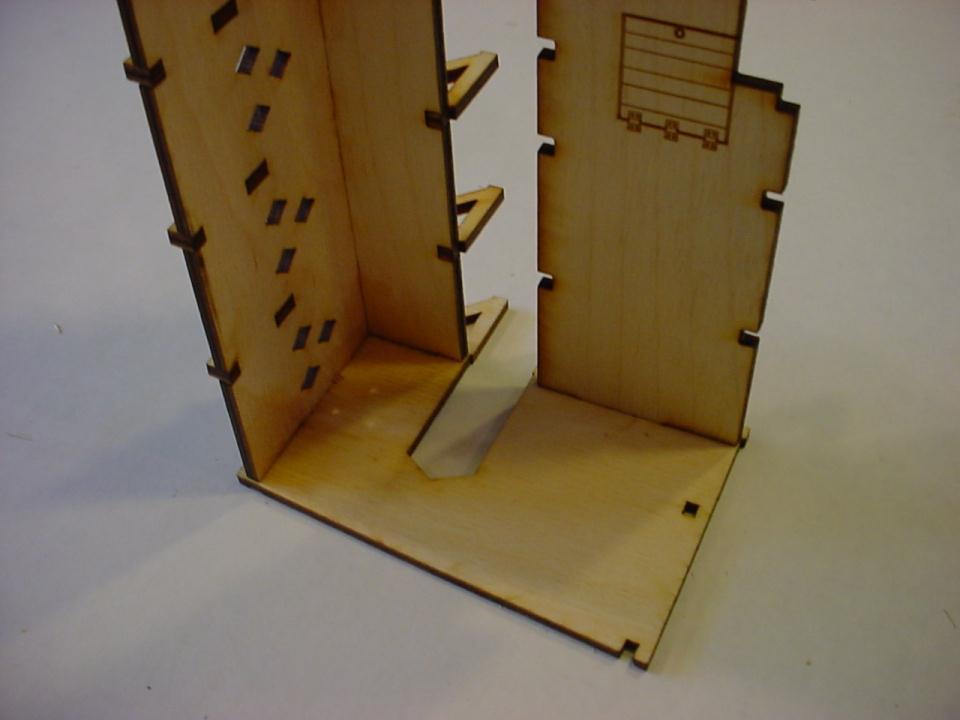
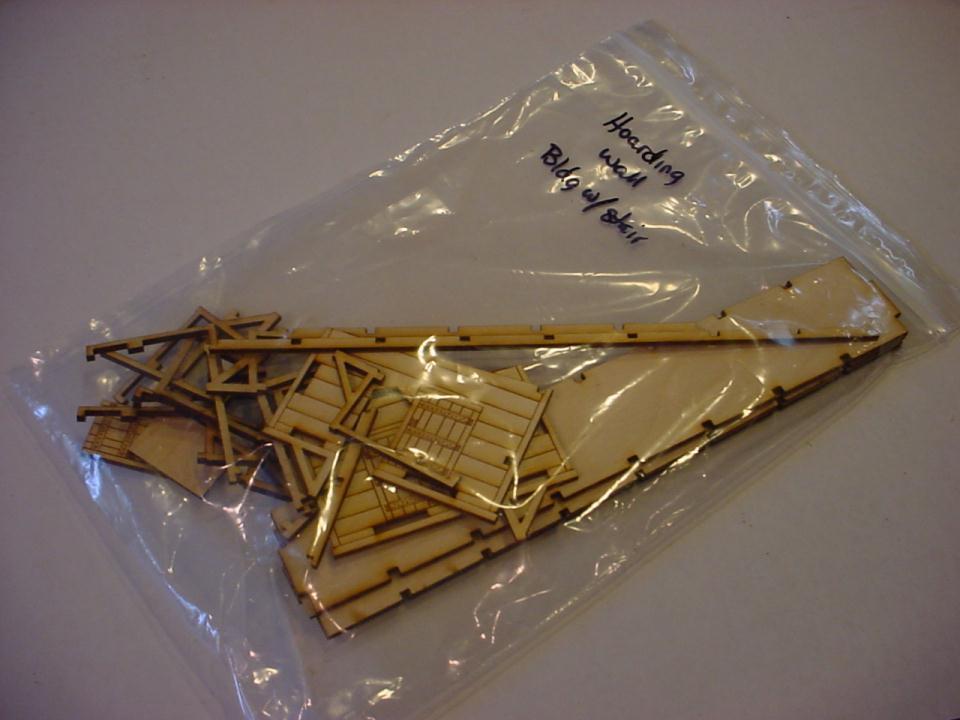
60 Building with Stair Hoarding Assembly Assembly is typical as for the smaller main gate section. Reference that section for annotations.
61
62
63
64
65
66
67
68
69
70
71
72

73
74
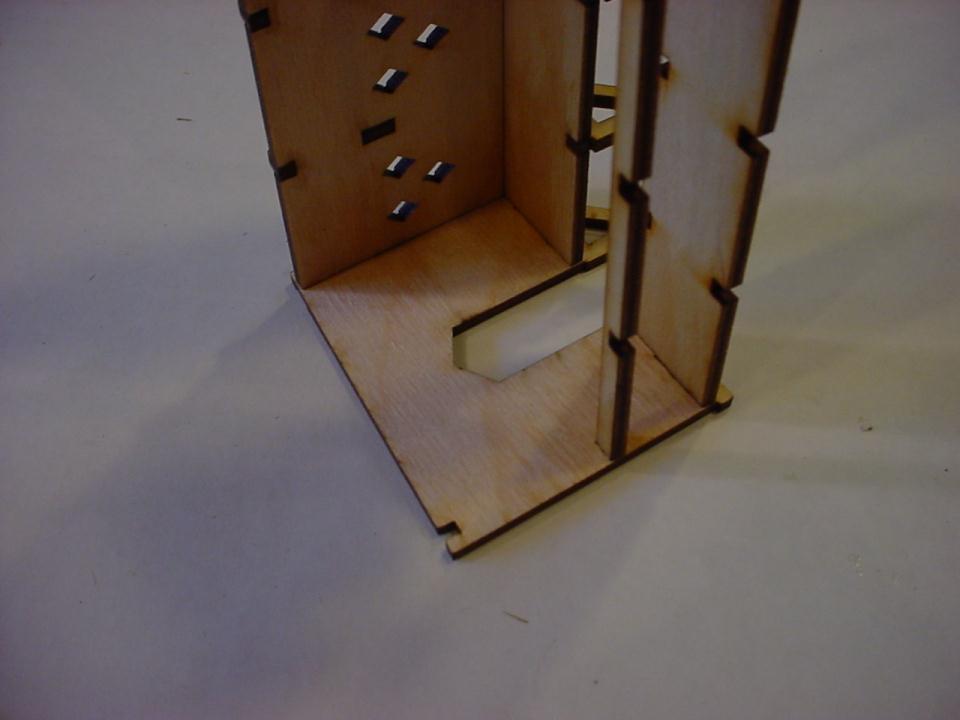
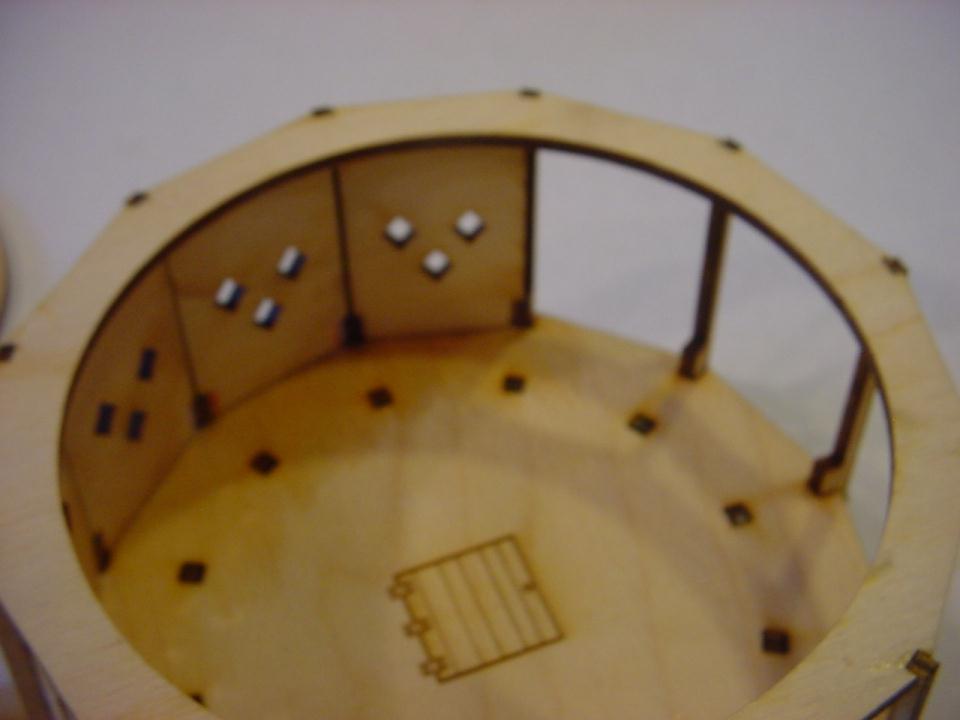
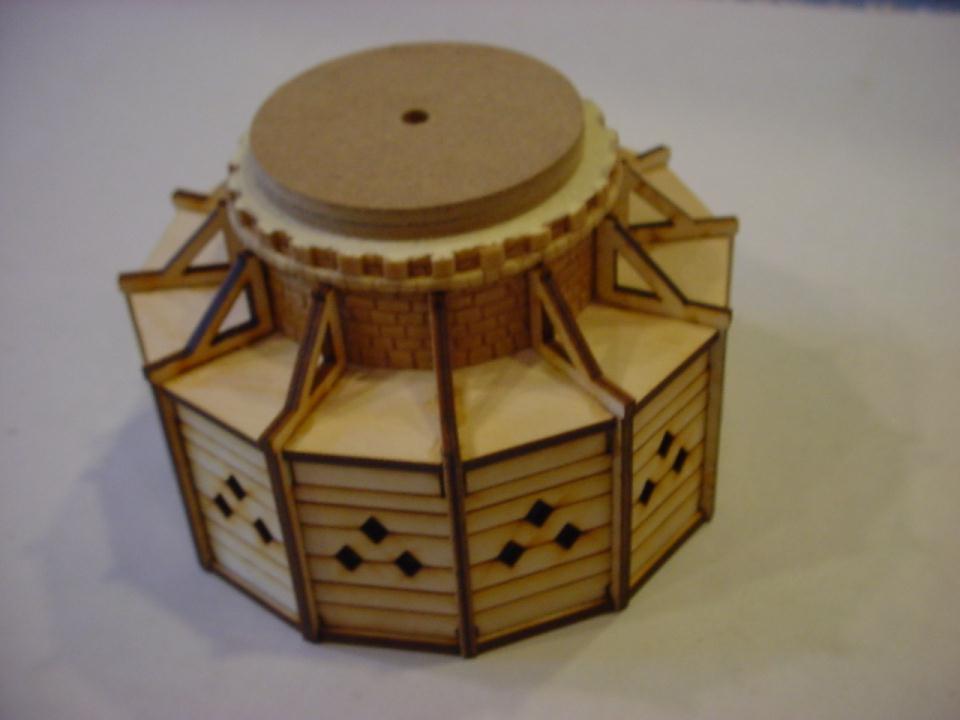
75 Tower Hoarding Assembly Assembly is typical as for the smaller main gate section. Reference that section for annotations.

76 Top Support Ring Roof Locator Base Platform Vertical Trusses Side Facades

77 1 Glue the first four vertical trusses on to the base. Attach the four opposite corners to start with. Make sure this is 90 o (square) when glued.
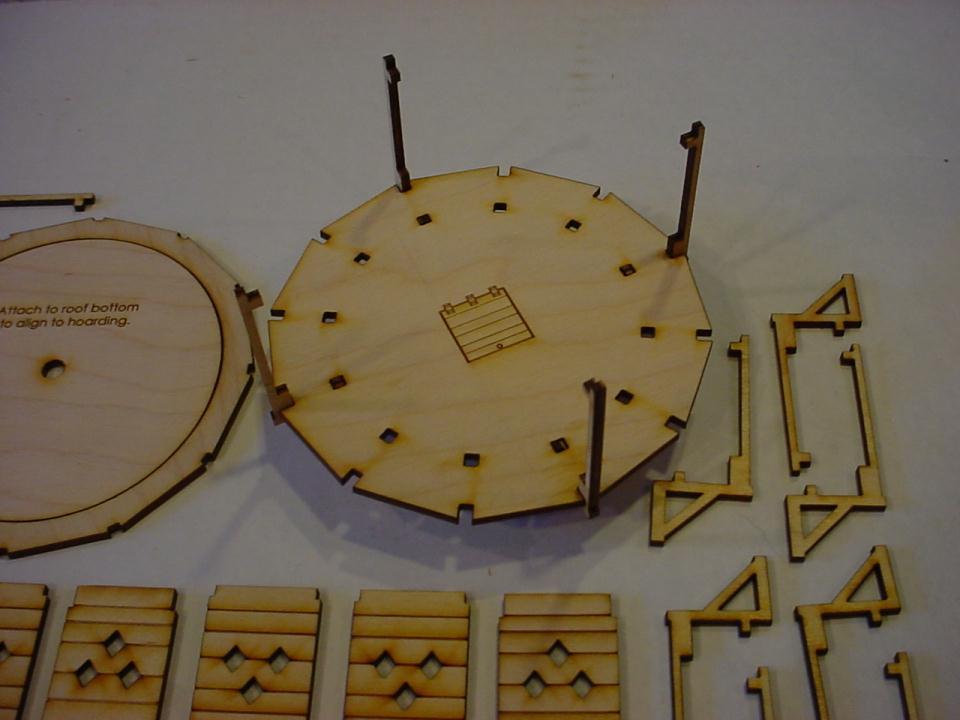
78

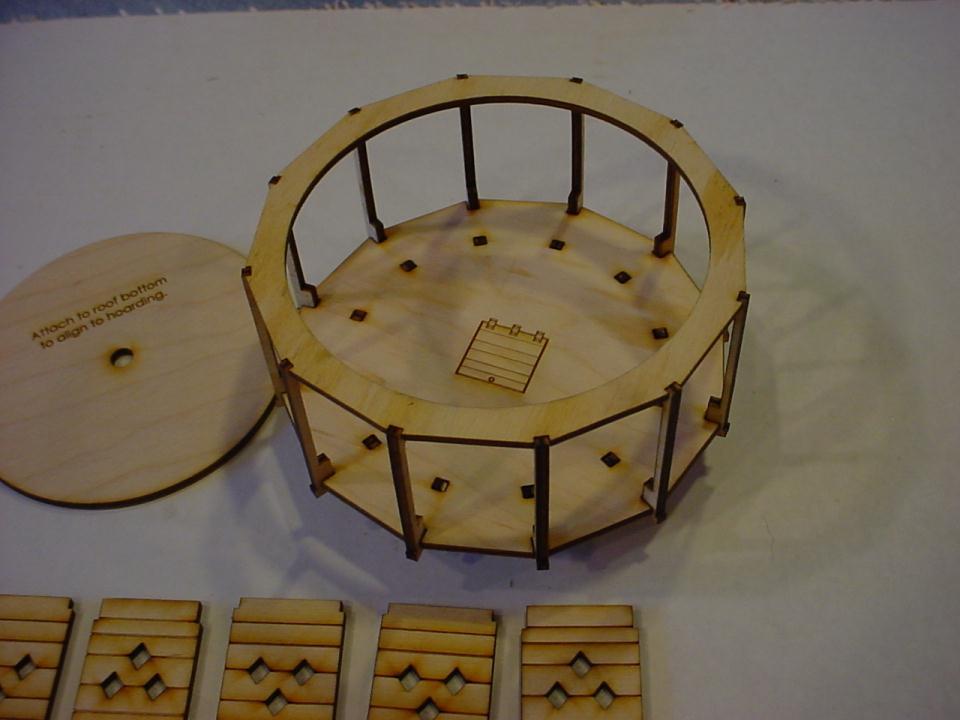
79 2 Glue the top support ring on. Align it to the base and make sue the vertical trusses are square. 90 o

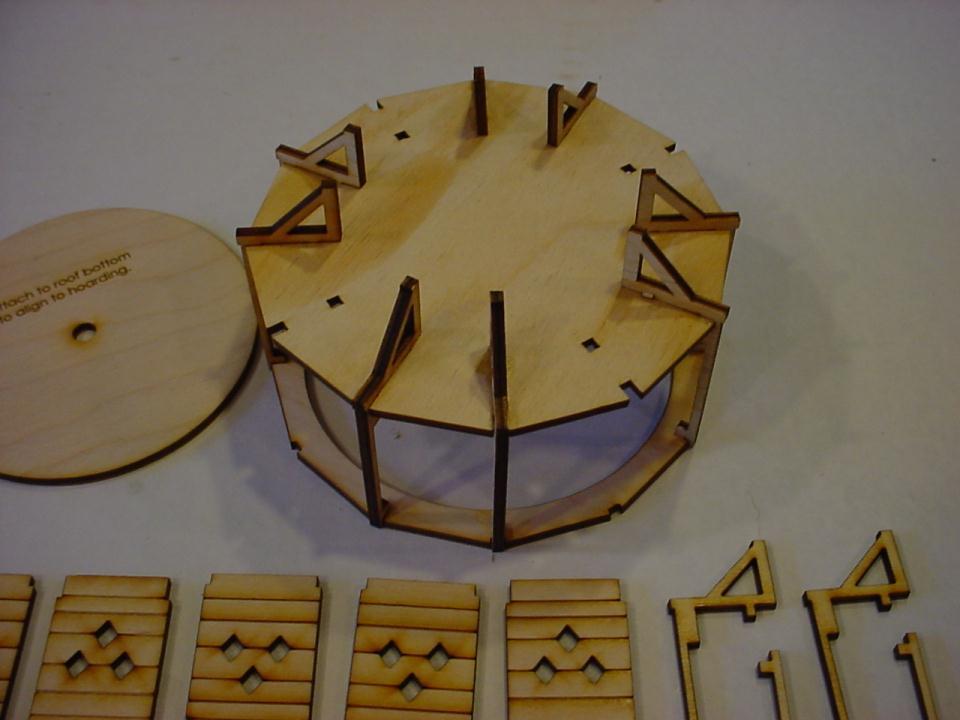
80 3 Attach the remaining vertical trusses.
81
82
83

84 4 Assemble the side facades. Note the inside corners marked in red on this instructional piece. These inside corners need to be beveled inward slightly to facilitate assembly.

85 Why we bevel. The angle of the side wall will cause a sleight interference with the vertical truss part (as shown below). This will prevent proper assembly unless beveled. Vertical truss The four inside corners need to be beveled. Use a small wood rasp or sandpaper on a stick. Only a small amount needs to be beveled. File or sand into the grain of the part to avoid splintering the inside. Side Facade Side Facade
86

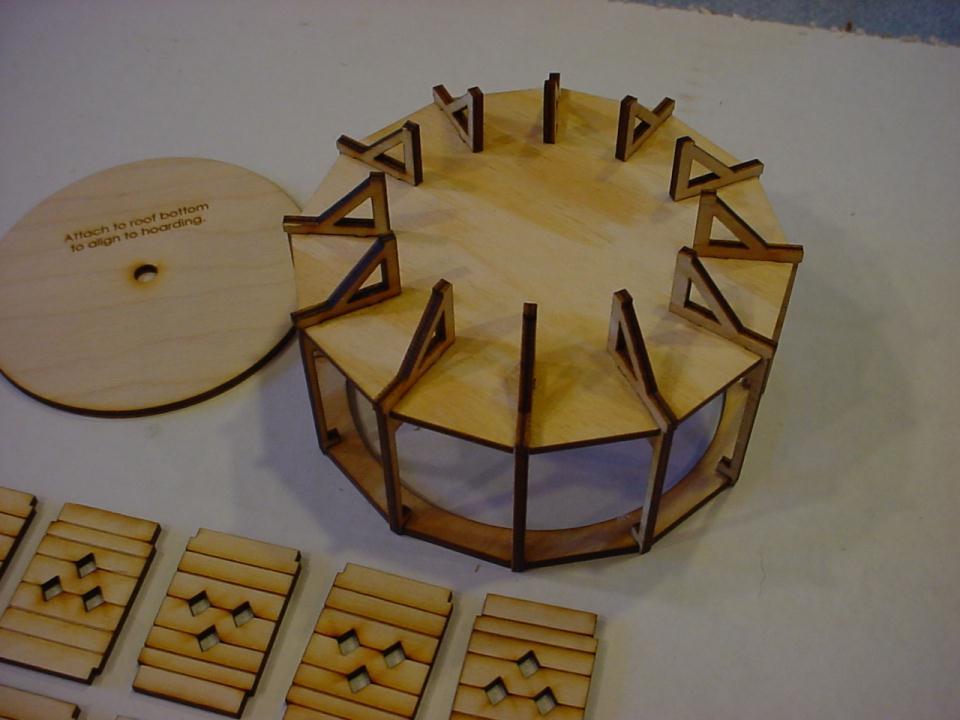
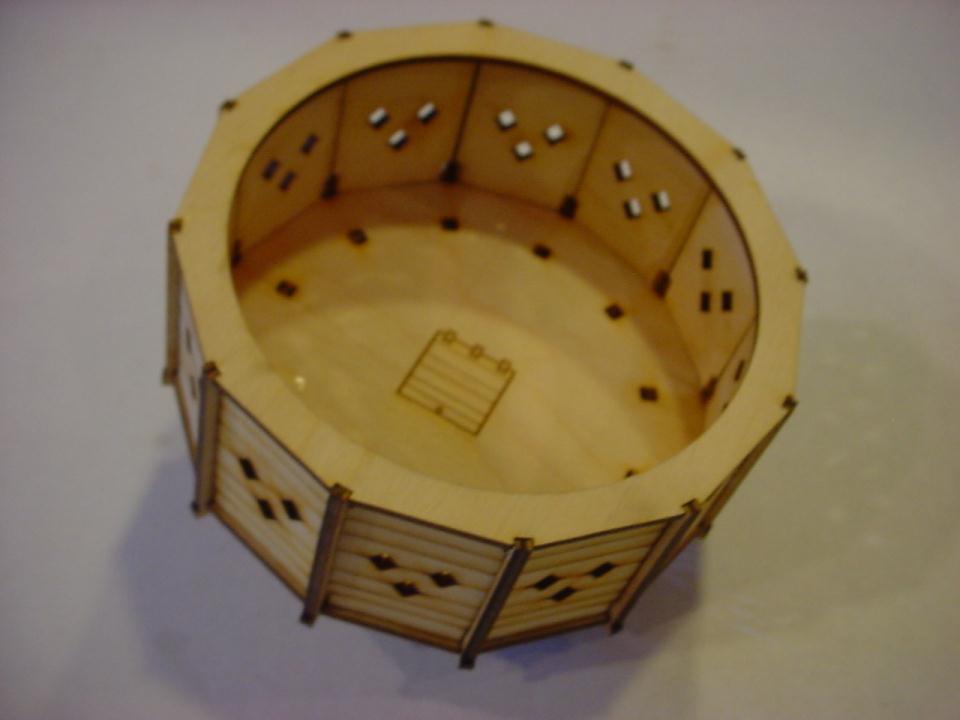
87 Apply a little glue to the vertical trusses and snap in the side facades. Insert one edge first and rotate into place. For the second piece, insert the edge next to the previous piece first.

88 After inserting, add a bit of glue to intersection points for reinforcement.

89 Continue to rotate and assemble all side façade pieces.
90

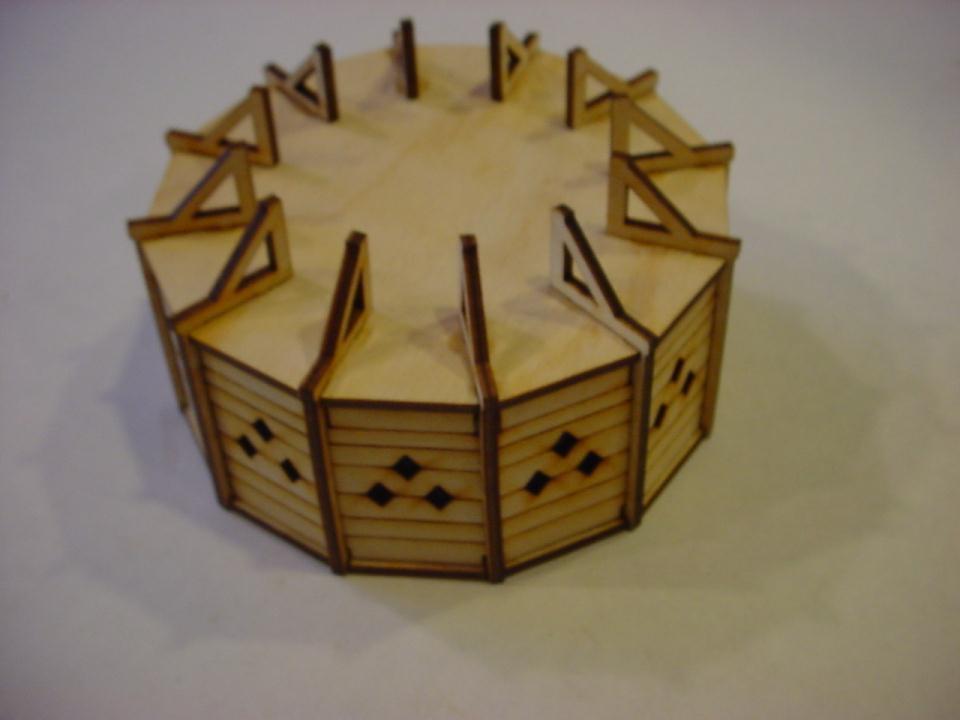
91 Tower hoarding with all laser parts assembled.
92
93
94

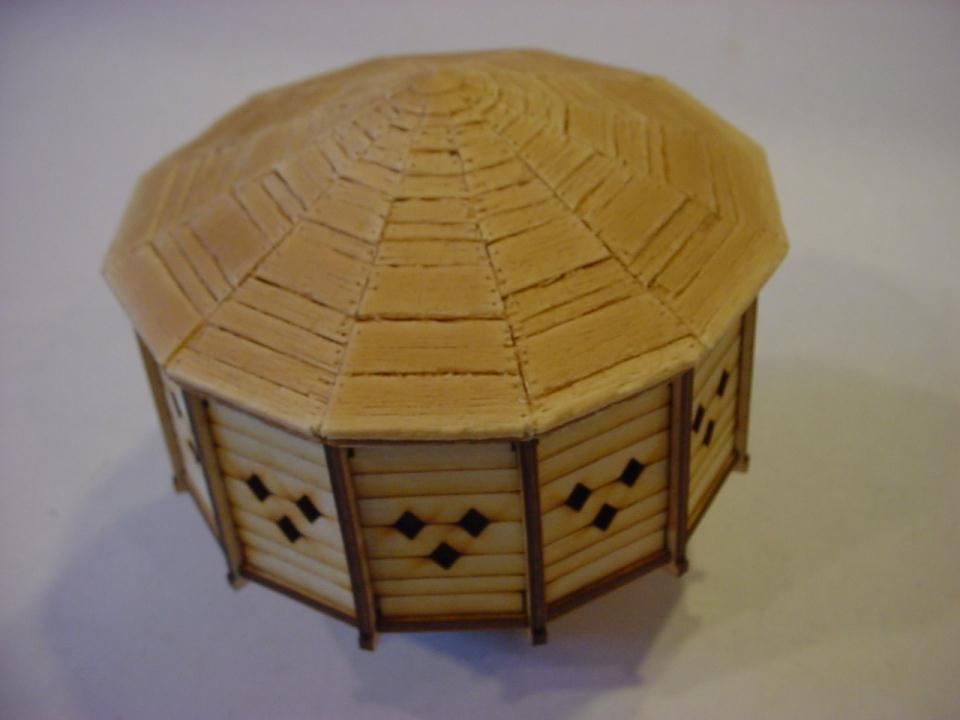
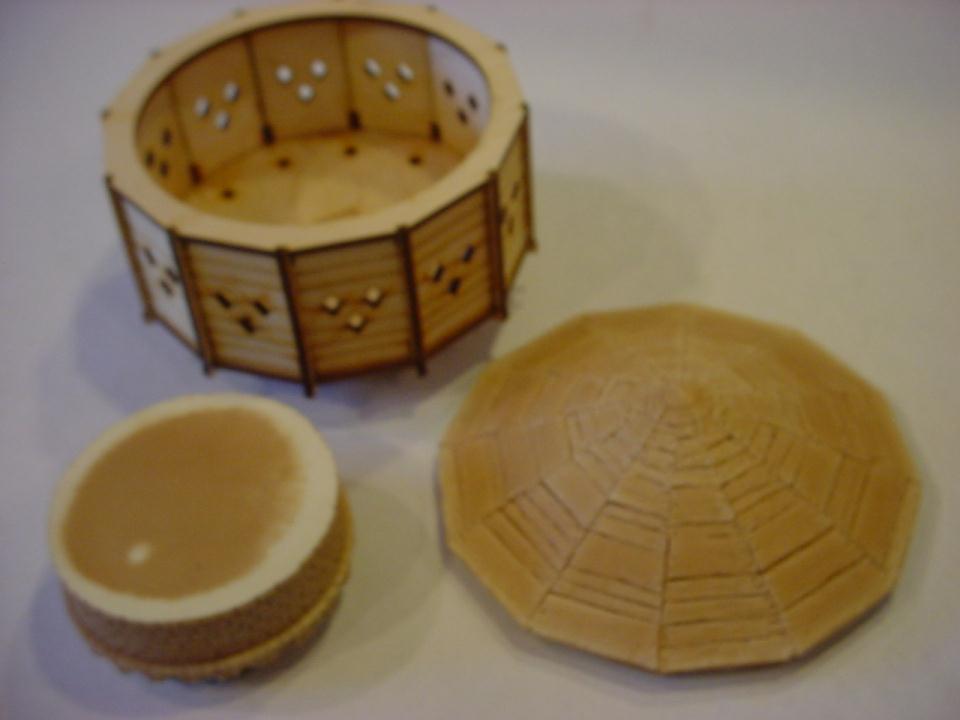
95 Glue the round roof locator part to the bottom of the foam roof part. Align to the center of the roof.
96
97
The Castle House Assembly Instructions By Laser Dollhouse Designs
 The Castle House Assembly Instructions By Laser Dollhouse Designs HOUSE PARTS First floor slots labeled 1A-1G First floor Walls labeled 1A-1G First floor interior door frames (4) Wall 1A frames (6) Main
The Hamlin Assembly Instruction By Laser Dollhouse Designs
 The Hamlin Assembly Instruction By Laser Dollhouse Designs NOTE 1: Please do a dry assembly using only tape to hold house together. This will get you familiar with parts, location, and fit. This also gives
Little Briana Cottage Dollhouse assembly instructions
 Little Briana Cottage Dollhouse assembly instructions NOTE 1: Please do a dry assembly using only tape to hold house together. This will get you familiar with parts, location, and fit. This also gives
ALIEN ENCLOSURES GM A-BODY Trunk Panel Kit instructions
 ALIEN ENCLOSURES 68-72 GM A-BODY Trunk Panel Kit instructions TYPICAL TOOLS & MATERIALS NEEDED FOR UPHOLSTERED KITS 2 Yards of Main Panel Material 1.5 Yards of Backer Material 3 yards of foam backing material
Vivian Mansion Assembly Instruction By Laser Dollhouse Designs
 Vivian Mansion Assembly Instruction By Laser Dollhouse Designs NOTE 1: Please do a dry assembly using only tape to hold house together. This will get you familiar with parts, location, and fit. This also
How to assemble the Reims Gueux Pit Centre Module #005
 How to assemble the Reims Gueux Pit Centre Module #005 We recommend quick drying super glue for our models. Just a few drops on the joining edges, press and hold them for a few seconds and the connection
Craftman One Car Garage Assembly Instruction by Laser Dollhouse Designs
 Craftman One Car Garage Assembly Instruction by Laser Dollhouse Designs NOTE 1: Please do a dry assembly using only tape to hold house together. This will get you familiar with parts, location, and fit.
Ben Franklin 5&10 Store
 Ben Franklin 5&10 Store RIVER LEAF MODELS, LLC RIVER LEAF MODELS, LLC Thank you for purchasing the Ben Franklin 5&10 structure kit. Your kit includes everything you need to assemble the final product.
1Take the keel (3) and
 and") 1 The hull and the bridge 1Take the keel (3) and apply PVA wood glue in the second slot from the left: a toothpick may make it easier. Take care: the left end is the one that has a projection. THE HULL
1 The hull and the bridge 1Take the keel (3) and apply PVA wood glue in the second slot from the left: a toothpick may make it easier. Take care: the left end is the one that has a projection. THE HULL
Wayside Cottage Assembly Instructions By Laser Dollhouse Designs
 Wayside Cottage Assembly Instructions By Laser Dollhouse Designs Parts for assembly Base Floor marked 1A thru 1L 13 post and 11 fences With one gate Walls 1A thru 1L and Alcove roof panels 3 lg and 1 sm
The Rowen Victorian Assembly Instructions By Laser Dollhouse Designs
 The Rowen Victorian Assembly Instructions By Laser Dollhouse Designs Parts Listing 1. Four main floors A. Base Floor with markings S1 thru S6 B. 1 st Floor with markings 1A thru 1H C. 2 nd Floor with markings
ALIEN ENCLOSURES CAMARO AND FIREBIRD Trunk Panel Kit Instructions
 ALIEN ENCLOSURES 67-69 CAMARO AND FIREBIRD Trunk Panel Kit Instructions TYPICAL TOOLS & MATERIALS NEEDED FOR UPHOLSTERY 2 Yards of Main Panel Material 1.5 Yards of Backer Material 3 yards of foam backing
HRMLaserModels.com T.W. SNOW 25 TON COALING TOWER S SCALE AS USED ON THE MILWAUKEE ROAD
 HRMLaserModels.com T.W. SNOW 25 TON COALING TOWER S SCALE AS USED ON THE MILWAUKEE ROAD HRM-61 S SCALE COAL TOWER T.W.Snow 25 Ton Coaling Tower General Instructions Check out HRMLaserModels.com for construction
Seascape Bungalow Assembly instructions. Laser Dollhouse Designs
 Seascape Bungalow Assembly instructions Laser Dollhouse Designs NOTE: Please do a dry assembly using only tape to hold house together. This will get you familiar with parts, location, and fit. This also
USS Enterprise Instructions
 USS Enterprise Instructions If things don t fit right, double check the placement. Because all lasers are different, you may have to sand or file for a perfect fit. Clamp these pieces together and glue
3Position the hull of the ship as
 Yamato: Step-by-step 25 The hull and stern deck c b d a b d c e e f a Rear frame b Stern deck x 2 c Stern deck x 2 d Side wall x 2 Wood glue Sandpaper (no. 400 grain) Craft knife Pliers d Side wall x 2
Building the Cathedral
 Building the Cathedral Please note that the cathedral is a fairly difficult and time consuming project. I strongly suggest building one or two easier models before tackling this one! Four molds are needed
How to assemble the Reims Gueux Pit End Modules #005
 How to assemble the Reims Gueux Pit End Modules #005 Depending on which kit you have purchased you will either have a pair of end sections, some centre sections or both. We will describe building of the
5If the protruding part is. 6Place 1 as is shown in the. 7Place what was assembled
 Yamato: Step-by-step 49 The base of the bridge and strakes a c b d a Base of the bridge b Base of the bridge c Base of the bridge d Strakes x 10 THE BASE OF THE BRIDGE 1Smooth 1 to 3, first using the metal
After printing these plans, several pages will need to be taped together to form a larger plan. Below is a diagram of which pages need assembled.
 Watermill Building Plans For complete building instructions and instructional videos, please visit the main web site at www.hirstarts.com/watermill/watermill.html. Using these plans alone will not give
Hegeler Carus Mansion Assembly Instructions By Laser Dollhouse Designs
 Hegeler Carus Mansion Assembly Instructions By Laser Dollhouse Designs Parts for assembly 2 nd floor base 3 rd floor base 1 st floor base 4 th floor base Lower roof panel Mid roof panel Upper roof panel
STONEYBRIDGE STRUCTURES
 02-208-OO North Eastern Railway N2 Style Signal Box INTRODUCTION Thank you for purchasing one of our products. We hope this information sheet will prove useful in the construction of this model. We have
 Allied Tool is a freelance model of a small manufacturing company that grew from production in a home basement to a new building. Assume a gentleman starts assembling gauges in his basement and the business
The Park Hotel Instructions for Assembly of N Scale Kit
 The Park Hotel Instructions for Assembly of N Scale Kit Kit Contents: 198 ea. Laser Cut Acrylic Parts, 2 ea. Chimney Parts Sheets, 1 ea.2".040 styrene rod, 5 ea. Sidewalk Parts, 14 ea. Cast Resin Dormers,
The Park Hotel Instructions for Assembly
 The Park Hotel Instructions for Assembly Kit Contents: 280 ea. Laser Cut Acrylic Parts. 1 ea. 6" Plastic Coated Wire. 5 ea. Sidewalk Parts. 14 ea. Cast Resin Dormers. 12 ea. Window Glass Templates, 12
STOP! READ THIS FIRST! TIPS FOR BUILDING LASER CUT MODELS
 INSTRUCTIONS STOP! READ THIS FIRST! TIPS FOR BUILDING LASER CUT MODELS 1. Test fit all parts and make sure you know how everything goes together before gluing. If you are contemplating cutting a part to
STICK 2 IT. Fuselage Construction:
 RCCD 2014 CLUB PROJECT STICK 2 IT Fuselage Construction: The fuselage is constructed without the use of a set of plans. The fuselage will be constructed on your previously prepared work surface and by
The Lansdowne One Car Garage Assembly Instruction by Laser Dollhouse Designs
 The Lansdowne One Car Garage Assembly Instruction by Laser Dollhouse Designs NOTE 1: Please do a dry assembly using only tape to hold house together. This will get you familiar with parts, location, and
FUSELAGE CONSTRUCTION
 FUSELAGE CONSTRUCTION Note: prior to building and gluing on the work surface use protective covering on your building surface. (wax paper or clear wrap) Fit the laser cut Fuselage Front and Fuselage Rear
Sky Eagle. User Guide. Cautionary and Warning Statements
 Sky Eagle User Guide 60089 V0613 Cautionary and Warning Statements This kit is designed and intended for educational purposes only. Use only under the direct supervision of an adult who has read and understood
Building the Gothic Church
 Building the Gothic Church Mold #54 does not contain all of the blocks to build this church. You will need extra regular blocks (1/2" x 1/2" x 1") and square blocks (1/2" x 1/2" x 1/2"). These blocks can
Contents. Build the Spitfire: Step-By-step
 Pack 2 Stages -20 Contents Stage Page Number 8-0 2 - - 7 8-50 5 5-5 6 5-57 7 58-60 8 6-6 9 6-67 20 68-7 Editorial and design by Continuo Creative, 9- North Road, London N7 9DP All rights reserved 20 De
3Insert the second rod no. 4
 Yamato: Step-by-step 37 The stern block and searchlight control towers a b c d e f Recommended tools and materials Wood glue Sandpaper (no. 800 grain) Metal file Putty Craft knife For metal: Super Glue
7/8n2 Scale Plantation Coach
 7/8n2 Scale Plantation Coach Introduction This small coach modeled in 7/8 n2 was inspired from a Hawaiian Railway Company plantation excursion car from the late 19 century. While not an exact replica,
Donaldson s Department Store
 Donaldson s Department Store Instructions for Assembly of Donaldson s Department Store Kit Contents: 80 each laser cut acrylic parts. 1 each sheet of canopy parts. 1 each sheet of AC roof unit parts. 1
Roof Contour By Bob Parrish
 Roof Contour By Bob Parrish This text will show you how to shape the roof contour on Labelle passenger and trolley kits. The height of the clerestory on the two types of kits is different. Passenger kits
Unit 5: Designing with Data (Safer Buildings) Contents
 Contents") Contents 1. Working with Balsa Wood and Foam Core. 1 a. Cutting & Safety 1 b. Joining 2 c. Aligning & Squaring... 3 2. Building the Base 3 3. Building the Roof Load Holder.. 4 1. Working with Balsa Wood
Contents 1. Working with Balsa Wood and Foam Core. 1 a. Cutting & Safety 1 b. Joining 2 c. Aligning & Squaring... 3 2. Building the Base 3 3. Building the Roof Load Holder.. 4 1. Working with Balsa Wood
Central New York Rocket Team Challenge 2018 Rocket Assembly Instructions
 Central New York Rocket Team Challenge 2018 Rocket Assembly Instructions Note: These instructions vary from those provided by the manufacturer of the rocket kits. There is also considerable varying discussion
Nanton Grain Mill Assembly
 ( 1 ) Nanton Grain Mill Assembly Locate package for assembling storage building. These are cut from 1/8 masonite. Inspect and lightly sand edges where it will be bonded. Use white glue or CA glue to bond.
Adjustable Roof Racks Installation Guide v1.2
 Adjustable Roof Racks Installation Guide v1.2 Thank you for purchasing Coast to Coast s Adjustable Roof Rack. In this document you will find a list of all components and a detailed guide on how to correctly
Tough warrior. The author's many years of intensive competition are your guarantee of a sturdy, fliable design with all "bugs" eliminated.
 Tough warrior. The author's many years of intensive competition are your guarantee of a sturdy, fliable design with all "bugs" eliminated. LAST month we described the construction of the fuselage and motor
Kristiana Tudor Assembly Instructions By Laser Dollhouse Designs
 Kristiana Tudor Assembly Instructions By Laser Dollhouse Designs Parts for assembly Second floor base Third floor base First floor base First floor walls and porch rails Second floor walls Third floor
Rosalina Accessories Tutorial Version March 2011 Martyn
 Rosalina Accessories Tutorial Version 1.0 - March 2011 Martyn Star Brooch Feel free to experiment with these dimensions, you should make a template you are happy with, the method still works. 1) Creating
PITTS S2S CONSTRUCTION
 PITTS S2S CONSTRUCTION FUSELAGE CONSTRUCTION 1) Place the right fuselage side over the plan and mark the former positions. Place the left side over the right side and mark the former positions. Glue F1
Product must be installed as shown using the screws and brackets provided. Use of incorrect hardware could result in damage to the product.
 General Notes These installation instructions are intended to be comprehensive for a typical Keyeira/Presto configuration. Your configuration may differ. If you have questions contact Geiger Customer Service
1Smooth pieces 4, 5 and 6, using
 Yamato: Step-by-step 109 Machine-guns, anti-aircraft guns and decking h e f a b c g d e f a Anti-aircraft gun base x 2 b Anti-aircraft gun (bottom) x 2 c Anti-aircraft gun (top) x 2 d Machine-gun base
How to Use the Wooden Plank Mold
 How to Use the Wooden Plank Mold Even though I'm giving instructions for only two projects, there are tons of uses for this mold. Some of these include: Floors Steps Doors Tables Benches Crates Drawbridge
1/6 PA-25 PAWNEE. *Specifications are subject to change without notice.*
 1/6 PA-25 PAWNEE INSTRUCTION MANUAL [ A335 Kit ] Wing Span : 72 in / 1830 mm Wing Area : 736 sq in / 47.5 sq dm Flying Weight : 6.6 lbs / 3000 g Fuselage Length : 48 in / 1220 mm Requires : "Glow Power"
The Saint Paul Building
 The Saint Paul Building Instructions for Assembly of The Saint Paul Building. Kit Contents: 65 each laser cut acrylic parts. 1 each sheet of AC roof unit parts. 1 each sidewalk. 3 each Window Glass Templates,
Kentucky 4H Wood Science Plans Notebook. Plans Level 1
 Kentucky 4H Wood Science Plans Notebook Plans Level 1 MATERIALS NEEDED: 1 piece wood 3/4" x 2 x 2 1 piece wood 3/4" x 3 x 3 1/2" 1 wooden spring-type clothespin 2-1 1/2" nails 1-1/2 woodscrew Wood Glue
The Gothic Chess Set
 The Gothic Chess Set Please note that this chess set is a fairly difficult and time consuming project. I strongly suggest building one or two easier models before tackling this one! The miniatures used
Scratchbuild A Backwoods Water Tank Part V - Making the Frost Box and Hanging the Water Spout
 Scratchbuild A Backwoods Water Tank Part V - Making the Frost Box and Hanging the Water Spout By Dwight Ennis In this section, we're going to make the Frost Box, and we'll build the Spout Hanger Assembly
The Midtown Apartment Building
 The Midtown Apartment Building Instructions for Assembly of The Midtown Apartment Building. Kit Contents: 70 each laser cut acrylic parts. 3 each sidewalk parts. 3each Window Glass Templates, 3 each Window
Tools and Tips: ( 1 )
") Tools and Tips: As you build instructions will show in my many picture manual how to assemble. You can use your own methods as you desire, my results are very good. A smooth, flat work surface is very
Tools and Tips: As you build instructions will show in my many picture manual how to assemble. You can use your own methods as you desire, my results are very good. A smooth, flat work surface is very
C-180 Builder s Manual
 C-180 Builder s Manual. May 20, 2002 Last revised July 11, 2002 Copyright! 2002 Douglas Binder, Mountain Models www.mountainmodels.com sales@mountainmodels.com (719) 630-3186 1 Required Equipment! Xacto
Australian Vintage Radio Society Inc.
 Australian Vintage Radio Society Inc. (Incorporated in Victoria A0050003S) P.O. Box 3099, Syndal L.P.O., Victoria, 3150, Australia. Cabinet assembly instructions for the AVRS 10 th Anniversary construction
Assembly Instructions for Busted Bricks Marble Machine #1
 Assembly Instructions for Busted Bricks Marble Machine #1 Ver. 2 instructions Page number 1 Required for assembly: Wood glue (PVA or aliphatic resin recommended) and/or Cyanoacrylate (CA) glue Clamps or
4" Round Fieldstone Tower
 4" Round Fieldstone Tower This page contains instructions on how to use mold #72 to build the round fieldstone tower. You will have to cast the mold 18 times to build the tower. This round tower is slightly
WRIGHT FLYER 1 INSTRUCTIONS FOR THE D10LC KIT
 WRIGHT FLYER 1 INSTRUCTIONS FOR THE D10LC KIT Manufactured in the USA by Easy Built Models PO Box 681744, Prattville, AL 36068-1744 Visit us at www.easybuiltmodels.com Easy Built Models GLUE METHODS Always
Post & Rail Crossbuck
 Post & Rail Crossbuck 1. Getting Started 6. Crossbuck Be sure to call underground prior to digging Assemble gates (if necessary) and decide where they will be located Stake out the fence line Space and
How to Use the Gothic Graveyard Mold #46
 How to Use the Gothic Graveyard Mold #46 The pieces you see here are cast in plastic resin. You cannot use plaster to cast the fence and gate sections, because they would be too fragile and would break
Installation instructions, accessories. Rails. Volvo Car Corporation Gothenburg, Sweden. Instruction No Version Part. No
 Instruction No Version Part. No. 8685942 1.0 Rails J8401014 Page 1 / 9 Equipment A0000162 A0000161 J8401006 Page 2 / 9 INTRODUCTION Read through all of the instructions before starting installation. Notifications
4-H Model Building. Monroe County. Grades 3-12
 4-H Model Building Monroe County Grades 3-12 PURPOSE Positive development of our young people through the stimulation of their personal interest and natural skills through the assembly, techniques of construction,
Corona Concepts presents The Laurel All Wood Dollhouse. Instructions and Assembly Guides
 Corona Concepts presents The Laurel All Wood Dollhouse Instructions and Assembly Guides Introduction In Short... Welcome to the exciting world of dollhouses and miniatures. Since the first tab and slot
Additional Parts List:
 THE TIME MACHINE Additional Parts List: In addition to the cast resin parts enclosed in this kit, there should also be a plastic bag containing the following items needed to complete your time machine
Build the Spitfire: Step-By-step. Pack 3 Stages 21-30
 Pack Stages 2-0 Contents Stage Page Number 2 72-74 22 75-78 2 79-8 24 82-84 25 85-88 26 89-9 27 92-94 28 95-97 29 98-00 0 0-05 Editorial and design by Continuo Creative, 9-4 North Road, London N7 9DP All
Instructions and Assembly Guide
 Corona Concepts presents The Creekside Cabin All Wood Dollhouse 1997 Corona Concepts Schenevus, NY 12155 All rights reserved These instructions were printed in New York State Instructions and Assembly
Dynamics Colorwave Fullrim. Technical Instructions
 Dynamics Colorwave Fullrim Technical Instructions Dynamics Colorwave Fullrim Glazing Recommendation for Optical Lenses Frame is designed with 5.0 base curve Other base curves are possible Groove should
Hotel Belvedere Instructions for Assembly of the HO scale kit. v1.1
 Hotel Belvedere Instructions for Assembly of the HO scale kit. v1.1 Kit Contents: 319 ea. laser cut.090" acrylic parts. 132 ea. laser cut.060" acrylic parts. 8 ea. window glass templates 8 ea. window glazing
Pre-Paint>Fuselage>Empennage>Fit elevator. Objectives of this task: Materials required: Prepare the horizontal stabiliser and the elevator
 Pre-Paint>Fuselage>Empennage>Fit elevator Objectives of this task: To fit the elevator to the horizontal stabiliser, to fit the trim tabs to the elevator and the end caps to the elevator and the horizontal
Agricultural Mechanics and Technology Power Tool Safety Rules
 Agricultural Mechanics and Technology Power Tool Safety Rules Name: BAND SAW Use: Cutting curves, circles and irregular shapes. 1. Use clean SHARP blades. 2. The teeth should always point DOWN. 3. Adjust
(Build Instructions)
") (Build Instructions) Specifications * Wingspan: 58cm * Length: 50cm * Flying Weight: 59 grams * Channels: 3 (Rudder Elevator Throttle) * Suggested Receiver: 4Ch Micro * Motor: 8mm GearDrive * Prop: GWS
(Build Instructions) Specifications * Wingspan: 58cm * Length: 50cm * Flying Weight: 59 grams * Channels: 3 (Rudder Elevator Throttle) * Suggested Receiver: 4Ch Micro * Motor: 8mm GearDrive * Prop: GWS
Corona Concepts presents The Lily All Wood Dollhouse. Instructions and Assembly Guide
 Corona Concepts presents The Lily All Wood Dollhouse Instructions and Assembly Guide Introduction In Short... Welcome to the exciting world of dollhouses and miniatures. Since the first tab and slot die-cut
C-Bot. User Guide. Cautionary and Warning Statements
 C-Bot User Guide Cautionary and Warning Statements This kit is designed and intended for educational purposes only. Use only under the direct supervision of an adult who has read and understood the instructions
Field of Armor. 1/6th SCALE TIGER 1 MODEL TANK INSTRUCTIONS
 Field of Armor 1/6th SCALE TIGER 1 MODEL TANK INSTRUCTIONS Items needed for construction: - Well ventilated, clean 4' x 4' working space - 1 can black or clear ABS Glue (available in plumbing section of
USS ENTERPRISE BRIDGE
 ASSEMBLY MANUAL USS ENTERPRISE BRIDGE GENERAL INSTRUCTIONS: Print out on either 8.5 x 11 inch or A4 paper. All printout finished images should measure 7.5 inches x 10 inches (190.5 x 254 mm). Pre-crease
Assembly instructions for Classic Cantabile DIY Ukulele
 Assembly instructions for Classic Cantabile DIY Ukulele ArtNr.: 00036326 Sopranukulele / 00036327 Konzertukulele Musikhaus Kirstein GmbH Bernbeurener Strasse 11 D-86956 Schongau / Germany Tel.: 0049-8861-909494-0
The Severn Instructions for Assembly of the N scale kit.
 The Severn Instructions for Assembly of the N scale kit. Kit ontents: 172 each laser cut 1/16" acrylic parts 102 each adhesive backed styrene parts 1 each cast entryway 3 each cast balcony 4 each cast
Building the Circular Tower
 Building the Circular Tower You will need to fill this mold 18 times to have enough blocks to build the circular tower. Be sure the blocks are completely dry before gluing them together. For detailed instructions
NEXUS SERIES CABINETS
 NEXUS SERIES CABINETS STANDARD BASE ASSEMBLY INSTRUCTIONS Also applies to: Galaxy Series, Nexus Series, Ridgeline Series, Statesman Series, and Waterford Series FOR YOUR INFORMATION: These assembly instructions
Installing Novi Siding Trim
 Installing Novi Siding Trim CAUTION: Remember that polymer undergoes expansion/contraction due to variations in temperature. The following instructions will allow for the expansion/contraction of the material.
Instructions for Assembly of the HO Scale The Charles
 The Charles Instructions for Assembly of the HO Scale The Charles HO Kit Contents: 337 ea. white 1/16" laser cut acrylic part 19 ea. Clear 1/16" laser cut acrylic part 69 ea. white 1/8" laser cut acrylic
Please contact us at BLMAmodels.com for any spare part requests.
 BLMA Models 16623 Pear Blossom Ct. Whittier, California 90603 Phone: 562-712-7085 Ssales@blmamodels.com Cantilever Signal Bridge Instructions Thank you for purchasing this fine-scale model! This bridge
1. Build the bottom first - make sure your table is flat. Build the entire plane using foam safe CA and kicker. The best technique is to spray kicker
 Wxá zç uç `tçué 1. Build the bottom first - make sure your table is flat. Build the entire plane using foam safe CA and kicker. The best technique is to spray kicker on one part and apply a sparing amount
BUILD THE. Soleil Royal. Pack 1. The flagship of King Louis XIV.
 BUILD THE Soleil Royal The flagship of King Louis XIV www.model-space.com Pack 1 Stage 1 Assembly Guide Hull frame, false keel and first deck half A 4 2 5 1 6 7 1A Smooth the surfaces of all the pieces
How to Install Elite Bayside Beadboard
 How to Install Elite Bayside Beadboard Beadboard will give a room a warm and comfortable feeling. Its beauty lies in its simplicity. It is one of the easiest to install out of all wainscoting, regardless
Advanced Gothic Dungeon Pieces
 Advanced Gothic Dungeon Pieces Basing Your Dungeon Pieces......1 Construction Guidelines......2 Peak Hall......3 Modular Doorways......4 Modular Gates......5 Stair Piece......6 Stair Room......7 Opening
FINISH CARPENTRY. Installing Arched Casing How to make three different arched trim details look like they grew there
 FINISH CARPENTRY 1 2 3 Installing Arched Casing How to make three different arched trim details look like they grew there Photos by Gary Striegler BY GARY STRIEGLER I love the challenge of trimming arched
Scratch Build a Water Tower
 Here s some Prototype details Photos Courtesy of Rodney Doster Water Spout and Discharge Pipe Tank Bands Here s some more Prototype details Photos Courtesy of Rodney Doster Weather Vane as a Finial Using
Mousetrap Catapult. About this project:
 Designed by: Ritchie Kinmont Project #44 Page 1/19 About this project: The is fun for ages four and up. Using a mousetrap for the spring, this catapult is designed to throw objects such as practice golf
3. Be careful not to cut off all of the adjustment screws. It may be better to take a little off of each end rather than all off one side.
 QUIET DOOR KITS Description Quiet Door Soundproofing Kits are specifically designed for all your door soundproofing needs. The Quiet Door Perimeter Seal and Quiet Door Sweep are engineered to create a
Desktop Trebuchet Kit Assembly Instructions
 Desktop Trebuchet Kit Assembly Instructions Contents of package (drawings are not to scale for clarity, parts that have duplicates are indicated with total number of that part to be found, example: 2X
The Fyfe Building Instructions for Assembly of the N scale kit.
 The Fyfe Building Instructions for Assembly of the N scale kit. Kit Contents: 150 each laser cut 1/16" acrylic parts. 6 each 020 adhesive backed part 6 each column caps 2 each decorative canopy 1 each.125"
the wire, less is better. And make sure the bends on each truss wire are in line with the other. See the next photo.
 The following information and photographs are what I did to build the kit. Your methods and needs may differ from this which is fine. There is no right or wrong way if you are used to scratch building.
Railroad Kits PO Box 461 Holden, MA
 (Formerly Downtown Deco DD 1004 Fallburg Station) HO Scale. Thanks for purchasing one of my kits. Because different people have different degrees of experience, I'll walk you through, step by step, explaining
10x12 Victorian Manual
 Tools Needed: -Cordless Drill (12V or higher) -#2 Square Drive Bit -Hammer -6 Step Ladder -Tape Measure -Square utility knife w/ blade & hook blade -Speed Square Little Cottage Co. PO Box 455 Berlin, OH
Code Description Qty. Material Dimensions A Long Inner 4 2 x 4 pine 34-1/2 long
 B utler s Chest Because it s designed to suit a variety of purposes, this butler s chest is a piece of furniture that absolutely anyone can appreciate. Used by itself, it can serve as an end table or can
After the glue dries, trim the trussrod ends with your cutting pliers.
 The following information and photographs are what I did to build the kit. Your methods and needs may differ from this which is fine. There is no right or wrong way if you are used to scratch building.
PS 5077 cu. ft. Boxcar with EOC device. 1:29 scale resin craftsman kit. by Burl Rice
 PS 5077 cu. ft. Boxcar with EOC device 1:29 scale resin craftsman kit by Burl Rice www.burlrice.com Bill of materials (not included): Thick/medium viscosity CA PL adhesive, or Gorilla Glue Heavy Duty Construction
MH60/MH72 DESK HUTCH IMPORTANT!
 MH60/M2 DESK HUTCH IMPORTANT! Assembly may require the assistance of another person. Before you begin assembly: READ THE DIRECTIONS all the way through one time. This will speed up the process and help