Door Knocker Installation By Bill Shayler
|
|
|
- Charles Dennis
- 6 years ago
- Views:
Transcription


1 Door Knocker Installation By Bill Shayler
2 Contents Door Knocker Installation. 3 What Is Needed.. 3 Common Installation Methods.. 3 Where to Install... 4 Surface Mount... 5 Through The Door Mount.. 7 YDK Universal Mounting Kit. 9


3 Door knocker installation A door knocker is very easy to install. If you are replacing an existing door knocker there may be a couple more things to consider. Be sure to see this chapter at the end of this publication. What is needed? A few Basic home owners tools are all that is needed. Electric Drill & bits (don't forget the safety glasses) Screwdriver Level Ruler Small Crescent or socket Wrench (if cap nuts used) Hack Saw (through the door mount) Vice (through the door mount) Pencil Paper about 4 x 10 Common Installation Methods There are two common methods used to install door knockers. Surface mount and Through the Door mount. Surface Mount (pictured left) door knocker installation uses screws that go through the front of the door knocker and then screw into the surface of the door. Through the Door (pictured right) installation requires holes be drilled through the door so bolts or similar hardware can be used to hold the door knocker the opposite side of the door. Both methods are explained in detail later.
4 Where To Install Your Door Knocker Let me first say, the door knocker should be installed on the door, not next to the door, unless it is there solely for decoration. If you expect your door knocker to be functional and heard on the inside you need to mount it on the door itself. It will not resonate through the door jamb like it will through the door. The design of the door will in all likelihood dictate where the door knocker is placed. It should be placed in a position on the door that is the most attractive as well as within reach of the average user. Some doors have windows, some have panels and others are plain. Each circumstance will affect where the knocker should be placed. In general it should be centered horizontally on the door from 4 to 5 feet from the floor. If the door allows it, I like it about 4-1/2 feet from the floor. Door Knockers With Built In Eye Viewers Door knocker installation with a built in eye viewer could present the problem that it is either too high for the knocker or too low for the eye hole. It is for this reason I prefer the eye viewer to be a separate piece and mount higher than the door knocker. If a door knocker with a built in eye viewer is your choice, follow the instructions for the appropriate mounting method adding the hole for the eye viewer.
5 Surface Mount Surface mount door knocker installation can be used in many instances where you do not want hardware visible on the inside of the door. Many through the door mount door knockers can be converted to surface mount. Surface mounting involves 2 or more screws that pass through the casting and into the door. A through the door style door knocker can usually be converted to surface mount by drilling and counter sinking holes in the casting and obtaining matching screws. The bottom screw can usually be hidden under the clapper but the upper one is usually exposed. If the screw is a good match to the knocker this is not a problem and may even add to the appeal of the knocker overall. The most common residential door is made of wood or wood panels. Once the mounting location is chosen the screw hole centers should be located using a ruler to find the center of the door and a level to ensure the locations are straight up and down. Care should be taken to not drill all the way through the door. I like to put masking tape on the drill bit at the point where I want to stop drilling. I can see when the tape meets the door. If a peep hole or eye viewer is part of the door knocker another hole must be drilled through the door. Some doors available today are made of a fill material covered by a skin of PVC, fiberglass, aluminum, steel or other material. These doors offer excellent energy efficiency as well as easy care and


6 maintenance. Extra care must be taken when drilling these doors to prevent damage. If in doubt, contact the store or manufacturer for information on their doors. If you are mounting a surface mount door knocker on a filled door you may need to use a screw anchor similar to what is used to get screws to stay in drywall. The plastic anchors are placed in the hole drilled into the door. When the screw goes in them they expand on the inside of the skin to keep the screw tight. Without an anchor the screw cannot be made tight and the knocker will become very loose and possibly damage the surface of your door. When purchasing your anchors check the packaging to be sure you are getting the correct size for the screw you are using and that you are using the correct size drill bit for the anchor. This is important. You do not want to drill the hole in the door too large or too small.
7 Through The Door Mount Mounting your door knocker with the through the door method uses either all thread and cap nuts or stove bolts and washers to secure the casting to the door. The all thread or bolt must be cut to the correct length to be just long enough to pass through the door and enter into the threaded portion of the door knocker. Some doors available today are made of a fill material covered by a skin of PVC, fiberglass, aluminum, steel or other material. These doors offer excellent energy efficiency as well as easy care and maintenance. Extra caution must be taken when drilling these doors to prevent damage. Be especially careful of the exit hole on the opposite side you are drilling from. This hole may crack or deform if a slightly dull drill bit or too much pressure is used. Drilling the Door A common practice to prevent damage as the drill bit exits the door is to drill small diameter pilot holes through the door at the desired locations. Using the pilot hole as a guide, drill the full size hole 1/2 way through from one side and then drill the other 1/2 starting from the other side. This prevents the larger drill bit from splintering the surface as it exits the door. The drilling can be done with a typical home electric drill and bit. The size of the mounting bolts and inside hardware will determine the size drill bit to be used. The hole must be just large enough for the bolt to pass through but not so large that it cannot be covered by the door knocker on the outside and the hardware on the inside.

8 Care must be taken to ensure that the holes are drilled squarely through the door. When the bolts are screwed into the door knocker they stick out squarely from it. If the holes in the door are drilled at an angle the door will interfere with the bolts. Slightly out of square holes can be compensated for by drilling the hole larger but you must be very careful to not get them so large that they cannot be hidden by the hardware. The best bet is to take your time and to do the best job you can of getting the holes drilled correctly the first time. The distance between the holes must match the bolt center of the door knocker. A template can be made by placing a piece of paper on the back of the door knocker and pressing it into the mounting holes to make an impression. This paper can be taped to the door at the proper location to mark the drilling locations. You must decide approximately how high to place the knocker on the door. Generally a distance of between 4 feet and 5 feet from the floor is correct. When the general location is decided a ruler is used to find the horizontal center of the door. Mark the location of the upper hole to be drilled. Use your paper template and a level to locate the lower drilling point. Drill the pilot hole through the door for both holes using the smaller drill bit. When these are drilled squarely through the door you can use
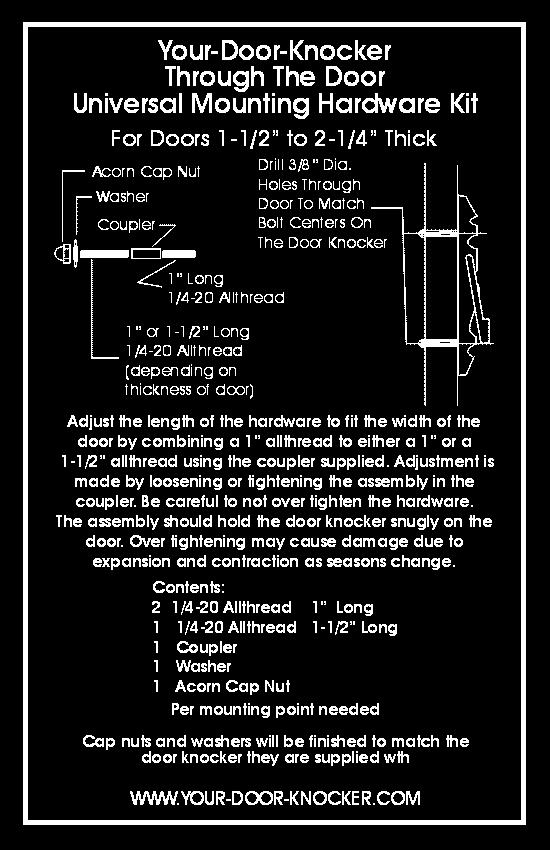
9 your larger drill bit to drill half way through the door from either the inside or the outside of the door. Be careful that the bit does not pull you all the way through the door. Go slowly for this first half of the drilling. When both holes are drilled to the finish size from one side of the door, complete the drilling by starting from the other side of the door. On metal doors you may find it necessary to use a center punch to keep the drill from wandering while starting the hole. When the holes are drilled the mounting bolts can pass through them and screw into the threaded bosses on the back of the casting. They should pull tight but not overly tight as to damage the door. Remember that things expand and contract from summer heat to winter cold. Overly tightened in the summer may cause damage later. Door knockers supplied with all-thread or bolts will need the hardware cut to the proper length using a hacksaw and a vice. Your-Door Knocker Universal Mounting Kit We have introduced our Exclusive Universal Mounting Hardware Kit that is now supplied with all our through the door mounted door knockers. Our exclusive universal through the door mounting hardware kit adjusts to fit doors from 1-1/2" to 2-1/4" thick. This kit eliminates the need to cut a bolt or all-thread to the exact dimension needed.
10
11 Sometimes a through the door style can be converted to a surface mount with a little machine work. The design of the door as well as how it is made may dictate which mounting method is used. A solid wood door should handle both methods but a filled door with a thin skin may not hold the screws for a surface mount. Both methods work equally well and both have their advantages. Through the door mounting is the most secure and adds decoration to the inside of the door. Surface mount does not require holes to be drilled through the door, only into the surface but the screws are generally visible on the knocker. A good rule of thumb is: " If It Is On Your House And You Like The Way It Looks, You Did It Right..."
LOFT DOOR HANGER BARN DOORS & HARDWARE. Hardware Installation Instructions. Page
 LOFT DOOR HANGER Page 1 Specifications 2 7/16" 3/8" 1-1/2 1-3/4 Ø3 3 7/8" 11-1/16 Page 2 Parts and Tools Tools Needed Tape Measure Pencil Drill with 1/8, 1/4 and 3/8 bits, 1 spade bit and Phillips bit
Frameless Fixed Panel Slider
 INSTALLATION INSTRUCTIONS Frameless Fixed Panel Slider QCI-5279 SINGLE ROLLER WITH ANTI-JUMP DOUBLE ROLLERS QCI5279 Rev Page Certified 08/09/6 Tools: To install your New Shower Enclosure, you may need
Mount to the Wall INSTALLATION MANUAL
 Mount to the Wall 15 Locate the Wooden Studs This step applies to wooden stud wall installation only. Determine and mark the exact locations of two stud centers on the wall. Wooden studs should be spaced
6625 WEST WILSHIRE BLVD. OKLAHOMA CITY, OK (405) FAX (405)
 FAX (405)") INSTALLATION INSTRUCTIONS FOR THE TAILGATE WITH LATCH AND LINK ASSEMBLY 76-87 FORD SHORT & 53-87 FORD LONG FLARESIDES 1. Assemble the bed and make sure the box is square. Measure the distance between the
INSTALLATION INSTRUCTIONS FOR THE TAILGATE WITH LATCH AND LINK ASSEMBLY 76-87 FORD SHORT & 53-87 FORD LONG FLARESIDES 1. Assemble the bed and make sure the box is square. Measure the distance between the
Frameless Bypass Slider
 INSTALLATION INSTRUCTIONS Frameless Bypass Slider QCI-5301 Heavy Glass Bypass Slider with Exposed Rollers QCI5301 Rev 0 Page 1 Certified 11/1/2016 Tools: To install your New Shower Enclosure, you may need
x2 1/4 (6mm) Floor Anchor
 Floor Anchor") INSTALLATION GUIDE Main Components x1 Rail x5 Wall Spacer x2 Anti-jump Block x2 Straight Strap x1 Right Stopper x1 Left Stopper x5 5/16 (8mm x 60mm) Carriage Bolt x5 5/16 (8mm x25mm) Anchor x5 5/16 (8mm
INSTALLATION GUIDE Main Components x1 Rail x5 Wall Spacer x2 Anti-jump Block x2 Straight Strap x1 Right Stopper x1 Left Stopper x5 5/16 (8mm x 60mm) Carriage Bolt x5 5/16 (8mm x25mm) Anchor x5 5/16 (8mm
Technicians of Terror. This is the air valve we make to use with our air
 These are pictures of our scissor prop. Technicians of Terror http://www.halloweenfear.com/scissorprop.html props. This is the air valve we make to use with our air This pictures the duel door closer cylinders
Cabinet is 90% assembled, all you need to do is to attach the legs, lay the glass top on the cabinet, connect the faucet, drains & ptrap.
 Things you might need for the installation: vessel sink, plumber's putty(home depot), liquid nails(home depot), Bucket silicone caulk(home depot), Putty knife Plumber's putty Pipe wrench Channel-lock pliers
Sentinel Electronic Safe Installation Guide
 Sentinel Electronic Safe Installation Guide by Rev 07/12/2004 P/N 100020 Table of Contents 1. OVERVIEW...3 2. SAFE INSTALLATION...3 2.1. TOOLS REQUIRED...3 2.2. SELECTING THE MOUNTING LOCATION...3 2.3.
1/4 FRAMELESS DOOR WITH INLINE PANEL 1413A-1713A-1813A
 1/4 FRAMELESS DOOR WITH INLINE PANEL 1413A-1713A-1813A F AB GLASS AND MIRROR www.fabglassandmirror.com Call: +1 888-474-2221 Fax: (614)-334-4919 Office Timing: 8:30-18:00 EST info@fabglassandmirror.com
GlideRite Retractable Cover System For HotSpring & Tiger River Spas (except Classic & pre-2000 Landmark Spas)
") List of Contents Quantity Description 12 #10 x 1 ½ Flat Head Phillips Screw (see pg. 2) 2 #10 x ½ Pan Head Phillips Screw (see pg. 2) 8 ¼ x 2 ½ Lag Bolt (see pg. 2) 7 ¼ 20 x 5 / 8 Hex Head Bolt (see pg.
List of Contents Quantity Description 12 #10 x 1 ½ Flat Head Phillips Screw (see pg. 2) 2 #10 x ½ Pan Head Phillips Screw (see pg. 2) 8 ¼ x 2 ½ Lag Bolt (see pg. 2) 7 ¼ 20 x 5 / 8 Hex Head Bolt (see pg.
P a r k c o n s o l e s i n k a s s e m b l y i n s t r u c t i o n s
 P a r k c o n s o l e s i n k a s s e m b l y i n s t r u c t i o n s Before You Begin: Professional installation by two-person crew is required for this fixture. Install water supply and drain piping
1/4 FRAMELESS CONTINUOUS HINGE SHOWER ENCLOSURE 1400A-1700A-1800A
 1/4 FRAMELESS CONTINUOUS HINGE SHOWER ENCLOSURE 1400A-1700A-1800A F AB GLASS AND MIRROR www.fabglassandmirror.com Call: +1 888-474-2221 Fax: (614)-334-4919 Office Timing: 8:30-18:00 EST info@fabglassandmirror.com
The following instructions will guide you through the installation of your new vinyl railing.
 Installation Guide St. James Vinyl T-Rail Tools Required Protective eye glasses 3/8 x 3 Concrete Anchors/Fasteners (for Tape measure concrete installations) Variable speed drill/screwdriver Philips Driver
The following instructions will guide you through the installation of your new vinyl railing stair kit.
 Installation Guide Vinyl Standard Stair Railing Tools Required Protective eye glasses Tape measure Variable speed drill/screwdriver Rotary hammer or hammer drill and masonry percussion bit recommended
Monster Tower Phone: U.S. Hwy 411 S. HS1. Installation Instructions and Owner s Manual CAUTION
 Monster Tower Phone: 877-778-6937 5714 U.S. Hwy 411 S. www.monstertower.com Maryville, TN 37801 info@monstertower.com HS1 Installation Instructions and Owner s Manual Your HS1 uses many common parts and
GlideRite Retractable Cover System For Hot Spot Spas (SE & SLX only)
") List of Contents Quantity Description 12 #10 x 1 ½ Flat Head Phillips Screw (see pg. 2) 2 #10 x ½ Pan Head Phillips Screw (see pg. 2) 8 ¼ x 2 ½ Lag Bolt (see pg. 2) 7 ¼ 20 x 5 / 8 Hex Head Bolt (see pg.
List of Contents Quantity Description 12 #10 x 1 ½ Flat Head Phillips Screw (see pg. 2) 2 #10 x ½ Pan Head Phillips Screw (see pg. 2) 8 ¼ x 2 ½ Lag Bolt (see pg. 2) 7 ¼ 20 x 5 / 8 Hex Head Bolt (see pg.
19 to 39 TV WALL MOUNT - FULL MOTION
 19 to 39 TV WALL MOUNT - FULL MOTION RF-HTVMMAB For wood-stud and concrete wall installations Safety information and specifications...2 Tools needed...2 Package contents...3 Installation instructions...5
BARN DOOR HARDWARE KIT
 INSTALLATION GUIDE Main Components x1 Rail x5 Wall Spacer x2 Anti-jump Block x2 Bent Strap x1 Right Stopper x1 Left Stopper x5 5/16 (8mm x 60mm) Carriage Bolt x5 5/16 (8mm x25mm) Anchor x5 5/16 (8mm x
INSTALLATION INSTRUCTIONS - CEILING POWER TRAK, HANGER HOOKS AND RACKS I. CONTENTS CEILING POWER TRAK KIT
 INSTALLATION INSTRUCTIONS - CEILING POWER TRAK, HANGER HOOKS AND RACKS I. CONTENTS CEILING POWER TRAK KIT QUANTITY DESCRIPTION 2 POWER TRAK, 5 FT LG 4 END CAPS, YELLOW 10 SCREWS, 1 5/8 LG 10 WASHERS, 5/8
Heavy-Duty Bypass Track System
 Heavy-Duty Bypass Track System Please Note: This track system must be installed with the screws going into a solid surface such as studs or a header. Due to the spacing of the holes on these Brackets,
340 & 350 SERIES BATH ENCLOSURES
 INSTALLATION INSTRUCTIONS 340 & 350 SERIES BATH ENCLOSURES 800-643-1514 www.alumaxbath.com Copyright Alumax Bath Enclosures 2010. All rights reserved. LIMITED WARRANTY AND REMEDY ALUMAX BATH ENCLOSURES
QCI0029 REV. 1 Page 1 of 11 Certified 07/06/05
 QCI0029 REV. 1 Page 1 of 11 Certified 07/06/05 MAINTENANCE: Two primary materials are used to manufacture your new Basco enclosure: tempered glass and anodized aluminum. To assure a long lasting finish
340 & 350 SERIES DELUXE FRAMELESS BYPASS
 BATH ENCLOSURES An Alcoa Company Tel: 800-643-1514 Fax: 870-234-3181 www.alumaxbath.com INSTALLATION INSTRUCTIONS 340 & 350 SERIES DELUXE FRAMELESS BYPASS BATH ENCLOSURES Copyright Alumax Bath Enclosures
1/4 FRAMELESS CONTINUOUS HINGE SHOWER ENCLOSURE
 1/4 FRAMELESS CONTINUOUS HINGE SHOWER ENCLOSURE QCI5028 Rev 1 Page 1 Certified 09/19/2018 INSTALLATION NOTES: Unpack your unit carefully and inspect for freight damage. Lay out and identify all parts using
INSTALLATION INSTRUCTIONS. Unit No. 126, 726 Classic Pivot Panel/Door/Panel Shower Enclosure
 INSTALLATION INSTRUCTIONS Unit No. 126, 726 Classic Pivot Panel/Door/Panel Shower Enclosure QCI0027 Rev. 0 Page 1 of 10 Certified 11/07/2006 MAINTENANCE: Two primary materials are used to manufacture your
Double Swing Door With Header QCI5114
 Double Swing Door With Header QCI5114 QCI5114 REV. 0 Page 1 of 9 Certified 06/22/2016 MAINTENANCE: Two primary materials are used to manufacture your new shower enclosure: tempered glass and anodized aluminum.
RangerWare Fiberglass Door System Installation Instructions P/N
 Page 1 of 9 RangerWare Fiberglass Door System Installation Instructions P/N 2878016 ORDER OF INSTALLATION Note: To assure proper order, read all Accessory Installation Instructions before beginning. 1.
MONKEY BARS OVERHEAD RACK INSTALLATION
 MONKEY BARS OVERHEAD RACK INSTALLATION Thank you for purchasing the New Monkey Bars Overhead storage rack. The most innovative overhead rack on the market WARNING THE PROPER INSTALLATION OF THIS STORAGE
Contour Hanger ASSEMBLY INSTRUCTIONS
 Contour Hanger ASSEMBLY INSTRUCTIONS CONTOUR HANGER Recommended Tools Drill with 1/8, 1/4, and 3/8 Drill Bits, 1-1/8 Forstner Bit or 1-1/8 Spade Bit, and Phillips Bit 9/16 and 5/8 Combination Wrench Socket
Industrial Hanger ASSEMBLY INSTRUCTIONS
 Industrial Hanger ASSEMBLY INSTRUCTIONS INDUSTRIAL HANGER Recommended Tools Drill with 1/8, 1/4, and 3/8 Drill Bits, 1-1/8 Forstner Bit or 1-1/8 Spade Bit, and Phillips Bit 9/16 and 5/8 Combination Wrench
UNIT No. 8150/9150 SHOWER ENCLOSURE
 INSTALLATION INSTRUCTIONS NEE INSTALLATION HELP? Call 1-800-45-BASCO (452-2726) UNIT No. 8150/9150 SHOWER ENCLOSURE Monday - Friday 8:00 A.M. - 4:30 P.M. Eastern Time MAINTENANCE: Two primary materials
INS T A L L A TIO N INS T R U C TIO N S HORSESHOE W/ BAR HANGER
 INS T A L L A TIO N INS T R U C TIO N S HORSESHOE W/ BAR HANGER 6-1/2" 5" 2-7/16" 3-7/16" Ø2-7/8" 4-7/8" 11" 2" 3/16" 1/2" HORSESHOE W/ BAR S P ECIFICATIONS PARTS AND TOOLS Tools Needed Tape Measure Pencil
TUB SHOWER Framed Sliding Enclosure
 INSTALLATION INSTRUCTIONS 8775-9775 - SHOWER Framed Sliding Enclosure Call Technical Dept @ 1-800-452-2726 QCI1000 Page 1 of 6 Certified 10/01/09 INSTALLATION NOTES: Unpack your unit carefully and inspect
UNIT No FRAMELESS PIVOT SHOWER DOOR
 INSTALLATION INSTRUCTIONS UNIT No. 3600 FRAMELESS PIVOT SHOWER DOOR NEED INSTALLATION HELP? Call 1-800-45-BASCO (452-2726) Monday - Friday 8:00 A.M. - 4:30 P.M. Eastern Time QCI0020 Rev. 3 Page 1 of 8
Continuous Handrail Kit Installation Instructions
 Continuous Handrail Kit Installation Instructions ALUMINUM RAILING SYSTEM Canadian Version Wall Application (see page 2) Railing Application (see page 7) Wall anchors not provided Hardware included: 1x
1/4 FRAMELESS SLIDING DOOR FOR TUB OR SHOWER 4400A-4500A
 1/4 FRAMELESS SLIDING DOOR FOR TUB OR SHOWER 4400A-4500A F AB GLASS AND MIRROR www.fabglassandmirror.com Call: +1 888-474-2221 Fax: (614)-334-4919 Office Timing: 8:30-18:00 EST info@fabglassandmirror.com
BD101K / BD101K INSTALLATION GUIDE BARN DOOR HARDWARE TOP OF DOOR STRAP KIT
 Common Components x1 Right Stopper x1 Left Stopper x2 Top of Door Strap x2 Anti-jump Block x2 #8 (4.2mm x 25mm) Floor Screws x2 1/4 (6mm) Floor Anchor x1 Internal Floor-Mounted Door Guide BD850-BR/MB/SS
Frameless Bypass Slider
 INSTALLATION INSTRUCTIONS Frameless Bypass Slider QCI-5301 3/8 or 1/4 Glass Bypass Slider with Exposed Rollers QCI5301 Rev 1 Page 1 Certified 6/5/2017 Tools: To install your New Shower Enclosure, you may
Warnings. Description. Prior to Installation Tools Needed
 Warnings Failure to act in accordance with the following may result in death or personal injury. The JT Strong Arm Stabilizer System is intended to eliminate chassis movement in travel trailers and fifth
Unit No. 1400, 1700, 1800 Infinity Continuous Hinge Frameless Swing Door Shower Enclosure
 INSTALLATION INSTRUCTIONS Unit No. 1400, 1700, 1800 Infinity Continuous Hinge Frameless Swing Door Shower Enclosure QCI0028 Rev. 2 Page 1 of 10 Certified 06/05/09 MAINTENANCE: Two primary materials are
TWIG Hanger ASSEMBLY INSTRUCTIONS
 TWIG Hanger ASSEMBLY INSTRUCTIONS TWIG HANGER Recommended Tools Drill with 1/8, 1/4, and 3/8 Drill Bits, 1-1/8 Forstner Bit or 1-1/8 Spade Bit, and Phillips Bit 9/16 and 5/8 Combination Wrench Socket Wrench
935 RODA VINESSE NEED INSTALLATION HELP? DOUBLE ROLLERS FRAMELESS DOOR INSTALLATION INSTRUCTIONS QCI XX/XX/XXXX. Call BASCO ( )
") INSTALLATION INSTRUCTIONS 935 RODA DOUBLE ROLLERS FRAMELESS DOOR NEED INSTALLATION HELP? Call 1-800-45-BASCO (452-2726) Monday - Friday VINESSE QCI0286 1 XX/XX/XXXX 935 Roda Parts List With double rollers
INSTALLATION INSTRUCTIONS 935 RODA DOUBLE ROLLERS FRAMELESS DOOR NEED INSTALLATION HELP? Call 1-800-45-BASCO (452-2726) Monday - Friday VINESSE QCI0286 1 XX/XX/XXXX 935 Roda Parts List With double rollers
INSTALLATION INSTRUCTIONS
 INSTALLATION INSTRUCTIONS BUILDERS CHOICE FRAMED Bypass Door Model: L0516 (Tub Height), L0517 (Shower Height) Rev. 09.20.13 INSTALLATION NOTES: Unpack your unit carefully and inspect for freight damage.
JK FRONT FENDER FLARE INSTALLATION INSTRUCTIONS
 JK FRONT FENDER FLARE INSTALLATION INSTRUCTIONS TOOLS NEEDED 3/16 Allen Wrench 1/2 Socket or wrench 10mm Socket Flat head screwdriver HARDWARE 5/16 x 3/4 button heads (14) 5/16 x 1 button heads (8) 5/16
Frameless Inline Door With Return QCI5263
 INSTALLATION INSTRUCTIONS Frameless Inline Door With Return QCI5263 WALL MOUNT HINGES FRAMELESS DOOR / PANEL / RETURN PANEL QCI5263 REV. 0 Page 1 Certified 06/17/2016 Parts List with wall mount hinges
Privacy Wall Glass Selections - Polished Edge Slider Door
 Privacy Wall Glass Selections - Polished Edge Slider Door 3/6" HEX BIT PUTTY KNIFE #2 ACR BIT SUCTION CUP HOLDERS DOOR LEAF: Satin Tempered Clear Tempered LOCTITE 425 SIDE LIGHT ETCHED GLASS STYLES: Satin
In the box: Figure 1: Instructions, 1-channel, 2 retainers, 2 adjustable tubes, 1 chrome ring, and hardware. Channel
 1 P a g e Thunder Mounts Garage Systems The Overhead Garage Mount Solution The World s Leader of Multi-fit Overhead Garage Mount Safety and Technology. Overhead Garage Door Opener Mounting Instructions.
Cellar Hanger ASSEMBLY INSTRUCTIONS
 Cellar Hanger ASSEMBLY INSTRUCTIONS CELLAR HANGER Recommended Tools Drill with 1/8 and 1/4 Drill Bits, 1-1/8 Forstner Bit or 1-1/8 Spade Bit, and Phillips Bit 9/16, 7/16, and 5/8 Combination Wrench Socket
Installation Instruction
 Tools Needed for Assembly Stud finder (for wood stud wall) Pencil Mark Electric drill Wood Stud Wall Installation Step 1. Locate the Wood Studs Installation Instruction Drill bit (for wood stud wall) Masonry
Unit No. 6150, 7150 Deluxe Framed Sliding Tub/Shower Enclosure
 INSTALLATION INSTRUCTIONS Unit No. 6150, 7150 Deluxe Framed Sliding Tub/Shower Enclosure QCI0023 Rev. 1 Page 1 of 8 Certified 8/20/10 MAINTENANCE: Two primary materials are used to manufacture your new
Assembly Aid. One of the packages contains the required bolts, washers and nuts for final assembly
 Assembly Aid Open the box and arrange the pieces similar to what you see here. Assembly instructions as well as the list of tools required for assembly are also in the box. One of the packages contains
METAL BLINDS. Deluxe GETTING STARTED OPTIONAL HARDWARE. A few simple tools are required: STANDARD HARDWARE
 METAL BLINDS Deluxe GETTING STARTED OPTIONAL HARDWARE A few simple tools are required: Steel Tape Measure Pencil Level Hold Down Brackets with Screws Extension Bracket Power Drill and Drill Bits Flathead
Pillar Hanger ASSEMBLY INSTRUCTIONS
 Pillar Hanger ASSEMBLY INSTRUCTIONS PILLAR HANGER Recommended Tools Drill with 1/8, 1/4, and 3/8 Drill Bits, 1-1/8 Forstner Bit or 1-1/8 Spade Bit, and Phillips Bit 9/16 and 5/8 Combination Wrench Socket
UNIT No. 15 & 16 SHOWER DOOR INSTALLATION INSTRUCTIONS
 UNIT No. 15 & 16 SHOWER DOOR INSTALLATION INSTRUCTIONS Page 2 of 7 MAINTENANCE: Two primary materials are used to manufacture your new Basco enclosure; tempered glass and anodized aluminum. To assure a
Clocking a TD-04 Turbo Compressor Housing. Appendix A : AWIC Silicone and Tubing Fitting
 Clocking a TD-04 Turbo Compressor Housing Appendix A : AWIC Silicone and Tubing Fitting Revision A: 7-13-2015 Tools: Metric Sockets (10, 12, 14, 17mm) 5mm Hex Key Large Internal Snap Ring Pliers 3/8 Socket
Loft Hanger ASSEMBLY INSTRUCTIONS
 Loft Hanger ASSEMBLY INSTRUCTIONS LOFT HANGER Recommended Tools Drill with 1/8, 1/4, and 3/8 Drill Bits, 1-1/8 Forstner Bit or 1-1/8 Spade Bit, and Phillips Bit 9/16 and 5/8 Combination Wrench Socket Wrench
Installation Instructions
 Installation Instructions For Models: Model Number / Description File Name 1540 Classic Series P-Lam Toilet Partitions 1540.pdf 1 INSTALLATION INSTRUCTIONS LAMINATED PLASTIC TOILET PARTITIONS 1540 Classic
Tin Lizzie 18 Assembly Instructions
 Tin Lizzie 18 Assembly Instructions Revision: 07/29/16 Table of Contents Aides 3 Before You Begin 5 Aides 5 Tools 6 Perfect Stitch Parts 2 12 Modify the Machine 12 Prepare Drill Templates 12 Front Display
Melamine Plastic Laminate. Toilet Partition Installation Manual
 Melamine Plastic Laminate Toilet Partition Installation Manual PHONE: FAX: 1-866-317-2786 ATTENTION DO NOT MIX FASTENER PACKS EACH FASTENER PACK HAS THE NECESSARY BOLTS, BARRELS AND SCREWS TO INSTALL THE
INSTALL INSTRUCTIONS WELCOME TO THE NEWAGE PERFORMANCE CABINETRY SERIES NEWAGE STEEL WELDED CABINETRY
 NEWAGE STEEL WELDED CABINETRY WELCOME TO THE NEWAGE PERFORMANCE CABINETRY SERIES ALL CABINETS MUST BE MOUNTED TO STUDS ON A SECURE WALL, AS PER THESE INSTRUCTIONS. FAILURE TO DO SO MAY RESULT IN SERIOUS
675 Quick N Stall Neo Angle Framed Hinge Shower Enclosure
 INSTALLATION INSTRUCTIONS 675 Quick N Stall Neo Angle Framed Hinge Shower Enclosure Call Technical Dept @ 1-800-452-2726 QCI1003 Page 1 of 9 Certified 10/01/09 INSTALLATION NOTES: Unpack your unit carefully
x2 1/4 (6mm) Floor Anchor
 Floor Anchor") Main Components x1 Rail x5 Wall Spacer x2 Anti-jump Block x2 Bent Strap x1 Right Stopper x1 Left Stopper x5 5/16 (8mm x 60mm) Carriage Bolt x5 5/16 (8mm x25mm) Anchor x5 5/16 (8mm x 90mm) Wall Screw x2
Main Components x1 Rail x5 Wall Spacer x2 Anti-jump Block x2 Bent Strap x1 Right Stopper x1 Left Stopper x5 5/16 (8mm x 60mm) Carriage Bolt x5 5/16 (8mm x25mm) Anchor x5 5/16 (8mm x 90mm) Wall Screw x2
SHELTON THERMOSTATIC SHOWER PANEL
 SKU(s): 413241 BEFORE YOU BEGIN We recommend consulting a professional if you are unfamiliar with installing plumbing fixtures. Signature Hardware accepts no liability for any damage to the plumbing, floor,
Deluxe Frameless ByPass Bath Enclosures. 340 & 350 Series
 202 Anderson Ave., Belvue, KS 66407 Phone: 800-669-9867 Fax: 800-393-6699 www.onyxcollection.com 800-643-1514 www.alumaxshowerdoor.com 340 & 350 Series Deluxe Frameless ByPass Bath Enclosures 350D-0517
PRODUCT: LOKI INSTALLATION INSTRUCTIONS. Product is covered by U.S. patents. For more information visit
 R INSTALLATION INSTRUCTIONS PRODUCT: LOKI CONFIGURATION: SINGLE DOOR MOUNT: GLASS MOUNT Product is covered by U.S. patents. For more information visit www.krownlab.com . TOOLS + MATERIALS REQUIRED TOOLS
FRAMED SLIDING DOOR FOR TUB OR SHOWER ENCLOSURE 6150A-7150A
 FRAMED SLIDING DOOR FOR TUB OR SHOWER ENCLOSURE 6150A-7150A F AB GLASS AND MIRROR www.fabglassandmirror.com Call: +1 888-474-2221 Fax: (614)-334-4919 Office Timing: 8:30-18:00 EST info@fabglassandmirror.com
CAB END BEDTRAX (SIDE VIEW)
") Supplied Hardware: (8-14) 1/4-20 Allen head bolts, (12-18) UHMW mount blocks, (4) D-ring tie downs Tools Needed: Allen head wrench GET TO IT. INSTALLATION INSTRUCTIONS STEP 1. INSERT (2) MOUNT BLOCKS INTO
Supplied Hardware: (8-14) 1/4-20 Allen head bolts, (12-18) UHMW mount blocks, (4) D-ring tie downs Tools Needed: Allen head wrench GET TO IT. INSTALLATION INSTRUCTIONS STEP 1. INSERT (2) MOUNT BLOCKS INTO
340D & 350D SERIES FRAMELESS BYPASS BATH ENCLOSURES
 INSTALLATION INSTRUCTIONS 340D & 350D SERIES FRAMELESS BYPASS BATH ENCLOSURES 800-643-1514 www.alumaxshowerdoor.com Copyright Alumax Bath Enclosures 2014. All rights reserved. !WARNINGS! INSTALLATION WARNINGS
Two Panel Frameless Bypass Door
 INSTALLATION INSTRUCTIONS Two Frameless Bypass Door Series 00 Please Record Model Number From Carton Label Here Please read these instructions carefully to familiarize yourself with the required tools,
TV WALL MOUNT ASSEMBLY GUIDE RF-TVMLPT01V2
 TV WALL MOUNT RF-TVMLPT01V2 For wood-stud and concrete wall installations Safety information and specifications...2 Tools needed...2 Package contents...3 Installation instructions...4 ASSEMBLY GUIDE Before
1/4 FRAMELESS SLIDING DOOR FOR TUB OR SHOWER
 1/4 FRAMELESS SLIDING DOOR FOR OR SHOWER INSTALLATION INSTRUCTIONS NEED INSTALLATION HELP? Call 1-800-45-BASCO (452-2726) M onda y - Friday 8 :00 A.M. - 4:30 P.M. Eastern Time MAINTENANCE: Two primary
tile redi redi DOOR Redi Redi Swing Slide g TM TM...Opening Doors to Stunning Showers! TM TM SERIES: CONFIGURATION: MOUNTING PACKAGE:
 redi DOOR INSTALLATION INSTRUCTIONS tile redi Redi Redi Swing Slide g TM TM...Opening Doors to Stunning Showers! TM TM SERIES: CONFIGURATION: MOUNTING PACKAGE: 3000 Door-Door Header, sliding doors RDQCI5301
Congratulations on purchasing the Spirit Rails Magnetic Attach that allows easy wand to pack removal and reattachment by just getting close!
 Introduction Congratulations on purchasing the Spirit Rails Magnetic Attach that allows easy wand to pack removal and reattachment by just getting close! The Spirit Rails Magnetic Attach Kit is designed
Unit No. 4400, 4500 Classic Frameless Sliding Tub/Shower Enclosure INSTALLATION INSTRUCTIONS
 Unit No. 4400, 4500 Classic Frameless Sliding Tub/Shower Enclosure INSTALLATION INSTRUCTIONS MAINTENANCE: Two primary materials are used to manufacture your new Basco enclosure: tempered glass and anodized
1/4 FRAMELESS SLIDING DOOR FOR TUB OR SHOWER
 1/4 FRAMELESS SLIDING DOOR FOR OR SHOWER INSTALLATION INSTRUCTIONS NEED INSTALLATION HELP? Call 1-800-45-BASCO (452-2726) M onda y - Friday 8 :00 A.M. - 4:30 P.M. Eastern Time MAINTENANCE: Two primary
FRAMED SLIDING DOOR FOR TUB OR SHOWER ENCLOSURE INSTALLATION INSTRUCTIONS
 FRAMED SLIDING DOOR FOR OR SHOWER ENCLOSURE INSTALLATION INSTRUCTIONS QCI5023 REV. 0 Page 1 Certified 06/22/2016 INSTALLATION NOTES: Unpack your unit carefully and inspect for freight damage. Lay out and
DX-TVMLPTB03. Low-Profile TV Wall Mount ASSEMBLY GUIDE. For either wood-stud or concrete wall installations
 ASSEMBLY GUIDE DX-TVMLPTB03 Low-Profile TV Wall Mount For either wood-stud or concrete wall installations Safety information and specifications...2 Tools needed...........................3 Package contents......................3
WAREHOUSE HANGER INSTALLATION INSTRUCTIONS R H INS T A L L A TIO N INS T R U C TIO N S
 INS T A L L A TIO N INS T R U C TIO N S WAREHOUSE HANGER NOTE: Due to the size and weight of the Warehouse Hanger it is recommended that this Hanger be installed on 3 4 or wider doors. 10.11.2016 2-3/16"
Unit No. 1413NP, 1713NP, 1813NP Infinity Continuous Hinge Frameless Door & Inline Panel with No Post Shower Enclosure
 INSTALLATION INSTRUCTIONS Unit No. 1413NP, 1713NP, 1813NP Infinity Continuous Hinge Frameless Door & Inline Panel with No Post Shower Enclosure QCI0239 Page 1 of 12 Certified 8/2/10 MAINTENANCE: Two primary
Frameless Inline Door QCI5254
 INSTALLATION INSTRUCTIONS Frameless Inline Door QCI5254 FRAMELESS DOOR / PANEL QCI5254 REV. 0 Page 1 Cer fied 06/16/2016 Parts List with wall mount hinges *Quanes may vary QCI5254 REV. 0 Page 2 Cer fied
Stag Hanger ASSEMBLY INSTRUCTIONS
 Stag Hanger ASSEMBLY INSTRUCTIONS STAG HANGER Recommended Tools Drill with 1/8, 1/4, and 3/8 Drill Bits, 1-1/8 Forstner Bit or 1-1/8 Spade Bit, and Phillips Bit 9/16 and 5/8 Combination Wrench Socket Wrench
INSTALLATION INSTRUCTIONS INS T A L L A TIO N INS T R U C TIO N S ROD IRON SCROLL HANGER R H
 INS T A L L A TIO N INS T R U C TIO N S ROD IRON SCROLL HANGER 10.5.2016 2-1- 3/16" 11/16" 8" 8 O 2-7/8 Ø2-7/8" 3-1/2 3-1/2" 12-9/16 12-9/16" PLEASE NOTE: These instructions are specific to a particular
INSTALLATION INSTRUCTIONS INS T A L L A TIO N INS T R U C TIO N S THE MAVERICK HANGER R H
 INS T A L L A TIO N INS T R U C TIO N S THE MAVERICK HANGER 10.6.2016 PARTS INSTALLATION SPECIFICATIONS AND TOOLS INSTRUCTIONS 2-1/4" 2-7/8 11-3/8" 1/4" 2-1/8 PARTS INSTALLATION AND INSTRUCTIONS TOOLS
* * 98/9950WDC. Fire-Rated Devices include these. additional components. 1-Point Latch (LBL)
") *24739468* 24739468 98/9950WDC Installation Instructions 1-Point Latch (LBL) Fire-Rated Devices include these additional components Metal Edge Wrap required for 60 and 90-minute applications 2-Point Latch
*24739468* 24739468 98/9950WDC Installation Instructions 1-Point Latch (LBL) Fire-Rated Devices include these additional components Metal Edge Wrap required for 60 and 90-minute applications 2-Point Latch
MM540 Installation Instructions IMPORTANT SAFETY INSTRUCTIONS - SAVE THESE INSTRUCTIONS
 MM50 Installation Instructions IMPORTANT SAFETY INSTRUCTIONS - SAVE THESE INSTRUCTIONS Please read this entire manual before you begin. Do not unpack any contents until you verify all requirements on PAGE.
INSTALLATION GUIDE. C20-FTL STRAIGHT PARTITION Transit Partition ( Perforated Window, No Access, Steel )
") INSTALLATION GUIDE C20-FTL STRAIGHT PARTITION Transit Partition ( Perforated Window, No Access, Steel ) QUICK START GUIDE Phase 1 - Assembly q 1.1 Setup... q 1.2 Partition Assembly... 3-5 5-6 Phase 2 -
INSTALLATION GUIDE C20-FTL STRAIGHT PARTITION Transit Partition ( Perforated Window, No Access, Steel ) QUICK START GUIDE Phase 1 - Assembly q 1.1 Setup... q 1.2 Partition Assembly... 3-5 5-6 Phase 2 -
340D / 350D SERIES FRAMELESS BYPASS BATH ENCLOSURES
 INSTALLATION INSTRUCTIONS 340D / 350D SERIES FRAMELESS BYPASS BATH ENCLOSURES 800-643-1514 www.alumaxshowerdoor.com Copyright Alumax Bath Enclosures 2016. All rights reserved. !WARNINGS! INSTALLATION WARNINGS
WALL MOUNT LOCKER ASSEMBLY. 208 Chestnut St, Reading, PA (610)
") WALL MOUNT LOCKER ASSEMBLY 208 Chestnut St, Reading, PA 19602 (610)376-2666 Locker Assembly Wall Mount: locker Installation Introduction: Before beginning, check to ensure the floor is level, and the wall
WALL MOUNT LOCKER ASSEMBLY 208 Chestnut St, Reading, PA 19602 (610)376-2666 Locker Assembly Wall Mount: locker Installation Introduction: Before beginning, check to ensure the floor is level, and the wall
INSTALLATION INSTRUCTIONS
 INSTALLATION INSTRUCTIONS Universal Low Profile Flat Mount Model: U.S. Toll Free: 1-866-752-6271 Outside N. America: 1-503-748-5799 E-mail: ts@planar.com FRANCE Phone: +33 5 6378 3810 E-mail: emeats@planar.com
Enclosed Partition Installation Instructions
 Nissan NV1500/2500/3500 High Roof Partition Kit Part #: DTC 1502-036 V1.0.08.06.18 IMPORTANT INSTALLATION STEPS ARE DENOTED USING A STOP SIGN. THESE STEPS MUST BE PERFORMED IN THE SPECIFIED ORDER TO ENSURE
3/8 FRAMELESS BYPASS SLIDING SHOWER ENCLOSURE
 INSTALLATION INSTRUCTIONS 3/8 FRAMELESS BYPASS SLIDING SHOWER ENCLOSURE QCI-5017 QCI5017 Rev. 3 Page 1 of 9 Certified 12/6/17 INSTALLATION NOTES: Unpack your unit carefully and inspect for freight damage.
Frameless Fixed Panel Slider QCI5279
 Frameless Fixed Panel Slider QCI5279 F AB GLASS AND MIRROR www.fabglassandmirror.com Call: +1 888-474-2221 Fax: (614)-334-4919 Office Timing: 8:30-18:00 EST info@fabglassandmirror.com Frameless Fixed Panel
Top Mount Ultra Modern Hanger
 Top Mount Ultra Modern Hanger ASSEMBLY INSTRUCTIONS TOP MOUNT ULTRA MODERN HANGER Recommended Tools Level Tape Measure Pencil Drill with 1/8, and 1/4, Drill Bits and Phillips Bit Socket Wrench with 9/16
Horizontal Cable Systems
 ALUMINUM RAILING INSTALLATION INSTRUCTIONS v2012 orizontal Cable Systems 1) Check Contents Of Packages: Verify that all parts have arrived and that they match the packing list. 1A) Coastal applications:
CAELI THERMOSTATIC SHOWER PANEL
 SKU(s): 300280 CAELI THERMOSTATIC SHOWER PANEL BEFORE YOU BEGIN We recommend consulting a professional if you are unfamiliar with installing plumbing fixtures. Signature Hardware accepts no liability for
INSTALLATION INSTRUCTIONS FOR FRONT CASTING DECK RAIL Ranger
 INSTALLATION INSTRUCTIONS FOR FRONT CASTING DECK RAIL Ranger TOOLS REQUIRED FOR INSTALLATION: Drill motor, (1) 5/16 inch drill bit, (1) 13/64 drill bit, (1) 3/16 inch hex wrench (1) 3/32 inch hex wrench.
Bulkhead Model Number and
 Bulkhead Model Number 96141-3-01 and 96142-3-01 Installing your ProMaster bulkhead is very clear cut following these instructions. Before cutting or drilling in the floor, verify the location of you gas
Assembly Instructions for Model: VMPR1
 Assembly Instructions for Model: VMPR1 Thank you for choosing a Sanus Systems Model: VMPR1 ceiling mount. The VMPR1 ceiling mount provides a unique, simplified method of ceiling mounting inverted LC/LP
Shop Style Miter Saw Stand Kit
 Quality Power Tool Accessories OWNER S MANUAL Assembled Unit Shown Without Shelves & Wings Assembled With Shelves & Wings Shop Style Miter Saw Stand Kit Model 2850 IMPORTANT Read and understand all safety