fold away petite Assembly Instructions
|
|
|
- Shanon Baker
- 6 years ago
- Views:
Transcription

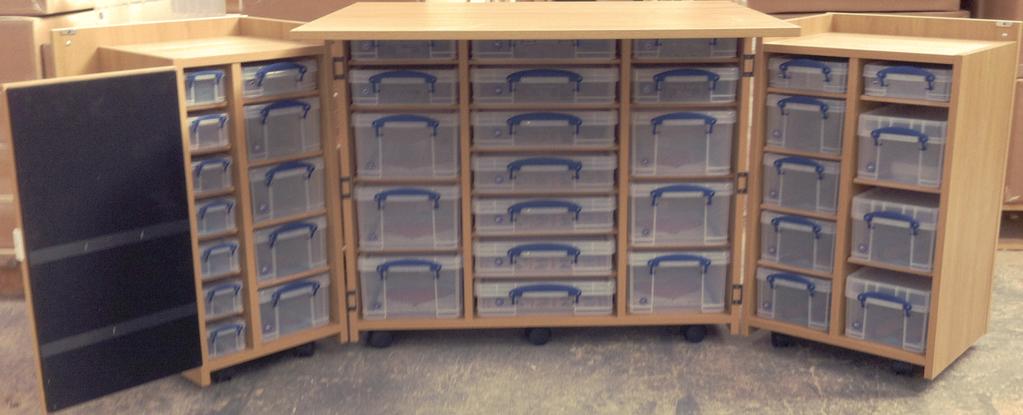
1 fold away petite Assembly Instructions
2


 x 12 MAG CATCH (MC1) x 2 SCREW")
 KNOB (K2) x 2")

3 fold away Thank you for purchasing a Fold Away etite cabinet. If you have any questions regarding assembly please contact us on petite CASTER (C2) x 14 CAM BOLT (CB1) x 76 SHELF EG (S1) x 124 BRACKET (AB1) x 12 MAG CATCH (MC1) x 2 SCREW (35-17D) x 104 SCREW (3-15C) x 30 CAM LOCK (CL1) x 76 (these may already be inserted into panels) KNOB (K2) x 2 SCREW (S30) x 2 HARDWARE M-B1 x 2 M-B2 x 2 M-LHS M-RHS M-BOT M- D1-LHS D1-RHS D1-CD D-B1 x 3 D1- D1-BOT D1-DOOR D2-LHS D2-RHS D2-CD D2- D2-BOT D2-DOOR D-VEL 12x12 x 6 4\9L x 8 2.5\5L x L x 6 ANELS SHELVES
 STE 2 Screw a cam bolt into")

4 STE 1 Attach six of the casters (C2) to the M-BOT as indicated using screws 35-17D. M-BOT 35-17D The casters attach to this side of the panel (the side showing the part label) STE 2 Screw a cam bolt into each of the four holes indicated. These need to be screwed into the opposite side to the casters. screw in to this point STE 3 Screw a cam bolt into each of the four holes indicated on both of the anels. Two need into one side of the panel and two into the opposite side. (SIDE 1) (SIDE 2)
5 STE 4 Attach the both of the M-B1 panels, M-B2 and both of the together as indicated. Once slotted together ensure you tighten the cam locks. M-B1 M-B2 M-B1 STE 5 Attach the section you have already assembled to the M-BOT as shown below and tighten the cam locks. M-B1 M-B2 M-B1
 to the left and right hand sides using screws (35-17D) as shown below.")
6 STE 6 Screw a Cam Bolt (CB1) into each of the holes indicated below M-RHS screw in to this point M-LHS STE 7 AB1 Attach the brackets (AB1) to the left and right hand sides using screws (35-17D) as shown below. M-LHS M-RHS 35-17D
7 STE 8 Attach the M-LHS and the M-RHS to the assembled sections. Secure by tightening the cam locks in the both of the backs (M-B1) and the base (M-BOT). M-RHS M-B1 M-B2 M-B1 M-LHS STE 9 M-BOT M-LHS Fix the brackets that you have already attached to the sides to the base using screws (35-17D) as shown below.
8 STE 10 Screw a Cam Bolt (CB1) into each of the holes indicated below M- STE 11 Attach the M- to the assemble main section. Secure by tightening the cam locks in the both the s and the M-LHS and the M-RHS. M-B1 M-B2 M-B1 M-LHS M-

9 STE 10 Insert shelf pegs and shelves to fit the storage boxes as shown below. Start from each section from the bottom and work upwards when fitting the shelves and boxes to ensure the correct shelf spacing. STE 11 Attach the remaining eight casters (C2) to the D1-BOT and the D2-BOT using screws 35-17D as shown below. D2-BOT D1-BOT STE 12 Screw a cam bolt into each of the four holes indicated. These need to be screwed into the opposite side to the casters. D2-BOT D1-BOT screw in to this point
10 STE 13 Screw a cam bolt into each of the four holes indicated on the D1-CD anel. Two need into one side of the panel and two into the opposite side. D1-CD D1-CD (SIDE 1) (SIDE 2) STE 14 Screw a cam bolt into each of the two holes indicated on the D2-CD anel. D2-CD (SIDE 2) STE 15 Attach two of the D-B1 panels to the D1-CD as indicated. Attach one of the D-B1 panels to the D2CD as indicated. Once slotted together ensure you tighten the cam locks. D2-CD D1-CD
11 STE 16 Screw a Cam Bolt (CB1) into each of the holes indicated below D1- D2- STE 17 Attach the sections you have already assembled to the D1-, D1-BOT, D2- and D2-BOT tas shown below. Once slotted together ensure you tighten the cam locks. D1- D1-BOT D1-CD D1-CD D2- D2-BOT
12 STE 18 Screw a Cam Bolt (CB1) into each of the holes indicated below screw in to this point D1-LHS D1-RHS D2-RHS D2-LHS STE 19 Attach the brackets (AB1) to the left and right hand sides shown above using screws (35-17D). Refer to step 7 for detailed instructions of this step.. STE 20 D1- D2- D1-BOT D2-BOT D2-RHS D2-CD D2-LHS D1-RHS D1-CD D1-LHS Attach the left and right hand sides to the assembled sections. Secure by tightening the cam locks in the both of the backs, tops and bases.
13 STE 21 Fix the brackets that you have already attached to the sides to the bases using screws (35-17D) as shown below. For detailed instructions refer to step 9. STE 22 Screw a Cam Bolt (CB1) into each of the holes indicated below D1-DOOR D2-DOOR STE 23 Fit the front door panels to the assembled sections and tighten the cam locks to secure. STE 24 Fit the door sections to the main sections that is already assembled. Secure the hinges using screws 3-15C. STE 25 Attach the door knobs. Attach the velcro panel to the Door 2 section using screws 3-15C. Attach the magnetic catches using the pre-drilled holes.

14 STE 26 Insert shelf pegs and shelves to fit the storage boxes as shown below. Start each section from the bottom and work upwards when fitting the shelves and boxes to ensure the correct shelf spacing.
15
16 fold away petite storage storage storage 4 C R A F T S 4 O F F I C E H O M E
FOLDAWAY DOOR SECTION OPTION 6. Assembly Instructions. Folding Work Desk (adjustable shelves behind can be accessed when the desk is in use)
") FOLDAWAY DOOR SECTION OPTION 6 Folding Work Desk (adjustable shelves behind can be accessed when the desk is in use) Assembly Instructions It is strongly recommended to have two persons present when assembling
FOLDAWAY DOOR SECTION OPTION 6 Folding Work Desk (adjustable shelves behind can be accessed when the desk is in use) Assembly Instructions It is strongly recommended to have two persons present when assembling
#916 CLASSIC 16 GUN CABINET ASSEMBLY INSTRUCTIONS
 Thank you for purchasing this quality product. A list of PARTS and INSTRUCTIONS is included to assist you. Unpack and identify all parts included on the Parts List and Hardware List. If parts are missing,
Assembly Instructions
 1 27694 Trend Podium Assembly Instructions #27694 Trend Podium Part Drawing Description Qty Part Drawing Description Qty P-1 Base 1 EA Hardware List Screw M6x12mm 30 EA P-2 Right Side Panel 1 EA A2 Phil
Barnside Pantry IMPORTANT NOTE Carefully remove all the parts from the carton and put them individually on a soft cloth to prevent scratch
 88 5516 653 Barnside Pantry IMPORTANT NOTE Carefully remove all the parts from the carton and put them individually on a soft cloth to prevent scratches or other damage occurring to the parts. We have
Exponents Bench Cushion
 Exponents Bench Cushion Power Drill #2 Phillips Bit Bit Holder Page 1 of 2 939500640 Rev A 1. Place cushion on top of the bench, so the black Coalesse tag is in the right rear corner of the bench. 2. From
Hampshire Buffet Cabinet with Glass Doors
 Thanks for shopping with Improvements! Hampshire Buffet Cabinet with Glass Doors Item #55919 Note: Read these instructions carefully before assembling. Tools required: Philips screwdriver (not included).
Should you experience any missing or damaged parts, do not return to the store. Please contact us directly at
 Congratulations! You have purchased a stylish piece of Crosley Furniture. We strive to provide fine furniture products, built with quality materials and hand finished details. Please carefully follow the
Pantry IMPORTANT NOTE Carefully remove all the parts from the carton and put them individually on a soft cloth to prevent scratches or oth
 88 5076 691 Pantry IMPORTANT NOTE Carefully remove all the parts from the carton and put them individually on a soft cloth to prevent scratches or other damages occurring to the parts. We have taken great
Colonial Classic Bar
 88 5528 991 Colonial Classic Bar IMPORTANT NOTE Carefully remove all the parts from the carton and put them individually on a soft cloth to prevent scratches or other damages occuring to the wood parts.
Thanks for shopping with Improvements! Providence Storage Bench Item #567493
 Thanks for shopping with Improvements! Providence Storage Bench Item #5679 To order, call -800-6- West Chester, OH 5069 Made in China PR-06 If you have questions regarding this product, call -800-6- Mon.-Fri.
Display-Top Apothecary Cabinet. Assembly Instructions. Page 1
 Display-Top Apothecary Cabinet Assembly Instructions Page 1 Display-Top Apothecary Cabinet Parts List Please check packaging for all parts and hardware before discarding. Unpack and lay parts on clean,
M. Door 1 Pc. 1 Pc. Door 1 Pc. 1 Pc. M3x20 Wood Screw (long) 8 Pcs. (+1 extra) M3x10 Wood Screw for Magnet 8 Pcs. (+1 extra)
 8 Pcs. (+1 extra) M3x10 Wood Screw for Magnet 8 Pcs. (+1 extra)") 88 5516 653 Barnside Pantry IMPORTANT NOTE Carefully remove all the parts from the carton and put them individually on a soft cloth to prevent scratches or other damage occurring to the parts. We have
88 5516 653 Barnside Pantry IMPORTANT NOTE Carefully remove all the parts from the carton and put them individually on a soft cloth to prevent scratches or other damage occurring to the parts. We have
27693 Trend Podium Desk
 1 27693 Trend Podium Desk Assembly Instructions #27693 Trend Podium Desk Hardware List Part Drawing Description Qty P-1 Table Top 1 EA Part Drawing Description Qty A Screw M6 X 15mm 13 EA B Screw M6 X
Homestead Bar Cabinet IMPORTANT NOTE Carefully remove all the parts from the carton and put them individually on a soft cloth to prevent s
 88 5527 991 Homestead Bar Cabinet IMPRTANT NTE Carefully remove all the parts from the carton and put them individually on a soft cloth to prevent scratches or other damages occuring to the wood parts.
A. Top Unit 1 Pc. For assembly see instructions in carton:
 88 5005 9441 Kitchen Island IMPRTANT NTE Carefully remove all the parts from the carton and put them individually on a soft cloth to prevent scratches or other damage occurring to the parts. We have taken
Thanks for shopping with Improvements! Louvered Pedestal Sink Cabinet Item #512042
 Thanks for shopping with Improvements! Louvered Pedestal Sink Cabinet Item #512042 Note: Read these instructions carefully before assembling. Tools required: Philips screwdriver (not included). Find a
ASSEMBLY INSTRUCTIONS MANUAL
 PAGE 1 OF 9 RECOMMENDED TOOLS FOR ASSEMBLY: ALLEN WRENCH (INCLUDED) BOX WRENCH (INCLUDED) PHILLIPS SCREW DRIVER (NOT INCLUDED) PARTS IN CARTON: ALLEN WRENCH SCREWS (20 EACH) ROUND HEAD SCREWS (8 EACH)
Thanks for shopping with Improvements! Rolling Kitchen Storage Cart with Wood Top Item #583649
 Thanks for shopping with Improvements! Rolling Kitchen Storage Cart with Wood Top Item #58349 Note: Read these instructions carefully before assembling. Tools required: Philips screwdriver (not included).
Copyright 2010, by Walker Edison Furniture Co., LLC. All rights reserved.
 General Assembly Guidelines I. Insure that all parts and hardware are available before beginning assembly. II. III. IV. Follow each step carefully to insure the proper assembly of this product. Two people
HZ1032A0TX/ HZ1032B0TX Shadowbox Wine/Bar Cabinet Assembly Instructions
 HZ0A0TX/ HZ0B0TX Shadowbox Wine/Bar Cabinet Assembly Instructions For assistance with assembly contact: Southern Enterprises Inc. Customer Service -800--509 service@seidal.com www.seidal.com Due to weight,
LOCK ASSEMBLY INSTRUCTIONS
 LOCK ASSEMBLY INSTRUCTIONS Use the drawing below as a key to determine which lock assembly instruction to follow. There are three different types of locks used, and the instructions for each are on the
TOOLS REQUIRED FOR ASSEMBLY. Rubber Mallet or Plastic Tip Hammer PARTS REQUIRED FOR ASSEMBLY OF SINGLE ENTRY STARTER.
 TOOLS REQUIRED FOR ASSEMBLY Rubber Mallet or Plastic Tip Hammer Top Cover Support PARTS REQUIRED FOR ASSEMBLY OF SINGLE ENTRY STARTER Back Stop Divider Closed 'L' Upright Slotted Reinforcement Support
Thanks for shopping with Improvements! Weatherby Corner Storage Cabinet Item #511676
 Thanks for shopping with Improvements! Weatherby Corner Storage Cabinet Item #57 Note: Read these instructions carefully before assembling. Tools required: short Philips screwdriver (not included). Find
Thanks for shopping with Improvements! Louvered Space Saver Cabinet Item #512059
 Thanks for shopping with Improvements! Louvered Space Saver Cabinet Item #512059 Note: Read these instructions carefully before assembling. Tools required: Philips screwdriver (not included). Find a clean,
HZ104100TX Black Contemporary Bar Cabinet Assembly Instructions PO#:
 HZ104100TX Black Contemporary Bar Cabinet Assembly Instructions For assistance with assembly contact: Southern Enterprises, Inc. customer service 1-800-33-09 service@seidal.com www.seidal.com PO#: Page
pottery barn kids MADISON CABINET HUTCH
 pottery barn kids MADISON CABINET HUTCH IMPORTANT SAFETY INSTRUCTIONS: Please read all instructions carefully before assembling. For your safety, assembly by two adults is recommended. PRE-ASSEMBLY: Remove
#27541 Mobile Laptop. Charging Station. Assembly Instructions
 1 #27541 Mobile Laptop Charging Station Assembly Instructions #27541 Mobile Laptop Charging Station Part Drawing Description Qty Part Drawing Description Qty Hardware List P-1 Left Leg Welded 1 EA A Phil
Item # Thanks for shopping with Improvements!
 Thanks for shopping with Improvements! Hampshire -Door Cabinet Item #5505 To order, call -800-64- West Chester, OH 45069 Made in China PR-6 If you have questions regarding this product, call -800-64- Mon.-Fri.
Pedestal Desk IMPORTANT NOTE Carefully remove all the parts from the carton and put them individually on a soft cloth to prevent scratches
 88 5549 181 Pedestal Desk IMPORTANT NOTE Carefully remove all the parts from the carton and put them individually on a soft cloth to prevent scratches or other damage occurring to the parts. We have taken
CROWN IMPERIAL ASSEMBLY INSTRUCTIONS
 CROWN IMPERIAL ASSEMBLY INSTRUCTIONS Standard Drawer Box Page 1 of 14 Standard Drawer Box Parts Parts Supplied B C D A E F G Page 2 of 14 Part Letter Part Name Quantity 300-600 Deep Pan A Base Panel 1
ASSEMBLY INSTRUCTIONS FOR SL500A AND SL500AL
 ASSEMBLY INSTRUCTIONS FOR SL500A AND SL500AL January 2013 The SL500A is a square upright glass cabinet with a single hinged lockable door. It has five adjustable shelves plus the base. It also has an optional
Ver:1.1. Display Cabinet 4 SHELF
 Ver:1.1 GALLERY Display Cabinet 4 SHELF TEMPERED GLASS should be handled with care. Scratches, chips, sudden changes in temperature and hairline fractures may cause the glass to break. This glass is designed
For assembly see instructions in carton
 88 5523 943 Kitchen Island IMPORTANT NOTE Carefully remove all the parts from the carton and put them individually on a soft cloth to prevent scratches or other damages occurring to the parts. We have
(1) (2) (3) (4) (5) (6) Upward (7) (8) (9) (10) (11) (12) 2PCS EACH
 (2) (3) (4) (5) (6) Upward (7) (8) (9) (10) (11) (12) 2PCS EACH") Sh 1 SOUTHERN ENTERPRISES INC. NOTE. This product has been engineered for easy assembly and constructed for durability. Please take time to read and follow assembly instructions. WINDOW PANE DOUBLE DOOR
Sh 1 SOUTHERN ENTERPRISES INC. NOTE. This product has been engineered for easy assembly and constructed for durability. Please take time to read and follow assembly instructions. WINDOW PANE DOUBLE DOOR
C. Side Panel 1 pc. B. Side Panel. 1 pc. J2. Shelf. 4 pcs. Adjustable Pin 24 pcs. (+1 extra) M3.5x16 Wood Screw 20 pcs. (+1 extra) 2 pcs.
 M3.5x16 Wood Screw 20 pcs. (+1 extra) 2 pcs.") IMPORTANT 20 05180 0307 Hutch Carefully remove all the parts from the carton and place them individually on a soft cloth to prevent scratches or other damage. Carefully and strictly follow these assembly
IMPORTANT 20 05180 0307 Hutch Carefully remove all the parts from the carton and place them individually on a soft cloth to prevent scratches or other damage. Carefully and strictly follow these assembly
ASSEMBLY INSTRUCTIONS
 Lockable Wall Cabinet Model: CWC50 Part No: 7640020 ASSEMBLY INSTRUCTIONS GC05/13 INTRODUCTION Thank you for purchasing this CLARKE product. Before assembling the cabinet, be sure to read these instructions
Thanks for shopping with Improvements! Slanted Shoe Shelves Item #512142
 Thanks for shopping with Improvements! Slanted Shoe Shelves Item #512142 Note: Read these instructions carefully before assembling. Tools required: Philips screwdriver (not included). Find a clean, smooth
Installing Electronic Media Storage Components into Lateral File Cabinets
 Steelcase, Inc. Grand Rapids, MI 49501 U.S.A. 1-888-783-3522 Installing Electronic Media Storage Components into Lateral File Cabinets 830-CH-9 830-CH-12 830-CH15 836-CH-9 836-CH-12 836-CH-15 842-CH-9
#27541 Mobile Laptop Charging Station
 1 #27541 Mobile Laptop Charging Station Assembly Instructions #27541 Mobile Laptop Charging Station Part Drawing Description Qty Part Drawing Description Qty Hardware List P-1 Left Leg Welded 1 EA A Phil
Storage Cabinet (Model No )
") ASSEMBLY INSTRUCTIONS (36" W X 18" D X 72" H) (pg 1 of 10) PARTS LIST (pg 2 of 10) Please check the parts carefully according to the parts list. If you are missing any parts, please contact our customer
ASSEMBLY INSTRUCTIONS (36" W X 18" D X 72" H) (pg 1 of 10) PARTS LIST (pg 2 of 10) Please check the parts carefully according to the parts list. If you are missing any parts, please contact our customer
Whalen Furniture Mfg. Factory No. 5 Page # 1
 If you have any questions regarding assembly or if you are missing parts, do not return this item to Sam s Wholesale Club Please call our customer service number and have your instructions and parts list
White Black Espresso Corner Desk Assembly Instructions
 White Black Espresso Corner Desk Assembly Instructions Page 1 White / Black / Espresso Corner Desk Parts List Please check packaging for all parts and hardware before discarding. Unpack and lay parts on
Cook's Corner Kitchen Assembly Instructions
 Assembly Instructions 00 Melissa & Doug, LLC All rights reserved 0 We care about your comments Please call us! -800-84-948 www.melissaanddoug.com PARTS D A E I ( pieces) Q N B F J R ( pieces) S ( pieces)
Assembly Instructions
 1 BLT-27565 FDB Stand Assembly Instructions BLT-27565 FDB Stand Part Drawing Description Qty Part Drawing Description Qty P-1 Top Shelf 1 EA P-10 LL Lower Leg 1 EA P-11 Middle Shelf 1 EA P-2 L-Upper Leg
STEP 1 STEP 2 LEVELER KIT OPTION MOBILE CASTER KIT OPTION
 B SERIES INDUSTRIAL BENCHES TOOLS REQUIRED FOR ASSEMBLY Socket set, Open end wrench set, Cordless drill with 3/8" socket bit (Magnetic recommended). BEFORE ASSEMBLY Read through the assembly instructions
Thanks for shopping with Improvements! Mandarin Tansu Step Cabinet Item #512735
 Thanks for shopping with Improvements! Mandarin Tansu Step Cabinet Item #512735 This unit can be assembled so the top and middle cabinets are on the left or on the right. Use these instructions for a right-sided
RYAN 6 DRAWER TALLBOY PARTS LIST
 RYAN 6 DRAWER TALLBOY Congratulations on your purchase of your RYAN 6 DRAWER TALLBOY. The RYAN Collection is made in New Zealand from 100% New Zealand made MDF an environmentally sound and renewable resource.
Parts list. Model:10400
 Manufacturing, Inc. Instruction sheet -- VTI Flat panel TV cart with cabinet Model number: 10400 Congratulations for having chosen this excellent VTI product. To assure your complete satisfaction, this
J. Shelf 4 pcs. L. Door. K. Door. 1 pc. Magnet. 2 pcs. Adjustable Pin. 16 pcs. (+1 extra)
") 88 5523 61 Buffet IMPORTANT Carefully remove all the parts from the carton and place them individually on a soft cloth to prevent scratches or other damage. Carefully and strictly follow these assembly
88 5523 61 Buffet IMPORTANT Carefully remove all the parts from the carton and place them individually on a soft cloth to prevent scratches or other damage. Carefully and strictly follow these assembly
v1.0 ASSEMBLY GUIDE Josie Sideboard Large
 v1.0 ASSEMBLY GUIDE Josie Sideboard Large Components Upon unpacking your sideboard from it s delivery box, you should have the separate pieces shown below. Follow the steps on the next pages to assemble
MISSION AUDIO STAND GBU
 MISSION AUDIO STAND Thank you for purchasing our Mission Audio Stand. Assembly of this product requires a Phillips screwdriver and a hammer. We have found it helpful to have a second person present in
Queen Wingback Bed King Wingback Bed
 Parts and Hardware List A. Side Rails with Attachment Hooks 2 pcs B. Foot Rail 1 pc C. Head Rail 1 pc D. Center Support Slat 1 pc E. Leg Supports 3 pcs F. Support Slats 4 pcs G. Flat Washers 8 pcs H. Lock
INSTRUCTION SHEET U19
 U19 All Refrigerator and All Freezer Trim Kit Installation Product Line: U19 All Refrigerator and All Freezer Models Parts Included in Kit TRIMKITEZ1 (Part# 297333500): Single Trim Kit Components Single
Pedestal Desk. D. Side Panel 1 pc. E. Side Panel. I. Back Panel. 2 pcs.
 IMPORTANT 88 5530 182 Pedestal Desk Carefully remove all the parts from the carton and place them individually on a soft cloth to prevent scratches or other damage. Carefully and strictly follow these
v1.0 ASSEMBLY GUIDE Josie Sideboard Small
 v1.0 ASSEMBLY GUIDE Josie Sideboard Small Components Upon unpacking your sideboard from it s delivery box, you should have the separate pieces shown below. Follow the steps on the next pages to assemble
ASSEMBLY INSTRUCTIONS DIY WALL BED KIT QUEEN BI FOLD DOOR CABINET & MECHANISM. Tools Required For Assembly. 6.5mm Masonry Drill Bit
 ASSEMBLY INSTRUCTIONS DIY WALL BED KIT QUEEN BI FOLD DOOR CABINET & MECHANISM Tools Required For Assembly No 2 & No 4 Phillips Head Screwdrivers No 2 Slot Head Screwdriver Hammer Electric Drill (Hammer
Bi-Pass And Bi-Fold Sliders
 Bi-Passs and Bi-Fold Sliders Installation Guide Bi-Pass And Bi-Fold Sliders Tools required: Hand Drill Counter Sink Drill BitSet #8 Philips Screw Driver Measuring Tape Level What s Included: Panels with
Sentinel Series Cigar Humidor End Tables
 Sentinel Series Cigar Humidor End Tables Assembly Instructions Models: Sentinel 500, 1000 and 1500 Style: Traditional SENTINEL ASSEMBLY INSTRUCTIONS Congratulations! You have purchased a superior cigar
Left Unit. G. Shelf 1 pc. Small Cam Lock 6 pcs.(+1 extra) Cam Lock Screw 2 pcs.(+1 extra) Cam Lock Screw 6 pcs.(+1 extra)
 Cam Lock Screw 2 pcs.(+1 extra) Cam Lock Screw 6 pcs.(+1 extra)") 88 5180 181 Art & Craft Computer Desk (Cottage Oak) IMPORTANT NOTE Carefully remove all the parts from the carton and put them individually on a soft cloth to prevent scratches or other damages occuring
88 5180 181 Art & Craft Computer Desk (Cottage Oak) IMPORTANT NOTE Carefully remove all the parts from the carton and put them individually on a soft cloth to prevent scratches or other damages occuring
Expandable Bar Cabinet CF4001
 Expandable Bar Cabinet CF4001 Congratulations! You have purchased a stylish piece of Crosley Furniture. We strive to provide fine furniture products, built with quality materials and hand finished details.
GlideRite Retractable Cover System For HotSpring & Tiger River Spas (except Classic & pre-2000 Landmark Spas)
") List of Contents Quantity Description 12 #10 x 1 ½ Flat Head Phillips Screw (see pg. 2) 2 #10 x ½ Pan Head Phillips Screw (see pg. 2) 8 ¼ x 2 ½ Lag Bolt (see pg. 2) 7 ¼ 20 x 5 / 8 Hex Head Bolt (see pg.
List of Contents Quantity Description 12 #10 x 1 ½ Flat Head Phillips Screw (see pg. 2) 2 #10 x ½ Pan Head Phillips Screw (see pg. 2) 8 ¼ x 2 ½ Lag Bolt (see pg. 2) 7 ¼ 20 x 5 / 8 Hex Head Bolt (see pg.
Section 7. Microwave/compact oven... page 185 Microwave/compact oven with warming drawer... page 187. Fridge or freezer option...
 Section 7 Midi tower shelf configurations Cabinet information How the cabinet is supplied... page 176 Additional shelf pack... page 177 Cabinet modifications... page 177 Hints and tips for installation..........................................
INSIDE PANEL NOT SHOWN TO DETAIL ANCHORING SYSTEM
 SIX INCH ALPHA MODULE INSTALLATION KEWAUNEE SCIENTIFIC CORPORATION SIX INCH ALPHA MODULE ANCHORING SYSTEM After Alpha module has been set in desired location. Adjust the four adjustment bolts until the
Thanks for shopping with Improvements! Serena File Cart with Charging Station Item #513376
 Thanks for shopping with Improvements! Serena File Cart with Charging Station Item #513376 Note: Read these instructions carefully before assembling. Tools required: Philips screwdriver (not included).
TOYOTA TUNDRA CARGO DIVIDER Preparation. Part Number: PT
 Preparation Part Number: PT767-34070 Kit Contents 1 1 Divider Screen 2 1 LH Bracket with Warning Label 3 1 RH Bracket without Warning Label NOTE: Part number of this accessory may not be the same as the
B. Side Panel. E. Middle Panel 1 pc. 1 pc. 1 pc. S. Side Rack. 1 pc. T. Base Rack. U. Pipe 3 pcs. M6x35 Head Cap Bolt 14 pcs.
 IMPORTANT 88 5089 95C Kitchen Cart Carefully remove all the parts from the carton and place them individually on a soft cloth to prevent scratches or other damage. Carefully and strictly follow these assembly
OFS ED-6C Instruction Sheet LIGHTGUIDE CROSS-CONNECT Comcode: LGX DISTRIBUTING FRAME INSTALLATION
 OFS ED-6C321-50 636-299-104-01 Instruction Sheet LIGHTGUIDE CROSS-CONNECT Comcode: 845 866 367 LGX DISTRIBUTING FRAME INSTALLATION This instruction sheet is intended for use with the installation of an
Hodedah. HIK 77 L23 5 8'' X D16 6 8'' X H42 1 8''
 HIK 77 L3 5 '' X D6 6 '' X H4 '' PART & HARDWARE LIST 4 7 0 3 3 6 4 5 5 A PLASTIC DOWEL M X 5MM M CAP 4 B CB SCREW M3.5 X MM N 0 MAGNET PLATE C CB SCREW M4 X 5MM O 0 MAGNET D CB SCREW M4 X 35MM P CB M3
Move System Swivel Caster Installation ( )
") Move System Swivel Caster Installation (002-10265-00) Caution Always disconnect power to chair before removing covers or performing any service procedures. Step 1: Remove Top Cover A) Position chair to
Move System Swivel Caster Installation (002-10265-00) Caution Always disconnect power to chair before removing covers or performing any service procedures. Step 1: Remove Top Cover A) Position chair to
Thanks for shopping with Improvements! Stafford Entryway Bench Item #547396
 Thanks for shopping with Improvements! Stafford Entryway Bench Item #547396 Note: Read these instructions carefully before assembling. Tools required: Philips screwdriver (not included) Find a clean, smooth
Northcote Wardrobe with Toy Box Base & Shelf L2988
 Thank you for shopping with GLTC, we hope you enjoy having this product in your home. www.gltc.co.uk Northcote Wardrobe with Toy Box Base & Shelf L2988 We know assembling furniture, toys or accessories
Oslo Storage Cupboard L4157
 Thank you for shopping with GLTC, we hope you enjoy having this product in your home. We know assembling furniture, toys or accessories is not everyone s favourite way to spend their time, so we ve tried
Custom Wood Frame Overlay for Glass Doors Installation Instructions
 MARVEL CUSTOM WOOD FRAME OVERLAY FOR GLASS DOORS Custom Wood Frame Overlay for Glass Doors Installation Instructions Wine Cellars 6SWC 6SWCE 61WC 61WCM 66SWC (2 required) 66SWCE (2 required) Beverage Centers
3 D Printer Enclosure Assembly Instructions
 3 D Printer Enclosure Assembly Instructions Tools Required: 2.5 mm Allen wrench (included) Phillips screwdriver Adjustable Wrench Parts Included: Plexiglas Back with fan and filters installed (29.5 x 35.5
Assembly Instructions Nevins Phone Booth
 Assembly Instructions Nevins Phone Booth Included Hardware Tools Required supplied by installer Drill & Bit Bolt A - (16) 1/4-20 x 1-1/2 hex head Bolt B - (20) 1/4-20 x 2-1/2 phillips head Screw 1 - (24)
DELUXE PRESENTATION CART
 DELUXE PRESENTATION CART MODEL # PRC 250 1 Dear Valued Customer, Although extreme care goes into manufacturing and packing of this package, mistakes are possible. If you encounter any missing parts or
Nantucket Buffet
 88 5022 611 Nantucket Buffet IMPORTANT NOTE Carefully remove all the parts from the carton and put them individually on a soft cloth to prevent scratches or other damages occuring to the wood parts. We
ASSEMBLY INSTRUCTIONS
 ASSEMBLY INSTRUCTIONS ITEM No. :Quilty/ 3 A helpful Assembly Video can be found on www.arrowcabinets.com in the Video Section under Quilty Incorrect Correct The turning direction of attaching The arrow
PUNCTUAL SHELVING SYSTEM ASSEMBLY MANUAL
 PUNCTUAL SHELVING SYSTEM ASSEMBLY MANUAL Needed for assembling PUNCTUAL SHELVING SYSTEM 1x3 ASSEMBLY MANUAL Min. two persons Screw driver Spirit level PUNCTUAL SHELVING SYSTEM 1x3 3 of the box 3 Assembly
Version 1.0. Forbes Credenza File Cabinet.
 Version 1.0 Forbes Credenza File Cabinet www.fantasticfurniture.com.au Enjoy Your purchase from Australia s Best Value Furniture Store www.fantasticfurniture.com.au PAGE 2 Assembly checklist Read through
Therma-Tru Door Gallery Setup Instructions Swing Unit with Hardware Kit - Hardware Part # MADGSWU15 (Swing Unit) Part # MADGHKSU10 (Hardware Kit)
 Part # MADGHKSU10 (Hardware Kit)") Swing Unit with Hardware Kit - Hardware Tools Included: 4mm Allen Wrench, 6mm Allen Wrench, 8mm T-Handle Allen Wrench (1) 3/4" Drill Bit, (1) 7/32" Drill Bit and Hole Template Guide Tools Required: Phillips
Swing Unit with Hardware Kit - Hardware Tools Included: 4mm Allen Wrench, 6mm Allen Wrench, 8mm T-Handle Allen Wrench (1) 3/4" Drill Bit, (1) 7/32" Drill Bit and Hole Template Guide Tools Required: Phillips
Pantry IMPORTANT NOTE
 88 5022 69 Pantry IPORTANT NOTE Carefully remove all the parts from the carton and put them individually on a soft cloth to prevent scratches or other damages occuring to the parts. We have taken great
TV/MEDIA CONSOLE F 1
 F 1 Please review all parts and hardware before disposing of any packaging. Call Customer Service if missing hardware. Do not return to store/retailer. Using a screw that is too long will cause damage.
ARROW LINE DUAL SEWING CENTER
 ARROW LINE DUAL SEWING CENTER (Desk Only) Model Number: 272.98400A90 (Oak) 272,98401.490 (White) Assembly Instructions and Parts List IMPORTANT: Please read these instructions before assembling desk. Assemble
BALTIC WARDROBE 3 DOORS 3 DRAWERS
 BLTI WRROB OORS RWRS 059mm 50mm 764mm Page of 2 Please check all parts before you begin to assemble the item. This to make sure you always use the correct part. Fittings contained in the box. 6 pcs. am
WALL UNIT. Assembly Guide For Internal Use: FI.WR.INS.034_WKIN00124_WALL_ _1Dr_Rev4.indd
 WLL UNIT ssembly uide 150 200 350 400 500 300 450 600 or Internal Use: I.WR.INS.034_WKIN00124_WLL_150-600_1Dr_Rev4.indd WLL UNIT ssembly uide EORE YOU STRT INSTLLTION SHOULD E PERORMED Y OMPETENT PERSON
1 Door Tall Unit ASSEMBLY GUIDE. WARNING: Contains small parts, keep out of reach of children.
 ASSEMBLY GUIDE 1 Door Tall Unit IMPORTANT Before Commencing Assembly: Read all instructions COMPLETELY Ensure all listed parts are present If any parts are missing from Parts List 1, please contact 1800
Thanks for shopping with Improvements! Chapin Secretary Desk Item #398643
 Thanks for shopping with Improvements! Chapin Secretary Desk Item #398643 Note: You will receive this desk in two boxes. To order, call 1-800-642-2112 West Chester, OH 45069 Made in China 1111 If you have
C PART LIST HARDWARE LIST. Kitchen Cart IMPORTANT NOTE
 88 9200 006C Kitchen Cart IMPORTANT NOTE Carefully remove all the parts from the carton and put them individually on a soft cloth to prevent scratches or other damages occuring to the parts. We have taken
IMPORTANT NOTE Do not tighten up all the screws until each part is properly assembled. You should keep Hex Wrench in the safe place as you may need to
 88509995 C Kitchen Center Dear Our Valuable Customers, Please follow our assembly instructions in every step, we guarantee that you will get the perfect merchandise. Thank you so much for purchasing our
Kitchen Island IMPORTANT Carefully remove all the parts from the carton and place them individually on a soft cloth to prevent scratches o
 88 5170 943 Kitchen Island IMPORTANT Carefully remove all the parts from the carton and place them individually on a soft cloth to prevent scratches or other damage. Carefully and strictly follow these
Storage Cabinets 9000 Series Assembly Instructions
 Storage Cabinets 9000 Series Assembly Instructions Thank you for selecting Salsbury s storage cabinets. We are confident that the quality and construction of the cabinets will prove to be a good investment.
D2/367A ASSEMBLY INSTRUCTIONS 6 BAY AV CREDENZA. Salamander 6 Bay AV Credenza [5.17] page 1 of 8
![D2/367A ASSEMBLY INSTRUCTIONS 6 BAY AV CREDENZA. Salamander 6 Bay AV Credenza [5.17] page 1 of 8](/thumbs/88/115215636.jpg "D2/367A ASSEMBLY INSTRUCTIONS 6 BAY AV CREDENZA. Salamander 6 Bay AV Credenza [5.17] page 1 of 8") D2/367 SSEMBLY INSTRUCTIONS 6 BY V CREDENZ Salamander 6 Bay V Credenza 503-232 [5.17] page 1 of 8 hardware B I L C J D K M E ID PRT # DESCRIPTION F G H 303-453 1/4-20 x 4 Head Socket Screw B 300-518 1/4-20
D2/367 SSEMBLY INSTRUCTIONS 6 BY V CREDENZ Salamander 6 Bay V Credenza 503-232 [5.17] page 1 of 8 hardware B I L C J D K M E ID PRT # DESCRIPTION F G H 303-453 1/4-20 x 4 Head Socket Screw B 300-518 1/4-20
Vigilant Cigar Humidor Vault. Assembly Instructions
 Vigilant Cigar Humidor Vault Assembly Instructions Models: 1000, 1500, and 2000 Congratulations! You have purchased a superior cigar humidor. These humidors have been specifically designed to properly
Streamline L-Shaped Desk
 www.teknikoffice.co.uk Teknik For all your newfangled gadgetry. Streamline L-Shaped Desk Model 5414417 NOTE: THIS INSTRUCTION BOOKLET CONTAINS IMPORTANT SAFETY INFORMATION. PLEASE READ AND KEEP FOR FUTURE
2 shelf bookcase. >> assembly instructions. ebony style # BK2SHLFXEB dpci # espresso style # BK2SHLFXES dpci #
 2 shelf bookcase ebony style # BK2SHLFXEB dpci # 249-4-005 espresso style # BK2SHLFXES dpci # 249-4-006 midtone/cherry style # BK2SHLFXMT dpci # 249-4-007 white style # BK2SHLFXWH dpci # 249-4-0050 chestnut
Office Partitions WARNING. Assembly Instructions. Customer Service A S S E M B LY HARDWARE H1 H2 H3 H4 H5 H8 H9 H10 H11 H12
 Customer Service 1-800-645-2986 Assembly Instructions WARNING In order to prevent structural failure, instability, t i p - o v e r, and/or serious injury, please follow i n s t ructions care f u l l y.
GlideRite Retractable Cover System For Hot Spot Spas (SE & SLX only)
") List of Contents Quantity Description 12 #10 x 1 ½ Flat Head Phillips Screw (see pg. 2) 2 #10 x ½ Pan Head Phillips Screw (see pg. 2) 8 ¼ x 2 ½ Lag Bolt (see pg. 2) 7 ¼ 20 x 5 / 8 Hex Head Bolt (see pg.
List of Contents Quantity Description 12 #10 x 1 ½ Flat Head Phillips Screw (see pg. 2) 2 #10 x ½ Pan Head Phillips Screw (see pg. 2) 8 ¼ x 2 ½ Lag Bolt (see pg. 2) 7 ¼ 20 x 5 / 8 Hex Head Bolt (see pg.
Mobile Automotive Cart Assembly
 General Information: The following provides step-by-step instructions for assembling the Mobile Automotive Cart. The finished assembly will consist of the following: (1) Cart bottom shelf, (1) or (2) shelves,
Shop Style Miter Saw Stand Kit
 Quality Power Tool Accessories OWNER S MANUAL Assembled Unit Shown Without Shelves & Wings Assembled With Shelves & Wings Shop Style Miter Saw Stand Kit Model 2850 IMPORTANT Read and understand all safety