Section I. Before You Start deals with numerous considerations which you should be aware of before you start installing Western Red Cedar siding.
|
|
|
- Scott Rogers
- 6 years ago
- Views:
Transcription
1
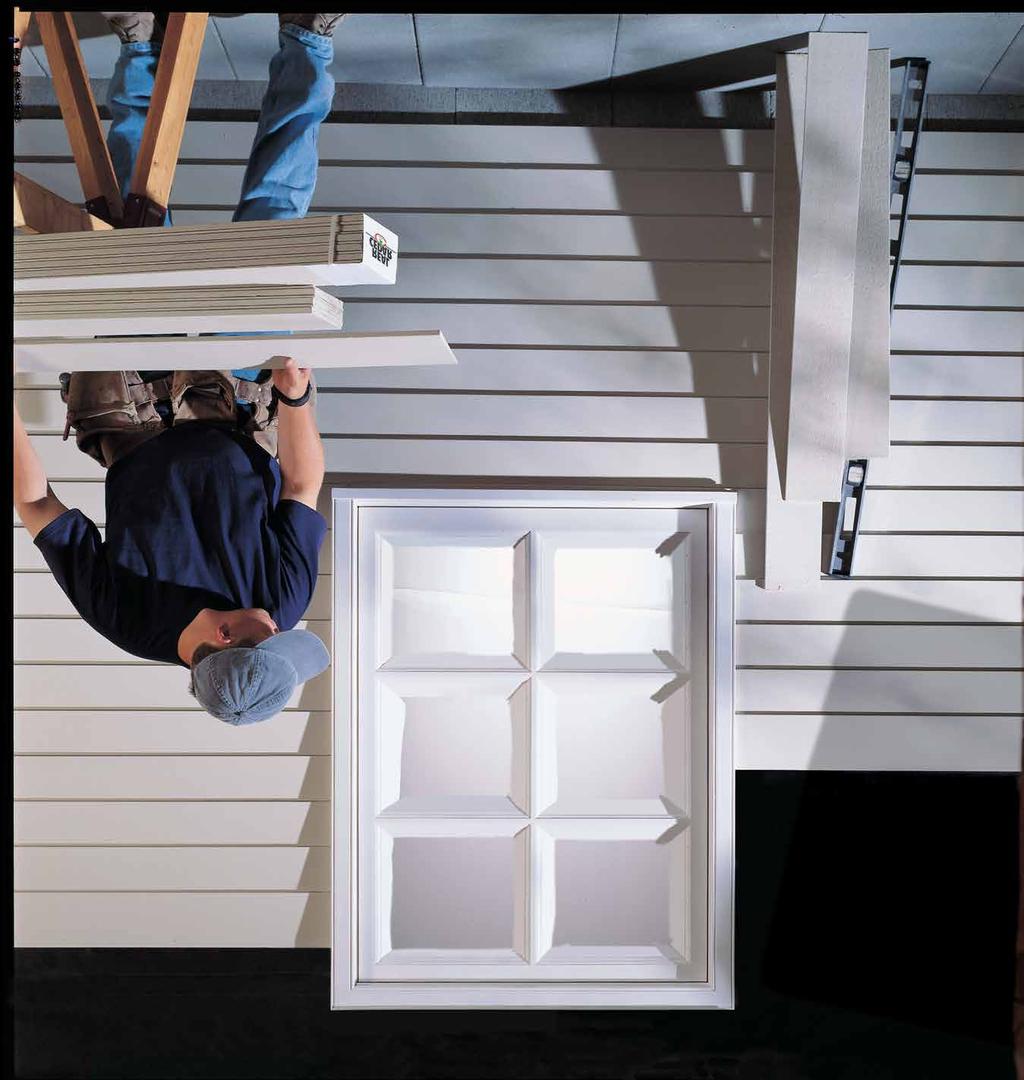
2 INTRODUCTION Congratulations on your choice of Western Red Cedar siding. Western Red Cedar is one of the world s premier quality woods noted for its appearance, durability, light weight, insulation value and dimensional stability. It will provide your home with character and a distinction that other sidings cannot match. Properly installed and finished, it will provide years of low maintenance performance. Before beginning your siding project read this brochure thoroughly it contains useful information to ensure the siding is installed correctly and will perform as intended. This brochure is organized into three sections. Section I. Before You Start deals with numerous considerations which you should be aware of before you start installing Western Red Cedar siding. Section II. Outlines proper installation techniques. Section III. Provides a list of industry best practices for Western Red Cedar siding installation. Note that these are general guidelines that are minimum standards to be followed with confidence in most areas. However, severe local climatic conditions such as extreme heat and dryness; high winds; seacoast exposure; and, areas with wide climatic swings may necessitate additional provisions for the installation of the siding. Your national and local building code requirements always supersede these instructions. 2
3 SECTION I BEFORE YOU START 1. INSPECT MATERIAL Always purchase recognized grades such as those from WRCLA members and ensure you understand the grade of material you ve purchased. Grades are designed for specific appearances and uses. Before installing, be sure the siding you ve selected meets your requirements. Any product found to be damaged or visually unacceptable for any reason should not be installed; if you encounter any such product STOP and call your supplier immediately. 2. ACCLIMATIZE SIDING BEFORE INSTALLING One of the most stable softwoods, Western Red Cedar is nevertheless a natural material and it responds to the environment. Cedar siding can swell or shrink as it gains or loses moisture to reach equilibrium with the moisture content of the surrounding air. Ensuring that the moisture content of cedar siding is at equilibrium before it is installed will minimize movement later on. Recommended moisture content for sidings are given in the table below. BEFORE YOU START 1) To calculate average, test 10% or more of pieces. 2) Source: Wood Handbook The following procedures are suggested for different siding specifications: Kiln Dried Clear Siding Kiln dried siding products are the preferred choice for consistency, stability, paintability and overall performance. These siding products have been dried at the mill to 12-15% moisture content. They are the most ready-to-use of all siding products. If the siding has not been wetted prior to arrival on the job site it may be applied upon arrival except in hot and dry conditions where 3 to 5 days of well ventilated storage away from direct sunlight is generally required. If the siding has been wetted it must be separated and allowed to dry to the local equilibrium moisture content. Dry Knotty Sidings Some knotty sidings are air or kiln dried to less than 19% moisture content. These products should be acclimatized to ambient moisture conditions by stacking the siding face to face on evenly spaced, vertically aligned stickers in a dry storage area for 7-10 days. More time may be required in damp or humid conditions. Green (Unseasoned) Sidings Unseasoned or green sidings have not been dried prior to delivery and require a longer time to acclimatize than seasoned sidings. Separate the siding with vertically aligned stickers, keeping two pieces stacked face to face between stickers and store in a well ventilated dry location for a minimum of 30 days, or longer in damp or humid conditions. If specifying unseasoned siding, patterns such as channel, bevel and board-and-batten are recommended since these allow for shrinkage. Narrower widths are also recommended since they move less overall than wider widths. Note the WRCLA discourages the use of green sidings. 3


4 BEFORE YOU START 3. JOB SITE STORAGE Until installed, Western Red Cedar siding needs protection from direct sunlight, water saturation, snow, ice, dirt, and other elements. Store the siding flat and off the ground on stickers and a vapor barrier so that moisture is not absorbed through the bottom boards of the stack. Protect with a waterproof covering elevated in the center so that water does not pool on the cover. Do not completely seal the bundle, as good air circulation is required. Ideally, the siding should be stored in an enclosed building such as a garage prior to use. 4. FINISH SIDING PRIOR TO INSTALLATION Before installation (job site), applying a finish to all surfaces (including ends) is recommended. Factory applied finishes are best. They ensure the best performance of the finish. The type of coating will be determined by final finish and look selected. The finish protects the wood from moisture absorption and UV degradation, helps prevent staining caused by mildew and extractives and will increase the service life of top coats. Recommended Procedures for Finishing Western Red Cedar Siding WESTERN RED CEDAR SIDING More information about finishing is available on the WRCLA s website and in the How to Finish Western Red Cedar publication. 5. FIELD CUTS Regardless of the time of the year of the installation, all field cuts must be finished. The end grain of all wood products absorbs liquids up to 250 times more rapidly than other wood surfaces. 100% acrylic-latex primer is acceptable as long as it is able to properly cure according to the primer manufacturer s instructions. However, where temperatures drop below 50 degrees Fahrenheit either during application or within the curing period, use an alkyd oil wood primer to coat end grain exposed by jobsite cuts. Siding with end cuts coated with alkyd oil primer can be installed before drying without compromising the coating s effectiveness. Above 50 degrees, a high quality 100% acrylic-latex primer will suffice to coat exposed end grain if allowed to dry before installation. With either primer, follow manufacturer s recommendations. 6. FASTENERS Stainless steel nails are the best choice, especially if the siding is to be finished with transparent, semi-transparent stain or bleaching oil. Use No. 304 stainless for general siding applications and No. 316 for seacoast exposures. 4
5 Hot-dipped galvanized as per ASTM A-153, aluminum and stainless steel fasteners are all corrosion-resistant and all can be used to fasten Western Red Cedar. Other types of fasteners (including electroplated and mechanically galvanized) are not recommended. They can rust and disintegrate and react adversely with the natural preservative present in cedar, resulting in stains and streaks. Type For best result use splitless ring shank siding nails. These have thin shanks and blunt points to reduce splitting. Textured heads should be used to reduce the glossy appearance of the nail head. BEFORE YOU START Hand Nailing is Preferred. Nails should be driven with care into the framing members. To ensure nailing accuracy, run chalk lines to mark framing locations. Heavy nailing distorts the wood and may cause splitting. At mitered corners, near edges and near ends, nail holes may need to be pre-drilled to avoid splitting. Avoid the use of pneumatic nailers if possible. If a pneumatic nailer must be used, reduce the air pressure and tap nails flush. Overdriven nails must be remedied immediately. Fill overdriven nail holes with exterior grade wood putty specifically designed for filling exterior nail holes. Placement Siding should be fastened to each stud or blocking with nails spaced at a maximum of 24 inches on center. Nail placement depends on the siding pattern and width. The key is to fasten the siding securely without preventing it from moving in response to the moisture content in the air. In general, each piece of siding must be nailed independently. Nailing overlapping pieces together restricts the natural movements of each piece and may cause splitting. Size The size of nails to use depends on the type and thickness of siding. Use ring-shank siding nails long enough so that they penetrate solid wood by a minimum of 1 ¼. * Important: For application over foam sheathing, add the thickness of the foam to the tabulated nail length. 5
6 7. CONTROLLING MOISTURE: VAPOR BARRIERS AND BUILDING PAPER BEFORE YOU START Sheathing House Wrap (eg. Tyvek DrainWrap ) Real Cedar Siding Vapor barrier Stud Insulation Strapping Flashing Real Cedar Bandboard Minimum 6 Clearance From Ground Level WESTERN RED CEDAR SIDING 6 High humidity output from washers, dryers, showers, kitchens and other sources, combined with today s energy-efficient construction, can result in a build-up of interior moisture vapor. This vapor migrates through the fabric of a building from the warm interior to the cold exterior, and when it condenses to water can cause structural damage and damage to sidings and finishes. Vapor barriers installed on the warm side of the wall largely prevent the migration of moisture vapor but they are not perfect. Residual vapor must be allowed to escape to the outside. Housewrap installed on the outside face of the sheathing helps prevent rain and snow from penetrating the walls but allows the escape of moisture vapor. The WRCLA recommends the use of rainscreen wall construction (see diagram and related section later in this publication) especially when installing over rigid foam. Proper wall construction includes the use of breathable or gas permeable housewrap (such as DuPont Tyvek DrainWrap ) or building paper and interior vapor barriers. These are extremely effective in helping to prevent moisture problems. 8. WALL CONSTRUCTION Stud Walls Like all siding materials, Western Red Cedar performs best when installed properly on a suitable frame. Cedar siding should be securely nailed to framing members, furring members or to blocking between framing members. Standard stud walls generally require no special preparation for horizontal siding installation. Siding should be nailed into studs or blocking at maximum of 24 inches on center when applied over wood based sheathing and 16 inches on center when siding is installed without sheathing. In instances where an air space between siding and sheathing is desired (see rain screen wall construction), nail siding to furring strips, sheathing and framing. Maximum spacing for furring strips is 16 inches on center. Spacing for furring strips should match the spacing of the studs.
7 Vertical siding applications require horizontal nailers, blocking or other wood framing members spaced no more than 24 inches on center. Check your building code to verify requirements in your area. Lumber Size and Spacing for Blocking and Furring 1 BEFORE YOU START 1. Furring must be securely fastened to studs. 2. Can be used in moist and severe climates to form an air space between siding and sheathing (i.e. rain screen). Rain Screen Construction The basic rainscreen wall configuration, incorporating two layers, or wythes, separated by an air space, has variations that provide different levels of rain protection effectiveness. A distinction should be made between the drained cavity wall, the simple or open rain screen, and the pressure-equalized rain screen wall. What is usually meant by a rain screen wall is generally the latter: an exterior cladding, a cavity behind the cladding, drained and vented to the outside; an inner wall plane incorporating an air barrier; and a set of compartment seals limiting the cavity size. The outer screen layer of cladding deflects the kinetic force of the rain, while the inner wythe remains protected. The vented cavity uses gravity and flashings to drain water that penetrates the outer wall, away from vulnerable surfaces and joints. The cavity is sufficiently wide so that surface tension and capillary action are not able to move water across the cavity. Step by step construction tips for basic rainscreen construction (check with local building codes for the appropriate techniques in your area): 1. Install gas permeable housewrap (such as DuPont Tyvek DrainWrap ) or breathable building paper. 2. Install vertical furring strips. Ensure they are lined up with the studs. 3. Install screen materials under the ends of the furring strips. Fold the screen material over the furring strips and staple to the front of the furring strips. 4. Install Western Red Cedar siding over the furring strips. Masonry Walls Masonry walls require furring strips for horizontal and vertical siding installation. Furring strips must be thick enough to allow for nail penetration of 1 ¼ into solid wood. Structural Insulated Panels (S.I.P.) Structural Insulated Panels require furring strips for horizontal and vertical siding installation. Furring strips must be thick enough to allow for nail penetration of 1¼ into solid wood. Typical Structural Insulated Panels have nominal ½ sheathing. To ensure the appropriate nailing base, furring strips a minimum of ¾ thick should be installed on the outside of the sheathing and breathable building paper at a maximum of 16 inches on center. 7
8 BEFORE YOU START Insulated Concrete Forms (I.C.F.) These systems have no wood component and the foam has no nail holding capacity. As a result, Insulated Concrete Forms require framing of a minimum of 1¼ thick spaced 16 inches on center on the outside of the foam. Note these will need to be securely fastened to the concrete. Rigid Foam Sheathing Rigid foam sheathing has an insulation value superior to that of traditional lumber and plywood sheathings. However, it has no nail holding power and using rigid foam sheathing as a nailing base for cedar siding is not recommended. Follow the nailing recommendations given in this publication as to nail type, positioning, penetration and spacing. Foam sheathing panels vary in moisture permeability but are generally considered good moisture barriers. They should be used with a continuous film vapor retarder on the inside wall under the interior finish. Rigid foam sheathing can cause moisture to accumulate on the back of siding and cause staining, buckling and damage to finish coats. As a result, it is recommended that furring strips are used to create an air space between the sheathing and siding (follow the rainscreen construction method). WESTERN RED CEDAR SIDING Other recommendations that should be followed to minimize potential problems: Thick, narrow siding is more stable than thinner, wider patterns and better able to resist dimensional changes. Use kiln-dried siding over rigid foam sheathing. This is the most stable cedar siding. Proper prefinishing is essential. Use light color finish coats to maximize heat reflection and reduce dimensional movement. In all cases it is strongly recommended that gas permeable house wrap, such as DuPont Tyvek DrainWrap, be applied over the foam sheathing. 8
9 SECTION II INSTALLING WESTERN RED CEDAR SIDING 1. FLASHING Before installing siding, make sure that flashings are installed to prevent moisture from entering wall and roof spaces. Flashing is an important line of defense in controlling moisture in wall assemblies. Flashing intercepts and directs the flow of water away from the building to designed drainage paths. Install horizontal flashing extending from the top of all wall penetrations (i.e. all windows and doors) and at any material or material directional change (i.e. bandboards, water tables or the introduction of any alternative material). The flashing should tilt downward to allow water to drain away from the wall. Siding or trim should be ¼ above the flashing ledge. Do not caulk where the flashing and trim or other materials meet. Note that caulking in lieu of flashing is not acceptable. INSTALLATION Door and Window Flashing The purpose of flashing window and door headers is to intercept water behind the siding and direct it to the outside, and to redirect water flowing down the face of the wall to flow away from the wall opening. Moisture can accumulate behind the siding as a result of: rain penetration through the siding; water vapor diffusion; leakage of moist air from the interior or condensation. Some moisture will drain through the weepholes at the bottom of windows. An additional head trim flashing is required at the head of the window/door to direct water further outward, beyond the thickness of the window Skirt and Bandboards Ensure Minimum of 6 Ground Clearance Ground Level Skirtboard Second Story Bandboard 9

10 INSTALLATION Fascia Flashing The purpose of fascia flashing is to support the shingle edge and to provide a drip edge to prevent water from running back underneath the roofing shingles and down along the fascia and soffit. Preformed eaves flashing/drip edge should be installed under the starter course of the shingle roofing. The extension of flashing supports the edge of shingles. If eavestroughs (rain gutters) are used, the flashing edge also helps to direct the water into troughs. Fascia flashing protects both the soffit and the fascia board, and provides a drip edge at the bottom edge to direct water away from the building. Self adhesive, self healing membrane for ice-dam protection Fascia WESTERN RED CEDAR SIDING Furring Strip Flashing Metal gutter Shingles 2. CAULKING Use high-performance acrylic-latex, acrylic, acrylic-silicone, polyurethane, polysulfide or terpolymer rubber caulks or sealants to seal gaps around windows, doors, corners, and other exterior joints that are exposed to potential water intrusion. Pure silicone and clear caulks do not work well on Western Red Cedar and are not recommended. Caulking is not a permanent solution and as such requires regular maintenance. If not inspected and maintained, caulking may fail and trap water, creating severe moisture problems. Do not rely on it as the only barrier to moisture penetration. Do not caulk areas that will prevent moisture from escaping the wall cavity (e.g., under windows and around flashing). 3. ROOF AND GROUND CLEARANCE Siding and Trim that extends down to a roof (dormers, second floors, etc.) and decks requires a minimum of a 2-inch gap to avoid wicking. Trim, such as water table or skirt boards must be a minimum of 6 inches above the grade. 10
11 4. INSTALLING BEVEL SIDING (ALSO KNOWN AS CLAPBOARDS) Spacing for the siding should be laid out beforehand. The number of board spaces between the soffit and bottom of the lowest piece of siding at the foundation should be such that the overlap is as per the table below. Start with the bottom course using a furring strip to support the lower edge. Each succeeding course overlaps the upper edge of the previous one by a minimum of 1 inch. Rabbeted patterns are self-spacing, but leave ⅛ expansion clearance. Where possible, the bottom of the board that is placed across the top of the windows should coincide with the window cap. INSTALLATION Bevel siding should be face nailed to studs with 1¼ penetration into solid wood using one nail per piece spaced at a maximum of 24 inches on center. Place nail just above the overlap. Take care not to nail through the overlap of two pieces. Do not reduce the siding overlap recommendations given in the installation sections of this publication. Doing so could result in damage from wind-driven water. Use the larger overlaps for unseasoned sidings to allow for shrinkage and expansion. Take care not to overdrive fasteners when using larger overlaps. Butt joints between boards should be staggered and meet on studs. Fit siding snugly to other pieces and to trim. Recommended Overlap * These overlap recommendations must be followed for proper installation. Stud (eg. Tyvek DrainWrap ) Sheathing Overlap undercourse as per Table solid wood 1¼ Stud (eg. Tyvek DrainWrap ) Sheathing Expansion gap 1/8 solid wood 1¼ Start with furring strip 11
 Exterior sheathing Cedar siding up to 6 wide solid wood 1¼ Extra nail Stud (eg.")
12 5. INSTALLING TONGUE AND GROOVE INSTALLATION Stud (eg. Tyvek DrainWrap ) Exterior sheathing solid wood 1¼ Cedar siding up to 6 wide Stud (eg. Tyvek DrainWrap ) Exterior sheathing Cedar siding up to 6 wide solid wood 1¼ Extra nail Stud (eg. Tyvek DrainWrap ) Exterior sheathing solid wood 1¼ Cedar siding (A) 6 and narrower siding in normal climatic conditions (B) 6 and narrower siding in hot, dry, windy or seacoast climates (C) 8 and wider siding Tongue and groove siding can be installed horizontally or vertically. In horizontal application, start at the bottom and work up with the groove edges facing downwards. Siding up to 6 inches wide can be blind nailed with one siding nail per bearing toe-nailed through the base of each tongue. Wider siding should be face nailed using two nails per piece. Nails 1¼ into solid wood. WESTERN RED CEDAR SIDING In vertical application, start at one corner with grooved edge toward the adjacent wall. Use a level or plumb line to ensure that the first board is installed plumb. The grooved edge of the first board may have to be trimmed to ensure a flush fit. Siding is nailed to horizontal blocking lines installed between studs or to furring strips. As with horizontal installation, pieces up to 6 inches can be blind nailed and wider pieces should be face nailed. 6. INSTALLING LAP SIDINGS Stud (eg. Tyvek DrainWrap ) Exterior sheathing Expansion gap 1/8 for dry siding solid wood 1¼ Cedar siding up to 6 wide (A) 6 and narrower lap siding Stud (eg. Tyvek DrainWrap ) Exterior sheathing Expansion gap 1/8 for dry siding solid wood 1¼ Cedar siding (B) 8 and wider lap siding Lap sidings can be installed horizontally or vertically. For horizontal applications, start with the bottom course and work up with the channels pointing upwards. Allow a ⅛ expansion gap between pieces if the siding is air or kiln-dried. Do not nail through overlaps. For siding up to 6 inches wide, use one nail one inch up from the lap. Face nail with two nails per piece for 8 inches patterns and wider, keeping nails 2 ½ to 3 inches apart to allow for dimensional movement without splitting. For vertical applications, siding should be nailed to horizontal blocking or furring strips. 12
13 7. INSTALLING BOARD-AND-BATTEN SIDING (eg. Tyvek Drain- Wrap ) Batten Exterior sheathing Board (eg. Tyvek DrainWrap ) Exterior sheathing Batten Batten overlap minimum ½ INSTALLATION Batten overlap minimum ½ solid wood 1¼. Nails 2½ -3 apart (A) Narrow boards 6 Board solid wood 1¼. Nails 2½ -3 apart (B) Wide boards 8 and wider Board-and-Batten is a vertical pattern created using cedar boards and battens of various widths for a wide range of appearances. For nominal 6 inches boards spaced ½ apart, battens should overlap by a least ½. With wider boards, increase batten overlap proportionately. While there are no set widths for board-and-batten siding, an attractive combination is 1x3 battens with 1x10 boards. Siding should be nailed to horizontal blocking lines or to furring strips. Boards up to 6 inches wide should be fixed with one nail per bearing driven through the center of the board. The overlying batten covering the gap between boards should be attached with one nail per bearing, the shank passing between the edges of the under boards. Use two nails per bearing on boards 8 inches and wider placing the nails 2 ½ to 3 inches apart. 13
14 8. OUTSIDE AND INSIDE CORNERS INSTALLATION There are two main methods used for outside corners. The choice depends primarily on the desired appearance but also the experience and skill of the installer. Mitered corners offer a professional looking finish. They are most commonly used with horizontally applied siding applications such as bevel. Mitered corners require good carpentry skills. They must fit tightly for the full depth of the miter. (eg. Tyvek DrainWrap ) Sheathing (A) Mitered Corners Cedar siding Corner boards are a popular and easier alternative to mitered corners. Thickness of the corner board will depend on the thickness of the siding. The most common are nominal one inch or nominal 5 4 thick. Width is a matter of taste and proper proportion. Corner boards are applied to the sheathing with siding fitting tightly against the narrow edge of the boards, allowing for expansion and an adequate caulking bead. The corner boards and the ends of the siding are nailed to the corner studs, which anchor the wood for a maintenance-free joint. Designing roofs with an eaves overhang to protect corners from weathering also helps ensure trouble-free joints. Always apply primer or stain to end cuts. With corner boards, there is the choice of applying them next to the siding or over top of the siding as shown here. WESTERN RED CEDAR SIDING Provide additional stud to allow for nailing at ends of siding (eg. Tyvek DrainWrap ) Sheathing Caulk joints (B) Corners boards Corner boards Cedar siding Provide additional stud to allow for nailing at ends of siding (eg. Tyvek DrainWrap ) Sheathing Corner boards Cedar siding As in the above illustration, at inside corners, siding is frequently butted against a 2 x 2 trim strip. It can also be butted against adjoining walls with a trim strip used to cover the joint. Caulk joints (C) Trim boards Trim 9. FIELD JOINTS When butt jointing siding, cut ends at 45 degree angles to form an overlapping joint. This is particularly important for vertical installation. Ensure joints meet on studs, blocking or furring strips with the nail penetrating solid wood at least 1¼. 14
15 SECTION III SIDING INSTALLATION QUICK TIPS All installers should learn and follow best practices in order to deliver a better job for their customer and reduce callbacks. DO: Follow local and national building codes. Follow WRCLA installation instructions. Purchase from WRCLA members, distributors and retailers. Use construction techniques to create easy drainage planes to shed water accumulations. Finish Western Red Cedar ASAP! Factory finish or apply coatings prior to installation if possible. Always touch up field cuts. Acclimatize Western Red Cedar siding before you install it. Use the correct fasteners: 304 or 316 grade stainless steel, aluminum, or hot dipped galvanized (as per ASTM A-153). Nail all Western Red Cedar siding into 1¼ of solid wood. Ensure butt joints are made over solid wood to provide secure nailing. Join two pieces of siding with a mitered butt joint. Visit: RealCedar.com or call for more information. QUICK TIPS DO NOT: Allow Western Red Cedar to Weather before applying a finish coating to the Cedar. Use electroplated or mechanical galvanized fasteners that do not conform to ASTM A-153. Install Western Red Cedar siding without acclimatizing. Fasten Western Red Cedar siding only to the sheathing material. Nail through two layers of siding. Fail to finish the end cuts during installation. Attempt to blind nail bevel siding/clapboards. Install or paint over wet siding. Use caulking sealant as a substitute for flashing. Place siding in direct contact with concrete, masonry, top soil, mulch, patios, porches and/or roofs. 15
16 MORE INFORMATION WESTERN RED CEDAR LUMBER ASSOCIATION The Western Red Cedar Lumber Association is an organization of Western Red Cedar producers, distributors and retailers throughout North America. Founded in 1954, the association is known worldwide as the voice of the cedar industry. Its members account for more than 65 percent of the world s production of cedar and have an annual production volume of nearly 1 billion board feet. The mission of the WRCLA is to promote quality Western Red Cedar products and support them with a comprehensive marketing and PR program, technical services, education and training. The WRCLA works closely with architects, designers and builders to ensure the right product is specified and utilized. The association offers extensive resources including installation guides for builders and installers. For more information about the WRCLA and Western Red Cedar siding products, visit our website at RealCedar.com or call Or if you like to DIY on the Fly, download our new Real Cedar Mobile Toolkit app for fast & easy building facts. Available for free from itunes or the Google Play Store. For a list of distributors or affiliated retailers stocking WRCLA member product, visit the Where to Purchase section on RealCedar.com or the Real Cedar Mobile Toolkit. WESTERN RED CEDAR SIDING Produced with the support of NOTICE: THE WESTERN RED CEDAR LUMBER ASSOCIATION (WRCLA) DOES NOT WARRANT THE ACCURACY OF THE INFORMATION HEREIN. THE WRCLA, ITS DIRECTORS, OFFICERS, EMPLOYEES, CONTRACTORS AND AGENTS SHALL NOT BE RESPONSIBLE OR LIABLE FOR ANY CAUSE OF ACTION, LOSS, DAMAGE, INJURY OR DEATH IN ANY WAY CONNECTED WITH THE INFORMATION HEREIN EVEN THOUGH SUCH CAUSE OF ACTION, LOSS, DAMAGE, INJURY OR DEATH ARISES FROM THE NEGLIGENCE OR DEFAULT OF THE WRCLA, ITS DIRECTORS, OFFICERS, EMPLOYEES, CONTRACTORS OR AGENTS. ALWAYS FOLLOW LOCAL AND NATIONAL BUILDING CODES. (July/15)
PANELTEK ENGINEERED SIDING/PANELLING INSTRUCTIONS
 PANELTEK ENGINEERED SIDING/PANELLING INSTRUCTIONS This product can be used for interior and exterior installations. Much of this guide refers to exterior installation, however, many of the construction
INSTALLATION, STORAGE AND WALL CONSTRUCTION DETAILS
 www.capecodsiding.com INSTALLATION, STORAGE AND WALL CONSTRUCTION DETAILS IMPORTANT READ THE FOLLOWING INSTRUCTIONS CAREFULLY BEFORE INSTALLING YOUR WOOD SIDING. FAILURE TO STRICTLY FOLLOW THESE INSTALLATION,
Installation Instructions for Standard Lap and Self-Aligning Lap Siding
 Installation Instructions for Standard Lap and Self-Aligning Lap Siding 7/16 in. Standard Laps Include: All Old Mill Widths, Cedar Shake Lap and Smooth Lap 1/2 in. Self-Aligning Include: 8 in. and 12 in.
PRIMED STRAND REVERSIBLE SHAKE
 PRIMED STRAND REVERSIBLE SHAKE PRIOR TO INSTALLATION Inspect product for any issues before installing (breakage, surface defects, foreign objects). Do not install questionable product. Report any problems
Installation Guide Classic Series Wood Siding
 Installation Guide Classic Series Wood Siding Please read the following instructions prior to beginning your installation. The following installation guidelines have been produced in accordance with the
Installation Guide - Evolution Series Wood Siding
 Installation Guide - Evolution Series Wood Siding The following instructions pertain to the installation of Fraser Wood Siding Evolution Series on a typical wood frame construction allowing for nail penetration
application instructions
 application instructions architectural collection cedar shake 76 series lap siding General At the time of manufacture, siding meets or exceeds the performance standards set forth in Composite Panel Association
Natural Wood Siding. Installation Procedures
 Natural Wood Siding Installation Procedures Priming & Prefinishing Material which has been properly seasoned, stored and handled will often pick up moisture after installation but prior to finishing. Later,
Installation Instructions for Old Mill Shingle and Designer Shake Lap Siding
 Installation Instructions for Old Mill Shingle and Designer Shake Lap Siding Includes: Cove, Craftsmen Staggered, Diamond, Fish Scale, Octagon, Round and Old Mill Shingle Lap Important: Read and understand
Installation Instructions for Panel Siding and Soffit
 Installation Instructions for Panel Siding and Soffit 7/16 in. Panels Include: Sturdy Panel, Square Edge, 3/4 in. Channel and Reverse Board and Batten (RB&B) 1/2 in. Panels Include: Adobe Shiplap and 808
Installation Guide. Shingles. Classical. Shingles. Warning. Storage. Cutting Shingles. Touch-Up. Eastern White Cedar
 Installation Guide Before you begin, take the time to read this entire guide to clearly understand the requirements and steps to follow for proper installation. The Fastening Make shingle fastening simpler
DURABLE, STABLE AND LOW MAINTENANCE SIDING
 Innovation in wood DURABLE, STABLE AND LOW MAINTENANCE SIDING Available from: CREATED FROM SUSTAINABLY SOURCED WOOD AND COMPLETELY NON-TOXIC, ACCOYA IS A REVOLUTION IN WOOD TECHNOLOGY. Toronto train, Canada
Installation Instructions for TruWood Reversible Trim
 Installation Instructions for TruWood Reversible Trim Important: Read and understand all pages of the installation instructions before starting the trim application. For TruWood care and maintenance information,
Shapes Siding. Perfection Shingles. Chalk Line
 Snap a Chalk Line Shapes Siding Perfection Shingles Chalk Line To establish a straight reference line to guide the positioning of the starter strip and the first course of siding, snap a chalk line. starter
INSTALLATION INSTRUCTIONS
 CERBER FIBER CEMENT SIDING - SIERRA PREMIUM SHAKE Construction Requirements Sierra Premium Shake boards must be installed over vertical wood framing spaced no greater than 16 oc. with an APA rated 7/16
LP SmartSide Soffit ON SITE STORAGE PREPARATION. Application Instructions Vented and Non-Vented Smooth Finish or Cedar Texture. General Information
 Application Instructions Vented and Non-Vented Smooth Finish or Cedar Texture A B A - Open / Closed (Page 5) B - Vented (Page 6) ON SITE STORAGE Store off the ground well supported, on a flat well-drained
SIDING INSTALLATION GUIDE
 READ THIS ENTIRE GUIDE CAREFULLY BEFORE INSTALLING NOBELIA SIDING. This installation guide applies to all NOBELIA siding profiles, including SPF tongue-and-groove and exposed nail siding. IMPORTANT: FAILURE
eco-shake INSTALLATION INSTRUCTION
 1 eco-shake INSTALLATION INSTRUCTION NOTE: Shuffling the eco-shakes during installation may be necessary to obtain a uniform color throughout the roof. Due to the natural wood content in the ecoshakes,
Installation Instructions
 Installation Instructions SLICKER CLASSIC RAINSCREEN Page List of Approved Compatible Products 2 Nail Selection Guide 3 General Installation 4 Insulation Board Installation 5 EIFS Installation 6 Top of
Application Instructions
 Application Instructions Architectural Collection, Precision Series & Foundations Soffit GENERAL These soffits can enhance the appearance of almost any roof overhang. The advantages of GOODStyle soffit
Ash Brook Golf Course Scotch Plains, New Jersey
 SECTION 062013 - EXTERIOR FINISH CARPENTRY PART 1 - GENERAL 1.1 RELATED DOCUMENTS A. Drawings and general provisions of the Contract, including General and Supplementary Conditions and Division 01 Specification
COMPOSITE SIDING INSTALLATION GUIDE
 CENTURY HOME LIVING COMPOSITE SIDING INSTALLATION GUIDE Read all instructions prior to installing any siding product. Failure to install and finish this product in accordance with all local building codes,
Installation Instructions
 Installation Instructions SLICKER MAX RAINSCREEN Page List of Approved Compatible Products 2 Nail Selection Guide 3 General Installation 4 Top of Wall Detail 5 Bottom of Wall Detail 6 Wall Corner Detail
NEW HOME WARRANTY A REFERENCE GUIDE FOR TYPICAL WALL AND WINDOW DETAILS (RAINSCREEN SYSTEM) SHOWN AS FIBRE CEMENT CLADDING
 SHOWN AS FIBRE CEMENT CLADDING") NEW HOME WARRANTY A REFERENCE GUIDE FOR TYPICAL WALL AND WINDOW DETAILS (RAINSCREEN SYSTEM) SHOWN AS Reference Guide 0.1 GENERAL 0.1 Reference Guide 0.2 Index 0.3 Disclaimer & Limitations 0.4 General Notes
NEW HOME WARRANTY A REFERENCE GUIDE FOR TYPICAL WALL AND WINDOW DETAILS (RAINSCREEN SYSTEM) SHOWN AS Reference Guide 0.1 GENERAL 0.1 Reference Guide 0.2 Index 0.3 Disclaimer & Limitations 0.4 General Notes
How To Install Windows: Nail-Fin Application
 How To Install Windows: Nail-Fin Application Required Tools & Materials: Materials: 1 3/4" galvanized roofing nails. Nails must penetrate at least 1" into framing For mulled and/or DP50 or above units:
RED DIAMOND SHINGLES Roof Installation Introduction:
 RED DIAMOND SHINGLES Roof Installation Introduction: The guidelines set forth in this manual are intended for use with the application of Red Diamond shingles. Wallaba specie (Eperua Falcata) shingles
SECTION CARPENTRY
 SECTION 06100 CARPENTRY PART 1 GENERAL 1.01 SUMMARY A. Section Includes: Carpentry work including grounds, nailers, blocking, miscellaneous framing, plywood backing panels, plywood sheathing, preservative
A. Rough carpentry includes but is not limited to the following:
 SECTION 06100 ROUGH CARPENTRY PART 1 - GENERAL 1.01 RELATED DOCUMENTS A. Drawings and general provisions of Contract, including General and Supplementary Conditions and Division-1 Specification Sections,
Tapersawn Shake Installation Instructions
 Smart-Shingle TM System Tapersawn Shake Installation Instructions INSTALLATION GUIDE MARKS Shake-Strip 0 1 2 3 4 5 6 7 8 9 10 11 12 13 14 15 16 17 18 19 20 21 22 23 24 25 26 27 28 29 30 31 32 33 34 35
INSTALLATION INSTRUCTIONS for Wood/Clad Wood Windows without Exterior Trim or Nailing Fin (JII025) ImpOrTaNT INFOrmaTION & GlOssary.
 ImpOrTaNT INFOrmaTION & GlOssary.") for Wood/Clad Wood Windows without Exterior Trim or Nailing Fin (JII025) Thank you for selecting JELD -WEN products. Attached are JELD-WEN s recommended installation instructions for metal clad wood windows
for Wood/Clad Wood Windows without Exterior Trim or Nailing Fin (JII025) Thank you for selecting JELD -WEN products. Attached are JELD-WEN s recommended installation instructions for metal clad wood windows
(773) INSTALLATION INSTRUCTIONS for Vinyl Windows with Integral Nailing Fin (JII001) IMPORTANT INFORMATION & GL OSSARY ROUGH OPENINGS
 INSTALLATION INSTRUCTIONS for Vinyl Windows with Integral Nailing Fin (JII001) IMPORTANT INFORMATION & GL OSSARY ROUGH OPENINGS") Thank you for selecting C l i m a t e G u a r d products. Attached are our recommended installation instructions for Vinyl windows with an integral (2400-02) will not affect application of the ClimateGuard
Thank you for selecting C l i m a t e G u a r d products. Attached are our recommended installation instructions for Vinyl windows with an integral (2400-02) will not affect application of the ClimateGuard
EXTERIOR NEW WALL CONSTRUCTION
 EXTERIOR NEW WALL CONSTRUCTION 4 Design and Application Details The instructions given here are not meant to supercede local code requirements. Check with your local building official for their preference
INSTALLATION INSTRUCTIONS for Vinyl Windows with Integral Nailing Fin (JII001) IMPORTANT INFORMATION & GLOSSARY ROUGH OPENINGS
 IMPORTANT INFORMATION & GLOSSARY ROUGH OPENINGS") Thank you for selecting JELD-WEN products. Attached are JELD-WEN s recommended installation instructions for Vinyl windows with an integral nailing fin. While the use of these installation instructions
Thank you for selecting JELD-WEN products. Attached are JELD-WEN s recommended installation instructions for Vinyl windows with an integral nailing fin. While the use of these installation instructions
E-Z BUILD SHED GUIDE 12' 12' 12' 16' 12' 20'
 E-Z BUILD SHED GUIDE 12' 12' 12' 16' 12' 20' BUILD You can construct your own E-Z frame shed with the help of this step by step guide. North American softwood dimensional lumber sizes: Nominal Actual in
INSTALLATION INSTRUCTIONS for Vinyl Windows with Integral Nailing Fin (JII001)
") Thank you for selecting JELD-WEN products. Attached are JELD-WEN s recommended installation instructions for Vinyl windows with an integral nailing fin. While the use of these installation instructions
Thank you for selecting JELD-WEN products. Attached are JELD-WEN s recommended installation instructions for Vinyl windows with an integral nailing fin. While the use of these installation instructions
Sun Windows General Information New Construction Sliding Door Installation Instructions H F
 A G B D C H F H E H A. Apply Weather Resistive Barrier B. Apply Bottom Flashing Tape C. Install Sill Pan End Caps & Pan D. Caulk Sides & Top Nailing Surface, Set Door, Fasten E. Apply Side Flashing Tape
Slate Shingle Specifications
 Slate Shingle Specifications California Slate is a proud member of the Slate Roofing Contractors Association of North America, Inc. (SRCA) which publishes Section 07310 Slate Shingles setting forth architectural
A. All trim that has been damages, broken, or missing shall be repaired or replaced with material of the same size, shape, and type.
 SECTION 062000 - FINISH CARPENTRY PART 1 - GENERAL 1.1 SECTION REQUIREMENTS A. All trim that has been damages, broken, or missing shall be repaired or replaced with material of the same size, shape, and
PREMIUM LAMINATED ASPHALT SHINGLES Dallas, TX Tuscaloosa, AL Phillipsburg, KS
 Application Instructions for FORMERLY 50 THESE ARE THE MANUFACTURER S APPLICATION INSTRUCTIONS FOR THE ROOFING CONDITIONS DESCRIBED. TAMKO BUILDING PRODUCTS, INC. ASSUMES NO RESPONSIBILITY FOR LEAKS OR
1 Exam Prep NRCA Roofing Manual: Steep-Slope Roof Systems 2013 Tabs and Highlights
 1 Exam Prep NRCA Roofing Manual: Steep-Slope Roof Systems 2013 Tabs and s These 1 Exam Prep Tabs are based on the National Roofing Contractors Association (NRCA) manual listed below: Steep-Slope Roof Systems
Sun Windows General Information New Construction Hinged Door Installation Instructions
 A G H F H H A. Apply Weather Resistive Barrier B. Apply Bottom Flashing Tape C. Install Sill Pan End Caps & Pan D. Caulk Sides & Top Nailing Surface, Set Door, Fasten E. Apply Side Flashing Tape F. Apply
DIVISION 6 WOOD AND PLASTICS
 DIVISION 6 WOOD AND PLASTICS PART 1 - GENERAL 1.01 SUMMARY A. This Section includes the following: 1. Wood framing. 2. Wood supports. 3. Wood blocking. 4. Wood cants. 5. Wood nailers. 6. Wood furring.
Inspire Aledora Slate Application Guidelines
 July 2014 Inspire Aledora Slate Application Guidelines Only Basic Roofing Tools Required Hand fastened or fastened with a pneumatic nail gun Utility knife or a standard circular saw Tape measure, pry bar,
Table of Contents. Notes to Designer/User Map of Typical Roof Conditions Fastener Placement Fastener Selection...
 Table of Contents Section Page Notes to Designer/User... 2-3 Map of Typical Roof Conditions... 4 Fastener Placement... 5 Fastener Selection... 6 Ridge/Hip Flashing... 7 Valley Flashing... 8 Eave Flashings...
SG-30 A P P L I C A T I O N I N S T R U C T I O N S. Directions For Application
 1 2 3 General Instructions NOTICE: THESE SHINGLES MUST BE APPLIED TO CONFORM WITH ALL APPLICABLE BUILDING CODES. THESE DIRECTIONS REPRESENT COMMON AND ACCEPTED ROOFING PRACTICES. DEVIATIONS FROM THESE
Turada Hardwood Shingles and Shakes Installation instructions
 1. General 1.1 Maximum Exposure: Maximum exposure for wood shingles and shakes shall comply with Table 1 herein, unless specifically specified in the roof assemblies Product Approval. 1.2 Solid and Spaced
ForceField Air & Water Barrier System. installation instructions
 ForceField Air & Water Barrier System installation instructions Protection and Performance inside and out The ForceField air and water barrier system consists of engineered wood sheathing panels laminated
3-Tab Shingle Instructions DURA-SEAL 20 DURA-SEAL 25
 3-Tab Shingle Instructions DURA-SEAL 20 DURA-SEAL 25 1 Directions For Applying Malarkey 3-Tab Shingles GENERAL INSTRUCTIONS Install Malarkey 3-tab shingles according to building code and local amendments.
ROOFING APPLICATION STANDARD (RAS) No. 115 STANDARD PROCEDURES FOR ASPHALTIC SHINGLE INSTALLATION
 No. 115 STANDARD PROCEDURES FOR ASPHALTIC SHINGLE INSTALLATION") ROOFING APPLICATION STANDARD (RAS) No. 115 STANDARD PROCEDURES FOR ASPHALTIC SHINGLE INSTALLATION 1. Scope 4. Underlayment 2. 1.1 This roofing application standard has been developed to provide a responsive
ROOFING APPLICATION STANDARD (RAS) No. 115 STANDARD PROCEDURES FOR ASPHALTIC SHINGLE INSTALLATION 1. Scope 4. Underlayment 2. 1.1 This roofing application standard has been developed to provide a responsive
Installation Guidelines For Quaker Window Products Aluminum flange fin sub sill & receptor system using a T mulled twin window unit.
 Installation Guidelines For Quaker Window Products Aluminum flange fin sub sill & receptor system using a T mulled twin window unit. Installer: Read these instructions completely before starting any installation.
ROOFING APPLICATION STANDARD (RAS) No. 115 STANDARD PROCEDURES FOR ASPHALTIC SHINGLE INSTALLATION
 No. 115 STANDARD PROCEDURES FOR ASPHALTIC SHINGLE INSTALLATION") ROOFING APPLICATION STANDARD (RAS) No. 115 STANDARD PROCEDURES FOR ASPHALTIC SHINGLE INSTALLATION 1. Scope 4. Underlayment 2. 1.1 This roofing application standard has been developed to provide a responsive
ROOFING APPLICATION STANDARD (RAS) No. 115 STANDARD PROCEDURES FOR ASPHALTIC SHINGLE INSTALLATION 1. Scope 4. Underlayment 2. 1.1 This roofing application standard has been developed to provide a responsive
StormMaster Slate General Instructions 1.) GENERAL INSTRUCTIONS 2.) ROOF DECK VENTILATION 3.) ROOF DECK
 GENERAL INSTRUCTIONS 2.) ROOF DECK VENTILATION 3.) ROOF DECK") StormMaster Slate General Instructions IMPORTANT: THE STATEMENTS EXPRESSED ON THIS PAGE ARE THE RECOMMENDATIONS FOR THE APPLICATION OF THE ROOFING PRODUCTS AS OUTLINED AND ILLUSTRATED. ANY DEVIATION FROM
StormMaster Slate General Instructions IMPORTANT: THE STATEMENTS EXPRESSED ON THIS PAGE ARE THE RECOMMENDATIONS FOR THE APPLICATION OF THE ROOFING PRODUCTS AS OUTLINED AND ILLUSTRATED. ANY DEVIATION FROM
Effective February, 2015
 Effective February, 2015 Table of Contents Ensuring System Performance 1 Components 2 Frequently Asked Questions 3 List of Tools 3 Before you Begin Preparation 3 Quality Tips 4 Cold Weather Tips 4 Cleaning
AIA Specification. Section Slate Shingles PART 1 GENERAL
 AIA Specification Section 07315 Slate Shingles PART 1 GENERAL 1.1 RELATED DOCUMENTS A. Drawings and general provisions of the Contract, including General and Supplementary Conditions and Division 1 Specification
Inspire Slate Starter Piece Hip and Ridge. 13 1/2" Height: 13 ½" Width: 12" Squares/ Pallet. Bundles/ Square
 December 2017 Classic Slate Application Guidelines Only Basic Roofing Tools Required Hand fastened or fastened with a pneumatic nail gun Utility knife or a standard circular saw Tape measure, pry bar,
INSTALLATION INSTRUCTIONS for Wood/Clad Wood Windows with Exterior Trim or Nail Fin (JII024)
") Thank you for selecting JELD-WEN products. Attached are JELD-WEN s recommended installation instructions for metal clad wood windows with nailing fin or primed wood windows with exterior trim. While the
Thank you for selecting JELD-WEN products. Attached are JELD-WEN s recommended installation instructions for metal clad wood windows with nailing fin or primed wood windows with exterior trim. While the
HERITAGE LAMINATED ASPHALT SHINGLES Frederick, MD
 Application Instructions for FORMERLY 30 THESE ARE THE MANUFACTURER S APPLICATION INSTRUCTIONS FOR THE ROOFING CONDITIONS DESCRIBED. TAMKO BUILDING PRODUCTS, INC. ASSUMES NO RESPONSIBILITY FOR LEAKS OR
Tools required by installer: Materials required by installer:
 Installation Guidelines For Quaker Window Products Vinyl product line (Single Hung, Double Hung, Sliding Window, Fixed Window, Casement, Awning, and Hopper) Installer: Read these instructions completely
Installation Guide Maibec Resistech Panel, Shingle Strips and Trims Solid Colours
 TM Maibec Resistech Panel, Shingle Strips and Trims Solid Colours TM Maibec Resistech Panel, Shingle Strips and Trims Solid Colours This installation guide applies to the installation of Maibec Resistech
APPLICATION INSTRUCTIONS FOR DINGEWOOD SIDING
 APPLICATION INSTRUCTIONS FOR DINGEWOOD SIDING SQUARE FOOTAGE Customers should plan on ordering 10-20% more wood because wood is, by nature, imperfect. Prefinished wood will come pre-stained, but wood planks
Best Materials LLC distributes backer rod, caulking and sealants for all types of EIFS joints and penetration sealing applications.
 Best Materials LLC distributes backer rod, caulking and sealants for all types of EIFS joints and penetration sealing applications. EXTERIOR INSULATION & FINISH SYSTEM CONSTRUCTION Data Published Courtesy
INSTALLATION INSTRUCTIONS for Wood Bay or Bow Windows with Nailing Fin or Exterior Trim (JII032)
") for Wood Bay or Bow Windows with Nailing Fin or Exterior Trim (JII0) Thank you for selecting JELD-WEN products. Attached are JELD-WEN s recommended installation instructions for wood and clad wood bay
for Wood Bay or Bow Windows with Nailing Fin or Exterior Trim (JII0) Thank you for selecting JELD-WEN products. Attached are JELD-WEN s recommended installation instructions for wood and clad wood bay
Installation Instructions
 Installation Instructions ROLL VENT STANDARD / METRIC Page Installation Considerations 3 Roll Vent Standard General Installation 4 Roll Vent Metric General Installation 5 Steep Pitch Guidelines 6 Asphalt
Brava Old World Slate Installation Guide
 Brava Old World Slate Installation Guide Brava Roof Tile Phone: 844-290-4196 www.bravarooftile.com This document includes the recommended and suggested installation procedures for Brava Old World Slate
SmartVent Eave Edge Installation Instructions
 SmartVent Eave Edge Installation Instructions STEP 1: Cut a slit 1 wide (or a series of 1 ¾ holes at 3 on center) into the roof decking 6 to 7 up from the drip edge. SmartVent is rated 9NFA. Ensure drip
Certified Kiln Dried Siding Patterns and Applications
 Certified Kiln Dried Siding Patterns and Applications Redwood is synonymous with quality architecture. No other siding material adds value to a home or commercial building like redwood. The value of redwood
PROJECT INSTRUCTIONS Roofing
 PROJECT INSTRUCTIONS Roofing This handout outlines some basic regulations contained within the 2015 Minnesota State Building Code, as well as other good building practices. However, this handout is not
KuraStone TM Installation Guide
 Installation Guide Read these installation guidelines completely and thoroughly before beginning installation. Construction Requirements KuraStone pieces can be installed on braced wood or steel stud (18
STEEL FRAMING WEATHERBOARD SYSTEM
 T A R A NAK IPINE STEEL FRAMING WEATHERBOARD SYSTEM Installation information and technical drawings TIMBER WEATHERBOARDS NATURALLY BETTER FOR MORE THAN A CENTURY www.taranakipine.co.nz T A R ANAKIPINE
Installation Guidelines For ALUMINUM M-SERIES 3 PANEL SLIDING DOOR
 www.quakerwindows.comv www.quakercommercialwindows.com PO Box 128 504 Highway 63 South Freeburg, MO 65035 800-347-0438 573-469-4151 (fax) Installation Guidelines For ALUMINUM M-SERIES 3 PANEL SLIDING DOOR
Installation Guidelines
 Installation Guidelines Tando Building Products provides these instructions as general guidelines only. Tando Building Products neither installs exterior cladding nor has any control over any installation.
Installation Instructions for Siding
 Smart-Shingle TM System "The new smart way to install cedar shingles." - This Old House Installation Instructions for Siding V3.2 INSTALLATION GUIDE MARKS Shingle-Strip 0 1 2 3 4 5 6 7 8 9 10 11 12 13
CONTENTS. Transitions Board and Batten Vertical Installation... 10,11
 INSTALLATION MANUAL CONTENTS Important Notes... 2-4 Weather Protective Barriers... 2 Storage and Transportation... 2 Tools and Equipment... 2 Fastener Choices... 3 Wall Preparation... 3,4 Flashing... 4
The Beauty Of Wood. Made Better. Product Specifications LPZB0590
 The Beauty Of Wood. Made Better. Product Specifications LPZB0590 LP SmartSide Trim Specifications Reversible Two Premium Looks The natural look of cedar on one side and smooth on the other Interior or
A P P L I C A T I O N I N S T R U C T I O N S
 1 2 3 General Instructions NOTICE: THESE SHINGLES MUST BE APPLIED TO CONFORM WITH ALL APPLICABLE BUILDING CODES. THESE DIRECTIONS REPRESENT COMMON AND ACCEPTED ROOFING PRACTICES. DEVIATIONS FROM THESE
Norwood Windows Permaglass Fiberglass Products Installation Instruction
 Norwood Windows Permaglass Fiberglass Products Installation Instruction Care and storage of fiberglass windows: Fiberglass products purchased from Norwood Windows must be stored in a dry sheltered area
DIRECTIONS FOR APPLICATION
 Instructions 1 General NOTICE: THESE SHINGLES MUST BE APPLIED TO CONFORM WITH ALL APPLICABLE BUILDING CODES. THESE DIRECTIONS REPRESENT COMMON AND ACCEPTED ROOFING PRACTICES. DEVIATIONS FROM THESE DIRECTIONS
Installation Instructions Split Shake, Staggered Shake, Shingle, Perfection Shingle, and Shapes
 Installation Instructions Split Shake, Staggered Shake, Shingle, Perfection Shingle, and Shapes General Guidelines These instructions show one type of installation and are intended for the professional
SECTION LAP SIDING. A. Fiber cement lap siding, panels, single, trim, fascia, moulding and accessories.
 SECTION 07460 LAP SIDING PART 1 GENERAL 1.1 SECTION INCLUDES A. Fiber cement lap siding, panels, single, trim, fascia, moulding and accessories. B. Factory-finished fiber cement lap siding, panels, single,
Barrel Vault Counter Batten and Batten
 Barrel Vault Counter Batten and Batten INSTALLATION GUIDE www.gerardusa.com INSTALLATION NOTIFICATION The installation procedures demonstrated in this manual are recommended methods for the installation
PREMIUM LAMINATED ASPHALT SHINGLES Frederick, MD
 Application Instructions for FORMERLY 50 THESE ARE THE MANUFACTURER S APPLICATION INSTRUCTIONS FOR THE ROOFING CONDITIONS DESCRIBED. TAMKO BUILDING PRODUCTS, INC. ASSUMES NO RESPONSIBILITY FOR LEAKS OR
F-WAVE REVIA SYNTHETIC ROOFING SHINGLES
 F-WAVE REVIA SYNTHETIC ROOFING SHINGLES Installation Manual for Steep-Slope Residential Installations For support with all other Steep-Slope Installations, please call F-Wave Technical Support at 888-GO-FWAVE.
INSTALLATION GUIDE SAVANNAH SMOOTH & SIERRA PREMIUM SHAKE
 INSTALLATION GUIDE SAVANNAH SMOOTH & 1 NICHIHA INSTALLATION GUIDE FOR SAVANNAH SMOOTH & GENERAL INSTRUCTIONS FOR SAVANNAH SMOOTH & CONSTRUCTION REQUIREMENTS Savannah Smooth and Sierra Premium Shake boards
ROOFING APPLICATION STANDARD (RAS) No. 130 INSTALLATION CRITERIA FOR WOOD SHINGLES AND SHAKES APPLICATION
 No. 130 INSTALLATION CRITERIA FOR WOOD SHINGLES AND SHAKES APPLICATION") ROOFING APPLICATION STANDARD (RAS) No. 130 INSTALLATION CRITERIA FOR WOOD SHINGLES AND SHAKES APPLICATION 1. 2. 3. Scope 1.1 This application standard provides the minimum installation criteria for wood
ROOFING APPLICATION STANDARD (RAS) No. 130 INSTALLATION CRITERIA FOR WOOD SHINGLES AND SHAKES APPLICATION 1. 2. 3. Scope 1.1 This application standard provides the minimum installation criteria for wood
TECHNICAL GUIDE BEONSTONE PANELIZED STONE SIDING
 TECHNICAL GUIDE BEONSTONE PANELIZED STONE SIDING TABLE OF CONTENTS This installation guide provides detailed step-by-step instructions for do-it-yourself projects. We invite you to read it carefully and
With Illustrations, Drawings & Step By Step Details. Click Here To Download 12,000 Shed Plans. 1 P a g e Download 12,000 More Shed Plans
 With Illustrations, Drawings & Step By Step Details Click Here To Download 12,000 Shed Plans 1 P a g e Download 12,000 More Shed Plans Table of Contents OVERVIEW... 3 MATERIALS & CUTTING LISTS... 4 DRAWINGS,
DIRECTIONS FOR APPLICATION
 Instructions 1 General NOTICE: THESE SHINGLES MUST BE APPLIED TO CONFORM WITH ALL APPLICABLE BUILDING CODES. THESE DIRECTIONS REPRESENT COMMON AND ACCEPTED ROOFING PRACTICES. DEVIATIONS FROM THESE DIRECTIONS
GlassMaster General Instructions - Ardmore, OK & Hampton, GA <br /> Atlas Roofing
 GlassMaster General Instructions - Ardmore, OK & Hampton, GA (For Metric Size Franklin, OH Instructions Click Here) IMPORTANT: THE STATEMENTS EXPRESSED ON THIS WRAPPER ARE THE RECOMMENDATIONS FOR THE APPLICATION
BARRELL VAULT BATTENLESS
 i BARRELL VAULT BATTENLESS INSTALLATION GUIDE INSTALLATION NOTIFICATION The installation procedures demonstrated in this manual are recommended methods for the installation of the Gerard Barrel Vault battenless
Five Star Panel Installation Instructions
 Five Star Panel Installation Instructions How to Store Five Star Panels You will need to store FIVE STAR PANELS in dry place to prevent staining, deterioration and possibly void all warranties. Stand the
SECTION PVC THATCH SHINGLE ROOFING SYSTEM PART 1 GENERAL 1.01 SUMMARY
 SECTION 07312 PVC THATCH SHINGLE ROOFING SYSTEM PART 1 GENERAL 1.01 SUMMARY A. This Section Includes the following: 1. Endureed Dominica PVC thatch shingles. 2. Self- adhering sheet underlayment. B. Related
SECTION ROUGH CARPENTRY
 SECTION 06 10 00- ROUGH CARPENTRY PART 1 - GENERAL 1.1 RELATED DOCUMENTS A. Drawings and general provisions of the Contract, including Contracting Requirements and Division 1 Specification Sections, apply
Tuff-Rib Install Guide
 Install Guide bestbuymetalroof.com Page 2 of 27 Page 3 of 27 1. Page 4 2. a. Installation Guide b. Panel Squaring Pages 5, 6 Pages 7, 8 3. Pages 9, 10 4. a. Fascia (optional) b. Eave / 1.5x3.5 Angle c.
A REFERENCE GUIDE OF TYPICAL RAINSCREEN WALL AND WINDOW DETAILS
 WARRANTY PROVIDER ACCEPTED A REFERENCE GUIDE OF TYPICAL RAINSCREEN WALL AND WINDOW DETAILS Per: 2006 B.C.B.C. Part 9 DISCLAIMER THE INFORMATION CONTAINED IN THIS DOCUMENT REPRESENTS CURRENT WOOD FRAME
1 Roof Substrate (Deck) OWENS CORNING BERKSHIRE SHINGLES INSTALLATION INSTRUCTIONS
 OWENS CORNING BERKSHIRE SHINGLES INSTALLATION INSTRUCTIONS") General This Installation Instruction document for Owens Corning Berkshire roofing shingles is to be read in conjunction with the Installation information printed on each packet of shingles along with
General This Installation Instruction document for Owens Corning Berkshire roofing shingles is to be read in conjunction with the Installation information printed on each packet of shingles along with
BARDOLINE INSTALLATION INSTRUCTIONS
 BARDOLINE INSTALLATION INSTRUCTIONS www.onduline.com CONTENTS General conditions Material requirements Terms Estimating shingle requirements Roof preparation Shingle application 9 GENERAL CONDITIONS ONDULINE
Installation Guide. Cedar Shake. Distributed by: BEST MATERIALS LLC, Phoenx AZ
 RPM ROOFING Installation Guide Cedar Shake Distributed by: BEST MATERIALS LLC, Phoenx AZ 602-272-8128 800-474-7570 www.bestmaterials.com Table of Contents OVERVIEW... 1 CAUTION... 1 DISCLAIMER... 1 PRODUCT
WEB BASED CORE APPLICATION SPECIFIC INSTALLATION INFORMATION AND METHODS
 CORE WEB BASED CORE APPLICATION SPECIFIC INSTALLATION INFORMATION AND METHODS Proper Window & Door Flashing Although all possible measures have been taken to insure the accuracy of the material presented,
With Illustrations, Drawings & Step By Step Details. Click Here To Download 12,000 Shed Plans. 1 P a g e Download 12,000 More Shed Plans
 With Illustrations, Drawings & Step By Step Details Click Here To Download 12,000 Shed Plans 1 P a g e Download 12,000 More Shed Plans Table of Contents OVERVIEW... 3 MATERIALS & CUTTING LISTS... 4 DRAWINGS,
DIRECTIONS FOR APPLICATION
 Instructions 1 General NOTICE: THESE SHINGLES MUST BE APPLIED TO CONFORM WITH ALL APPLICABLE BUILDING CODES. THESE DIRECTIONS REPRESENT COMMON AND ACCEPTED ROOFING PRACTICES. DEVIATIONS FROM THESE DIRECTIONS