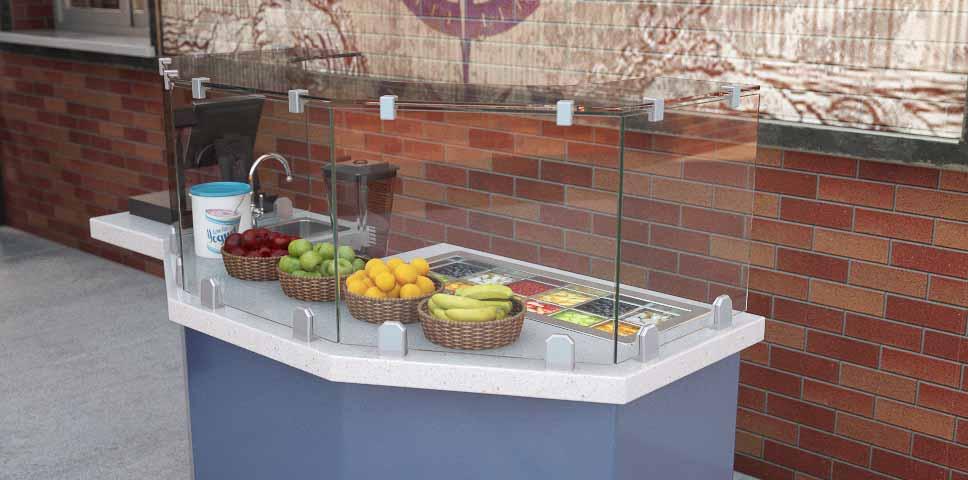
CAPTUR COMPONENTS. We make food look better.
|
|
|
- Tyler McKenzie
- 6 years ago
- Views:
Transcription

1 CAPTUR COMPONENTS
2 TOP EDGE GLASS CONNECTORS GCA6 6mm (1/4") Glass GCA10 10mm (3/8") Glass TOP BOTTOM mm GLASS GC906 6mm (1/4") Glass 10mm GLASS GC mm (3/8") Glass Adjustable Angle Edge Clamp - Adjusts from 0 to 200 degrees - For flat tempered glass mm FLAT GLASS 90 Angle Edge Clamp - For flat tempered glass PAGE 01
3 TOP EDGE GLASS CONNECTORS GC1806 6mm (1/4") Glass GC mm (3/8") Glass FRONT BACK 6mm FLAT GLASS GCT mm (1/4") Glass GCT mm (3/8") Glass 180 Angle Edge Clamp - For flat tempered glass mm FLAT GLASS 3-Way Tee Edge Clamp - For 6mm and 10mm flat tempered glass PAGE 02
4 EDGE GLASS CONNECTORS GC6161 6mm TOP mm VERTICAL mm FLAT GLASS mm FLAT GLASS 90 Glass Joiner - For 6mm to 6mm flat tempered glass connection GC mm TOP mm VERTICAL mm FLAT GLASS 90 Glass Joiner - For 6mm to 10mm flat tempered glass connection PAGE 03
5 EDGE GLASS CONNECTORS GC mm TOP mm VERTICAL 90 Glass Joiner - For 10mm to 10mm flat tempered glass connection GC mm TOP mm FLAT GLASS 6mm VERTICAL 10mm TOP TYP (2) PLACES Tee Glass Joiner - For 10mm to 6mm flat tempered glass connection PAGE 04
6 EDGE GLASS CONNECTORS GC mm TOP mm VERTICAL 10mm TOP GCSK2 6mm (1/4") Vertical 0.69 FLAT GLASS GCSK1 10mm (3/8") Vertical 0.69 FLAT GLASS Tee Glass Joiner - For 10mm to 6mm flat tempered glass connection mm FLAT GLASS Shelf Kit Bracket - For addition of tempered glass shelf - For use with 6mm tempered glass vertical panels - GCSK2 - For use with 10mm tempered glass vertical panels - GCSK1-6mm shelf requires (2) 1/2" dia. drilled holes at each bracket location - 10mm shelf requires (2) 1/2" dia. drilled holes at each bracket location - Max. recommended glass shelf depth is 10" - Max. spacing between brackets is 30" centerline - Fasteners included for both 6mm and 10mm thickness shelf glass PAGE 05
7 BOTTOM EDGE GLASS CONNECTORS GCSK3 10mm SHELF VERTICAL 1.03 (REF) 1.60 FLAT GLASS Shelf Kit Bracket - For addition of intermediate 10mm tempered glass shelf - For use with tempered glass vertical panels - Fasteners provided for both 6mm and 10mm vertical glass - Vertical panels require 1/2" dia. drilled hole in glass for bracket attachment - Maximum shelf span (length) is 54" - Includes nylon tipped set screw GCAB FLAT GLASS FLAT GLASS Shelf Kit Bracket - For addition of intermediate tempered glass shelf - For use with tempered glass vertical panels - Fasteners included for both 6mm and 10mm glass - All glass panels require 1/2" dia. drilled holes in glass for bracket attachment - Maximum distance between GCAB brackets along the front glass edge is 36" for 6mm glass and 54" for 10mm glass. See Pg. 16 for reference. PAGE 06
8 BOTTOM EDGE GLASS CONNECTORS GC6 6mm (1/4") Glass GC7 6mm (1/4") Bent Tempered Glass with a 40" Minimum Radius 6mm Base Glass Clamp - For 6mm tempered glass panels - Bottom-mount w/ (2) 1/4-20 machine studs - Surface mount w/ (2) #10 FH wood screws or FH sheet metal screws FRONT GC6: 6mm FLAT GLASS GC7: 6mm BENT TEMPERED GLASS (40" RADIUS MIN.) (2) #10 FH WOOD SCREWS BACK (2) 1/4"- 20 STUDS PAGE 07
9 BOTTOM EDGE GLASS CONNECTORS GC8 10mm (3/8") Glass 10mm Base Glass Clamp - For 10mm tempered glass panels - Bottom-mount w/ (2) 1/4-20 machine studs - Surface mount w/ (2) #10 FH wood screws or FH sheet metal screws FRONT (2) #10 FH WOOD SCREWS 2.63 BACK (2) 1/4"- 20 STUDS 2.00 PAGE 08
10 BOTTOM EDGE GLASS CONNECTORS GCFL1 6mm (1/4") or 10mm (3/8") Glass Surface Mount (2) #12 FH WOOD SCREWS OR SHEET METAL SCREWS Glass - For tempered glass panels - Fasteners included for both 6mm and 10mm glass - Surface mount w/ (2) #12 FH wood screws or FH sheet metal screws - Requires 1/2" dia. drilled hole in glass panel GLASS FASTENER COMPONENTS FRONT 6mm FLAT GLASS BACK PAGE 09
11 BOTTOM EDGE GLASS CONNECTORS GCFL2 6mm (1/4") or 10mm (3/8") Glass Concealed Mount Base Glass Mount - For tempered glass panels - Fasteners included for both 6mm and 10mm glass - Conceal mount w/ (2) 1/4"- 20 studs - Requires 1/2" dia. drilled hole in glass panel GLASS FASTENER COMPONENTS 3/8"- 16 STUD 6mm FLAT GLASS PAGE 10
12 TYPICAL APPLICATIONS SERVICE CASE 2 Section Example 10mm TOP (TYP) Typical example of a protector case w/ 10mm top panels and either 6mm or 10mm vertical panels ~ A C ~ SIDES & ENDS B GC10161 or GC DETAIL C GC10261 or GC GC6, GC8, GCFL1 or GCFL2 DETAIL A DETAIL B PAGE 11
13 TYPICAL APPLICATIONS SERVICE CASE Custom Configuration Typical setup for a curved counter 10mm TOP (TYP) ~ A ~ SIDES & ENDS B GC10161 or GC GC6, GC8, GCFL1 or GCFL2 DETAIL A DETAIL B PAGE 12
14 TYPICAL APPLICATIONS VERTICAL SCREEN 2 Section Typical example of a vertical protector with either glass panels SIDES & ENDS A C B GC6, GC8, GCFL1 or GCFL2 DETAIL C ALTERNATE CORNER CLAMPING ARRANGEMENTS GC906 or GC9010 CENTER CLAMP OVER JOINT GAP IN GLASS GC1806 or GC18010 EITHER CLAMP STYLE IS ACCEPTABLE GC6161 or GC DETAIL A DETAIL B PAGE 13


15 TYPICAL APPLICATIONS PAGE 14
16 TYPICAL APPLICATIONS VERTICAL SCREEN Custom Configuration GCT6 or GCT10 CUSTOM ANGLE B DETAIL A ~ A SIDES & ENDS C CENTER CLAMP ABOUT GLASS JOINT BEFORE TIGHTENING SCREWS GCA6 or GCA10 DETAIL C GC6, GC8, GCFL1 or GCFL2 DETAIL B PAGE 15
17 TYPICAL APPLICATIONS SERVICE CASE WITH SHELF Typical example illustrating the use of the different shelf brackets 10mm TOP & SHELF (TYP) SIDES & ENDS A B C (2) SHELF BRACKET OPTIONS GCSK3 GC6, GC8, GCFL1 or GCFL2 GCAB DETAIL A DETAIL B DETAIL C PAGE 16
18 TYPICAL APPLICATIONS VERTICAL SCREEN With Shelf Kit - GCSK2 * or GCSK1 * Illustration of a typical add-on shelf to an existing vertical protector. ~ * ADJACENT SIDE SUPPORT PANEL A ~ SHELF GLASS ~ ADJACENT SIDE SUPPORT PANEL GCSK2 or GCSK1 SIDE GLASS ~ * ONLY USE ON VERTICAL PANEL THAT HAS (2) ADJACENT SIDE SUPPORT PANELS DETAIL A PAGE 17

19 TYPICAL APPLICATIONS PAGE 18

20
Face Mount to Through-the-Post Mount
 Face Mount to Through-the- Mount Cable Runs through Two Corners When going around two corners, it s necessary to tension the cable from both ends as shown in Deck 4. Use the 672 series The tensioning devices
INSTALLATION INSTRUCTIONS VENETIAN 84" SLIDING SHOWER DOOR SYSTEM (180º INSTALLATION)
") INSTALLATION INSTRUCTIONS VENETIAN 84" SLIDING SHOWER DO SYSTEM (180º INSTALLATION) 28539 Industry Drive, Valencia, CA 91355 Toll Free Phone: (877) 728-3874 Toll Free Fax: (888) 440-9567 Phone: (661) 775-1675
INSTALLATION INSTRUCTIONS VENETIAN 84" SLIDING SHOWER DO SYSTEM (180º INSTALLATION) 28539 Industry Drive, Valencia, CA 91355 Toll Free Phone: (877) 728-3874 Toll Free Fax: (888) 440-9567 Phone: (661) 775-1675
Installation Instructions - Model V4JSD 1
 Installation Instructions - Model V4JSD 1 Support Assemblies: Parts list: (Note see enclosed cut sheet for quantities and dimensional information) A vertical structural member (1 ½ x 1 ½ modular frame)
Office Partitions WARNING. Assembly Instructions. Customer Service A S S E M B LY HARDWARE H1 H2 H3 H4 H5 H8 H9 H10 H11 H12
 Customer Service 1-800-645-2986 Assembly Instructions WARNING In order to prevent structural failure, instability, t i p - o v e r, and/or serious injury, please follow i n s t ructions care f u l l y.
Assembly Instructions
 Selling Station Assembly Instructions View from above without top A B C D Rounded finished corners on A & D Square unfinished 3-sides on B & C Selling Station Components (2) 2' x 6' Side s Have a channel
Installation and Assembly: Flat Video Wall Mount For 40" to 65" Flat Panel Displays
 Installation and Assembly: Flat Video Wall Mount For 40" to 65" Flat Panel Displays Model: DS-VW665 Maximum Load Capacity: 125 lb (57 kg) 1 of 11 ISSUED: 03-22-12 SHEET #: 125-9288-4 06-25-13 NOTE: Read
Extra Wide Heavy Duty Plastic Lockers Series Locker Installation Instructions
 Locker Installation Instructions Thank you for selecting Extra Wide Heavy Duty Plastic Lockers. We are confident that the quality and construction of the lockers will prove to be a good investment. These
FIXED PANEL SLIDER QCI5241
 INSTALLATION INSTRUCTIONS FIXED PANEL SLIDER QCI5241 FRAMELESS PANEL / DOOR / PANEL FRAMELESS DOOR / PANEL QCI5241 REV. 0 Page 1 Certified 06/16/2016 Parts List *Quantities may vary QCI5241 REV. 0 Page
v1.0 ASSEMBLY GUIDE Mia Wide Bookcase
 v1.0 ASSEMBLY GUIDE Mia Wide Bookcase Components Upon unpacking your bookcase from it s delivery box, you should have the pieces shown. Follow the steps on the next pages to assemble your new bookcase.
Installation Instructions
 Important SECTION VIEW 1. Acclimate materials 24 hrs before installation. Maintain temperature controlled environment after installation 2. Install in accordance with manufacturer s installation instructions.
ASSEMBLY GUIDE. Mia Narrow Bookcase
 ASSEMBLY GUIDE Mia Narrow Bookcase Components: Upon unpacking your bookcase from it s delivery box, you should have the pieces shown. Follow the steps on the next pages to assemble your new bookcase. Step
Aluminum Railing Installation. Glass Railing Spindle Railings Intimacy Railings and Panels
 Aluminum Railing Installation Glass Railing Spindle Railings Intimacy Railings and Panels This information in this manual will help you to Better understand our product line. Give you guidelines for an
Tufftec Solid Plastic Lockers
 Tufftec Solid Plastic Lockers Installation Instructions Please read all of the installation instructions prior to installing this product. If you have any questions contact Scranton Products as soon as
Installation and Assembly: Full Service Video Wall Mount
 Installation and Assembly: Full Service Video Wall Mount Model: DS-VW765-LAND Max UL Load Capacity: 125 lb (57 kg) 1 of 12 ISSUED: 05-13-11 SHEET #: 145-9011-5 05-21-12 Note: Read entire instruction sheet
Therma-Tru Door Gallery Setup Instructions Swing Unit with Hardware Kit - Hardware Part # MADGSWU15 (Swing Unit) Part # MADGHKSU10 (Hardware Kit)
 Part # MADGHKSU10 (Hardware Kit)") Swing Unit with Hardware Kit - Hardware Tools Included: 4mm Allen Wrench, 6mm Allen Wrench, 8mm T-Handle Allen Wrench (1) 3/4" Drill Bit, (1) 7/32" Drill Bit and Hole Template Guide Tools Required: Phillips
Swing Unit with Hardware Kit - Hardware Tools Included: 4mm Allen Wrench, 6mm Allen Wrench, 8mm T-Handle Allen Wrench (1) 3/4" Drill Bit, (1) 7/32" Drill Bit and Hole Template Guide Tools Required: Phillips
Assembly Instructions 10 X 10 Aluminum Roof Support
 Assembly Instructions 10 X 10 Aluminum Roof Support Aluminum Roof Support Bolt Package 16-5/16 X 2 ¼ SS Bolt 24-5/16 X 1 SS Bolt 40-5/16 SS Nylon Lock Nuts 16-5/16 SS Flat Washers 28-4 ½ Wood Screws 36-1
CURVED ROOF ASSEMBLY INSTRUCTIONS ATTACHED VERANDAH. Your supplementary guide to building an ATTACHED CURVED ROOF VERANDAH or PATIO BEFORE YOU START
 ROOF ATTACHED VERANDAH ASSEMBLY INSTRUCTIONS Your supplementary guide to building an ATTACHED ROOF VERANDAH or PATIO This set of instructions should be used in conjunction with the Stratco instruction
Charisma SEG Slim Profile Light Box - XSL Series
 Page - Assemble the Frame First start by assembling corners. There are three (3) brackets per corner. All extrusion sections are numbered to identify which pieces go together, with, 2 with 2, etc. Insert
Installation Instructions 1500/1500W/G Wall Guard Important
 Important 1. Acclimate materials 24 hrs before installation. Maintain temperature controlled environment after installation. 2. Install in accordance with manufacturer s installation instructions. Failure
Video Wall Installation Instructions 2W X 3H, 3W X 3H
 Video Wall Installation Instructions 2W X 3H, 3W X 3H www.microndisplaysolutions.com Table of Contents Important Safety Instructions... 3 Configuration... 4 Package Contents, included and optional items...
Frameless Inline Door With Return QCI5263
 INSTALLATION INSTRUCTIONS Frameless Inline Door With Return QCI5263 WALL MOUNT HINGES FRAMELESS DOOR / PANEL / RETURN PANEL QCI5263 REV. 0 Page 1 Certified 06/17/2016 Parts List with wall mount hinges
INSTALLATION INSTRUCTIONS
 INSTALLATION INSTRUCTIONS SHOWER DOOR KIT ALUMINUM 2503 E. Vernon Avenue, Los Angeles, CA 90058-1826 Phone: (800) 421-6144 EXT. 7740 Fax: (800) 458-7496 crlaurence.com Email: showers@crlaurence.com 11M0260
Three vertical L angles must be riveted to each main spar (length = 206mm see boxed diagram on drawing 7-V-2).
.") Cut over-sized (left); Trim and file (above). Note: Six needed. Three vertical L angles must be riveted to each main spar (length = 206mm see boxed diagram on drawing 7-V-2). Trace line down center of
Cut over-sized (left); Trim and file (above). Note: Six needed. Three vertical L angles must be riveted to each main spar (length = 206mm see boxed diagram on drawing 7-V-2). Trace line down center of
INSTALLING INVISIRAIL GLASS PANELS POST INFORMATION... 2 PRE-INSTALLATION... 2
 Contents POST INFORMATION... 2 PRE-INSTALLATION... 2 STEP A1: MEASURING FOR INVISIRAIL CUSTOM GLASS PANELS (skip if using Standard Sized Panels)... 2 STEP A2: GATHER ADDITIONAL TOOLS/SUPPLIES... 2 STEP
INSTRUCTION SHEET U19
 U19 All Refrigerator and All Freezer Trim Kit Installation Product Line: U19 All Refrigerator and All Freezer Models Parts Included in Kit TRIMKITEZ1 (Part# 297333500): Single Trim Kit Components Single
Frameless Inline Door QCI5248
 INSTALLATION INSTRUCTIONS Frameless Inline Door QCI5248 FRAMELESS PANEL / DOOR / PANEL QCI5248 REV. 0 Page 1 Certified 06/16/2016 Parts List with glass to glass hinges *Quantities may vary. **Support Bar
Installation Instructions
 Important 1. Acclimate materials 24 hrs before installation. Maintain temperature controlled environment after installation 2. Install in accordance with manufacturer s installation instructions. Failure
Commercial Wine & Liquor Display. Double Displays
 Commercial Wine & Liquor Display Double Displays Congratulations! You have purchased a superior commercial wine rack kit. These commercial kits have been specifically designed to properly store and display
BEN'S COUNTRY WOODSHOP SMALL MISSION TABLE Version 2
 BEN'S COUNTRY WOODSHOP SMALL MISSION TABLE Version 2 Cutting & Drilling Cut 2 top rails out of 1 x 3s. Each will be 8 1/2 long. Drill 1 pocket hole on the inside bottom center. This will connect the center
4 Column Standard Corner
 4 Column Standard Corner Page 1 IMPORTANT! If you purchased a 2 Column Standard Corner Kit, your package will contain the following parts: END LADDER ASSEMBLIES - x4 1 COLUMN SCREWLESS CONNECTORS - x4
Frameless Inline Door QCI5254
 INSTALLATION INSTRUCTIONS Frameless Inline Door QCI5254 FRAMELESS DOOR / PANEL QCI5254 REV. 0 Page 1 Cer fied 06/16/2016 Parts List with wall mount hinges *Quanes may vary QCI5254 REV. 0 Page 2 Cer fied
Panel & Shelf Identification
 4 to 8 Aromatic Cedar Closet Model # 801 1 PLEASE READ INSTALLATION INSTRUCTIONS BEFORE ASSEMBLING Rev. C IF YOU ARE MISSING PARTS OR HAVE QUESTIONS PLEASE CONTACT: customerservice@cedargreen.net Tools
media:scape HDVC Wall Mount
 Dual Shroud media:scape HDVC Wall Mount Single Shroud CAUTION Quad Shroud FAILURE TO FOLLOW THESE INSTRUCTIONS COULD RESULT IN PROPERTY DAMAGE OR PERSONAL INJURY. Triple Shroud Read the entire Assembly
Double Frameless Swing Door QCI5247
 INSTALLATION INSTRUCTIONS Double Frameless Swing Door QCI5247 WALL MOUNT HINGES QCI5247 REV. 0 Page 1 Certified 06/16/2016 Parts List with wall mount hinges *Quantities may vary **Quantities double where
BSM, GSM & GSS. Joint Kit Instruction. (Modified for IMPACT) (NSF Certified) Curved Glass Fresh Meat Delicatessen and Seafood Merchandisers
 (NSF Certified) Curved Glass Fresh Meat Delicatessen and Seafood Merchandisers") BSM, GSM & GSS Joint Kit Instruction (Modified for IMPACT) (NSF Certified) Curved Glass Fresh Meat Delicatessen and Seafood Merchandisers February, 1999 JOINT ASSEMBLY PARTS LIST Item Quantity Description
BSM, GSM & GSS Joint Kit Instruction (Modified for IMPACT) (NSF Certified) Curved Glass Fresh Meat Delicatessen and Seafood Merchandisers February, 1999 JOINT ASSEMBLY PARTS LIST Item Quantity Description
Leveling Feet, Base Plates and Casters
 Leveling Feet, Base Plates and Casters 77 Leveling Foot 1 1 Fastening to profile end Fastening in T-slot of profile For leveling tables and light equipment. Ratchet-type height adjustment requires no tools.
ATLANTIS RAIL Contact Information
 ATLANTIS RAIL Contact Information Customer Service (800) 541-6829 (508) 732-9191 Spectrum System Installation Instructions Atlantis Rail s Spectrum System is an easy to install, universal cable railing
Dura-Lock Roof System
 DLR-14 Dura-Lock Roof System Assembly and Installation Instructions Read the instructions before starting the job. They explain the steps required to produce a finished product that will meet factory specifications.
STOL CH 701. Clamp a reference extrusion on the bottom of the spar. Clamp the bottom flange of the rib to the extrusion. Rear Root Rib 7V4-2
 Rear Root Rib 7V4-2 Clamp a reference extrusion on the bottom of the spar. Clamp the bottom flange of the rib to the extrusion. Cleco the root nose rib to the spar Position the rear root rib at station
LOGAN HUTCH WITH SHELVES 36
 LOGAN HUTCH WITH SHELVES 36 Date: 12-May-15 www. potterybarn.com Page 1 of 9 Important Safety Instructions: Please read all instructions carefully before assembling. For your safety, assembly by two or
Section 11 CABLE & ROD SYSTEMS, SIGN FIXING & SIGN STANDOFFS. Web. acrylicdesign.ie .
 Section 11 CABLE & ROD SYSTEMS, SIGN FIXING & SIGN STANDOFFS Web. acrylicdesign.ie Email. sales@acrylicdesign.ie Acrylic Design 2004-2015 Mobile Cable System Components Single panel clamp Stand Off for
Installation Instruction
 Tools Needed for Assembly Stud finder (for wood stud wall) Pencil Mark Electric drill Wood Stud Wall Installation Step 1. Locate the Wood Studs Installation Instruction Drill bit (for wood stud wall) Masonry
Frameless Heavy Glass Door with Wall Mount Hinges
 INSTALLATION INSTRUCTIONS Frameless Heavy Glass Door with Wall Mount Hinges QCI-5245 QCI5245 REV. 0 Page 1 Certified 06/16/16 Frameless Door with Wall Mount Hinges ITEM NUMBER DESCRIPTION QUANTITY 1 DOOR
ED1300/1300F SERIES CONCEALED VERTICAL ROD DEVICE INSTALLATION INSTRUCTIONS
 ED1300/1300F SERIES CONCEALED VERTICAL ROD DEVICE INSTALLATION INSTRUCTIONS Ver.2 1300 SERIES CONCEALED VERTICAL ROD DEVICE Top Strike Latch Screws Strike Screws Release Plunger Top Latch Plunger Screws
ED5200(A) Series Rim Exit Devices
 Series Rim Exit Devices") ED5200(A) Series Rim Exit Devices Installation Instructions (Single Doors or Pairs with Mullion) FM156 4/10 (617350602) For Metal, Composite and Wood Doors of Either Hand End Clamp (3) 8-32 x 5/16" Flat
ED5200(A) Series Rim Exit Devices Installation Instructions (Single Doors or Pairs with Mullion) FM156 4/10 (617350602) For Metal, Composite and Wood Doors of Either Hand End Clamp (3) 8-32 x 5/16" Flat
a.k.a. casegoods instructions
 a.k.a. casegoods instructions a a.k.a. workwall installation IMPORTANT NOTES Failure to install product according to installation instruction will result in loss of warranty. Tools required for assembly
FIXED SHOWER SCREEN For Wall Mount Hinges QCI5283
 FIXED SHOWER SCREEN For Wall Mount Hinges QCI5283 QCI5283 Page 1 Date Certified: 06/16/2016 Parts List with wall mount clamp ITEM NO. DESCRIPTION QTY. 1 FIXED GLASS PANEL 1 2 WALL MOUNT CLAMP 1 3 U-CHANNEL
IDP Entry-Fit Steel Door Frames. Installation Instructions K2A and NK2A Series Frames
 IDP Entry-Fit Steel Door Frames Installation Instructions K2A and NK2A Series Frames IDP Inc 21300 W. 8 Mile Rd. Southfield, MI 48075 1-877-645-2770 www.idpframes.com email: info@idpframes.com K2A and
ED5800 (A) Series. Installation Instructions. Concealed Vertical Rod. Exit Device WARNING
 Series. Installation Instructions. Concealed Vertical Rod. Exit Device WARNING") Strike Shim (2) Supplied Strike Plate (3) 10-24 x 3/4" PFHMS (6) 10-24 x 1/2" PFHMS Top Latch TopTube Concealed Vertical Rod Exit Device Important: For use with metal doors only. Device is packed ready
Strike Shim (2) Supplied Strike Plate (3) 10-24 x 3/4" PFHMS (6) 10-24 x 1/2" PFHMS Top Latch TopTube Concealed Vertical Rod Exit Device Important: For use with metal doors only. Device is packed ready
Frameless Door QCI5284
 Frameless Door QCI5284 F AB GLASS AND MIRROR www.fabglassandmirror.com Call: +1 888-474-2221 Fax: (614)-334-4919 Office Timing: 8:30-18:00 EST info@fabglassandmirror.com INSTALLATION INSTRUCTIONS Frameless
Installation Instructions
 Important 1. Acclimate materials 24 hrs before installation. Maintain temperature controlled environment after installation. 2. Install in accordance with manufacturer s installation instructions. Failure
Mounting Hardware Guide
 Mounting Hardware Guide by The key to a successful and trouble-free installation is the selection of appropriate mounting hardware. Versa-Gard offers the most comprehensive array of mounting hardware for
Series 1500 Aluminum Door Canopy
 Series 500 Aluminum Door Canopy with Sidewings It is our recommendation that you read instructions carefully prior to assembly and installation. Series 500 with Sidewings mounting bar (A) top trim (B)
KEITH PANEL SYSTEMS FUNDERMAX- MAX EXTERIOR CONCEALED FASTENERS PRESSURE EQUALIZED WALL SYSTEM
 S Y S T E M D E T A I L S FUNDERMAX- MAX EXTERIOR CONCEALED FASTENERS PRESSURE EQUALIZED WALL SYSTEM PAGE TITLE PAGE Table of Contents Fundermax Max Exterior Product Information Design and Installation
Mounting Instructions Item No.: xxx
 Mounting Instructions Item No.: 271.92.xxx Wall-Beds 1 General Notes For vertical folding beds Successful and safe installation of Bed-Lift and construction of casework requires a professional skill level
INSTALLATION GUIDE N5-DS48-4
 INSTALLATION GUIDE N5-DS48-4 Shelving ( steel ) Transit High Roof & Medium Roof Promaster Standard Roof & High Roof Nissan NV High Roof Sprinter Low Roof & High Roof Box Truck / Trailer QUICK START GUIDE
How To Measure Your Finished Opening
 3000 Series Bifold Doors How To Measure Your Finished Opening MEASURE FROM RIGHT TO LEFT 2 PLACES (WIDTH) MEASURE FROM TOP TO BOTTOM 2 PLACES (HEIGHT) Tools Required for Assembly: Tools Needed: Phillips
INTELLITOUCH / SECURE TOUCH MODELS ONLY
 NOTE: ALL DIMS. +/- 1mm UNLESS NOTED INTELLITOUCH / SECURE TOUCH MODELS ONLY 511.7 42.6 (Max. 44.6mm) 476.64 (ACTIVE AREA) 268.11 (ACTIVE AREA) 298.1 12V DC POWER INPUT VGA VIDEO INPUT USB TOUCH SCREEN
Steel Solutions USA 602 E. Walnut Street Watseka, IL p: (888) f: (815)
 f: (815)") Steel Solutions USA 602 E. Walnut Street Watseka, IL 60970 p: (888) 875-5004 f: (815) 432-3364 sales@steelsolutionsusa.com Published February 2011 2011 Steel Solutions USA. All rights reserved. version
Steel Solutions USA 602 E. Walnut Street Watseka, IL 60970 p: (888) 875-5004 f: (815) 432-3364 sales@steelsolutionsusa.com Published February 2011 2011 Steel Solutions USA. All rights reserved. version
ASSEMBLY INSTRUCTION FOR WYTHE BURLED WOOD BAR
 ASSEMBLY INSTRUCTION FOR WYTHE BURLED WOOD BAR IMPORTANT SAFETY INSTRUCTIONS: Please read all instructions carefully before assembling. For your safety, assembly by two or more adults is strongly recommended.
ED5200S(A) Series ED5200S(A) Series x M107 Windstorm Series SecureBolt Exit Device
 Series ED5200S(A) Series x M107 Windstorm Series SecureBolt Exit Device") ED5200S(A) Series ED5200S(A) Series x M107 Windstorm Series SecureBolt Exit Device Installation Instructions FM532 3/11 (Single Doors or Pairs with Mullion) For Doors of Either Hand In U.S.: Corbin Russwin,
ED5200S(A) Series ED5200S(A) Series x M107 Windstorm Series SecureBolt Exit Device Installation Instructions FM532 3/11 (Single Doors or Pairs with Mullion) For Doors of Either Hand In U.S.: Corbin Russwin,
 www.hafeleindia.com www.hafeleindia.com Silver Gold Rose Gold Graphite Dark Bronze PROFIN : ONE RANGE. MANY SOLUTIONS. 2. Stack Modular Shelving Pg. 23-32 3. Rail Door Profiles Pg. 33-41 1. Gola Profiles
LOGAN BASE WITH DOORS 36
 (NOTE : This product comes with only 1 shelf that is adjustable please refer to Assembly Instruction) LOGAN BASE WITH DOORS 36 Date: 2 Apr 15 www. potterybarn.com Page 1 of 7 Important Safety Instructions:
This is a motor attachment option in which the motors attach closely to the sides of the NXT.
 6 II. Ways to Attach NXT Motors 1. Simple Side Attachment Model Description: This is a motor attachment option in which the motors attach closely to the sides of the NXT. 7 These are the parts that you
MECHANICAL BACK FASTENED SYSTEMS INSTALLATION DATA
 MECHANICAL BACK FASTENED SYSTEMS INSTALLATION DATA 7/16 PETRARCH ARCHITECTURAL WALL PANELS APPLIED OVER A STUDWALL BY MEANS OF A FIELD ASSEMBLED BACK FASTENED SYSTEM DESIGN CONCEPT 7/16 panels may be installed
Straight Stringer Installation Instructions
 Straight Stringer Installation Instructions Floor-to-Wall Installation F L I G H T P L A N Unpack: What s included? Your Stringer Tread Screws (8) per tread (1) Torque Wrench (1) Socket (for the brackets
Frameless Inline Door QCI5250
 INSTALLATION INSTRUCTIONS Frameless Inline Door QCI5250 FRAMELESS PANEL / DOOR / PANEL QCI0249 REV. 3 Page 1 Certified 10/12/12 Parts List with pivot hinges *Quantities may vary. QCI0249 REV. 3 Page 2
ALL SEASON PATIO COVER
 ALL SEASON PATIO COVER 61 Where the All Season Patio Cover is to be attached to the home, create a level line showing where the top of the mounting rail is to be located. Install each section with the
INSTALLATION INSTRUCTIONS
 INSTALLATION INSTRUCTIONS SHOWER Englefield has a history of making superb showers and their popularity is testament to their quality and affordability. It s the details that Englefield cares about - from
Installation Instructions
 Important 1. Acclimate materials 24 hrs before installation. Maintain temperature controlled environment after installation 2. Install in accordance with manufacturer s installation instructions. Failure
MONKEY BARS OVERHEAD RACK INSTALLATION
 MONKEY BARS OVERHEAD RACK INSTALLATION Thank you for purchasing the New Monkey Bars Overhead storage rack. The most innovative overhead rack on the market WARNING THE PROPER INSTALLATION OF THIS STORAGE
Shim (2) Supplied. Strike Plate. (3) x 5/8" PFHMS or 10 x 1" PFHWS. Top Latch. (3) x 1/4" PRHMS. Latch Cover. (2) 8 x 3/8" PFH AB SMS
 Supplied. Strike Plate. (3) x 5/8 PFHMS or 10 x 1 PFHWS. Top Latch. (3) x 1/4 PRHMS. Latch Cover. (2) 8 x 3/8 PFH AB SMS") Installation Instructions ED5400 (A) Series ED5470 (B) Series Surface Vertical Rod Exit Devices Strike Angle Must Engage Strike Top Strike 10-24 PFHMS Top Bracket and Strike required for ED5470. Shim (2)
Installation Instructions ED5400 (A) Series ED5470 (B) Series Surface Vertical Rod Exit Devices Strike Angle Must Engage Strike Top Strike 10-24 PFHMS Top Bracket and Strike required for ED5470. Shim (2)
Top Closure Kit Accessory for Music Library System
 Assembly Instructions Top Closure Kit Accessory for Music Library System Contents Required Tools.....................................2 Installation Requirements............................2 Fasteners -
EUROLINE CLASSIC PHENOLIC / EVERGREEN. Installation Instructions. Installation Instructions.
 EUROLINE ASSIC PHENOLIC / EVERGREEN EUROLINE ASSIC PHENOLIC / EVERGREEN Before you begin, please note the following considerations: Safety First! Please use proper safety gear when performing any installation.
western window systems westernwindowsystems.com installation instructions non-pocket 2-1/4 panels
 series 2600 multi-slide non-pocket 2-1/4 panels windowsystems.com windowsystems.com movement, which can cause warping and other problems. Frame kit components: Each door will have a head assembly, a threshold
GROWING BETTER THROUGH DESIGN. 6ft Lean-To LEAN-TO. Assembly Instructions 04/02
 GROWING BETTER THROUGH DESIGN 6ft Lean-To LEAN-TO Assembly Instructions 04/02 6ft Lean-To Greenhouse Base Plan Introduction/Tools/Contents / / Contents This is a copy of our Lean-To greenhouse base plan.
FRAMELESS DOOR / PANEL WITH WALL MOUNT HINGES QCI5274
 FRAMELESS DOOR / PANEL WITH WALL MOUNT HINGES QCI5274 QCI0274 QCI5274 REV. Rev. 1 0 Page Page 1 1 Date Certified: Certified 06/16/2016 10/01/10 Parts List with wall mount hinges ITEM NO. Part # DESCRIPTION
INSTALLATION GUIDE FTX FLOOR Ford Transit ( 148" Extended Wheelbase )
") INSTALLATION GUIDE 6540-FTX FLOOR Ford Transit ( 148" Extended Wheelbase ) QUICK START GUIDE Phase 1 - Assembly q 1.1 Setup... 3-4 Phase 2 - Installation q 2.1 Install Preparation... q 2.2 Floor Installation...
INSTALLATION GUIDE 6540-FTX FLOOR Ford Transit ( 148" Extended Wheelbase ) QUICK START GUIDE Phase 1 - Assembly q 1.1 Setup... 3-4 Phase 2 - Installation q 2.1 Install Preparation... q 2.2 Floor Installation...
Sliding Door Hardware Installation Instructions ROB ROY
 Sliding Door Hardware Installation Instructions ROB ROY Installation Instructions Structural Information For standard systems and most custom single door opening systems. General Overview All Krown Lab
TYPICAL STANDOFF GLASS RAIL ELEVATION TYPICAL SECTION RS0B20 WITH RECTANGULAR BACK PLATE TYPICAL STAIRS
 Revisions By: CRL SRS STANDOFF RAILING SYSTEM CRL GLASS RAIL S RS0B20 w/ RECTANGULAR BACK PLATE CRL'S GLASS RAIL S CAN BE USED FOR MOUNTING GLASS PANELS UP TO 3/4" (19 MM) IN THICKNESS. THE 4" X 8" (102
Fasteners. Bolts. NAPA FastTrack Counter Sales Training Fasteners Page 1. Figure 1. Typical Measurements for a Bolt or Hex Head Cap Screw
 Fasteners Many types and sizes of fasteners are used in the automotive industry. Each fastener is designed for a specific purpose and condition. One of the most commonly used type of fastener is the threaded
INSTALLATION INSTRUCTIONS Aluminum Railing System
 INSTALLATION INSTRUCTIONS FASCIA MOUNT SURFACE MOUNT OFFSET BASE SURFACE MOUNT STANDARD BASE CORE MOUNT Ø3" [Ø76 mm] 3 2 1 " [89 mm] 1 4 1 " [32 mm] 2 8 7 " [73 mm] 200 SERIES 300 SERIES 3 3 4 " [95 mm]
Tradewinds Amplify Display System Instructions
 Table of Contents Packing & Unpacking... Standard Kits... Component Identification... Primary Components Vertical Pole Top... Vertical Pole Bottom... Horizontal... Cross/Hanging Bar... Amplify Shelf Package
Fixings & Fastenings. Bright Zinc Plated, Galvanised & Stainless Steel. Lockinex. ea i, ea u i
 Fixings & Fastenings Bright Zinc Plated, Galvanised & Stainless Steel Lockinex ea i, ea u i INTRODUCTION The Lockinex Range of Fixings & Fastenings are manufactured in Bright Zinc Plate, Hot dipped galvanised
Installation Guide. Mounting Kit for Mounting Philips Avalon CTS Cordless Fetal Transducer System on Wall, 2'' Post, Rail, or Slide-on Mounting Plate
 Installation Guide Mounting Kit for Mounting Philips Avalon CTS Cordless Fetal Transducer System on Wall, 2'' Post, Rail, or Slide-on Mounting Plate The purpose of this guide is to: 1. Describe mounting
Setup. The Faraday Cage is available in two types of configurations. Cage for mounting to a full perimeter enclosure on series tables.
 Faraday CageSetup, 2017 Setup The Faraday Cage is available in two types of configurations. Cage for mounting to a full perimeter enclosure on 63-500 series tables. Cage with a base plate for use on a
IMPORTANT: Read all sections before you start
 1 IMPORTANT: Read all sections before you start For the most up to date information please visit our website @ www.newtechwood.com Prior to installing the railing, please consult local zoning laws in regards
Pilaster with J-Channel Back Plate
 THE PILASTER CONTAINS: (2) transition tops (one left, one right), (2) pilasters, (2) pilaster bases, (2) bottom corners (one left, one right), (2) bottom corner bases, (2) 24pk. screws, (3) 12 pk. Shutter-Loks,
CXT PRO RAILING INSTALLATION INSTRUCTIONS For Installations Using Aluminum and Glass Balusters Sold Separately
 CXT PRO RAILING INSTALLATION INSTRUCTIONS For Installations Using Aluminum and Glass Balusters Sold Separately CCRR-0171 PFS AA-652 Drill/power screwdriver Assorted drill bits Hammer Miter or circular
INSTALLATION INSTRUCTIONS PRAVOL DURA-SHIELD COMPOSITE DECK RAILINGS
 INSTALLATION INSTRUCTIONS PRAVOL DURA-SHIELD COMPOSITE DECK RAILINGS Important: Read all sections before you start Prior to installing railing, please consult local zoning laws in regards to load requirements
86-1/2" TRACK INSTALLATION GUIDE
 BARN TRACK 86-1/2" TRACK INSTALLATION GUIDE READ ALL INSTRUCTIONS AND REVIEW DIAGRAMS BEFORE BEGINNING THE INSTALLATION TO GET A THOROUGH UNDERSTANDING OF THE PROCESS. BEFORE YOU BEGIN This kit comes with
Closet System Installation Manual
 Closet System Manual Thank you For choosing our Custom Closet Collection to fit all your needs Closets come fully assembled to make your project an enjoyable and satisfying experience. With quality Custom
Top Mount Ultra Modern Hanger
 Top Mount Ultra Modern Hanger ASSEMBLY INSTRUCTIONS TOP MOUNT ULTRA MODERN HANGER Recommended Tools Level Tape Measure Pencil Drill with 1/8, and 1/4, Drill Bits and Phillips Bit Socket Wrench with 9/16
Installation Manual Using Existing Handrail Version 4.0 Oct 2017
 Installation Manual Using Existing Handrail Version 4.0 Oct 2017 ORDER OF ASSEMBLY TOOLS YOU WILL NEED - Fine Saw - Sander - Wood Filler - Allen keys - Screw Driver - Drill - Suitable Screws PROTECTING
Austin Standing Seam Awning Assembly and Installation Instructions. Assembly Instructions
 Austin Standing Seam Awning Assembly and Installation Instructions Be sure to use safety glasses when assembling and installing the awning. Some metal parts may have sharp edges. Use work gloves to handle
Installation Instructions High Impact Corner Guards
 Important [76mm] 2" [50.8mm] 1. Acclimate materials 24 hrs before installation. Maintain temperature controlled environment after installation 2. Install in accordance with manufacturer s installation
Austin Standing Seam Awning with Overhead Braces Assembly and Installation Instructions. Assembly Instructions
 Austin Standing Seam Awning with Overhead Braces Assembly and Installation Instructions Be sure to use safety glasses when assembling and installing the awning. Some metal parts may have sharp edges. Use
Installation Manual ZGuard Mounting Options
 Installation Manual ZGuard Mounting Options Above-Counter Heavy-Duty Flange (EZ-Span) (Entire EZ-Span unit not shown) Lift EZ-Span unit up until bottom of 1.5" diameter post clears internal heavy duty
NORMAN SHUTTERS INSTALLATION INSTRUCTIONS. 4 Sided L Frame. (Outside Mount - Single Panel) Getting Started
 Getting Started") NORMAN SHUTTERS INSTALLATION INSTRUCTIONS 4 Sided L Frame (Outside Mount - Single Panel) Getting Started Recommended Tools: Nail Gun or Drill, Tape Measure, Torpedo Level, Box Knife, 6 Philips head driver
NORMAN SHUTTERS INSTALLATION INSTRUCTIONS 4 Sided L Frame (Outside Mount - Single Panel) Getting Started Recommended Tools: Nail Gun or Drill, Tape Measure, Torpedo Level, Box Knife, 6 Philips head driver
INSTALLATION GUIDE Locker With Top Shelf Transit Low Roof & Nissan NV Low Roof ( Aluminum )
") INSTALLATION GUIDE 7115 Locker With Top Shelf Transit Low Roof & Nissan NV Low Roof ( Aluminum ) QUICK START GUIDE Phase 1 - Assembly q 1.1 Setup... q 1.2 Locker w/ Top Shelf Assembly... 3-5 6-13 Phase
INSTALLATION GUIDE 7115 Locker With Top Shelf Transit Low Roof & Nissan NV Low Roof ( Aluminum ) QUICK START GUIDE Phase 1 - Assembly q 1.1 Setup... q 1.2 Locker w/ Top Shelf Assembly... 3-5 6-13 Phase