FORD TRANSIT PARTITION WITH DOOR INSTALLATION INSTRUCTIONS
|
|
|
- Hollie Kelley
- 6 years ago
- Views:
Transcription


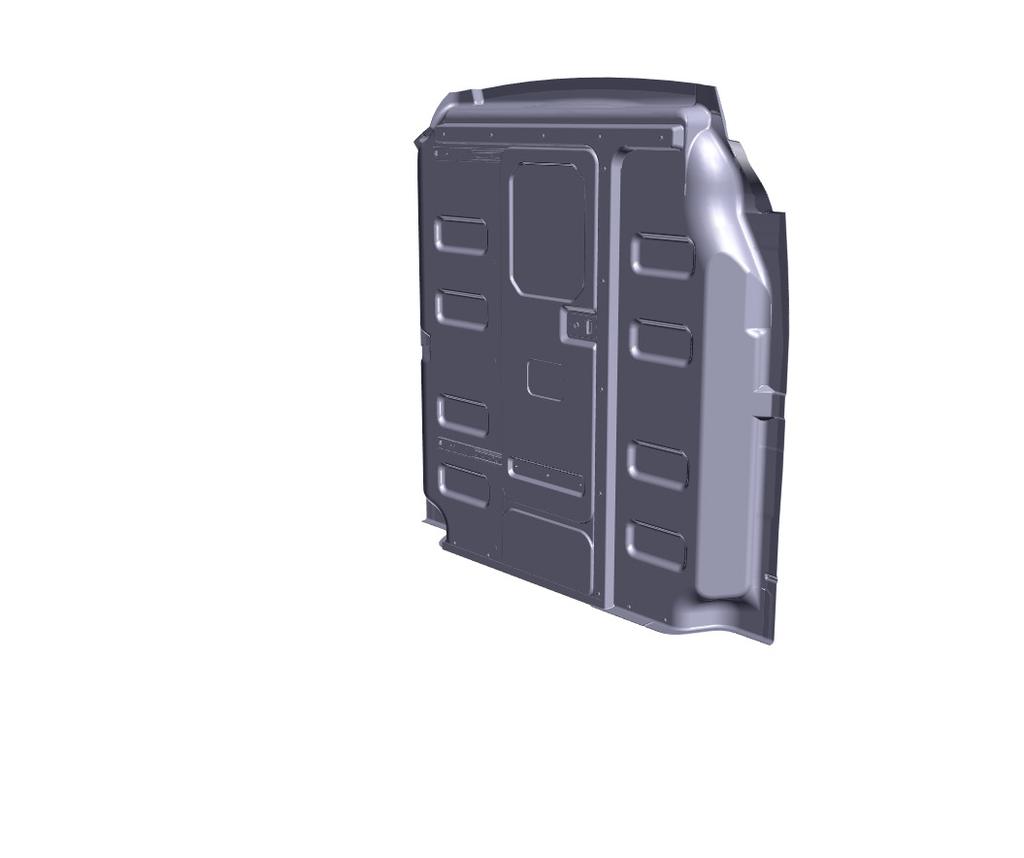


1 FORD TRANSIT PARTITION WITH DOOR
2 The following instructions detail the procedure for installing a Sortimo By Knapheide Protexx Partition with a sliding door in a Ford Transit. This guide is intended to walk you through a step by step installation. Please read these instructions thoroughly prior to beginning the partition installation. Contents Hardware... 3 Partition Installation Warranty and Limitation of Liability SORTIMO N.A. warrants its van interior equipment to be free from defects in material and workmanship, under normal use and service for a period of three years or 36,000 miles, whichever occurs first, after the date of delivery to the original retail purchaser, when installed by an authorized SORTIMO Distributor and/or SORTIMO N.A. Upfit facility. Products not installed by an authorized SORTIMO Distributor and/or SORTIMO Upfit facility will not be subject to any warranty whatsoever and ANY AND ALL WARRANTIES WHATSOEVER RELATIVE TO SUCH SALES ARE HEREBY FULLY AND EXPRESSSLY DISCLAIMED. This warranty only provides for the following remedy: repairs at the point of SORTIMO N.A. s main place of business or any of its Distributor locations, or part replacements in part or in full to correct any defects related to material and workmanship. This warranty does not apply to products not installed by an authorized SORTIMO Distributor and/or SORTIMO N.A. Upfit facility. 2
")
 Ribbed")
 Push Type Retainer")

3 HARDWARE (9) Whiz Bolt M6 x 40 Part# (8) Flange Bolt M6 x 25 Part# (13) Ribbed Riv-nut M6 Part# (3) Push Type Retainer Part# (8) Sealing Washer.33 x.75 Part#


4 WARNING! Prior to drilling into any part of a vehicle, check behind and underneath drilling and mounting locations for electrical wire, fuel lines, brake lines, and other critical vehicle components. Adjust the drilling location as required to avoid these components. Failure to do so can result in death or serious injury in addition to impairing critical vehicle functions. 1. Prior to installing the partition in the van, remove both D-rings. 2. Remove the grab handle and retain it for later re-installation. 3. Use a small pry bar to carefully remove the plastic fasteners on the street side upper wall panel. Retain all fasteners for re-use. 4


5 4. Do not remove the (3) fasteners with retaining clips located along the front edge of the panel. 5. Remove the metal bracket located along the street side B-pillar. Also retain this bracket and fasteners for re-use. 6. Remove the retaining clips from the B-pillar and discard. 7. Load the partition into the van cargo area. 5


6 8. Position the partition in the van. Tilt the top of the partition forward and slide the bottom firmly in place all around. NOTE: The partition must fit firmly in place prior to marking mounting holes to be drilled in the van structures. 9. Use a white paint pen to mark hole drilling locations in the floor. 10. Be sure to mark hole locations in the doorway threshold. 11. Use a dark marker to indicate hole drilling locations in the street side B-pillar. 6


7 12. Also mark hole drilling locations in the roof crossmember along the top of the partition. 13. Remove the partition from the cargo area. WARNING! Prior to drilling into any part of a vehicle, install a drill bit collar on the drill bit at the minimal required cutting depth. 14. Use a 25/64 drill bit equipped with a drill bit collar to drill mounting holes through the street side B-pillar at the locations indicated here. 7

 M6 ribbed riv-nuts in the B-pillar.")


8 15. Use a 25/64 drill bit equipped with a bit collar to drill through the van crossmember in marked locations. 16. Install (3) M6 ribbed riv-nuts in the B-pillar. 17. Install M6 ribbed riv-nuts in each hole. 18. Use a drill bit equipped with a stop collar to drill pilot holes through the van floor mat ONLY! DO NOT DRILL THROUGH THE METAL FLOOR OF THE VAN AT THIS TIME! 8


9 19. Use a 1¼ hole saw to cut holes through the floor mat ONLY in the pilot holes. 20. Use a 25/64 drill bit with a stop collar to drill holes through the van floor in each location. 21. Install M6 ribbed riv-nuts in each hole. 22. Reposition the partition in place in the cargo area. 9


10 23. Secure the partition to the street side B-pillar with M6 x 25 flange bolts. 24. Secure the partition to the curb side B-pillar with M6 x 25 flange bolts. 25. Re-install the grab handle with M6 x 40 flange bolts. 26. Secure the top of the partition with M6 x 25 flange bolts. 10


11 27. Re-install the wall panel metal bracket on the street side B-pillar. 28. Re-install the wall panel with the original plastic retainers. 29. Re-install and tighten the threaded fastener at the rear of the wall panel. 30. Secure the bottom flange and threshold of the partition to the floor with M6 x 40 flange bolts. 11


12 31. Re-install the D-rings. Partition installation is completed. 12


13 sortimo.knapheide.com 844-EXXPAND The Knapheide Manufacturing Company 1848 Westphalia Strasse Quincy, IL Sortimo North America 3055 Northwoods Circle NW Norcross, GA September
ATTENTION: PLEASE READ AND UNDERSTAND ALL INSTRUCTIONS AND WARNINGS BEFORE ASSEMBLING, INSTALLING OR USING THIS PRODUCT.
 VAN STORAGE SOLUTIONS FOR THE WAY YOU WORK TM INSTALLATION MANUAL BULKHEAD Model Number 96101-3-01 ATTENTION: PLEASE READ AND UNDERSTAND ALL INSTRUCTIONS AND WARNINGS BEFORE ASSEMBLING, INSTALLING OR USING
ATTENTION: PLEASE READ AND UNDERSTAND ALL INSTRUCTIONS AND WARNINGS BEFORE ASSEMBLING, INSTALLING OR USING THIS PRODUCT.
 INSTALLATION MANUAL Models 96111-3-02 & 96511-3-02 Bulkheads for 2014 and Later Ford Transit Connect Vans ATTENTION: PLEASE READ AND UNDERSTAND ALL INSTRUCTIONS AND WARNINGS BEFORE ASSEMBLING, INSTALLING
Installation Guide 40670
 Installation Guide 40670 Kargo Master Rancho Cordova, CA 95742 800-343-7486 CustomerService@KargoMaster.com DATE: Installation Instructions 40670 *PLEASE READ ALL INSTRUCTIONS AND WARNINGS PRIOR TO ASSEMBLING,
ATTENTION: PLEASE READ AND UNDERSTAND ALL INSTRUCTIONS AND WARNINGS BEFORE ASSEMBLING, INSTALLING OR USING THIS PRODUCT.
 PLAN YOUR VAN (TIPS FOR FASTER INSTALLATION) Installing your Transit bulkhead is very clear cut following these instructions. Before cutting or drilling in the floor, verify the location of you gas tank,
OPERATORS MANUAL WEEKENDER STEEL LADDER RACK
 OPERATORS MANUAL WEEKENDER STEEL LADDER RACK WWW.WEATHERGUARD.COM MODELS 1450 & 1475 1475 Shown INSTALLATION TIME Approximate installation time: 60 minutes (depending on truck equipment installation experience
Installation Guide 406TH
 Installation Guide 406TH (High Roof Shown) Kargo Master Rancho Cordova, CA 95742 800-343-7486 CustomerService@KargoMaster.com DATE: Installation Instructions 406TH *PLEASE READ ALL INSTRUCTIONS AND WARNINGS
Installation Manual Roof Zone Ladder Rack
 Installation Manual Roof Zone Ladder Rack 102113,E1346 Installation Time: About 90 minutes. Depending on truck and Do-it-Yourself experience level Tools Required: Electric Drill with 1/2 Chuck 1/2 & 7/32
INSTALLATION GUIDE. C20-FTL STRAIGHT PARTITION Transit Partition ( Perforated Window, No Access, Steel )
") INSTALLATION GUIDE C20-FTL STRAIGHT PARTITION Transit Partition ( Perforated Window, No Access, Steel ) QUICK START GUIDE Phase 1 - Assembly q 1.1 Setup... q 1.2 Partition Assembly... 3-5 5-6 Phase 2 -
INSTALLATION GUIDE C20-FTL STRAIGHT PARTITION Transit Partition ( Perforated Window, No Access, Steel ) QUICK START GUIDE Phase 1 - Assembly q 1.1 Setup... q 1.2 Partition Assembly... 3-5 5-6 Phase 2 -
JEEP JK ( 5 DOOR ) SLIMLINE II - FULL TRAY EXTREME RACK KIT
 SLIMLINE II - FULL TRAY EXTREME RACK KIT") JEEP JK ( 5 DOOR ) SLIMLINE II - FULL TRAY EXTREME RACK KIT FAJK001 / KRJW014T INSTALL TIME: 2.5 Hours NOTE: Your Jeep JK (5 Door) Extreme Roof Rack Kit consists of four boxes. (1) the Tray, (2) the Roll
JEEP JK ( 5 DOOR ) SLIMLINE II - FULL TRAY EXTREME RACK KIT FAJK001 / KRJW014T INSTALL TIME: 2.5 Hours NOTE: Your Jeep JK (5 Door) Extreme Roof Rack Kit consists of four boxes. (1) the Tray, (2) the Roll
INSTALLATION MANUAL WEEKENDER STEEL LADDER RACK
 TRUCK STORAGE SOLUTIONS SECURING YOUR REPUTATION INSTALLATION MANUAL WEEKENDER STEEL LADDER RACK STEEL & ALUMINUM SIDE BOX WITH PACK RAT DRAWER UNITS MODELS ATTENTION: PLEASE READ AND UNDERSTAND ALL INSTRUCTIONS
40670 Transit Connect/NV200/City Express/ProMaster City Partition
 40670 Transit Connect/NV200/City Express/ProMaster City Partition Top Panel (1) Bottom Panel (1) Transit Connect (2014) Top Angle (1) TC Top MNT BRKT (2) TC Bottom MNT PLT (2) NV200/City Express Top Mount
INSTALLATION GUIDE FTX FLOOR Ford Transit ( 148" Extended Wheelbase )
") INSTALLATION GUIDE 6540-FTX FLOOR Ford Transit ( 148" Extended Wheelbase ) QUICK START GUIDE Phase 1 - Assembly q 1.1 Setup... 3-4 Phase 2 - Installation q 2.1 Install Preparation... q 2.2 Floor Installation...
INSTALLATION GUIDE 6540-FTX FLOOR Ford Transit ( 148" Extended Wheelbase ) QUICK START GUIDE Phase 1 - Assembly q 1.1 Setup... 3-4 Phase 2 - Installation q 2.1 Install Preparation... q 2.2 Floor Installation...
Once the new slots are cut, the A-pillars snap right into place.
 So, you hate those stock 89-93 automatic seat belts, right? This little article will walk you through the installation of the 94-97 style manual seat belts into a 89-93 MN12. Disclaimer: I take no responsibility
FORD INTERCEPTOR SEDAN READY BUCKLE
 INSTALLATION MANUAL FORD INTERCEPTOR SEDAN READY BUCKLE PART# FT3501RB We recommend you read through the installation guide prior to installation, if you have any questions please call us at 800-516-2322
JEEP JK ( 5 DOOR ) SLIMLINE II - FULL TRAY EXTREME RACK KIT
 SLIMLINE II - FULL TRAY EXTREME RACK KIT") JEEP JK ( 5 DOOR ) SLIMLINE II - FULL TRAY EXTREME RACK KIT FAJK002 / KRJW014T INSTALL TIME: 5 Hours NOTE: Your Jeep JK (5 Door) Extreme Roof Rack Kit consists of four boxes. (1) the Tray, (2) the Roll
JEEP JK ( 5 DOOR ) SLIMLINE II - FULL TRAY EXTREME RACK KIT FAJK002 / KRJW014T INSTALL TIME: 5 Hours NOTE: Your Jeep JK (5 Door) Extreme Roof Rack Kit consists of four boxes. (1) the Tray, (2) the Roll
Sea Doo Spark Engine Access Kit
 Sea Doo Spark Engine Access Kit PART# - RS4-130-EAK APPLICATION(S): Sea Doo Spark. 2up & 3up Models. We strongly recommend the use of a service manual to familiarize yourself with the various components
Bulkhead Model Number and
 Bulkhead Model Number 96141-3-01 and 96142-3-01 Installing your ProMaster bulkhead is very clear cut following these instructions. Before cutting or drilling in the floor, verify the location of you gas
VAN STORAGE SOLUTIONS FOR THE WAY YOU WORK
 WWW.WEATHERGUARD.COM VAN STORAGE SOLUTIONS FOR THE WAY YOU WORK Weather Guard / KNAACK 420 E. Terra Cotta Ave. Crystal Lake, IL 60014 USA 800-456-7865 (Toll Free) 800-334-2981 (Fax) Knaack.OrderEntry@wernerco,.com
4832A Installation Sheet Part List
 4832A Installation Sheet Part List (1) 4016A-43-003 Qty 1- (2) 4016A-43-002 Qty 1- (3) 4016A-43-001 Qty 2- (4) 4016A-10-005 Qty 1- (5) 4016A-43-004L Qty 1- Mounting Bolt Kit (A) (K) Qty 2 - Qty 6 - M10
INSTALLATION INSTRUCTIONS
 INSTALLATION INSTRUCTIONS Trans4mer Grille Guard/Winch Mount For Chevrolet Silverado 1500HD & 2500 Kit 68162 This WARN Trans4mer system can be customized to give your Chevy Silverado a wide variety of
INSTALLATION INSTRUCTIONS
 INSTALLATION INSTRUCTIONS R5 STEP BOARD APPLICATION: 2009-2017 Dodge Ram 1500 Quad / Crew Cab 2010-2017 Dodge Ram 2500/3500 Crew Cab PART NUMBER: 28-51040, 28-51045, 28-51050, 28-51055 ITEM QUANTITY DESCRIPTION
Instruction Guide 4A90L
 Instruction Guide 4A90L Kargo Master Rancho Cordova, CA 95742 800-343-7486 CustomerService@KargoMaster.com DATE: *PLEASE READ ALL INSTRUCTIONS AND WARNINGS PRIOR TO ASSEMBLING, INSTALLING, AND USING THIS
ASSEMBLY and INSTALLATION INSTRUCTIONS for VAN SHELVING and SECURE STORAGE UNITS
 VAN STORAGE SOLUTIONS FOR THE WAY YOU WORK TM ASSEMBLY and INSTALLATION INSTRUCTIONS for VAN SHELVING and SECURE STORAGE UNITS 1 ATTENTION: PLEASE READ AND UNDERSTAND ALL INSTRUCTIONS AND WARNINGS BEFORE
INSTALLATION INSTRUCTIONS
 JK BRAWLER ROCKERS INSTALLATION Thank you for purchasing Poison Spyder Brawler Rockers for your Jeep JK. Although it is a lengthy procedure, Installation is fairly simple with the right tools and good
INSTALLATION MANUAL PACK RAT DRAWER UNITS MODELS NOTICE WARNING DANGER CAUTION
 TRUCK STORAGE SOLUTIONS SECURING YOUR REPUTATION INSTALLATION MANUAL ALUMINUM STEEL & ALUMINUM & STEEL SIDE HI-SIDE/SUPER-SIDE BOX WITH BOX PACK RAT DRAWER UNITS MODELS ATTENTION: PLEASE READ AND UNDERSTAND
Installation Instructions Kit, Base Rail Bracket Part # 31413
 Installation Instructions Kit, Base Rail Bracket Part # 31413 Dealer / Installer: End User: Provide a copy of these Instructions to the end user of this product. These Instructions provide important operating
LC200DS1 Double Stud Articulating Wall Mount for Flat Panel Screens up to 32" with up to 200mm x 200mm VESA Mounting Patterns
 Page 1 of 6 LC200DS1 Double Stud Articulating Wall Mount for Flat Panel Screens up to 32" with up to 200mm x 200mm VESA Mounting Patterns A multi-position dual articulating arm for flat screens up to 60
NISSAN NV200 CHEVY CITY EXPRESS WALL LINER KIT INSTALLATION INSTRUCTIONS
 NISSAN NV200 CHEVY CITY EXPRESS WALL LINER KIT INSTALLATION INSTRUCTIONS NOTES: 1. Before commencing, remove all wall liners and D Rings already installed in the vehicle. 2. Consult layout PDF and compare
Rear Mount Installation Instructions
 Rear Mount Installation Instructions Ford Transit Low Roof 130 WB Frame Kit Part #: DTC 0809-011 V1.0.10.12.18 IMPORTANT INSTALLATION STEPS ARE DENOTED USING A STOP SIGN. THESE STEPS MUST BE PERFORMED
Enclosed Partition Installation Instructions
 Nissan NV1500/2500/3500 High Roof Partition Kit Part #: DTC 1502-036 V1.0.08.06.18 IMPORTANT INSTALLATION STEPS ARE DENOTED USING A STOP SIGN. THESE STEPS MUST BE PERFORMED IN THE SPECIFIED ORDER TO ENSURE
INSTALL INSTRUCTIONS K9-F14-PT K9/PRISONER TRANSPORTATION SYSTEM FORD EXPEDITION
 INSTALL INSTRUCTIONS K9-F14-PT K9/PRISONER TRANSPORTATION SYSTEM 2003-2017 FORD EXPEDITION HARDWARE: QTY: DESCRIPTION: PART #: 28 ¼-20 x ½ Stainless carriage bolt GSM32022 8 ¼-20 x ¾ Stainless carriage
Check us out on-line! Installation Instructions
 Installation Instructions 2 OPTIONAL ACCESSORIES Order Quantum Rack Accessories Online at www.dawsbetterbuilt.com Cargo Lock Kit Secure Your Load Cargo Locks can easily be installed and adjusted left or
INSTALLATION INSTRUCTIONS
 NOTE: Bolts should remain hand tight until all bolts are installed. STEP 1 Installing the door base (both sides). 1. Locate the outer, roll cage, mounting bolt (passenger side is shown in the illustration).
INSTALLATION INSTRUCTIONS
 AUTOMOTIVE PRODUCTS, INSTALLATION INSTRUCTIONS ROCK SLIDERS APPLICATION: 2007-2017 Jeep Wrangler JK 2 Door PART NUMBER: 42-7005 ITEM QUANTITY DESCRIPTION TOOLS NEEDED 1,2 2 ROCK SLIDER ASSEMBLY, DRIVER
INSTALLATION MANUAL WEEKENDER STEEL LADDER RACK
 TRUCK STORAGE SOLUTIONS SECURING YOUR REPUTATION INSTALLATION MANUAL WEEKENDER STEEL LADDER RACK STEEL & ALUMINUM SIDE BOX WITH PACK RAT DRAWER UNITS MODELS ATTENTION: PLEASE READ AND UNDERSTAND ALL INSTRUCTIONS
4Post and 2Post Universal Shelf System for 19 Racks
 Patent(s) Pending 4Post and 2Post Universal Shelf System for 19 Racks Installation Instructions Kit P/N: 108-4013 108-4261 Kit Contents (1) Shelf (2) Rear Brackets Front Hardware Kit (4) 8-32 x.375 Flat
TIRE RACK INSTALLATION INSTRUCTIONS Dodge Sprinter
 Aluminess Products Inc 9402 Wheatlands Ct. #A Santee, CA 92071 619-449-9930 TIRE RACK INSTALLATION INSTRUCTIONS 07-11 Dodge Sprinter Please read before beginning Stainless steel hardware may bind together
M ACS Instructions
 APPLICABLE MODELS: Nissan Frontier 2005 and up short bed with Utili-Trak mounting rails PACKAGE CONTENTS 00-0060-M-01-1205 ACS Instructions Leitner Designs 25675 Taladro Circle Unit E Mission Viejo, CA
PARTITION INSTALLATION INSTRUCTIONS
 PARTITION INSTALLATION INSTRUCTIONS 2015 Chevrolet Tahoe PPV / Part Number 5703FW, FWA & FEW Do not attempt to install this product on any vehicle equipped with third row seating! Parts List Distributed
Installation Instructions:
 NOTE: Carefully read entire instructions thoroughly before attempting to install this part. (SB76904) Parts Included Qty 94-241CA001 Front Upright: Drvr 1 94-241CA002 Front Upright: Pass 1 94-241CA003
JEEP JK ( 3 DOOR ) SLIMLINE II - FULL TRAY EXTREME RACK KIT
 SLIMLINE II - FULL TRAY EXTREME RACK KIT") JEEP JK ( 3 DOOR ) SLIMLINE II - FULL TRAY EXTREME RACK KIT FAJK004 / KRJW016T INSTALL TIME: 2 Hours NOTE: Your Jeep JK (3 Door) Extreme Roof Rack Kit consists of four boxes. (1) the Tray, (2) the Roll
JEEP JK ( 3 DOOR ) SLIMLINE II - FULL TRAY EXTREME RACK KIT FAJK004 / KRJW016T INSTALL TIME: 2 Hours NOTE: Your Jeep JK (3 Door) Extreme Roof Rack Kit consists of four boxes. (1) the Tray, (2) the Roll
INSTALLATION INSTRUCTIONS
 INSTALLATION INSTRUCTIONS Hidden Winch Skirt Kit For 2011 Ford Super Duty Kit 84520 Your safety, and the safety of others, is very important. To help you make informed decisions about safety, we have provided
Installation Instructions Cage Kit JK Unlimited (4-Dr) Part # 76902
 Part # 76902") Please read instructions entirely before installing this product. Drilling is required to install this part. Parts Included Qty Parts Included Qty Driver Front Upright 1 Pass Side Drill Template (7289)
Please read instructions entirely before installing this product. Drilling is required to install this part. Parts Included Qty Parts Included Qty Driver Front Upright 1 Pass Side Drill Template (7289)
RBP-1215B-RX DODGE RAM QUAD CAB RX3
 RBP-1215B-RX3 2002-2017 DODGE RAM 15-3500 QUAD CAB RX3 Passenger side RX-3 Side Step Drill Template Passenger side rear Modular Bracket (6) L Support Brackets Driver side rear Modular Bracket Driver side
31082 INSTALLATION INSTRUCTIONS
 08 INSTALLATION INSTRUCTIONS Safety glasses should be worn at all times while installing this product. YEARS: 07-CURRENT MAKE: HONDA MODEL: RIDGELINE STYLE: TRUCK WARNING: NEVER EXCEED YOUR VEHICLE MANUFACTURER'S
Side DuraRac Installation Instructions
 Side DuraRac Installation Instructions Ford Transit Low Roof 130 /148 WB Frame Kit Part #: CRC 22-1010-002 V1.0.08.10.18 IMPORTANT INSTALLATION STEPS ARE DENOTED USING A STOP SIGN. THESE STEPS MUST BE
INSTALLATION INSTRUCTIONS
 Thank you for purchasing Poison Spyder Rocker Knockers for your Jeep JK. You now own the ultimate in rocker panel protection for your Jeep. If you purchased the Slider option, these have already been welded
Installation Instructions Lower Cargo Rack Bracket
 Installation Instructions Lower Cargo Rack Application: Jeep Wrangler 2003 Current Part Number: 41437 US Patent 6799706 www.bestop.com - We re here to help! Visit our web site and click on Ask a Question.
Installation Instructions Hard Top Part # , Wrangler 2 & 4 Door
 Please read instructions entirely before installing this product. This accessory is designed and manufactured primarily to augment the vehicles appearance and to protect the occupants from normal weather
INSTALLATION GUIDE N5-DS48-4
 INSTALLATION GUIDE N5-DS48-4 Shelving ( steel ) Transit High Roof & Medium Roof Promaster Standard Roof & High Roof Nissan NV High Roof Sprinter Low Roof & High Roof Box Truck / Trailer QUICK START GUIDE
INSTALLATION INSTRUCTIONS ATV PLOW Mount Kit: PN Application: HONDA RANCHER
 INSTALLATION INSTRUCTIONS ATV PLOW Mount Kit: PN 63290 Application: 2000+ HONDA RANCHER Your safety, and the safety of others, is very important. To help you make informed decisions about safety, we have
FORD 4100/4400 SUPERRAIL MOUNTING KIT WITH ADAPTER FOR B&W GOOSENECK PART #4431
 FORD 4100/4400 SUPERRAIL MOUNTING KIT WITH ADAPTER FOR B&W GOOSENECK PART #4431 Installation Instructions SPECIFICATIONS Fits 1999 2016 Ford F250 & F350 Short Bed Mounts to B&W gooseneck part #1108 & 1111
Katerack Wagon Shelving System
 Ford Transit Connect Assembly Installation Instructions Sheet 1 of 14 BEFORE YOU START! IMPORTANT INSTALLATION STEPS ARE DENOTED USING A STOP SIGN. THESE STEPS MUST BE PERFORMED IN THE SPECIFIED ORDER
JEEP JK ( 3 DOOR ) SLIMLINE II - FULL TRAY EXTREME RACK KIT
 SLIMLINE II - FULL TRAY EXTREME RACK KIT") JEEP JK ( 3 DOOR ) SLIMLINE II - FULL TRAY EXTREME RACK KIT FAJK005 / KRJW016T INSTALL TIME: 5 Hours NOTE: Your Jeep JK (3 Door) Extreme Roof Rack Kit consists of four boxes. (1) the Tray, (2) the Roll
JEEP JK ( 3 DOOR ) SLIMLINE II - FULL TRAY EXTREME RACK KIT FAJK005 / KRJW016T INSTALL TIME: 5 Hours NOTE: Your Jeep JK (3 Door) Extreme Roof Rack Kit consists of four boxes. (1) the Tray, (2) the Roll
SAFETY INJURY & HAZARD
 SAFETY Your safety and the safety of others is very important. In order to help you make informed decisions about safety, we have provided installation instructions and other information. These instructions
CHEVY 4100/4400 SUPERRAIL MOUNTING KIT WITH ADAPTER FOR B&W GOOSENECK PART #4432
 CHEVY 4100/4400 SUPERRAIL MOUNTING KIT WITH ADAPTER FOR B&W GOOSENECK PART #4432 Installation Instructions SPECIFICATIONS Fits 2011-2018 Chevy 2500 & 3500 Short Bed Mounts to B&W gooseneck part #1011 Hitch
Heritage Solar Lamp Post
 Heritage Solar Lamp Post Instruction Manual 23108 Thank you very much for choosing a Nature Power product! For future reference, please complete the owner s record below: Model: Purchase Date: Save the
INSTALLATION INSTRUCTIONS KK-K9-F14-K K9 KIT FOR FORD EXPEDITION
 INSTALLATION INSTRUCTIONS KK-K9-F14-K-32 32 K9 KIT FOR 2003-2016 FORD EXPEDITION TOOLS REQUIRED: Power Drill Drill Bit Set Standard & Metric Socket Sets Phillips Screw Driver Open End Wrench Set Wire Cutters
Installation Instructions Kit, Base Rail Bracket Part # 31413
 Installation Instructions Kit, Base Rail Bracket Part # 31413 Dealer / Installer: Provide a copy of these Instructions to the end user of this product. These Instructions provide important operating and
Kit Includes: 4 Door Jeep Wrangler: Marker Tape Drill. 1 Left Door Check Strap/Arm 1 Left Hinge Plate 1 Right Door Check Strap/Arm
 Smart Door Installation Instructions PRODU UCT INSTALL LATION GUI IDE Prior to beginning this or any installation, completely read these instructions to familiarize yourself with the required steps and
JEEP CARGO SLIDE IMPORTANT WARNING! SSST001. INSTALL TIME: 45 mins
 JEEP CARGO SLIDE SSST001 INSTALL TIME: 45 mins IMPORTANT WARNING! IT IS CRITICAL THAT ALL FRONT RUNNER PRODUCTS BE PROPERLY AND SECURELY ASSEMBLED AND ATTACHED TO YOUR VEHICLE. IMPROPER ATTACHMENT COULD
Single-Sliding Header Mount INSTALLATION INSTRUCTIONS
 1-800-701-4782 Single-Sliding Header Mount INSTALLATION INSTRUCTIONS GATEWAY SO# OPENING SIZE: W x H PULLEY SYSTEM: YES / NO Upon receiving your Gateway Door, inspect packaging and contents for freight
INSTALLATION INSTRUCTIONS
 JK FRONT CRUSHER FLARES INSTALLATION Thank you for purchasing Poison Spyder Front Crusher Flares for your Jeep JK. Installation is fairly simple with the right tools and good mechanical abilities. If you
4" Oval Nerf Bar. Part No. A1007S/B. PARTS LIST: Qty Part Description Qty Part Description
 4" Oval Nerf Bar Part No. A1007S/B Fits: 2009 - Current Dodge Ram 1500 Crew Cab 2001 - Current Dodge Ram 2500/3500 Crew Cab REMOVE CONTENTS FROM BOX. VERIFY ALL PARTS ARE PRESENT. 60-180 min Cutting Not
DRAWer FORD RANGER IMPORTANT WARNING! SSDS201 / SSFR001. INSTALL TIME: 1 Hour. Thank you for purchasing a Front Runner Storage System.
 DRAWer FORD RANGER SSDS201 / SSFR001 INSTALL TIME: 1 Hour Thank you for purchasing a Front Runner Storage System. This Storage System is made up of the following components: 1. A Drawer System - SSDR010
Page No. 1 of 15. Issue F: 11/ FI
 MY09 FORESTER SUV CARGO BARRIER Installation Instructions Part Number 705400/425 705400 -To Suit Non Sunroof models only 705425 To suit Sunroof models only Production From March 2008 to Dec. 2012 This
w w w. h d o n l i n e s h o p. d e VRSCF RIGID SADDLEBAGS GENERAL PREPARATION -J04704 REV Kit Number Models Tools and Supplies Required
 -J070 REV. 00-0- VRSCF RIGID SADDLEBAGS GENERAL Kit Number 7-0 Models For model fitment information, see the P&A retail catalog or the Parts and Accessories section of www.harley-davidson.com (English
CHEVY 4100/4400 SUPERRAIL MOUNTING KIT WITH ADAPTER FOR B&W GOOSENECK PART #4434
 CHEVY 4100/4400 SUPERRAIL MOUNTING KIT WITH ADAPTER FOR B&W GOOSENECK PART #4434 Installation Instructions SPECIFICATIONS Fits 1999-2010 Chevy 2500 & 3500 Short Bed Mounts to B&W gooseneck part #1067 Hitch
Assembly Instructions Signature Choral Riser 4-Step Model
 Assembly Instructions Signature Choral Riser 4-Step Model Contents Important User Information...........................2 General...2 Manufacturer...2 Intended Use...2 Warranty...2 Safety Precautions.................................3
ENG DEFENDER SPARE WHEEL BRACKET RBLD001 GET ORGANIZED. INSTALL TIME:1.5 hours
 DEFENDER SPARE WHEEL BRACKET ENG RBLD001 INSTALL TIME:1.5 hours 1 GET ORGANIZED you will need: Land Rover Defender a Friend Clinch nut tool Drill machine 4,7, 8 & 9 mm drill bit 10,13,19,24 mm spanner
Side DuraRac Installation Instructions
 Side DuraRac Installation Instructions Ford Transit Med/ High Roof Full Size Van (129.9 or 147.6 Wheelbase) Frame Kit Part Number CRC 22 1020 001 Revision 1.0 11/12/14 STEP 1. These instructions are based
US RACK, Inc Falcon Drive, Madera, CA
 US RACK, Inc - 2850 Falcon Drive, Madera, CA 93637-559-661-3050 INSTALLATION AND USE INSTRUCTIONS for Long-John Extension Ladder Rack WARNING: Do NOT attempt to install or use this rack without following
3/4 Rear DuraRac Installation Instructions
 3/4 Rear DuraRac Installation Instructions Ford Transit Low Roof 130 WB Frame Kit Part #: CRC 27-1010-001 V1.0.09.28.18 IMPORTANT INSTALLATION STEPS ARE DENOTED USING A STOP SIGN. THESE STEPS MUST BE PERFORMED
Models 2230 and 2240
 Models 2230 and 2240 Overview... 2 Tools Needed... 2 Hardware...3 Assembly... 4-13 Installation... 14 Drawer Removal... 15 Operation... 15 Maintenance... 15 Accessories... 16 Limited Warranty... 16 Perform
Installation Instructions Dual battery Tray Wrangler & Unlimited Part # 2799
 Please read instructions entirely before installing this product. Wiring is not included with this part and should be done by an experienced technician. This part is designed to work with Optima Class
RH-412 STEEL DOORS INSTALLATION INSTRUCTIONS
 RH-412 STEEL DOORS INSTALLATION INSTRUCTIONS By following the steps outlined below, the assembly, installation and adjustment of the steel doors, will be a simple process. Let s start with the Driver Side.
INSTALL INSTRUCTIONS WELCOME TO THE NEWAGE PERFORMANCE CABINETRY SERIES NEWAGE STEEL WELDED CABINETRY
 NEWAGE STEEL WELDED CABINETRY WELCOME TO THE NEWAGE PERFORMANCE CABINETRY SERIES ALL CABINETS MUST BE MOUNTED TO STUDS ON A SECURE WALL, AS PER THESE INSTRUCTIONS. FAILURE TO DO SO MAY RESULT IN SERIOUS
SAFETY THIS PRODUCT IS FOR OFFROAD USE ONLY. ALL LIABILITY FOR INSTALLATION AND USE RESTS WITH THE OWNER.
 SAFETY Your safety and the safety of others is very important. In order to help you make informed decisions about safety, we have provided installation instructions and other information. These instructions
FORD RANGER Onwards SLIMLINE II RACK (1255MM x 1358MM)
") FORD RANGER - 2012 Onwards SLIMLINE II RACK (1255MM x 1358MM) FAFR001 / KRFM010T INSTALL TIME: 60 mins READ ME FIRST: Thank you for purchasing a Front Runner Slimline II Rack. This Roof Rack consists of
FORD RANGER - 2012 Onwards SLIMLINE II RACK (1255MM x 1358MM) FAFR001 / KRFM010T INSTALL TIME: 60 mins READ ME FIRST: Thank you for purchasing a Front Runner Slimline II Rack. This Roof Rack consists of
INSTALLATION INSTRUCTIONS, AND PARTS LIST
 INSTALLATION INSTRUCTIONS, AND PARTS LIST LB20 SERIES RAMPS Link Mfg. Ltd. 223 15th St. N.E. Sioux Center, IA USA 51250-2120 (712) 722-4868 Fax (712) 722-4779 QUESTIONS? CALL CUSTOMER SERVICE 1-800-248-3057
S H E D A S S E M B L Y I N S T R U C T I O N S
 T I T A N R A N G E S H E D A S S E M B L Y I N S T R U C T I O N S 6 X 4ft = 190 x 150 cm 6 X 6ft = 190 x 190 cm 6 X 8ft = 190 x 255 cm COMPONENT LIST Component illustrations are given as a visual guide
Instruction Sheet D-CPU. Secure CPU Holder
 Instruction Sheet D-CPU Secure CPU Holder I-00457 Rev A PARTS LIST NOTE: Select Security Components when a more secure application is desired. Mounting Track with Mounting Tape Security Bracket Assembly
Polaris XP Doors (P144202) Installation Instructions
 Installation Instructions") Polaris XP4 000 Doors (P440) Installation Instructions WARNING Pro Armor Door and Net are designed to work together to replace your original equipment nets and/or door. Install both the Pro Armor Door
Polaris XP4 000 Doors (P440) Installation Instructions WARNING Pro Armor Door and Net are designed to work together to replace your original equipment nets and/or door. Install both the Pro Armor Door
INSTALLATION INSTRUCTIONS ATV PLOW Mount Kit: Application: 2002 and newer Yamaha Grizzly 660
 INSTALLATION INSTRUCTIONS ATV PLOW Mount Kit: 64669 Application: 2002 and newer Yamaha Grizzly 660 Your safety, and the safety of others, is very important. To help you make informed decisions about safety,
10-PIECE. Garage Storage Set OWNER'S MANUAL. Patent pending
 10-PIECE Garage Storage Set OWNER'S MANUAL Patent pending IMPORTANT When you open the cartons, carefully check the units and make sure there IS NO damage. If you have any problems with the units or with
INSTALLATION INSTRUCTIONS
 JK BODY ARMOR INSTALLATION Thank you for purchasing Poison Spyder Body Armor for your Jeep JK. Although it is a lengthy procedure, Installation is fairly simple with the right tools and good mechanical
INSTALLATION GUIDE. C20-NH STRAIGHT PARTITION Nissan NV ( Perforated Window, No Access, Steel )
") INSTALLATION GUIDE C20-NH STRAIGHT PARTITION Nissan NV ( Perforated Window, No Access, Steel ) QUICK START GUIDE Phase 1 - Assembly q 1.1 Setup... q 1.1.1 Unpack components; compare with the bill of materials...
INSTALLATION GUIDE C20-NH STRAIGHT PARTITION Nissan NV ( Perforated Window, No Access, Steel ) QUICK START GUIDE Phase 1 - Assembly q 1.1 Setup... q 1.1.1 Unpack components; compare with the bill of materials...
DuraRac Shelving System
 GM Full Size Van Assembly Installation Instructions Sheet 1 of 13 BEFORE YOU START! IMPORTANT INSTALLATION STEPS ARE DENOTED USING A STOP SIGN. THESE STEPS MUST BE PERFORMED IN THE SPECIFIED ORDER TO ENSURE
TYGER ARMORTM. Parts List BEFORE INSTALLATION WARNING. Customer Support TG-AM2C /8. x1 Driver/Left Side Armor
 TYGER ARMORTM TG-AM2C20028 Customer Support Parts List x1 Driver/Left Side Armor BEFORE INSTALLATION READ INSTRUCTIONS CAREFULLY BEFORE STARTING INSTALLATION. REMOVE CONTENTS FROM BOX AND VERIFY ALL PARTS
Installation Instructions
 DODGE 4100/4400 SUPERRAIL MOUNTING KIT WITH ADAPTER FOR B&W GOOSENECK PART #4433 Installation Instructions SPECIFICATIONS Fits 2003 2012 Dodge 2500 & 3500 Short Bed Mounts to B&W gooseneck part #1307 &
LC200WT Security Wall Mount with Tilt for up to 32" Flat Screens
 Page 1 of 6 The LC200WT Security Wall Mount with Tilt is designed to secure up to a 32" flat panel monitor to the wall while still allowing the monitor to tilt. The VESA mounting patterns on the front
FORD ESCAPE/KUGA SUV CARGO BARRIER INSTALLATION INSTRUCTION
 This cargo barrier is capable of being located in two positions, behind the 2nd row of seats with the seats in an upright position, and behind the 1st row of seats with the 2nd row of seats in their folded
40680 Transit Connect/NV200/City Express/ProMaster City Wire Partition
 40680 Transit Connect/NV200/City Express/ProMaster City Wire Partition Top Wire Panel (1) Bottom Wire Panel (1) Bottom Mount Panel (1) Transit Connect Top Angle (1) ProMaster City Top Panel (1) NV200/City
INSTALLATION GUIDE. C20-FTM STRAIGHT PARTITION Transit Partition ( Perforated Window, No Access, Steel )
") INSTALLATION GUIDE C20-FTM STRAIGHT PARTITION Transit Partition ( Perforated Window, No Access, Steel ) QUICK START GUIDE Phase 1 - Assembly q 1.1 Setup... q 1.1.1 Unpack components; compare with the bill
INSTALLATION GUIDE C20-FTM STRAIGHT PARTITION Transit Partition ( Perforated Window, No Access, Steel ) QUICK START GUIDE Phase 1 - Assembly q 1.1 Setup... q 1.1.1 Unpack components; compare with the bill
KWIK-KIT KK-S INSTALLATION INSTRUCTION PACKAGE
 KWIK-KIT KK-S-120-02 INSTALLATION INSTRUCTION PACKAGE INSTALLATION INSTRUCTIONS HAVIS KWIK-KIT KK-S-120-02 2002-2007 DODGE/FREIGHTLINER SPRINTER VAN PLEASE READ COMPLETE INSTRUCTIONS PRIOR TO INSTALLATION
WK2 Rear Tie Downs. Install Instructions. Begin Trim Removal IMPORTANT
 Page REF QTY DESCRIPTION REF QTY DESCRIPTION A B C D E 4 4 Tie-Down Bracket Tie-Down Fixture M6 x 0mm.9 Bolts (Zinc) M6 x 30mm.9 Bolts (Zinc) M6 Wedge-Lock Washer F - - Flanged Nut 4g Anti-Seize Pouch
Jeep Wrangler JK & 4-Door Front Pair Part # Revision H
 Jeep Wrangler JK 2007 2 & 4-Door Front Pair Part # 10045 Revision H 03-25-09 Step 1: Prior to Installation: A) Bushwacker only approves installing the flares according to these written instructions with
LC6X4WTM Security Wall Mount with Tilt for up to 60" Flat Screens with VESA 600mm x 400mm or less
 Page 1 of 6 The LC6X4WTM Security Wall Mount with Tilt is designed to secure a flat screen, up to a 60", to the wall while still allowing the monitor to tilt. The VESA mounting patterns on the front of
4Post and 2Post Sliding Rails for Lenovo/IBM M5
 Patent(s) Pending 4Post and 2Post Sliding Rails for Lenovo/IBM M5 4Post Page 2 2Post Center Page 4 Installation Instructions Kit P/N: 122-4818 Kit Contents Kit Contents: (2) (Left & Right) (2) Inner Rail
Install Instructions. NewAge Steel Welded Tall Locker
 Kit Contains Full Width Adjustable Steel Shelves (4) Height-Adjustable Steel Leveling Legs (4) Aluminum Door Trim (2) 2.5 x ¼ Cabinet Mounting Lag Bolts (4) Large Zinc Plated Mounting Washers (4) 5/8 x