Installation Guide. Windows. ORG996_US Windows Installation guide 2016 V4.indd 1 07/11/ :08
|
|
|
- Adela Manning
- 6 years ago
- Views:
Transcription


1 Installation Guide Windows ORG996_US Windows Installation guide 2016 V4.indd 1 07/11/ :08


2 Installation Guide Openings Windows should be installed in the opening without twisting, racking or distorting. Open cavities discovered between the inner and outer skins of brick or block work should be closed in accordance with the local building authority regulations. 2 ORG996_US Windows Installation guide 2016 V4.indd 2 07/11/ :08
. Each shim should be placed in line with the pre-drilled fixing hole in the window frame. Windows Installation Guide 3 ORG996_US Windows Installation guide 2016 V4.indd 3 07/11/2016 15:08")
3 1. Frame Fixing FIG 1 Measure the opening, checking it fits with all measurements on your Origin paperwork Place the correct frame shims along the bottom of the opening to create a level, well supported platform for the window to sit. (Fig.1). Each shim should be placed in line with the pre-drilled fixing hole in the window frame. Windows Installation Guide 3 ORG996_US Windows Installation guide 2016 V4.indd 3 07/11/ :08
 1.3. Run a bead of sealant across and in between shims for window to sit in.")
4 Installation guide 1. Frame Fixing (continued) FIG Place the window on the pre prepared frame shims and re-check for level. Adjust if necessary. Once complete, remove window from the opening once more. (Fig.2) 1.3. Run a bead of sealant across and in between shims for window to sit in. 4 ORG996_US Windows Installation guide 2016 V4.indd 4 07/11/ :09
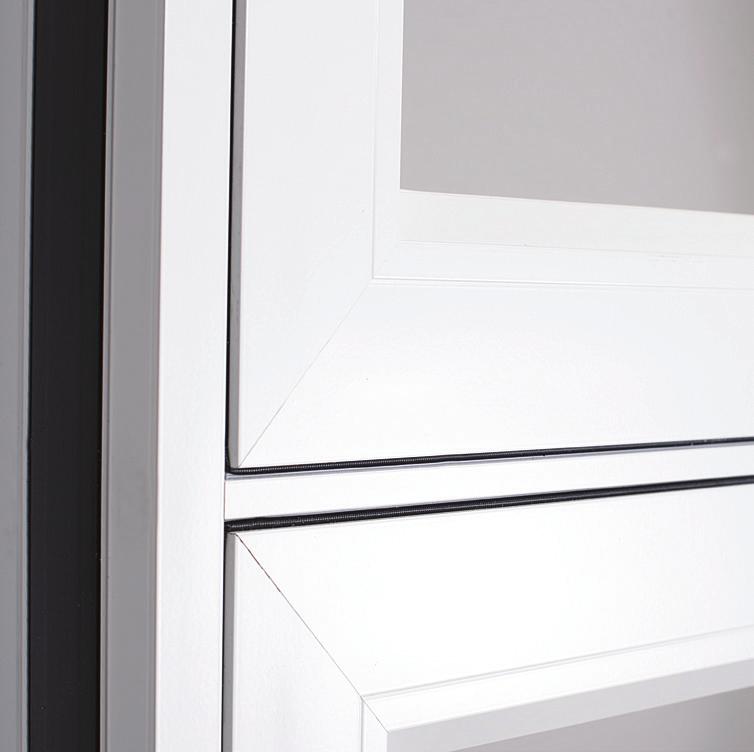
5 FIG Place the window in the opening and secure all four sides of the frame as follows: Frame anchors to be installed at pre-drilled locations (please refer to the back of this guide for installation anchorage details for different substrates etc) Insert suitable frame shims at the top and sides of the frame in line with each pre-drilled set of anchor holes. Care should be taken not to twist or bow the frame as the anchor is tightened Install one pair of frame anchors in the bottom of the frame close to the centre Making sure the frame is sitting plumb in the opening install the opposite pair of anchors in the top of the frame Repeat this process until all frame anchors have been installed into all four sides of the frame. It is wise to check the frame for level and square after each pair of anchors has been installed Once all anchors are in place, work the sealant around each of the anchor heads to prevent water from leaking into the frame. Windows Installation Guide 5 ORG996_US Windows Installation guide 2016 V4.indd 5 07/11/ :09
 2.5.")
6 Installation guide 2. Glazing FIG All insulated glass units should be examined for damages and defects before installation Close the window and fully engage the lock Remove the 4 glazing beads Place glazing shims in the bottom of the glazing chamber spaced approximately 2 in from each corner and no more than 18 centres. (Fig.4) 2.5. Install the glass on the shims Place the required shims between the glass and frame on the remaining 3 sides, spaced as in step 2.4. being careful not to bow or twist the sash Apply a small amount of sealant to the bottom of each shim on the vertical sides to stop the shim from slipping down over time. 6 ORG996_US Windows Installation guide 2016 V4.indd 6 07/11/ :09
 For fixed/picture windows, apply sealant inside the channel from where the bead was removed prior to re-installing the bead. 2.9.")
7 FIG Re-install the four glazing beads. For safety, always ensure the top bead is installed first, followed by the bottom and then the side beads. (Fig.5) For fixed/picture windows, apply sealant inside the channel from where the bead was removed prior to re-installing the bead Insert the glazing wedge gasket between the glass unit and the glazing bead and cut to length For fixed/picture windows, apply sealant along each mitered corner where glazing beads meet. Windows Installation Guide 7 ORG996_US Windows Installation guide 2016 V4.indd 7 07/11/ :09
. (Fig.6) 8 ORG996_US Windows Installation guide 2016 V4.")
8 Installation guide 3. Finishing FIG Wherever practical, the perimeter of the window should be foam filled between the window and the substrate Sealant must be applied around the outside perimeter of the window frame and opening /mull bar (if used). (Fig.6) 8 ORG996_US Windows Installation guide 2016 V4.indd 8 07/11/ :09
9 Casement Window FPA Installation Instructions Lucas A. Turner :38-04:00 Windows Installation Guide 9 ORG996_US Windows Installation guide 2016 V4.indd 9 07/11/ :09
10 Casement Window FPA Installation Instructions 10 ORG996_US Windows Installation guide 2016 V4.indd 10 07/11/ :09
11 Fixed Window FPA Installation Instructions Lucas A. Turner :46-04:00 Windows Installation Guide 11 ORG996_US Windows Installation guide 2016 V4.indd 11 07/11/ :09

12 Fixed Window FPA Installation Instructions 12 ORG996_US Windows Installation guide 2016 V4.indd 12 07/11/ :09
13 Notes Windows Installation Guide 13 ORG996_US Windows Installation guide 2016 V4.indd 13 07/11/ :09
14 Notes 14 ORG996_US Windows Installation guide 2016 V4.indd 14 07/11/ :09
15 Windows Installation Guide 15 ORG996_US Windows Installation guide 2016 V4.indd 15 07/11/ :09
16 Origin USA, 771 Commerce Drive Suite 16, Venice, Florida t e info@originbifolds.com w OFDL_ ORG996_US Windows Installation guide 2016 V4.indd 16 07/11/ :09
Casement/ Casement Picture Pocket Installation (Interior) Tools: (Not Provided by Manufacturer) Fig Supplies: (Not Provided by Manufacturer)
 Tools: (Not Provided by Manufacturer) Fig Supplies: (Not Provided by Manufacturer)") Casement/ Casement Picture Pocket Installation (Interior) Tools: (Not Provided by Manufacturer) Tape Measure Utility Knife Fig. 0-1 Drill Level Putty Knife Pry bar Square Caulk Gun Hammer Safety Glasses
Casement/ Casement Picture Pocket Installation (Interior) Tools: (Not Provided by Manufacturer) Tape Measure Utility Knife Fig. 0-1 Drill Level Putty Knife Pry bar Square Caulk Gun Hammer Safety Glasses
3-LITE PATIO DOOR INSTALLATION INSTRUCTIONS
 3-LITE PATIO DOOR INSTALLATION INSTRUCTIONS IMPORTANT: Read the instructions and familiarize yourself with the door parts and pieces before beginning assembly and installation. TOOLS NEEDED: Tape Measure
Picture Window and Welded Dead-Lite (Exterior) Tools: (Not Provided by Manufacturer) Fig Supplies: (Not Provided by Manufacturer) Fig.
 Tools: (Not Provided by Manufacturer) Fig Supplies: (Not Provided by Manufacturer) Fig.") Picture Window and Welded Dead-Lite (Exterior) Tools: (Not Provided by Manufacturer) Tape Measure Utility Knife Fig. 0-1 Drill Level Putty Knife Pry bar Square Foam Gun (Optional) Caulk Gun Hammer Safety
Picture Window and Welded Dead-Lite (Exterior) Tools: (Not Provided by Manufacturer) Tape Measure Utility Knife Fig. 0-1 Drill Level Putty Knife Pry bar Square Foam Gun (Optional) Caulk Gun Hammer Safety
Installation Guide. Bi-fold Doors
 Installation Guide Bi-fold Doors Installation Guide Components box 1. 6. 2. 3. 7. 5. 4. 8. Contents 1. Fixing plugs 2. Wedge gasket 3. Bottom trolley 4. Top trolley 5. Magnetic keep (x 2 if door height
SMART SYSTEMS VISOGLIDE+ INSTALLTION GUIDE
 SMART SYSTEMS VISOGLIDE+ INSTALLTION GUIDE Please read guide before beginning any installation. Instructions/Guides Keys & Handle Screw Covers Interlock Covers Anti-Lift & Rubber Stops Anti-Lift for Slim
4-lite Patio Door. Installation Instructions
 4-lite Patio Door Installation Instructions IMPORTANT: Read the instructions and familiarize yourself with the door parts and pieces before beginning assembly and installation. Note: Only the 5-0 x 6-8
THERMO-FIT REPLACEMENT WINDOW INSTALLATION INSTRUCTIONS (BRICKMOULD / NO NAILING FLANGE)
") THERMO-FIT REPLACEMENT WINDOW INSTALLATION INSTRUCTIONS (BRICKMOULD / NO NAILING FLANGE) fig.3 Casement, Awning, Fixed Casement, Direct-Set, Double-Hung, Single-Hung & Horizontal Slider Windows Materials
THERMO-FIT REPLACEMENT WINDOW INSTALLATION INSTRUCTIONS (BRICKMOULD / NO NAILING FLANGE) fig.3 Casement, Awning, Fixed Casement, Direct-Set, Double-Hung, Single-Hung & Horizontal Slider Windows Materials
VYTEX PREMIUM SLIDING GLASS DOOR. Table of Contents. Precautions and Safety 2. Tools Required...3. Inspect and Prepare Door...4
 VYTEX PREMIUM SLIDING GLASS DOOR Table of Contents Precautions and Safety 2 Tools Required...3 Inspect and Prepare Door...4 Hardware and Parts Check List....4 Master Frame Assembly 5 Master Frame Installation..7
Installation Guidelines For Quaker Window Products Aluminum flange fin sub sill & receptor system using a T mulled twin window unit.
 Installation Guidelines For Quaker Window Products Aluminum flange fin sub sill & receptor system using a T mulled twin window unit. Installer: Read these instructions completely before starting any installation.
SERIES 360. Single Hung Windows. NOTE: Read instructions completely before attempting any installation.
 Installation Instructions SERIES 360 Single Hung Windows Page 2: Opening Preparation and Wood Buck Installation and Figure 1 Page 3-5: Installation Instructions for Series 360 WINDOWS Page 6: Figure 2:
Side Light Frame Pack Assembly Instructions
 Please read this complete set of assembly instructions before starting the installation and only when you understand the construction method start to follow the step by step guide. IDENTIFY THE PACK CONTENTS
VINYL WINDOWS (new construction or replacement) page 2. VINYL PATIO DOORS pages WOOD CLAD WINDOWS (new construction).page 5 WOOD CLAD WINDOWS
 page 2. VINYL PATIO DOORS pages WOOD CLAD WINDOWS (new construction).page 5 WOOD CLAD WINDOWS") RECOMMENDED INSTALLATION INSTRUCTIONS Please choose the appropriate instructions for the product(s) you are using. Read the instructions thoroughly before beginning the installation process. All instructions
RECOMMENDED INSTALLATION INSTRUCTIONS Please choose the appropriate instructions for the product(s) you are using. Read the instructions thoroughly before beginning the installation process. All instructions
Side Light Frame Pack Assembly Instructions
 Side Light Frame Pack Assembly Instructions Please read this complete set of assembly instructions before starting the installation and only when you understand the construction method start to follow
Metal & Vinyl, Flush Mount and Recessed Fin Windows Recommended Installation Instructions
 PO Box 480 Ph: 417-235-7821 Monett, MO 65708 Fax: 417-737-7140 Metal & Vinyl, Flush Mount and Recessed Fin Windows Recommended Installation Instructions These installation instructions are recommendations
VisioGlide 100 System W4F Four doors 2 fixed, 2 sliding
 Balcony Systems 2011 Visio Glide W4-F Curved Sliding Doors 4 doors: 2 fixed, and 2 sliding Installation guide 1. Insert silicone into the two bottom corners before closing the frame. 1 2. Connect top and
WOOD OUT SWING AWNING, CASEMENT, & HOPPER WINDOW
 WOOD OUT SWING AWNING, CASEMENT, & HOPPER WINDOW INSTALLATION GUIDE READ SPECIFIC INSTALLATION INSTRUCTIONS COMPLETELY BEFORE STARTING ANY INSTALLATION Failure to install and maintain our product according
GENERAL INSTALLATION GUIDELINES
 1551 MT. ROSE AVENUE YORK PA 17403-2909 (717) 849-8100 GENERAL INSTALLATION GUIDELINES For Receptor Systems Approved 08/31/2018 Installation Guideline Disclaimer This document contains general installation
Vinyl Sliding Glass Door Assembly Instructions
 Vinyl Sliding Glass Door Assembly Instructions SERIES SGD 5470/5570 Para instrucciones en español, visite: http://bit.ly/pgtassemblyinstructions Parts List ITEM 4 5 6 7 8 9 0 4 5 6 7 8 SGD 5470/5570 PARTS
ASS 70 FD folding / sliding door. Installation Guide
 ASS 70 FD folding / sliding door Installation Guide IMPORTANT! These doors should be fitted by competent and trained installers. Please read these instructions thoroughly before beginning the installation.
HERITAGE CASEMENT BOW & BAY WINDOW
 HBB HERITAGE CASEMENT BOW & BAY WINDOW INSTALLATION INSTRUCTIONS READ THESE INSTRUCTIONS COMPLETELY BEFORE STARTING ANY INSTALLATION Kolbe & Kolbe Millwork, Co., Inc. 1323 S. 11th Ave. - Wausau, WI 54401
Tools required by installer: Materials required by installer:
 Installation Guidelines For Quaker Window Products Vinyl product line (Single Hung, Double Hung, Sliding Window, Fixed Window, Casement, Awning, and Hopper) Installer: Read these instructions completely
Window Frame Installation Instructions For Nail-on and Block Frames
 General The key to any window or door installation is preparation. This extends from storage of the product to the final installation and to all points in between. Careful planning and attention to detail
Flashing Materials. Rough Opening Preparation
 Installation Instructions for CertainTeed New Construction Windows Handling vinyl windows CAUTION: Always store vinyl windows and doors in an upright position on a slight angle. Never lay them flat or
Architect: Daluz/González Architekten Photo: Peter Baracchi CP 155 SLIDING DOOR INSTALLATION GUIDE. Edition 15/21
 Architect: Daluz/González Architekten Photo: Peter Baracchi CP 155 SLIDING DOOR INSTALLATION GUIDE Edition 15/21 INDEX 1. IMPORTANT INFORMATION... 4 1.1. Lift & slide door overview... 5 1.2. Details...
If you discover that material is missing or defective, contact our customer service department immediately:
 General Information Open the pack list on the crate s exterior. Locate the shop drawings and installation instruction inside the box. Review contents and make sure all parts are present. For a rectangular
InstallatIon InstructIons for 2-lIte PatIo Door unassembled
 InstallatIon InstructIons for -lite PatIo Door unassembled tools & materials You will need: Measuring Tape Pencil Shims Drill & Drill bits: 6", 8", 5 6", 7 6" Utility Knife High-Performance Premium Silicone
Storefront Installation Guide
 Storefront General Notes: 1. Check Contract Documents and Shop Drawings. Understand and clarify any Field Verify Notes and approvals of drawings and products to be familiar with the project. Installation
GENERAL INSTALLATION GUIDELINES
 1551 MT. ROSE AVENUE YORK PA 17403-2909 (717) 849-8100 GENERAL INSTALLATION GUIDELINES For Receptor Systems Approved 9/29/2017 Installation Guideline Disclaimer This document contains general installation
SENTINEL SERIES 110 SINGLE HUNG WINDOWS
 Installation Instructions SENTINEL SERIES 110 SINGLE HUNG WINDOWS Page 2: Opening Preparation, Wood Buck Installation and Figure 1 Page 3-6: Installation Instructions and Figure 2 Page 7: Figure 3: Installation
INSTALLATION INSTRUCTIONS - INSTRUCCIONES PARA LA INSTALACIÓN CLAD WINDOWS WITH FLUSH FLANGE
 2012 Pella Corporation Part Number: 81CP0101 INSTALLATION INSTRUCTIONS - INSTRUCCIONES PARA LA INSTALACIÓN CLAD WINDOWS WITH FLUSH FLANGE Lea las instrucciones en español en el reverso Installation Instructions
Sliding Glass Door Assembly and Installation Guide
 Sliding Glass Door Assembly and Installation Guide Index Door System Components and Hardware The following components are needed to complete the installation of your Sliding Patio Door unit. Check all
ASS 70 FD folding/sliding door installation guide
 ASS 70 FD folding/sliding door installation guide 2 Preparation IMPORTANT These doors should be fitted by competent and trained installers. Please read these instructions thoroughly before beginning the
WEB BASED CORE APPLICATION SPECIFIC INSTALLATION INFORMATION AND METHODS
 CORE WEB BASED CORE APPLICATION SPECIFIC INSTALLATION INFORMATION AND METHODS Proper Measurement Although all possible measures have been taken to insure the accuracy of the material presented, WIXSYS,
Folding Sliding door system
 Folding Sliding door system Installation guide V1.1 Nov 2014 p2 This document is offered as guidance for WarmCore folding sliding door installations - for full survey and installation guidelines please
NEW CONSTRUCTION, REPLACEMENT AND FLUSH FIN REPLACEMENT WINDOW INSTALLATION INSTRUCTIONS
 NEW CONSTUCTION, REPLACEMENT & FLUSH FIN WINDOWS NEW CONSTRUCTION, REPLACEMENT AND FLUSH FIN REPLACEMENT WINDOW INSTALLATION INSTRUCTIONS IMPORTANT! READ ALL INSTRUCTIONS BEFORE BEGINNING INSTALLATION.
Installation Guidelines For ALUMINUM M-SERIES 3 PANEL SLIDING DOOR
 www.quakerwindows.comv www.quakercommercialwindows.com PO Box 128 504 Highway 63 South Freeburg, MO 65035 800-347-0438 573-469-4151 (fax) Installation Guidelines For ALUMINUM M-SERIES 3 PANEL SLIDING DOOR
Please read and understand all instructions before beginning. These instructions cover the non-impact aluminum French Door 101.
 The performance and proper operation of a door is only as good as the installation. By following these instructions, the probability of a good installation greatly increases. Please read and understand
Installation Guide. WarmCore. Folding Sliding door system. Glass Packing. Pre-Installation. Removing the Existing Door.
 WarmCore Installation Guide Pre-Installation Glass Packing p5 Removing the Existing Door Glazing Sequence p6 Preparing the Opening Glass Packing Locations for Toe & Heel p6 Door Alignment Sill Options
Installation - Sub Cills
 Installation - Sub Cills Fitting of Subcill Drainage paths through the sub-cill can be seen on the illustration alongside so care must be taken to ensure they are not obstructed and that screw fixings
VINYL REPLACEMENT WINDOW INSTALLATION STANDARDS
 VINYL REPLACEMENT WINDOW INSTALLATION STANDARDS BEFORE you start to remove the existing windows Place clean drop cloths in all work areas. Re-measure the opening to ensure the new window will fit. Remove
Installation Guide. Evolve bi-fold. 8. Door restrictor- optional p9. 1. Before you start p2. 9. Adjustment. 2. Measuring and surveying p2
 Evolve bi-fold Installation Guide 1. Before you start p2 8. Door restrictor- optional p9 2. Measuring and surveying p2 3. Configuration details p4 4. Installation p5 5. Glazing p5 6. Glazing packer details
Please read and understand all instructions before beginning. These instructions cover impact and non-impact aluminum French Door 650/750.
 The performance and proper operation of a door is only as good as the installation. By following these instructions, the probability of a good installation greatly increases. Please read and understand
DIANE MODEL PASS-THRU
 INSTALLATION INSTRUCTIONS MODELS D101 AND D10 DIANE MODEL PASS-THRU 50 E. Vernon Avenue, Los Angeles, CA 90058-186 Phone: (800) 41-6144 EXT. 7760 Fax: (800) 458-7496 crlaurence.com Email: transaction@crlaurence.com
METL-VISION WINDOW SYSTEM FOR HORIZONTAL WALL PIONEERING INSULATED METAL PANEL TECHNOLOGY
 METL-VISION WINDOW SYSTEM FOR HORIZONTAL WALL Window assembly GUIDE PIONEERING INSULATED METAL PANEL TECHNOLOGY PIONEERING INSULATED METAL PANEL TECHNOLOGY CONTENTS DETAIL TITLE FILE NO. PAGE NO. INTRODUCTION..................................................................
Installation Instructions
 Installation Instructions 1293 N. Harvey Mitchell Pkwy. Bryan, Texas 77803 800.444.1444 ph 979.823.1005 fax www.aswcommercial.com Simplifying Windows Complete Architectural CD Binder Inside B l as t I
Picture Window Rough Opening Installation with Sheathing Intact with Brickmould Tools: (Not supplied by manufacturer) Fig. 0-1
 Fig. 0-1") Picture Window Rough Opening Installation with Sheathing Intact with Brickmould Tools: (Not supplied by manufacturer) Tape Measure Drill Level Putty Knife Square Foam Gun Utility Knife Caulk Gun Hammer
Picture Window Rough Opening Installation with Sheathing Intact with Brickmould Tools: (Not supplied by manufacturer) Tape Measure Drill Level Putty Knife Square Foam Gun Utility Knife Caulk Gun Hammer
InSTallaTIon InSTruCTIonS For 4-lITe PaTIo Door unassembled
 InSTallaTIon InSTruCTIonS For 4-lITe PaTIo Door unassembled Measuring Tape Pencil Shims Drill & Drill bits: 6", 8", 5 6", 7 6" Tools & materials You Will need: Square Hammer or Mallet Level Stiff Putty
SIG Awning / Casement / Fixed Lite 100
 TYPICAL FRAME ASSEMBLY - AWNING WINDOW 07-01 85720-2 GASKET EXT FL JAMB 100 BS201 (3471) HEAD HINGED 100 86064 TRIM FIN A 83963 SCREW SQ 8G X 1.0 PAN PP SS #2 85737 GASKET EXT FL TRANSOM 85720-1 86065
Installation Instructions Double-Hung, Single-Hung, Casement, Awning, Sliding, Picture & Shapes Non-Impact & Impact Resistant Nailing Fin Windows
 Installation Instructions Double-Hung, Single-Hung, Casement, Awning, Sliding, Picture & Shapes Non-Impact & Impact Resistant Nailing Fin Windows americancraftsmanwindows.com Project Requirements: Read
INSTALLATION INSTRUCTIONS for Custom and Tradition Plus/W-4500 Pocket Windows (JII022) IMPORTANT INFORMATION AND GLOSSARY
 IMPORTANT INFORMATION AND GLOSSARY") for Custom and Tradition Plus/W-4500 Pocket Windows (JII022) Thank you for selecting JELD-WEN products. Attached are JELD-WEN s recommended installation instructions for Pocket (replacement) Double-Hung,
for Custom and Tradition Plus/W-4500 Pocket Windows (JII022) Thank you for selecting JELD-WEN products. Attached are JELD-WEN s recommended installation instructions for Pocket (replacement) Double-Hung,
Kinro Metal, Vinyl, Flush Mount and Recessed Fin Windows OEM INSTALLATION MANUAL
 Kinro Metal, Vinyl, Flush Mount and Recessed Fin Windows OEM INSTALLATION MANUAL TABLE OF CONTENTS Introduction 2 Safety Requirements 2 Fasteners 3 Preparation 3 Rough Opening Preparation 3 Resources Required
Chapter 12 - Windows and Doors
 Chapter 12 - Windows and Doors Contents Chapter 12 - Windows and Doors... 12-1 Timing & Prerequisites... 12-2 Verifying Windows and Doors Order... 12-3 Windows... 12-4 Prepare the Window Openings... 12-4
Series Advanced and alternate. Installation Instructions
 Series 5500 Advanced and alternate Installation Instructions Part NO. Y557 February 2013 TABLE OF CONTENTS SECTION S-5500 ADVANCED INSTALLATION INSTUCTIONS PAGE I. General Notes and Guidelines...... 3-4
Vinyl Windows and Doors
 Vinyl Windows and Doors Part Number: V983571 2011 Pella Corporation INSTALLATION INSTRUCTION - INSTRUCCIONES DE INSTALACION 350 SERIES WINDOW INTO EXISTING WOOD FRAME WINDOW Lea las instrucciones en español
Liniar Window. installation guide
 Liniar Window installation guide This installation guide is designed to show you the best way to fit Liniar windows, and covers all styles of window made from Liniar s lead-free 70mm PVCu profile. Not
Vinyl Windows and Doors Manufactured by VPI Quality Windows
 Vinyl Windows and Doors Manufactured by VPI Quality Windows Part Number: 511_Installation ENDURANCE CASEMENT\AWNING\PW INSTALLATION INSTRUCTIONS Installation Instructions for Typical Construction These
INSTALLATION INSTRUCTIONS for Custom and Premium Pocket Windows (JII022) IMPORTANT INFORMATION AND GLOSSARY SAFETY AND HANDLING
 IMPORTANT INFORMATION AND GLOSSARY SAFETY AND HANDLING") Thank you for selecting JELD-WEN products. Attached are JELD-WEN s recommended installation instructions for pocket (replacement) double-hung, casement, awning, picture or transom windows, designed to
Thank you for selecting JELD-WEN products. Attached are JELD-WEN s recommended installation instructions for pocket (replacement) double-hung, casement, awning, picture or transom windows, designed to
Installation Instructions for Vista Air Vertically Folding Walls
 Installation Instructions for Vista Air Vertically Folding Walls Use these instructions in conjunction with your shop drawings to see the specifics that are particular to the model you are installing.
WINDOW REPLACEMENT INSTRUCTIONS FOR CASEMENT, DOUBLE-HUNG AND CLAD FRAME WINDOWS USING FRAME SCREWS
 WINDOW REPLACEMENT INSTRUCTIONS FOR CASEMENT, DOUBLE-HUNG AND CLAD FRAME WINDOWS USING FRAME SCREWS These instructions were tested developed for replacing windows in wood-frame wall construction systems
YVS 400 TU Window System
 YVS 400 TU SYSTEM DESCRIPTION YVS 400 TU PERFORMANCE FEATURES 4 Overall Depth ThermaBond Plus Poured & Debridged Thermal Break Variations: Single Hung, Double Hung & Fixed Windows 1 /8 & 1 1 /16 Glazing
SLIDING GLASS DOOR ASSEMBLY INSTRUCTION Series 680/780
 10/07 M0200030 GENERAL NOTICE READING THESE INSTRUCTIONS FIRST AND FOLLOWING THE PROCEDURES IN PROPER SEQUENCE WILL REDUCE FRUSTRATION, COSTLY MISTAKES AND WASTED TIME. Protect main frame only with light
Installation Guide for Architectural Wood Hinged Windows
 Guide for Architectural Wood Hinged Windows Congratulations! You have just purchased one of the many fine Andersen products. Proper assembly, installation and maintenance are essential if the benefits
Method of Build 1. General
 Method of Build 1 General GLAZED ELEVATIONS Viso Double Glazed in glazed form differs from many other systems as the vertical joints can have Viso dry joints or the unique HIDDEN mullion post between glazed
Integrity Polygon and Round Top Installation and Finishing Instructions
 Integrity Polygon and Round Top Installation and Finishing Instructions 08/20/2004 70852 BEFORE YOU BEGIN IMPORTANT: Read these instructions thoroughly before beginning to install your Integrity Polygon
INSTALLATION INSTRUCTIONS IMPERVIA SLIDING PATIO DOOR WITH FINS
 2008 Pella Corporation Part Number: 803V0101 INSTALLATION INSTRUCTIONS IMPERVIA SLIDING PATIO DOOR WITH FINS Installation Instructions for Typical Wood Frame Construction. These instructions were developed
340 & 350 SERIES BATH ENCLOSURES
 INSTALLATION INSTRUCTIONS 340 & 350 SERIES BATH ENCLOSURES 800-643-1514 www.alumaxbath.com Copyright Alumax Bath Enclosures 2010. All rights reserved. LIMITED WARRANTY AND REMEDY ALUMAX BATH ENCLOSURES
UNIT No. 15 & 16 SHOWER DOOR INSTALLATION INSTRUCTIONS
 UNIT No. 15 & 16 SHOWER DOOR INSTALLATION INSTRUCTIONS Page 2 of 7 MAINTENANCE: Two primary materials are used to manufacture your new Basco enclosure; tempered glass and anodized aluminum. To assure a
Installation Instructions For Slider Casement Air Conditioners
 Installation Instructions For Slider Casement Air Conditioners NOTE: These instructions describe installation in a typical wood framed window with a wood SLIDE-BY sash, or installation in a metal CASEMENT
INTERIOR. Checkrail. Flashing tape
 Pella Corporation 2007 Part Number: 808F0100 INSTALLATION INSTRUCTION - INSTRUCCIONES DE INSTALACION FOR PELLA PRECISION FIT DOUBLE-HUNG VENT WINDOW PARA LA VENTANA DE GUILLOTINA CON HOJA PRACTICABLE PRECISION
Kinro Metal, Vinyl, Flush mounted and Recessed Fin Windows (HUD) OEM INSTALLATION MANUAL
 OEM INSTALLATION MANUAL") Kinro Metal, Vinyl, Flush mounted and Recessed Fin Windows (HUD) OEM INSTALLATION MANUAL TABLE OF CONTENTS Introduction 2 Safety Requirements 2 Resources Required 2 Tools Required 2 Fasteners 3 Preparation
Kinro Metal, Vinyl, Flush mounted and Recessed Fin Windows (HUD) OEM INSTALLATION MANUAL TABLE OF CONTENTS Introduction 2 Safety Requirements 2 Resources Required 2 Tools Required 2 Fasteners 3 Preparation
340 & 350 SERIES DELUXE FRAMELESS BYPASS
 BATH ENCLOSURES An Alcoa Company Tel: 800-643-1514 Fax: 870-234-3181 www.alumaxbath.com INSTALLATION INSTRUCTIONS 340 & 350 SERIES DELUXE FRAMELESS BYPASS BATH ENCLOSURES Copyright Alumax Bath Enclosures
installation instructions For Slider Casement Air Conditioners
 installation instructions For Slider Casement Air Conditioners NOTE: These instructions describe installation in a typical wood framed window with a wood SLIDE-BY sash, or installation in a metal CASEMENT
Installation Guide for Andersen Architectural Clad Hinged Windows
 Guide for Andersen Architectural Clad Hinged Windows Congratulations! You have just purchased one of the many fine Andersen products. Proper assembly, installation and maintenance are essential if the
PLAYLAND 72 SPIRAL SLIDE 3.5 Posts, 3.5 Posts / 48 Grid and 5 Posts
 PLAYLAND 72 SPIRAL SLIDE 3.5 Posts, 3.5 Posts / 48 Grid and 5 Posts USER GROUP: 2-12 RECOMMENDED CREW: 2 people TOOLS REQUIRED: T-30 TORX tool (supplied by manufacturer) T-45 TORX tool (supplied by manufacturer)
INOVO 2-LITE SLIDING PATIO DOOR
 INOVO 2-LITE SLIDING PATIO DOOR ASSEMBLY AND INSTALLATION INSTRUCTIONS IMPORTANT: READ THE INSTRUCTIONS AND FAMILIARIZE YOURSELF WITH THE DOOR PARTS AND PIECES BEFORE BEGINNING ASSEMBLY AND INSTALLATION.
SAF-T-LINER MVP-EF PARTS MANUAL. Window Section. Page 5-1. Windows 10/96
 Windows Page 5-1 Driver's Standard Page 5-2 Windows Driver's Standard Item Part Num. Number Qty. Description Notes 45001506 1 Sash - Driver's, Assembly, with Tempered Glass 7/32" Complete with Trim, No
Installation Guide for Andersen Architectural Clad Awning Windows
 Guide for Andersen Architectural Clad Awning Windows Congratulations! You have just purchased one of the many fine Andersen products. Proper assembly, installation and maintenance are essential if the
All Window Installation Instruction
 1 All Window Installation Instruction Hurd Window Installation Instructions for Nail Fin & Wood Brick Mould Units Nail Fin Windows See Pages 2-11 Wood Brick Mould Windows See Pages 2-6, 8 & 12BM - 14BM
WINDOW INSTALLATION GUIDE
 WINDOW INSTALLATION GUIDE SAWDAC is not responsible for or liable for any use or misuse of the information contained in this window installation guide. Window Installation Guide This guide provides basic
Chapter 12 - Windows and Doors
 Chapter 12 - Windows and Doors Contents Chapter 12 - Windows and Doors... 12-1 Timing & Prerequisites... 12-2 Verifying Windows and Doors Orders... 12-3 Windows... 12-4 Prepare the Window Openings... 12-4
Method of Build 1. Fire. Sound
 Method of Build 1 General Viso Fire & Acoustic in the solid form differs from most other systems as it can be erected using 12.5mm & 15.0mm boards within the same Aluminium framework. Also hidden fix board
FITTING INSTRUCTIONS FOR FOLDING SLIDING DOOR SYSTEM SF55 & SF75 WITH WEATHERED OR FLUSH TRACK
 FITTING INSTRUCTIONS FOR FOLDING SLIDING DOOR SYSTEM SF55 & SF75 WITH WEATHERED OR FLUSH TRACK Please refer to your order or detailed sectional drawing (if requested) to assist you with the configuration
Window with Nail fin (New construction)
") Window with Nail fin (New construction) Disclaimer: Improper installation and care may void warranty. These instructions are a basic/general recommendation for installation, but may not be utilized in
Window with Nail fin (New construction) Disclaimer: Improper installation and care may void warranty. These instructions are a basic/general recommendation for installation, but may not be utilized in
40mm Thermoclick. Type II Class 1 Clear Satin Anodize - 201R1 (Mid Grade Commercial)
") http://www.sundancesupply.com 40mm Thermoclick Type II Class 1 Clear Satin Anodize - 201R1 (Mid Grade Commercial) U-Profile 12' Lengths $39 Out System offers a complete set of extrusions and accessories
http://www.sundancesupply.com 40mm Thermoclick Type II Class 1 Clear Satin Anodize - 201R1 (Mid Grade Commercial) U-Profile 12' Lengths $39 Out System offers a complete set of extrusions and accessories
INSTALLATION INSTRUCTION - INSTRUCCIONES DE INSTALACIÓN FOR CLAD CASEMENT & AWNING WINDOW VENTANA DE DOS HOJAS CON REVESTIMIENTO
 2008 Pella Corporation Part Number: 801P0101 INSTALLATION INSTRUCTION - INSTRUCCIONES DE INSTALACIÓN FOR CLAD CASEMENT & AWNING WINDOW VENTANA DE DOS HOJAS CON REVESTIMIENTO Corner Corner Top Fin Corner
INSTALLATION INSTRUCTION FOR CLAD BOW WINDOWS WITHOUT HEAD AND SEAT BOARD
 2008 Pella Corporation Part Number: 80KG0101 INSTALLATION INSTRUCTION FOR CLAD BOW WINDOWS WITHOUT HEAD AND SEAT BOARD Note: These instructions may be used for all Pella Bow windows that do not have a
Heavy Wall Applied Stop Tube Frame and Door Installation
 INSTALLATION INSTRUCTIONS Heavy Wall Applied Stop Tube Frame and Door Installation Read all instructions before beginning installation. These instructions are provided to help prevent installation problems
UNIT No FRAMELESS PIVOT SHOWER DOOR
 INSTALLATION INSTRUCTIONS UNIT No. 3600 FRAMELESS PIVOT SHOWER DOOR NEED INSTALLATION HELP? Call 1-800-45-BASCO (452-2726) Monday - Friday 8:00 A.M. - 4:30 P.M. Eastern Time QCI0020 Rev. 3 Page 1 of 8
Installation Guidelines for all Quaker products with nail fins New Construction nail fin installation with a Zip sheathing system.
 www.quakerwindows.com www.quakercommercialwindows.com PO Box 128 504 Highway 63 South Freeburg, MO 65035 800-347-0438 573-469-4151 (fax) Installation Guidelines for all Quaker products with nail fins New
YOW 350 XT Thermally Broken Operable Window System
 YOW 350 XT Thermally Broken Operable Window System MegaTherm Glass Fiber With 6/6 Nylon Thermal Break YOW 350 XT SYSTEM DESCRIPTION 3-1/2 Overall Frame Depth MegaTherm Thermal Break Construction: Frame
300C6 CONTINUOUS HINGE SEMI-FRAMELESS DOOR KIT
 300C6 CONTINUOUS HINGE SEMI-FRAMELESS DOOR KIT LIMITED WARRANTY AND REMEDY Alumax Bath Enclosures warrants to its dealers, customers, and all subsequent purchasers and users, that the products supplied
Figure #1 - VSNEO Shower Door Assembly
 Figure #1 - VSNEO Shower Door Assembly Figure #2 - VSNEO - Top View Figure #3 - VSNEO - Side View Figure #4 - Foam Curb Plug Figure #5 - Magnet Strip Figure #6 - VSNEO - Drip Deflector Preparation VSNEO
Contemporary 3 Panel Classic 5 Panel French Panel
 Contemporary 3 Panel Classic 5 Panel French Panel (X) Operating / Lock Panel Left (O) Fixed Panel Right Note : Glazing Beads For All Panel Face To The Exterior 2 Panel XO Left Is Shown Above Opposite =
INSTALLATION INSTRUCTION SINGLE PANEL, SINGLE PANEL WITH SIDELIGHT COMBINATION AND 20 MINUTE FIRE RATED WOOD FRAME ENTRY DOOR
 2011 Pella Corporation Part Number: 818T0101 INSTALLATION INSTRUCTION SINGLE PANEL, SINGLE PANEL WITH SIDELIGHT COMBINATION AND 20 MINUTE FIRE RATED WOOD FRAME ENTRY DOOR Installation Instructions for
1/4 FRAMELESS SLIDING DOOR FOR TUB OR SHOWER 4400A-4500A
 1/4 FRAMELESS SLIDING DOOR FOR TUB OR SHOWER 4400A-4500A F AB GLASS AND MIRROR www.fabglassandmirror.com Call: +1 888-474-2221 Fax: (614)-334-4919 Office Timing: 8:30-18:00 EST info@fabglassandmirror.com
Vinyl Windows and Doors
 Vinyl Windows and Doors Manufactured by Pella Corporation WINDOW REPLACEMENT INSTRUCTIONS FOR SINGLE-HUNG AND SLIDING WINDOWS INTO EXISTING CASEMENT FRAME Part Number: V981203 2009 Pella Corporation USING
ASS 70.HI Lift/Sliding and Sliding Doors Installation Guide
 ASS 70.HI Lift/Sliding and Sliding Doors Installation Guide 2 Schueco ASS 70.HI Lift/Sliding and Sliding Doors Installation Guide Installation guide IMPORTANT The ASS 70.HI door should be fitted by competent
Flushglaze For Framed Openings and Horizontal Panels. Window System Installation Guide
 Flushglaze 4500 For Framed Openings and Horizontal Panels Window System Installation Guide January 2017 BENCHMRK Welcome to Kingspan, global leaders in the design and manufacture of insulated metal panels
FITTING INSTRUCTIONS FOR FOLDING SLIDING DOOR SYSTEM SF75H
 FITTING INSTRUCTIONS FOR FOLDING SLIDING DOOR SYSTEM SF75H 01603 424434 Please refer to your order or detailed sectional drawing (if requested) to assist you with the configuration of the system supplied
BSM, GSM & GSS. Joint Kit Instruction. (Modified for IMPACT) (NSF Certified) Curved Glass Fresh Meat Delicatessen and Seafood Merchandisers
 (NSF Certified) Curved Glass Fresh Meat Delicatessen and Seafood Merchandisers") BSM, GSM & GSS Joint Kit Instruction (Modified for IMPACT) (NSF Certified) Curved Glass Fresh Meat Delicatessen and Seafood Merchandisers February, 1999 JOINT ASSEMBLY PARTS LIST Item Quantity Description
BSM, GSM & GSS Joint Kit Instruction (Modified for IMPACT) (NSF Certified) Curved Glass Fresh Meat Delicatessen and Seafood Merchandisers February, 1999 JOINT ASSEMBLY PARTS LIST Item Quantity Description