Tuff-Rib. Installation Manual. Nationwide supplier of quality metal roofing. Toll-Free (800) S. Lee Hwy. Cleveland, TN 37311
|
|
|
- Emil McDonald
- 6 years ago
- Views:
Transcription


1 Installation Manual Nationwide supplier of quality metal roofing. 65 S. Lee Hwy. Cleveland, TN Toll-Free (800) 78-00
2 IMPORTANT NOTICE This manual contains suggestions and guidelines on how to install Best Buy Metals panels and trim details. The contents of this manual include the guidelines that were in effect at the time this publication was originally printed. In an effort to keep pace with the ever-changing code environment, Best Buy Metals retains the right to change specifications and / or designs at any time without incurring any obligations. To insure you have the latest information available, please inquire or visit our web site. Application and design details are for illustrative purposes only and may not be appropriate for all environmental conditions and/or building designs. Projects should be engineered and installed to conform to applicable building codes, regulations, and accepted industry practices FAX: Page of 0
3 TABLE OF CONTENTS. Introduction - Design and Testing Page. Panel Installation a. Installation Guide b. Panel Squaring Pages, 5 Pages 6, 7. Installation Sequence Pages 8, 9. Trim Assemblies a. Fascia b. Mini Eave c. Eave Trim d. Rake / Gable e. Preformed Valley f. h. Hip i. Ridge j. Vented Ridge k. High Side Peak l. Side Wall m. End Wall Page 0 Page Page Page Page Page 5 Page 6 Page 7 Page 8 Page 9 Page 0 Page Page 5. Trim, Accessories, & Tools 6. Special Details a. Valley Lapping and Cutting b. Pipe Flashing Pages,, 5 Page 6, FAX: Page of 0
4 Introduction The Tuff-Rib panel is an industry leader in strength and durability. This popular and versatile panel features classic looks and is used in a wide range of applications including residential, commercial, and post-frame buildings. Tuff-Rib was designed with strong trapezoidal ribs to increase strength and ease handling and installation. In addition, the anti-siphoning channel on the under-lap provides extra leak resistance in the presence of extreme wind and rain loads. Tuff-Rib is available in many different paint colors and in both 6 and 9 gauge steel. It is also available in unpainted Galvalume or in some cases unpainted galvanized. Our paint system and Galvalume substrate are individually covered by a limited warranty. Please see our color chart for details on our paint system. The Tuff-Rib panel is available in 6 coverage. The panel has five major support ribs at ¾ high that add rigidity and strength to the panel. Tuff-Rib is Metal Construction Association certified. Below is a list of all of the Tuff-Rib panels approvals and certifications. Dade County NOA # & ASCE 7-98 Compliant Florida Building Code Approval #FL586., #FL6., #FL960. Texas Department of Insurance Approval #6 UL 790 Fire Resistance Class A UL 8 Impact Resistance Class UL 580 Uplift UL Class 90 CONSTRUCTION #58 Allowable Uniform Loads Per Square Foot LIVE LOAD (PSF) WIND LOAD (PSF) SPAN (INCHES) Gauge Gauge NOTES:. Theoretical allowable loads are based on section properties and allowables calculated in accordance with 00 AISI Specifications.. Theoretical allowable loads are based on three or more uniform spans.. For roof panels, deduct self weight for actual live load capacity of the panel.. These loads are for panel strength. Frames, purlins, decks and fasteners must be designed to resist all loads imposed on the panel. 5. Check local building codes if panel testing is required FAX: Page of 0
5 Panel Installation Guide Storage If metal is not to be used immediately, store inside in a well ventilated, dry location. Condensation or other moisture can form between the sheets during storage causing water stains or white rust which detract from the appearance of the product and may affect the product s useful life. Trapped moisture between sheets of painted metal can cause white rust to form underneath the paint. This can cause the paint to flake off the panel immediately or several years later. To prevent white rust and staining, break the shipping bands on the material. Store the material on end or on an incline of at least 8 with a supporting board underneath to prevent sagging. Fan the sheets slightly at the bottom to allow for air circulation. Keep the sheets off of the ground with an insulator such as wood. Any outdoor storage is at the customer s own risk. If outdoor storage cannot be avoided, protect the metal using a canvas cover or waterproof paper. Never cover the metal with plastic as this will cause condensation to form. Some Safety Precautions Always wear protective gloves when working with steel panels to avoid cuts from sharp edges. When cutting or drilling steel panels, always wear safety glasses and sweep off any metal shavings immediately to prevent eye injury from flying metal fragments. If you must walk on a metal roof, take great care. Metal panels can become slippery, so always wear shoes with non-slip soles. Avoid working on metal roofs during wet conditions when the panels can become extremely slippery. General Installation Information Insure that the structure is square and true before beginning panel installation. If the structure is not square, the panels will not properly seal at the sidelaps. Start the first panel square to eave by using the,, 5 Triangle Method. Green or damp lumber is not recommended. Moisture released from the damp lumber may damage the metal panels. Nails installed in green or damp lumber may back out. Remove any loose metal shavings left on the roof surface immediately to prevent corrosion. After installing roof, remove any debris such as leaves or dirt to prevent moisture from getting trapped on panels. Fastening If you wish to predrill fastener holes, use a cover sheet to prevent hot shavings from sticking to panels. Screws - For best results, use a -/ washered wood screw in the flat of the panel as shown in the illustration below. Drive the fastener so that the washer is compressed securely against the metal. Do not over drive the fastener as this will form a dimple that can collect water and cause leakage. Do not leave any loose fasteners that have missed the purlin. Use a # stitch screw or caulk to fill the hole. Figure # - Fastening Patterns for Tuff-Rib RECOMMENDED FASTENING PATTERN FOR ½ SCREWS Figure # / Oversized Antisiphoning Channel SCREW FASTENERS EAVE, RIDGE, & ENDLAPS SCREW FASTENERS INTERMEDIATE SUPPORTS FAX: Page 5 of 0
6 Roofing Slopes of less than.5 on are not recommended. For slopes of.5 on or greater, end lap panels 6. Side laps should face away from the prevailing wind. Lay the first sheet along the eave at the down-wind side of the roof, farthest away from the direction of the prevailing winds (See Figure #). Install sheets in the sequence shown in Figure #. Figure # Figure #5 - Installation Options Prevaili ng Winds x s Spacing Underlayment Underlayment Maximum Purlin Spacing for Roof on Center 5 Install Metal Directly to Wood Frame Use Maximum Purlin Spacing Install Metal *NOT RECOMMENDED FOR HEATED SPACES UNLESS INSULATION AND VAPOR BARRIER PROTECTION IS USED Install Metal on Solid Deck Lay Plywood Deck Apply Synthetic Underlayment or other Vapor Barrier Protection Install Metal Install Metal Over Existing Shingles Apply Synthetic Underlayment or other Vapor Barrier Protection Install Metal * Proper ventilation and vapor barrier protection recommended for heated spaces Allow an overhang a minimum of at the eave to provide for a drip edge. Use inside closure at eave to prevent water infiltration, insect or bird infestation at openings. To protect against uplifting winds and to provide a finished appearance, apply gable trim. Apply fasteners every 6-0. Optionally apply butyl tape as shown in Figure #6 along the top of lap ribs. Do not block the siphon channel with the tape. Also an option: apply a / or 7/8 lap stitch screw into the crown of the rib to secure the side lap. This is especially a good idea on roofs with a slope less than :. Figure #6 - Proper Application of Side Lap Butyl Tape Allowable Uniform Loads Per Square Foot SPAN (INCHES) 9 Gauge 6 Gauge LIVE LOAD (PSF) WIND LOAD (PSF) NOTES:. Theoretical allowable loads are based on section properties and allowables calculated in accordance with 00 AISI Specifications.. Theoretical allowable loads are based on three or more uniform spans.. For roof panels, deduct self weight for actual live load capacity of the panel.. These loads are for panel strength. Frames, purlins, decks and fasteners must be designed to resist all loads imposed on the panel. 5. Check local building codes if panel testing is required FAX: Page 6 of 0
7 Triangle Method Point C 6 5 Using two tape measures, locate point C by hooking one tap to a nail at point A and the second tape to a nail at point B. Extend the tapes until they cross and meet at on the first tape and 5 on the second tape and place a temporary nail where and 5 meet. Ridge Rake Roof Slope...the and 5 measurements are the and 5 sides of the triangle. Rake Point A Point B Eave Point C Establish a line from point A to point B by temporarily marking each point with a nail. The line must be parallel to the eave and in this example long (this is the side of the Triangle). Ridge Note: For larger triangles multiple each side of the triangle by the desired increase in size. For example, if the roof panels are 5 from eave to ridge, multiply each side by a factor of 6 for an Triangle. Obviously, the closer the triangle vertical leg length is to matching the panel Rake Roof Slope Rake Hook a chalk line to point A and pull it in line with point C and mark a chalk line on the roof deck. Point A This will be the square reference line for the Tuff-Rib panel installation. Eave FAX: Page 7 of 0
8 Triangle Method Ridge Mark chalk lines parallel with the square reference line out ahead of panel installation so that panel square can be checked as the panels are installed. Suggested line spacing is one foot beyond panels wide or about 0 feet Rake Roof Slope Square Reference Line Rake Eave 5 Check for square by measuring the distance from the installed panel edge to the chalk line at both the eave and ridge. If the measurements match, then the installed panels are square, if not, adjustments must be made to bring the panels back into square. Ridge Rake Rake Eave FAX: Page 8 of 0
9 Installation Sequence The following is an example of a typical sequence for the installation of Tuff-Rib panels and trims and is specific to the roof plan and conditions illustrated. The actual sequence may vary based on the specific roof plan and applicable conditions.. Moisture Barrier Install the Moisture Barrier per the manufacturer s. Fascia Trim (optional) Install the Fascia Trim along all eaves and rakes.. Eave Trim Install the Eave Trim along all eaves lapping over the Fascia Trim.. Valley Trim Install the Valley Trim over the Eave Trim working from the eave to the valley peak. 5. Tuff-Rib Panels Install the panels over the Eave and Valley Trims. Do not install panels where the Ridge Trim laps under the panels. 6. Hip Trim Install the Hip Trim over the panels FAX: Page 9 of 0
10 Installation Sequence 7. Ridge Trim Install the Ridge Trim over the Hip Trim intersection and valley peak. 8. Transition Trim Install the Transition Trim over the low slope panels and moisture barrier. 9. Tuff-Rib Panels Complete the panel installation installing the high slop panels over the Trim Transition and the other remaining exposed locations. 0. Gable / Rake Trim Install the Rake Trim over the panels along all rake (gable) edges.. High Side Peak Trim Install the High Side Peak Trim over the panels.. Ridge Trim Install the Ridge Trim over the panels.. Side Wall Trim Install the Side Wall Trim over the panels.. Side Wall Trim (Rear View) Install the Side Wall Trim over the panels. 5. End Wall Trim Install the End Wall Trim over the panels FAX: Page 0 of 0
11 Fascia Roof Substrate Install the roof substrate according to local building code requirements. Moisture Barrier Install moisture barrier according to the manufacture s recommended procedure and in compliance with local building code requirements. Fascia Trim Install the Fascia trim and butt ends. Trim Pancake Screw Fasten trim with Pancake Screws apart along the length of the trim. Trim Wood Screw Fasten trim with Wood Screws spaced apart along the length of the trim FAX: Page of 0
12 Mini Eave Moisture Barrier Install moisture barrier according to the manufacture s recommended procedure and in compliance with local building code requirements. Trim Pancake Screw Fasten trim with Pancake Screws spaced apart along the lenght of the trim. Mini Style Eave Install the Mini Style Eave and butt ends. Roof Substrate Install the roof substrate according to local building code requirements. Panel Wood Screw Fasten panels to the roof substrate using Wood Screws spaced according to the recommended fastening pattern and frequency, and in compliance with local building codes. Tuff-Rib Panel Install the panel and overhang the panel a minimum of beyond the Mini Eave trim edge. See panel squaring method in this manual. 6 7 Inside Closure Place the Inside Closure over the top of the Mini Eave or underlayment FAX: Page of 0
13 Eave Trim Moisture Barrier Install moisture barrier according to the manufacture s recommended procedure and in compliance with local building code requirements. Trim Pancake Screw Fasten trim with Pancake Screws spaced apart along the length of the trim. Eave Trim Install the Eave Trim and butt ends. Roof Substrate Install the roof substrate according to local building code requirements. Panel Wood Screw Fasten panels to the roof substrate using Wood Screws spaced according to the recommended fastening pattern and frequency, and in compliance with local building codes. Tuff-Rib Panel Install the panel and overhang the panel a minimum of beyond the Eave Trim edge. See panel squaring method in this manual. 6 7 Inside Closure Place the Inside Closure down over the eave or underlayment FAX: Page of 0
14 Rake / Gable Tape Sealant Apply Butyl Tape along the length of the panel. Tuff-Rib Panel Install the panel and overhang the panel a minimum of beyond the Eave trim edge. See panel squaring method in this manual. Panel Wood Screw Fasten panels to the roof substrate using Wood Screws spaced according to the recommended fastening pattern and frequency, and in compliance with local building codes. 5 Moisture Barrier Install moisture barrier according to the manufacture s recommended procedure and in compliance with local building code requirements. Roof Substrate Install the roof substrate according to local building code requirements. Rake / Gable Trim Install the Rake trim and overlap the ends. See lapping diagram in this manual. Trim Wood Screw Fasten trim with Wood Screws spaced apart along the length of the trim. 6 7 Trim Wood Screw Fasten trim with Wood Screws spaced apart along the length of the trim FAX: Page of 0
15 Preformed Valley Roof Substrate Install the roof substrate according to local building code requirements. Moisture Barrier Install moisture barrier according to the manufacture s recommended procedure and in compliance with local building code requirements. Preformed Valley Trim Install the Valley trim and overlap the ends. See lapping diagram in this manual. Trim Pancake Screw Fasten trim with Pancake Screws spaced apart along the length of the trim. See lapping diagram fastener pattern in this manual. minimum 7 6 Tuff-Rib Panel Install the panel a minimum of up from the water diverter at the bottom of the Valley and minimum of down from the top of the Valley. See panel squaring method in this manual. Expanding Closure Place Expanding Closure parallel to each side of the Valley center water diverter. Closure should be up from the panel end about. See panel minimum set back above. Panel Wood Screw Fasten panels to the roof substrate using Wood Screws spaced according to the recommended fastening pattern and frequency, and in compliance with local building codes. 5 Notes:. See Valley Lapping - Page 5. See Valley Cutting - Page FAX: Page 5 of 0
16 Transition / Pitch Break Panel Wood Screw Fasten panels to the roof substrate using Wood Screws spaced according to the recommended fastening pattern and frequency, and in compliance with local building codes. Tuff-Rib Panel Install the panel up the transition bend. See panel squaring method in this manual. 9 0 Inside Closure Place the Inside Closure over the top of the Transition. The closure should be about up from the panel end. 8 Transition Trim Place the Transition Flashing over the Outside Closure. Trim 6 Trim Wood Screw Fasten trim with Wood Screws spaced 8 apart along the length of the trim, through the rib. See lapping diagram. 7 5 Outside Closure Place the Outside Closure over panels. Panel Wood Screw Fasten panels to the roof substrate using Wood Screws spaced according to the recommended fastening pattern and frequency, and in compliance with local building codes. Tuff-Rib Panel Install the panel and overhang the panel a minimum of beyond the eave edge. See panel squaring method in this manual. Moisture Barrier Install moisture barrier according to the manufacture s recommended procedure and in compliance with local building code requirements. Roof Substrate Install the roof substrate according to local building code requirements FAX: Page 6 of 0
17 Gambrel Tuff-Rib Panel Install the panel up the transition bend. See panel squaring method in this manual. Panel Wood Screw Fasten panels to the roof substrate using Wood Screws spaced according to the recommended fastening pattern and frequency, and in compliance with local building codes. Panel Wood Screw Fasten panels to the roof substrate using Wood Screws spaced according to the recommended fastening pattern and frequency, and in compliance with local building codes. 8 Inside Closure Place the Inside Closure over the top of the Gambrel up about from the panel end. Gambrel Trim Place the Gambrel Flashing Trim over the Outside Closure. Trim Wood Screw 9 Fasten trim with Wood Screws spaced 8 apart along the length of the trim, through the rib. Tuff-Rib Panel Install the panel and overhang the panel a minimum of beyond the eave edge. Moisture Barrier Install moisture barrier according to the manufacturer s recommended procedure and in compliance with local building code requirements. 6 Outside Closure Place the Outside Closure over the top of the panels. Roof Substrate Install the roof substrate according to local building code requirements FAX: Page 7 of 0
18 Hip Panel Wood Screw Fasten trim with Wood Screws spaced 8 apart along the length of the trim, through the rib. See lapping diagram fastener pattern in this manual. Hip Trim Place the Hip Trim over the Expanding Closure Expanding Closure Place Expanding closure parallel to each side of the hip center line so that hip fastener penetrates the center of the closure. Closure should be up from the panel end about Panel Wood Screw Fasten panels to the roof substrate using Wood Screws spaced according to the recommended fastening pattern and frequency, and in compliance with local building codes. Tuff-Rib Panel Install the panel and overhang the panel a minimum of beyond the eave edge. See panel squaring method in this manual. Moisture Barrier Install moisture barrier according to the manufacture s recommended procedure and in compliance with local building code requirements. Roof Substrate Install the roof substrate according to local building code requirements FAX: Page 8 of 0
19 Ridge Trim Wood Screw Fasten trim with Wood Screws spaced 8 apart along the length of the trim, through the rib. See lapping diagram. Ridge Trim Place the Ridge Trim over the Outside Closure. 7 Outside Closure Place the Outside Closure over the top of the panel Panel Wood Screw Fasten panels to the roof substrate using Wood Screws spaced according to the recommended fastening pattern and frequency, and in compliance with local building codes. Tuff-Rib Panel Install the panel and overhang the panel a minimum of beyond the eave edge. See panel squaring method in this manual. Moisture Barrier Install moisture barrier according to the manufacture s recommended procedure and in compliance with local building code requirements. Roof Substrate Install the roof substrate according to local building code requirements FAX: Page 9 of 0
20 Vented Ridge Trim Wood Screw Fasten trim with Wood Screws spaced 8 apart along the length of the trim, through the rib. See lapping diagram fastener pattern in this manual. Ridge Trim Place the Ridge Trim over the Profile Vent. Vent Material Apply the Profile Vent ridge venting material over the panels on each side Panel Wood Screw Fasten panels to the roof substrate using Wood Screws spaced according to the recommended fastening pattern and frequency, and in compliance with local building codes. Tuff-Rib Panel Install the panel and overhang the panel a minimum of beyond the eave edge. See panel squaring method in this manual. Moisture Barrier Install moisture barrier according to the manufacture s recommended procedure and in compliance with local building code requirements. Roof Substrate Install the roof substrate according to local building code requirements FAX: Page 0 of 0
21 High Side Peak Trim Wood Screw Fasten trim with Wood Screws spaced apart along the length of the trim. See lapping diagram. High Side Peak Trim Place the High Side Peak Trim over the Outside Closure. Trim Wood Screw Fasten trim with Wood Screws spaced 8 apart along the length of the trim, through the rib. See lapping diagram Outside Closure Place the Outside Closure over the panels. 5 Panel Wood Screw Fasten panels to the roof substrate using Wood Screws spaced according to the recommended fastening pattern and frequency, and in compliance with local building codes. Tuff-Rib Panel Install the panel and overhang the panel a minimum of beyond the eave edge. See panel squaring method in this manual. Moisture Barrier Install moisture barrier according to the manufacturer's recommended procedure and in compliance with local building code requirements. Roof Substrate Install the roof substrate according to local building code requirements FAX: Page of 0
22 Side Wall Tube Sealant Apply Tube Sealant continuously along the Counter Flashing and generously filling the space between the flashing and the wall. Round or slope the Sealant top so that water will run off. Trim Wood Screw Fasten trim with Wood Screws spaced apart along the length of the trim. If wall material is not wood, fasteners will be 0 9 Counter Flashing (optional) Position the Counter Flashing above the Side Wall Trim as shown. Some applications may not need counter flashing. 8 Side Wall Trim Place the Side Wall Trim over the Butyl tape and overlap the ends. See lapping diagram in this manual. 6 Trim Wood Screw 7 Fasten trim with Wood Screws spaced apart along the length of the trim. See lapping diagram. Tape Sealant Apply Butyl Tape along the length of the panel. 5 Panel Wood Screw Fasten panels to the roof substrate using Wood Screws spaced according to the recommended fastening pattern and frequency, and in compliance with local building codes. Tuff-Rib Panel Install the panel and overhang the panel a minimum of beyond the eave edge. See panel squaring method in this manual. Moisture Barrier Install moisture barrier according to the manufacturer's recommended procedure and in compliance with local building code requirements. Roof Substrate Install the roof substrate according to local building code requirements FAX: Page of 0
23 End Wall Tube Sealant Apply Tube Sealant continuously along the Counter Flashing and generously filling the space between the flashing and the wall. Round or slope the Sealant top so that water will run off. Trim Wood Screw Fasten trim with Wood Screws spaced apart along the length of the trim. If wall material is not wood, fasteners will be 0 9 Counter Flashing Position the Counter Flashing above the Side Wall Trim as shown. Some applications may not need counter flashing. 8 Side Wall Trim Place the End Wall Trim over the Butyl tape and overlap the ends. See lapping diagram in this manual. Outside Closure Place the Outside Closure over the top of the panel. 5 6 Trim Wood Screw Fasten trim with Wood Screws spaced 8 apart along the length of the trim, through the rib. See lapping diagram. 7 Tuff-Rib Panel Install the panel and overhang the panel a minimum of beyond the eave edge. See panel squaring method in this manual. Moisture Barrier Install moisture barrier according to the manufacturer s recommended procedure. Roof Substrate Install the roof substrate according to local building code requirements. Panel Wood Screw Fasten panels to the roof substrate using Wood Screws spaced according to the recommended fastening pattern and frequency, and in compliance with local building codes FAX: Page of 0
24 Trims (Exact trims vary by plant, please call for exact dimensions) Mini Eave Eave Trim Fascia Trim Rake / Gable Trim Valley Transition Flashing Specify Pitch Specify Pitch Specify Pitch FAX: Page of 0
25 Trims (Exact trims vary by plant, please call for exact dimensions) Gambrel Flashing Ridge Cap / Hip Cap Specify Pitch Specify Pitch Specify Pitch High Side Peak Side Wall Trim Specify Pitch Counter Flashing End Wall Trim Counter Flashing Specify Pitch FAX: Page 5 of 0
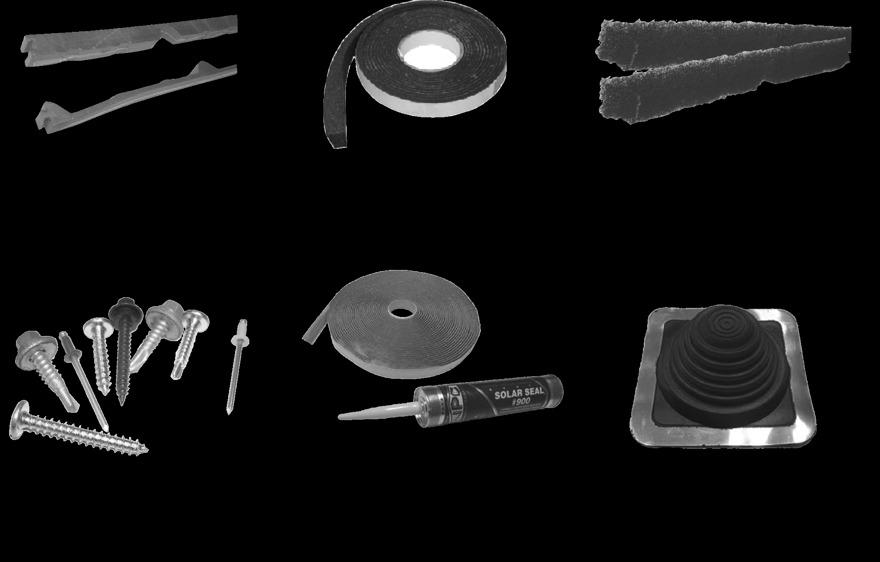
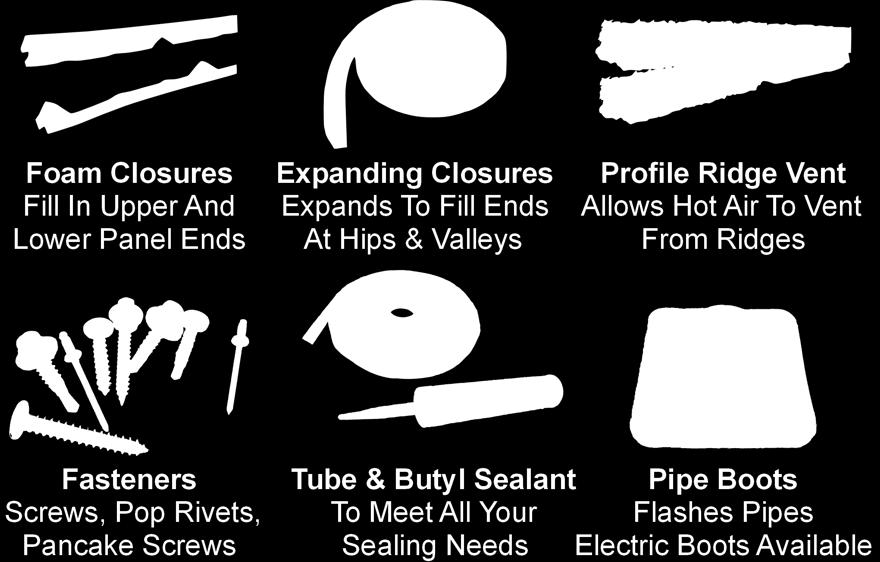

26 Accessories & Tools FAX: Page 6 of 0
27 Valley Lapping After cutting notches and applying Tube Sealant, slide the up slope valley into the hem groove while lapping over the top of the low slope valley. Edge of Panel Edge of Panel Cut notch in Valley hem if applicable Cut notch in Valley hem if applicable After lapping, install screws spaced apart between Tube Sealant rows. Do not install screws above edge of panel line. Apply two rows of Tube Sealant spaced apart Edge of Panel lap line Edge of Panel Cross section of completed valley Lap FAX: Page 7 of 0
28 Valley Cutting Valley starter cutting diagram with water diverter tabs. Before folding tabs. Bend Line, bend left tab down 90º. Bend Line, bend right tab down 90º.Cut alone dashed lines After folding tabs FAX: Page 8 of 0
29 Pipe Flashing Cut pipe flashing 5% smaller than actual pipe. Apply tube sealant to the underside of the pipe flashing. Slide pipe flashing down over the pipe. Press the pipe flashing into contours of panel configuration and fasten to the Tuff-Rib panel with wood screws or stitch screws. Apply additional sealant around base if desired FAX: Page 9 of 0


30 65 S Lee Hwy Cleveland, TN FAX:
Tuff-Rib Install Guide
 Install Guide bestbuymetalroof.com Page 2 of 27 Page 3 of 27 1. Page 4 2. a. Installation Guide b. Panel Squaring Pages 5, 6 Pages 7, 8 3. Pages 9, 10 4. a. Fascia (optional) b. Eave / 1.5x3.5 Angle c.
MasterRib. Installation Manual. July Toll-Free (888) MTL-ROOF. PO Box 229 Fayetteville, NC Rev.
 MTL-ROOF. PO Box 229 Fayetteville, NC Rev.") MasterRib Installation Manual July 010 PO Box 9 Fayetteville, NC 80.. www.unionmetalroofing.com Toll-Free (888) MTL-ROOF Rev. 7/10 IMPORTANT NOTICE This manual contains suggestions and guidelines on how
MasterRib Installation Manual July 010 PO Box 9 Fayetteville, NC 80.. www.unionmetalroofing.com Toll-Free (888) MTL-ROOF Rev. 7/10 IMPORTANT NOTICE This manual contains suggestions and guidelines on how
METAL ROOFING INSTALLATION GUIDE
 METAL ROOFING INSTALLATION GUIDE STANDING SEAM ROOFING PANELS Horizon 16 and Climaguard 16 Regardless of whether your roofing project is a new installation or a re-roof, and whether your building is residential,
Best Buy Metals Toll Free / Phone / Fax
 DETAIL MANUAL for Vertical Seam Best Buy Metals Toll Free 1-800-728-4010 / Phone 423-479-6382 / Fax 423-728-3066 www.bestbuymetals.com Vertical Seam Roofing Panels Fig. 2 Vertical Seam Has 1-3/4" high
DETAIL MANUAL. Metal Roofing Wholesalers. Classic Rib Roofing Panels
 Metal Roofing Wholesalers Classic Rib Roofing Panels DETAIL MANUAL 1178 Topside Rd Louisville, TN 37777 The Classic Rib Roofing Panel Figure 1 House With Classic Rib Metal Roofing Installed Classic Rib
Straight Rib Series Metal Roofing Panel Installation Guide
 D-Rib G-Rib C-Rib Straight Rib Series Metal Roofing Panel Installation Guide 7000 AIRPORT LINE R.R., BOX 7 HENSALL, ONTARIO N0M X0 EASY BUILDING PRODUCTS TEL. : 5-6-07 TOLL FREE : -888-76-777 FAX: 5-6-08
DETAIL MANUAL for Standing Seam / Image II
 DETAIL MANUAL for Standing Seam / Image II Best Buy Metals Toll Free 1-800-728-4010 / Phone 423-479-6382 / Fax 423-728-3066 www.bestbuymetals.com Best Buy Metals Standing Seam Roofing Panels Fig. 2 Standing
Five Star Panel Installation Instructions
 Five Star Panel Installation Instructions How to Store Five Star Panels You will need to store FIVE STAR PANELS in dry place to prevent staining, deterioration and possibly void all warranties. Stand the
TABLE OF CONTENTS A. PBR
 TABLE OF CONTENTS A. PBR Panel 1. PBR Panel Architect/Engineer Information....................................... 2 2. PBR Panel UL 90 Requirements............................................... 3 3. PBR
Table of Contents Light Gauge Metal Roof & Wall Panels
 Table of Contents Light Gauge Metal Roof & Wall Panels Installation Guide for Delta Rib, Nor-Clad, Strata Rib & 2-1/2 Corrugated Introduction Important Notice Notes: April 2008 Minimum Recommended Tools
Tuff Rib Panel Installation Specifications
 Tuff Rib Panel Installation Specifications ROOF APPLICATION: Roof slope must be a minimum of a 2/12 pitch to use this product. For slopes lower than a 3/12 pitch, lap sealant is suggested on the side laps
Installation Guide. Step 3. Valley Flashing. Step 7. Transition Flashings and Accessories. Step 6. Hip and Ridge Installation
 Step 7. Transition s and Accessories Step 3. Valley Step 6. Hip and Ridge Installation Step 2. Rake Trim Step 5. Installing the Shingles Step 1. Eave Starter Installation Step 4. Endwall s Installation
2 ½ Corrugated Panel Installation Specifications
 2 ½ Corrugated Panel Installation Specifications ROOF APPLICATION: Roof slope must be a minimum of a 2/12 pitch to use this product. When using this product butyl lap sealant is recommended for all slopes.
Installation Instructions
 Installation Instructions ROLL VENT STANDARD / METRIC Page Installation Considerations 3 Roll Vent Standard General Installation 4 Roll Vent Metric General Installation 5 Steep Pitch Guidelines 6 Asphalt
DETAIL MANUAL. For R-Panel / PBR Panel. Metal Roofing Wholesalers
 Metal Roofing Wholesalers DETAIL MANUAL For R-Panel / PBR Panel 1178 Topside Rd Louisville, TN 37777 Picture of Gulf Coast Figure 1 Metal Roofing Plant PBR/R-Panel The 26-gauge R-Panel is a strong, durable,
BARRELL VAULT BATTENLESS
 i BARRELL VAULT BATTENLESS INSTALLATION GUIDE INSTALLATION NOTIFICATION The installation procedures demonstrated in this manual are recommended methods for the installation of the Gerard Barrel Vault battenless
REGAL. Installation Manual
 REGAL Installation Manual General Information The details shown on the following pages are suggestions or guidelines for installing the Regal system. The installation details shown here are proven methods
PBR Panel Installation Specifications
 4906 St. Stephens Rd. 5780 Hwy 90 W Eight Mile, Al 36613 Theodore, AL 36590 251 456 2254 251 653 1550 251 457 2254(F) 251 653 1514(F) PBR Panel Installation Specifications ROOF APPLICATION: Roof slope
Steel Roofing & Siding INSTALLATION GUIDE
 Steel Roofing & Siding INSTALLATION GUIDE Your Authorized Dealer is: WASHINGTON Auburn (800) 700-7228 WASHINGTON Spokane (866) 321-5954 www.nuraymetals.com CALIFORNIA Redlands (800) 806-8729 CONTENTS BEFORE
Barrel Vault Counter Batten and Batten
 Barrel Vault Counter Batten and Batten INSTALLATION GUIDE www.gerardusa.com INSTALLATION NOTIFICATION The installation procedures demonstrated in this manual are recommended methods for the installation
Ultra-Rib Installation Manual
 www.tricountymetals.com Ultra-Rib Installation Manual Table of Contents Important Notice/Safety/Storage/Tools...1 Product Information/Product Approvals...,...2 Roofing Anatomy/Side Trim...3 Measuring Your
CertainTeed. Shake / Slate Installation Guide
 CertainTeed Shake / Slate Installation Guide Table of Contents System Components... 2 General Conditions, Safety and Roof Preparations... 3... 4 Eave/Drip Edge... 5 Inner Gable... 6 Outer Gable... 7 Open
Table of Contents. Notes to Designer/User Map of Typical Roof Conditions Fastener Placement Fastener Selection...
 Table of Contents Section Page Notes to Designer/User... 2-3 Map of Typical Roof Conditions... 4 Fastener Placement... 5 Fastener Selection... 6 Ridge/Hip Flashing... 7 Valley Flashing... 8 Eave Flashings...
Phone (662) Fax (662) DETAIL MANUAL. and guide to Reed s Metals products
 Fax (662) DETAIL MANUAL. and guide to Reed s Metals products") Phone (662) 869-7797 www.reedsmetals.com Fax (662) 869-7799 DETAIL MANUAL and guide to Reed s Metals products Perma-Loc & Secure-Seam Standing Seam Roofing Panels & Accessories -1- Reed s Metals Standing
Phone (662) 869-7797 www.reedsmetals.com Fax (662) 869-7799 DETAIL MANUAL and guide to Reed s Metals products Perma-Loc & Secure-Seam Standing Seam Roofing Panels & Accessories -1- Reed s Metals Standing
TIOGA Table of Contents
 Table of Contents TABLE OF CONTENTS Product Data Sheet...2 Engineering Data...3 General Information...4 Handling...5 Roof Preparation...5 Fastening Recommendations...6 Field Cutting...7 Touch-up Paint...7
Installation Manual. Future Roof Shingle / Slate Products
 Installation Manual Future Roof Shingle / Slate Products REVISED 14/09/2010 Future Roof Shingle Installation Manual is a component of Future Roof, Inc. and as such is intended to be used with Future Roof
401 SW 33rd Ave Ocala, FL
 401 SW 33rd Ave Ocala, FL 34474 352-622-1035 www.metalroofingofocala.com Table of Contents Panels...Pg.1 Ultra Rib Trim...Pg.2-4 PBR Trim...Pg.5-6 5V Trim...Pg.7-9 TCM-Lok...Pg.10-11 Insulation/Ventilation:
TABLE OF CONTENTS A-1
 TABLE OF CONTENTS PAGE NUMBER: DETAIL DESCRIPTION A-1...TABLE OF CONTENTS A-2...GENERAL NOTES B-1...GENERAL INFORMATION C-1...EAVE DRIP DETAIL C-2...EAVE DRIP with GUTTER DETAIL C-3 & C-4...FIXED RIDGE
installation guide Villa
 installation guide Villa Table of Contents Introduction............................. 2 Safety................................... 2 Tools.................................... 2 Codes & Requirements....................
MANUAL. Perma-Loc & Secure-Seam. Standing Seam Roofing Panels & Accessories. and guide to Town and Country Metals products
 DETAIL MANUAL and guide to Town and Country Metals products Perma-Loc & Secure-Seam Standing Seam Roofing Panels & Accessories Town & Country Metals, LLC 10 Progress Parkway Union, MO 63084 Town and Country
Table of Contents. Installation Guide for Profile with Hidden Fasteners 3. Installation Steps 4, 5. Prestige Series Moldings 6, 7. Other Accessories 8
 1 Table of Contents Page(s) Installation Guide for Profile with Hidden Fasteners 3 Installation Steps 4, 5 Prestige Series Moldings 6, 7 Other Accessories 8 Trims & Accessories 9 Eave Starters 10 Gableboards
MetroCOTTAGE Shingle
 Batten-less Installation Sept. 14, 2017 INSTALLATION WARNING! These install details are provided to demonstrate a recommended installation method for Metro Roof panels and accessories. used in the United
 TremLock T-138 INSTALLATION MANUAL T-138 www.tremcoroofing.com 3735 Green Road Beachwood, Ohio 44122 1.800.852.6013 50 Beth Nealson Drive Toronto, Ontario M4H 1M6 1.800.668.9879 7241 6/8/18 TABLE OF CONTENTS
Storing, Handling, and Cutting Steel Panels
 Storing, Handling, and Cutting Steel s Storing Specifically check your quantities, colors, and lengths All materials should be used as soon as possible Steel bundles should be stored indoors with enough
Terrabella Shake & Shingle Znap Ver. 2.0
 Terrabella Shake Znap Actual length = 52.6 Actual Width = 16.33 Coverage length = 49.7 Coverage width = 14 Terrabella Shingle Znap Actual Length = 52.375 Actual Width = 15.25 Coverage Length = 49.375 Coverage
ONDUVILLA. The Attractive Alternative to Shingles I N S T A L L A T I O N I N S T R U C T I O N S
 ONDUVILLA The Attractive Alternative to Shingles I N S T A L L A T I O N I N S T R U C T I O N S 1 INSTALLATION INSTRUCTIONS Even though ONDUVILLA is easy to install, it is important to read through these
Inspire Slate Starter Piece Hip and Ridge. 13 1/2" Height: 13 ½" Width: 12" Squares/ Pallet. Bundles/ Square
 December 2017 Classic Slate Application Guidelines Only Basic Roofing Tools Required Hand fastened or fastened with a pneumatic nail gun Utility knife or a standard circular saw Tape measure, pry bar,
Installation Instructions
 Installation Instructions RAPID RIDGE STANDARD / 7 / METRIC Page Installation Considerations 3 Rapid Ridge Standard General Installation 4 Rapid Ridge Metric General Installation 5 Rapid Ridge 7 General
or Ordering Installation and Self-Help Guide
 1-800-467-0626 or 479-787-6264 Ordering Installation and Self-Help Guide MBS Self-Storage buildings offer a wide variety of layouts Typically based on 5ft spacing. Common roof slopes 1:12 to 1/2:12 and
A P P L I C A T I O N I N S T R U C T I O N S
 1 2 3 General Instructions NOTICE: THESE SHINGLES MUST BE APPLIED TO CONFORM WITH ALL APPLICABLE BUILDING CODES. THESE DIRECTIONS REPRESENT COMMON AND ACCEPTED ROOFING PRACTICES. DEVIATIONS FROM THESE
installation guide 7 8 Corrugated corrugated metal panel
 installation guide / 7 8 Corrugated corrugated metal panel Table of Contents General Notes Handling and Storage 1-3 Tools and Equipment, Field Cutting Panels 4 Safety 5 Preparing to Install your New Roofing
Table of Contents. Fasteners... 4 Venting Preparation Installation with Battens - DECRA Tile & DECRA Shake 1
 Table of Contents DECRA Tile & Shake Roof Overview... 2 Introduction... 3 Safety... 3 Tools.... 3 Estimating Sheets... 4 Codes & Requirements... 4 Roof Slope... 4 Underlayment... 4 Deck Preparation....
5V Installation Manual
 Flat 1/2 12 24 Striated www.tricountymetals.com 5V Installation Manual Table of Contents Important Notice/Safety/Storage/Tools...1 Product Information/Product Approvals...2 Roofing Anatomy/ Trim...3 Measuring
Installation Instructions
 Installation Instructions XTRACTOR VENT X18 / X18 XTRA / XLP Page Installation Considerations 3 X18 and X18 Xtra General Installation 4 XLP General Installation 5 Steep Pitch Guidelines 6 Asphalt Shingles
Roofing Training - Basics. Sandy Wesch
 Roofing Training - Basics Sandy Wesch Tools Hammer Measuring Tape Chalk Line & Chalk Speed Square Framing Square Utility Knife Metal Snips Extension Ladder(s) 2 Safety Any tools or material up on the roof
Table of Contents. Important Notices 3. Residential Roofing Application 4. Trims & Accessories 5. Trim Glossary 6, 7, 8. Estimating Material 9
 Table of Contents Page(s) Important Notices 3 Residential Roofing Application 4 Trims & Accessories 5 Trim Glossary 6, 7, 8 Estimating Material 9 Eave Trim Installation 10 Connecting Eavestarters 10 Gable
Timberline and Sovereign Expanded Fastener Placement Area
 Timberline and Sovereign Expanded Fastener Placement Area Information Sheet Updated: 2004 Quality You Can Trust Since 1886... From North America s Largest Roofing Manufacturer Less Fastening Hassles! Announcing
Installation Manual. Future Shingle Products
 Installation Manual Future Shingle Products TITLE REVISED 7/4/2011 Future Shingle Installation Manual is a component of Future Roof, Inc. and as such is intended to be used with Future Roof products only.
SLATE & SHINGLE INSTALLATION
 EAVE EDGE Apply a small strip of roofing paper to the bottom of eave. Eave flashing is attached to substrate with roofing nails every 9". Install underlayment over entire roof. (See Fig. 1) PAGE 1 Bend
PRODUCT EVALUATION Effective July 1, 2009 RC-204
 TEXAS DEPARTMENT OF INSURANCE Engineering Services / MC 103-3A 333 Guadalupe Street P.O. Box 149104 Austin, Texas 78714-9104 Phone No. (512) 322-2212 Fax No. (512) 463-6693 PRODUCT EVALUATION Effective
6 STEP INSTALLATION GUIDE BY DCI
 6 STEP INSTALLATION GUIDE BY DCI STEP 1 (Ensure metal drip edge was previously installed.) Begin by cutting a slit 1 wide (or a series of 1 ¾ holes 3 on center) into the roof decking 6 to 7 up from the
ROOFING APPLICATION STANDARD (RAS) No. 115 STANDARD PROCEDURES FOR ASPHALTIC SHINGLE INSTALLATION
 No. 115 STANDARD PROCEDURES FOR ASPHALTIC SHINGLE INSTALLATION") ROOFING APPLICATION STANDARD (RAS) No. 115 STANDARD PROCEDURES FOR ASPHALTIC SHINGLE INSTALLATION 1. Scope 4. Underlayment 2. 1.1 This roofing application standard has been developed to provide a responsive
ROOFING APPLICATION STANDARD (RAS) No. 115 STANDARD PROCEDURES FOR ASPHALTIC SHINGLE INSTALLATION 1. Scope 4. Underlayment 2. 1.1 This roofing application standard has been developed to provide a responsive
SG-30 A P P L I C A T I O N I N S T R U C T I O N S. Directions For Application
 1 2 3 General Instructions NOTICE: THESE SHINGLES MUST BE APPLIED TO CONFORM WITH ALL APPLICABLE BUILDING CODES. THESE DIRECTIONS REPRESENT COMMON AND ACCEPTED ROOFING PRACTICES. DEVIATIONS FROM THESE
ROOFING APPLICATION STANDARD (RAS) No. 115 STANDARD PROCEDURES FOR ASPHALTIC SHINGLE INSTALLATION
 No. 115 STANDARD PROCEDURES FOR ASPHALTIC SHINGLE INSTALLATION") ROOFING APPLICATION STANDARD (RAS) No. 115 STANDARD PROCEDURES FOR ASPHALTIC SHINGLE INSTALLATION 1. Scope 4. Underlayment 2. 1.1 This roofing application standard has been developed to provide a responsive
ROOFING APPLICATION STANDARD (RAS) No. 115 STANDARD PROCEDURES FOR ASPHALTIC SHINGLE INSTALLATION 1. Scope 4. Underlayment 2. 1.1 This roofing application standard has been developed to provide a responsive
E-Z BUILD STEEL BARN 12' 12' 12' 16' 12' 20'
 E-Z BUILD STEEL BARN 12' 12' 12' 16' 12' 20' BUILD You can construct your own E-Z frame barn with the help of this step by step guide. North American softwood dimensional lumber sizes: Nominal Actual in
C e r t a i n T e e d S h i n g l e A p p l i c a t o r s M a n u a l. and Carriage House STEEP. Slope Application. (over 21/12)
") C e r t a i n T e e d S h i n g l e A p p l i c a t o r s M a n u a l Grand Manor 16 and Carriage House YOUR OBJECTIVE: To learn the correct method of installing each of these roofing products. These shingles
C e r t a i n T e e d S h i n g l e A p p l i c a t o r s M a n u a l Grand Manor 16 and Carriage House YOUR OBJECTIVE: To learn the correct method of installing each of these roofing products. These shingles
Cambridge English Application Instructions
 Cambridge English Application Instructions ROOF SLOPE: Never apply asphalt shingles to roof slopes less than 2:12. For slopes 2:12 to 4:12 (LOW SLOPE), see special underlayment requirements outlined below.
Horizon-Loc. Installation Details 16" COVERAGE C GUID_INSTL_HLOC_160606
 Horizon-Loc Installation Details ¾" 1" 4" 16" COVERAGE D C GUID_INSTL_HLOC_160606 INDEX Information in the catalog may vary by plant location. Please call your salesperson to verify product availability.
Installation Instructions
 Installation Instructions SHARK VENT XLP / XTRA Page Installation Considerations 3 Shark Vent XLP & Xtra General Installation 4 Steep Pitch Guidelines 5 Asphalt Shingles Detail 6 Ridge Beam Detail 7 Hip
Hatteras Shingles. CertainTeed Shingle Applicator s Manual. YOUR OBJECTIVE: To learn the correct procedures for installing Hatteras shingles
 CertainTeed Applicator s Manual Hatteras s 14 YOUR OBJECTIVE: To learn the correct procedures for installing Hatteras shingles HATTERAS SHINGLES Hatteras shingles are a premium oversize (18" x 36") roofing
HERITAGE LAMINATED ASPHALT SHINGLES Frederick, MD
 Application Instructions for FORMERLY 30 THESE ARE THE MANUFACTURER S APPLICATION INSTRUCTIONS FOR THE ROOFING CONDITIONS DESCRIBED. TAMKO BUILDING PRODUCTS, INC. ASSUMES NO RESPONSIBILITY FOR LEAKS OR
900 SERIES PANEL SHEET INDEX STAGGERED ENDLAP STAGGERED MALE LEG AT ENDLAP CONTINUOUS FEMALE ENDLAP INSTALLATION SEQUENCE CI-WR
 900 SERIES PANEL CI-DS-01-900 CI-PJ-01-900 CI-PJ-02-900 CI-EL-01-900 CI-EL-02-900 CI-EL-03-900 CI-EL-04-900 CI-EL-05-900 CI-EL-06-900 CI-EL-07-900 CI-EL-08-900 CI-RD-01-900 CI-RD-02-900 CI-RD-03-900 CI-EV-01-900
DIRECTIONS FOR APPLICATION
 Instructions 1 General NOTICE: THESE SHINGLES MUST BE APPLIED TO CONFORM WITH ALL APPLICABLE BUILDING CODES. THESE DIRECTIONS REPRESENT COMMON AND ACCEPTED ROOFING PRACTICES. DEVIATIONS FROM THESE DIRECTIONS
4. Metal roof jacks at penetrations and attachments
 - - - - - - - - - - - - - - - - - - - - - - - - - - - - - - - - - - - - - - - - - - - - - - - - - - - - - - - - - - - - - - - - - - - - - - SECTION 07 61 00 METAL SHINGLE ROOFING - - - - - - - - - - -
1 Roof Substrate (Deck) OWENS CORNING BERKSHIRE SHINGLES INSTALLATION INSTRUCTIONS
 OWENS CORNING BERKSHIRE SHINGLES INSTALLATION INSTRUCTIONS") General This Installation Instruction document for Owens Corning Berkshire roofing shingles is to be read in conjunction with the Installation information printed on each packet of shingles along with
General This Installation Instruction document for Owens Corning Berkshire roofing shingles is to be read in conjunction with the Installation information printed on each packet of shingles along with
Toll Free: S.E. 16th Street Trenton, Florida Tel: SW 90th Trail Live Oak, Florida Tel:
 Toll Free: 877-766-3309 301 S.E. 16th Street Trenton, Florida 32693 Tel: 352-463-8400 10142 SW 90th Trail Live Oak, Florida 32060 Tel: 386-330-0101 3021 N.W. Blitchton Road Ocala, Florida 34475 Tel: 352-622-5500
A. B. MARTIN. Roofing Supply, llc. ABM Panel Installation & Trim Guide.
 A. B. MARTIN A. B. MARTIN Roofing Supply, llc Roofing Supply, llc ABM Panel Installation & Trim Guide www.abmartin.net www.abmartin.net Storage Store the ABM Panels in a dry place. The panels should be
Chapter 16: Roof Steel
 Chapter 16: Roof Steel Most Common Mistakes: 1. Roof purlins not checked for alignment. 2. Failure to properly square roof. 3. Reversing steel laps. 4. Using not enough or too many screws. 5. Over or under
PREMIUM LAMINATED ASPHALT SHINGLES Frederick, MD
 Application Instructions for FORMERLY 50 THESE ARE THE MANUFACTURER S APPLICATION INSTRUCTIONS FOR THE ROOFING CONDITIONS DESCRIBED. TAMKO BUILDING PRODUCTS, INC. ASSUMES NO RESPONSIBILITY FOR LEAKS OR
WESTERN WAVE Panel. Vertical Installation and Technical Information
 WESTERN WAVE Panel Vertical Installation and Technical Information Western States Western Wave Wall and Soffit Panels (Vertical) Installation, Flashings & Shop Drawing Detail Guide Section Notes to Designer
WESTERN WAVE Panel. Horizontal Installation and Technical Information
 WESTERN WAVE Panel Horizontal Installation and Technical Information Western States Western Wave Wall and Soffit Panels Installation, Flashings & Shop Drawing Detail Guide Table of Contents Section Page
Inspire Aledora Slate Application Guidelines
 July 2014 Inspire Aledora Slate Application Guidelines Only Basic Roofing Tools Required Hand fastened or fastened with a pneumatic nail gun Utility knife or a standard circular saw Tape measure, pry bar,
DIRECTIONS FOR APPLICATION
 Instructions 1 General NOTICE: THESE SHINGLES MUST BE APPLIED TO CONFORM WITH ALL APPLICABLE BUILDING CODES. THESE DIRECTIONS REPRESENT COMMON AND ACCEPTED ROOFING PRACTICES. DEVIATIONS FROM THESE DIRECTIONS
DIRECTIONS FOR APPLICATION
 Instructions 1 General NOTICE: THESE SHINGLES MUST BE APPLIED TO CONFORM WITH ALL APPLICABLE BUILDING CODES. THESE DIRECTIONS REPRESENT COMMON AND ACCEPTED ROOFING PRACTICES. DEVIATIONS FROM THESE DIRECTIONS
StormMaster Slate General Instructions 1.) GENERAL INSTRUCTIONS 2.) ROOF DECK VENTILATION 3.) ROOF DECK
 GENERAL INSTRUCTIONS 2.) ROOF DECK VENTILATION 3.) ROOF DECK") StormMaster Slate General Instructions IMPORTANT: THE STATEMENTS EXPRESSED ON THIS PAGE ARE THE RECOMMENDATIONS FOR THE APPLICATION OF THE ROOFING PRODUCTS AS OUTLINED AND ILLUSTRATED. ANY DEVIATION FROM
StormMaster Slate General Instructions IMPORTANT: THE STATEMENTS EXPRESSED ON THIS PAGE ARE THE RECOMMENDATIONS FOR THE APPLICATION OF THE ROOFING PRODUCTS AS OUTLINED AND ILLUSTRATED. ANY DEVIATION FROM
Installation Instructions
 Installation Instructions Building Design and Construction To ensure adequate performance and longevity, protect metal panels from potentially corrosive situations and materials. When treated lumber will
Capstone Application Instructions
 Capstone Application Instructions Information Sheet Updated: 2007 Quality You Can Trust Since 1886... From North America s Largest Roofing Manufacturer L IFETIME D ESIGNER S HINGLES APPLICATION INSTRUCTIONS
F-WAVE REVIA SYNTHETIC ROOFING SHINGLES
 F-WAVE REVIA SYNTHETIC ROOFING SHINGLES Installation Manual for Steep-Slope Residential Installations For support with all other Steep-Slope Installations, please call F-Wave Technical Support at 888-GO-FWAVE.
3-Tab Shingle Instructions DURA-SEAL 20 DURA-SEAL 25
 3-Tab Shingle Instructions DURA-SEAL 20 DURA-SEAL 25 1 Directions For Applying Malarkey 3-Tab Shingles GENERAL INSTRUCTIONS Install Malarkey 3-tab shingles according to building code and local amendments.
PREMIUM LAMINATED ASPHALT SHINGLES Dallas, TX Tuscaloosa, AL Phillipsburg, KS
 Application Instructions for FORMERLY 50 THESE ARE THE MANUFACTURER S APPLICATION INSTRUCTIONS FOR THE ROOFING CONDITIONS DESCRIBED. TAMKO BUILDING PRODUCTS, INC. ASSUMES NO RESPONSIBILITY FOR LEAKS OR
ROOFING APPLICATION STANDARD (RAS) No. 130 INSTALLATION CRITERIA FOR WOOD SHINGLES AND SHAKES APPLICATION
 No. 130 INSTALLATION CRITERIA FOR WOOD SHINGLES AND SHAKES APPLICATION") ROOFING APPLICATION STANDARD (RAS) No. 130 INSTALLATION CRITERIA FOR WOOD SHINGLES AND SHAKES APPLICATION 1. 2. 3. Scope 1.1 This application standard provides the minimum installation criteria for wood
ROOFING APPLICATION STANDARD (RAS) No. 130 INSTALLATION CRITERIA FOR WOOD SHINGLES AND SHAKES APPLICATION 1. 2. 3. Scope 1.1 This application standard provides the minimum installation criteria for wood
Sapphire Metal Tile Roofing System. Installation Guide
 Sapphire Metal Tile Roofing System Installation Guide Overview - Sapphire Installation Guide FIG. 1 CROSS-SECTION 7-¼" Overall width = 46-7/16" Coverage width = 43-5/16" SAPPHIRE 350 Rib Height = 1-9/16"
Turada Hardwood Shingles and Shakes Installation instructions
 1. General 1.1 Maximum Exposure: Maximum exposure for wood shingles and shakes shall comply with Table 1 herein, unless specifically specified in the roof assemblies Product Approval. 1.2 Solid and Spaced
Polytegola N. Bitumen Roof shingles. Application guide
 Polytegola N Bitumen Roof shingles Application guide Application manual POLYTEGOLA N CONTENT 1. Foreword - General conditions 3 2. POLYTEGOLA N designs 4 3. Roof pitches 5 4. Storage 5 5. Roof decking
SmartVent Eave Edge Installation Instructions
 SmartVent Eave Edge Installation Instructions STEP 1: Cut a slit 1 wide (or a series of 1 ¾ holes at 3 on center) into the roof decking 6 to 7 up from the drip edge. SmartVent is rated 9NFA. Ensure drip
INSTALLATION GUIDE LEARN MORE AT DECRA.COM
 Villa Tile INSTALLATION GUIDE LEARN MORE AT DECRA.COM Table of Contents DECRA Villa Tile Roof Overview... 2 Introduction... 3 Safety... 3 Tools.... 3 Estimating Sheet... 3 Codes & Requirements... 3 Roof
eco-shake INSTALLATION INSTRUCTION
 1 eco-shake INSTALLATION INSTRUCTION NOTE: Shuffling the eco-shakes during installation may be necessary to obtain a uniform color throughout the roof. Due to the natural wood content in the ecoshakes,
westmansteel.com Installation Guide Proudly Canadian. Family Owned. Cambridge (ON) TF. (855) F. (855)
 TF. (855) F. (855)") MEMBER COMPANY Proudly Canadian. Family Owned. Cambridge (ON) TF. (8) 620-2720 F. (8) 97-829 Winnipeg \ Brandon (MB) TF. (800) 661.282 F. (800) 661.90 Swift Current \ Regina \ Saskatoon (SK) TF. (800)
MEMBER COMPANY Proudly Canadian. Family Owned. Cambridge (ON) TF. (8) 620-2720 F. (8) 97-829 Winnipeg \ Brandon (MB) TF. (800) 661.282 F. (800) 661.90 Swift Current \ Regina \ Saskatoon (SK) TF. (800)
GlassMaster General Instructions - Ardmore, OK & Hampton, GA <br /> Atlas Roofing
 GlassMaster General Instructions - Ardmore, OK & Hampton, GA (For Metric Size Franklin, OH Instructions Click Here) IMPORTANT: THE STATEMENTS EXPRESSED ON THIS WRAPPER ARE THE RECOMMENDATIONS FOR THE APPLICATION
Thompson Architectural TM-RIB PANEL ACCESSORY DETAIL GUIDE
 TM-RIB PANEL ACCESSORY DETAIL GUIDE FL11101.1 FL11101.2 TA125 (UL580 Class 90) Certified Thompson Architectural Metal Roofing is proud to be a partner of the Energy Star Roof Products Program SINGLE SOURCE
Grand Manor Carriage House and Centennial Slate 16 YOUR OBJECTIVE: To learn the correct method of installing each of these roofing products.
 CertainTeed Shingle Applicator s Manual Grand Manor Carriage House and Centennial Slate 16 YOUR OBJECTIVE: To learn the correct method of installing each of these roofing products. 90 STEEP Slope Application
Stone coated steel roof tile INSTALLATION GUIDE
 Stone coated steel roof tile INSTALLATION GUIDE Ⅰ. Introduction These installation details are provided to demonstrate recommended installation methods for KD One roof products and accessories. Consult
ROOFING APPLICATION STANDARD (RAS) No. 130
 No. 130") ROOFING APPLICATION STANDARD (RAS) No. 130 1. Scope 1.1 This application Standard provides the minimum installation criteria for wood shingles and shakes. 2. Definitions 2.1 For definitions of terms used
ROOFING APPLICATION STANDARD (RAS) No. 130 1. Scope 1.1 This application Standard provides the minimum installation criteria for wood shingles and shakes. 2. Definitions 2.1 For definitions of terms used
Ekoroof LiteTile Dimensions
 Ekoroof LiteTile Dimensions 7 3 3.5 Height 40 Width 20 Length Weight per Panel: 3 kg / 6.61 lbs 2 2 Area per panel 800 in / 5.55 ft 2 Panels per Square: 20 (including overlap, for a 100 ft covered area)
ARMORTAB R SUPER TM Shingles Installation Instructions
 ARMORTAB R SUPER Shingles Installation Instructions ARMORTAB SUPER DO NOT REMOVE THE RELEASE TAPE The release tape on the top of the ARMORTAB SUPER is designed to prevent adhesion between the shingles,
Table of Contents. Roof to Head Wall w/ Side Flashing DECRA Shake XD Roof Overview Roof Penetration - Pipes & Vents...
 Table of Contents DECRA Shake XD Roof Overview.... 2 DECRA Shingle XD Roof Overview.... 3 Introduction... 4 Safety... 4 Tools.... 4 Estimating Sheet... 4 Codes & Requirements... 4 Roof Slope... 4 Underlayment...
Installation Catalog
 PREMIUM ROOFING. LEGENDARY SERVICE. www.marcometals.com Installation Catalog 1 MARCO METALS, LLC Premium roofing. Legendary service. Marco Metals, LLC is a family-owned and operated company with its origin
INSTALLATION DETAILS
 INSTALLATION DETAILS Front Issued January 23rd, 2005 These install details are provided to demonstrate the recommended installation method for Metro Roof products and accessories. The details and information
900 SERIES WALL PANELS
 CI-DS-01-900 CI-PP-01-900 CI-PJ-01-900 CI-PJ-02-900 CI-PJ-03-900 CI-BS-01-900 CI-BS-02-900 CI-BS-03-900 CI-BS-04-900 CI-BS-05-900 CI-OC-01-900 CI-OC-02-900 CI-IC-01-900 CI-FO-01-900 CI-FO-02-900 CI-FO-03-900
BARDOLINE INSTALLATION INSTRUCTIONS
 BARDOLINE INSTALLATION INSTRUCTIONS www.onduline.com CONTENTS General conditions Material requirements Terms Estimating shingle requirements Roof preparation Shingle application 9 GENERAL CONDITIONS ONDULINE