PoorBoy Skiff. A 10-11ft 6in skiff for outboard motoring By Steven Lewis
|
|
|
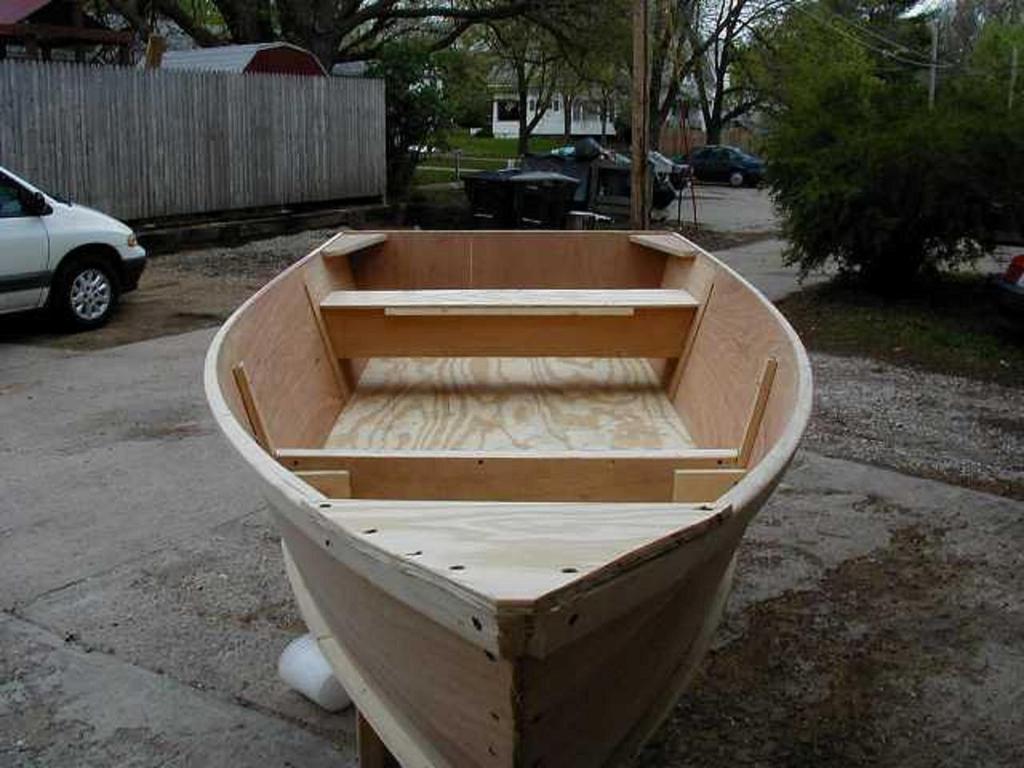
- Anastasia Adams
- 6 years ago
- Views:
Transcription
1
2
3
4 PoorBoy Skiff. A 10-11ft 6in skiff for outboard motoring By Steven Lewis PoorBoy is about the simplest small motorboat you will come across. It consists of 2-2 1/4 sheets of plywood (1-1 1/4 sheets x3/8 and 1 sheet x1/4 ), ½ sheet of ¾ ply for transom, doubler, knees and breasthook, 1 8 foot 1 x12 for seats 1 1 x4 x12 (or scraps) for the center mould and a 1 x 10 x 12 for inner and outer wales and chine logs and a 2 2 x4 for the stem. You will need to cut a 1 x2 for cleats and stuff from the 1 x10. You will also need some 5/8 screws and some ¾ screws. You can use PL Premium for glue or thickened epoxy. The boat is a hair under 10 ft to 11 ½ ft long and has a beam of 49 at the sheer and 43 at the chine. The sides and transom are flared 13. The side panels are simple strips of ply, 16 wide, joined with a butt block at the back of the boat. The length of the panels is 10 1 ¾ to 11 8 (12 with glass butts) long. The bottom of the transom is angled in 3 7/16 and the bottom of the stem is angled in 6 9/16. The stem piece is cut to a 36 half angle (36 per side) and the bottom beveled by The angles don t have to be 100%, but fairly close. Leave the stem long so you can trim it later. The chines and transom corners should be taped with glass and epoxy for durability and leak protection and the bottom can be glassed for additional abrasion protection. To start building, cut your side panels and butt them together using 3 wide butt blocks or fiberglass butts. Cut the panels out of the ¼ ply, ripping it into 3 even strips of just a hair under 16 wide. Use 2 full-length panels for the front of the boat and cut the third in half to finish the back parts minus a 3 strip each, used for the butt blocks. If using glass butts you can omit cutting the strip off. Line up each end part with its side and glue and screw the buttblocks on or glass the joint. Flip them over and glass the outside of the seam for either method. Cut out your transom to 17 high, beveling the bottom to 13, beveling from the inside of the panel to the outside, in other words the outside of the panel will be shorter height wise than the inside (until you bevel the top later). Next we make the mould. The inside of the bottom is 35 ½ across, so you need to cut your 1 x4 piece to this dimension, angling the ends outward by 13. Cut sidepieces and attach to the bottom at this angle, then cut a top piece to create a trapezoid shape (see picture). The top crosspiece should fall at the top of the shear and the mould width should be 42 ½ across. Cut large plywood triangles to brace the corners of the mold to keep it square when you bend the panels around it. Bevel cut 2 strips 1 ½ wide (from the 1 x10 ) to 13 to make chine logs to attach the bottom and glue and screw them on the bottom outside edges of the side panels(see picture as to how to cut and attach them angle wise).
5 Putting it together: Take your side panels and attach them to the mould 4-5 1/2 feet (use the amount added) forward of the bottom corner of the transom edge. Cut, glue and screw pieces of 1 x2 to the inside edge of the transom then install the transom, gluing and screwing from the outside into the plywood and 1x. Get someone to help you or use a Spanish Windlass and bend the side panels inwards and upwards to the bow, glue and screw the panels and stem piece together. Be sure the bottom of the stem piece is even with the bottom of the panels. Flip the boat over and square it up. You do this by measuring from the bow back along each edge 2 then mark a point. Measure from the opposite corner of the transom to each point. They should be even. Measure from the opposite corners of the transom to the corners of the mould, this should be even. Measure from the opposite corner of the mould to the points marked off, these should be even too. When everything is square, lay the bottom sheet of ply onto the boat (with the edge at the transom and one side even with a side panel) and trace around the outside of the boat. Leave the hole at the front, as you will fill this with cut off from the main panel. Cut outside of the line you traced so you can sand to fit. Re-square the boat (in case you moved it) then glue and screw the panel onto the bottom. Take a piece of cut off with a factory edge and butt it up to the edge of the hole, trace the outline and cut out. Using another piece of cut off, make a butt block to fit inside the bow area, glue and screw everything together. If you plan to glass the bottom, you won t need to tape this joint but if you don t put some tape on it to seal and strengthen things properly. Bevel cut to 13 and 30 your inner and outer wales (see drawing) and glue and screw the outside one (from the inside). Lay a piece of ¾ cut off on the bow of the boat and trace the inside of the bow onto it. Cut it out and bevel it so if fits flush with the top of the bow panels. It should extend 12 back from the stem. Glue it in. While you are there, I recommend you cut the stem off 4-6 above the tip of the bow to use as a tie off point. Round off the edges and drill a hole for a rope. At the back of the boat, cut and bevel some knees (corner braces see my web site for suggested shape) to help brace the back of the boat. Cut a doubler for the center of the transom (motor mount) and glue and screw it on. Bevel the top of the transom and doubler so that it is level with the sides. The transom is designed to take a short shaft OB without modification. You will not need a center brace as the boat should not have more than a 10 hp motor on it and the transom is plenty strong for this. With this sized motor you can use full throttle going straight, but please throttle back to turn as you may trip on the chine and capsize. Fit, glue and clamp your inwale after the rest is in for a professional finish. Notch the wale to fit under the breasthook and knees. Furniture and Finishing: The seats can be simple planks on cleats attached to the sides or fully enclosed chambers or anywhere in between. I will detail the simple ones. The front of the rear seat should be 30 from the rear transom to comfortably use a tiller motor. Measure up from the floor 12 and mark on each side the correct distance from the transom. This will be the top of the seat so measure down ¾ for your plank and mark this. This is where the top of the cleats go. The cleats should be 1 ½ deep and ¾ wide, but doubled to 1 ½. Another strip will run under the center of the seat athwartship to support the middle of the plank. Glue your cleats together and screw them to the sides, level with the bottom. Drill, glue
6 and screw the support to the bottom of the seat (look at the end grain of the seat plank. The growth lines should cup down otherwise the plank will cup upwards and hold water). Put the seat on the cleats and drill angled holes through the plank and into the cleats. Glue and screw the plank to the seats then fill the holes. The front seat should land forward of where the mould is, so you will have to cut the top of the front seat to fit the side curve. The cleats should be beveled a bit to fit the sides. Alternately you can just use a large cooler as a seat. Simply glue and screw crosswise cleats on the floor to keep the cooler from sliding around. Drinks and ice are good ballast to keep the front end down, or you can use it as a live well. Finishing is nothing more sanding the rough spots and painting. Use a couple coats of primer and a couple coats of exterior oil or latex paint. If you use latex you will need to let it cure properly (3-4 weeks) but if you use oil, it should be cured well in about a week. Let the paint cure out of the sun, but somewhere where there is air circulation. Enjoy Steve
7
8
9
10
11
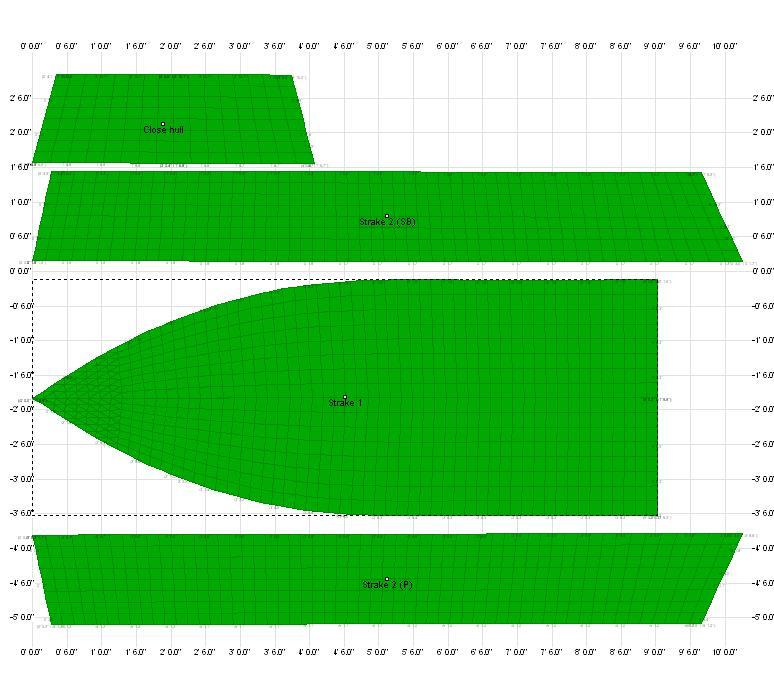
Above are the offsets for the plywood panels.
 DinkyDink Plans Bottom Panel Half Station X Y X2 Y2 1 1/4 3/4 0 11 5/16 2 4 9/16 4 12 9/16 3 11 11/16 1/4 11 7/16 14 1/2 4 18 5/8 1/16 18 5/8 15 11/16 5 25 3/4 0 25 3/4 16 5/16 6 32 13/16 0 32 13/16 16
Photo Essay: How to Build a. Seneca. Pacific Power Dory. Plans for this boat may be found at:
 Photo Essay: How to Build a Seneca Pacific Power Dory Plans for this boat may be found at: http://www.spirainternational.com/ To begin building the Seneca, or any Spira International framed boat, a strongback
Photo Essay Building a. Key Largo. Carolina Dory. Plans for this boat may be found at:
 Photo Essay Building a Key Largo Carolina Dory Plans for this boat may be found at: http://spirainternational.com/ Photo Essay Building a Key Largo Carolina Dory The Carolina Dory is a specialized type
DuckSkiff. Specifications for motorized version: LOA: Beam: 5 2 (with trim) Depth at midships: 18. Draft at design weight of 860 lbs is 4.
 Depth at midships: 18. Draft at design weight of 860 lbs is 4.") DuckSkiff Duckskiff is a 14 foot skiff I designed for a buddy of mine named Tim that I work with. Tim is an avid Duck hunter and wanted a fairly lightweight boat but in nice quiet wood rather than noisy
DuckSkiff Duckskiff is a 14 foot skiff I designed for a buddy of mine named Tim that I work with. Tim is an avid Duck hunter and wanted a fairly lightweight boat but in nice quiet wood rather than noisy
Illustrated Guide to Building a Spira International Ply on Frame Boat
 Illustrated Guide to Building a Spira International Ply on Frame Boat Spira International, Inc. Huntington Beach, California Copyright, 2008 All Rights Expressly Reserved Building a Spira International
Bateau.com PH18 CNC kit notes 1/5
 Bateau.com PH18 CNC kit notes 1/5 These building notes must be used in conjunction with the standard building notes included in the plans package for this boat. The PH18 kit is assembled as described in
Penobscot 14 Building Log
 Penobscot 14 Building Log Date July 26, 2004 Duration Activity plane jig boards July 27, 2004 July 28, 2004 cut jig boards cut frame boards, assemble jig July 29, 2004 6.75 hr assemble jig August 2, 2004
Use these notes in conjunction with the plans and the plan's building notes.
 GF18 CNC kit notes. Use these notes in conjunction with the plans and the plan's building notes. The standard kit is based on the GF18 with the sole option, central bench included. There are small differences
A Skin-on-Frame Pram. Designed by Dana Munkelt. Drawings by Andrew Walters. Duckworks Boatbuilder's Supply duckworksbbs.com
 A Skin-on-Frame Pram Designed by Dana Munkelt Drawings by Andrew Walters Duckworks Boatbuilder's Supply duckworksbbs.com "" is a small skin-on-frame (SOF) pram design with a twist; a solid plywood floor.
Building small wooden boats in Myanmar
 39 12 ft & 18 ft Prepare bottom Before fitting the keel, there are several steps to complete: 1) Cut frame ends and transom to length (level with bottom). 2) Bevel bottom edge of lower side planks; this
Mudroom Unit. Page 1 of 25
 Mudroom Unit www.andrewharriswoodwork.com Page 1 of 25 Introduction This plan makes a unit which is 66 ¾ inches tall, 39 ½ inches wide and 18 ½ inches deep. It was custom made for some friends to fit the
Photo Essay How to Build an. Alaskan. Grand Banks Dory. Plans for this boat may be found at:
 Photo Essay How to Build an Alaskan Grand Banks Dory Plans for this boat may be found at: http://www.spirainternational.com/ How to Build an Alaskan Grand Banks Dory The Alaskan is an easy to build Spira
Cowper From Steve Wolverton on the T&TTT forum, Feb 2005 For Reference Only Do not use to build a trailer. Check on Teardrop and Tiny Travel Trailers
 Cowper From Steve Wolverton on the T&TTT forum, Feb 2005 For Reference Only Do not use to build a trailer. Check on Teardrop and Tiny Travel Trailers for up to date building information; http://www.mikenchell.com/forums
FireFighter.21 Building Instructions
 A Tom Moorehouse design. Thank-you for purchasing the FireFighter.21. I believe that you will find it to be the best.21 rigger kit available. It has won 1 st place in the 2006 AMPBA nationals! It was designed
Hatch Installation For Pygmy Solo and Double Kayaks
 Introduction/Overview Hatch Installation For Pygmy Solo and Double Kayaks The hatch kit consists of several wooden lips, strapping and hardware. The hatch is constructed by cutting a hole in your deck,
Redwood strips are tacked to the templates, and edge-glued. Drive brads through into the templates before putting on fiberglass doth.
 1 Make the building form and attach templates to the crosspieces. Nail a strip down the center to hold the stems and templates in position. prototype canoe took about three weekends to build. She's broad
About.com :
 http://woodworking.about.com/gi/dynamic/offsite.htm?sit...//www.popularwoodworking.com/features/fea.asp%3fid=1088 (1 of 8)1/28/2004 12:05:01 AM Modern Storage Tower The last thing I want to do when starting
Hudson Dresser [1] Hudson Dresser Published on Ana White ( Submitted by dan-k [2] on Fri, :43 [1]
![Hudson Dresser [1] Hudson Dresser Published on Ana White ( Submitted by dan-k [2] on Fri, :43 [1]](/thumbs/90/102626096.jpg "Hudson Dresser [1] Hudson Dresser Published on Ana White ( Submitted by dan-k [2] on Fri, :43 [1]") [1] Submitted by dan-k [2] on Fri, 2011-03-11 11:43 [1] If you plan on staining this piece, it is recommended that you stain all of the drawer face materials before assembly for a more professional look.
[1] Submitted by dan-k [2] on Fri, 2011-03-11 11:43 [1] If you plan on staining this piece, it is recommended that you stain all of the drawer face materials before assembly for a more professional look.
Building Instructions Diva cabin boat
 Building Instructions Diva cabin boat Order no. 3093/00 aero-naut Modellbau Stuttgarterstr. 18-22 D-72766 Reutlingen / Germany http://www.aero-naut.com 1 For pictured building instructions please see the
Materials and Tools: Printer s Triple Console Cabinet. Free Plans to build a Triple Console Cabinet
 Materials and Tools: Materials: 3 sets euro style bottom corner mount drawer slides, 16 length 3 sets inset hinges 24 cup style handles 8 2x2 @ 8 feet long 6 1x3 @ 8 feet long 6 1x2 @ 8 feet long 1 sheet
Adjustable Hammered Dulcimer Stand
 Adjustable Hammered Dulcimer Stand Musicmaker s Kits (Hwy 36 behind Joseph s Restaurant) P.O. Box 2117 Stillwater MN 55082 651 439 9120 www.harpkit.com PARTS LIST: 1 Set of Assembly Instructions A. 2 front
SE5a Wing Panels rev 1.0
 SE5a Wing Panels rev 1.0 The top and bottom wings are different. They might look the same but the bottom wing has one less rib and some rib spacing difference. This is due to where the wooden interplane
Building small wooden boats in Myanmar
 19 12 ft & 18 ft Fit remaining floors The remaining floors can now be cut to size by taking measurements at the boat. The timber required is given in step 1. See step 10, 11 and 20 for installation procedures.
Build It: The Most Amazing Cooler Bench Ever
 Build It: The Most Amazing Cooler Bench Ever wooditsreal.com/2017/04/28/build-it-cooler-bench-free-plans/ A bench. A cooler. Put them together and what do you get? The most amazing Cooler Bench you ve
Introduction: The model should be assembled following the sequence of the stages of construction described in these instructions.
 Victoria Bestell-Nr. 3082/00 Introduction: The model should be assembled following the sequence of the stages of construction described in these instructions. The laser-cut components are individually
AN IMPROVED DESIGN FOR AMATEUR BUILDERS.. TAKES SAIL OR MOTOR
 BUILDING A General H ERE is a rowboat that is in a class by itself the final development of a long line of forerunners. This graceful little V-bottom craft is 13 ft. long, carries from four to six passengers,
10. Wing prep and subassembly
 Date Section Objective: Construct and fabricate the sub-assemblies of the wing panel. Required Parts: Wing left 11gal PN104-300, Wing right 1gal PN104-400, Wing left 15 gal option PN104-322, Wing right
Kreg Tool Co. All Rights Reserved.
 Version 1 p. 1 Materials: Lumber: Qty: Board 2 2x2s 3 ft. long 2 1x2s 8 ft. long 2 1x3s 8 ft. long 6 1x6s 10 ft. long INSTRUCTIONS: Supplies: 1 1 / 4" Kreg Screws (coarse thread for softwoods, fine thread
AC50 Enclosure - Thin Edge
 AC50 Enclosure - Thin Edge 2 3/16??? 4 PL 11/16 1 7/8 Piping Groove 2 7/8 Top thickness = 18mm 6 7/16 All other pieces thick Corner Radii and joints =?? Bracing blocks for back = 5/8 square, 2 ea. Back
Cockpit Kit. Full Depth - Builds Quickly - Light Weight READ THROUGH THIS INSTRUCTION MANUAL FIRST. IT CONTAINS IM- laser cut wood kit
 The Savage Light Sukhoi Su- 27 Cockpit Kit contains everything you need to build a full depth semi scale Su-27 cockpit, yet adds less than an ounce to your finished model s weight (not including pilot).
Building Tips This model can be built using the following types of adhesives:
 Page 1 Building Tips This model can be built using the following types of adhesives: Epoxy (with or without microballons) Odorless cyanoacrylate (CA) with accelerator UHU Creativ for Styrofoam (or UHU
(1) 2x4 Ft. Sheet of ¼-inch Plywood. 1 ¼-inch Wood Screws. 1 ¼-inch Brad Nails ¾-inch Brad Nails Wood Glue CUT LIST:
 2x4 Ft. Sheet of ¼-inch Plywood. 1 ¼-inch Wood Screws. 1 ¼-inch Brad Nails ¾-inch Brad Nails Wood Glue CUT LIST:") MATERIALS: (5) 1x3x8 Ft. Boards (3) 2x4x8 Ft. Boards (10) 1x4x8 Ft. Boards (1) 1x2x10 Ft. Board (1) 2x2x4 Ft. Board (2) 1x6x8 Ft. Boards (1) 4x8 Ft. Sheet of ¾-inch Plywood (1) 2x4 Ft. Sheet of ¼-inch
MATERIALS: (5) 1x3x8 Ft. Boards (3) 2x4x8 Ft. Boards (10) 1x4x8 Ft. Boards (1) 1x2x10 Ft. Board (1) 2x2x4 Ft. Board (2) 1x6x8 Ft. Boards (1) 4x8 Ft. Sheet of ¾-inch Plywood (1) 2x4 Ft. Sheet of ¼-inch
JAE Mini Sprint. Fast Electric Outrigger. A Zippkits R/C Boat. Building Instructions
 Z I P P M A N U FA C T U R I N G JAE Mini Sprint Fast Electric Outrigger A Zippkits R/C Boat Building Instructions 2011 Zipp Manufacturing - Frankfort, New York 13340 www.zippkits.com Toll Free (866) 922-ZIPP
Entrance Cabinet Plans
 Entrance Cabinet Plans www.andrewharriswoodwork.com Page 1 of 19 Introduction I have tried to ensure all steps are covered in these plans but if you find any errors in the plans or have a question then
ADULT. Adirondack / Muskoka Chair Plans
 ADULT Adirondack / Muskoka Chair Plans Materials List 3/4" x 9 1/2" (1.9cm x 24.1cm) redwood, cedar or pine boards. Six, 8' (2.44m) boards should make one chair depending on knots and layout. You can also
Sawhorses. for the Shop. Three horses that cover all of your shop needs
 w J ANUARY/FEBRUARY 2003 Sawhorses for the Shop Three horses that cover all of your shop needs BY CHRISTIAN BECKSVOORT Sawhorses are an indispensable part of my shop equipment. No matter what the process
Sort 4 (four) 2x6x12 pieces and cut to 126 1/2" for a total of 4 (four) 126 1/2" pieces.
 2x6x12 pieces and cut to 126 1/2 for a total of 4 (four) 126 1/2 pieces.") # Materials: Quantity Each: Total Quantity: xx8 6 x6x8 1 x6x1 1 TIPS FOR SUCCESSFUL PREP WORK: Before starting, carefully read through the entire instruction sheet. Refer to the material list to the left
# Materials: Quantity Each: Total Quantity: xx8 6 x6x8 1 x6x1 1 TIPS FOR SUCCESSFUL PREP WORK: Before starting, carefully read through the entire instruction sheet. Refer to the material list to the left
You start assembling the boat by piacing the buiiding board on two sawhorses as in Fig. 3. The lines marked on the building
 ERE'S just what prospective builders of small sailboats have been looking for, as you will see from a glance at the facsimiles on the left, which reproduce excerpts from letters written by enthusiastic
Building instructions ARTEMIS Sailing Canoe Day Five Version 1.0 Brian Pearson & Dr. Axel Schmid Day Five. Assembly of Planks and Frames
 Building instructions ARTEMIS Sailing Canoe Version 1.0 Brian Pearson & Dr. Axel Schmid 2016 Assembly of Planks and Frames Steps: Assembling hull plansk with wire Install frames Align and check keel rocker
How to build a Javelin Skiff
 How to build a Javelin Skiff This is not your grandfather s plywood boat! The Javelin involves a high-tech type construction, called composite. The hull can be constructed with foam or plywood; these materials
CUSTOM SHUTTERS IN-A-BOX
 CUSTOM SHUTTERS IN-A-BOX SHUTTER ASSEMBLE INSTRUCTIONS & INSTALLATION INSTRUCTIONS 1. Inspect the contents of your package. Do not discard the shutter packaging box until you have started painting your
The Hearse Carriage Assembly Instructions Page 1.
 The Hearse Carriage Assembly Instructions Page 1. The Hearse Carriage Assembly Instructions Page 2. WHAT YOU'LL NEED: Scissors, Elmer's glue (or a glue stick), a needle, two toothpicks, a sharpened pencil,
Chapter Six. Getting started inboard. Installing the false deck
 A close look at the thinning down of the bulkhead extensions. They are just 1/16 thick after fairing them. Chapter Six Getting started inboard This next step is one of the last remaining messy tasks to
THE APOGEE A 100-INCH AMA DURATION SAILPLANE FROM DYNAFLITE
 THE APOGEE A 100-INCH AMA DURATION SAILPLANE FROM DYNAFLITE Apogee is the intermediate sailplane designed to be competitive in AMA duration contests. Effective spoilers, rudder and full flying stabilizer
FUSELAGE CONSTRUCTION
 FUSELAGE CONSTRUCTION Note: prior to building and gluing on the work surface use protective covering on your building surface. (wax paper or clear wrap) Fit the laser cut Fuselage Front and Fuselage Rear
SZD-10 bis CZAPLA ASSEMBLY MANUAL IN PICTURES
 1 RUDDER Plan and parts: 2 Assembly steps: Photo above: glue together rudder spar, ribs and trailing edge. Clamp spar to a flat surface (chipboard on the photo) and make sure the straight aligment of the
CONTINUED. BACK & SEAT RAILS: 1. Sort three (3) 2x2x8 pieces. 2. Measure and cut one (1) 61 length from each piece.
 2x2x8 pieces. 2. Measure and cut one (1) 61 length from each piece.") # Materials: Quantity Each: Total Quantity: 2x2x8 6 2x4x8 9 4x4x8 2 4x6x8 1 TIPS FOR SUCCESSFUL PREP WORK: Before starting, carefully read through the entire instruction sheet. Refer to the material list
# Materials: Quantity Each: Total Quantity: 2x2x8 6 2x4x8 9 4x4x8 2 4x6x8 1 TIPS FOR SUCCESSFUL PREP WORK: Before starting, carefully read through the entire instruction sheet. Refer to the material list
Jeff Branch WOODWORKING YOU CAN BUILD A. By adding subtle design elements, a traditional furniture style becomes decidedly modern.
 Jeff Branch WOODWORKING YOU CAN BUILD A By adding subtle design elements, a traditional furniture style becomes decidedly modern. Jeff Branch WOODWORKING Publisher: Jeff Branch Editor: Jeff Branch Art
The image above is intended to give you an idea of what the dovecote will look like when finished.
 Thank you for buying my book, I hope it is useful and enjoyable in your quest to building your own dovecote. This book will give you step-by step instructions on how to build your own dovecote also included
Cedar 2-Drawer Desktop Storage Cube
 Cedar 2-Drawer Desktop Storage Cube 5 ½ Dimensions 5 ½ 5 ½ 2 2 1 7/8 4 ¼ 4 ½ Author s Notes: Build a Cedar 2-Drawer Desktop Storage Cube from just 1 cedar fence picket. No angles, special cuts or rips
Building the Wee Lassie Canoe. A Michigan Woodworkers Guild Presentation by Bob Mills
 Building the Wee Lassie Canoe A Michigan Woodworkers Guild Presentation by Bob Mills So you want to build a boat, eh? Ok, how about this for starters? Carved by Livio De Marchi, Woodcarver Extraordinaire
ULS Cherokee. Ultra Low Speed aircraft for indoor RC flying. Zippkits. Specifications: Required to complete:
 Zippkits ULS Cherokee Ultra Low Speed aircraft for indoor RC flying. Specifications: Span- 28 inches Wing Area- 151 Sq/In Wing Loading- 3.0 ounces/ft Weight- 3.5 ounces RTF Build time- 1-2 Hours Radio-
ENJOY THIS SELECTION FROM. Pocket Hole Joinery. Pocket Hole. Joinery Bookshelf Day bed Mirror/picture frame Dresser Bathroom vanity...and More!
 t ENJOY THIS SELECTION FROM Pocket Hole Joinery Pocket Hole Joinery Bookshelf Day bed Mirror/picture frame Dresser Bathroom vanity...and More! Mark EdMundson To purchase your copy of Pocket Hole Joinery,
An Inner Hive Cover. In the Beekeeper s Work Shop. Building a Bee Hive: The Inner Hive Cover. by Stephen E. Tilmann
 An Inner Hive Cover In the Beekeeper s Work Shop The project for this article is an inner hive cover. The inner cover sits on top of the topmost hive body (super) and underneath the telescoping top cover
136 PLYWOOD DESK 522
 136 PLYWOOD DESK 522 Simple in design and inexpensive, this plywood desk is made from a single 4- x 8-foot panel. Plywood is available with many hardwood veneers; it can also be covered with plastic laminate,
TAPE & GLUE PROCESS Version: Jun. 2011
 FREE to print TAPE & GLUE PROCESS Version: Jun. 2011 The following small boat assembly process was developed out of the need for an easy, lightweight, cost effective and health friendly method of providing
Cobra X Q Construction Tips Construction: Bel y pan
 Cobra X Q Construction Tips : The white plastic in this kit is high impact styrene. It can be painted with most types of coatings if light coats are applied this is necessary due to the thickness of the
Kentucky 4H Wood Science Plans Notebook. Plans Level 3
 Kentucky 4H Wood Science Plans Notebook Plans Level 3 MATERIALS: 2 pieces wood 3/4 x 10 x 4 1 piece wood 3/4 x 12 x 4 2 pieces wood 3/4 x 3 x 2 5 1/2" 2 pieces wood 3/4 x 3 x 1 8 1 piece wood 2 x 4 x
Tools and Tips: ( 1 )
") Tools and Tips: As you build instructions will show in my many picture manual how to assemble. You can use your own methods as you desire, my results are very good. A smooth, flat work surface is very
Tools and Tips: As you build instructions will show in my many picture manual how to assemble. You can use your own methods as you desire, my results are very good. A smooth, flat work surface is very
Harriet Chair with Modifications
 Harriet Chair with Modifications This modification of the Harriet chair includes a slat back, padded seat, and is 2 inches wider than the original plan. The overall dimensions of the finished chair: 38
Making your Rudder Cassette
 Making your Rudder Cassette A list of the stuff you ll need The row of materials below is laid out in the order of application. The foam blank shown on the right is available from Bob at www.flyingfoam.com
Jigsaw Puzzle Tray. Premium Plan. In this plan you ll find: America s leading woodworking authority
 America s leading woodworking authority Premium Plan In this plan you ll find: Step-by-step construction instruction. A complete bill of materials. Construction drawings and related photos. Tips to help
Serving Tray. When some good friends got married recently, An exercise in template-making yields a great gift project that s easy to duplicate
 Serving Tray An exercise in template-making yields a great gift project that s easy to duplicate END Create from 3 8 2 8" piece. By Geoff Noden When some good friends got married recently, I decided to
SmallSyns, sealed box version, general cabinet plan.
 4.275" 8" 6.2" 4.5" 4.65" 8" 15.00" 4.5" SmallSyns, sealed box version, general cabinet plan. (more detailed drawings of each part to follow in later pages, with better-than-ikea directions!) 0.125"nom
Shed Assembly Instructions
 Shed Kit Contents The shed kit includes all the parts needed to assemble your shed except for tools and fasteners such as screws and nails. The various pieces are pre-cut and many are marked to indicate
Best Barns USA Assembly Book
 Best Barns USA Assembly Book Revised August 17, 2017 the Roanoke 16'x32' Building w/ full loft Manufactured by Reynolds Building Systems, Inc 205 Arlington Drive Greenville, PA 16125 This manual is copyrighted
Computer Desk. Project designed by April Wilkerson
 Project designed by April Wilkerson Copyright WilkerDos.com 2018 Project plan Desk Page 2 of 16 Page 3 of 16 File cabinet Page 4 of 16 Metal base Page 5 of 16 Glue up Get started by gluing up boards for
Package contains. Required tools and consumables:
 Thank you for purchasing the TriTrix MTM Transmission Line cabinet kit. This cabinet kit was precision cut using CNC machinery for the best possible fit and finish. With a little time and patience, your
How to Install Elite Bayside Beadboard
 How to Install Elite Bayside Beadboard Beadboard will give a room a warm and comfortable feeling. Its beauty lies in its simplicity. It is one of the easiest to install out of all wainscoting, regardless
G. Building the Cab, Cab Roof and Cab Boiler Extension Page 14 and Backhead.
 G. Building the Cab, Cab Roof and Cab Boiler Extension Page 14 and Backhead. Cab. In order to ensure that the cab and tender would actually look right, as what often appears on a drawing is not always
PROJECT PLAN TRAVEL CRIBBAGE BOARD
 BUILD IT WITH ROCKLER PROJECT PLAN TRAVEL CRIBBAGE BOARD BUILD Stock # Item Stock # Item 59160 Small Cribbage Board Template, 2-Player, Straight Track 90638 3/4" Dia. Straight Router Bit (1/2" shank) 21026
Contents. Introduction. List of Materials. Glue, Resin and Fixings. Tools. Construction Sequence. Study Plans Sheet 3. Andrew Walters April 2012
 Mia Study Plans Contents C Andrew Walters April 2012 2 Introduction. 4 List of Materials. 5 Glue, Resin and Fixings. 6 Tools. 7 Construction Sequence. 10 Study Plans Sheet 1. 11 Study Plans Sheet 2. 12
3Position the hull of the ship as
 Yamato: Step-by-step 25 The hull and stern deck c b d a b d c e e f a Rear frame b Stern deck x 2 c Stern deck x 2 d Side wall x 2 Wood glue Sandpaper (no. 400 grain) Craft knife Pliers d Side wall x 2
3x2 Building. Instructions. Jackson Van Buren s
 Jackson Van Buren s 3x2 Building Instructions Lumber QTY 2 3 DESCRIPTION 1/2 x 2 x Plywood 8 x 2 x Stud Hardware QTY IMAGE DESCRIPTION 36 16 8 Coarse Drywall Screw 2 1/2 Deck Screw 3/8 x Carriage Bolt
Building a Scarab 350 Trimaran
 This boat was designed to be built using flat panels. In either foam laminated panels or plywood. 1. The build time is less. Panels are lofted, cut out and joined on the frame. 2. Frame can be simpler.
Build a comfortable outdoor seat in time for spring
 asy lider Build a comfortable outdoor seat in time for spring by Vern rassel Our glider features metal swing arms that are easy to install and provide a smooth gliding motion. W hen you re choosing a spot
Making a Massive Bookcase Step-by-Step
 Making a Massive Bookcase Step-by-Step Jeff Branch WOODWORKING The only thing challenging about this project is its huge size. By JFF BRANCH A t right is a rendering of my first woodworking project completed
Tools and Tips: ( 1 )
") Tools and Tips: As you build instructions will show in my many picture manual how to assemble. You can use your own methods as you desire, my results are very good. A smooth, flat work surface is very
Tools and Tips: As you build instructions will show in my many picture manual how to assemble. You can use your own methods as you desire, my results are very good. A smooth, flat work surface is very
Ask your DIY store or carpenter to cut the required boards to size. Instructions. 1. Cut out the opening for the bottles
 KITCHEN TROLLEY Next time you're whipping up some magic in the kitchen, take advantage of our willing assistant. Fixed on rollers to provide easy mobility, our kitchen trolley can be stationed wherever
JAMISON SPECIAL. Building Guide
 JAMISON SPECIAL Building Guide WING Mark then drill holes for wing jig rods. Slide Ribs onto jig rods Mark the rib positions on 1/16 x 1 trailing edge, 1/4 x 1/4 leading edge & 1/4 x 1/4 spars Pin ribs
Building an Unfeathered Paddle with a Wood Shaft and Carbon Fiber Blades
 Building an Unfeathered Paddle with a Wood Shaft and Carbon Fiber Blades by Duane Strosaker Choosing the Wood Two 3/4" pieces of Sitka spruce laminated with epoxy for an unfeathered one-piece paddle. For
woodworkersjournal.com MATERIAL LIST
 MATERIAL LIST T x W x L 1 Legs (2) 1 1 2" x 3 1 2" x 36 7 16" 2 End Uprights (2) 1 1 2" x 3 1 2" x 32 1 2" 3 Stringers (4) 1 1 2" x 3 1 2" x 42" 4 Top Cladding, Long (2) 3/4" x 7 1 4" x 65 3 4" 5 Side
Flamingo. That s what I looked
 Plans N O W w w w. P l a n s N O W. c o m flip-seat Storage Bench Flamingo. That s what I looked like as I stood in the doorway perched on one leg, with my other foot raised so that I could untie the laces
Chapter Four, Fitting out the Shell
 Chapter Four Fitting out the Shell This chapter outlines the process for fitting the parts that go into a round or stave back shell. Square back sound boxes usually have the cap and base of the sound box
The Hamlin Assembly Instruction By Laser Dollhouse Designs
 The Hamlin Assembly Instruction By Laser Dollhouse Designs NOTE 1: Please do a dry assembly using only tape to hold house together. This will get you familiar with parts, location, and fit. This also gives
rmoire Materials Hardware
 A rmoire No house ever has enough storage space, and I built this armoire to satisfy a couple of needs. Inside the armoire is a shelf large enough for the television. Under the shelf are six drawers that
Contents. Study Plans. 2 Introduction. 4 List of Materials. 5 Glue, Resin and Fixings. 6 Tools. 7 Construction Sequence
 Volare Study Plans Contents 2 Introduction 4 List of Materials 5 Glue, Resin and Fixings 6 Tools 7 Construction Sequence Study Plans The study plans consist of an abridged version of the first 7 pages
84 WING SPAN MESSERSCHMITT BF-109
 84 WING SPAN MESSERSCHMITT BF-109 (COPYRIGHT PROTECTED 2014) ALL RIGHTS RESERVED MEISTER 84 ME-109 SIERRA GEAR UPDATE PLEASE NOTE: THE MAIN GEAR MOUNTING PLATE FROM SIERRA IS NOT SQUARE. YOU HAVE TO ROUND
Using the star template provided, trace out half the star shape on the pegboard sheet. Flip template over and trace out other side of star.
 Shining Star PROJECT INFORMATION Created by DIY hacker, woodworker and teacher, Kerryn Carter of Toolschool, brighten up your Christmas with this shining Star, complete with LED lights for extra twinkle.
Contest Field Border Construction Manual
 Contest Field Border Construction Manual TABLE OF CONTENTS Section 1 Field Construction...3 Section 2 Bill of Materials 3 Section 3 Construction.. 4 Step 1 - Layout...4 Step 2 - Bottom...4 Step 3 1 st
!! " # $ % & '! ( ) * +, -
 * +, -") !! " # $ % & '! ( ) * +, - North Pegasus This carton contains: (1) Instruction package. Response Curves North Creek Cabinet Handbook North Creek Wiring Guide (2) 6 oz. Rolls of Dacron stuffing. (1) Tube
!! " # $ % & '! ( ) * +, - North Pegasus This carton contains: (1) Instruction package. Response Curves North Creek Cabinet Handbook North Creek Wiring Guide (2) 6 oz. Rolls of Dacron stuffing. (1) Tube
Vivian Mansion Assembly Instruction By Laser Dollhouse Designs
 Vivian Mansion Assembly Instruction By Laser Dollhouse Designs NOTE 1: Please do a dry assembly using only tape to hold house together. This will get you familiar with parts, location, and fit. This also
10x12 Victorian Manual
 Tools Needed: -Cordless Drill (12V or higher) -#2 Square Drive Bit -Hammer -6 Step Ladder -Tape Measure -Square utility knife w/ blade & hook blade -Speed Square Little Cottage Co. PO Box 455 Berlin, OH
M. R. Mittleman, Constructor Member, Long Island Woodworkers
 M. R. Mittleman, Constructor Member, Long Island Woodworkers You wanna do what??? February 24, 2016 Long Island Woodworkers Presentation 2 Some particulars about the craft to be constructed: Model name
RSM DISTRIBUTION Presents
 RSM DISTRIBUTION Presents MOSQUITO By Jack Sheeks Photo _ Jack Sheeks Semi Scale Twin Stunter Wing Span: 58" Length: 37-3/4 Area: 579 sq. in. Engine: Two.35 -.40 www.rsmdistribution.com Call (951) 678
CPB-1 Lightweight Folding Pram
 Lightweight Folding Pram An ultra-lightweight folding pram, only 15 pounds. Ideal for the lone fisherman or paddling enthusiast. Easy to make and fits in any vehicle when folded! See the hull and load
Kitchen Step Stool. Premium Plan. In this plan you ll find: America s leading woodworking authority
 America s leading woodworking authority Premium Plan In this plan you ll find: Step-by-step construction instruction. A complete bill of materials. Construction drawings and related photos. Tips to help
SPUNKY ASSEMBLY MANUAL
 SPUNKY ASSEMBLY MANUAL Please read the tips section at the back of this manual regarding the use of laser cut parts. The proper removal and preparation of these parts is important. When laser cut, some
8 x 10 Timber-frame Garden Shed
 8 x 10 Timber-frame Garden Shed Includes: Step-By-Step Instructions, Complete Details & Materials Lists Timber-framing is a traditional building method that uses a simple framework of heavy timber posts
Eco Office File Base. Materials and Tools: Free Plans to build an office file cabinet base
 Materials and Tools: Materials: 1 - Sheet 3/4 PureBond Hardwood Plywood (Available at the Home Depot) 1 - Sheet 1/4 PureBond Hardwood Plywood (Available at the Home Depot) 3-21 Drawer Slides, Euro Style