Table of Contents. Installation Guide for Profile with Hidden Fasteners 3. Installation Steps 4, 5. Prestige Series Moldings 6, 7. Other Accessories 8
|
|
|
- Mervyn Carr
- 6 years ago
- Views:
Transcription

1 1
2 Table of Contents Page(s) Installation Guide for Profile with Hidden Fasteners 3 Installation Steps 4, 5 Prestige Series Moldings 6, 7 Other Accessories 8 Trims & Accessories 9 Eave Starters 10 Gableboards 11 Wall Flashings 11 Valleys 12 Wall Finishing 12 Hips 13 Ridges 13 Mansard 14 Dektite Combo Flashing 15 Warranty 16 2
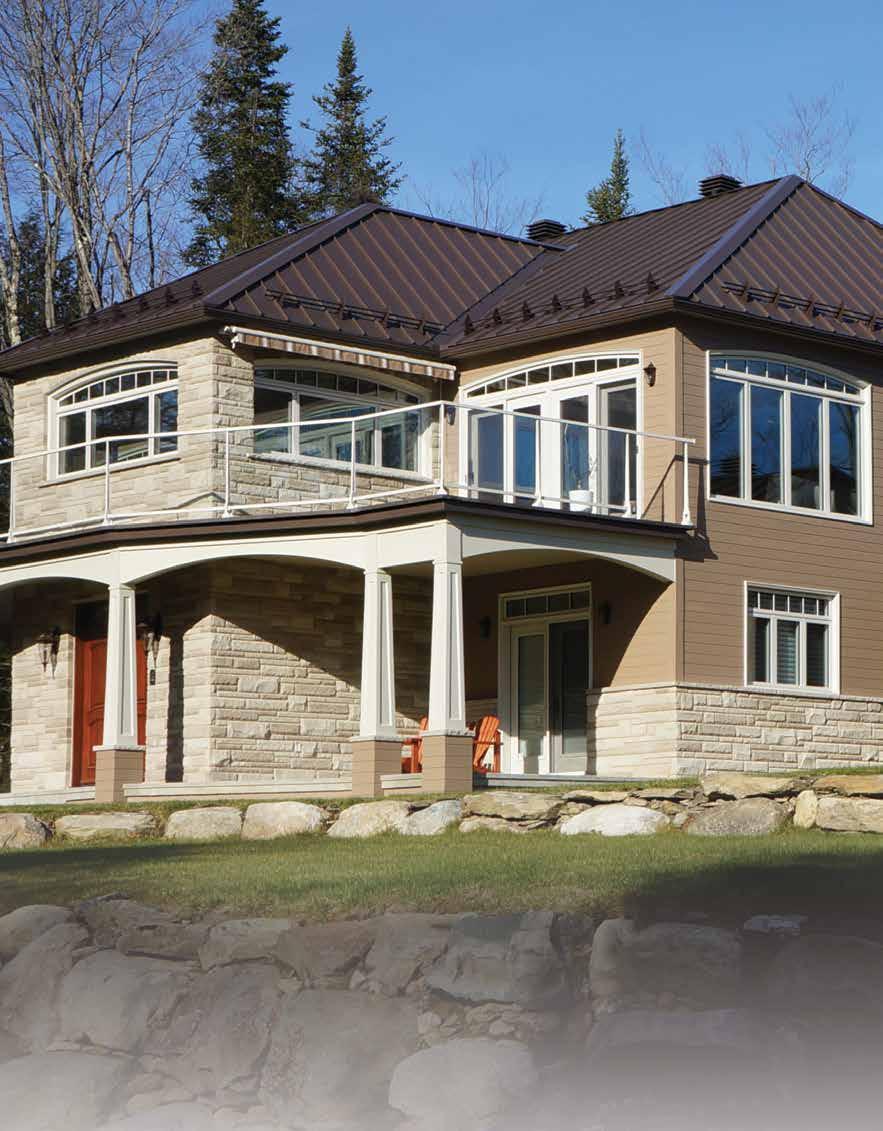
3 Installation Guide for Profile with Hidden Fasteners Enrich your next project with Prestige, our elegant batten-style roofing system. In addition to its distinctive opulent look, it will add dynamism and value to your construction. Prestige is available in a rich and sophisticated colour palette (including natural and metallic finishes) that will add panache to the architectural elegance of your home. The Prestige line should be installed on a solid substrate. If you wish to install it on laths, please contact Vicwest s technical department. Moreover, it can be installed with or without hidden fasteners, and is available in 24 or 26 gauge steel. Prestige 12 with intermediate ribs *Prestige 12 without intermediate ribs *Only available in Western Canada, this product without intermediate ribs is prone to oil canning. Prestige 16 with intermediate ribs *Prestige 16 without intermediate ribs *Only available in Quebec, this product without intermediate ribs is prone to oil canning. Prestige 20 with intermediate ribs *Prestige 20 without intermediate ribs *Only available in Quebec, this product without intermediate ribs is prone to oil canning. This installation guide will easily lead you step-by-step through to the completion of your roof construction or renovation works. Storage Recommended side joint The Prestige products and their accessories must be stored in a dry, ventilated area and protected from moisture and chemicals. 3 Recommended Tools Drill Caulking gun Metal shears Tape measure Chalk line Bending tools Vicwest TurboShear Scaffolding Square Work Safety Be sure to wear appropriate safety and fall protection equipment as well as soft-soled shoes. Soft-soled shoes will better grip the profile surface while protecting the painted finish. When you have no other choice than stepping on the profile, place your feet between the intermediate corrugations (or on the laths if applicable). For more information, visit www. or contact one of our sales representatives.
4 Step 1 Draw a diagram of the structure you will be applying the Prestige roofing panels on to. To accurately estimate and order Vicwest products, all exact measurements must be listed on the drawing. Please include the length of all valleys and hips, dormer window dimensions, length of ridges and rafters, as well as the dimensions and location of chimneys, skylights and ventilation pipes. It is also important to note the approximate roof slope, as flashings and ventilation pipes must absolutely adapt to the roof features. To determine the roof slope, measure a 12-inch width from the gable end and draw a mark. From this point, measure the roof vertical height. These measurements will indicate the roof slope. For example, 4 inches high by 12 inches wide gives a 4:12 slope Ask your Vicwest distributor to estimate your needs. Step 2 Preparation Plan the sheathing installation and organize the construction site so you can receive delivery of the material. Check the roof squareness. Draw a mark on the eave at an 8-foot distance from a corner. Draw a second mark on the gable edge at a 6-foot distance from the eave. If the distance between the two is 10 feet, the roof is square at this corner. Repeat for all the roof corners. During installation, make sure that the total width of the panels is a multiple of 20, 16 or 12 coverage profile selected. Avoid stretching panels to adjust them; this may cause local buckling on the sheet. Check and adjust the roof deflection before installation. Attach a wire between the top and bottom of the roof to ensure its composure. It must be taut. Note: The following guidelines assume that the roof is square. Otherwise, trim the panel along the gable so that it follows the deflection. Then install a gable flashing to minimize visual impact. 4
5 Step 3 Once the Vicwest panels and accessories are delivered, you can install the roof. Replace or repair any damaged or deteriorated fascia boards. Check the integrity of the roof structure, and repair damaged parts. For the Prestige profile, moldings and underlayment are installed simultaneously. Step 4 Centre and mark the locations of panels throughout the building to create a balanced visual effect at the end of each slope. Note: For both ends of each slope, the panel must be cut lengthwise to fit the fascia fastening system. Step 5 Begin laying the sheets, making sure they are square. Refer to the page inset illustrating the overlap joint installation procedure. Note: The overlapping joints must be oriented on the opposite side of prevailing winds. NB Always consult the applicable building code before starting work. THE BUILDING CODE REQUIRES PROPER VENTILATION;AN IMPROPER VENTILATION IS THE LEADING CAUSE OF ROOF SPACE CONDENSATION. Vicwest offers different types of vents. Refer to the Building Code or a specialist to determine the appropriate accessory for your building. 5
6 Prestige Series Moldings TRIM/ACCESSORY DESCRIPTION Starter with Fasteners S-125 Endwall A-type Gable Cap Slope Change 24 Standard Valley with Open Ends Gambrel Hip Rib End-cap Flashing for Side Wall 6
7 Prestige Series Moldings TRIM/ACCESSORY DESCRIPTION Z Field Notched Closure Strip Notched Closure Strip Available in 16 or length to be notched on site. Field Notched Ridge Cap / Hip Cap FV-8 Ridge / Hip Cap FR Ridge Cap FR-6 FR-8 Pre-painted or Galvalume 10-0 (3048 mm) Standard Endwall Flashing Pre-painted or Galvalume 10-0 (3048 mm) Standard Sidewall Flashing Pre-painted or Galvalume 10-0 (3048 mm) Type B Valley Pre-painted or Galvalume 10-0 (3048 mm) Standard Gambrel Trim 7

8 Other Accessories DESCRIPTION Folding clip Vicwest Synthetic Underlayment 48 x 250 roll covers 1000 sq. ft. *Vicwest Self Adhering Underlayment 36 x 66.7 covers 200 sq. ft. Metal Building Tape 1/8 x 1/2 x 25 long 1/16 x 1/2 x 50 0 long Dektite Combo Flashing Rib End Cap (Metal Rib End Cap) Polycarbonate Closure Strip (Prestige Closure) Sealant Colour Matched #12 Pancake Head Screws #12 x 1 (25.4 mm) Self Drilling Screw Self Tapping Screw Vented Foam Closures Large Tab (for use above profile) 8
9 Trims & Accessories 9
10 Eave Starters Prestige Starter (with Hidden Fasteners) 1. Install the Prestige starter molding with fasteners. 2. Install the Vicwest underlayment. 3. Provide for an excess in the panel of 1 inch at the molding nose. 4. Prepare the Prestige profile by folding in on itself only the flat part extending one inch from each panel to allow the fitting on the nose of the starter molding; then perform the installation. 5. Cut the rib excess after folding the end of the molding nose. 6. Close the bottom of the sheet with the metal rib end cap and sealant. For a 12:12 maximum slope Prestige Single Starter (with Hidden Fasteners) 1. Install the Prestige single starter molding. 2. Install the Vicwest underlayment. 3. Install the Prestige starter fastener on the Prestige single starter molding, and leave about 1 protruding from the starter molding. 4. Prepare the Prestige profile so it can interlock on the starter molding nose and install it. 5. Plan to leave the panel exceed 1 inch in the end area of the moulding. For slopes greater than 12:12 Prestige Starter (with Exposed Fasteners) 1. Install the Prestige starter molding with fasteners. 2. Install the Vicwest underlayment. 3. Install 1/8 x 1/2 metal building tape or a sealant bead on the entire length of starter molding. 4. Install the Prestige profile by aligning it with the end of the molding nose. 5. Apply two (2) 1 #9 screws with washers on the metal building tape (or sealant bead) at the bottom of each sheet, between the two (2) central ribs. 6. Close the bottom of the sheet with the metal rib end cap and sealant. For a 12:12 maximum slope 10
11 Gableboards Prestige A-Type Gableboard 1. Install the Vicwest underlayment. 2. Install a first Prestige profile sheet on the gable edge with the first rib cut beforehand. 3. Install 1/16 x 1/2 metal building tape or a sealant bead along the entire length of the gableboard. 4. Install the galvanized steel fastener on the gableboard on the tape or sealant joint by using screws near the rake fascia end. 5. Fit the Prestige A-type gableboard molding in the galvanized steel fastener and lock the molding using rivets or stitch screws. Wall Flashings Prestige Sidewall Flashing (with Hidden Fasteners) 1. Install the Vicwest underlayment and extend its installation to at least 4 up the wall. 2. Install the Prestige profile. 3. Install 1/8 x 1/2 metal building tape or a sealant bead approximately 3 from the wall. 4. Install the galvanized-steel flashing fastener on the tape (or sealant) so as to interlock the sidewall flashing molding. 5. Install the sidewall flashing molding by fitting it to the lateral fastener and proceed to fastening sidewall molding to the wall. Wall Flashing with Prestige Finish (with Exposed Fasteners) 1. Install the Vicwest underlayment and extend its installation to at least 4 on the wall. 2. Install the pre-bended Prestige finish molding at 90. Fasten it to the roof and the wall. 3. Install 1/8 x 1/2 metal building tape or a sealant bead in the finish molding. 4. Install the Prestige profile at the bottom of the Prestige finish molding. 11
12 Valleys ** The longer your valley will be, the larger your molding should be ** Prestige Valley (with Hidden Fasteners) 1. Install the Vicwest underlayment. 2. Install the Prestige valley molding and fasten it to the roof. 3. Apply a sealant bead on the end of molding double fold. 4. Cut the profile sheets at the right angle and make a fold so it can be interlocked. 5. Install the Prestige profile on the roof; insert the sheet end fold in the double fold of the Prestige valley. 6. Apply a sealant in each cavity and insert a metal rib end cap. Wall Finishing Prestige Wall Finish (Standard) 1. Install the Vicwest underlayment and extend its installation to at least 4 on the wall. 2. Install the Prestige finish molding and fasten it to the roof and wall. 3. Install the Prestige profile in the Prestige finish. 4. Insert the closure strip at the bottom of the molding. Install by fastening the 16 or 20 (as appropriate) metal closure and seal the outline with a sealant. Slope Change ** For installation on a masonry wall, contact the technical department ** Prestige Slope Change (with Hidden Fasteners) 1. Install the Vicwest underlayment. 2. Install the Prestige slope-change molding and fasten it to the roof. 3. Prepare a panel so that it interlocks on the roofing top and install it. (Plan an additional 1 inch before folding). 4. Install the Prestige profile on the lower roofing by inserting it into the molding. 5. Insert the closure strip at the bottom of the molding. Install by clamping the 16 or 20 (as appropriate) metal closure and seal the outline with a sealant. 12
13 Hips Prestige Hip (with Hidden Fasteners) 1. Install the Vicwest underlayment. 2. Install the Prestige hip molding and fasten it to the roof. 3. Prepare a panel so that it interlocks on the upper part of the roof and install it. (Plan an additional 1 inch before folding). 4. Install the Prestige profile on the lower roof, in the molding. 5. Insert the closure strip at the bottom of the molding. Install by clamping the 16 or 20 (as appropriate) metal closure and seal the outline with a sealant. Ridges Prestige Ridge View of the finished ridge/hip cap. Folded on site by installer. 1. Install the Vicwest underlayment. 2. Keep your roof sheet back 2 from the ridge line. 3. Peel paper from glue line on vented foam closure. 4. Place vented closure on panel. 5. Install ridge cap and centre on both slopes of roof and fasten with a pre-painted screw on every rib of profile. Field Notched Ridge Cap/Hip Cap 1. Install the Vicwest underlayment. 2. Install the hip/valley foam sealer up both sides of hip on profile keeping close to center. 3. Install the Prestige Field Notched Hip/Ridge cap by marking the rib location on the bottom leg. Notch out cap with tin snips so cap sits flush with profile below. 4. Fasten with a pre-painted screw on every rib of profile. 5. Seal the outline with a sealant. FV-8 Ridge / Hip Cap (Standard) 1. Starting from the Gable edge, a long length of ridge line, cut open into roofing substrate (sheathing) at no more than 1 1/2 per each side of ridge (required venting area). 2. Install the Vicwest underlayment. 3. Fasten a continuous Vicwest galvanized J molding on each side of the cut open venting area of plywood (sheathing) 4. Install the Prestige profile. Then install the closure strip at the bottom of the J-molding. 5. Install the vent roll on the J-moldings and fasten the FV-8 molding on the profile ribs, centered on the gable. Provide extra excess on ridge/hip cap at the fascia/gable edges in order to fold the molding ends as a cap. Vicwest offers different types of vents. Refer to the Building Code or a specialist to determine the appropriate accessory for your building. Can be installed on a 6:12 slope maximum ** Exposed screws ** 13
14 Mansard Prestige (with Hidden Fasteners) 1. Install a J-molding on the wall (under the base of the roof) with the colour facing inside J molding. 2. Install the roof starter according to the chosen model and installation type. Refer to page 10 to view options of starter detail. 3. Install a Vicwest configurable C-170 soffit molding under the cornice. 4. Install soffit.*. 5. Fasten the Vicwest Series 17 custom trim molding and complete the installation. 6. Proceed to install wall cladding as per manufacturer recommendations. * Depending on profile 14


 & up to 150 C (302 F) intermittently.")


15 Dektite Combo Flashing Dektite Combo Flashing Installation For use with hydro masts and vent pipes. Cut to size, place bead of silicone around metal base from base to ribs or profile and then fasten with skirt flange screws. Standard flashing and retrofit flashing all in one When retrofit is required just add clips for easy application Internal cone design provides 1/2 of continuous contact Pipe OD markings clearly shown on cutting groves Large base design to improve sealing on high rib metal roof sheets 20 Year Warranty Available in Black (Grey EPDM & Red Silicone Available by Special Order) EPDM will withstand constant temperatures at the roofline of -50 C (-122 F ) to 115 C (239 F) & up to 150 C (302 F) intermittently. Red Silicone will withstand constant temperatures at the roofline of -50 C (-122 F) to 200 C ( 392 F) & up to 250 C (482 F) intermittently. 1. When used in retrofit application apply silicone to both seam & underside 2. Limited spacing may occur between clips 3. Fasten clips using multigrips, working from top to base 4 Fasten combo base by placing a fastener either side of clips first *Always use the neutral base low modulus silicone for sealing **In corrosive and coastal environments fix blind aluminum rivets 1. TRIM - Cut opening 20% smaller than pipe diameter. 3. SEAL - Apply urethane / silicone sealant between Dektite Combo Flashing and roofing. 5. FASTEN - Complete the seal using common weather-resistant fasteners. 2. SLIDE - Slip Dektite Combo Flashing over pipe. 4. FORM - Bend aluminum base to fit irregularities. Use large slot screwdriver to press into tight angles. CODE DESCRIPTION PIPE SIZE METRIC PIPE SIZE IMPERIAL ROOF PITCH BASE MM INCHES COLOURS MAX # OF DC CLIPS (TWINS) REQUIRED DC103 Dektite Combo # mm 1/ or 10/ x 216 mm 8 1/2 x 8 1/2 Black 4 15
16 Warranty Registration Homeowners can register online at Upon receipt of your registration, Vicwest will forward by the warranty with certificate number. The homeowner should keep this information in a safe place for future reference or in the event they need to submit a claim or wish to transfer the warranty where applicable. Disclaimer It is the sole responsibility of the contractor to ensure installation is completed according to the directions herein, and that all construction by-laws and codes are met. The recommendations in the printed and the video versions of the installation guide are based on Vicwest s continuing program of labratory testing, product research and comprehensive field experience. Vicwest does not and cannot cover damage of any kind resulting from faulty or improper installation. In accordance with ongoing efforts to improve our products and their performance, Vicwest Building Products reserves the right to change, without notice, the specifications contained herein. The contents herein are for general information and illustrative purposes only and are not intended to serve as any type of advice. Every effort is made to ensure the accuracy of the information included in this brochure and it is believed that the information contained herein is accurate and reliable as of the date of publication. Vicwest Building Products, however, does not warrant or represent the accuracy or reliability of any information included in this brochure. Any reliance on any information without consultation with Vicwest Building Products or a duly authorized representative shall be at the user s own risk. 2017, Vicwest Building Products All rights reserved March
Table of Contents. Important Notices 3. Residential Roofing Application 4. Trims & Accessories 5. Trim Glossary 6, 7, 8. Estimating Material 9
 Table of Contents Page(s) Important Notices 3 Residential Roofing Application 4 Trims & Accessories 5 Trim Glossary 6, 7, 8 Estimating Material 9 Eave Trim Installation 10 Connecting Eavestarters 10 Gable
Table of Contents. Important Notices 3. Residential Roofing Application 4. Trims & Accessories 5. Trim Glossary 6, 7, 8, 9
 1 Table of Contents Page(s) Important Notices 3 Residential Roofing Application 4 Trims & Accessories 5 Trim Glossary 6, 7, 8, 9 General Installation Recommendations 10 Installation Guidelines Roof Preparation
Table of Contents. Important Notices 3. Residential Roofing Application 4. Trims & Accessories 5. Trim & Accessory Glossary 6, 7, 8
 Table of Contents Page(s) Important Notices 3 Residential Roofing Application 4 Trims & Accessories 5 Trim & Accessory Glossary 6, 7, 8 Estimating Material 9 Roof Preparation: 5 Steps 10, 11 Shingle Installation
Installation Guide. Step 3. Valley Flashing. Step 7. Transition Flashings and Accessories. Step 6. Hip and Ridge Installation
 Step 7. Transition s and Accessories Step 3. Valley Step 6. Hip and Ridge Installation Step 2. Rake Trim Step 5. Installing the Shingles Step 1. Eave Starter Installation Step 4. Endwall s Installation
Tuff-Rib Install Guide
 Install Guide bestbuymetalroof.com Page 2 of 27 Page 3 of 27 1. Page 4 2. a. Installation Guide b. Panel Squaring Pages 5, 6 Pages 7, 8 3. Pages 9, 10 4. a. Fascia (optional) b. Eave / 1.5x3.5 Angle c.
Installation Manual. Future Shingle Products
 Installation Manual Future Shingle Products TITLE REVISED 7/4/2011 Future Shingle Installation Manual is a component of Future Roof, Inc. and as such is intended to be used with Future Roof products only.
Installation Manual. Future Roof Shingle / Slate Products
 Installation Manual Future Roof Shingle / Slate Products REVISED 14/09/2010 Future Roof Shingle Installation Manual is a component of Future Roof, Inc. and as such is intended to be used with Future Roof
Table of Contents Light Gauge Metal Roof & Wall Panels
 Table of Contents Light Gauge Metal Roof & Wall Panels Installation Guide for Delta Rib, Nor-Clad, Strata Rib & 2-1/2 Corrugated Introduction Important Notice Notes: April 2008 Minimum Recommended Tools
TABLE OF CONTENTS A-1
 TABLE OF CONTENTS PAGE NUMBER: DETAIL DESCRIPTION A-1...TABLE OF CONTENTS A-2...GENERAL NOTES B-1...GENERAL INFORMATION C-1...EAVE DRIP DETAIL C-2...EAVE DRIP with GUTTER DETAIL C-3 & C-4...FIXED RIDGE
TIOGA Table of Contents
 Table of Contents TABLE OF CONTENTS Product Data Sheet...2 Engineering Data...3 General Information...4 Handling...5 Roof Preparation...5 Fastening Recommendations...6 Field Cutting...7 Touch-up Paint...7
DETAIL MANUAL for Standing Seam / Image II
 DETAIL MANUAL for Standing Seam / Image II Best Buy Metals Toll Free 1-800-728-4010 / Phone 423-479-6382 / Fax 423-728-3066 www.bestbuymetals.com Best Buy Metals Standing Seam Roofing Panels Fig. 2 Standing
Ekoroof LiteTile Dimensions
 Ekoroof LiteTile Dimensions 7 3 3.5 Height 40 Width 20 Length Weight per Panel: 3 kg / 6.61 lbs 2 2 Area per panel 800 in / 5.55 ft 2 Panels per Square: 20 (including overlap, for a 100 ft covered area)
REGAL. Installation Manual
 REGAL Installation Manual General Information The details shown on the following pages are suggestions or guidelines for installing the Regal system. The installation details shown here are proven methods
Best Buy Metals Toll Free / Phone / Fax
 DETAIL MANUAL for Vertical Seam Best Buy Metals Toll Free 1-800-728-4010 / Phone 423-479-6382 / Fax 423-728-3066 www.bestbuymetals.com Vertical Seam Roofing Panels Fig. 2 Vertical Seam Has 1-3/4" high
installation guide Villa
 installation guide Villa Table of Contents Introduction............................. 2 Safety................................... 2 Tools.................................... 2 Codes & Requirements....................
RIDGEMASTER PLUS CAUTION INSTALLATION INSTRUCTIONS ALWAYS WEAR SAFETY GLASSES TOOLS NEEDED GENERAL GUIDELINES FOR RIDGEMASTER PLUS AND HIPMASTER
 INSTALLATION INSTRUCTIONS RIDGEMASTER PLUS CAUTION Before beginning installation read all general guidelines, special notes and installation steps thoroughly and be sure to check and follow all your local
HipMaster Installation Instructions
 Mid-America, Plus and HipMaster Installation Instructions New applications for metal, slate and wood shingle roofs (see page 7) CAUTION: Before beginning installation read all general guidelines, special
Tuff-Rib. Installation Manual. Nationwide supplier of quality metal roofing. Toll-Free (800) S. Lee Hwy. Cleveland, TN 37311
 S. Lee Hwy. Cleveland, TN 37311") Installation Manual Nationwide supplier of quality metal roofing. 65 S. Lee Hwy. Cleveland, TN 7.. www.bestbuymetals.com Toll-Free (800) 78-00 IMPORTANT NOTICE This manual contains suggestions and guidelines
Installation Manual Nationwide supplier of quality metal roofing. 65 S. Lee Hwy. Cleveland, TN 7.. www.bestbuymetals.com Toll-Free (800) 78-00 IMPORTANT NOTICE This manual contains suggestions and guidelines
Straight Rib Series Metal Roofing Panel Installation Guide
 D-Rib G-Rib C-Rib Straight Rib Series Metal Roofing Panel Installation Guide 7000 AIRPORT LINE R.R., BOX 7 HENSALL, ONTARIO N0M X0 EASY BUILDING PRODUCTS TEL. : 5-6-07 TOLL FREE : -888-76-777 FAX: 5-6-08
 TremLock T-138 INSTALLATION MANUAL T-138 www.tremcoroofing.com 3735 Green Road Beachwood, Ohio 44122 1.800.852.6013 50 Beth Nealson Drive Toronto, Ontario M4H 1M6 1.800.668.9879 7241 6/8/18 TABLE OF CONTENTS
Terrabella Shake & Shingle Znap Ver. 2.0
 Terrabella Shake Znap Actual length = 52.6 Actual Width = 16.33 Coverage length = 49.7 Coverage width = 14 Terrabella Shingle Znap Actual Length = 52.375 Actual Width = 15.25 Coverage Length = 49.375 Coverage
Phone (662) Fax (662) DETAIL MANUAL. and guide to Reed s Metals products
 Fax (662) DETAIL MANUAL. and guide to Reed s Metals products") Phone (662) 869-7797 www.reedsmetals.com Fax (662) 869-7799 DETAIL MANUAL and guide to Reed s Metals products Perma-Loc & Secure-Seam Standing Seam Roofing Panels & Accessories -1- Reed s Metals Standing
Phone (662) 869-7797 www.reedsmetals.com Fax (662) 869-7799 DETAIL MANUAL and guide to Reed s Metals products Perma-Loc & Secure-Seam Standing Seam Roofing Panels & Accessories -1- Reed s Metals Standing
INSTALLATION GIUDE.
 INSTALLATION GIUDE INTRODUCTION The instructions and drawings included here are intended only as a guide for the installation of ECO Roofing Systems Spanish and Modern profiles. The materials and methods
CertainTeed. Shake / Slate Installation Guide
 CertainTeed Shake / Slate Installation Guide Table of Contents System Components... 2 General Conditions, Safety and Roof Preparations... 3... 4 Eave/Drip Edge... 5 Inner Gable... 6 Outer Gable... 7 Open
Steel Roofing & Siding INSTALLATION GUIDE
 Steel Roofing & Siding INSTALLATION GUIDE Your Authorized Dealer is: WASHINGTON Auburn (800) 700-7228 WASHINGTON Spokane (866) 321-5954 www.nuraymetals.com CALIFORNIA Redlands (800) 806-8729 CONTENTS BEFORE
Inspire Slate Starter Piece Hip and Ridge. 13 1/2" Height: 13 ½" Width: 12" Squares/ Pallet. Bundles/ Square
 December 2017 Classic Slate Application Guidelines Only Basic Roofing Tools Required Hand fastened or fastened with a pneumatic nail gun Utility knife or a standard circular saw Tape measure, pry bar,
Gerard Installation Manual Shingle Profiles
 Gerard Installation Manual Shingle Profiles Granite Ridge Shingle Guardian Shingle March 2017 This Installation Manual is designed as an instructional tool to clearly depict to the contractor, installer,
Granite Ridge Shingle Guardian Shingle
 Allmet Installation Manual Shingle Profiles Granite Ridge Shingle Guardian Shingle March 2017 This Installation Manual is designed as an instructional tool to clearly depict to the contractor, installer,
Installation Instructions
 Installation Instructions ROLL VENT STANDARD / METRIC Page Installation Considerations 3 Roll Vent Standard General Installation 4 Roll Vent Metric General Installation 5 Steep Pitch Guidelines 6 Asphalt
INSTALLATION GUIDE LEARN MORE AT DECRA.COM
 Villa Tile INSTALLATION GUIDE LEARN MORE AT DECRA.COM Table of Contents DECRA Villa Tile Roof Overview... 2 Introduction... 3 Safety... 3 Tools.... 3 Estimating Sheet... 3 Codes & Requirements... 3 Roof
Installation Instructions
 Installation Instructions RAPID RIDGE STANDARD / 7 / METRIC Page Installation Considerations 3 Rapid Ridge Standard General Installation 4 Rapid Ridge Metric General Installation 5 Rapid Ridge 7 General
ONDUVILLA. The Attractive Alternative to Shingles I N S T A L L A T I O N I N S T R U C T I O N S
 ONDUVILLA The Attractive Alternative to Shingles I N S T A L L A T I O N I N S T R U C T I O N S 1 INSTALLATION INSTRUCTIONS Even though ONDUVILLA is easy to install, it is important to read through these
Inspire Aledora Slate Application Guidelines
 July 2014 Inspire Aledora Slate Application Guidelines Only Basic Roofing Tools Required Hand fastened or fastened with a pneumatic nail gun Utility knife or a standard circular saw Tape measure, pry bar,
BARRELL VAULT BATTENLESS
 i BARRELL VAULT BATTENLESS INSTALLATION GUIDE INSTALLATION NOTIFICATION The installation procedures demonstrated in this manual are recommended methods for the installation of the Gerard Barrel Vault battenless
Barrel Vault Counter Batten and Batten
 Barrel Vault Counter Batten and Batten INSTALLATION GUIDE www.gerardusa.com INSTALLATION NOTIFICATION The installation procedures demonstrated in this manual are recommended methods for the installation
INSTALLATION DETAILS
 INSTALLATION DETAILS Front Issued January 23rd, 2005 These install details are provided to demonstrate the recommended installation method for Metro Roof products and accessories. The details and information
MANUAL. Perma-Loc & Secure-Seam. Standing Seam Roofing Panels & Accessories. and guide to Town and Country Metals products
 DETAIL MANUAL and guide to Town and Country Metals products Perma-Loc & Secure-Seam Standing Seam Roofing Panels & Accessories Town & Country Metals, LLC 10 Progress Parkway Union, MO 63084 Town and Country
METAL ROOFING INSTALLATION GUIDE
 METAL ROOFING INSTALLATION GUIDE STANDING SEAM ROOFING PANELS Horizon 16 and Climaguard 16 Regardless of whether your roofing project is a new installation or a re-roof, and whether your building is residential,
4. Metal roof jacks at penetrations and attachments
 - - - - - - - - - - - - - - - - - - - - - - - - - - - - - - - - - - - - - - - - - - - - - - - - - - - - - - - - - - - - - - - - - - - - - - SECTION 07 61 00 METAL SHINGLE ROOFING - - - - - - - - - - -
SLATE & SHINGLE INSTALLATION
 EAVE EDGE Apply a small strip of roofing paper to the bottom of eave. Eave flashing is attached to substrate with roofing nails every 9". Install underlayment over entire roof. (See Fig. 1) PAGE 1 Bend
DIRECTIONS FOR APPLICATION
 Instructions 1 General NOTICE: THESE SHINGLES MUST BE APPLIED TO CONFORM WITH ALL APPLICABLE BUILDING CODES. THESE DIRECTIONS REPRESENT COMMON AND ACCEPTED ROOFING PRACTICES. DEVIATIONS FROM THESE DIRECTIONS
DIRECTIONS FOR APPLICATION
 Instructions 1 General NOTICE: THESE SHINGLES MUST BE APPLIED TO CONFORM WITH ALL APPLICABLE BUILDING CODES. THESE DIRECTIONS REPRESENT COMMON AND ACCEPTED ROOFING PRACTICES. DEVIATIONS FROM THESE DIRECTIONS
DETAIL MANUAL. Metal Roofing Wholesalers. Classic Rib Roofing Panels
 Metal Roofing Wholesalers Classic Rib Roofing Panels DETAIL MANUAL 1178 Topside Rd Louisville, TN 37777 The Classic Rib Roofing Panel Figure 1 House With Classic Rib Metal Roofing Installed Classic Rib
Table of Contents. Roof to Head Wall w/ Side Flashing DECRA Shake XD Roof Overview Roof Penetration - Pipes & Vents...
 Table of Contents DECRA Shake XD Roof Overview.... 2 DECRA Shingle XD Roof Overview.... 3 Introduction... 4 Safety... 4 Tools.... 4 Estimating Sheet... 4 Codes & Requirements... 4 Roof Slope... 4 Underlayment...
SG-30 A P P L I C A T I O N I N S T R U C T I O N S. Directions For Application
 1 2 3 General Instructions NOTICE: THESE SHINGLES MUST BE APPLIED TO CONFORM WITH ALL APPLICABLE BUILDING CODES. THESE DIRECTIONS REPRESENT COMMON AND ACCEPTED ROOFING PRACTICES. DEVIATIONS FROM THESE
Installation Manual. For Gerard Shingle Products
 Installation Manual For Gerard Shingle Products Gerard Shingle Installation Manual is a component of Gerard roofing products and as such is intended to be used with Gerard products only. All information
DIRECTIONS FOR APPLICATION
 Instructions 1 General NOTICE: THESE SHINGLES MUST BE APPLIED TO CONFORM WITH ALL APPLICABLE BUILDING CODES. THESE DIRECTIONS REPRESENT COMMON AND ACCEPTED ROOFING PRACTICES. DEVIATIONS FROM THESE DIRECTIONS
ROOFING APPLICATION STANDARD (RAS) No. 115 STANDARD PROCEDURES FOR ASPHALTIC SHINGLE INSTALLATION
 No. 115 STANDARD PROCEDURES FOR ASPHALTIC SHINGLE INSTALLATION") ROOFING APPLICATION STANDARD (RAS) No. 115 STANDARD PROCEDURES FOR ASPHALTIC SHINGLE INSTALLATION 1. Scope 4. Underlayment 2. 1.1 This roofing application standard has been developed to provide a responsive
ROOFING APPLICATION STANDARD (RAS) No. 115 STANDARD PROCEDURES FOR ASPHALTIC SHINGLE INSTALLATION 1. Scope 4. Underlayment 2. 1.1 This roofing application standard has been developed to provide a responsive
A P P L I C A T I O N I N S T R U C T I O N S
 1 2 3 General Instructions NOTICE: THESE SHINGLES MUST BE APPLIED TO CONFORM WITH ALL APPLICABLE BUILDING CODES. THESE DIRECTIONS REPRESENT COMMON AND ACCEPTED ROOFING PRACTICES. DEVIATIONS FROM THESE
Guardian Shingle Granite Ridge Shingle
 Installation Manual Shingle Profiles Guardian Shingle Granite Ridge Shingle Shingle Installation Manual This Installation Manual is designed as an instructional tool to clearly depict to the contractor,
VENTED GABLE DETAIL ROOF PANEL GABLE FLASHING 24" C/C MAX. BUTYL SEALANT TAPE ROOF PURLIN FLASH AB-1, AB-2, AB-3, OR AB-4
 GABLE FLASHING FASTENER @ 24" C/C MAX. ROOF PURLIN BUTYL SEALANT TAPE FLASH AB-1, AB-2, AB-3, OR AB-4 FASTENER @ EVERY MAJOR RIB OR 12" C/C MAX. F-J TRIM FABRAL ALUMINUM SOFFIT FASTENER 24" C/C MAX. BUTYL
ProSnap 100 STANDARD DETAILS
 ProSnap 100 OVER WOOD DECK STANDARD DETAILS Austin - Headquarters/Sales Office 830 Sagebrush Drive Austin, TX 78758 (512) 452-1515 (800) 428-7412 Fax (512) 833-7499 www.ctmrs.com email: info@ctmrs.com
Table of Contents. Fasteners... 4 Venting Preparation Installation with Battens - DECRA Tile & DECRA Shake 1
 Table of Contents DECRA Tile & Shake Roof Overview... 2 Introduction... 3 Safety... 3 Tools.... 3 Estimating Sheets... 4 Codes & Requirements... 4 Roof Slope... 4 Underlayment... 4 Deck Preparation....
Tuff Rib Panel Installation Specifications
 Tuff Rib Panel Installation Specifications ROOF APPLICATION: Roof slope must be a minimum of a 2/12 pitch to use this product. For slopes lower than a 3/12 pitch, lap sealant is suggested on the side laps
MetroCOTTAGE Shingle
 Batten-less Installation Sept. 14, 2017 INSTALLATION WARNING! These install details are provided to demonstrate a recommended installation method for Metro Roof panels and accessories. used in the United
ROOF FRAMING INFORMATION BATTEN INSTALLATION CORONA SHAKE INSTALLATION ACCESSORY INSTALLATION ESTIMATING DATA GENERAL INFORMATION
 ROOF FRAMING INFORMATION BATTEN INSTALLATION CORONA SHAKE INSTALLATION ACCESSORY INSTALLATION ESTIMATING DATA GENERAL INFORMATION ROOF FRAMING INFORMATION It is the responsibility or roofers, building
2 ½ Corrugated Panel Installation Specifications
 2 ½ Corrugated Panel Installation Specifications ROOF APPLICATION: Roof slope must be a minimum of a 2/12 pitch to use this product. When using this product butyl lap sealant is recommended for all slopes.
Steel Shingle Installation Guide
 Page THESE ARE THE MANUFACTURER S APPLICATION INSTRUCTIONS FOR THE ROOFING CONDITIONS DESCRIBED. TAMKO BUILDING PRODUCTS, INC. ASSUMES NO RESPONSIBILITY FOR LEAKS OR OTHER ROOFING DEFECTS RESULTING FROM
Stone coated steel roof tile INSTALLATION GUIDE
 Stone coated steel roof tile INSTALLATION GUIDE Ⅰ. Introduction These installation details are provided to demonstrate recommended installation methods for KD One roof products and accessories. Consult
westmansteel.com Installation Guide Proudly Canadian. Family Owned. Cambridge (ON) TF. (855) F. (855)
 TF. (855) F. (855)") MEMBER COMPANY Proudly Canadian. Family Owned. Cambridge (ON) TF. (8) 620-2720 F. (8) 97-829 Winnipeg \ Brandon (MB) TF. (800) 661.282 F. (800) 661.90 Swift Current \ Regina \ Saskatoon (SK) TF. (800)
MEMBER COMPANY Proudly Canadian. Family Owned. Cambridge (ON) TF. (8) 620-2720 F. (8) 97-829 Winnipeg \ Brandon (MB) TF. (800) 661.282 F. (800) 661.90 Swift Current \ Regina \ Saskatoon (SK) TF. (800)
Slate Shingle Specifications
 Slate Shingle Specifications California Slate is a proud member of the Slate Roofing Contractors Association of North America, Inc. (SRCA) which publishes Section 07310 Slate Shingles setting forth architectural
PBR Panel Installation Specifications
 4906 St. Stephens Rd. 5780 Hwy 90 W Eight Mile, Al 36613 Theodore, AL 36590 251 456 2254 251 653 1550 251 457 2254(F) 251 653 1514(F) PBR Panel Installation Specifications ROOF APPLICATION: Roof slope
E-Z BUILD STEEL BARN 12' 12' 12' 16' 12' 20'
 E-Z BUILD STEEL BARN 12' 12' 12' 16' 12' 20' BUILD You can construct your own E-Z frame barn with the help of this step by step guide. North American softwood dimensional lumber sizes: Nominal Actual in
Ultra-Rib Installation Manual
 www.tricountymetals.com Ultra-Rib Installation Manual Table of Contents Important Notice/Safety/Storage/Tools...1 Product Information/Product Approvals...,...2 Roofing Anatomy/Side Trim...3 Measuring Your
INSTALLATION PROCEDURE
 Vinyl Siding INSTALLATION PROCEDURE Tools Needed and Preparation MOST ESSENTIAL TOOLS The proper tools, materials and equipment can make the installation of Durabuilt Vinyl Siding much easier. Here are
3-Tab Shingle Instructions DURA-SEAL 20 DURA-SEAL 25
 3-Tab Shingle Instructions DURA-SEAL 20 DURA-SEAL 25 1 Directions For Applying Malarkey 3-Tab Shingles GENERAL INSTRUCTIONS Install Malarkey 3-tab shingles according to building code and local amendments.
Shapes Siding. Perfection Shingles. Chalk Line
 Snap a Chalk Line Shapes Siding Perfection Shingles Chalk Line To establish a straight reference line to guide the positioning of the starter strip and the first course of siding, snap a chalk line. starter
DECRA Shingle Installation Guidelines
 Installation Guide DECRA Shingle Installation Guidelines General Instructions Failure to use these guidelines may void the product warranty. Local building codes may require additional application techniques
CONTENTS. Transitions Board and Batten Vertical Installation... 10,11
 INSTALLATION MANUAL CONTENTS Important Notes... 2-4 Weather Protective Barriers... 2 Storage and Transportation... 2 Tools and Equipment... 2 Fastener Choices... 3 Wall Preparation... 3,4 Flashing... 4
Storing, Handling, and Cutting Steel Panels
 Storing, Handling, and Cutting Steel s Storing Specifically check your quantities, colors, and lengths All materials should be used as soon as possible Steel bundles should be stored indoors with enough
MasterRib. Installation Manual. July Toll-Free (888) MTL-ROOF. PO Box 229 Fayetteville, NC Rev.
 MTL-ROOF. PO Box 229 Fayetteville, NC Rev.") MasterRib Installation Manual July 010 PO Box 9 Fayetteville, NC 80.. www.unionmetalroofing.com Toll-Free (888) MTL-ROOF Rev. 7/10 IMPORTANT NOTICE This manual contains suggestions and guidelines on how
MasterRib Installation Manual July 010 PO Box 9 Fayetteville, NC 80.. www.unionmetalroofing.com Toll-Free (888) MTL-ROOF Rev. 7/10 IMPORTANT NOTICE This manual contains suggestions and guidelines on how
Installation Instructions
 Installation Instructions XTRACTOR VENT X18 / X18 XTRA / XLP Page Installation Considerations 3 X18 and X18 Xtra General Installation 4 XLP General Installation 5 Steep Pitch Guidelines 6 Asphalt Shingles
Table of Contents. Notes to Designer/User Map of Typical Roof Conditions Fastener Placement Fastener Selection...
 Table of Contents Section Page Notes to Designer/User... 2-3 Map of Typical Roof Conditions... 4 Fastener Placement... 5 Fastener Selection... 6 Ridge/Hip Flashing... 7 Valley Flashing... 8 Eave Flashings...
COMPONENTS OF THE CLICKFAST FASCIA AND GUTTER SYSTEM 5: INTERNAL MITRE
 INTRODUCING THE CLICKFAST FASCIA AND GUTTER SYSTEM The Clickfast Fascia and Gutter System was originally designed by Stratco and has proven to be the most successful fascia and gutter system in Australia
METRO PANELS (EXPOSED
 METRO PANELS 001EX-METRO-PANELS.VSD STARTER EAVE Detail Metro V-Bat RISER METAL (1) PANELS (2) FASTENERS (5) BOTTOM ROW fastening 0.75in. (4) METRO RISER Metal, With Integral Batten Riser & Locator-Lip.
Thompson Architectural TM-RIB PANEL ACCESSORY DETAIL GUIDE
 TM-RIB PANEL ACCESSORY DETAIL GUIDE FL11101.1 FL11101.2 TA125 (UL580 Class 90) Certified Thompson Architectural Metal Roofing is proud to be a partner of the Energy Star Roof Products Program SINGLE SOURCE
installation guide 7 8 Corrugated corrugated metal panel
 installation guide / 7 8 Corrugated corrugated metal panel Table of Contents General Notes Handling and Storage 1-3 Tools and Equipment, Field Cutting Panels 4 Safety 5 Preparing to Install your New Roofing
COMPOSITE TILE INSTALLATION MANUAL
 COMPOSITE TILE INSTALLATION MANUAL Product Description Quarrix Composite Tile is a lightweight molded composite of a mixture of polyethylene polymer and inorganic proprietary additive materials that gives
PREMIUM LAMINATED ASPHALT SHINGLES Dallas, TX Tuscaloosa, AL Phillipsburg, KS
 Application Instructions for FORMERLY 50 THESE ARE THE MANUFACTURER S APPLICATION INSTRUCTIONS FOR THE ROOFING CONDITIONS DESCRIBED. TAMKO BUILDING PRODUCTS, INC. ASSUMES NO RESPONSIBILITY FOR LEAKS OR
Installation Instructions
 Installation Instructions SHARK VENT XLP / XTRA Page Installation Considerations 3 Shark Vent XLP & Xtra General Installation 4 Steep Pitch Guidelines 5 Asphalt Shingles Detail 6 Ridge Beam Detail 7 Hip
VENTED GABLE DETAIL ROOF PANEL GABLE FLASHING 24" C/C MAX. BUTYL SEALANT TAPE ROOF PURLIN FLASH AB-1, AB-2, AB-3, OR AB-4
 ROOF PANEL GABLE FLASHING FASTENER @ 24" C/C MAX. ROOF PURLIN BUTYL SEALANT TAPE FLASH AB-1, AB-2, AB-3, OR AB-4 FASTENER @ EVERY MAJOR RIB OR 12" C/C MAX. F-J TRIM FABRAL ALUMINUM SOFFIT FASTENER 24"
1 Exam Prep NRCA Roofing Manual: Steep-Slope Roof Systems 2013 Tabs and Highlights
 1 Exam Prep NRCA Roofing Manual: Steep-Slope Roof Systems 2013 Tabs and s These 1 Exam Prep Tabs are based on the National Roofing Contractors Association (NRCA) manual listed below: Steep-Slope Roof Systems
Hatteras Shingles. CertainTeed Shingle Applicator s Manual. YOUR OBJECTIVE: To learn the correct procedures for installing Hatteras shingles
 CertainTeed Applicator s Manual Hatteras s 14 YOUR OBJECTIVE: To learn the correct procedures for installing Hatteras shingles HATTERAS SHINGLES Hatteras shingles are a premium oversize (18" x 36") roofing
GIRTS ON BACK OF BUILDING
 GIRTS ON BACK OF BUILDING ALL GIRTS ARE 1 1/2 SQUARE TUBE. GIRT LENGTHS FOR 12, 20, 24, AND 30 WIDE BUILDINGS: ON 12 WIDE BUILDINGS GIRTS ARE 67 3/4 LONG ON 20 WIDE BUILDINGS GIRTS ARE 56 3/4 LONG ON 24
Installation Instructions
 Installation Instructions XTRACTOR VENT X18 / X18 XTRA / XLP Page X18 and X18 Xtra General Installation 2 XLP General Installation 3 Asphalt Fiberglass Shingles Detail 4 Ridge Beam Detail 5 Hip Roof Detail
Horizon-Loc. Installation Details 16" COVERAGE C GUID_INSTL_HLOC_160606
 Horizon-Loc Installation Details ¾" 1" 4" 16" COVERAGE D C GUID_INSTL_HLOC_160606 INDEX Information in the catalog may vary by plant location. Please call your salesperson to verify product availability.
HERITAGE LAMINATED ASPHALT SHINGLES Frederick, MD
 Application Instructions for FORMERLY 30 THESE ARE THE MANUFACTURER S APPLICATION INSTRUCTIONS FOR THE ROOFING CONDITIONS DESCRIBED. TAMKO BUILDING PRODUCTS, INC. ASSUMES NO RESPONSIBILITY FOR LEAKS OR
ULTRA WINDOW & DOOR EXPANDERS AND RECEIVERS INSTALLATION INSTRUCTIONS
 ULTRA WINDOW & DOOR S AND RECEIVERS INSTALLATION INSTRUCTIONS! CAUTION: *REMEMBER SAFETY FIRST* Proper Eye and! Hearing Protection must always be worn during installation of all window and door products.
SmartVent Eave Edge Installation Instructions
 SmartVent Eave Edge Installation Instructions STEP 1: Cut a slit 1 wide (or a series of 1 ¾ holes at 3 on center) into the roof decking 6 to 7 up from the drip edge. SmartVent is rated 9NFA. Ensure drip
eco-shake INSTALLATION INSTRUCTION
 1 eco-shake INSTALLATION INSTRUCTION NOTE: Shuffling the eco-shakes during installation may be necessary to obtain a uniform color throughout the roof. Due to the natural wood content in the ecoshakes,
Installation Guide. Cedar Shake. Distributed by: BEST MATERIALS LLC, Phoenx AZ
 RPM ROOFING Installation Guide Cedar Shake Distributed by: BEST MATERIALS LLC, Phoenx AZ 602-272-8128 800-474-7570 www.bestmaterials.com Table of Contents OVERVIEW... 1 CAUTION... 1 DISCLAIMER... 1 PRODUCT
Shingle Installation Guide
 Installation Guide Roof Framing Information Installation Installation Accessory Installation Estimating Data General Information Roof Framing Information It is the responsibility or roofers, building contractors
Dura-Lock Roof System
 DLR-14 Dura-Lock Roof System Assembly and Installation Instructions Read the instructions before starting the job. They explain the steps required to produce a finished product that will meet factory specifications.
Roofing Training - Basics. Sandy Wesch
 Roofing Training - Basics Sandy Wesch Tools Hammer Measuring Tape Chalk Line & Chalk Speed Square Framing Square Utility Knife Metal Snips Extension Ladder(s) 2 Safety Any tools or material up on the roof
DETAIL MANUAL. For R-Panel / PBR Panel. Metal Roofing Wholesalers
 Metal Roofing Wholesalers DETAIL MANUAL For R-Panel / PBR Panel 1178 Topside Rd Louisville, TN 37777 Picture of Gulf Coast Figure 1 Metal Roofing Plant PBR/R-Panel The 26-gauge R-Panel is a strong, durable,
F-WAVE REVIA SYNTHETIC ROOFING SHINGLES
 F-WAVE REVIA SYNTHETIC ROOFING SHINGLES Installation Manual for Steep-Slope Residential Installations For support with all other Steep-Slope Installations, please call F-Wave Technical Support at 888-GO-FWAVE.
Five Star Panel Installation Instructions
 Five Star Panel Installation Instructions How to Store Five Star Panels You will need to store FIVE STAR PANELS in dry place to prevent staining, deterioration and possibly void all warranties. Stand the
Installation Guide. Guardian Slate Roof System. England, Scotland & Wales
 Installation Guide Guardian Slate Roof System England, Scotland & Wales March 2016 Product Information Construction: Manufactured from resin bonded crushed limestone Size (slate): 445 x 294mm (ridgecap):
Light Gauge Metal Roof and Wall Panels. Installation Guide for Delta Rib, Delta Rib III, Nor-Clad, Strata Rib & Corrugated
 Light Gauge Metal Roof and Wall Panels Installation Guide for Delta Rib, Delta Rib III, Nor-Clad, Strata Rib & 2 1 2 Corrugated Light Gauge Metal Roof & Wall Panels ASC Building Products A Division of