PLEASE CHECK ALL BOXES FOR HARDWARE BEFORE DISCARDING
|
|
|
- Jonathan Lawson
- 5 years ago
- Views:
Transcription


1 Thank you for purchasing the SleepSafe Safety Bed. With proper care, your bed will provide years of safe use. Carefully unpack all the contents of your bed and verify that all parts are included using the following pages. PLEASE CHECK ALL BOXES FOR HARDWARE BEFORE DISCARDING WARRANTY AND USER INFORMATION CAN BE FOUND AT THE END OF THESE INSTRUCTIONS Be sure to run your bed down all the way once a month or multiple resets will be needed. TOOLS NEEDED: 4mm Allen Wrench (Provided) Flat-Head Screwdriver 3/8 Wrench At least 2 People
")

2 90mm Allen Bolt ¾ Hex Bolt Barrel Nut (Preinstalled on padded beds) Cardboard Spacer ¼ Allen Wrench 4mm Allen Wrench T15 Torx Wrench T10 Torx Wrench 2


3 Casters Hi- Lo Electric Frame Mattress Headboard Footboard Side Rails Safety Rails 3


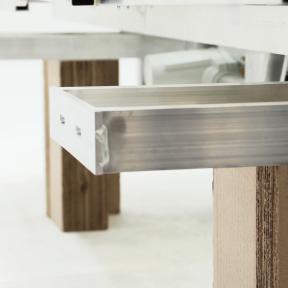
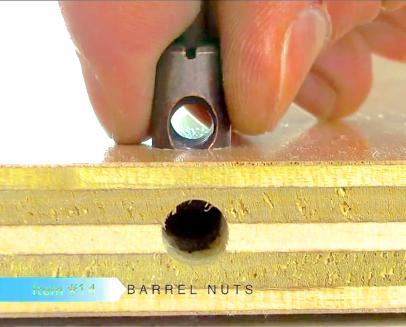
4 Prepare Side-Rails (insert Barrel Nuts): Align Barrel Nut Slot Perpendicular to the edge of the Side Rail. Set Frame on Cardboard Spacers: Attach Side Rails to Frame: 4


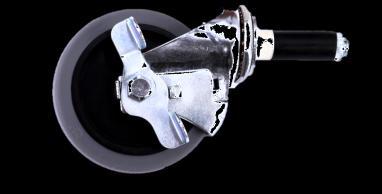
5 Attach Headboard and Footboard to Side Rails: Install Casters: * Once the caster is inserted, turn the tightening nut as shown above to compress the rubber sleeve on the stem inside the wood leg, thus preventing the caster from falling out. 5


6 Remove Spacers & Install Mattress: Install Safety Rails: * Be sure to run your Hi-Lo Bed all the way down once a month or multiple resets will be needed! 6

 Determine if your Safety Rails need adjustment: Look at each")


 Reinsert Plastic Strike: Fig.")
7 *Each Safety Rail is pre-adjusted at our factory, but it may become necessary to adjust the Safety Rail height over time. TOOLS NEEDED: T10 Torx Wrench (Provided) T15 Torx Wrench (Provided) Rubber Mallet (or Hammer) Determine if your Safety Rails need adjustment: Look at each brass locking-pin when the Safety Rail is in the locked position as indicated by A in Fig. 1. The pin should be centered in the hole of the plastic strike. If it is not, note which way the rail needs to move (up or down). Remove Plastic Strikes: Using your Hammer or Rubber Mallet, gently tap the plastic strike out of place and remove it from the leg. A Centered Adjust Accordingly: Fig. 1 Insert the T10 Torx Wrench as shown in Fig. 2. Adjust the screw up or down depending on which way you noted in Step 1. (Clockwise = Up / Counterclockwise = Down) Reinsert Plastic Strike: Fig. 2 Place the Plastic Strike back into position and align by gently tapping it with your Rubber Mallet. 7


8 *Each Safety Rail is pre-adjusted at our factory, but it may become necessary to adjust the Safety Rail height over time. Determine if your Safety Rails need adjustment: With the safety rail in the locked position, check the spacing between the end of the safety rail and the headboard and footboard legs. The spacing should be even! Remove Safety Rail and Adjust Accordingly: If spacing is not even, or there is too much side-to-side play in the rail, remove safety rail and turn the black hex bolt using the ¼ Allen Wrench provided. B = Clockwise = Increase Play A = Counterclockwise = Decrease Play A B 8


9 Hi Lo Bed Surface (Up/Down) Knee & Foot (Up/Down) Head (Up/Down) 9


10 Full One Year Warranty: The SleepSafe Bed is warranted against defects in workmanship or materials for a period of one year from the date of purchase. SleepSafe Beds will repair any defective part at no cost to the purchaser. Limited Five-Year Warranty: During the second through fifth years from the date of purchase, SleepSafe Beds will replace any part found to be defective. Purchaser shall pay any service and shipping costs related to the replacement of the defective part. Terms and Conditions: This warranty applies to normal use and does not cover any damage caused by normal wear, abuse, misuse, mishandling or modification of the product. *Safety Rails are intended to hinder or discourage the possibility of a roll-out. This product does not take the place of proper client supervision and monitoring. Any modification to the product or its components will void the warranty and render the product incapable of fulfilling its intended purpose. 10
11 11
12 12
PLEASE CHECK ALL BOXES FOR HARDWARE BEFORE DISCARDING WARRANTY AND USER INFORMATION CAN BE FOUND AT THE END OF THESE INSTRUCTIONS
 Thank you for purchasing the SleepSafe Safety Bed. With proper care, your bed will provide years of safe use. Carefully unpack all the contents of your bed and verify that all parts are included using
PLEASE CHECK ALL BOXES FOR HARDWARE BEFORE DISCARDING
 SleepSafe Thank you for purchasing the SleepSafe Safety Bed. With proper care, your bed will provide years of safe use. Carefully unpack all the contents of your bed and verify that all parts are included
PLEASE CHECK ALL BOXES FOR HARDWARE BEFORE DISCARDING WARRANTY AND USER INFORMATION CAN BE FOUND AT THE END OF THESE INSTRUCTIONS
 Thank you for purchasing the SleepSafe Safety Bed. With proper care, your bed will provide years of safe use. Carefully unpack all the contents of your bed and verify that all parts are included using
SleepSafe II Hi Lo (Medium Bed)
") SleepSafe II Hi Lo (Medium Bed) Assembly Instructions 3135 Dillons Mill Road Callaway, VA 24067 Toll Free 866.852.2337 Fax 540.334.2100 www.sleepsafebed.com Thank you for purchasing the SleepSafe II Hi
SleepSafe II Hi Lo (Medium Bed) Assembly Instructions 3135 Dillons Mill Road Callaway, VA 24067 Toll Free 866.852.2337 Fax 540.334.2100 www.sleepsafebed.com Thank you for purchasing the SleepSafe II Hi
O-Sullivan King 4 Poster Bed O-Sullivan Queen 4 Poster Bed Parts and Hardware List
 Parts and Hardware List A. Left Headboard Post 1 pc B. Right Headboard Post 1 pc C. Left Footboard Post 1 pc D. Right Footboard Post 1 pc E. Headboard Panel 1 pc F. Footboard Rail 1 pc. Spindles 4 pcs
Riverside. Oakmont Queen Storage Bed Assembly Instructions
 Queen Storage Bed Page 1 of 7 8 pcs. 8 pcs. 1 pc. 1 pc. 8 pcs. 8 pcs. 8 pcs. 8 pcs. 1 pc. 1 pc. 20270 --5/0 Sleigh Headboard 20274 --5/0-6/6 Bed Rails 20273 -- 5/0 Storage Footboard, Panels, Slats Queen
K-Emily Twin Nkl Canopy Bed K-Emily Twin Pink Canopy Bed K-Emily Purple Twin Canopy Bed
 Parts and Hardware List A. Headboard 1 pc B. Footboard 1 pc C. Side Rails 2 pcs D. Support Slats 3 pcs E. Leg Supports 3 pcs F. Long Canopy Rails 2 pcs G. Short Canopy Rails 2 pcs H. Long Posts 2 pcs I.
Riverside. Windhaven Queen Storage Bed Assembly Instructions
 Queen Storage Bed Page 1 of 7 2 pcs. 4 pcs. 4 pcs. 4 pcs. 2 pcs. 5/0 Queen Storage Bed 50773 -- 5/0 Storage Footboard w/platform Note: The 50773 Storage Footboard can be used with the 50770 Panel Headboard
Riverside. Harbor Hill Queen Storage Bed Assembly Instructions
 Queen Storage Bed Page 1 of 7 8 pcs. 8 pcs. 1 pc. 2 pcs. 3 pcs. 3 pcs. 4 pcs. 4 pcs. 4 pcs. 1 pc. 1 pc. 8 pcs. 8 pcs. 8 pcs. 2 pcs. 8 pcs. 1 pc. 25770 -- 4/6-5/0 Panel Headboard (NOTE: the 25775 Leather
Riverside. Harbor Hill King Storage Bed Assembly Instructions
 King Storage Bed Page 1 of 7 8 pcs. 8 pcs. 1 pc. 2 pcs. 6 pcs. 3 pcs. 4 pcs. 4 pcs. 4 pcs. 1 pc. 1 pc. 2 pcs. 8 pcs. 8 pcs. 8 pcs. 8 pcs. 25780 -- 6/0-6/6 Panel Headboard (NOTE: the 25785 Leather Headboard
ASPEN OUTDOOR TABLE TENNIS
 ASPEN OUTDOOR TABLE TENNIS Replacement Parts Order direct at or call our Customer Service department at (800) 225-7593 8 am to :30 pm Central Standard Time January 201 UPC Code 7-19265-51830-3 Staple your
THANK YOU FOR PURCHASING OUR STUDIO RTA CREATION STATION
 THANK YOU FOR PURCHASING OUR STUDIO RTA MODEL# 20672 IF YOU REQUIRE ANY ASSISTANCE WITH ASSEMBLY, PARTS, OR INFORMATION ON OTHER PRODUCTS, PLEASE VISIT OUR WEBSITE: www.studiorta.com OR CALL OR WRITE THE
Strata. urniture. Adriana Instructions. Parts in the Arm Box: Parts in the Body Box: Watch our assembly videos at
 1A Watch our assembly videos at www.strataf.com/videos Parts in the Arm Box: Arm - Outside View Arm - Inside View 1B Parts in the Body Box: Back Deck x 1 Seat Deck x 1 with the Feet attached Back Panel
Queen Wingback Bed King Wingback Bed
 Parts and Hardware List A. Side Rails with Attachment Hooks 2 pcs B. Foot Rail 1 pc C. Head Rail 1 pc D. Center Support Slat 1 pc E. Leg Supports 3 pcs F. Support Slats 4 pcs G. Flat Washers 8 pcs H. Lock
Loading Dock Safety Gate
 Installation Instructions/Operation and Maintenance Manual Models LDSG-120-PCY LDSG-144-PCY Table of Contents Product Information...2 Parts List...3 Installation Instructions...5 Operation...13 Inspection
PRINCESS SINGLE BED WITH TRUNDLE
 PRINCESS SINGLE BED WITH TRUNDLE If you have any questions regarding assembly or if you are missing parts, do not return this item to Sam s Wholesale Club Please call our customer service number and have
Tools Required: Materials Identification and Segregation: Disassembly Steps: Aeron Disassembly for Recycling
 Y Aeron Disassembly for Recycling Tools Required: Power Driver 2 lbs Hammer Torx Bit Safety Glasses Rubber Mallet Materials Identification and Segregation: Where possible, plastic components are marked
MK52 Series ULTRA-LOW FREQUENCY VIBRATION ISOLATION WORKSTATION ASSEMBLY AND OPERATION INSTRUCTIONS
 MK52 Series ULTRA-LOW FREQUENCY VIBRATION ISOLATION WORKSTATION ASSEMBLY AND OPERATION INSTRUCTIONS i Information contained in this document is subject to change without notice and does not represent a
L.L.Bean. Platform Bed
 L.L.Bean Platform Bed Thank you for purchasing our Platform Bed. Assembly of this product requires a Phillips head and a flat head screwdriver. We have found it helpful to have a second person present
Assembly Instructions
 Laminate/Phenolic & 1 Pc Butcherblock Tops Before you begin, please make sure all parts and proper quantities are included. (See on next page) Any parts damaged during shipment must be reported within
Assembly Instructions and Parts Manual JPSF-1 Fence and JPSR Rail Set
 Assembly Instructions and Parts Manual JPSF-1 Fence and JPSR Rail Set WALTER MEIER (Manufacturing) Inc. 427 New Sanford Road LaVergne, Tennessee 37086 Part No. M-708482 Ph.: 800-274-6848 Revision C2 02/2013
#27541 Mobile Laptop Charging Station
 1 #27541 Mobile Laptop Charging Station Assembly Instructions #27541 Mobile Laptop Charging Station Part Drawing Description Qty Part Drawing Description Qty Hardware List P-1 Left Leg Welded 1 EA A Phil
Kendall Crib (W5921)- Assembly and Operation Manual
- Assembly and Operation Manual") Kendall Crib (W5921)- Assembly and Operation Manual Congratulations on purchasing this product. This crib will provide many years of service if you adhere to the following guidelines for assembly, maintenance,
Kendall Crib (W5921)- Assembly and Operation Manual Congratulations on purchasing this product. This crib will provide many years of service if you adhere to the following guidelines for assembly, maintenance,
L.L.Bean. Wooden Slat Bed
 L.L.Bean Wooden Slat Bed Thank you for purchasing our Slat Bed. Assembly of this product requires A Phillips head screwdriver. We have found it helpful to have a second person present in at least one step
Whalen Furniture Mfg. Inc. Factory No. 4 Page # 1
 ADULT ASSEMBLY REQUIRED DUE TO THE PRESENCE OF SMALL PARTS, SHARP POINTS, SHARP EDGES If you have any questions regarding assembly or if you are missing parts, do not return this item to Sam s Wholesale
FP-4855 Flat Panel Television Stand ASSEMBLY INSTRUCTIONS
 FP-4855 Flat Panel Television Stand ASSEMBLY INSTRUCTIONS Patent Pending Italian Designed A Product of China Do not discard these instructions M-1_051607v3 Bell O International Corp. will not be responsible
#27541 Mobile Laptop. Charging Station. Assembly Instructions
 1 #27541 Mobile Laptop Charging Station Assembly Instructions #27541 Mobile Laptop Charging Station Part Drawing Description Qty Part Drawing Description Qty Hardware List P-1 Left Leg Welded 1 EA A Phil
Worktop. Weight Capacity. 100 lbs. 21 Corner Worktop. 48 Worktop. Fits over 2 Cabinets. 72 Worktop. Fits over 3 Cabinets. 200 lbs. 150 lbs.
 Bold.0 Warning: Excessive weight hazard! Use two or more people to move, assemble or install cabinets and locker to avoid back injury. Do not leave children unattended near cabinets. High risk of tipping
WEIGHT ADJUSTABLE ESPREE. Model 2ESP-WA-C48- Model 2ESP-WA-C60- 2ESP-WA Rev B 8/17 ASSEMBLY AND OPERATION
 WEIGHT ADJUSTABLE ESPREE PNEUMATIC TABLE BASE 2ESP-WA Rev B 8/17 Model 2ESP-WA-C48- Model 2ESP-WA-C60- = SLV, BLK or WHT ASSEMBLY AND OPERATION PARTS AND TOOLS PLEASE REVIEW these instructions before beginning
Shop Style Miter Saw Stand Kit
 Quality Power Tool Accessories OWNER S MANUAL Assembled Unit Shown Without Shelves & Wings Assembled With Shelves & Wings Shop Style Miter Saw Stand Kit Model 2850 IMPORTANT Read and understand all safety
Q-Zone Hoop-Frame. Assembly Instructions. Copyright July 11, 2018 Grace Company (Reproduction Prohibited) Version 1.8
 Version 1.8") Q-Zone Hoop-Frame Assembly Instructions Copyright July 11, 2018 Grace Company (Reproduction Prohibited) Version 1.8 Table of Contents Table of Contents... i Warranty... ii Parts List Box 1...iii Box 2...
Q-Zone Hoop-Frame Assembly Instructions Copyright July 11, 2018 Grace Company (Reproduction Prohibited) Version 1.8 Table of Contents Table of Contents... i Warranty... ii Parts List Box 1...iii Box 2...
Assembly Instructions and Parts Manual JPSF-1 Fence and JPSR Rail Set #
 Assembly Instructions and Parts Manual JPSF-1 Fence and JPSR Rail Set #1002493 JET 427 New Sanford Road LaVergne, Tennessee 37086 Part No. M-708482 Ph.: 800-274-6848 Revision C3 02/2014 www.jettools.com
SawStop. Contractor Fence Assembly OWNER S MANUAL. Model CNS-SFA
 Contractor Fence Assembly OWNER S MANUAL Model CNS-SFA Warranty warrants to the original retail purchaser of the Contractor Fence Assembly accompanying this manual that the fence assembly will be free
Myra Bed Room King Storage Bed Assembly Instructions. Hardware and Parts packed with the Headboard. One Left & One Right H-C
 email: Headboard Panel info@riverside-furniture.com King Storage Bed Hardware and Parts packed with the Headboard Headboard Post Headboard Stretcher Page 1 of 7 H-A One Left & One Right H-C M5/16"-18 x
Hodedah. HIK 77 L23 5 8'' X D16 6 8'' X H42 1 8''
 HIK 77 L3 5 '' X D6 6 '' X H4 '' PART & HARDWARE LIST 4 7 0 3 3 6 4 5 5 A PLASTIC DOWEL M X 5MM M CAP 4 B CB SCREW M3.5 X MM N 0 MAGNET PLATE C CB SCREW M4 X 5MM O 0 MAGNET D CB SCREW M4 X 35MM P CB M3
THANK YOU FOR PURCHASING OUR STUDIO RTA PROJECT STATION
 THANK YOU FOR PURCHASING OUR STUDIO RTA MODEL# 50040 BLACK/MAPLE, 50042 PEWTER/CHERRY IF YOU REQUIRE ANY ASSISTANCE WITH ASSEMBLY, PARTS, OR INFORMATION ON OTHER PRODUCTS, PLEASE VISIT OUR WEBSITE: www.studiorta.com
Single Arm Pole Mount. Installation Manual Edition v1.01. For models: UNI-SA/14 UNI-SA/21.5 UNI-SA/26 UNI-SA01-MAN
 Pole Mount Installation Manual 2016 Edition v1.01 For models: UNI-SA/14 UNI-SA/21.5 UNI-SA/26 UNI-SA01-MAN Table of Contents 1 1 2 3 4 5 5 Introduction Customer Support Project Essentials Assembly: Steps
Strata. urniture. Mission Rim Instructions. Parts in the Arm Box: Parts in the Body Box:
 1A Watch our assembly videos at www.strataf.com/videos.html Parts in the Arm Box: Arm - Outside View Arm - Inside View Corbels x 4 1B Parts in the Body Box: Back Deck x 1 Seat Deck x 1 with the Feet attached
SawStop. T-GlideTM. Fence System- Professional Series II OWNER S MANUAL
 SawStop T-GlideTM Fence System- Professional Series II OWNER S MANUAL Warranty SawStop warrants to the original retail purchaser of a new T-Glide Fence System - Professional Series II from an authorized
55000/55010 Installation Instructions
 A. Install 55015 B. Bolt roof rails, 55020/55025, to front hoop. C. Assemble 55026 D. To install without drilling into bumper. E. If mounting directly to bumper. A. 55015 Installation Instructions 55000/55010
ALUMINUM HEADKNOCKER RACK P/N HKRS4-1 / HKRS5-1
 ALUMINUM HEADKNOCKER RACK P/N HKRS4-1 / HKRS5-1 Package Contents: PARTS (1) CROSS BAR (2) LEGS WITH FEET (2) T BRACKETS (1) SCREEN ASSEMBLY (2) SCREEN L MOUNTS (2) LOWER SCREEN MOUNTS (2) LOAD SECURE POSTS
INSTALLATION INSTRUCTIONS
 CREATING POSITIVE CUSTOMER EXPERIENCES INSTALLATION INSTRUCTIONS Universal Low Profile Tilt Mount for 42 to 63 Flat Panels NORTH AMERICA 3130 East Miraloma Avenue Anaheim, CA 92806 USA USA and Canada Phone:
POCKEY 3 IN 1 GAME TABLE
 POCKEY 3 IN 1 GAME TABLE Replacement Parts Order direct at or call our Customer Service department at (800) 225-7593 8 am to 4:30 pm Central Standard Time Publication 64-1046 Rev C October 2014 UPC Code
Video Wall Installation Instructions 2W X 3H, 3W X 3H
 Video Wall Installation Instructions 2W X 3H, 3W X 3H www.microndisplaysolutions.com Table of Contents Important Safety Instructions... 3 Configuration... 4 Package Contents, included and optional items...
Models 2030 and 2040
 Models 2030 and 2040 Overview... 2 Tools Needed... 2 Hardware... 2 Assembly... 3-8 Installation... 9 Operation... 9 Maintenance... 10 Accessories... 10 Limited Warranty... 10 Document # 101290 0607 Printed
Expandable Bar Cabinet CF4001
 Expandable Bar Cabinet CF4001 Congratulations! You have purchased a stylish piece of Crosley Furniture. We strive to provide fine furniture products, built with quality materials and hand finished details.
AST-2446 INSTALLATION INSTRUCTIONS
 AST-2446 Suspension Adapter AST-2446 INSTALLATION INSTRUCTIONS Single Stud Installation Step 1. Secure the ceiling plate to the ceiling structure (see WARNING). Step 2. Use suitable hardware (commercially
Owner s Manual Mobile Flat-Panel Floor Stand
 Owner s Manual Mobile Flat-Panel Floor Stand Model: DMCS3270XP Espanol 13 Francais 25 Русский 37 Deutsch 49 CAUTION: DO NOT EXCEED MAXIMUM LISTED WEIGHT CAPACIT. SERIOUS INJUR OR PROPERT DAMAGE MA OCCUR!
SM-RAZOR-F-M/L/XL. Strong Low Profile Fixed Mount for Ultra-Thin Flat-Panel TVs INSTALLATION MANUAL
 SM-RAZOR-F-M/L/XL Strong Low Profile Fixed Mount for Ultra-Thin Flat-Panel TVs INSTALLATION MANUAL WARNINGS: Installation of this product should be done by a qualified professional. Do not begin installation
Tilting Flat Panel Wall Mount Installation Guide
 Tilting Flat Panel Wall Mount Installation Guide Model: A580TM Easy installation Built-in level for easy positioning Safety bolts lock the TV on the mount Easy to adjust tilt angles: +5 to -15 degrees
Installation Instructions HOSS Hardtop Organized Storage System
 Installation Instructions HOSS Hardtop Organized Storage System Application: Hard Top and Doors Storage System Part Number: 42801 www.bestop.com - We re here to help! Visit our web site and click on Ask
HEAVY DUTY 11 STEEL CABINET
 HEAVY DUTY STEEL CABINET ASSEMBLY INSTRUCTIONS ONE DRAWER BASE CABINET 05-206 Parts List Part No Description Qty Image ONE DRAWER BASE CABINET Part No Description Qty Image SB- Cabinet Body EH-0 Euro Hinge
Desk/Wall-Mount Rack
 Desk/Wall-Mount Rack Patent(s) Pending Installation Instructions Post P/N: 119-1752 119-1781 119-1782 119-4014 Frame P/N: 119-1591 119-1754 119-1755 Kit Contents (2) Frames (4) Posts Assembly Hardware
KneeWalkersForRent.com How to Set Up and Adjust Your Knee Walker
 KneeWalkersForRent.com 408.564.7899 How to Set Up and Adjust Your Knee Walker The Knee Walker comes out of the box in two sections the body and handlebar. Insert the Handlebar section into the body. Line
Performance 2.0 Series
 Performance. Series Warning: Excessive weight hazard! Warning: Excessive weight hazard! Use two or more people to move, assemble, or install cabinets and locker to avoid back injury. Do not leave children
Installation Manual. Tamarack Solar Products. Side of Pole Mount Edition v1.02. For models:
 Mount Installation Manual 2016 Edition v1.02 For models: UNI-SP/01 UNI-SP/01A UNI-SP/01XH UNI-SP/01XX UNI-SP/02 UNI-SP/02A UNI-SP/02X UNI-SP/03 UNI-SP01-MAN Table of Contents 1 Introduction 1 Customer
Beadboard Curved Bed Queen Size
 Beadboard Curved Bed Queen Size PRE- ASSEMBLY: Remove all parts and hardware from the box, and lay them out on a carpeted or scratch-free work surface. The shipping box provides an ideal work surface,
STOP. V00029AC Rev. 04 READ ALL OF THE FOLLOWING INSTRUCTIONS BEFORE REMOVING CABINET FROM SKID TOOL LIST. NET-ACCESS S-Type Network Cabinets
 Rev. 04 STOP READ ALL OF THE FOLLOWING INSTRUCTIONS BEFORE REMOVING CABINET FROM SKID NET-ACCESS S-Type Network Cabinets -Phillips screwdriver -Flatblade screwdriver -22mm socket wrench -15mm socket wrench
Models 2130 and 2140
 Models 2130 and 2140 Overview... 2 Tools Needed... 2 Hardware... 2 Assembly... 3-10 Installation...11 Operation... 11 Maintenance... 12 Accessories...12 Limited Warranty... 12 Printed in USA 2007 Perform
Models 2130 and 2140
 Models 2130 and 2140 Overview... 2 Tools Needed... 2 Hardware... 2 Assembly... 3-10 Installation...11 Operation... 11 Maintenance... 12 Accessories...12 Limited Warranty... 12 Perform the following sequence
Tilting & Swiveling Plasma/LCD Flat Panel Wall Mount Installation Guide Model: A380SM
 Tilting & Swiveling Plasma/LCD Flat Panel Wall Mount Installation Guide Model: A380SM Easy installation Built-in level for easy positioning Corrective leveling adjustments after installation Forward /
LifeGear G1 /HOME GYM ITEM NO.: 63100
 LifeGear G1 /HOME GYM ITEM NO.: 63100 OWNER S MANUAL IMPORTANT: Read all instructions carefully before using this product. Retain this owner s manual for future reference. The specifications of this product
DO NOT RETURN PRODUCT TO THE STORE
 Model Number: UPC Code: Color: DL7519E 0-65857-17348-2 Espresso DL7519W 0-65857-17349-9 White Congratulations on your latest furniture purchase! Dorel Living furniture has been developed with quality,
Part# 85200, 86200, 85095, 86095, TC200,TT200,TC095,TT095
 Part# 85200, 86200, 85095, 86095, TC200,TT200,TC095,TT095 Bag Hardware: (8) 5/16 x 1 ½ Allen flat head (14) 3/8 x 1 Hex bolt G5 (2) ½ x 2 ½ Hex Bolt G5 (6) 5/16 flange nuts (14) 3/8 flange nuts (2) ½ stove
ATTENTION USE THIS MANUAL TO ASSEMBLE THE TWIN BUNK BED TWIN BUNKBED
 TWIN BUNKBED Model Number: UPC Code: Color: DL891-1 0-6585-196-1 Mocha Customer satisfaction is important to us at Dorel Asia. Our agents are available Monday to Friday 8am to 5pm (EST) to answer any question
Models 2230 and 2240
 Models 2230 and 2240 Overview... 2 Tools Needed... 2 Hardware...3 Assembly... 4-13 Installation... 14 Drawer Removal... 15 Operation... 15 Maintenance... 15 Accessories... 16 Limited Warranty... 16 Perform
2 ADULTS REQUIRED FOR ASSEMBLING
 2 ADULTS REQUIRED FOR ASSEMBLING If you have any questions regarding assembly or if you are missing parts, do not return this item to Retailer Store Please call our customer service number and have your
Gared Pro-S Portable Backstop
 Models: 9616 & 9618 Installation, Operation and Maintenance Instructions Please read all instructions before attempting installation or operation of these units SAVE THESE INSTRUCTIONS FOR FUTURE USE PUBLICATION
00108/00110 INSTRUCTION MANUAL
 00108/00110 INSTRUCTION MANUAL Removable and Adjustable Mudflap System IMPORTANT! Please Read this Instruction Booklet prior to assembly of your Rock Tamer Kit. IMPORTANT! Exhaust Systems Note: Any modifications
INSTALLATION INSTRUCTIONS
 INSTALLATION INSTRUCTIONS Universal Low Profile Tilt Mount Model: U.S. Toll Free: 1-866-752-6271 Outside N. America: 1-503-748-5799 E-mail: ts@planar.com FRANCE Phone: +33 5 6378 3810 E-mail: emeats@planar.com
Continuum Frame Assembly Instructions
 Continuum Frame Assembly Instructions Copyright January 1, 2017 Jim M. Bagley, GraceWood, Inc (Reproduction Prohibited) Version 2.2 Table of Contents Continuum Frame Table of Contents... i Warranty...ii
Vir Stil Console Lavatory INSTALLATION INSTRUCTIONS
 THANK YOU FOR CHOOSING KALLISTA We appreciate your commitment to Kallista quality products. Please take a moment to review this manual before you install your Kallista product. If you encounter any installation
ATTENTION USE THIS MANUAL TO ASSEMBLE THE TRIPLE BUNK BED TRIPLE BUNKBED
 TRIPLE BUNKBED Model Number: UPC Code: Color: DL891TBB 0-6585-182-2 Mocha Customer satisfaction is important to us at Dorel Asia. Our agents are available Monday to Friday 8am to 5pm (EST) to answer any
OWNER'S MANUAL TWIN OVER FULL BUNK BED DATE OF PURCHASE: MODEL #: TG-BTC01E ESPRESSO TG-BTC01W WHITE
 OWNER'S MANUAL TWIN OVER FULL BUNK BED MODEL #: TG-BTC01E ESPRESSO TG-BTC01W WHITE NOTE: THIS INSTRUCTION BOOKLET CONTAINS IMPORTANT SAFETY INFORMATION. PLEASE READ AND KEEP FOR FUTURE REFERENCE. DATE
Universal Projector Ceiling Mount Model: DPM-45
 Universal Projector Ceiling Mount Model: DPM-45 Instruction Manual Images may different from actual product Disclaimer It is Dyconn s intention to have all the correct information represented within this
ASSEMBLY INSTRUCTIONS FOR HAULER II UNIVERSAL CAMPER SERIES RACKS
 ASSEMBLY INSTRUCTIONS FOR HAULER II UNIVERSAL CAMPER SERIES RACKS C11U2873-1 shown above Package Contents: HARDWARE KIT PARTS (4) 3/8-16 x 3 CARRAIGE BOLTS (1) RAIL DRIVER S SIDE ASSEMBLY (20) 3/8-16 x
Circo Kids. >> assembly instructions E. Loft Bed (incl. solid pine slats) DPCI # (White) DPCI # (Chocolate)
 DPCI # (White) DPCI # (Chocolate)") Circo Kids Loft Bed (incl. solid pine slats) DPCI # 242-17 - 9390 (White) DPCI # 242-17 - 9391 (Chocolate) >> assembly instructions 92346 E 1 2 Congratulations on your latest Target purchase Don't start
Circo Kids Loft Bed (incl. solid pine slats) DPCI # 242-17 - 9390 (White) DPCI # 242-17 - 9391 (Chocolate) >> assembly instructions 92346 E 1 2 Congratulations on your latest Target purchase Don't start
TIRADE MMXI SOCCER TABLE
 TIRADE MMXI SOCCER TABLE Replacement Parts Order direct at or call our Customer Service department at (800) 225-7593 8 am to 4:30 pm Central Standard Time Publication 64-0908 Rev D August 2014 UPC Code
SCS-WB INSPIRE ASSEMBLY AND OPERATION MANUAL
 SCS-WB INSPIRE ASSEMBLY AND OPERATION MANUAL SCS-PC PREACHER CURL OPTION SCS-LE LEG EXTENSION OPTION SCS-WB WEIGHT BENCH RECORD SERIAL NUMBER HERE (SCS-PC and SCS-LE sold separately) www.inspirefitness.net
USSC LLC 4 ONE LLC FIELD MODIFICATION INSTRUCTIONS
 1 OF 17 A 1. PURPOSE: Instructions for in field replacement of 9004 mechanical suspension top pan 2. SCOPE: 9004 mechanical suspension with legacy two point LX back frame and current LX back frame 3. PROCEDURE:
ASSEMBLY INSTRUCTIONS FOR HAULER II SERVICE BODY A RACK
 ASSEMBLY INSTRUCTIONS FOR HAULER II SERVICE BODY A RACK T12USBA-1 shown above Package Contents: HARDWARE KIT PARTS (4) 3/8-16 x 3 CARRAIGE BOLTS (1) RAIL DRIVER S SIDE ASSEMBLY (20) 3/8-16 x 2 CARRAIGE
INSTALLATION INSTRUCTIONS
 CREATING POSITIVE CUSTOMER EXPERIENCES INSTALLATION INSTRUCTIONS PDS-PLUS Universal Projector Mount Model: NORTH AMERICA 3130 East Miraloma Avenue Anaheim, CA 92806 USA USA and Canada Phone: 1.800.368.9700
 Flat Panel TV Cart Instruction Manual SKU: STAND-TV02D Scan the QR code with your mobile device or follow the link for helpful videos and specifications related to this product. https://vivo-us.com/products/stand-tv02d
Installation Manual. Tamarack Solar Products. Top of Pole Mount Edition v1.01. For models:
 Mount Installation Manual 2016 Edition v1.01 For models: UNI-TP/06 UNI-TP/06LL UNI-TP/08 UNI-TP/08LL UNI-TP/10 UNI-TP/10LL UNI-TP/12 UNI-TP/12LL UNI-TP02-MAN Table of Contents 1 Introduction 1 2 Customer
!ATTENTION: READ BEFORE ASSEMBLING/OPERATING! ASSEMBLY INSTRUCTIONS FOR THE MULTICHAIR 6000Tilt Series
 !ATTENTION: READ BEFORE ASSEMBLING/OPERATING! ASSEMBLY INSTRUCTIONS FOR THE MULTICHAIR 6000Tilt Series multichair 6000Tilt multichair 6200Tilt multichair 6000Tilt P1 multichair 6000Tilt P2!ATTENTION: READ
HUSTLER 7' & 8' POOL TABLE ASSEMBLY INSTRUCTIONS
 HUSTLER 7' & 8' POOL TABLE ASSEMBLY INSTRUCTIONS Please Do Not Hesitate to Contact Our Consumer Hotline at 800-759-0977 with Any Questions That May Arise During Assembly or Use of This Product! NG2515PB/NG2520PB
Prospera PL050 byoung Duo Bike User Manual
 Prospera PL050 byoung Duo Bike User Manual This user manual provides detailed installation and use information. Please read this manual carefully before installation and operation. Keep this manual for
Assembly Instructions
 1 BLT-27565 FDB Stand Assembly Instructions BLT-27565 FDB Stand Part Drawing Description Qty Part Drawing Description Qty P-1 Top Shelf 1 EA P-10 LL Lower Leg 1 EA P-11 Middle Shelf 1 EA P-2 L-Upper Leg
Model No.: UPC CODE: Color
 DOREL ASIA BUNK BED Model No.: UPC CODE: Color WM3911-13 0-65857-15752-9 PINE WM3921-13 0-65857-15700-0 LIGHT CHERRY WM3921E2 0-65857-16529-6 MOCHA WM3921B-DC 0-65857-16887-7 BLACK WM3921W-DC-13 0-65857-16277-6
Miter Saw Super Stand
 Quality Power Tool Accessories OWNER S MANUAL Miter Saw Super Stand Models 2875/2875XL IMPORTANT Read and understand all safety guidelines and instructions carefully before operating. GENERAL INFORMATION
Mast R Lift II. User Manual for Incra Mast-R-Lift II. Suggested Router Bit Speeds. Model #02120
 Mast R Lift II User Manual for Incra Mast-R-Lift II Model #02120 61 Forest Plain Road Oro-Medonte, Ontario, Canada L3V 0R4 Toll Free: 1-866-272-7492 Email: jessem@jessem.com Website: www.jessem.com Thank
Worktop INDEX eight Capacity Unpacking
 Pro.0 Series Warning: Excessive weight hazard! Use two or more people to move, assemble or install cabinets and locker to avoid back injury. Do not leave children unattended near cabinets. High risk of
PFW 6851 Display Wall Mount, Turn & Tilt 80 kg INSTALLATION INSTRUCTIONS
 Display Wall Mount, Turn & Tilt 80 kg INSTALLATION INSTRUCTIONS 9531-007-Z00-01 Table of Contents Warning Statements 2 Parts List 3 Installation Tools 3 Wood Stud Installation 5 Concrete Surface Installation
BBULTRA Basketball Tower Installation
 Ph: 1300 500 314 Basketball Tower Installation Thank you for your purchase of the Ultra adjustable Basketball system. To ensure that our equipment will provide years of use to you, we are including this
INSTALLATION INSTRUCTIONS
 INSTALLATION INSTRUCTIONS Universal Low Profile Flat Mount Model: U.S. Toll Free: 1-866-752-6271 Outside N. America: 1-503-748-5799 E-mail: ts@planar.com FRANCE Phone: +33 5 6378 3810 E-mail: emeats@planar.com
F l a t S c r e e n A R M S I n s t a l l a t i o n
 ITEM NUMBERS (1) #TOACAORG16 (2) #TOACAORG20 (3) #TOACATRP24 (4) #TOACATRP30 (5) #TOACATRPDS (6) #TOACATRPSS TOOLS REQUIRED (1) 3/8 Wrench (not provided) (2) Phillips head screwdriver (not provided) (1)
XM-7631 AB, HYPEREXTENSION and PREACHER CURL BENCH
 XM-763 AB, HYPEREXTENSION and PREACHER CURL BENCH Owner s Manual 8/09 Table Of Contents Important Safety Information 3 Before You Start 4 Assembly 5-8 Parts List 9 Exploded View 0 Warranty Information
MODEL M1023 QUICK CHANGE COLLET ATTACHMENT INSTRUCTION MANUAL. Phone: On-Line Technical Support:
 MODEL M1023 QUICK CHANGE COLLET ATTACHMENT INSTRUCTION MANUAL Phone: 1-360-734-3482 On-Line Technical Support: tech-support@shopfox.biz #6727BL COPYRIGHT JANUARY, 2005 BY WOODSTOCK INTERNATIONAL, INC.
INSTRUCTION BOOKLET #34. For Wallbed models: KING SIZE SIERRA WITH STORAGE HEADBOARD
 For Wallbed models: KING SIZE SIERRA WITH STORAGE HEADBOARD INSTRUCTION BOOKLET #34 WARNING! ALL MURPHY/WALLBED SYSTEMS CONTAIN STORED ENERGY. FAILURE TO USE AND FOLLOW THESE INSTRUCTIONS DURING THE INSTALLATION
MAINSTREET 36 INCH TABLE SOCCER
 Mainstreet 36 Inch Table Soccer MAINSTREET 36 INCH TABLE SOCCER Replacement Parts Order direct at or call our Customer Service department at (800) 5-7593 8 am to 4:30 pm Central Standard Time September