-ARBOREAL. Skanfas Ltd Rikkilän/e 993 FIN Simola
|
|
|
- Buck Watkins
- 5 years ago
- Views:
Transcription


1 Skanfas Ltd Rikkilän/e 993 FIN Simola


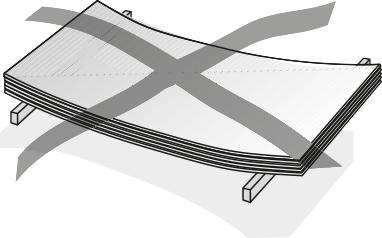
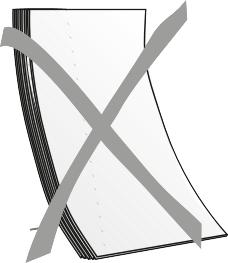
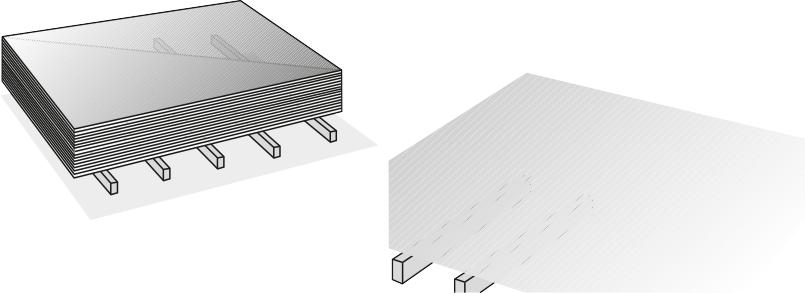
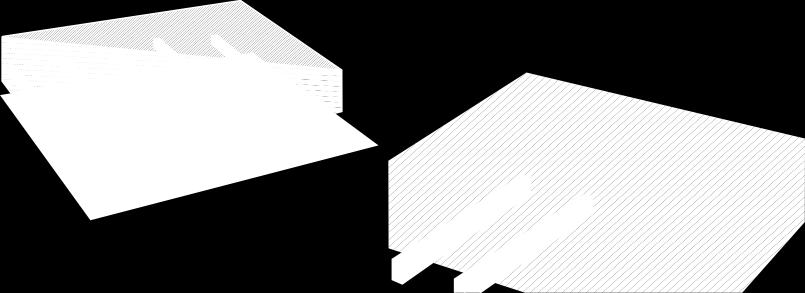
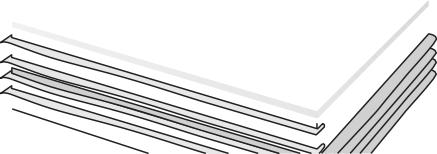
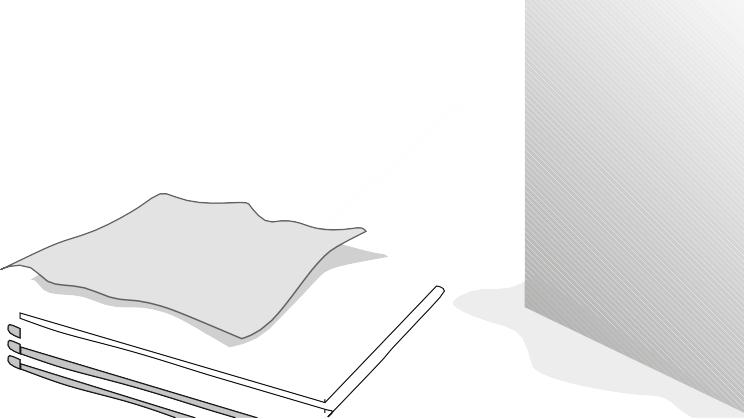
2 Installation Instructions Skanfas is a fire-proof, weather-proof and non-decaying facade material. It is a combination of the pleasant look of wood and the indisputable benefits of fibre-cement technology: it does not burn, it does not rot, it is not susceptible to moulds, and it does not become warped when fastened to walls. When storing these panels on the construction site Skanfas panels must always be kept dry, away from the rain and dust, and on a flat base. The factory packaging serves only to provide protection during transportation. At the construction site, these panels need to be covered with a separate protective covering. Never mount wet or moist panels!! Handling the panels When you lift a single panel from a stack of panels, do not allow it to drag against the panel underneath it, but instead turn it on its and lift it upwards vertically this enables you to avoid scratching the surface of the other panel! Always carry the panels on their side. When restacking panels on the construction site, you need to make sure that there is always a film on plastic between the panels. By doing this way, you can prevent the panels from becoming stuck to one another. Processing the panels The best tool for cutting Skanfas panels is a circular saw. Cut the panel with the coloured surface pointing upwards! Skanfas also supplies the best the saw blades for cutting panels. Screw twister or impulse nailer Cross-cutting saw Hand-held circular saw Sanding paper 2
3 Installation Instructions Mounting Before starting to mount the panels, it is important to set aside a moment for planning whereby you can speed up the work and get a final outcome that is to your liking. Mounting methods Max. 600 mm Variation 1 Variation 2 Skanfas panels are meant to be munted horizontally in the manner of bevelled siding. The panels are mounted onto vertical supports, which can be of wood or steel. The maximum distance between the vertical supports is 600mm. The panels can also be installed vertically oriented. Skanfas panels can then also be used to form the lowermost tier of panels. ARBOREAL PANEELIN Dimensions Max. 600 mm Thickness mm Width mm Length mm Weight kg/m2 7,
4 Beginning Cut a mounting strip about wide from a Skanfas panel and fasten it to the lower edge edge of a vertical support to serve as the starter strip. Check the horizontality using a level. Make sure that the distance from the ground is sufficient to keep the panels from getting dirty. TIP Wind-shield board Vertical support If you need to make the plinth higher, it is easy to do using Skanfas Rock-panels, which have an outer coating of crushed natural stone. A plinth that is high enough gives the building more stature. Mountingthe firstpanel Draw a line 200mm above the starting point (from lower edge of the ventilation strip) as this enables you secure the drop edge of the the lowermost panel. Fasten the first panel as per the line you have jsut drawn. The minimum fastening distances for the screws is 20mm from the upper edge of the panel and from the ends. When you add panels lengthwise, always leave a gap of 2mm between the panels. By painting the sawed edges on the site before mounting, you have a finished final result. Before painting, smoothen the sawn edges lightly with fine sandpaper. The next panel needs to be mounted with an overlap of at least on top of the lower panel. Remember to retain the same distance throughout the panelling work and the final result will have a finished look. Skanfas NOTE! Do not over-tighten the screws! 200mm Starter strip Wrong Correct 4
5 For vertical joints we recommend It's a good idea to place Skanfas joint tape or EPDM tape along Skanfas panel joints. This prevents water from entering the structures through the vertical joints. EPDM-tape NOTA! The correct way to fasten screws Correct Wrong Wrong Various ways of mounting panels to corners Inside and outside corners can be dealt with using wooden strips painted at the Skanfas factory to match the panel colour. Screw Strip no. 14 Wooden support Wall Screw Wooden support Strip no. 13 Wall Wooden support -strip Wall Strip no.12 Screw 5
6 Skanfas profile models Profile 10 End profile for individual panel Profile 11 End profile for two panels 10mm 45mm 15mm 40mm 10mm Profile 12 Inside corner profile Profile 13 Asymmetrical outside corner profile 35mm 10mm 35mm Profile 14 Outside corner profile 6


7 Handling instructions 7
External cladding technical instructions
 External cladding technical instructions Contents External cladding technical instructions... 1 General... 2 Vertical cladding... 3 Horizontal cladding... 5 Lower end of the cladding and the plinth...
KEITH PANEL SYSTEMS FUNDERMAX- MAX EXTERIOR EXPOSED FASTENER PRESSURE EQUALIZED WALL SYSTEM
 S Y S T E M D E T A I L S FUNDERMAX- MAX EXTERIOR EXPOSED FASTENER PRESSURE EQUALIZED WALL SYSTEM PAGE TITLE PAGE Table of Contents Fundermax Max Exterior Product Information Design and Installation Information
maintenance-free free from painting easy to install Fixing Guide Cedral Lap
 maintenance-free free from painting easy to install Fixing Guide Cedral Lap www.cedralsidings.com CONTENT Step by step guide to installing your Cedral façade Required materials and tools 1. Prepare wall(s)
Installation Manual for Thermo Panel
 Installation Manual for Thermo Panel 1 About Thermo Panel is a building wrap, insulation, air and water barrier, mold inhibitor and cold bridge eliminator all-in-one. Delivering an R-value of up to 5 on
Five Star Panel Installation Instructions
 Five Star Panel Installation Instructions How to Store Five Star Panels You will need to store FIVE STAR PANELS in dry place to prevent staining, deterioration and possibly void all warranties. Stand the
Fir and pine wood (52 %) Portland cement (38 %) made by firing limestone and clay Water (9 %) Wood mineralisation substances (1 %)
 Portland cement (38 %) made by firing limestone and clay Water (9 %) Wood mineralisation substances (1 %)") Duripanel Structura Product information sheet 1 1 Product composition Duripanel Structura fibre panels are made from: Fir and pine wood (52 %) Portland cement (38 %) made by firing limestone and clay Water
Duripanel Structura Product information sheet 1 1 Product composition Duripanel Structura fibre panels are made from: Fir and pine wood (52 %) Portland cement (38 %) made by firing limestone and clay Water
Tape Measure Metal Clippers Screw Bit Set With Extensions
 IMPORTANT: Read through instructions thoroughly before beginning to replace any damaged material. Minor damage can be fixed with a fiberglass repair kit and color matched paint. Tools Required Tape Measure
Installation Instructions Palladium Wall Panels - Demountable Factory Finished Edges and Field Cut Edges
 Please read all instructions before installing Palladium Wall Panel System. 1. Before installation: a. Acclimate Palladium Panels, reveals, adhesives and wall substrates to room temperature 24 hours before
MAGNUM BOARD INTERIOR INSTALLATION GUIDELINES
 TECHNICAL BULLETIN No.: 090509-1405 Subject: Issue Date: September 4, 2009 Issue No.: II MAGNUM BOARD INTERIOR INSTALLATION GUIDELINES 1. CUTTING MAGNUM BOARD You can easily cut Magnum Board with carbide
Installation Manual for M4-Exterior Sheathing
 Installation Manual for M4-Exterior Sheathing 1 Application Area - Testing M4 complying with: 2015 and 2012 International Building Code (IBC) and 2015 and 2012 International Residential Code (IRC). The
SANDWICH PANEL SPA INSTALLATION INSTRUCTIONS
 www.ruukki.com SANDWICH PANEL SPA INSTALLATION INSTRUCTIONS Content Installation directions and fastening of the panels... 3 Weights of the panels... 3 Additional information of the panels... 3 Preparing
Installation Guide (888)
") BamDeck Installation Guide (888) 788-2254 The Collection Decking Systems BAMDECK 4G 5-7/16 Wide Plank Dims: 192 L x 5-7/16 W x 13/16 H BAMDECK 4G WIDE 8-1/4 Wide Plank Dims: 96 L x 8-1/4 W x 13/16 H BAMDECK
BamDeck Installation Guide (888) 788-2254 The Collection Decking Systems BAMDECK 4G 5-7/16 Wide Plank Dims: 192 L x 5-7/16 W x 13/16 H BAMDECK 4G WIDE 8-1/4 Wide Plank Dims: 96 L x 8-1/4 W x 13/16 H BAMDECK
Noville School Diorama Part 4 Making the Floors and Plastering the Walls and Ceilings
 Noville School Diorama Part 4 Making the Floors and Plastering the Walls and Ceilings Moulds and Materials Making the Floors Plastering the Ceiling Plastering the Walls Installing the Ceiling and Floor
COMPOSITE SIDING INSTALLATION GUIDE
 CENTURY HOME LIVING COMPOSITE SIDING INSTALLATION GUIDE Read all instructions prior to installing any siding product. Failure to install and finish this product in accordance with all local building codes,
Installation Guide (888)
") BamDeck Installation Guide (888) 788-2254 The Collection Decking Systems BAMDECK 3G 5-7/16 Wide Plank Dims: 96 L x 5-7/16 W x 13/16 H BAMDECK 3G 16FT. 5-7/16 Wide Plank Dims: 192 L x 5-1/2 W x 13/16 H
BamDeck Installation Guide (888) 788-2254 The Collection Decking Systems BAMDECK 3G 5-7/16 Wide Plank Dims: 96 L x 5-7/16 W x 13/16 H BAMDECK 3G 16FT. 5-7/16 Wide Plank Dims: 192 L x 5-1/2 W x 13/16 H
GARDEN SHED - WALESDimensions: 10x10 (1 1/8')"
") ASSEMBLY INSTRUCTIONS GARDEN SHED - WALESDimensions: 0x0 ( /8')" IMPORTANT Before beginning the assembly of your garden shed, please read the instructions carefully and follow them closely. By doing so
ASSEMBLY INSTRUCTIONS GARDEN SHED - WALESDimensions: 0x0 ( /8')" IMPORTANT Before beginning the assembly of your garden shed, please read the instructions carefully and follow them closely. By doing so
Resysta 6 and 4 Flat Board Siding System Assembly Installation Guidelines
 Resysta 6 and 4 Flat Board Siding System Assembly Installation Guidelines NOTE: Proper planning of the siding layout is essential for ease of installation of siding boards and siding components. Thoroughly
I N S TA L L AT I O N & M A I N T E N A N C E G U I D E
 I N S TA L L AT I O N & M A I N T E N A N C E G U I D E E N V I R O B U I L D. C O M + 4 4 ( 0 ) 2 0 8 0 8 8 4 8 8 8 Version 3.2 EnviroBuild 2018 C O N T E N T S Storage & Handling 03 Tools 04 Calculating
March High performance building boards
 CI/SfB March 2009 (4-) Rf9 High performance building boards High performance building boards Contents 3 Product Selector 4-5 Bluclad 6-7 Hydropanel 8-9 Eterboard 10-11 Duripanel 12 Handling & Storage 2
Copyright 2010 Springbok Publishing All Rights Reserved- Page 1
 Copyright 2010 Springbok Publishing All Rights Reserved- www.woodensaddlerackplans.com Page 1 Legal Information All contents copyright 2010 by Springbok Publishing. All rights reserved. No part of this
ASSEMBLY INSTRUCTIONS GARDEN SHED - ModernaDimensions: 10 x 10 (3/4 )
") ASSEMBLY INSTRUCTIONS GARDEN SHED - ModernaDimensions: 0 x 0 (/4 ) IMPORTANT Before beginning the assembly of your garden shed, please read the instructions carefully and follow them closely. By doing
ASSEMBLY INSTRUCTIONS GARDEN SHED - ModernaDimensions: 0 x 0 (/4 ) IMPORTANT Before beginning the assembly of your garden shed, please read the instructions carefully and follow them closely. By doing
Storing, Handling, and Cutting Steel Panels
 Storing, Handling, and Cutting Steel s Storing Specifically check your quantities, colors, and lengths All materials should be used as soon as possible Steel bundles should be stored indoors with enough
GARDEN SHED BRIGHTOLN
 ASSEMBLY INSTRUCTIONS GARDEN SHED BRIGHTOLN Dimensions: 10x10 (1 1/8") IMPORTANT Before beginning the assembly of your garden shed, please read the instructions carefully and follow them closely. By doing
INSTALLATION INSTRUCTIONS
 CERBER FIBER CEMENT SIDING - SIERRA PREMIUM SHAKE Construction Requirements Sierra Premium Shake boards must be installed over vertical wood framing spaced no greater than 16 oc. with an APA rated 7/16
woodworkersjournal.com MATERIAL LIST
 MATERIAL LIST T x W x L 1 Legs (2) 1 1 2" x 3 1 2" x 36 7 16" 2 End Uprights (2) 1 1 2" x 3 1 2" x 32 1 2" 3 Stringers (4) 1 1 2" x 3 1 2" x 42" 4 Top Cladding, Long (2) 3/4" x 7 1 4" x 65 3 4" 5 Side
Wave Profile Installation Guide
 Wave Profile Installation Guide American Pa o Covers Plus Proudly Builds With Tools & Hardware Wave Profile Installation Guide Tape Measure Square Level Felt tipped Marker and/or grease pencil 3/8" Nut
Easyfix. Easyglaze. Superglaze. Filmglaze
 Easyfix Easyglaze Superglaze Filmglaze Magnetglaze Magnetglaze Pro TUBEWAY (SALES) LTD are proud to offer six effective secondary double glazing systems to the general public. Each system is available
WET AREA PANELLING. Designer Walls. Fast
 WET AREA PANELLING Designer Walls. Fast AU/a5 WallART Brochure_ART BUNNINGS.qxp_Layout 1 7/6/18 10:16 am Page 3 LINEAR SERIES WET AREA PANELLING Add a touch of class to your SHEET COLOURS home or workplace
DOUBLE GLAZING SYSTEMS
 DOUBLE GLAZING SYSTEMS EASYFIX SUPERGLAZE EASYGLAZE FILMGLAZE Enjoy Warmth All Year Round not just in the Summer! TUBEWAY SALES LTD are proud to offer four effective secondary double glazing systems to
INSTALLATION GUIDE. Biowood Outdoor Wall Panel BWWPO20018 Shiplap 8x6 Deep. Green Resources Material Australia Pty Ltd
 Green esources Material Australia Pty Ltd Congratulations on the fine choice you have made in the selection of this product. outdoor wall panels will give you many years of carefree maintenance. When installed
SUPER-UNDERLAY SHEET
 SUPER-UNDERLAY SHEET SBS modified bitumen underlay sheet Producer: KATEPAL OY P.O.Box 33 FI-37501 LEMPÄÄLÄ FINLAND Telephone +358 3 375 9111 Telefax +358 3 375 0974 E-mail: katepal@katepal.fi www.katepal.fi
SHIPLOCK CLADDING PRODUCT GUIDE INSTALLATION TECHNICAL SPECIFICATIONS CARE & MAINTENANCE
 SHIPLOCK CLADDING PRODUCT GUIDE INSTALLATION TECHNICAL SPECIFICATIONS CARE & MAINTENANCE SHIPLOCK CLADDING CN-04E / CN-04W / CN-W008 Prior to the installation of any form of Cladding, it is recommended
GARDEN SHED OPTIMA 328Dimensions: 12x8; 10; 12 (1 1/8')"
") ASSEMBLY INSTRUCTIONS GARDEN SHED OPTIMA 38Dimensions: x8; 0; ( /8')" IMPORTANT Before beginning the assembly of your garden shed, please read the instructions carefully and follow them closely. By doing
ASSEMBLY INSTRUCTIONS GARDEN SHED OPTIMA 38Dimensions: x8; 0; ( /8')" IMPORTANT Before beginning the assembly of your garden shed, please read the instructions carefully and follow them closely. By doing
Wet Area Panelling. Linear Series
 Wet Area Panelling Linear Series LINEAR SERIES WET AREA Add a touch of class to your home or workplace with the Linear Series, WallART s line of wet area panelling. With a striking range of colours and
Installation instructions: Elements Vulcan+ Newport Hector Cladding
 Technical Data Wood Species Thermally Modified Softwood (Pinus Radiata) Images Profile Newport Hector - Light Band Sawn face - Secret fix 5.4 6.0 8.5 3.0 25.0 3.0 111.0 3.0 12.0 R 3.0 7.0 7.0 123.0 15.0
ASSEMBLY INSTRUCTIONS FOR STORETTE STA42
 ASSEMBLY INSTRUCTIONS FOR STORETTE STA42 A01 CAUTION: Some parts have sharp edges. Care must be taken when handling the various pieces to avoid a mishap. For safety sake, please read the safety information
PAREFEU PANEL Environmentally Sustainable Product with High Fire Rating
 PAREFEU PANEL Environmentally Sustainable Product with High Fire Rating WHY PAREFEU PANEL Parefeu Panels is made from special fire rated minerals that have been reinforced with palm fibres and glass fibres
S H E D A S S E M B L Y I N S T R U C T I O N S
 T I T A N R A N G E S H E D A S S E M B L Y I N S T R U C T I O N S 6 X 4ft = 190 x 150 cm 6 X 6ft = 190 x 190 cm 6 X 8ft = 190 x 255 cm COMPONENT LIST Component illustrations are given as a visual guide
Robert Bosch GmbH. Minimalist washstand
 Minimalist washstand Neat and tidy Minimalist washstand Minimalist design in the bathroom is in fashion. And rightly so, as this washstand proves: because less is more! 1 Introduction Here s an idea to
2. Sanding the Modules Sand the entire surface of each cyc module with 60-grit sandpaper. This will provide for better paint adhesion.
 ASSEMBLY INSTRUCTIONS SYSTEM SUPER 2.5 EZ Congratulations on your decision to use the world s most advanced and user-friendly cyclorama system. We have taken a great deal of care to create and ship your
Installation of HORIZONT and HORIZONT HIGH pool enclosures
 Installation of HORIZONT and HORIZONT HIGH pool enclosures Rev. 19.10.2017 PARTS LIST Parts for rail installation: Rail screw 6 x 60 Plastic anchor 10 x 50 Rail connector Arrest wedge [R-L] Pop rivet 4
Dura-Lock Roof System
 DLR-14 Dura-Lock Roof System Assembly and Installation Instructions Read the instructions before starting the job. They explain the steps required to produce a finished product that will meet factory specifications.
CINTRALUX ALU BARREL VAULT EP 10/10
 CINTRALUX ALU BARREL VAULT EP 10/10 Installation instructions EN 14963 Artn 43984 E_MH_Cintralux EP 10/10 mm AG.PLASTICS QUALITY 1 Installation instructions Cintralux aluminium barrel vault: Cintralux
#P536 Mary Wall Plaque Create our beautiful and intricate fretwork wall plaque in honor of the Mother of our Savior. Over 17 tall.
 Mary Wall Plaque Create our beautiful and intricate fretwork wall plaque in honor of the Mother of our Savior. Over 7 tall. Cut on dashed line for Back Cut on solid line for Frame only. Stock: /8 - /4,
E-Z BUILD STEEL BARN 12' 12' 12' 16' 12' 20'
 E-Z BUILD STEEL BARN 12' 12' 12' 16' 12' 20' BUILD You can construct your own E-Z frame barn with the help of this step by step guide. North American softwood dimensional lumber sizes: Nominal Actual in
IMPORTANT NOTES ABOUT YOUR FLOORING PLEASE READ BEFORE INSTALLING INSTALLATION & MAINTENANCE FOR ENGINNERED HERRINGBONE
 IMPORTANT NOTES ABOUT YOUR FLOORING PLEASE READ BEFORE INSTALLING INSTALLATION & MAINTENANCE FOR ENGINNERED HERRINGBONE ACCLIMATIZATION AND STORAGE Your new flooring has to be acclimatized before installation,
STONEYBRIDGE STRUCTURES
 02-208-OO North Eastern Railway N2 Style Signal Box INTRODUCTION Thank you for purchasing one of our products. We hope this information sheet will prove useful in the construction of this model. We have
Scratchbuilding with 3D Building Materials Cut Lintels, Install Corners
 The most realistic brick on the market today, these 3D engraved sheets are from actual photos of brick walls. We engrave every detail into basswood with a laser. Why put brick on wood? For modelers who
Siding Systems NOVIKSTONETM DS DRY STACK STONE INSTALLATION GUIDE
 Siding Systems NOVIKSTONETM DS DRY STACK STONE GENERAL INFORMATION CAUTION: REMEMBER THAT POLYMER UNDERGOES EXPANSION/CONTRACTION DUE TO VARIATIONS IN TEMPERATURE. THE FOLLOWING INSTRUCTIONS WILL ALLOW
Cabonyx Installation Manual
 Cabonyx Installation Manual Content Deck-Nyx and Plan-Nyx Installation Page 1 Flooring Products Page 1 Accessories Page 1 Installation Tools Page 2 Preparing Sub-structure Page 2 Installation Page 4 Cautions
#P2-21 Victorian Wall Pocket Organize and decorate all at the same time with this handy wall pocket. 12 tall.
 Victorian Wall Pocket Organize and decorate all at the same time with this handy wall pocket. 12 tall. Cut on dashed line for Back Cut on solid line for Frame only. Stock: 1/8-1/4, cut 1 each Left pattern
#P6-18 Floral Shelf Graceful vines flow and swirl to create the elegant brackets on this Victorian style shelf. 15 wide.
 Floral Shelf Graceful vines flow and swirl to create the elegant brackets on this Victorian style shelf. 15 wide. Cut on dashed line for Back Cut on solid line for Frame only. Stock: 1/8-1/4, cut 1 each
DIY CHILD S STOOL. Instructions
 DIY CHILD S STOOL Children have their own special world. And having the right furniture is part of that world. We have designed an easy-to-assemble child's stool that you can paint in a selection of bright
HOW TO INSTALL ELITE PANELED WAINSCOTING Using X-Rails with Either Raised, Flat or Beaded Panels
 HOW TO INSTALL ELITE PANELED WAINSCOTING Using X-Rails with Either Raised, Flat or Beaded Panels 1. First, remove the cover plates from all electrical outlets. All baseboards should also be removed; the
Effective February, 2015
 Effective February, 2015 Table of Contents Ensuring System Performance 1 Components 2 Frequently Asked Questions 3 List of Tools 3 Before you Begin Preparation 3 Quality Tips 4 Cold Weather Tips 4 Cleaning
WORK METHODS FOR THE RENOVAID WOOD RENOVATION SYSTEM
 WORK METHODS FOR THE RENOVAID WOOD RENOVATION SYSTEM Durable maintenance of exteri joinery of all sts with the RENOVAID system can be subdivided into the following parts: V.(Vokomen) = Prevention of Wood
Installation Guide Classic Series Wood Siding
 Installation Guide Classic Series Wood Siding Please read the following instructions prior to beginning your installation. The following installation guidelines have been produced in accordance with the
Shed Assembly Instructions
 Shed Kit Contents The shed kit includes all the parts needed to assemble your shed except for tools and fasteners such as screws and nails. The various pieces are pre-cut and many are marked to indicate
Installing your SHOE KEEL
 Installing your SHOE KEEL The shoe keel is there solely to protect the bottom of the hull. On a windy day, it will offer some resistance to a side or quartering wind and will help to avoid being blown
Shutter Installation Instructions
 Shutter Installation Instructions ITEMS YOU WILL NEED: Tape measure Framing square Screw gun Circular saw Caulk gun PL premium adhesive Exterior grade screws 1 ¾" Safety glasses Putty knife Window and
Ignitability Index Spread of Flame Index Heat Evolved Index Smoke Developed Index. Range 0-20 Range 0-10 Range 0-10 Range
 (Expressed Panel Facade System) is a versatile, glass fibre-reinforced, recycled wood fibre and magnesium cement based cladding. The panels are fabricated from a combination of recycled timber materials,
POOL ENCLOSURES LEIA & ALVA. Assembly manual
 POOL ENCLOSURES LEIA & ALVA Assembly manual Rev. 07.2017 PARTS LIST Parts for rail installation: Rail Síncsavar screw 1 Plastic Síncsavar anchor 10 50 2 Rail Síncsavar connector 3 Arrest Síncsavar wedge
Install Instructions for Corvallis #4008GRC Mantel
 Install Instructions for Corvallis #4008GRC Mantel Please read this manual before installing the suite. This manual should remain with the homeowner. Updated 12/10/13 NOTE the installation requirements
3Insert the second rod no. 4
 Yamato: Step-by-step 37 The stern block and searchlight control towers a b c d e f Recommended tools and materials Wood glue Sandpaper (no. 800 grain) Metal file Putty Craft knife For metal: Super Glue
Wooden façade damage and the design of new wooden façades - Long-term durability of timber Façades in Finland
 Wooden façade damage and the design of new wooden façades - Long-term durability of timber Façades in Finland Soikkeli, Anu 1 ABSTRACT Wooden facings on façades are durable if the boarding and its details
For best results, it is essential that you follow the installation instructions exactly.
 For best results, it is essential that you follow the installation instructions exactly. PREPRTION Let the planks acclimatize for 48 hours in the unopened packaging at the normal room temperature, in the
ADGV_001_FASTPOS. Date Jan 2013 Detail. Profile. Fastener Positioning Scale 1:20 Detail No. ADGV_ mm from top edge. 600mm MAX CTRS TIMBER STUDS
 ADGV_001_FASTPOS Panel Timber Frame 12mm from top edge 600mm MAX CTRS TIMBER STUDS 200 mm MAX CTRS 50mm from corner Fastener Positioning Scale 1:20 No. ADGV_001 ADGV_003_SHTEDGEPOS Centre line of Timber
1 RANNILA PANEL 3LOCK...2
 1.6 SPECIFYING THE PANEL... 14 1.6.1 General... 14 1.6.2 Wind Loads... 15 1.6.2.1 External Walls... 15 1.6.2.2 Double Facades... 15 Structural Systems / Rannila Panel 3Lock 1 RANNILA PANEL 3LOCK...2 1.1
Cladding. Quick Installation Guide. HardiePlank Cladding with ColorPlus Technology. For façades that last longer. Simple. Reliable. Durable.
 Cladding Quick Installation Guide HardiePlank Cladding with ColorPlus Technology. For façades that last longer. Simple. Reliable. Durable. Installation instructions This document is a step by step guide
DUALCASE VERSATILE ALUMINIUM SIGN SYSTEM
 VERSATILE ALUMINIUM SIGN SYSTEM Universal Components Ltd. May 2007 Introduction Nothing beats DualCase for speed of fabrication, aesthetic appearance and easy maintenance. With the minium of components
KEITH PANEL SYSTEMS FUNDERMAX- MAX EXTERIOR CONCEALED FASTENERS PRESSURE EQUALIZED WALL SYSTEM
 S Y S T E M D E T A I L S FUNDERMAX- MAX EXTERIOR CONCEALED FASTENERS PRESSURE EQUALIZED WALL SYSTEM PAGE TITLE PAGE Table of Contents Fundermax Max Exterior Product Information Design and Installation
INSTALLATION GUIDE DUOFUSE SLAT WALL SYSTEM
 06/2013 ENG 1 INSTALLATION GUIDE DUOFUSE SLAT WALL SYSTEM The Duofuse wood composite slat wall system is much more durable than wooden fences, and correct installation is necessary to enjoy the fences
Curium 19.4H Installation Instructions & Parts List
 Curium 19.4H Installation Instructions & Parts List Illustration Curium 19.4H Right Hand Page 1 of 21 30/06/2016 Revision 1.0 IMPORTANT This shower screen / enclosure must be installed by suitably qualified
Installation Instructions
 Installation Instructions Roof edge trim profile Series TAG multi-piece aluminium profile Front face height: 250-1050 mm supplied with patented 4F brackets as standard height-adjustable, horizontally moveable,
Subframe Installation Guide
 FACADE TECHNOLOGY THE FIXING DOES NOT REQUIRE A RAINSCREEN AND HAS PASSED CSIRO AS484-995 WEATHER PERFORMANCE 7.5 AND STRUCTURAL TEST 7.3 HAS ALSO PASSED NATA ACCREDITATION CYCLONE TESTING AS4040.3 600mm
PVCu FOLD & SLIDE DOOR OUTWARD OPENING
 PVCu FOLD & SLIDE DOOR OUTWARD OPENING STEP-BY-STEP FULLY ILLUSTRATED ASSEMBLY INSTRUCTIONS This product is covered by a 10 year manufacturer s guarantee. Should any part of it become defective due to
Roofs. Installation instructions Models Classic C and D
 Roofs Installation instructions Models Classic C and D A complete roof includes a lot more than just the roofin g sheets. A combination of lead-ins, water removal systems, ladders, roof bridges and snow
Installation guide HARRYWOOD
 Installation guide CAUTION: The material may have sharp edges. We recommend using protection equipment, including safety boots, helmet, goggles and gloves. WARRANTY FOR THE WARRANTY TO BE APPLICABLE, INSTALLATION
Curium 19H Installation Instructions & Parts List
 Curium 19H Installation Instructions & Parts List Illustration Curium 19H Right Hand Page 1 of 15 01/07/2016 Revision 2.1 IMPORTANT This shower screen / enclosure must be installed by suitably qualified
Playaway Swiss Cottage Assembly Instructions
 Playaway Swiss Cottage Assembly Instructions English SS288C IMPORTANT SAFETY INFORMATION Adult assembly is required. Checks and maintenance needs to be carried out on the main parts (fixings etc.) at regular
KuraStone TM Installation Guide
 Installation Guide Read these installation guidelines completely and thoroughly before beginning installation. Construction Requirements KuraStone pieces can be installed on braced wood or steel stud (18
Stabalux T. 5.0 Stabalux T 1
 5.0 1 5.1 - System 2 5.1.1 System properties 2 5.1.2 System profiles 6 5.2 - Processing information 9 5.2.1 Mullion-transom joint 9 5.3 - Design 11 5.3.1 System cross sections 11 5.3.2 Notes 13 System
Corrugated Installation and Technical Guide
 Corrugated Installation and Technical Guide AmeriLux International, in partnership with Menards, offers high quality polycarbonate, pvc and fiberglass panels which feature the latest in product technology.
TruGrain 6 and 4 Flat Board Siding System Assembly Installation Guidelines
 TruGrain 6 and 4 Flat Board Siding System Assembly Installation Guidelines NOTE: Proper planning of the siding layout is essential for ease of installation of siding boards and siding components. Thoroughly
Portofino Case2 Installation Guide
 Portofino Case2 Installation Guide vjun16 (for 17 or 24 mm Surface Wall Profile) DO NOT ASSEMBLE WITHOUT FULLY READING THESE INSTRUCTIONS Page 2 Thank you for purchasing this Portofino Case 2 shower enclosure.
Max Launch Abort System Prod. No *Kevlar is a registered trademark of Dupont
 Flying Model Parts List Max Launch Abort System Prod. No. 3014 A 11820 - Body Tube 3.5 Diam x 5.5" Long B 11824 - Orange Capsule Base Shoulder Ring C 16032 - Laser-cut Ring motor mount rear D 16033 - Laser-cut
Corrugated Sheet. Installation Instructions
 Corrugated Sheet Installation Instructions corrugated sheets are installed with an overlap, whenever the opening is greater than the width of the sheet (ie., approx. 41 (1045 mm) for the IMPACT WP3 76/18)
G. Building the Cab, Cab Roof and Cab Boiler Extension Page 14 and Backhead.
 G. Building the Cab, Cab Roof and Cab Boiler Extension Page 14 and Backhead. Cab. In order to ensure that the cab and tender would actually look right, as what often appears on a drawing is not always
Installation Instructions
 Installation Instructions Follow these simple instructions to install your OneDayCab! IMPORTANT: Unpack and check shipment for damage. Verify color, size and parts before demolition. Installation of interiors
Façade CUT-TO-SIZE FAÇADE STRIPS APPLICATION IN OVERLAP ON WOODEN SUPPORTING STRUCTURE APPLICATION INSTRUCTIONS 1 1. GENERAL
 Façade CUT-TO-SIZE FAÇADE STRIPS APPLICATION IN OVERLAP ON WOODEN SUPPORTING STRUCTURE APPLICATION INSTRUCTIONS 1 1. GENERAL These application instructions are specifically intended for the fastening of
#P571 - Victorian Queen Fretwork Clock inspired by 18th century Victorian elegance. 17 H x 21 W. Requires a 3 1/2 clock insert.
 - Victorian Queen Fretwork Clock inspired by 8th century Victorian elegance. 7 H x 2 W. Requires a 3 /2 clock insert. Cut on dashed line for Back Cut on solid line for Frame only. Stock: /8 - /4, cut each
#P570 - Leavenworth Requires a pendulum movement kit (#A309 - #A312) 24 H x 14 W
 24 H x 14 W") - Leavenworth Requires a pendulum movement kit (#A309 - #A32) 24 H x 4 W Cut on dashed line for Back Cut on solid line for Frame only. Stock: /8 - /4, cut each Left pattern piece. GENERAL SCROLLSAW TIPS
- Leavenworth Requires a pendulum movement kit (#A309 - #A32) 24 H x 4 W Cut on dashed line for Back Cut on solid line for Frame only. Stock: /8 - /4, cut each Left pattern piece. GENERAL SCROLLSAW TIPS
Assembly Instructions 10 X 10 Aluminum Roof Support
 Assembly Instructions 10 X 10 Aluminum Roof Support Aluminum Roof Support Bolt Package 16-5/16 X 2 ¼ SS Bolt 24-5/16 X 1 SS Bolt 40-5/16 SS Nylon Lock Nuts 16-5/16 SS Flat Washers 28-4 ½ Wood Screws 36-1
I N S T A L L A T I O N & M A I N T E N A N C E G U I D E
 I N S T A L L A T I O N & M A I N T E N A N C E G U I D E E N V I R O B U I L D. C O M + 4 4 ( 0 ) 2 0 8 0 8 8 4 8 8 8 Version 3.7 EnviroBuild 2018 C O N T E N T S 03 Storage & Handling 04 Tools 05 Calculating
How to repair a wall or ceiling FREE
 How to repair a wall or ceiling FREE How to repair a wall or ceiling This guide shows how to repair walls and ceilings throughout the guide we only refer to walls but the same principles apply to ceiling
REFERAT REFERAT WOOD FOR GOOD. A study on the service life of external wood claddings. Anu Soikkeli
 Anu Soikkeli REFERAT REFERAT WOOD FOR GOOD A study on the service life of external wood claddings In 1998 99 the University of Oulu s Department of Architecture conducted a broad study on the long-term
For ANGLE-DROP Styles
 For ANGLE-DROP Styles BEFORE INSTALLATION: 1. READ THESE DETAILED INSTALLATION INSTRUCTIONS. 2. Material and tool requirements: - Estimate square footage and add 10%. - Select underlayment (over concrete
S H E D A S S E M B L Y I N S T R U C T I O N S
 T I T A N R A N G E S H E D A S S E M B L Y I N S T R U C T I O N S 8 X 10 ft Approx = 2550 x 3140 cm COMPONENT LIST Component illustrations are given as a visual guide only and are not in proportion PART
Make every component count.
 Make every component count. Technical Bulletin Installation Instructions ABOUT THE MATERIAL The frame and material have been thoroughly tested for strength, durability and low maintenance, offering a never
Installation Guide. Focal Point Architectural Mouldings. Focal Point Architectural Mouldings
 Installation Guide Focal Point Architectural Mouldings 6a Howards Road Beverley, South Australia 5009 Ph: 08 8244 7322 Contents Preface... 2 Moulding Application 1. Planning and Estimations... 3 2. Marking