Mat Instructions: Rubber Hinge
|
|
|
- Hugh Morrison
- 5 years ago
- Views:
Transcription

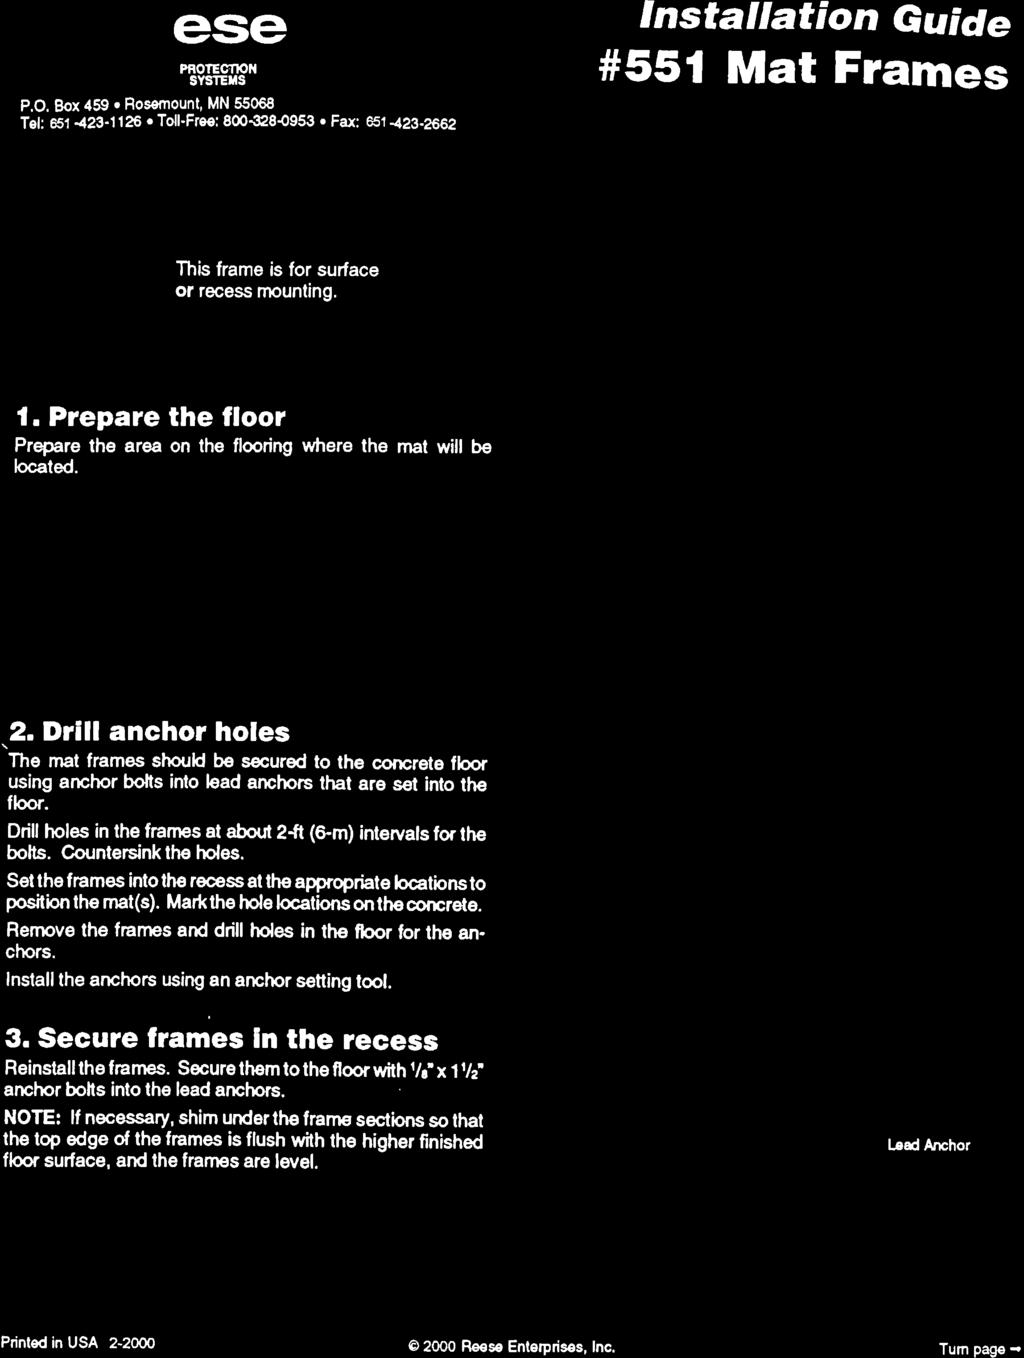
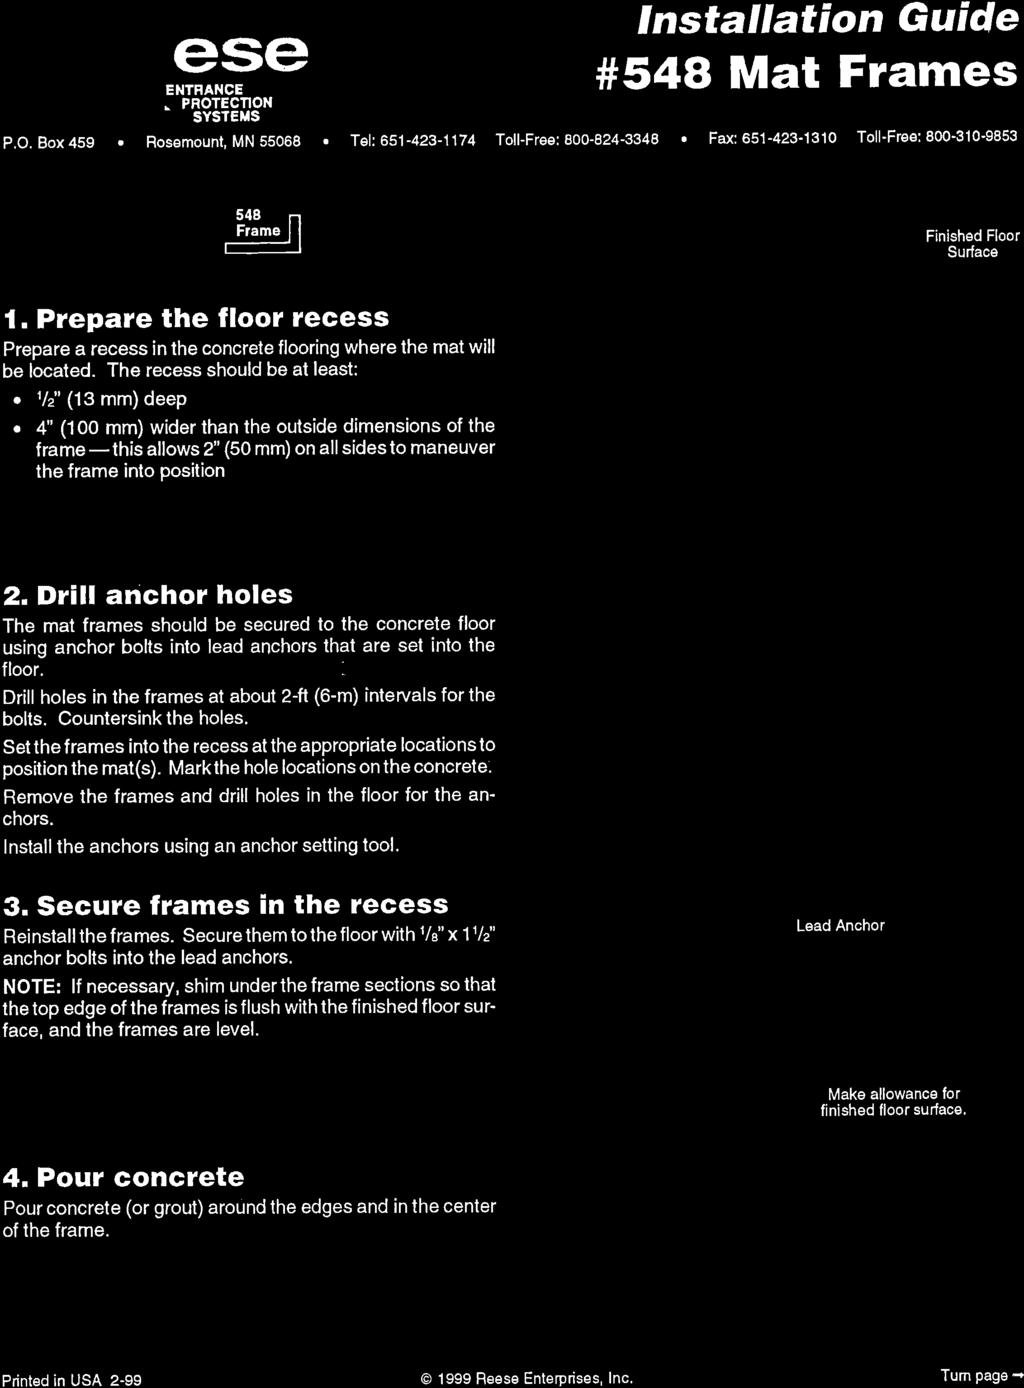
1 P.O. Box 459 Rosemount, MN Tel: Toll Free: Fax: Toll Free Connecting Sections: REESE ENTERPRISES, INC. Mat Instructions: Rubber Hinge 1. Lay both sections next to each other with the tread side down with filler on opposite ends onto a clean surface to prevent scratching or staining. 2. Remove the rubber hinge from the section with an extra piece then reinsert in to both sections. Try to keep in line with the rest of the rubber hinge. 3. Use a 5/64 hex key to drill supplied set screws through the rubber hinge, into the groove in the aluminum. NOTE: Set screws should be placed two per aluminum groove at each end of the hinge. Screwing into one groove at a time will allow for adjusting the other section so to make sure the ends are flush. Trimming Vinyl Filler: 1. Lay mat flat with tread side up and use a straight edge to trim filler to be even with aluminum mat rails. Repeat on all corners of the mat. 2. Next lay mat in recessed flooring with the tread side up and push on both ends of the traffic direction to compact mat as much as possible. 3. Center the mat inside the recessed portion to ensure equal amounts of filler on either side. 4. Take box cutter to vinyl to trim filler to size. NOTE: The alternating grooves of the filler are 1/8 wide with a 1/8 tab between. Cut slowly along one of the tabs to get a straight cut. 5. Make sure mat fits (compacted) in the recessed portion of the floor. Replacing Vinyl Filler: 1. Lay mat with the tread side down onto a clean surface to prevent scratching or staining. 2. Find the two set screws (one on each end) that are drilled through the vinyl into the groove in the aluminum rails and unscrew using a 5/64 hex key. 3. Pull vinyl filler out of the aluminum rail and replace with new filler. 4. Replace set screws on each end by applying pressure while trying to find the groove in the aluminum. Set screws should easily go through the vinyl when placed where the groove is. 5. Trim filler so it is flush with aluminum rails on each end. 6. Lay inside recessed floor then push on both ends of the traffic direction to compact mat as much as possible. Next use box cutter to trim filler to size. NOTE: The alternating grooves of the filler are 1/8 wide with a 1/8 tab between. Cut slowly along one of the tabs to get a straight cut. 7. Make sure mat fits (compacted) in the recessed portion of the floor. Sept Turn Page
2 Replacing or Adding Rubber Hinge Rail(s): 1. Lay mat on a flat surface with tread side down onto a clean surface to prevent scratching or staining. 2. Locate aluminum rail or rails that need replaced and use box cutter to cut rubber hinge on each side of replacement area. If adding to an existing mat just piece of hinge will need to be cut. 3. Once loose, pull rubber hinge out of groove(s) using pliers and remove bad rails. Once hinge is out of groove you ll need to take a screwdriver or something flat and narrow to knock out the crimp indents in the metal. Without this step, it will be very difficult to add the new hinge pieces. 4. Replace with new rails by laying replacements in space that was opened up. Next take your new rubber hinge and slide into groves on each side of replacement/addition. 5. Use a 5/64 hex key to drill supplied set screws through the rubber hinge, into the groove in the aluminum. NOTE: Set screws should be placed two per aluminum groove at each end of the hinge. Screwing into one groove at a time will allow for adjusting the other section so to make sure the ends are flush. 6. Flip mat so that tread is up and replace mat into recessed floor.
3

4
5

6

7

8

9
Series 1500 Aluminum Door Canopy
 Series 500 Aluminum Door Canopy with Sidewings It is our recommendation that you read instructions carefully prior to assembly and installation. Series 500 with Sidewings mounting bar (A) top trim (B)
Series 1100 Aluminum Door Canopy
 Series 00 Aluminum Door Canopy with Support Arms It is our recommendation that you read instructions carefully prior to assembly and installation. Series 00 with Support Arms MOUNTING BAR (A) TOP TRIM
Assembly Instructions
 10' and 12' Octagon Cedar Gazebo Assembly Instructions Toll Free: 866.768.8465 Hours: 9-5 Monday-Friday EST www.homeplacestructures.com Package ships as shown revised 06/20/09 Cedar Gazebo Assembly Instructions
Homestead Bar Cabinet IMPORTANT NOTE Carefully remove all the parts from the carton and put them individually on a soft cloth to prevent s
 88 5527 991 Homestead Bar Cabinet IMPRTANT NTE Carefully remove all the parts from the carton and put them individually on a soft cloth to prevent scratches or other damages occuring to the wood parts.
Quick Fit Installation Guide Retractable Screen - Double Door
 Quick Fit Installation Guide Retractable Screen - Double Door 1 REMOVE KIT PARTS FROM SHIPPING TUBE 2 Slide bolts 2 Rail receiver Clips 15 Mounting screws 1 Housing end cap screw 2 Handles 1 Housing end
Quick Fit Installation Guide Retractable Screen - Single Door
 Quick Fit Installation Guide Retractable Screen - Single Door 1 REMOVE KIT PARTS FROM SHIPPING TUBE 15 Mounting screws 1 Housing end cap screw 2 Handles 1 Housing end cap 1 Bushing 1 Pull bar end cap 2
Pantry IMPORTANT NOTE Carefully remove all the parts from the carton and put them individually on a soft cloth to prevent scratches or oth
 88 5076 691 Pantry IMPORTANT NOTE Carefully remove all the parts from the carton and put them individually on a soft cloth to prevent scratches or other damages occurring to the parts. We have taken great
Assembly Instructions
 Selling Station Assembly Instructions View from above without top A B C D Rounded finished corners on A & D Square unfinished 3-sides on B & C Selling Station Components (2) 2' x 6' Side s Have a channel
Octagon Vinyl Gazebo Assembly Instructions For 10 & 12 Models
 Octagon Vinyl Gazebo Assembly Instructions For 10 & 12 Models Toll Free: 866.768.8465 Hours: 9-5 Monday-Friday EST www.homeplacestructures.com Package ships as shown revised 04/29/09 Vinyl Gazebo Assembly
EASY-IN POOL STEP SYSTEM NE132
 EASY-IN POOL STEP SYSTEM NE132 This instruction manual features multiple guides for the step unit components. 7939 EASY POOL STEP (NE113) FOR USE WITH: EASY-IN POOL STEP (NE126) 6492 PARTS & HARDWARE FOR
INSTALLATION INSTRUCTIONS
 INSTALLATION INSTRUCTIONS A CSW Industrials Company FGLP with Cast-In Frames FGLP-A, FGLP-C, FGLP-D IMPORTANT The following instructions are very important. Read them carefully, and be sure you understand
This instruction manual is an in-depth look and explanation of how to assemble and install the Murphy Bed properly and efficiently.
 This instruction manual is an in-depth look and explanation of how to assemble and install the Murphy Bed properly and efficiently. Don t be put off by the size of the instruction manual as the large diagrams
Nantucket Buffet
 88 5022 611 Nantucket Buffet IMPORTANT NOTE Carefully remove all the parts from the carton and put them individually on a soft cloth to prevent scratches or other damages occuring to the wood parts. We
INSTALLATION INSTRUCTIONS KK-K9-C12-K CHEVY IMPALA
 INSTALLATION INSTRUCTIONS KK-K9-C12-K 2000-2005 CHEVY IMPALA READ ALL INSTRUCTIONS PRIOR TO INSTALLATION TOOLS REQUIRED: Power Drill Drill bits1/4 and 5/32 7/l6 wrench and socket 15,18 and\or 19mm socket
For assembly see instructions in carton
 88 5523 943 Kitchen Island IMPORTANT NOTE Carefully remove all the parts from the carton and put them individually on a soft cloth to prevent scratches or other damages occurring to the parts. We have
EASY POOL STEP (NE113)
") EASY POOL STEP (NE113) FOR USE WITH: EASY POOL STEP (NE113) (1 CARTON) EASY POOL STEP WITH OUTSIDE LADDER (NE126) EASY POOL STEP ENTRY SYSTEM (NE138) (With Gate) (4 CARTONS) Above are the options available
EASY POOL STEP (NE113) FOR USE WITH: EASY POOL STEP (NE113) (1 CARTON) EASY POOL STEP WITH OUTSIDE LADDER (NE126) EASY POOL STEP ENTRY SYSTEM (NE138) (With Gate) (4 CARTONS) Above are the options available
BARLOW TYRIE quality since Ref: x 3m - 12 x 10 Pavilion with Cabrio Folding Roof Step by Step Assembly Instructions
 Pavilions 3.66 x 4.5m - Step 12 x by 15 Step Pavilion Assembly Shelter Instructions with Double Rail Beams Ref: 9011215 3.66 x 3m - 12 x 10 Pavilion with Cabrio Folding Roof Step by Step Assembly Instructions
Joiner Kit For Models N388, C450, E402B, E411T, E415H, E440T, E442B, E521T and E522B
 Joiner Kit For Models N388, C450, E402B, E411T, E415H, E440T, E442B, E521T and E522B KIT COMPONENTS Part Illustration Description Rear Bracket Front Lower Bracket Front Upper Bracket KIT APPLICATION This
Arts & Crafts Dining Buffet IMPORTANT NOTE Carefully remove all the parts from the carton and put them individually on a soft cloth to prev
 88 580 69 Arts & Crafts Dining Buffet IMPORTANT NOTE Carefully remove all the parts from the carton and put them individually on a soft cloth to prevent scratches or other damages occuring to the wood
Pergola Installation Instructions
 Pergola Installation Instructions TOOLS REQUIRED HAMMER DRILL 1/2 MASONRY BIT PENCIL DRILL 3/16 DRILL BIT LEVEL SQUARE LADDER WRATCHET & SOCKETS RUBBER MALLET 2 TAPE MEASURE Column/Post Placement Table
Under Seat Storage Drawer Installation Instructions
 Under Seat Storage Drawer Installation Instructions Parts List: 1) Drawer Assembly 8) Self Tapping Screws 1) Instructions 1) Template Tools Needed: Drill and/or Bit Driver Tape Measure Jigsaw or metal
INSTALLATION AND CARE INSTRUCTIONS
 INSTALLATION AND CARE INSTRUCTIONS Vertical Applications Honeycomb Shades 52 C8-10-3401 Rev 2/14 CONTENTS Introduction...2 Before You Begin...3 Vertical Application Parts Overview...4 Materials Required...5
Shetland Stalls Installation Instructions
 Shetland Stalls Installation Instructions RAMM Horse Fencing and Stalls 13150 Airport Hwy. Swanton, OH 43558-9615 1-800-434-8456 Rev. 1/9/18 Before you start Kit can accommodate up to 12 wide stall front
Ultra Fast Delivery SGL Toilet Cubicle Pack Fitting Instructions
 Ultra Fast Delivery SGL Toilet Cubicle Pack Fitting Instructions This instructional booklet should be read in full prior to undertaking any work. If in doubt please call Commercial Washrooms on 01202 650900,
Installation And Care Instructions. Vertical Honeycomb Shades
 Installation And Care Instructions Vertical Honeycomb Shades Rev 5/2013 Table Of Contents Getting Started... 3 Parts Overview... 4 Materials Required... 5 Tools Required... 6 Outside Mount Installation...
Phone # La Jolla Doors. Block Frame Installation Manual Aluminum Frame with either Vinyl or Aluminum Panels
 Phone # 800-440-8785 www.lajolladoors.com La Jolla Doors Block Frame Installation Manual Aluminum Frame with either Vinyl or Aluminum Panels Thank you for choosing La Jolla Doors In this manual you will
REVIEW ENTIRE INSTALLATION GUIDE. This step gives you the opportunity to contact your dealer to answer any questions before you begin.
 Cabriolet Shelter (Retractable Roof) Step by Step Assembly Instructions Before You Begin These installation instructions will lead you through the process of installing your new shelter. The installation
Tensioning Instructions
 Tensioning Instructions S I G N E X T R U S I O N S A N D S Y S T E M S S I G N E X T R U S I O N S A N D S Y S T E M S Before beginning, thoroughly read all tensioning instructions. Tools Required: 1.
Revised
 Indentify Non-powered panels and separate from Powered panels. Non-powered panel shown at left.. Powered panel shown at left has powerway mounted at factory. Also separate panels by surface type, width
Assembly Instructions 10 X 10 Aluminum Frame Building
 Assembly Instructions 10 X 10 Aluminum Frame Building 27 97 9 8 47 36 74 52 10 10 X 10 Square Building W/ Dome Includes: The Steel Entry Door with a Dead Bolt Lock assembly and Aluminum Door Frame. Metal
C Cuisine Cart IMPORTANT NOTE
 88 9001 001C Cuisine Cart IMPORTANT NOTE Carefully remove all the parts from the carton and put them individually on a soft cloth to prevent scratches or other damages occuring to the parts. We have taken
K9 KIT INSTALLATION INSTRUCTIONS CROWN VIC KK-K9-F7-K
 K9 KIT INSTALLATION INSTRUCTIONS 1998-2011 CROWN VIC KK-K9-F7-K TOOLS REQUIRED: Power Drill (Cordless preferable) Drill Bit Set Standard Wrench and Socket Set Metric Socket Set Screwdriver Set Torx Bit
#11179 Wellington ARBOR
 #11179 Wellington ARBOR Assembly INSTRUCTIONS TOOLS NEEDED Tape Measure Variable Speed Drill with #2 Phillips Bit (recommended) or Phillips Screwdriver Hammer or Mallet ARBOR SIDE PANEL ASSEMBLY (Refer
Figure #1 - VSNEO Shower Door Assembly
 Figure #1 - VSNEO Shower Door Assembly Figure #2 - VSNEO - Top View Figure #3 - VSNEO - Side View Figure #4 - Foam Curb Plug Figure #5 - Magnet Strip Figure #6 - VSNEO - Drip Deflector Preparation VSNEO
Model 6100 Illustrated Installation Instructions Contractors Wardrobe
 Model 6100 Illustrated Installation Instructions Contractors Wardrobe DESIGNERS MANUFACTURERS 26121 Avenue Hall Valencia, CA 91355 (661) 257-17 Fax: (661) 257-4907 Toll Free: (800) CW-DOORS (800) 293-6677
TRUE TECHNICAL SERVICE MANUAL - ALL MODELS. DOORS/DRAWERS/LIDS
 DOORS/DRAWERS/LIDS 55 56 NOTES DOORS/DRAWERS/LIDS Swing s 73 74 NOTES INSTALLATION OF A GDM-SWING DOOR Phillips Head Screwdriver (2) - 1/8" Drift Punches (forged) Top Bracket NOTE: It may be necessary
southpaw enterprises, inc.
 Store these instructions in a safe place or with the enclosed maintenance checklist In-FUN-ity Climbing System Assembly Examples This example sheet is intended to supplement the instruction sheets that
Almost Heaven Saunas THE AUTHENTIC SAUNA EXPERIENCE. Patterson Sauna Installation & Owner s Manual
 Almost Heaven Saunas THE AUTHENTIC SAUNA EXPERIENCE Patterson Sauna Installation & Owner s Manual Read this entire manual through to the end before proceeding with the assembly. ELECTRICAL REQUIREMENTS
Left Unit. G. Shelf 1 pc. Small Cam Lock 6 pcs.(+1 extra) Cam Lock Screw 2 pcs.(+1 extra) Cam Lock Screw 6 pcs.(+1 extra)
 Cam Lock Screw 2 pcs.(+1 extra) Cam Lock Screw 6 pcs.(+1 extra)") 88 5180 181 Art & Craft Computer Desk (Cottage Oak) IMPORTANT NOTE Carefully remove all the parts from the carton and put them individually on a soft cloth to prevent scratches or other damages occuring
88 5180 181 Art & Craft Computer Desk (Cottage Oak) IMPORTANT NOTE Carefully remove all the parts from the carton and put them individually on a soft cloth to prevent scratches or other damages occuring
HOUSE PARTS PACKED IN HOUSE BOX PARTS IN PLASTIC BAG (HARDWARE) PARTS IN SMALL PLASTIC BAG (FLOOR CLIPS) PARTS PACKED IN BUNDLE
 PARTS IN SMALL PLASTIC BAG (FLOOR CLIPS) PARTS PACKED IN BUNDLE") Check parts against this list before starting assembly. Refer to illustrations on pages 6 and 7 to view house parts. If any shortages are found, refer to Packing Slip for claim instructions. Item 3 5 6
Check parts against this list before starting assembly. Refer to illustrations on pages 6 and 7 to view house parts. If any shortages are found, refer to Packing Slip for claim instructions. Item 3 5 6
L182 - Installation Sheet Modular Wine Rack ( Wall Mount )
") Modular Wine Rack ( Wall Mount ) 1A 1B 2B 2A Cross Bar Options: 1A 2A 1B 2B Modular Wine Rack ( Wall Mount ) Parts Rail LED arm modules Wine bottle cross bars Rail cover Setscrew cover 1) Drill holes and
Modular Wine Rack ( Wall Mount ) 1A 1B 2B 2A Cross Bar Options: 1A 2A 1B 2B Modular Wine Rack ( Wall Mount ) Parts Rail LED arm modules Wine bottle cross bars Rail cover Setscrew cover 1) Drill holes and
TrendWall Floor-To-Ceiling Panels Installation Instruction
 TrendWall Floor-To-Ceiling Panels Installation Instruction TrendWall Components Covered by this Instruction: Crown (and accessories) Floor Plate Solid Panel Filler Panel Wall Channel Door Section Pilaster
D. Middle Panel. C. Middle Panel. 1 pc. B. Side Panel 1 pc. I. Back Stretcher. 1 pc. J. Front Stretcher. 1 pc. S. Door 1 pc. T.
 itchen Cart IMPORTANT NOTE Carefully remove all the parts from the carton and put them individually on a soft cloth to prevent scratches or other damages occuring to the parts. We have taken great care
It is important you read this entire assembly manual before putting your track together.
 It is important you read this entire assembly manual before putting your track together. We need to be notified of damaged/missing parts within 30 days of the delivery of your order. Important notes on
Buffet with Doors and Drawers
 88 5100 002 Buffet with s and s IMPORAN NO Carefully remove all the parts from the carton and put them individually on a soft cloth to prevent scratches or other damages occuring to the parts. We have
Assembly Instructions Please keep for future reference Inspire 40
 Assembly Instructions Please keep for future reference Inspire 40 Version 3 : 28/07/2014 Important - Please read these instructions fully before starting assembly ALR2902 Safety and Care Advice Important
LEGENDS RETRACTABLE DOOR SCREENS
 LEGENDS RETRACTABLE DOOR SCREENS MAGNETIC LATCHING DESIGN SYSTEM 42 I N S T A L L A T I O N I N S T R U C T I O N S 1 MOUNTING OPTIONS Recess : Mount the Screen Cassette using Recess Mounting Clips Recess
10 Octagon Cedar Gazebo Assembly Instructions
 10 Octagon Cedar Gazebo Assembly Instructions Toll Free: 866.768.8465 Hours: 9-5 Monday-Friday EST www.homeplacestructures.com Package ships as shown revised 06/22/09 10 Cedar Gazebo Assembly Instructions
K9 KIT INSTALLATION INSTRUCTIONS CROWN VIC with Fire Suppression System Model KK-K9-F7-K-FS
 K9 KIT INSTALLATION INSTRUCTIONS 2005-2011 CROWN VIC with Fire Suppression System Model KK-K9-F7-K-FS TOOLS REQUIRED: Power Drill (Cordless preferable) Drill Bit Set Standard Wrench and Socket Set Metric
Proctor Silex 2-Slice Extra Wide Slot Toaster Teardown
 Proctor Silex 2-Slice Extra Wide Slot Toaster Teardown Taking apart the Proctor Silex 2-Slice Toaster is order to access it's circuit board for maintenance. Written By: Cory ifixit CC BY-NC-SA www.ifixit.com
PH03 Comfort XL Front Assembly Replacement Instructions
 PH03 Comfort XL Front Assembly Replacement Instructions POLYJOHN USA PolyJohn Enterprises Corp 2500 Gaspar Ave. Whiting, IN 46394 Phone: 800-292-1305 Fax: 219-659-0625 www.polyjohn.com info@polyjohn.com
C PART LIST HARDWARE LIST. Kitchen Cart IMPORTANT NOTE
 88 9200 006C Kitchen Cart IMPORTANT NOTE Carefully remove all the parts from the carton and put them individually on a soft cloth to prevent scratches or other damages occuring to the parts. We have taken
Colonial Classic Bar
 88 5528 991 Colonial Classic Bar IMPORTANT NOTE Carefully remove all the parts from the carton and put them individually on a soft cloth to prevent scratches or other damages occuring to the wood parts.
How to fit an Internal Door
 How to fit an Internal Door How to fit an Internal Door The following instructions are for installing a internal door only. If you have any queries please contact Cheshire Mouldings technical helpline
INSTALLATION INSTRUCTIONS RH 412 STEEL DOORS
 By following the steps outlined below, the assembly, installation and adjustment of the steel doors, will be a simple process. Let s start with the Driver Side. Note: Having the hood open makes the job
Installation Instructions 1500/1500W/G Wall Guard Important
 Important 1. Acclimate materials 24 hrs before installation. Maintain temperature controlled environment after installation. 2. Install in accordance with manufacturer s installation instructions. Failure
Barnside Pantry IMPORTANT NOTE Carefully remove all the parts from the carton and put them individually on a soft cloth to prevent scratch
 88 5516 653 Barnside Pantry IMPORTANT NOTE Carefully remove all the parts from the carton and put them individually on a soft cloth to prevent scratches or other damage occurring to the parts. We have
Octagon Vinyl Gazebo Assembly Instructions
 Octagon Vinyl Gazebo Assembly Instructions For 10 & 12 Models Toll Free: 866.768.8465 Hours: 9-5 Monday-Friday EST www.homeplacestructures.com Package ships as shown revised 04/29/09 Vinyl Gazebo Assembly
Traditional Wall Mounted Potfiller
 TOOLS NEEDED FOR INSTALLATION 1/4 hex wrench (provided in installation kit) 3/32 hex wrench (provided in installation kit) Pencil or marker PTFE tape Small level, or carpenters square Power Drill with
INSTALLATION AND CARE INSTRUCTIONS
 INSTALLATION AND CARE INSTRUCTIONS Vertical Applications Honeycomb Shades CONTENTS Introduction...2 Before You Begin...3 Vertical Application Parts Overview...4 Materials Required...5 Tools Required...6
McCue Bumper Installation Instructions
 McCue Bumper Installation Instructions McCue 8" Bumper Tools Required: Saw with 10-12" blade Tape measure Flat head screwdriver Phillips screw driver Pencil or chalk line Drill with Philips driver bit
INSTRUCTIONS High Tech II Unit Assembly
 INSTRUCTIONS High Tech II Unit Assembly The following instruction is a guideline, illustrating suggested methods, assembly sequence, and tool selection. Actual assembly may vary by each situation. Careful
INSTALLATION INSTRUCTIONS KK-K9-F14-K K9 KIT FOR FORD EXPEDITION
 INSTALLATION INSTRUCTIONS KK-K9-F14-K-32 32 K9 KIT FOR 2003-2016 FORD EXPEDITION TOOLS REQUIRED: Power Drill Drill Bit Set Standard & Metric Socket Sets Phillips Screw Driver Open End Wrench Set Wire Cutters
The Nantucket Legacy Arbor
 SSEMLY INSTRUTIONS The Nantucket Legacy rbor Please read through before starting assembly. IMPORTNT: HEK THE INSIDE OF YOUR POSTS FOR LL MTERILS. heck ox for These ontents In. the Keystone event of missing
The Nantucket Legacy Arbor
 ASSEMBLY INSTRUCTIONS 0. in 9 in 0. in 68 in 7 in in *Nantucket Legacy with Trim Kit Shown Above. Please read through before starting assembly. in 60 in 0 in 8 in IMPORTANT: CHECK THE INSIDE OF YOUR POSTS
8.5 Ton Assembly Instructions
 8.5 Ton Assembly Instructions Parts list for assembly. 6- Legs 2 1/2 Angle X 92 Long 6- Cone Supports 2 Angle X 60 Long 6-1 1/4 Angle X 27 1/4 Long. 12-1 1/4 Angles X 42 Long 6-1 Flat Straps 23 3/4 Long
PVC Composite Railing & Stair Kit
 FREEDOM-WEB PVC Composite Railing & Stair Kit INSTALLATION INSTRUCTIONS Read all instructions prior to installing product. Refer to manufacturers safety instructions when operating any tools. To register
Commercial Wine & Liquor Display. Double Displays
 Commercial Wine & Liquor Display Double Displays Congratulations! You have purchased a superior commercial wine rack kit. These commercial kits have been specifically designed to properly store and display
INSTALL INSTRUCTIONS CONTENTS: INSIDE MOUNT PAGE 2-7 OUTSIDE MOUNT PAGE 8-12
 INSTALL INSTRUCTIONS CONTENTS: INSIDE MOUNT PAGE 2-7 OUTSIDE MOUNT PAGE 8-12 HOW TO INSTALL INSIDE MOUNT SHUTTERS Your shutters are designed to be easy to install and maintain. Depending on the shutter
LF Series Assembly Instructions
 LF Series Assembly Instructions 1998760 Revision A-10 Complete Series Master Packet 2010 Kimball International, Inc. T 800.482.1818 F 812.482.8300 Footprint Storage and Metal Filing Systems Assembly Instructions
8x4 SpaceSaver Garden Shed Bevel Model Assembly Manual Revision #18 March 9th, 2017
 8x4 SpaceSaver Garden Shed Bevel Model Assembly Manual Revision #18 March 9th, 2017 Thank you for purchasing an 8x4 SpaceSaver Garden Shed. Please take the time to identify all the parts prior to assembly.
Pantry IMPORTANT NOTE
 88 5022 69 Pantry IPORTANT NOTE Carefully remove all the parts from the carton and put them individually on a soft cloth to prevent scratches or other damages occuring to the parts. We have taken great
INSTALLATION INSTRUCTIONS FOR PLASCORE NARROW STILE DOORS
 INSTALLATION INSTRUCTIONS FOR PLASCORE NARROW STILE DOORS The following information is provided by Plascore, Inc., as a general guideline for the installation of the Plascore Narrow Stile Door and Jamb
FOR PROFESSIONAL GARAGE DOOR INSTALLERS
 Composite Garage Doors Installation Instructions FOR PROFESSIONAL GARAGE DOOR INSTALLERS Tools required Screwdriver Claw Hammer Locking Pliers Power Drill Level with a 3/32" Drill Bit Utility Knife 9/16",
Series 9000 Panel Door; In-Line, Corner and Permanent Wall Application
 Series 9000 Panel Door; In-Line, Corner and Permanent Wall Application 5/32" Drill Bit In-Line Corner Permanent Wall 3/16" Allen Wrench If you have a problem, question, or request, call your local dealer,
INSTALLATION INSTRUCTIONS SIDE BAR FORD ESCAPE & MAZDA TRIBUTE PART #
 INSTALLATION INSTRUCTIONS SIDE BAR 2008-2010 FORD ESCAPE & MAZDA TRIBUTE PART # 50136 50137 PARTS LIST: 1 Driver/Left Sidebar 2 10-1.50mm x 35mm Bolt Plate 1 Passenger/Right Sidebar 2 10-1.50mm x 30mm
TERRACE / TERRACE CONCEPT Retractable Classic Roof / Double Rail System Step by Step Assembly Instructions
 TERRACE / TERRACE CONCEPT Retractable Classic Roof / Double Rail System Step by Step Assembly Instructions Before You Begin These installation instructions will lead you through the process of installing
Sentinel Series Cigar Humidor End Tables
 Sentinel Series Cigar Humidor End Tables Assembly Instructions Models: Sentinel 500, 1000 and 1500 Style: Traditional SENTINEL ASSEMBLY INSTRUCTIONS Congratulations! You have purchased a superior cigar
HEAVY DUTY 11 STEEL CABINET
 HEAVY DUTY STEEL CABINET ASSEMBLY INSTRUCTIONS ONE DRAWER BASE CABINET 05-206 Parts List Part No Description Qty Image ONE DRAWER BASE CABINET Part No Description Qty Image SB- Cabinet Body EH-0 Euro Hinge
Assembly Instructions Eggstreme Chicken Coops
 Assembly Instructions Eggstreme Chicken Coops Tools Needed Drill/Driver #2 screwdriver bit Pliers Scissors or wire cutter 3/4 wrench Parts List PO Box 1340 Henderson, TX 75653 800-527-1459 To insure a
INSTALLATION INSTRUCTIONS
 INSTALLATION INSTRUCTIONS TOOLS REQUIRED Rechargeable, variable speed drill 3/8 diameter drill bit 3 Robertson bits #0, #1 and #2 Slot screwdriver Non marring hammer with 1 head Level Caulk or sealant
Line volt rail & fixtures. Low volt quick connect fixtures with transformers
 INSTRUCTIONS: Line Volt Flexrail2 Safety Instructions: A qualified electrician must install system only. System is intended for installation in accordance with National Electric Code, local and Federal
WPS crew Doors Installation instructions
 WPS-132-133 crew Doors Installation instructions ORDER OF INSTALLATION FOR A COMPLETE ENCLOSURE OF A CREW WPS (Weather Protection System) IS AS FOLLOWS: 1. Heater 2. Rear Thresholds - Right Hand & Left
J. Base 1 pc. 1 pc. P. Shelf 2 pcs. Gate Leg. 1 pc. Head Cap Bolt 13 pcs. (+1 extra) Cam Lock Screw. Cam Lock. 20 pcs. (+1 extra)
 Cam Lock Screw. Cam Lock. 20 pcs. (+1 extra)") 88 5023 95C Kitchen Island with Breakfast Bar IMPORTANT NOTE Carefully remove all the parts from the carton and put them individually on a soft cloth to prevent scratches or other damages occuring to the
88 5023 95C Kitchen Island with Breakfast Bar IMPORTANT NOTE Carefully remove all the parts from the carton and put them individually on a soft cloth to prevent scratches or other damages occuring to the
Kitchen Island IMPORTANT Carefully remove all the parts from the carton and place them individually on a soft cloth to prevent scratches o
 88 5170 943 Kitchen Island IMPORTANT Carefully remove all the parts from the carton and place them individually on a soft cloth to prevent scratches or other damage. Carefully and strictly follow these
Replacing Hunting Case Springs
 Replacing Hunting Case Springs By Dave Coatsworth Pocket watch hunting cases have a pair of springs that latch the cover and cause the cover to open when unlatched. These are called, respectively, the
Simplex Studio. Model 700-S MAT CUTTER INSTRUCTION AND OPERATION MANUAL
 Model 700-S Simplex Studio 22 1 /2" Mat cutting system with production stops, parallel mat guide, flush cut squaring arm, including straight and bevel cutting heads. MAT CUTTER www.logangraphic.com For
V-Groover SIMPLEX INSTRUCTION AND OPERATION MANUAL M O DEL 703. For best results use only authentic Logan blades.
 www.logangraphic.com SIMPLEX M O DEL 703 INSTRUCTION AND OPERATION MANUAL For best results use only authentic Logan blades CAUTION: BLADES EXTREMELY SHARP Use replacement blades #1258 Logan Graphic Products,
Frameless Fixed Panel Slider
 INSTALLATION INSTRUCTIONS Frameless Fixed Panel Slider QCI-5279 SINGLE ROLLER WITH ANTI-JUMP DOUBLE ROLLERS QCI5279 Rev Page Certified 08/09/6 Tools: To install your New Shower Enclosure, you may need
AUDI A8 D3 REPLACING THE OUTSIDE DRIVER DOOR HANDLE
 AUDI A8 D3 REPLACING THE OUTSIDE DRIVER DOOR HANDLE The keyless entry system in the D3 is a great feature. If you have the car key fob in your pocket, putting your hand under the door handle will unlock
INTERCOOLER UPGRADE INSTALLATION INSTRUCTIONS PART NUMBER D APPLICATION: F87 M2
 INTERCOOLER UPGRADE INSTALLATION INSTRUCTIONS PART NUMBER D330-0026 APPLICATION: 2016-17 F87 M2 Congratulations for being selective enough to use a Dinan Intercooler Upgrade Kit. We have spent many hours
Cape Cod Manual. Little Cottage Co. PO Box 455 Berlin, OH Little Cottage Co.
 Tools Needed: -Cordless Drill (12v or higher) -#2 Square drive bit -Hammer -6 Step Ladder -Tape Measure -Square utility knife with blade & hook blade -Speed Square Little Cottage Co. PO Box 455 Berlin,
Pillar Hanger ASSEMBLY INSTRUCTIONS
 Pillar Hanger ASSEMBLY INSTRUCTIONS PILLAR HANGER Recommended Tools Drill with 1/8, 1/4, and 3/8 Drill Bits, 1-1/8 Forstner Bit or 1-1/8 Spade Bit, and Phillips Bit 9/16 and 5/8 Combination Wrench Socket
Vertical Honeycomb Shades
 Step by Step Installation Instructions Vertical Honeycomb Shades Customer Service 800.248.8888 or visit us online at smithandnoble.com Thank you for purchasing from Smith+Noble. Your new shades have been
CABINETRY Assembly Instructions
 www.hdicabinetry.com Assembly Instructions TABLE OF CONTENTS Category Page(s) Section 1: Framed Series Base Cabinet Instructions Wall Cabinet Instructions Easy Reach Cabinet Instructions 1.01-1.04 1.05-1.06
Installation Manual for Metal Emperor Lockers
 P a g e 1 Table of Contents Page General Notes and Tools Required 2-3 Assemble Shelves with Coat Hooks/Coat Rods 4 Fastening Chart 5 Knock Down Locker Assembly (Banks of Three) 6-12 Appendix A: Dress End
TIGER MOTH 120 ASSEMBLY INSTRUCTIONS
 TIGER MOTH 120 ASSEMBLY INSTRUCTIONS SPECIFICATIONS Wing Span: Length: Radio: Flying Weight: 1920mm 1580mm 4 channel with 6 servos 4200g AILERON ASSEMBLY 1 Start by removing the servo cover from the bottom
** Do Not Contact the Store ** For Assistance, including missing or broken parts, Call Customer Service at:
 3/01/2007 VISIT THE LITIME WEB SITE: WWW.LITIME.COM ** Do Not Contact the Store ** For Assistance, including missing or broken parts, Call Customer Service at: 1 (800) 225-3865 Double Shed Doors for Back
Intermediate+ Model 450 MAT CUTTER INSTRUCTION AND OPERATION MANUAL. 40" Mat cutting system with production stop, straight and bevel cutting heads
 Model 450 Intermediate+ 40" Mat cutting system with production stop, straight and bevel cutting heads MAT CUTTER www.logangraphic.com For best results use only authentic Logan blades INSTRUCTION AND OPERATION