KFI Hybrid Mount Installation Manual
|
|
|
- Molly Flowers
- 5 years ago
- Views:
Transcription


1 KFI Hybrid Mount Installation Manual


2 Manual Conventions This manual uses the following symbols to help differentiate between different kinds of information. The safety symbol is used with a key word to alert you to potential hazards in operating and owning a plow. Follow all safety messages to avoid or reduce the risk of serious injury or death. DANGER DANGER indicates an imminently hazardous situation which, if not avoided, will result in death or serious injury. WARNING WARNING indicates a potentially hazardous situation which, if not avoided, could result in death or serious injury. CAUTION CAUTION indicates a potentially hazardous situation which, if not avoided, may result in minor or moderate injury. CAUTION CAUTION used without the safety alert symbol indicates a potentially hazardous situation which, if not avoided, may result in property damage. NOTE If you have questions regarding your mount, we can help. Please call our help line at To help you make informed decisions regarding safety, we have included instructions and information on labels. This information is provided with the intent to help avoid potential hazards that may harm you or others. It is, in no way, possible for us to inform you of every hazard you may come across with this product. Safety Rules WARNING Read this manual thoroughly before using this mount. Failure to follow instructions could result in serious injury or death. CAUTION Use care when lifting components into place. Make sure that all nuts and bolts are tightened per installation instructions. Never operate this KFI product with missing or damaged parts. Always perform regular inspections and maintenance on mount and hardware before use. Page
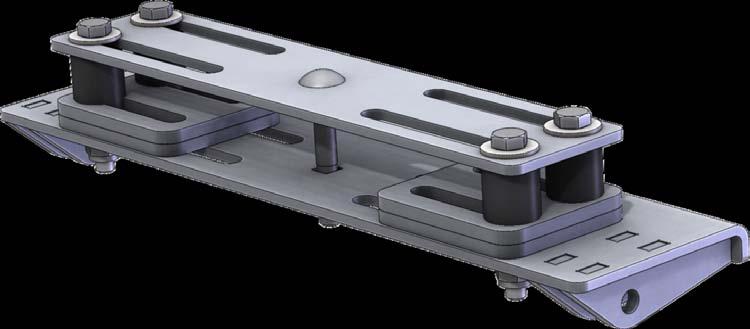
3 Hybrid Mount System Part # Parts List HYBRID LOWER MNT PLT WLDMT 050 HYBRID UPPER MOUNT PLATE 059 HYBRID MOUNT SPACER P8005 HYBRID RUBBER MOUNT SPACER.00 X.75 5 HK- HARDWARE KIT 5. P8000 /8-6 X / X / X / U-Bolt 5. HNNL-ZP /8-6 HEX NYLOCK NUT, STEEL, ZINC 5 5. FW-USS-ZP-075 /8 FLAT WASHER, USS, STEEL, ZINC PLATED 9 5. HC-G5-ZP _75 /8-6 x / HEX CAP SCREW, FULL THREAD, SAE GRADE 5 STEEL, ZINC PLATED 5.5 CB-ZP _75 /8-6 x / CARRIAGE BOLT, STEEL, ZINC PLATED Page


4 Hybrid Mount Installation Instructions Determine which frame type you have. Read general install notes below before proceeding.. For Round Tube Frames Proceed To Page 5. For Square Tube Frames Proceed To Page 6. For Polaris Sportsman Proceed To Page 7 General Install Notes: Be sure that when installing the mount it is centered on your machine. Some frames are not perfectly centered as shown in Figure. CAUTION Take care when installing mount fasteners. Damage could occur to the vehicle if installed improperly. The Approximate Distance that tab holes can be from the front of the machine is 6 inches as shown in Figure. Every machine can very because of ATV front contour. Plow Springs should not hit ATV when plow is angled fully. Equal Equal Round Tube Frame (Page 5) Wide Narrow 6 Approx Figure Approximate Mount Distance Square Tube Frame (Page 6) Polaris Tube Frame (Page 7) Figure Tube Frame Type Page

 provided with the mount. 5. Center the mount on the machine and tighten all bolts evenly.. Install the U-Bolts to the frame in the locations that were determined in step one.")
5 Hybrid Mount Round Tube Frame Install. Place the Hybrid Lower Mount Plate up to the frame at the location behind the front tires where the frame widens out, as shown in Figure. Determine the location allowing the mount to be centred, back as far on the frame as possible and the push tubes to be attached. Keep the mount holes within the approximate distance from the front of your machine. See Page 5, Figure.. Install the plate assembly to the U-Bolts using the washers (5.) and /8 Nuts (5.) provided with the mount. 5. Center the mount on the machine and tighten all bolts evenly.. Install the U-Bolts to the frame in the locations that were determined in step one. Note: If there is a skid plate installed and you do not wish to remove it, you will need to mark the locations where the U-Bolts will be installed and drill holes. Center of Frame. Optional: Place the Upper Mount Plate on top of the Lower Mount Plate as shown in Figure. This is not required but adds strength to the mount for less flex when plowing. Figure Round Tube Mount Placement (Top View) Frame configurations will vary. U-BOLT Figure Hybrid Mount Round Tube Install Page 5
 see Figure 5.")

 and lower mount plate () using the rubber spacers (), /8 bolts (5.), /8 carriage bolt (5.5), nuts (5.) and washers (5.) provided with your mount.")

6 Hybrid Mount Square Tube Frame Install. Check to see if the U-Bolts will fit over your tube frame. If they do it is recommended to use the U-Bolts (See round tube install, Page 6). If they do not proceed to step.. Measure the thickness of your tube frame and skid plate (if installed) see Figure 5. Then cut the provided rubber spacers to a / longer then the thickness of the tube frame.. Place the Upper Mount Plate () over the frame at the location behind the tires where the frame widens out. Refer to Figure 6 for best fastener placement.. Determine the location allowing the mount to be centred, back as far on the frame as possible and the push tubes to be attached. Keep the mount holes within the approximate distance (6 ) from the front of your machine. See Page 5, Figure. 5. Loosely install the upper mount plate () and lower mount plate () using the rubber spacers (), /8 bolts (5.), /8 carriage bolt (5.5), nuts (5.) and washers (5.) provided with your mount. Note: If there is a skid plate installed and you do not wish to remove it, you will need to mark the locations where the bolts will be installed and drill holes. Install the hardware with the head of the bolts towards the ground if possible. This will maximize ground clearance. See Figure 7. If not you can cut the bolts after install. Note: If the upper mount plate () doesn t fit because of obstruction you may substitute the spacer plates () for the upper mount plate as shown in Figure Tighten all bolts evenly. Carriage bolt only needs to be snug to plate as its purpose is to keep both plates from bending in the center. Note: Ensure that the rubber spacers are tight against the frame before tightening the bolts. If this is done incorrectly the mount could move and the plow may damage your machine. Figure 5 Frame Measurement ACCEPTABLE RECOMMENDED INCORRECT Figure 6 Fastener Placement Figure 8 Hybrid Mount Square Tube Install Using Spacer Plates. Figure 7 Hybrid Mount Square Tube Install Page 6
 over the frame at the location behind the tires where the frame widens out.")
 from the front of your machine. See Page 5, Figure.")
7 Hybrid Mount Polaris Sportsman Install. Measure the thickness of your tube frame and skid plate (if installed), see Figure 9. Then cut the provided rubber spacers to a / longer then the thickness of the tube frame.. Place the Upper Mount Plate () over the frame at the location behind the tires where the frame widens out. Refer to Figure 0 for best fastener placement.. Determine the location allowing the mount to be centred, back as far on the frame as possible and the push tubes to be attached. Keep the mount holes within the approximate distance (6 ) from the front of your machine. See Page 5, Figure.. Loosely install the upper mount plate (), spacer plates () and lower mount plate () using the rubber spacers (), /8 bolts (5.), /8 carriage bolt (5.5), nuts (5.) and washers (5.) provided with your mount. See Figure. Note: If there is a skid plate installed and you do not wish to remove it, you will need to mark the locations where the bolts will be installed and drill holes. 5. Tighten all bolts evenly. Carriage bolt only needs to be snug to plate as its purpose is to keep both plates from bending in the center. Figure 9 Frame Measurement RECOMMENDED Note: Ensure that the rubber spacers are tight against the frame before tightening the bolts. If this is done incorrectly the mount could move and the plow may damage your machine. ACCEPTABLE INCORRECT Figure 0 Fastener Placement Figure Hybrid Mount Sportsman Install Page 7


8 Kappers Fabricating, Inc. 05 Industrial Dr. Spring Valley, MN
ATV SNOW PLOW 50 IN. UNIVERSAL SYSTEM OPERATOR S MANUAL MODEL NUMBER
 OPERATOR S MANUAL warranty_badges.pdf 8/8/ 0: AM 0 IN. UNIVERSAL ATV SNOW PLOW SYSTEM MODEL NUMBER 0098 SAVE THESE INSTRUCTIONS Important safety instructions are included in this manual. MADE IN USA REV
INSTALLATION INSTRUCTIONS ATV PLOW Mount Kit: PN Application: Sportsman 400, Magnum 425
 INSTALLATION INSTRUCTIONS ATV PLOW Mount Kit: PN 37845 Application: 1996-97 Sportsman 400, 1997-98 Magnum 425 Your safety, and the safety of others, is very important. To help you make informed decisions
INSTALLATION INSTRUCTIONS UTV LIGHT BAR KIT Part Number: and Application: All UTV s*
 INSTALLATION INSTRUCTIONS UTV LIGHT BAR KIT Part Number: 83970 and 84360 Application: All UTV s* * does not include Arctic Cat vehicles Your safety, and the safety of others, is very important. To help
INSTALLATION INSTRUCTIONS ATV Winch Mounting Kit Part Number: Applications: Honda Rancher. Before You Begin.
 INSTALLATION INSTRUCTIONS ATV Winch Mounting Kit Part Number: 68852 Applications: 2000+ Honda Rancher As you read these instructions, you will see NOTES, CAUTIONS, and WARNINGS. Each message has a specific
INSTALLATION INSTRUCTION ATV BUMPER/WINCH MOUNT Mount Kit: PN Application: POLARIS 300, 400, 500 and 700 Sportsman
 INSTALLATION INSTRUCTION ATV BUMPER/WINCH MOUNT Mount Kit: PN 68573 Application: POLARIS 300, 400, 500 and 700 Sportsman Your safety, and the safety of others, is very important. To help you make informed
INSTALLATION INSTRUCTIONS ATV PLOW Mount Kit: PN Application: HONDA RANCHER
 INSTALLATION INSTRUCTIONS ATV PLOW Mount Kit: PN 63290 Application: 2000+ HONDA RANCHER Your safety, and the safety of others, is very important. To help you make informed decisions about safety, we have
INSTALLATION INSTRUCTIONS ATV PLOW Mount Kit: Application: 2002 and newer Yamaha Grizzly 660
 INSTALLATION INSTRUCTIONS ATV PLOW Mount Kit: 64669 Application: 2002 and newer Yamaha Grizzly 660 Your safety, and the safety of others, is very important. To help you make informed decisions about safety,
INSTALLATION INSTRUCTIONS ATV SNOW PLOW WARN KIT PN: KAWASAKI KIT PN: KAF Application: Kawasaki Prairie
 INSTALLATION INSTRUCTIONS ATV SNOW PLOW WARN KIT PN: 37838 KAWASAKI KIT PN: KAF90-220 Application: Kawasaki Prairie 1997-2002 Your safety, and the safety of others, is very important. To help you make
INSTALLATION INSTRUCTIONS ATV WINCH MULTI-MOUNT Multi-Mount Mounting-Kit: PN Application: YAMAHA BIGBEAR 00+
 INSTALLATION INSTRUCTIONS ATV WINCH MULTI-MOUNT Multi-Mount Mounting-Kit: PN 61025 Application: YAMAHA BIGBEAR 00+ Your safety, and the safety of others, is very important. To help you make informed decisions
INSTALLATION INSTRUCTIONS
 INSTALLATION INSTRUCTIONS Hidden Winch Skirt Kit For 2011 Ford Super Duty Kit 84520 Your safety, and the safety of others, is very important. To help you make informed decisions about safety, we have provided
INSTALLATION INSTRUCTIONS SKID PLATE BODY ARMOR Part Number: Application: 2009 POLARIS SPORTSMAN XP 550/850
 INSTALLATION INSTRUCTIONS SKID PLATE BODY ARMOR Part Number: 83680 Application: 2009 POLARIS SPORTSMAN XP 550/850 Your safety, and the safety of others, is very important. To help you make informed decisions
INSTALLATION INSTRUCTIONS PLOW MOUNTING KIT Part Number: Application: 2007 Honda TRX420
 INSTALLATION INSTRUCTIONS PLOW MOUNTING KIT Part Number: 75785 Application: 2007 Honda TRX420 Your safety, and the safety of others, is very important. To help you make informed decisions about safety,
PLOW MOUNT KIT FOR POLARIS RANGER P/N ASSEMBLY / OWNERS MANUAL
 PLOW MOUNT KIT FOR POLARIS RANGER P/N 34-3010 ASSEMBLY / OWNERS MANUAL Application PLOW PUSH FRAME NO. 34-0000 or 34-0070 Before you begin, please read these instructions and check to be sure all parts
INSTALLATION INSTRUCTIONS PART#:17A045200MSS\17A045200MA MODULAR GRILL GUARD FOR FORD SUPER DUTY F250/F
 INSTALLATION INSTRUCTIONS PART#:17A045200MSS\17A045200MA MODULAR GRILL GUARD FOR FORD SUPER DUTY F250/F350 08-09 1 guard, center section 1 brush guard, left side 1 brush guard, right side 1 wire guard
ATV Disc OWNER S MANUAL
 ATV Disc OWNER S MANUAL WARNING: Read carefully and understand all ASSEMBLY AND OPERATION INSTRUCTIONS before operating. Failure to follow the safety rules and other basic safety precautions may result
Hardware and Components:
 Hardware and Components: (A) 5/16 x 2 Hex Bolt (B) 5/16 x 2-1/4 Hex Bolt (C) 5/16 x 2-1/2 Hex Bolt (D) 4X 5/16 x 3/4 Hex Bolt (E) 4X 5/16 x 1-1/4 Hex Bolt (F) 11X 5/16 Flat Washer (G) 12X 5/16 Nylock Nut
INSTALLATION INSTRUCTIONS WINCH MOUNTING KIT Part Number: Application: Kymco MXU 250
 INSTALLATION INSTRUCTIONS WINCH MOUNTING KIT Part Number: 72008 Application: Kymco MXU 250 Your safety, and the safety of others, is very important. To help you make informed decisions about safety, we
INSTALLATION INSTRUCTIONS PART#:17GT23MSS\17GT23MA MODULAR GRILL GUARD FOR CHEVY SILVERADO 1/2 TON 99-02
 INSTALLATION INSTRUCTIONS PART#:17GT23MSS\17GT23MA MODULAR GRILL GUARD FOR CHEVY SILVERADO 1/2 TON 99-02 1 guard, center section 1 brush guard, left side 1 brush guard, right side 1 wire guard insert,
FLOE DOCK FURNITURE WARNING ASSEMBLY INSTRUCTIONS
 FLOE DOCK FURNITURE ASSEMBLY INSTRUCTIONS KIT P/N 510-00400-02 KIT P/N 510-00405-02 KIT P/N 510-00406-02 KIT P/N 510-00410-02 WARNING IT IS THE INSTALLER S RESPONSIBILITY TO PROPERLY INSTALL this chair
Intercooler Shroud and Belt Cover for WRX
 Intercooler Shroud and Belt Cover for 2015+ WRX 2016-05-18 Thank you for purchasing this PERRIN product for your car! Installation of this product should only be performed by persons experienced with installation
INSTALLATION MANUAL FRONT. See pages 2 and 3 of this manual for configuration options. Level of Difficulty. Product Photo (center section only)
") INSTALLATION MANUAL FRONT Level of Difficulty Moderate Product Photo (center section only) All hardware listed below will be provided with the bumpers center section. Additional hardware will be supplied
INSTALLATION MANUAL FRONT Level of Difficulty Moderate Product Photo (center section only) All hardware listed below will be provided with the bumpers center section. Additional hardware will be supplied
MODULAR BUMPER INSTALLATION MANUAL
 MODULAR BUMPER INSTALLATION MANUAL Parts List* 1 Center section 1 Side extension, passenger / right 1 Side extension, driver / left 1 Side cap, passenger / right 1 Side cap, driver / left 1 Brush guard,
INSTALLATION INSTRUCTIONS WINCH MOUNTING PLATE FOR STOCK BUMPER Part Number: 88140, FOR 8274 Application: Jeep JK 2012+
 INSTALLATION INSTRUCTIONS WINCH MOUNTING PLATE FOR STOCK BUMPER Part Number: 88140, 88418 FOR 8274 Application: Jeep JK 2012+ GENERAL SAFETY PRECAUTIONS Your safety, and the safety of others, is very important.
PLOW MOUNT KIT FOR CAN-AM MAVERICK P/N ASSEMBLY / OWNERS MANUAL
 PLOW MOUNT KIT FOR CAN-AM MAVERICK P/N 34-7030 ASSEMBLY / OWNERS MANUAL Application PLOW PUSH FRAME NO. 34-0000 or 34-0070 Before you begin, please read these instructions and check to be sure all parts
KOLPIN ATV SWITCHBLADE PLOW
 KOLPIN ATV SWITCHBLADE PLOW P/N 17-0000 OWNER S MANUAL Application ATV VEHICLES ATTENTION DEALER: CUSTOMER MUST RECEIVE A COPY OF THIS MANUAL AT THE TIME OF SALE. Before you begin, please read these instructions
INSTALLATION INSTRUCTIONS
 INSTALLATION INSTRUCTIONS Trans4mer Gen II Mount System For 2011-2012 Dodge Ram HD 4500/5500 Bracket Kit 90160 Your safety, and the safety of others, is very important. To help you make informed decisions
INSTALLATION INSTRUCTIONS WINCH MOUNTING PLATE Part Number: Application: 2007 JEEP JK WRANGLER
 INSTALLATION INSTRUCTIONS WINCH MOUNTING PLATE Part Number: 74247 Application: 2007 JEEP JK WRANGLER Your safety, and the safety of others, is very important. To help you make informed decisions about
PLOW MOUNT KIT FOR KAWASAKI TERYX, YAMAHA RHINO P/N ASSEMBLY / OWNERS MANUAL
 PLOW MOUNT KIT FOR KAWASAKI TERYX, YAMAHA RHINO P/N 34-2025 ASSEMBLY / OWNERS MANUAL Application PLOW PUSH FRAME NO. 34-0000 or 34-0070 Before you begin, please read these instructions and check to be
INSTALLATION INSTRUCTIONS PART#:17A096400MSS\17A096400MA MODULAR GRILL GUARD FOR TOYOTA TACOMA 05-09
 INSTALLATION INSTRUCTIONS PART#:17A096400MSS\17A096400MA MODULAR GRILL GUARD FOR TOYOTA TACOMA 05-09 1 guard, center section 1 brush guard, left side 1 brush guard, right side 1 wire guard insert, left
Rear Mount Installation Instructions
 Rear Mount Installation Instructions Ford Transit Low Roof 130 WB Frame Kit Part #: DTC 0809-011 V1.0.10.12.18 IMPORTANT INSTALLATION STEPS ARE DENOTED USING A STOP SIGN. THESE STEPS MUST BE PERFORMED
INSTALLATION INSTRUCTIONS SIDE BAR FORD ESCAPE & MAZDA TRIBUTE PART #
 INSTALLATION INSTRUCTIONS SIDE BAR 2008-2010 FORD ESCAPE & MAZDA TRIBUTE PART # 50136 50137 PARTS LIST: 1 Driver/Left Sidebar 2 10-1.50mm x 35mm Bolt Plate 1 Passenger/Right Sidebar 2 10-1.50mm x 30mm
Instruction Guide 4A90L
 Instruction Guide 4A90L Kargo Master Rancho Cordova, CA 95742 800-343-7486 CustomerService@KargoMaster.com DATE: *PLEASE READ ALL INSTRUCTIONS AND WARNINGS PRIOR TO ASSEMBLING, INSTALLING, AND USING THIS
WARNING. Failure to observe these instructions could lead to severe injury or death.
 INSTALLATION INSTRUCTIONS WINCH MOUNTING KIT Part Number: 80156, 80160 Application: 2008 Ford F150 Your safety, and the safety of others, is very important. To help you make informed decisions about safety,
INSTALLATION INSTRUCTIONS
 PART NO. 911000T 911000PS 915000T 915000PS PRODUCT DESCRIPTION: Sport Bar 2.0, Full size Textured Black Sport Bar 2.0, Full size Polished Stainless Steel Tubes Sport Bar 2.0, Mid size Textured Black PRODUCT
CPH Coulter Tool Bar Brace Assembly
 Operators/Parts Manual MANUFACTURING INC. 1994 20 CPH Coulter Tool Bar Brace Assembly 12134 Effective 3/30/04 149-721M General Information General Information Important Notice Great Plains Manufacturing,
TIRE RACK INSTALLATION INSTRUCTIONS Dodge Sprinter
 Aluminess Products Inc 9402 Wheatlands Ct. #A Santee, CA 92071 619-449-9930 TIRE RACK INSTALLATION INSTRUCTIONS 07-11 Dodge Sprinter Please read before beginning Stainless steel hardware may bind together
SAFETY THIS PRODUCT IS FOR OFFROAD USE ONLY. ALL LIABILITY FOR INSTALLATION AND USE RESTS WITH THE OWNER.
 SAFETY Your safety and the safety of others is very important. In order to help you make informed decisions about safety, we have provided installation instructions and other information. These instructions
PLOW MOUNT KIT FOR CAN-AM COMMANDER P/N ASSEMBLY / OWNERS MANUAL. Application PLOW PUSH FRAME NO or
 PLOW MOUNT KIT FOR CAN-AM COMMANDER P/N 34-7010 ASSEMBLY / OWNERS MANUAL Application PLOW PUSH FRAME NO. 34-0000 or 34-0070 Before you begin, please read these instructions and check to be sure all parts
OB1U INSTALLATION INSTRUCTIONS. Interactive Flat Panel Over White Board Mount
 INSTALLATION INSTRUCTIONS Interactive Flat Panel Over White Board Mount Spanish Product Description German Product Description Portuguese Product Description Italian Product Description Dutch Product Description
INSTALLATION INSTRUCTIONS
 INSTALLATION INSTRUCTIONS SPORTSMAN WINCH MOUNT GRILLE GUARD APPLICATION: 2016-2018 Toyota Tacoma PART NUMBER: 40-93885, 45-93880, 46-23885 ITEM QUANTITY DESCRIPTION TOOLS NEEDED 1 1 WINCH TRAY 15MM SOCKET
Assembly Instructions for model: VMPR1
 Assembly Instructions for model: VMPR1 Congratulations on your purchase! The VMPR1 ceiling mount provides a unique, simplified method of ceiling mounting inverted LCD/DLP projectors. Its low profile design
SAFETY THIS PRODUCT IS FOR OFFROAD USE ONLY. ALL LIABILITY FOR INSTALLATION AND USE RESTS WITH THE OWNER.
 SAFETY Your safety and the safety of others is very important. In order to help you make informed decisions about safety, we have provided installation instructions and other information. These instructions
SAFETY SENSORS FIELD OF VIEW WILL BE ALTERED WITH USE OF THE REPLACEMENT BUMPER. Injury hazard
 SAFETY Your safety and the safety of others is very important. In order to help you make informed decisions about safety, we have provided installation instructions and other information. These instructions
INSTALLATION INSTRUCTIONS
 INSTALLATION INSTRUCTIONS R5 STEP BOARD APPLICATION: 2009-2017 Dodge Ram 1500 Quad / Crew Cab 2010-2017 Dodge Ram 2500/3500 Crew Cab PART NUMBER: 28-51040, 28-51045, 28-51050, 28-51055 ITEM QUANTITY DESCRIPTION
INSTALLATION INSTRUCTIONS
 INSTALLATION INSTRUCTIONS Trans4mer Winch Mount For 2007-2010 Chevrolet Silverado HD and GMC Sierra HD Bracket Kit 90140 Your safety, and the safety of others, is very important. To help you make informed
Speaker Mount Center Channel Speaker Adapter (PAC-301)
") I N S T R U C T I O N M A N U A L Speaker Mount Center Channel Speaker Adapter () The Speaker Mount Center Channel Speaker Adapter () uses the same interface as the Side Speaker Adapter and can be used
I N S T R U C T I O N M A N U A L Speaker Mount Center Channel Speaker Adapter () The Speaker Mount Center Channel Speaker Adapter () uses the same interface as the Side Speaker Adapter and can be used
ATV STORM CHASER PLOW PUSH TUBE KIT
 ATV STORM CHASER PLOW PUSH TUBE KIT P/N 33-0070 OWNER S MANUAL Application MID-BODY ATV MOUNT NO. 15-XXXX, ALL MOUNT NO. 15-0050 ATTENTION DEALER: CUSTOMER MUST RECEIVE A COPY OF THIS MANUAL AT THE TIME
23001 Industrial Blvd, Rogers, MN / Denali PLOW MOUNT
 , / 1-866-527-7637 www.motoalliance.com Denali PLOW MOUNT RZR 1000 / RZR 900 / RZR Turbo / Polaris General Thank you for purchasing our Denali plow mount(s). You now own a premium, custom plow mount to
 Table of Contents for Standard Duty Poly Blade Arctic Standard Duty Poly Blade 84" & 90" (Blade, Quadrant & T-frame)....2 Important note: Lift frames for this specific blade are listed below: Lift Frame
ALL PRODUCTS MUST BE REGISTERED AT. ATS Design Running Board Installation Instructions
 ALL PRODUCTS MUST BE REGISTERED AT Before returning this product to the place of purchase read the following information packet Contact ATS Design if you experience the following problems: Missing/ Broken
INSTALLATION INSTRUCTIONS
 INSTALLATION INSTRUCTIONS Trans4mer Grille Guard/Winch Mount Kit 39680 (Black) & 39681 (Chrome) For Ford 4x4 F150, F250 Light Duty & Expedition As you read these instructions, you will see NOTES, CAUTIONS
INSTALLATION INSTRUCTIONS
 TEL:1-866-XANATOS INSTALLATION INSTRUCTIONS PART#: 17A110200MSS\17A110200MA MODULAR GRILL GUARD FOR NISSAN FRONTIER 05-10//PATHFINDER 05-07 1 guard, center section 1 brush guard, left side 1 brush guard,
CRITICAL INFORMATION:
 IMPORTANT ALERT: GM uses a very strong thread-locking compound on all body bolts. Use of an air assisted impact ratchet can cause damage to the threads on factory body mount bolts and the internal nut
INSTALLATION INSTRUCTIONS
 INSTALLATION INSTRUCTIONS Trans4mer Grille Guard/Winch Mount For 2007 Chevrolet Silverado 1500 and GMC Sierra 1500 Kit 75230 (Black) and 76007 (Stainless) Your safety, and the safety of others, is very
INSTALLATION INSTRUCTIONS
 INSTALLATION INSTRUCTIONS Trans4mer Grille Guard/Winch Mount Kit 645 For Chevrolet Silverado 500HD & 3500 This WARN Trans4mer system can be customized to give your Chevy Silverado a wide variety of looks,
MOUNT KIT PERSONAL PLOW
 February 15, 2011 Lit. No. 64645, Rev. 02 31303 MOUNT KIT PERSONAL PLOW Nissan Titan 2004-09 Installation Instructions Read this document before installing the snowplow. See your sales outlet/web site
3/4 Rear DuraRac Installation Instructions
 3/4 Rear DuraRac Installation Instructions Ford Transit Low Roof 130 WB Frame Kit Part #: CRC 27-1010-001 V1.0.09.28.18 IMPORTANT INSTALLATION STEPS ARE DENOTED USING A STOP SIGN. THESE STEPS MUST BE PERFORMED
MPA-9000 Universal Ceiling Projector Mount Kit
 I N S T R U C T I O N M A N U A L Universal Ceiling Projector Mount Kit The Universal Ceiling Projector Mount provides a unique, simplified method of ceiling mounting your inverted projector. This low
INSTALLATION INSTRUCTIONS
 INSTALLATION INSTRUCTIONS E-SERIES STEP BARS / 4 OVAL STEP BARS APPLICATION: 2011-2017 Jeep Grand Cherokee PART NUMBER: 23-3610, 23-3615, 21-3610, 21-3615, 23-73610 ITEM QUANTITY DESCRIPTION TOOLS NEEDED
VL GUIDE ON & BOW STOP INSTRUCTIONS
 VL GUIDE ON & BOW STOP INSTRUCTIONS REIMANN & GEORGER CORPORATION MARINE PRODUCTS BUFFALO, NY P/N 6112087 07/18/08 TABLE OF CONTENTS CHAPTER TITLE PAGE 1 SAFETY... 1 1.1 Introduction... 1 1.2 Safety Definitions...
Installation Instructions Jeep JL Front Grumper Product Number: GR4600 Application: 18+ JEEP JL
 ! IMPORTANT SAFETY GUIDE Your safety and the safety of others is very important. In order to help you make informed decisions about safety, we have provided the following warnings, safety precautions,
SAFETY. Read and understand all safety precautions and instructions before installing this product.
 SAFETY Your safety and the safety of others is very important. In order to help you make informed decisions about safety, we have provided installation instructions and other information. These instructions
Installing flat panels on the MPL15 wall mount
 Installing flat panels on the MPL15 wall mount The MPL15 (DS-VW775) is a full-service video wall mount that can accommodate tiled LCD panels with up to a 400 x 400 mm VESA pattern in portrait and landscape
IN-BED FRAME MOUNT INSTALLATION INSTRUCTIONS
 Lit. No. 13666, Rev. 05 December 5, 2005 IN-BED FRAME MOUNT INSTALLATION INSTRUCTIONS FOR SINGLE-STAGE AND TWO-STAGE TAILGATE SPREADERS Read Owner's Manual before operating or servicing spreader. Empty
SAFETY THIS PRODUCT IS FOR OFFROAD USE ONLY. ALL LIABILITY FOR INSTALLATION AND USE RESTS WITH THE OWNER.
 SAFETY Your safety and the safety of others is very important. In order to help you make informed decisions about safety, we have provided installation instructions and other information. These instructions
Foot Rail. Nissan Navara_Frontier D23 DC START HERE! READ ME FIRST
 Foot Rail Nissan Navara_Frontier D3 DC ENG FANN00 START HERE! READ ME FIRST Don t be a hero and muscle through this without first reading these fitting instructions! Improper installation of this gear
PRODUCT: DB3 Bolt-On Rear CA Correction Bracket READ INSTRUCTIONS IN FULL BEFORE INSTALLATION. QUESTIONS? CALL M-F 7:00 AM 5:00 PM PST
 PRODUCT: DB3 Bolt-On Rear CA Correction Bracket READ INSTRUCTIONS IN FULL BEFORE INSTALLATION. QUESTIONS? CALL 916-631-8071 M-F 7:00 AM 5:00 PM PST REV: A 03-01-2017 II-7197 The MetalCloak experience includes
Side Katerack Installation Instructions
 Side Katerack Installation Instructions Ram ProMaster City 2015+ Frame Kit Part #: CRC 28-1000-001 V1.0.12.06.18 IMPORTANT INSTALLATION STEPS ARE DENOTED USING A STOP SIGN. THESE STEPS MUST BE PERFORMED
Installation Instructions Kit, Base Rail Bracket Part # 31413
 Installation Instructions Kit, Base Rail Bracket Part # 31413 Dealer / Installer: Provide a copy of these Instructions to the end user of this product. These Instructions provide important operating and
VL GUIDE ON & VERTICAL BOW STOP INSTRUCTIONS
 VL GUIDE ON & VERTICAL BOW STOP INSTRUCTIONS REIMANN & GEORGER CORPORATION MARINE PRODUCTS BUFFALO, NY P/N 6112---- 05/06/11 TABLE OF CONTENTS CHAPTER TITLE PAGE 1 SAFETY... 1 1.1 Introduction... 1 1.2
400A 40113V, 401A 40120V, & 401AL 40120VL ALUMINUM VERTICAL 4000 LB LIFT INCLUDES SCREW LEG ASSEMBLY INSTRUCTIONS
 12/11/07 PAGE 1 OF 12 400A 40113V, 401A 40120V, & 401AL 40120VL ALUMINUM VERTICAL 4000 LB LIFT INCLUDES SCREW LEG ASSEMBLY INSTRUCTIONS Thank you for purchasing our product! *Please read these instructions
Hardware and Components:
 Hardware and Components: (A) 4X 5/16 x 1 Carriage Bolt (B) 2X 5/16 x 2-1/4 Carriage Bolt (C) 2X 5/16 x 3-1/4 Hex Bolt (D) 2X 5/16 x 3/4 Hex Bolt (E) 2X 5/16 x 1-1/4 Hex Bolt (F) 5/16 x 2-1/4 Hex Bolt (G)
Retro Fit Gearbox Mount. Assembly Instructions. Assembly Instructions. Before You Start. General Information. Manual No M
 Retro Fit Gearbox Mount Assembly Instructions Treker 4400NT & 4400ST Series Before You Start Assembly Instructions Manual No. 700-372M! When you see this symbol, the subsequent instructions and warnings
OPERATION, SERVICE AND PARTS INSTRUCTION MANUAL 1813 BENDING TABLE FOR 881 HYDRAULIC BENDER
 OPERATION, SERVICE AND PARTS INSTRUCTION MANUAL 1813 BENDING TABLE FOR 881 HYDRAULIC BENDER Read and understand this material before operating or servicing this bender. Failure to understand how to safely
INSTALLATION INSTRUCTIONS
 INSTALLATION INSTRUCTIONS Trans4mer Grille Guard/Winch Mount For Toyota Tundra Kit 68505 This WARN Trans4mer system can be customized to give your Toyota Tundra a wide variety of looks, front-end protection
OPERATOR'S MANUAL 46" SNOW BLADE. Model Numbers OEM IMPORTANT: READ SAFETY RULES AND INSTRUCTIONS CAREFULLY
 OPERATOR'S MANUAL 46" SNOW BLADE Model Numbers 190-833-OEM IMPORTANT: READ SAFETY RULES AND INSTRUCTIONS CAREFULLY MTD PRODUCTS INC. P.O. BOX 368022 CLEVELAND, OHIO 44136-9722 PRINTED IN U.S.A. FORM NO.
INSTALLATION INSTRUCTIONS
 INSTALLATION INSTRUCTIONS Trans4mer Winch Mount For 2011-2012 Chevrolet Silverado HD and GMC Sierra HD Bracket Kit 90165 Your safety, and the safety of others, is very important. To help you make informed
Attachment Kit Ford 250 4x4 Super Duty Early 350 4x4 Super Duty Early 450 Super Duty Early 550 Super Duty Early
 Fisher Engineering P.O. Box 529 Rockland, Maine 04841 September 2, 2005 Lit. No. 22303, Rev. 05 S Y S T E M Attachment Kit Ford 250 4x4 Super Duty 1999-04 Early 350 4x4 Super Duty 1999-04 Early 450 Super
INSTALLATION INSTRUCTIONS RH 412 STEEL DOORS
 By following the steps outlined below, the assembly, installation and adjustment of the steel doors, will be a simple process. Let s start with the Driver Side. Note: Having the hood open makes the job
Toyota Prado 150 / LEXUS GX460 SLIMLINE II RACK ( 1255MM X 1964mm)
") Toyota Prado 150 / LEXUS GX460 SLIMLINE II RACK ( 1255MM X 1964mm) FATP001 / KRTP011T / KRLE007T INSTALL TIME: 1 Hour READ ME FIRST: Thank you for purchasing a Front Runner Slimline II Rack. This Roof
Toyota Prado 150 / LEXUS GX460 SLIMLINE II RACK ( 1255MM X 1964mm) FATP001 / KRTP011T / KRLE007T INSTALL TIME: 1 Hour READ ME FIRST: Thank you for purchasing a Front Runner Slimline II Rack. This Roof
Arctic Equipment Manufacturing Corporation Arctic LD-P. Table of Contents
 Arctic LD-P Table of Contents Arctic Light Duty Poly Blade 78 & 84" (Blade, Quadrant & T-frame)....2 Installation of the Optional Spring...6 Installation of the Shoe Bracket...10 Power Angling Installation..........13
RBP-1215B-RX DODGE RAM QUAD CAB RX3
 RBP-1215B-RX3 2002-2017 DODGE RAM 15-3500 QUAD CAB RX3 Passenger side RX-3 Side Step Drill Template Passenger side rear Modular Bracket (6) L Support Brackets Driver side rear Modular Bracket Driver side
8mm x 25mm "Z" Bolt Plates. (2) Tube Spacers. (2) 12mm Bolt Plates w/ Nut
 Tube Spacers. (2) 12mm Bolt Plates w/ Nut") PARTS LIST: 1 Grille Guard 10 12mm Lock Washers 1 Driver/Left Side Frame Mounting Bracket 8 12mm Hex Nuts 1 Passenger/Right Side Frame Mounting Bracket 2 10-1.50mm x 25mm Button Head Bolts 1 Driver/Left
PARTS LIST: 1 Grille Guard 10 12mm Lock Washers 1 Driver/Left Side Frame Mounting Bracket 8 12mm Hex Nuts 1 Passenger/Right Side Frame Mounting Bracket 2 10-1.50mm x 25mm Button Head Bolts 1 Driver/Left
INSTALLATION INSTRUCTIONS
 TEL -866-XANATOS INSTALLATION INSTRUCTIONS PART#: 7D5000SS\7D500A GRILL GUARD FOR DODGE SPRINTER 07-09 PARTS LIST: 8 6 Grille Guard Driver/Left Frame Mounting Passenger/Right Frame Mounting Driver/Left
10-1.5mm x 40mm Hex Bolt 1 Driver/Left Front Inner Support Bracket (2WD & 4WD Vehicles W/O Skid Plate Only) 2
 2") PARTS LIST: 1 Driver/Left sidebar 4 12mm x 32mm OD x 3mm Flat Washer 1 Passenger/Right sidebar 4 12mm x 24mm OD x 2.5mm Flat Washer 1 Driver/Left Mounting Bracket 6 12mm Lock Washers 1 Passenger/Right
PARTS LIST: 1 Driver/Left sidebar 4 12mm x 32mm OD x 3mm Flat Washer 1 Passenger/Right sidebar 4 12mm x 24mm OD x 2.5mm Flat Washer 1 Driver/Left Mounting Bracket 6 12mm Lock Washers 1 Passenger/Right
INSTALLATION INSTRUCTIONS
 INSTALLATION INSTRUCTIONS Trans4mer Mounting System Dodge Ram Kit No. 65220, 73132, 75525, 76253 (black) or 65221, 73133, 75530, 76254 (stainless) As you read these instructions, you will see NOTES, CAUTIONS
(2) Plastic Plugs (2) Frame Bracket. Spacers. License Plate Bracket. (2) 12mm Single Bolt Plates. (2) 12mm Double Bolt Plates
 Plastic Plugs (2) Frame Bracket. Spacers. License Plate Bracket. (2) 12mm Single Bolt Plates. (2) 12mm Double Bolt Plates") LDB-CSIL26-FB PARTS LIST: 1 LD1 Bumper Assembly 10 12mm Hex Nuts 1 Driver/left Frame Mounting 6 10-1.5mm x 35mm Hex Bolts 1 Passenger/right Frame Mounting 12 10mm x 27mm OD x 3mm Flat Washers 2 Spacers
LDB-CSIL26-FB PARTS LIST: 1 LD1 Bumper Assembly 10 12mm Hex Nuts 1 Driver/left Frame Mounting 6 10-1.5mm x 35mm Hex Bolts 1 Passenger/right Frame Mounting 12 10mm x 27mm OD x 3mm Flat Washers 2 Spacers
INSTALLATION INSTRUCTIONS
 INSTALLATION INSTRUCTIONS Trans4mer Gen II Mount System For 2008 Ford Super Duty Kit 80140 (Large Frame Black) and Kit 80150 (Mid Frame Black) and Kit 80155 (Mid Frame Stainless) Your safety, and the safety
Please read these Installation Instructions in their entirety prior to installing or operating this equipment.
 2014-2017 Ram 2500 (All beds) Please read these in their entirety prior to installing or operating this equipment. This hitch is rated to 30,000 lbs. Gross Towing Weight and 7,500 lbs. Tongue Weight Bolt
Side DuraRac Installation Instructions
 Side DuraRac Installation Instructions Ford Transit Low Roof 130 /148 WB Frame Kit Part #: CRC 22-1010-002 V1.0.08.10.18 IMPORTANT INSTALLATION STEPS ARE DENOTED USING A STOP SIGN. THESE STEPS MUST BE
INSTALLATION MANUAL WEEKENDER STEEL LADDER RACK
 TRUCK STORAGE SOLUTIONS SECURING YOUR REPUTATION INSTALLATION MANUAL WEEKENDER STEEL LADDER RACK STEEL & ALUMINUM SIDE BOX WITH PACK RAT DRAWER UNITS MODELS ATTENTION: PLEASE READ AND UNDERSTAND ALL INSTRUCTIONS
INSTRUCTIONS INSTRUCCIONES CONSIGNES
 AUTOMOTIVE PRODUCTS, INC. INSTRUCTIONS INSTRUCCIONES CONSIGNES APPLICATION: 2007-2010 CHEVY/GMC SILVERADO/SIERRA 2500/3500 (EXCLUDES CLASSIC) APP PART #46-23715, 40-92315/45-92310 MAX WINCH TRAY, SPORTSMAN
INSTALLATION INSTRUCTIONS 3 BULL BAR 99-04, 04 "HERITAGE" F-150/250LD 2WD, 97-04, 04 "HERITAGE" 4WD WD EXPEDITION/ WD EXPEDITION PART
 INSTALLATION INSTRUCTIONS 3 BULL BAR PART #B-F1971;B-F2971 PARTS LIST: 1 Bull Bar 2 12-1.75mm x 130mm x 40mm Hex Bolts 1 Driver/Left Mounting Bracket 4 12-1.75mm x 35mm Hex Bolts 1 Passenger/Right Mounting
WARNING. BX Ford F350 (Includes Super Duty) Installation Instructions
 Installation Instructions") Serial Number BX231 Please read BOTH these and the General Towing Instructions before attempting to install or operate this equipment. 1. Blue Ox towing products and accessories are intended to be installed
Serial Number BX231 Please read BOTH these and the General Towing Instructions before attempting to install or operate this equipment. 1. Blue Ox towing products and accessories are intended to be installed
installation guide
 JANUS INTERNATIONAL 1 866 562 2580 w w w. j a n u s i n t l. c o m 2000 2500 3000 installation guide RIGHT DRIVE END SHOWN LH OPPOSITE LEFT TENSION END SHOWN RH OPPOSITE PUSH-UP OPERATION 2000 2500 3000
Please read BOTH these Installation Instructions and the General Instructions prior to installing or operating this equipment.
 Please read BOTH these and the General Instructions prior to installing or operating this equipment. 1. Blue Ox towing products and accessories are intended to be installed by Blue Ox Dealers who are familiar
1369 & 1379 MOUNT KITS
 November 15, 2014 Lit. No. 64573, Rev. 01 1369 & 1379 MOUNT KITS 1369 Ford Bronco, F 150 4X4 1992-96 1379 Ford F 250/350 4X4 1992-97 Ford F 250 2WD (over 8,500 GVWR) 1992-97 Ford F 350 2WD (over 10,000
Warnings. Description. Prior to Installation Tools Needed
 Warnings Failure to act in accordance with the following may result in death or personal injury. The JT Strong Arm Stabilizer System is intended to eliminate chassis movement in travel trailers and fifth
SubZero Plow System SEVERE INJURY, DEATH, OR EQUIPMENT DAMAGE MAY RESULT IF SAFETY INSTRUCTIONS ARE NOT FOLLOWED.
 1 SubZero Plow System Check out our instructional video online at www.rockymountainatvmc.com/videos or on our Youtube channel under: RockyMountainATVMC Safety Instructions For your safety and the safety
Please read BOTH these Installation Instructions and the General Instructions before attempting to install or operate this equipment.
 Please read BOTH these and the General Instructions before attempting to install or operate this equipment. 1. Blue Ox towing products and accessories are intended to be installed by Blue Ox Dealers who