Apple iphone 8. PennEngineering
|
|
|
- Barry Clarke
- 5 years ago
- Views:
Transcription

1 Apple iphone 8 March 2018 by Jon Brunk PennEngineering 1

2 Apple iphone 8 2
3 Details & Findings Pictures and Description of the iphone 8 and our disassembly process. 3

 Screen secured with")
4 Exterior 2 screws in bottom of the case, long dog point, pentalobe drive (yellow, p.35 row 1) Thru right angle metal tabs in screen (red) Thread into case wall (green) Screen secured with adhesive 4
5 Inside the Phone Screen Regions Top Bottom Side Tabs Case Regions Battery Top Left Top Right Mid Right Bottom Right Taptic Engine Bottom Sides 5

 2 additional")


6 Screen Top 3 screws attach a cover over the camera and speaker (yellow, p.35 row 2, 3) 2 additional screws used to hold speaker assembly (red, p.35, row 4) All of these screws thread into metal inserts, see next page 6

")

 www.")
7 Screen Top Under speaker are 4 conductive points Springs in speaker used to maintain contact (red) Overall 6 threaded inserts used in this region, install into plastic (p.41, threaded inserts) 7

 3 thread into metal")

8 Screen Bottom 4 Triwing drive screws attach metal cover along bottom row (p.35, row 5) 3 thread into metal inserts 1 threads into boss on back side of home button Boss Threaded Inserts 8

 Thread into")


9 Screen Side Tabs 3 short Triwing drive screws along each side (p.36 row 1) Thread into weld nuts at a right angle to the screen (p41, weld nuts) Tabs fit into brackets in the case 9


10 Battery Only adhesive used to attach battery 10
11 Case Mid Right 11


 2")


12 Case Mid Right 4 screws (red, p36 row 2, 3) attach metal cover over flex connections 1 into superscrew (gold, p36 row 4) 1 into PCB standoff (blue, p41) 2 thru hole, surface mount PCB standoffs (green, p41) 3 weld standoffs, attached to the case (p41) 12
13 Case Top Right 13


")
 and 1 screw (gold, p37 row")

14 Case Top Right 3 screws attach metal cover over flex connections (red, p36 row 5) 1 threads into PCB standoff (blue, p41) 2 thread into superscrews (yellow and green) 1 superscrew (yellow, p37 row 2) and 1 screw (gold, p37 row 1) secure another cover over the camera, into tapped holes 14


 Short")


 1 hidden")

15 Case Top Right 1 superscrew and 1 screw fasten metal bracket in corner thread into welded standoff and tapped hole Superscrew (green, p37 row 3) Short screw (yellow, p37 row 5) 1 superscrew and 1 short screw attach a widget, thread into tapped holes Superscrew (red, p37 row 4) Short screw (white, p38 row 1) 1 hidden screw holds bracket, threads into weld standoff (blue, p38 row 2) 15

16 Case Top Left 16
 3")
 1 threads into tapped hole in")
 1 threads into")

 1 short screw")

17 Case Top Left 4 screws attach metal and plastic cover (yellow, p38 row 3) 3 thread into surface mount PCB standoffs (white) 1 threads into tapped hole in case wall (orange) 2 screws attach thin metal bar (blue, green) 1 threads into PCB standoff (blue, p38 row 4) 1 into thru-hole standoff, then into weld standoff (p38 row 5) 2 screws connect bracket to PCB/case (red) 1 short screw into tapped hole in the case (row 4) 1 long screw thru PCB into weld standoff (row 5) 17
 www.pemnet.")
18 Motherboard 6 threaded standoffs, soldered on (yellow, p41, PCB standoffs) 3 unthreaded standoffs, soldered on, knurled at bottom (blue, p41, PCB Thru-Hole standoffs) 18
19 Case Bottom Right 19
 3 screws attach L shaped bracket,")
 2 on bottom thread into weld standoffs (p")
 1 into case tapped hole (p39 row 3) www.")
20 Case Bottom Right Speaker assembly held by a total of 5 screws 1 superscrew (gold, p36 row 4) 3 screws attach L shaped bracket, which also holds down the lightning connector (red) 1 threads into a superscrew (p39 row 2) 2 on bottom thread into weld standoffs (p 39 row 1) 2 screws along right side (yellow) 1 threads into weld standoff (p39 row 4) 1 into case tapped hole (p39 row 3) 20
 1 superscrew")
 Detached speaker assembly www.")
21 Case Bottom Right Detail of hardware in this location 2 weld standoffs (p41) 1 superscrew (p40, row 1) 1 tapped hole (bottom right corner of case, p41) Detached speaker assembly 21
22 Taptic Engine 22
 Threads")
 Passes through two")
 Attachment")

23 Taptic Engine Taptic engine held in two places 1 screw (red, p39 row 5) Threads into weld standoff (easier to see on page 27 and 28) Passes through two brackets, two layers of bent metal 1 superscrew (gold, p40 row 1) Attachment point is a welded collar attached to a flange Threads into weld standoff 23
24 Case Bottom 24

 1 into weld")


25 Case Bottom Plastic and rubber seal utilizes two screws (red, p40 row 2) 1 into weld standoff 1 into tapped hole in the case Additional screw thru PCB into weld standoff (blue, p40 row 3) 2 screws hold lightning port, thread into weld standoffs (yellow, p40, row 2) 25


26 Case Bottom Attachment point at bottom of the phone case 2 screws thread into blind holes in case wall (p40 row 4) Threads are angled slightly Screws pass thru thin flanges Lightning connector and speaker assembly also held by adhesive 26
 6 weld standoffs with different flange shapes (p41) Weld standoffs for Taptic Engine www.")
27 Case Bottom Detail of weld standoffs and tapped holes Total of 4 tapped holes, 2 are on an angle (yellow) 6 weld standoffs with different flange shapes (p41) Weld standoffs for Taptic Engine 27
 Behind black tape is wireless charging coil www.")
28 Case All major components now removed 16 weld standoffs spread around the case (yellow) 6 threaded bosses in the case (circled in red) Behind black tape is wireless charging coil 28
29 Case Sides and Buttons 29


")


30 Case Sides and Buttons 3 metal brackets attached to sides of the case 2 screws per bracket, or total of 8 screws (below in blue, p40 row 5) Thread into tapped holes (p41) Welded tabs around the tapped holes in the wall 30

31 Case Sides and Buttons Tabs on the screen fit into the brackets attached to case walls. 31


")
32 Case Sides and Buttons Volume buttons and sound/mute toggle switch 3 screws attach back plate with sensors for each button (yellow, p41, row 1) Under each screw head is a rubber seal Thread into tapped holes in side of the case (p41) 32
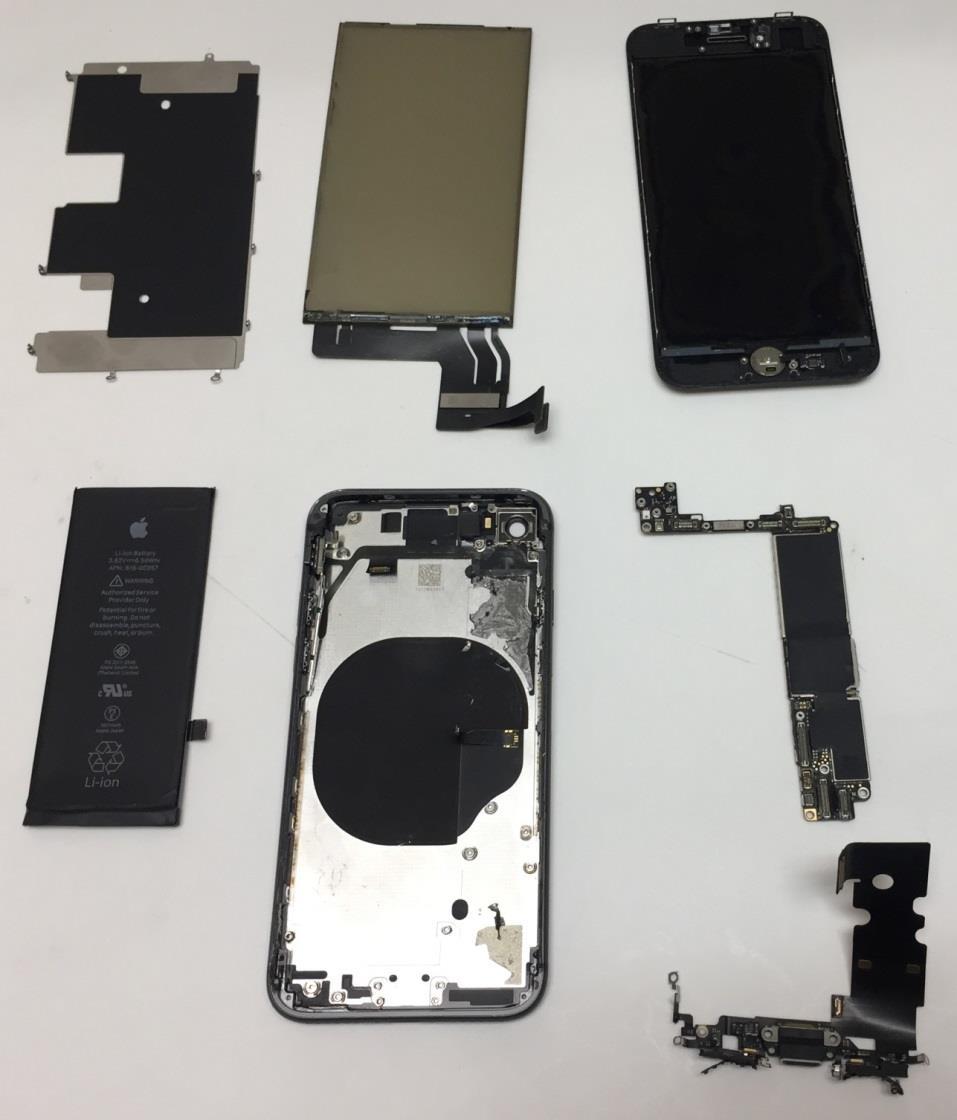
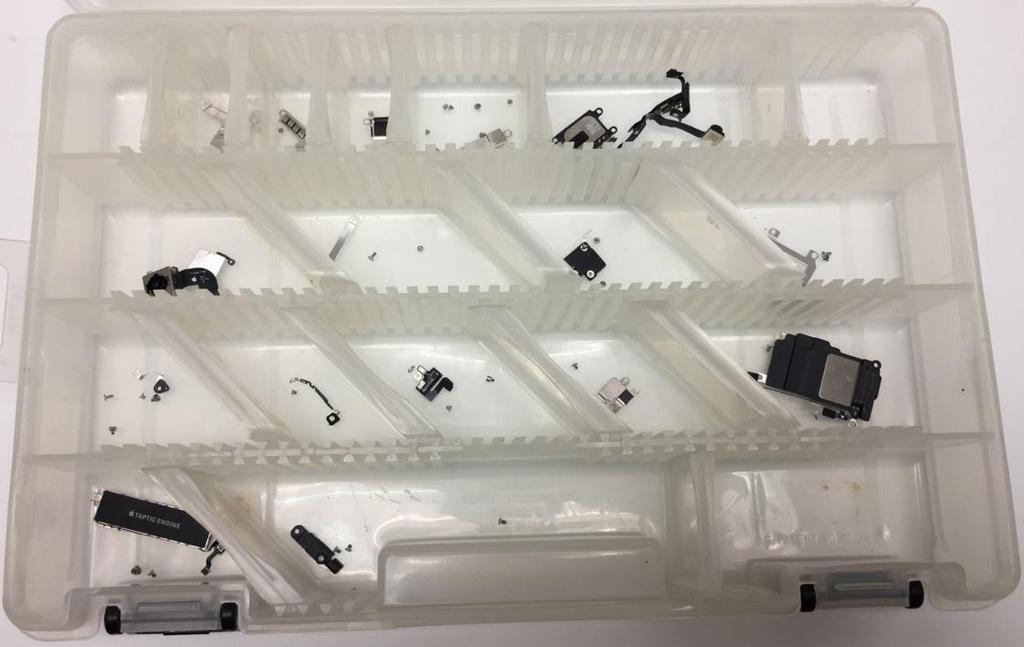
33 iphone 8 Disassembled 33
34 Fastener Summary 34


35 Fastener Summary Location Quantity Driver Exterior 2 P2 Pentalobe Thread Diameter Overall Length Head Diameter Head Thickness M Back to: Page 4 Screen Top 2 Phillips #000 M Page 6 Screen Top 2 Phillips #000 M Page 6 Screen Top 2 Phillips #000 M Page 6 Screen Bottom 4 Tri-point Y000 M Page


36 Fastener Summary Location Quantity Driver Screen Sides 6 Tri-point Y000 Thread Diameter Overall Length Head Diameter Head Thickness M Back to: Page 9 Case - Mid Right 2 Phillips #000 M Page 12 Case - Mid Right 2 Phillips #000 M Page 12 Case - Mid Right 1 Cross Slots M Page 12 or Page 20 Case - Top Right Cover 3 Phillips #000 M Page


37 Fastener Summary Location Quantity Driver Case - Top Right Camera 2 Phillips #000 Thread Diameter Overall Length Head Diameter Head Thickness M Back to: Page 14 Case - Top Right Camera 1 Cross Slots M Page 14 Case - Top Right Bracket 1 Cross Slots M Page 15 Case - Top Right Widget 1 Cross Slots M Page 15 Case - Top Right Bracket 1 Phillips #000 M Page


38 Fastener Summary Location Quantity Driver Case - Top Right Widget 1 Phillips #000 Thread Diameter Overall Length Head Diameter Head Thickness M Back to: Page 15 Case - Top Right Hidden 1 Phillips #000 M Page 15 Case - Top Left 4 Phillips #000 M Page 17 Case - Top Left 2 Phillips #000 M Page 17 Case - Top Left 2 Phillips #000 M Page


39 Fastener Summary Location Quantity Driver Case - Bottom Right 2 Phillips #000 Thread Diameter Overall Length Head Diameter Head Thickness M Back to: Page 20 Case - Bottom Right 1 Tri-point Y000 M Page 20 Case - Bottom Right 1 Phillips #000 M Page 20 Case - Bottom Right 1 Phillips #000 M Page 20 Taptic Engine 1 Phillips #000 M Page


40 Fastener Summary Location Quantity Driver Taptic Engine 1 Cross Slots Thread Diameter Overall Length Head Diameter Head Thickness M Back to: Page 21 or Page 23 Case - Bottom 4 Phillips #000 M Page 25 Case - Bottom 1 Phillips #000 M Page 25 Case - Bottom 2 Phillips #000 M Page 26 Case - Sides 8 Phillips #000 M Page


41 Fastener Summary Location Quantity Driver Case - Sides 3 Phillips #000 Thread Diameter Overall Length Head Diameter Head Thickness M Back to: Page 32 Type Quantity Thread Size Type Quantity Thread Size Back to: PCB Standoffs 6 M1 Page 12 Page 14 Page 18 Weld Nuts 9 M1 Back to: Page 9 Weld Standoffs 16 M1, M1.2 Page 12 Page 21 Page 27 Page 28 PCB Thru- Hole Standoff 3 N/A Page 12 Page 18 Threaded Inserts 6 M1.2 Page 7 Tapped Holes 24 M1, M1.2 Page 21 Page 28 Page 30 Page
42 Alternate Solutions PennEngineering recommendations of alternate hardware and cost savings opportunities. 42


43 Rotary Installation Replace weld standoffs with rotary installed standoffs Uses torque and reduced axial force to prevent damage to cosmetic surfaces Failure mode is the screw Micro fasteners install into material as thin as 0.5mm No protrusion above the top surface of the panel Requires a blind milled hole. 43


44 Clamp Disk Fastener Clamp Disk installs onto a pin or cast post. Thru-holes allow for removability. Generates clamp load due to flexing of the downward facing flanges. Axial installation force. (Patent Pending) 44


45 TackSert & TackPin Fasteners Replace screws with TackSert Pins for brittle materials and TackPin Fasteners for ductile materials where serviceability is not needed. Simple joining method for permanent joints. Many different head designs are available. 45
46 Conclusions and Summary 46
47 iphone 8 Teardown Total of 62 screws, 5 superscrews, 6 PCB standoffs, 16 weld standoffs, 6 weld nuts, 9 threaded inserts, and 24 tapped holes Many screws attach more than one layer of material (reduces the total number needed) Lots of adhesive used to hold screen to case and hold components within the phone. Many weld points as well 47
Google Pixel DISASSEMBLE. PennEngineering
 Google Pixel DISASSEMBLE June 4th, 2018 Allen Wang PennEngineering www.pemnet.com 1 Google Pixel Teardown www.pemnet.com 2 Details & Findings Pictures and Description of the Google Pixel and our disassembly
Lenovo IdeaPad U310 NoteBook
 Lenovo IdeaPad U310 NoteBook 2012-09-12 Lenovo IdeaPad U310-Overview Lenovo IdeaPad U310-Overview Top View Left Side View Comments: Bottom View Both the top case and bottom case are aluminum alloy material
Samsung Galaxy S7. PennEngineering. April 2016 by Larry Zhang & Xiaoming Chen. 25th. 1
 25th April 2016 by Larry Zhang & Xiaoming Chen PennEngineering 1 Overview 2 Details & Findings Pictures and Description of the Samsung Galaxy S7 and the Disassembly Process. 3 Teardown Step1: Remove the
MI HDTV Interactive Set - Top Box. PennEngineering. 21 st April, 2015 by Chen Xiaoming & Zhang Larry. 1
 MI HDTV Interactive Set - Top Box 21 st April, 2015 by Chen Xiaoming & Zhang Larry PennEngineering www.pemnet.com 1 MI HDTV Interactive Set - Top Box www.pemnet.com 2 MI HDTV Interactive Set - Top Box
Nokia 6 Cellphone. PennEngineering. April 7th, 2017 Xiaoming Chen. 1
 Nokia 6 Cellphone April 7th, 2017 Xiaoming Chen PennEngineering 1 Overview Nokia 6 has a 5.5-inch FHD IPS display with a polarizer film covered with 2.5D Gorilla Glass for protection. The smartphone comes
BrydgeAir Keyboard for ipad Air
 BrydgeAir Keyboard for ipad Air May 3 rd. 2016 by XiaoMing Chen & Larry Zhang PennEngineering 1 BrydgeAir Keyboard for ipad Air Overview 2 BrydgeAir Keyboard for ipad Air Details & Findings Pictures and
Le Max2. PennEngineering. September 26 th 2016 by Larry Zhang. 1
 September 26 th 2016 by Larry Zhang PennEngineering 1 Overview 5.7-inch Super AMOLED display with 2560 1440 resolution (Quad HD /2K) 2.21-megapixel rear camera with dual pixel autofocus, 4K video capture;
Samsung Gear VR. PennEngineering. April 26, 2016 by XiaoMing Chen & Larry Zhang. 1
 Samsung Gear VR April 26, 2016 by XiaoMing Chen & Larry Zhang PennEngineering 1 Samsung Gear VR Overview 2 Samsung Gear VR Details & Findings Pictures and Description of the Samsung Gear VR and the Disassembly
Written By: Jeff Suovanen
 iphone 8 Plus Taptic Engine Replacement Replace the Taptic Engine (haptic vibration motor) in an iphone 8 Plus. Written By: Jeff Suovanen ifixit CC BY-NC-SA www.ifixit.com Page 1 of 20 INTRODUCTION The
iphone 4S Dismantling Instructions
 iphone 4S Dismantling Instructions These instructions will show you how to open the iphone to replace the digitizer, LCD screen and other internal parts. Opening your iphone will void your warrantee, and
Written By: Jeff Suovanen
 iphone 8 Battery Replacement Replace the battery in your iphone 8 if it has failed, swollen, or no longer holds sufficient charge. Written By: Jeff Suovanen ifixit CC BY-NC-SA www.ifixit.com Page 1 of
Written By: Arthur Shi
 iphone 8 Taptic Engine Replacement Replace the Taptic Engine in an iphone 8. Written By: Arthur Shi ifixit CC BY-NC-SA www.ifixit.com Page 1 of 18 INTRODUCTION The Taptic Engine produces your iphone's
Ribcage Installation. Part 2 - Assembly. Back-Bone V1.06
 Ribcage Installation Part 2 - Assembly Back-Bone V1.06 Contents Section 1 Before You Get Started... 2 Included With Your Kit:... 2 Figure: A... 3 CAUTION!... 4 Note:... 4 Tools Required... 5 Section 2:
Written By: Walter Galan
 iphone 4 Vibrate Ring Switch Replacement Replace the metal portion of the vibrate/ring switch on your iphone 4. Written By: Walter Galan ifixit CC BY-NC-SA www.ifixit.com Page 1 of 21 INTRODUCTION Use
Written By: Jeff Suovanen
 iphone 8 Plus Antenna Flex Cable Remove or replace the small antenna interconnect cable in the iphone 8 Plus. Written By: Jeff Suovanen ifixit CC BY-NC-SA www.ifixit.com Page 1 of 18 INTRODUCTION Use this
Bulletin TK-518. For attachment of thin panels to plastics, common casting materials and other similar materials. NEW!
 Bulletin TK-518 For attachment of thin panels to plastics, common casting materials and other similar materials. NEW! TK TACKSERT PINS For attachment of thin sheets to plastics, common casting materials
Written By: Chad Facciolo
 HTC One Mini 2 Charging Port Replacement These instructions will show you how to replace your charging port. Written By: Chad Facciolo ifixit CC BY-NC-SA www.ifixit.com Page 1 of 11 INTRODUCTION The charging
Written By: Walter Galan
 iphone 4 Logic Board Replacement Replace a dead logic board in your iphone 4. Written By: Walter Galan ifixit CC BY-NC-SA www.ifixit.com Page 1 of 16 INTRODUCTION Use this guide to replace your iphone
Written By: Walter Galan
 iphone 4S Logic Board Replacement Replace a dead logic board in your iphone 4S. Written By: Walter Galan ifixit CC BY-NC-SA www.ifixit.com Page 1 of 22 INTRODUCTION Use this guide to replace your iphone's
Written By: Andrew Optimus Goldberg
 Replace the screen your GSM/AT&T iphone 4. Written By: Andrew Optimus Goldberg ifixit CC BY-NC-SA www.ifixit.com Page 1 of 25 INTRODUCTION [video: http://www.youtube.com/watch?v=obpfpfx5abw] Use this guide
Written By: Jeff Suovanen
 iphone XS Max Lower Speaker Replacement Remove or replace the main loudspeaker on the bottom edge of the iphone XS Max. Written By: Jeff Suovanen ifixit CC BY-NC-SA www.ifixit.com Page 1 of 23 INTRODUCTION
ROMAN AND. Roller Lift System Continuous Cord Loop GETTING STARTED BRACKET INFORMATION INSIDE MOUNT. A few simple tools are required:
 ROMAN AND WOVEN WOOD SHADES Roller Lift System Continuous Cord Loop GETTING STARTED BRACKET INFORMATION A few simple tools are required: The brackets you received with your product are REQUIRED for proper
LP-200 Dummy Load / Wattmeter
 LP-200 Dummy Load / Wattmeter Enclosure Retrofit Assembly Instructions March 2009 TelePost Incorporated LP-200 is a trademark of TelePost Inc. Material in this document copyrighted 2009 TelePost Inc. 1
Iphone 5 Glass/Lcd REPAIR GUIDE. Version Edition
 Iphone 5 Glass/Lcd REPAIR GUIDE Version 1 2016 Edition IPhone 5 Glass/LCd REPAIR GUIDE RiAna Soto Repair Training Specialist rsoto@cellairis.com FOR EVERY REPAIR MAKE SURE TO COMPLETE, INITIAL, AND HAVE
Repairing iphone 4 LCD Backlight Dim spot issue
 Repairing iphone 4 LCD Backlight Dim spot issue found a way to fix a liquid damaged iphone screen back light issue Written By: Pranav Singh ifixit CC BY-NC-SA www.ifixit.com Page 1 of 26 INTRODUCTION found
Written By: Walter Galan
 Replace the small antenna attached to the headphone jack of your iphone 4S. Written By: Walter Galan ifixit CC BY-NC-SA www.ifixit.com Page 1 of 23 INTRODUCTION Use this guide to replace your iphone's
IPhone 7 Plus Digitizer/LCD REPAIR GUIDE. Version Edition
 IPhone 7 Plus Digitizer/LCD REPAIR GUIDE Version 1 2016 Edition IPhone 7 Plus Digitizer/LCD REPAIR GUIDE LCD AND DIGITIZER REPLACEMENT RiAna Soto Repair Training Specialist rsoto@cellairis.com FOR EVERY
Droplit v2 Frame Assembly
 SeeMeCNC Guides Droplit v2 Frame Assembly Droplit v2 Frame Assembly Written By: JJ Johnson 2017 seemecnc.dozuki.com Page 1 of 22 Step 1 Droplit v2 Frame Assembly Locate the Projector Plate, Projector Joining
INSTALLATION INSTRUCTIONS
 INSTALLATION INSTRUCTIONS SNYPER TUBULAR FENDERS APPLICATION: 2007-2017 Jeep Wrangler JK PART NUMBER: 62-1005, 62-1015 ITEM QUANTITY DESCRIPTION TOOLS NEEDED 1,2 2 FRONT FENDERS, DRIVER (1) AND PASSENGER
ATLANTIS RAIL Contact Information
 ATLANTIS RAIL Contact Information Customer Service (800) 541-6829 (508) 732-9191 Spectrum System Installation Instructions Atlantis Rail s Spectrum System is an easy to install, universal cable railing
LG G2 Motherboard Replacement
 Use this guide to successfully replace the motherboard of the LG G2. Written By: Jair ifixit CC BY-NC-SA www.ifixit.com Page 1 of 10 INTRODUCTION This guide will walk you through the process of how to
Written By: Scott Havard
 Prerequisite for removing barometric vent in an iphone 7 Plus Written By: Scott Havard ifixit CC BY-NC-SA www.ifixit.com Page 1 of 15 INTRODUCTION Prerequisite guide for removing the barometric vent in
Cable Tray Kit: - Cable Tray - Cable Tray Cover - Power Block Support (x2) Top Support Kit: (x2) - 2 Top Supports. Quantities are per bench
 Top Support Kit: (x2) - 2 Top Supports. Quantities are per bench") Parts Included (per back to back bench) Column Kit: (x2) - 1 LH & 1 RH Column - Control Box - Hand Switch Cable Tray Kit: - Cable Tray - Cable Tray Cover - Power Block Support (x2) Depth Support Kit: -
Parts Included (per back to back bench) Column Kit: (x2) - 1 LH & 1 RH Column - Control Box - Hand Switch Cable Tray Kit: - Cable Tray - Cable Tray Cover - Power Block Support (x2) Depth Support Kit: -
GlideRite Retractable Cover System For Hot Spot Spas (SE & SLX only)
") List of Contents Quantity Description 12 #10 x 1 ½ Flat Head Phillips Screw (see pg. 2) 2 #10 x ½ Pan Head Phillips Screw (see pg. 2) 8 ¼ x 2 ½ Lag Bolt (see pg. 2) 7 ¼ 20 x 5 / 8 Hex Head Bolt (see pg.
List of Contents Quantity Description 12 #10 x 1 ½ Flat Head Phillips Screw (see pg. 2) 2 #10 x ½ Pan Head Phillips Screw (see pg. 2) 8 ¼ x 2 ½ Lag Bolt (see pg. 2) 7 ¼ 20 x 5 / 8 Hex Head Bolt (see pg.
Size Grade Torque 9/ ft/lbs. 5/ ft/lbs. 3/ ft/lbs. 7/ ft/lbs ft/lbs.
 8-3 HJ3205,Rev 4 BOlT TORQUE SPECIfICATIONS STANDARD BOlTS: Size Grade Torque 5/6 5 20 ft/lbs. 3/8 5 35 ft/lbs. 7/6 5 56 ft/lbs. /2 5 85 ft/lbs. Size Grade Torque 9/6 5 23 ft/lbs. 5/8 5 70 ft/lbs. 3/4
Viewing the Ryca Motors CS-1 Build Video series at youtube.com/rycamotors is highly recommended before beginning the following assembly process.
 RYCA CS-1 ASSEMBLY GUIDE [The CS-1 installation guides should be used as supplements to the videos found on our Youtube Channel. There is no strict order to the build process, but it is highly recommended
The Astronomical League
 The Astronomical League www.astroleague.org Library Telescope Modifications Check the collimation with the eyepiece cap provided (the one with the hole in its center) before starting on any modifications.
GlideRite Retractable Cover System For HotSpring & Tiger River Spas (except Classic & pre-2000 Landmark Spas)
") List of Contents Quantity Description 12 #10 x 1 ½ Flat Head Phillips Screw (see pg. 2) 2 #10 x ½ Pan Head Phillips Screw (see pg. 2) 8 ¼ x 2 ½ Lag Bolt (see pg. 2) 7 ¼ 20 x 5 / 8 Hex Head Bolt (see pg.
List of Contents Quantity Description 12 #10 x 1 ½ Flat Head Phillips Screw (see pg. 2) 2 #10 x ½ Pan Head Phillips Screw (see pg. 2) 8 ¼ x 2 ½ Lag Bolt (see pg. 2) 7 ¼ 20 x 5 / 8 Hex Head Bolt (see pg.
F l a t S c r e e n A R M S I n s t a l l a t i o n
 ITEM NUMBERS (1) #TOACAORG16 (2) #TOACAORG20 (3) #TOACATRP24 (4) #TOACATRP30 (5) #TOACATRPDS (6) #TOACATRPSS TOOLS REQUIRED (1) 3/8 Wrench (not provided) (2) Phillips head screwdriver (not provided) (1)
Written By: Adam O'Camb
 iphone XR Display Assembly Replacement Replace a cracked or faulty LCD screen in your iphone XR. Written By: Adam O'Camb ifixit CC BY-NC-SA www.ifixit.com Page 1 of 23 INTRODUCTION If your iphone XR screen
INSTALLATION INSTRUCTIONS CONTOURED LIGHT BAR APPLICATION: CHEVY EQUINOX/ GMC TERRAIN PART NUMBERS: ,
 INSTALLATION INSTRUCTIONS CONTOURED LIGHT BAR APPLICATION: 2010-2014 CHEVY EQUINOX/ GMC TERRAIN PART NUMBERS: 32-21020, 32-21025 ITEM QUANTITY DESCRIPTION TOOLS NEEDED 1 1 CONTOUR BAR TORQUE WRENCH 2 1
Written By: Jeff Suovanen
 iphone X Lower Speaker Replacement Remove or replace the primary loudspeaker on the bottom edge of the iphone X. Written By: Jeff Suovanen ifixit CC BY-NC-SA www.ifixit.com Page 1 of 22 INTRODUCTION The
E-Z LOK Products are available from MARYLAND METRICS P.O. Box 261 MD USA
 E-Z LOK Products are available from MARYLAND METRICS P.O. Box 261 MD 21117 USA phones: (410)358-3130 (800)638-1830 faxes: (410)358-3142 (800)872-9329 web: http://mdmetric.com email: sales@mdmetric.com
NX8 SERIES 6-1/4 HANDRAIL W/ VINYL HANDGRIP
 6-1/4 HANDRAIL W/ VINYL HANDGRIP TYPICAL ASSEMBLY 5 2 BUTT JOINT 12 10 9 1 8 11 6 3 7 4 BUTT JOINT COMPONENT LIST 1 LEFT RETURN 7 UPPER IMPACT ABSORBER 2 RIGHT RETURN 8 LOWER IMPACT ABSORBER 3 OUTSIDE
PEM VARIMOUNT BONDING FASTENERS
 Bulletin VM-917 PEM VariMount bonding fasteners are assemblies comprised of standard PEM fasteners mounted permanently into base plates. VM PEM VARIMOUNT BONDING FASTENERS The PEM VariMount fastening system
Ideal for today s compact electronics BULLETIN MPF
 Ideal for today s compact electronics BULLETIN MPF 13 R e v 513 IDEAL FOR TODAY S COMPACT ELECTRONICS Laptops Notebooks/Ultrabook Devices Tablets/eReaders Cell/Smart Phones Gaming/Hand Held Devices Ultrabook
Modular Bi-File Lateral
 Modular Bi-File Lateral Installation Instructions 920-563-6362 E-mail: ssc@spacesaver.com Internet: www.spacesaver.com Contents Hardware Identification..................................3 Pre-Installation........................................6
Parts Included: Tools Required: Canvas Office Landscape Interiors Off Module 90 Connector Kit Installation and Disassembly for Recycling Instructions
 Y Parts Included: Canvas Office Landscape Interiors Off Module 90 Connector Kit Installation and Disassembly for Recycling Instructions FT127.A N Shim A Light Seal B Foam Light Seal C G H Double-Face Tape
BL-ER-P Ethernet Radio Unit for Pedestal Installation Guide
 Assemble the Antenna Riser 1. Remove the antenna riser assembly and the antenna from its packaging. 2. Remove the plastic cap, the nut, and the lock washer from the stem of the antenna. 3. Put the stem
IN 578. Tools Required. Torque Specification: 10mm Socket 7/16 Socket 1/2 Socket 1/2 Wrench 7/16 Wrench 1/8 Allen Wrench.
 Tools Required 2011-C Ford F250/F350 No Drilling into Vehicle is Required 10mm Socket 7/16 Socket 1/2 Socket 1/2 Wrench 7/16 Wrench 1/8 Allen Wrench FL277 x 1 Torque Specification: 1/4 Bolts - 6 Ft Lbs.
INSTALLATION INSTRUCTIONS
 INSTALLATION INSTRUCTIONS R5 STEP BOARD APPLICATION: 2009-2017 Dodge Ram 1500 Quad / Crew Cab 2010-2017 Dodge Ram 2500/3500 Crew Cab PART NUMBER: 28-51040, 28-51045, 28-51050, 28-51055 ITEM QUANTITY DESCRIPTION
Installation Instructions: VIBRATION ISOLATION RAIL (CPR)
") Table of Contents: 1. Quick Installation Instructions 2. Required Tools 3. Supplied Parts 4. Step by Step Instructions 5. Leveling Instructions Spring Color Key (1 and 2 ) Blue 30 lb Green - 60 lb Red
Table of Contents: 1. Quick Installation Instructions 2. Required Tools 3. Supplied Parts 4. Step by Step Instructions 5. Leveling Instructions Spring Color Key (1 and 2 ) Blue 30 lb Green - 60 lb Red
iphone 6 Chargeport REPAIR GUIDE Version Edition
 iphone 6 Chargeport REPAIR GUIDE Version 1 2016 Edition IPHONE 6 CHARGEPORT REPAIR GUIDE LCD AND DIGITIZER REPLACEMENT RiAna Soto Repair Training Specialist rsoto@cellairis.com FOR EVERY REPAIR MAKE SURE
FRONT BUMPER KIT P/N APPLICATION BEFORE YOU BEGIN KIT CONTENTS. Instr Rev Page 1 of 6
 FRONT BUMPER KIT P/N 2882301 APPLICATION Verify accessory fitment at Polaris.com. BEFORE YOU BEGIN Read these instructions and check to be sure all parts and tools are accounted for. Please retain these
INSTALLATION INSTRUCTIONS
 INSTALLATION INSTRUCTIONS Trans4mer Grille Guard/Winch Mount For Chevrolet Silverado 1500HD & 2500 Kit 68162 This WARN Trans4mer system can be customized to give your Chevy Silverado a wide variety of
POP BLIND RIVET NUTS.
 POP BLIND RIVET NUTS www.emhart.com POP NUT Blind Rivet Nuts Introduction POP NUT brand blind rivet nuts are internally threaded rivets that can be installed into sheet-metal, tubing, extrusions, plastics
Arducopter 3DR-B Hardware
 Arducopter 3DR-B Thank you for purchasing an Arducopter 3DR kit. The Arducopter 3DR is a stable and supported quadrotor frame in the ongoing development of the Arducopter code on DIYDrones. It features
FRAME BRACKET. Doing Our Best to Provide You the Best. Ford F250, F350 & F parts list. Page 1. 2/17 HJ32002,Rev 2.
 2/17 HJ32002,Rev 2 BOlt torque specifications MEtRiC BOlts size Grade torque 8mm 8.8 23 ft/lbs. 10mm 8.8 45 ft/lbs. 12mm 8.8 78 ft/lbs. 14mm 8.8 125 ft/lbs. standard BOlts size Grade torque 5/16 5 18 ft/lbs.
M2 Assembly. M2 Sub-Assemblies mm Belt Sub-Assembly mm Belt Sub-Assembly Spider Sub-Assembly... 4
 M2 Assembly Table of Contents M2 Sub-Assemblies... 3 630mm Belt Sub-Assembly... 3 702mm Belt Sub-Assembly... 3 Spider Sub-Assembly... 4 Idler Bolt Sub-Assembly... 8 Y Motor Sub-Assembly... 9 X Motor Sub-Assembly...
Assembly Instructions 10 X 10 Aluminum Frame Building
 Assembly Instructions 10 X 10 Aluminum Frame Building 27 97 9 8 47 36 74 52 10 10 X 10 Square Building W/ Dome Includes: The Steel Entry Door with a Dead Bolt Lock assembly and Aluminum Door Frame. Metal
Quill Stop V2 Installation Guide 11/16/2014
 Thank you for purchasing the Quill Stop for the Sieg X3 (Grizzly G0463) and SX3 (Grizzly G0619) mills. Your feedback is always appreciated. Please email questions and comments to gregpriest@cox.net. What
MX8 SERIES 6-1/4 HANDRAIL W/ VINYL HANDGRIP
 6-1/4 HANDRAIL W/ VINYL HANDGRIP TYPICAL ASSEMBLY 5 2 BUTT JOINT 12 10 9 1 8 11 6 3 7 4 BUTT JOINT COMPONENT LIST 1 LEFT RETURN 7 UPPER IMPACT ABSORBER 2 RIGHT RETURN 8 LOWER IMPACT ABSORBER 3 OUTSIDE
NX7 SERIES 5-1/2 HANDRAIL
 STORAGE & HANDLING The handrails are shipped unassembled. Upon receipt, immediately check all material for any damage that may have occurred in transit and verify that all of the items and quantities are
CHICKEN COOP & CHICKEN RUN. Tools required for assembly (not included)
") CHICKEN COOP & CHICKEN RUN ASSEMBLY MANUAL SKU# 6839 Tools required for assembly (not included) Distributed by: TRACTOR SUPPLY COMPANY 0 VIRGINIA WAY, BRENTWOOD, TN 3707 For customer support, call: -888-376-960
CHICKEN COOP & CHICKEN RUN ASSEMBLY MANUAL SKU# 6839 Tools required for assembly (not included) Distributed by: TRACTOR SUPPLY COMPANY 0 VIRGINIA WAY, BRENTWOOD, TN 3707 For customer support, call: -888-376-960
Written By: slimchance2001
 Written By: slimchance2001 ifixit CC BY-NC-SA www.ifixit.com Page 1 of 10 INTRODUCTION Like a lot of LG devices I wasn't able to find a teardown guide for general knowledge, and if i needed to replace
7878 K940. Checkpoint Antenna. Kit Instructions. Issue B
 7878 K940 Checkpoint Antenna Kit Instructions Issue B Revision Record Issue Date Remarks A July 7, 2009 First issue B Nov2013 Revised the Checkpoint installation procedures for 7878 and 7874 scanners Added
INSTALLATION INSTRUCTIONS DODGE RAM 2 & 4WD 1500 PART # P5058
 INSTALLATION INSTRUCTIONS 2009-13 DODGE RAM 2 & 4WD 1500 PART # P5058 PARTS LIST: Qty Description Qty Description 1 Grille Guard 12 12-1.75mm Hex Nuts 2 Upper Frame Mounting s (for trucks without tow hooks
This document will provide detailed specifications, BOM information, and assembly instructions for the Official Competition Field.
 This document will provide detailed specifications, BOM information, and assembly instructions for the Official Field. Teams who do not need an official field should refer to the separate low-cost field
Tools Required. Bench Hardware. Bench Parts. Planter Hardware. Planter Parts. BENCH/PLANTER INSTALLATION GUIDELINES for
 Arbor Collection / Harvest Collection / Terra Collection Page 1 Please read all instructions completely before starting any part of the installation. Each AZEK and Kit comes complete with all hardware,
INSTALLATION INSTRUCTIONS
 INSTALLATION INSTRUCTIONS Trans4mer Grille Guard/Winch Mount Kit 645 For Chevrolet Silverado 500HD & 3500 This WARN Trans4mer system can be customized to give your Chevy Silverado a wide variety of looks,
788XL Dado Jig Owners Manual Please Read Carefully!
 788XL Dado Jig Owners Manual Please Read Carefully! 788XL Dado Jig Hardware List: Identify and verify that you have all of the hardware shown below prior to assembly. Tools needed for assembly: #2 & 3
Franklin Mills Stackable Movable Lateral Instructions
 Franklin Mills Stackable Movable Lateral Instructions Table of Contents: Table of contents...1 Tools Required...2 Stationary Shelving Assembly...3-7 Mobile Shelving Assembly...8-16 Rail Assembly...8-11
INSTALLATION INSTRUCTIONS
 AUTOMOTIVE PRODUCTS, INSTALLATION INSTRUCTIONS PLATINUM 4 OVAL STEP BAR (90 BENT END) APPLICATION: 2010-2015 Dodge Ram 2500/3500 Mega Cab PART NUMBER: 21-3570, 21-3575, 23-3570, 23-3575, 25-3570, 25-3575,
Installing and Upgrading Internal Modules in Cisco 1800 Series Routers (Modular)
") CHAPTER Installing and Upgrading Internal Modules in Cisco 800 Series Routers (Modular) This chapter describes how to install or upgrade modules that are located internally within the Cisco 800 series
CHAPTER Installing and Upgrading Internal Modules in Cisco 800 Series Routers (Modular) This chapter describes how to install or upgrade modules that are located internally within the Cisco 800 series
INSTALLATION INSTRUCTIONS VENETIAN 84" SLIDING SHOWER DOOR SYSTEM (180º INSTALLATION)
") INSTALLATION INSTRUCTIONS VENETIAN 84" SLIDING SHOWER DO SYSTEM (180º INSTALLATION) 28539 Industry Drive, Valencia, CA 91355 Toll Free Phone: (877) 728-3874 Toll Free Fax: (888) 440-9567 Phone: (661) 775-1675
INSTALLATION INSTRUCTIONS VENETIAN 84" SLIDING SHOWER DO SYSTEM (180º INSTALLATION) 28539 Industry Drive, Valencia, CA 91355 Toll Free Phone: (877) 728-3874 Toll Free Fax: (888) 440-9567 Phone: (661) 775-1675
Pickup Box Utility Rack Package Installation (Instruction ID: )
") 017 Chevrolet Colorado Pickup - WD (VIN S) Canyon, Colorado Accessory Installation Manual N America Document ID: 3966961 Pickup Box Utility Rack Package Installation (Instruction ID:3144879) Installation
017 Chevrolet Colorado Pickup - WD (VIN S) Canyon, Colorado Accessory Installation Manual N America Document ID: 3966961 Pickup Box Utility Rack Package Installation (Instruction ID:3144879) Installation
RIVETING Rivet types Solid rivets Solid rivets are used less and less. They have been replaced in many cases by welding or bonding.
 10.1 Rivet types 10.1.1 Solid rivets Solid rivets are used less and less. They have been replaced in many cases by welding or bonding. Because of the large countersinking angle of 140 flat countersunk
Fasteners. Metal Fasteners, Joining, and Adhesives. Bolts. Metal Fasteners, Joining, and Adhesives
 Metal Fasteners, Joining, and Adhesives Fasteners Metal assemblies are often held together with fasteners, hardware devices that mechanically join or affix two or more objects together. Assembling with
IDR assembly instructions:
 IDR assembly instructions: Required Tools: 2 X 12mm Open End Wrench 14mm open end wrench #2 Phillips Head Screw Driver (Drill with adjustable torque clutch recommended) 8mm nut driver (Supplied in IDR-AK)
APPLICATION NOTE. Mounting instructions for EasyPIM / EasyPACK modules with screw clamps. 1. General information
 APPLICATION NOTE Date:2003-02-14 Page 1 of 10 with screw clamps 1. General information The mounting instructions outlined below are recommended for the safe and reliable operation of these modules in industry
HTC One Mini 2 Battery Replacement
 HTC One Mini 2 Battery Replacement Replace the battery in your HTC One Mini 2 Geschreven door: Jeron Hogan ifixit CC BY-NC-SA nl.ifixit.com Pagina 1 van 10 GEREEDSCHAPPEN: 64 Bit Driver Kit (1) ifixit
INSTALLING INVISIRAIL GLASS PANELS POST INFORMATION... 2 PRE-INSTALLATION... 2
 Contents POST INFORMATION... 2 PRE-INSTALLATION... 2 STEP A1: MEASURING FOR INVISIRAIL CUSTOM GLASS PANELS (skip if using Standard Sized Panels)... 2 STEP A2: GATHER ADDITIONAL TOOLS/SUPPLIES... 2 STEP
Installation Instructions Kit, Base Rail Bracket Part # 31413
 Installation Instructions Kit, Base Rail Bracket Part # 31413 Dealer / Installer: Provide a copy of these Instructions to the end user of this product. These Instructions provide important operating and
The Derby Magic Company Track Assembly Instructions, revision F page 1 of 13
 The Derby Magic Company Track Assembly Instructions, revision F page 1 of 13 Thank you for purchasing a Derby Magic Pinewood Derby Track. To assemble your track, start with the stand. The parts of the
E N G L I S H GARDEN SHED. Assembly Instructions. Suitable for Models WITH VARYING DEPTHS
 GARDEN SHED Assembly Instructions Suitable for Models 6' Wide 8' Wide 0' Wide WITH VARYING DEPTHS GI0003 November 0 INSTALLATION ADVICE It's Not That Difficult! The construction of your shed isn't as complicated
TIRE RACK INSTALLATION INSTRUCTIONS Dodge Sprinter
 Aluminess Products Inc 9402 Wheatlands Ct. #A Santee, CA 92071 619-449-9930 TIRE RACK INSTALLATION INSTRUCTIONS 07-11 Dodge Sprinter Please read before beginning Stainless steel hardware may bind together
GEN II Toyota Prius Back Door Opener Switch Replacement & License Plate Lights
 GEN II Toyota Prius Back Door Opener Switch Replacement & License Plate Lights Rubber Surface of Switch had Degraded to Tar-like Substance Vehicle Manufacture Date 10/06 OLD SWITCH IN GARNISH SWITCH REMOVED
ProBuilder Series CoolSmart TV (42PB - sku# )(54PB - sku# )(72PB - sku# )
(54PB - sku# )(72PB - sku# )") Compatibility ProBuilder Series CoolSmart TV ProBuilder Series Linear Fireplaces (42PB, 54PB & 72PB) Packing List Convection Manifold (with grill and mounting brackets pre-attached) 5 Diameter Aluminum
Compatibility ProBuilder Series CoolSmart TV ProBuilder Series Linear Fireplaces (42PB, 54PB & 72PB) Packing List Convection Manifold (with grill and mounting brackets pre-attached) 5 Diameter Aluminum
ZROADZ Grille series - LED Installation Guide
 ZROADZ Grille series - LED Installation Guide START HERE The ZROADZ Series Grilles comes into 2 different configurations. One style features the LED Light Bar mounting hidden on the backside, while the
MECHANICAL ASSEMBLY John Wiley & Sons, Inc. M. P. Groover, Fundamentals of Modern Manufacturing 2/e
 MECHANICAL ASSEMBLY Threaded Fasteners Rivets and Eyelets Assembly Methods Based on Interference Fits Other Mechanical Fastening Methods Molding Inserts and Integral Fasteners Design for Assembly Mechanical
AM33 LP-P Natural Gas Conversion Manual For Outdoor Use Only
 AM33 LP-P Natural Gas Conversion Manual For Outdoor Use Only 1 4 6 2 3 5 Part No. Qty Description 1 RCOZZ00339A 1 Main Burner Valve & Manifold Assembly with Valves (NG) 2 RCOZZ00340A 1 Side Burner Assembly
Be sure any accessory used will fit with the soft upper doors before installing. Not all accessories will be compatible.
 Company Name: Spike Power Sports Vehicle Name: Polaris General 2P Product Description: Soft Upper Doors Part Number: 58-1600 Revision: R01 09/19/2018 Contents: 655 Elm Ridge Ave, Canal Fulton OH, 44614
3DR ArduCopter Quad-C
 3DR ArduCopter Quad-C 3DR ArduCopter Quad-C Thank you for purchasing a 3DR ArduCopter Quad kit. The 3DR ArduCopter Quad is a stable and supported multi-rotor frame in the ongoing development of the ArduCopter
Written By: Adam O'Camb
 iphone 8 Plus Battery Replacement Replace the battery in an iphone 8 Plus. Written By: Adam O'Camb ifixit CC BY-NC-SA www.ifixit.com Page 1 of 20 INTRODUCTION Use this guide to revive your iphone 8 Plus
Assembly Instructions
 Unite Panel System Hinge Door July 2016 #12 x / slotted hex washer head bolt Figure 1 threshold bracket frame Detail F threshold bracket threshold bracket (installed) #12 x / slotted hex washer head bolt
Please read BOTH these Installation Instructions and the General Instructions prior to installing or operating this equipment.
 Attachment Tab Height: 16-1/2 Serial Number Attachment Tab Width: 24 Please read BOTH these and the General Instructions prior to installing or operating this equipment. 1. Blue Ox towing products and
MS2 Straight Key Kit Assembly Manual
 American Morse Equipment MS2 Straight Key Kit Assembly Manual Thank you for purchasing our MS2 Miniature Straight Key Kit! Please take a few minutes to look over these instructions before starting assembly.
Slide the stock rubber tank mount caps onto the ends of the CS-1 tank mount:
 RYCA CS-1 BODY PARTS INSTALLATION GUIDE [The CS-1 installation guides should be used as supplements to the videos found on our Youtube Channel. There is no strict order to the build process, but it is
Harmony Remote Repair
 Harmony Remote Repair harmonyremoterepair.com How to install your new Harmony One Front Cover/Touch Screen Important! Before you begin working on your Harmony One, you must discharge any static electricity
Instructions. Perspex CubeSat Kit
 A Instructions Thank you for purchasing the Perspex CubeSat Kit (pcsk). This kit is a model of a Pumpkin, Inc. 1U skeletonised CubeSat Kit and is typically used for modeling or mounting CubeSat electronics