Kristiana Tudor Assembly Instructions By Laser Dollhouse Designs
|
|
|
- Paul Baker
- 5 years ago
- Views:
Transcription
1 Kristiana Tudor Assembly Instructions By Laser Dollhouse Designs


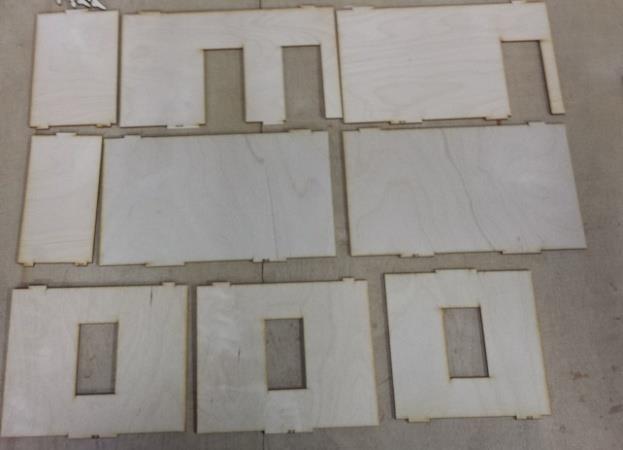
2 Parts for assembly Second floor base Third floor base First floor base First floor walls and porch rails Second floor walls Third floor walls


3 Parts for assembly Porch roof assembly Entry-way roof assembly Etched plexiglas Porch stair assembly Interior stairs Safety rails Top roof frame Interior walk-way frames


4 Parts for assembly Base support rails Interior doors, main, and side doors Exterior walls wood siding Interior window frames Dormer Assemblies


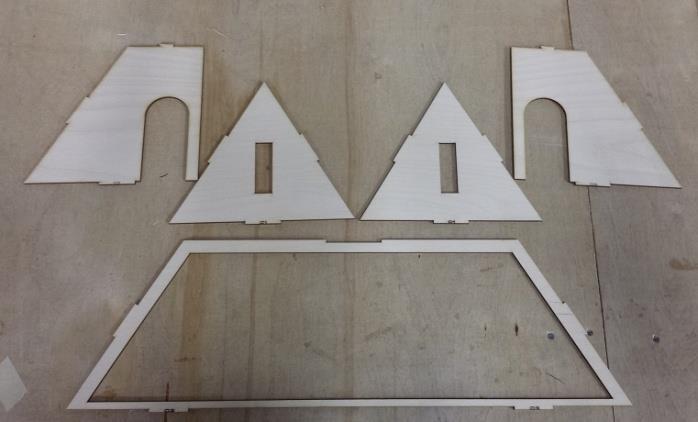
5 Parts for assembly Front window roof assembly Chimney assemblies Inside front roof frames Center main roof frame Outside roof frames

6 NOTE: Please do a dry assembly using only tape to hold house together. This will get you familiar with parts, location, and fit. This also give you a chance to visualize how you want to approach the build. Materials for build; 1. Wood glue, you may use Titebond, elmers or any good wood glue 2. Masking tape to hold house in place during assembly and gluing. 3. Utility knife for cutting out shingles and forming exterior frames after shingling roof.

 F4 rails in the middle.")
7 Step 1. Locate base floor and support rails, turn base upside down and insert parts F1, F3, and F5. See figure 1 Figure 1 Step 2. Install three (3) F4 rails in the middle. Next install rail F2 by inserting into rail F3 and aligning into open groves in rails F4. See figure 2 Figure 2


8 Step 3.Install the two (2) rail F6 and rails F8 (2), F9 (2), and F10 (2). See figure 3 The base is complete turn right side up. Figure 3 Step 4. Install interior window frames, when installing place frame on interior side and align to where you see equal amount of frame on each side when viewing from the front. Once in place add a small amount of super glue from the front opening along the frame and window edge. See figure 4 Figure 4


9 Step 5. Install Interior and exterior doors to walls. Figure 5 Figure 5 Step 6. Install first floor walls by matching walls labeled on tabs to the slots labeled on the 1 st floor. see Figure 6 Figure 6

10 Step 7. Install first floor stairs before putting on main second floor. Not doing this can lead to problems installing stairs later. Figure 7 Figure 7 Step 8. Install main second floor above first floor walls by aligning open slots to tabs. See Figure 8 Figure 8


11 Step 9. Install safety rails around stairs on second floor. See figure 9 Figure 9 Step 10. Install 2 nd floor walls by matching walls labeled on tabs to the slots labeled on the 2 nd floor base. See Figure 10 Figure 10

12 Step 11. Install 2 nd floor stairs before putting on third floor. Not doing this can lead to problems installing stairs later. See figure 11 Figure 11 Step 12. Install 3 rd floor matching wall tabs to the floor slots. See Figure 12 Figure 12


13 Step 13. Install 3 rd floor safety rails. See figure 13 Figure 13 Step 14. Install interior frames to 3 rd floor walls and arched door frames. Install 3 rd floor walls. See Figure 14 Figure 14


14 Step 15. Install center roof panel. See figure 15 Figure 15 Step 16. Install right interior front roof panel. Make sure you seat the front panel and middle roof panel flush together. See Figure 16 Figure 16


15 Step 17. repeat step 16 for the left side. See figure 17 Figure 17 Step 18. Install front window plexiglas into wall opening, install outer wall frames. See Figure 18 Figure 18


16 Step 19. Install right gable and outer main roof panel. See figure 19 Figure 19 Step 20. Repeat set 19 for the left side. See Figure 20 Figure 20


17 Step 21. Install upper roof center panel with tab listed back to the rear of house. Panel should be flush at all corners. See figure 21 Figure 21 Step 22. Install outer dormer support frames for right and left side dormer. See Figure 22 Figure 22


18 Step 23. Install dormer face. See figure 23 Figure 23 Step 24. Install dormer roof frames. See Figure 24 Figure 24


19 Step 25. Install entry roof supports. See figure 25 Figure 25 Step 26. Install entry roof panel. See Figure 26 Figure 26


20 Step 27. Install window center roof support to top of lower window extension panels. See figure 27 Figure 27 Step 28. Install window center roof panel. See Figure 28 Figure 28


21 Step 29. Install window left and right roof panels. See figure 29 Figure 29 Step 30. example of completed panels see figure 30 Figure 30


22 Step 31. Install porch roof panel supports. See figure 31 Figure 31 Step 32. Install porch roof panels. see figure 32 Figure 32


23 Step 33. Install entry-way stairs. See figure 33 Figure 33 Step 34. Install chimney stacks. see figure 34 NOTE!!! DO NOT GLUE UNTIL ROOF IS SHINGLED. Figure 34

24 Step 35. Install interior dormer frames. See figure 35 Figure 35 NOTE: At this point you are familiar with assembly, do not continue with rest of assembly until painting, wallpaper and lighting is done. The rest of assembly is applying shingles and outer wall frames.


25 DO NOT CONTINUE UNLESS YOU HAVE HOUSE PAINTED AND GLUED. THE REST IS DONE ONCE ALL WALL PAPER, LIGHTING AND PAINT IS DONE!!!! Step 36. Using a blade cut out the small holders one section at a time of roof shingles. Recommend not cutting out all shingles till each section is completed and glued to house, this will avoid confusion on shingle location. Apply shingles to area pictured in drawing on cutout board. Shingles match up with the edge of each roof panel. Shingles should form an octagon design between each row. This is accomplished by using the lines on the roof panel for the strips and aligning the pointed bottom of each shingle to the line on the shingle below. See example of arrow Figure 37. Figure 36 Figure 37


26 DO NOT CONTINUE UNLESS YOU HAVE HOUSE PAINTED AND GLUED. THE REST IS DONE ONCE ALL WALL PAPER, LIGHTING AND PAINT IS DONE!!!! Step 37. Using a blade cut out the small holders one section at a time of roof shingles for the window roof. Align the shingles starting with the center panel and working up. Shingles will align to the sides of center panel. Next run side shingles with the center shingles as reference for each line and should be flush with wall panel. See figure 38. Figure 38 Step 38. Do the same for the porch roof see figure 39 Figure 39


27 DO NOT CONTINUE UNLESS YOU HAVE HOUSE PAINTED AND GLUED. THE REST IS DONE ONCE ALL WALL PAPER, LIGHTING AND PAINT IS DONE!!!! Step 39. Now shingle the interior main roof. Glue chimney stacks in place. See figure 40 Figure 40 Step 40. Now shingle the outer main roof and dormers. See figure 41 Figure 41
28 DO NOT CONTINUE UNLESS YOU HAVE HOUSE PAINTED AND GLUED. THE REST IS DONE ONCE ALL WALL PAPER, LIGHTING AND PAINT IS DONE!!!! Step 41. Install outer panel wall frames by matching to walls, note you may need to trim some of the bottom frames due to shingles. Remove small amounts as they should fit snug. Congratulations Kristiana Tudor Completed Laser Dollhouse Designs.
Hegeler Carus Mansion Assembly Instructions By Laser Dollhouse Designs
 Hegeler Carus Mansion Assembly Instructions By Laser Dollhouse Designs Parts for assembly 2 nd floor base 3 rd floor base 1 st floor base 4 th floor base Lower roof panel Mid roof panel Upper roof panel
Wayside Cottage Assembly Instructions By Laser Dollhouse Designs
 Wayside Cottage Assembly Instructions By Laser Dollhouse Designs Parts for assembly Base Floor marked 1A thru 1L 13 post and 11 fences With one gate Walls 1A thru 1L and Alcove roof panels 3 lg and 1 sm
The Lansdowne One Car Garage Assembly Instruction by Laser Dollhouse Designs
 The Lansdowne One Car Garage Assembly Instruction by Laser Dollhouse Designs NOTE 1: Please do a dry assembly using only tape to hold house together. This will get you familiar with parts, location, and
Vivian Mansion Assembly Instruction By Laser Dollhouse Designs
 Vivian Mansion Assembly Instruction By Laser Dollhouse Designs NOTE 1: Please do a dry assembly using only tape to hold house together. This will get you familiar with parts, location, and fit. This also
Little Briana Cottage Dollhouse assembly instructions
 Little Briana Cottage Dollhouse assembly instructions NOTE 1: Please do a dry assembly using only tape to hold house together. This will get you familiar with parts, location, and fit. This also gives
The Hamlin Assembly Instruction By Laser Dollhouse Designs
 The Hamlin Assembly Instruction By Laser Dollhouse Designs NOTE 1: Please do a dry assembly using only tape to hold house together. This will get you familiar with parts, location, and fit. This also gives
The Rowen Victorian Assembly Instructions By Laser Dollhouse Designs
 The Rowen Victorian Assembly Instructions By Laser Dollhouse Designs Parts Listing 1. Four main floors A. Base Floor with markings S1 thru S6 B. 1 st Floor with markings 1A thru 1H C. 2 nd Floor with markings
Craftman One Car Garage Assembly Instruction by Laser Dollhouse Designs
 Craftman One Car Garage Assembly Instruction by Laser Dollhouse Designs NOTE 1: Please do a dry assembly using only tape to hold house together. This will get you familiar with parts, location, and fit.
The Castle House Assembly Instructions By Laser Dollhouse Designs
 The Castle House Assembly Instructions By Laser Dollhouse Designs HOUSE PARTS First floor slots labeled 1A-1G First floor Walls labeled 1A-1G First floor interior door frames (4) Wall 1A frames (6) Main
Seascape Bungalow Assembly instructions. Laser Dollhouse Designs
 Seascape Bungalow Assembly instructions Laser Dollhouse Designs NOTE: Please do a dry assembly using only tape to hold house together. This will get you familiar with parts, location, and fit. This also
 Allied Tool is a freelance model of a small manufacturing company that grew from production in a home basement to a new building. Assume a gentleman starts assembling gauges in his basement and the business
Corona Concepts presents The Lily All Wood Dollhouse. Instructions and Assembly Guide
 Corona Concepts presents The Lily All Wood Dollhouse Instructions and Assembly Guide Introduction In Short... Welcome to the exciting world of dollhouses and miniatures. Since the first tab and slot die-cut
How to assemble the Reims Gueux Pit Centre Module #005
 How to assemble the Reims Gueux Pit Centre Module #005 We recommend quick drying super glue for our models. Just a few drops on the joining edges, press and hold them for a few seconds and the connection
Corona Concepts presents The Laurel All Wood Dollhouse. Instructions and Assembly Guides
 Corona Concepts presents The Laurel All Wood Dollhouse Instructions and Assembly Guides Introduction In Short... Welcome to the exciting world of dollhouses and miniatures. Since the first tab and slot
How to assemble the Reims Gueux Pit End Modules #005
 How to assemble the Reims Gueux Pit End Modules #005 Depending on which kit you have purchased you will either have a pair of end sections, some centre sections or both. We will describe building of the
(56501) Corona Concepts presents The Willow All Wood Dollhouse. Instructions and Assembly Guide RTD AA
 Corona Concepts presents The Willow All Wood Dollhouse. Instructions and Assembly Guide RTD AA") (56501) Corona Concepts presents The Willow All Wood Dollhouse Instructions and Assembly Guide RTD10000572AA Introduction In Short... Welcome to the exciting world of dollhouses and miniatures. Since the
(56501) Corona Concepts presents The Willow All Wood Dollhouse Instructions and Assembly Guide RTD10000572AA Introduction In Short... Welcome to the exciting world of dollhouses and miniatures. Since the
DARC MANSION ASSEMBLY INSTRUCTIONS page 1.
 DARC MANSION ASSEMBLY INSTRUCTIONS page 1. DARC MANSION ASSEMBLY INSTRUCTIONS page 2. NOTE: This project should be printed on heavy card stock. WHAT YOU'LL NEED: Scissors, Elmer's glue (or a glue stick),
Corona Concepts presents The Buttercup All Wood Dollhouse. Instructions and Assembly Guides
 Corona Concepts presents The Buttercup All Wood Dollhouse Instructions and Assembly Guides Introduction In Short...Welcome to the exciting world of dollhouses and miniatures. Since the first tab and slot
Assembly Instructions for Summit Motel Kits # SMFS and SMBD
 Assembly Instructions for Summit Motel Kits # SMFS and SMBD Introduction Thank you for your purchase of the Summit Motel. This modern motel can be converted to almost any chain motel of your choice, depending
Instructions and Assembly Guide
 Corona Concepts presents The Creekside Cabin All Wood Dollhouse 1997 Corona Concepts Schenevus, NY 12155 All rights reserved These instructions were printed in New York State Instructions and Assembly
LASER-ART. The DuBois House. LASER-ARTSTRUCTURES by BRANCHLINE TRAINS BRANCHLINE TRAINS STRUCTURES
 LASER-ARTSTRUCTURES by BRANCHLINE TRAINS LASER-ART STRUCTURES by BRANCHLINE TRAINS The DuBois House History With their gingerbread trim and ornate decoration the Queen Anne style is what most people imagine
The Park Hotel Instructions for Assembly of N Scale Kit
 The Park Hotel Instructions for Assembly of N Scale Kit Kit Contents: 198 ea. Laser Cut Acrylic Parts, 2 ea. Chimney Parts Sheets, 1 ea.2".040 styrene rod, 5 ea. Sidewalk Parts, 14 ea. Cast Resin Dormers,
Donaldson s Department Store
 Donaldson s Department Store Instructions for Assembly of Donaldson s Department Store Kit Contents: 80 each laser cut acrylic parts. 1 each sheet of canopy parts. 1 each sheet of AC roof unit parts. 1
The Park Hotel Instructions for Assembly
 The Park Hotel Instructions for Assembly Kit Contents: 280 ea. Laser Cut Acrylic Parts. 1 ea. 6" Plastic Coated Wire. 5 ea. Sidewalk Parts. 14 ea. Cast Resin Dormers. 12 ea. Window Glass Templates, 12
Inventor s House (Alternate Version)
") Inventor s House (Alternate Version) Detailed Building Instructions Model Designed by Dave Graffam Model Built and Instructions Provided by Jerry Jensen For more of Dave s Models please visit www.davesgames.net
Inventor s House (Alternate Version) Detailed Building Instructions Model Designed by Dave Graffam Model Built and Instructions Provided by Jerry Jensen For more of Dave s Models please visit www.davesgames.net
STOP! READ THIS FIRST! TIPS FOR BUILDING LASER CUT MODELS
 INSTRUCTIONS STOP! READ THIS FIRST! TIPS FOR BUILDING LASER CUT MODELS 1. Test fit all parts and make sure you know how everything goes together before gluing. If you are contemplating cutting a part to
Cape Cod Manual. Little Cottage Co. PO Box 455 Berlin, OH Little Cottage Co.
 Tools Needed: -Cordless Drill (12v or higher) -#2 Square drive bit -Hammer -6 Step Ladder -Tape Measure -Square utility knife with blade & hook blade -Speed Square Little Cottage Co. PO Box 455 Berlin,
After printing these plans, several pages will need to be taped together to form a larger plan. Below is a diagram of which pages need assembled.
 Watermill Building Plans For complete building instructions and instructional videos, please visit the main web site at www.hirstarts.com/watermill/watermill.html. Using these plans alone will not give
Hotel Belvedere Instructions for Assembly of the HO scale kit. v1.1
 Hotel Belvedere Instructions for Assembly of the HO scale kit. v1.1 Kit Contents: 319 ea. laser cut.090" acrylic parts. 132 ea. laser cut.060" acrylic parts. 8 ea. window glass templates 8 ea. window glazing
7/8n2 Scale Plantation Coach
 7/8n2 Scale Plantation Coach Introduction This small coach modeled in 7/8 n2 was inspired from a Hawaiian Railway Company plantation excursion car from the late 19 century. While not an exact replica,
-1- Coach Instructions.
 -1- Coach Instructions. Insert the bogie pivot pins through the bottom of the coach body ensuring the dimples fit into the recesses. Glue the.06 x.25 short strips each side of the pivot head, bridge the
TOYOTA MOTOR EUROPE CA Products Division Tel : Fax :
 TOYOTA MOTOR EUROPE CA Products Division Tel : + 32 2 745 26 77 Fax : + 33 2 745 26 99 Ordering part numbers Comments Part Numbers Wooden floor one hatch PZ449-D3C42-11 one hatch with carpet PZ449-D3C42-01
The Fyfe Building Instructions for Assembly of the N scale kit.
 The Fyfe Building Instructions for Assembly of the N scale kit. Kit Contents: 150 each laser cut 1/16" acrylic parts. 6 each 020 adhesive backed part 6 each column caps 2 each decorative canopy 1 each.125"
The Bleak Estate Assembly Instructions - Page 1.
 The Bleak Estate Assembly Instructions - Page 1. The Bleak Estate Assembly Instructions - Page 2. The Bleak Estate Assembly Instructions - Page 3. WHAT YOU'LL NEED: Scissors, glue (or a glue stick), a
CVS Pharmacy kit in HO scale
 CVS Pharmacy kit in HO scale Parking lot base and cars not included This kit includes all building parts and wall-mounted signs milled in white styrene plastic, clear window glazing and pre-cut Plastruct
The Rubley Building Instructions for Assembly of the N scale kit. v1.1
 The Rubley Building Instructions for Assembly of the N scale kit. v1.1 Kit Contents: 197 ea. laser cut 1/16" acrylic parts. 1ea. adhesive backed.020 styrene part. 10 ea..060 x 1" styrene alignment pins.
Fidelity & Guaranty Building
 Fidelity & Guaranty Building Instructions for Assembly of the Fidelity & Guaranty Building Kit Contents: 69 each laser cut acrylic parts. 1 each sheet of AC roof unit parts. 1 each sidewalk base. 4 each
CORNER PORCH HOUSE PF5196
 1:87 BUILDING KIT CORNER PORCH HOUSE PF5196 Two-story home with cedar-shake roof and a corner wrap-around porch. Clapboard siding, paned windows, and loaded with accessories, such as a bicycle built for
Special Edition Alison, Jr.
 Instructions for Real Good Toys The Special Edition Alison, Jr. Kit #SE-JM907 8/13 Congratulations on your choice of a Real Good Toys product. Your kit has been precision made with meticulous care by our
STONEYBRIDGE STRUCTURES
 02-208-OO North Eastern Railway N2 Style Signal Box INTRODUCTION Thank you for purchasing one of our products. We hope this information sheet will prove useful in the construction of this model. We have
Instructions for Assembly of the HO Scale The Charles
 The Charles Instructions for Assembly of the HO Scale The Charles HO Kit Contents: 337 ea. white 1/16" laser cut acrylic part 19 ea. Clear 1/16" laser cut acrylic part 69 ea. white 1/8" laser cut acrylic
Sara s Victorian Mansion
 Tools Needed: Cordless Drill (12V or higher) #2 square drive bit Hammer 6 step ladder Tape measure Square utility knife w/ blade & hook blade Speed Square Little Cottage Co. PO Box 455 Berlin, OH 44610
Assembly Instruction. 9,2 m² Grillkota
 Assembly Instruction 9,2 m² Grillkota Dear customers, Thank you for purchasing our product. We recommend that you read these instructions before installation and make the necessary preparations for building.
Ben Franklin 5&10 Store
 Ben Franklin 5&10 Store RIVER LEAF MODELS, LLC RIVER LEAF MODELS, LLC Thank you for purchasing the Ben Franklin 5&10 structure kit. Your kit includes everything you need to assemble the final product.
Newport. the. Instructions for Real Good Toys
 Instructions for Real Good Toys the Newport Kit #71K 01/11 Congratulations on your choice of a Real Good Toys product. Your kit has been precision made with meticulous care by our craftspeople using carefully
4" Round Fieldstone Tower
 4" Round Fieldstone Tower This page contains instructions on how to use mold #72 to build the round fieldstone tower. You will have to cast the mold 18 times to build the tower. This round tower is slightly
Firehouse Manual. Tools Needed:
 Tools Needed: -Cordless Drill (12V or higher) -#2 Square Drive Bit -Hammer -6 Step Ladder -Tape Measure -Square utility knife w/ blade & hook blade -Speed Square Little Cottage Co. PO Box 455 Berlin, OH
G. Building the Cab, Cab Roof and Cab Boiler Extension Page 14 and Backhead.
 G. Building the Cab, Cab Roof and Cab Boiler Extension Page 14 and Backhead. Cab. In order to ensure that the cab and tender would actually look right, as what often appears on a drawing is not always
10 Octagon Cedar Gazebo Assembly Instructions
 10 Octagon Cedar Gazebo Assembly Instructions Toll Free: 866.768.8465 Hours: 9-5 Monday-Friday EST www.homeplacestructures.com Package ships as shown revised 06/22/09 10 Cedar Gazebo Assembly Instructions
Bungalow. the. Instructions for Real Good Toys
 Instructions for Real Good Toys the Bungalow Kit #B-1920 10/09 Congratulations on your choice of a Real Good Toys product. Your kit has been precision made with meticulous care by our craftspeople using
Newport. the. Instructions for Real Good Toys
 Instructions for Real Good Toys the Newport Kit #71K 01/09 Congratulations on your choice of a Real Good Toys product. Your kit has been precision made with meticulous care by our craftspeople using carefully
Gambrel Barn Construction Manual 8x8 through 16x24 Units
 Gambrel Barn Construction Manual 8x8 through 16x24 Units Tools Needed: Cordless drill (12V or higher) #2 square drive bit Hammer 6 step ladder Tape measure Square utility knife w/ blade & hook blade Little
Fidelity & Guaranty Building
 Fidelity & Guaranty Building N Scale Model Kit Instructions for Assembly of the Fidelity & Guaranty Building Kit Contents: 69 each laser cut acrylic parts. Sidewalk material 1 each Window Glass Templates
Assembly Instructions
 10' and 12' Octagon Cedar Gazebo Assembly Instructions Toll Free: 866.768.8465 Hours: 9-5 Monday-Friday EST www.homeplacestructures.com Package ships as shown revised 06/20/09 Cedar Gazebo Assembly Instructions
Gambrel Barn with Overhang Manual
 Tools Needed: -Cordless Drill (12V or higher) -#2 Square Drive Bit -Hammer -6 Step Ladder -Tape Measure -Square utility knife w/ blade & hook blade -Speed Square Little Cottage Co. PO Box 455 Berlin, OH
FLOW HIVE ASSEMBLY GUIDE. If we look after the bees they will look after us, and the honey really is an amazing bonus. Flow Hive Hybrid 3 Frame
 AUSTRALIAN MADE If we look after the bees they will look after us, and the honey really is an amazing bonus. FLOW HIVE ASSEMBLY GUIDE Flow Hive Hybrid 3 Frame Read all instructions first. If you are unfamiliar
Make Your Own White House Pop-Up. Glue Here. Glue Here. Glue Here. Glue Here. Card Base
 Make Your Own White House Pop-Up F G H I Card Base Make Your Own White House Pop-Up Piece #1 (front of building) E Piece #2 (roof) D C B fold around to back and glue A CUT AT TOP OF COLUMN TO CUT OUT THIS
Install Windsor Corners
 Install Windsor Corners Tools and Supplies You'll Need 1. Exterior Grade Screws use screws that are long enough to go through the FauxPanel and firmly attach to the wall behind the FauxPanel. We recommend
Boxed Shed. QUAKER or A-FRAME SIZES: 6 x 8 6 x 10 T1-11Siding
 Boxed Shed QUAKER or A-FRAME SIZES: 6 x 8 6 x 10 T1-11Siding Required Equipment; * Power Drill with square head bit * Hammer, Square, Gloves & an Allen wrench * Step Ladder Screws Supplied; * 2 for roof
City of Hartford. Historic Preservation Commission Staff Report. Rehabilitation of Three-Family Home 97 Williams Street January 20, 2016
 City of Hartford Connecticut s Capital City Historic Preservation Commission Staff Report Rehabilitation of Three-Family Home 97 Williams Street January 20, 2016 Applicant 97 Williams Street LLC Owner
Southern Pacific C-30-4/6 Bay Window Caboose N-Scale & HO-Scale
 Southern Pacific C-30-4/6 Bay Window Caboose N-Scale & HO-Scale Before Starting PREPARING BRASS The easiest way to remove the brass parts from the sheet they are produced on, is to use rail nippers. The
Best Barns USA Assembly Book
 Best Barns USA Assembly Book Revised September 12, 2017 the Arlington Building Size 12' x 16' Manufactured by Reynolds Building Systems, Inc. 205 Arlington Drive Greenville, PA 16125 This manual is copyrighted.
The Hearse Carriage Assembly Instructions Page 1.
 The Hearse Carriage Assembly Instructions Page 1. The Hearse Carriage Assembly Instructions Page 2. WHAT YOU'LL NEED: Scissors, Elmer's glue (or a glue stick), a needle, two toothpicks, a sharpened pencil,
Victorian Playhouse Manual
 Tools Needed: -Cordless Drill (12V or higher) -#2 Square Drive Bit -Hammer -6 Step Ladder -Tape Measure -Square utility knife w/ blade & hook blade -Speed Square Little Cottage Co. PO Box 455 Berlin, OH
10x12 Victorian Manual
 Tools Needed: -Cordless Drill (12V or higher) -#2 Square Drive Bit -Hammer -6 Step Ladder -Tape Measure -Square utility knife w/ blade & hook blade -Speed Square Little Cottage Co. PO Box 455 Berlin, OH
CABINETRY Assembly Instructions
 www.hdicabinetry.com Assembly Instructions TABLE OF CONTENTS Category Page(s) Section 1: Framed Series Base Cabinet Instructions Wall Cabinet Instructions Easy Reach Cabinet Instructions 1.01-1.04 1.05-1.06
N Scale Concrete Coal Dock Instruction Manual
 N Scale Concrete Coal Dock Instruction Manual 1. General Overview This kit combines precision laser cut acrylic, photo etched brass and wood parts to make a highly detailed model of the Roberts and Schaefer
The Severn Instructions for Assembly of the N scale kit.
 The Severn Instructions for Assembly of the N scale kit. Kit ontents: 172 each laser cut 1/16" acrylic parts 102 each adhesive backed styrene parts 1 each cast entryway 3 each cast balcony 4 each cast
Drawings of all parts have been included for ease of part identification.
 Acme Corporation Instructions for Assembly of the HO Scale Acme Corporation HO Kit Contents: 156 ea. white 1/16" laser cut acrylic part 10 ea. white 1/8" laser cut acrylic part 37 ea. adhesive-backed brick
BUZZ S SAWMILL PF5195 WOODLAND SCENICS BUILDING KIT
 1:87 BUILDING KIT BUZZ S SAWMILL PF5195 Buzz s Sawmill is a detailed work of art with all workings of a vintage steam-fired, belt-driven sawmill. Details include interior rafters and shake roof, attached
Star Barn Manual. Tools Needed:
 Tools Needed: -Cordless Drill (12V or higher) -#2 Square Drive Bit -Hammer -6 Step Ladder -Tape Measure -Square utility knife w/ blade & hook blade -Speed Square Little Cottage Co. PO Box 455 Berlin, OH
Beachside Bungalow. the. Instructions for Real Good Toys. Kit #B /11
 Instructions for Real Good Toys the Beachside Bungalow Kit #B 1895 2/11 Congratulations on your choice of a Real Good Toys product. Your kit has been precision made with meticulous care by our craftspeople
Assembly Instructions for Shuttle Crawler Transporter (Part 1)
") 2007 Assembly Instructions for Shuttle Crawler Transporter (Part 1) Building the main crawler body Top photo has indications where other parts will be located and glued. The bottom photos show where the
2007 Assembly Instructions for Shuttle Crawler Transporter (Part 1) Building the main crawler body Top photo has indications where other parts will be located and glued. The bottom photos show where the
Introduction: The model should be assembled following the sequence of the stages of construction described in these instructions.
 Victoria Bestell-Nr. 3082/00 Introduction: The model should be assembled following the sequence of the stages of construction described in these instructions. The laser-cut components are individually
DAVENPORT DEPARTMENT STORE PF5214
 1:160 BUILDING KIT DAVENPORT DEPARTMENT STORE PF5214 Dress up your downtown scene with the classic Victorian architecture and large first-floor picture windows of the Davenport Department Store. Details
Building a Shadow Box - Instructions
 Building a Shadow Box - Instructions Miniatures are art. And like all good art, it should be framed to enhance the art and to focus the viewers attention. Tools and Supplies Required 1. Large Cutting Mat
STAGE PAGE. 6 The left front door interior The right front wheel The right front seat back The right front wheel 37
 Pack 2 STAGE PAGE 6 The left front door interior 25 7 The right front wheel 29 8 The right front seat back 33 9 The right front wheel 37 10 The right front door 41 11 The right front door window 45 12
Precut Value Shed Manual Gambrel Barn
 Tools Needed: -Cordless Drill (12V or higher) -#2 Square Drive Bit -Hammer -6 Step Ladder -Tape Measure -Square utility knife w/ blade & hook blade -Speed Square Little Cottage Co. PO Box 455 Berlin, OH
BABYLON CARD MODELS KIT
 BABYLON CARD MODELS KIT by D ave G raffam special thanks to J ackson B ogart III J erry J ensen P atrick G ollmann HOW TO USE TEXTURE LAYERS This kit includes PDF files with multiple layers that contain
Best Barns USA Assembly Book
 Best Barns USA Assembly Book Revised March 6, 2017 the Arlington Building Size 12' x 24' Manufactured by Reynolds Building Systems, Inc. 205 Arlington Drive - Greenville, PA 16125 This manual is copyrighted.
Best Barns USA Assembly Book
 Best Barns USA Assembly Book Revised November 19, 2015 the Arlington-R Building Size 12' x 20' Manufactured by Reynolds Building Systems, Inc. 205 Arlington Drive Greenville, PA 16125 724-646-3775 This
Revision Date: April 01, Paramount Enclosure
 Paramount Enclosure www.urbanindustries.com 15 Urban Industries, Inc. 2008 Tools The following tools are recommended for the installation of the Paramount Aluminum Enclosure and roof. 1 2 Level 1 4 Level
Best Barns USA Assembly Book
 Best Barns USA Assembly Book Revised November 19, 2015 the Arlington-R Building Size 12' x 24' Manufactured by Reynolds Building Systems, Inc. 205 Arlington Drive Greenville, PA 16125 724-646-3775 This
PostIts, and Aleene s are trademarks of their manufacturers and have no affiliation with Real Good Toys
 Instructions for Real Good Toys My Dreamhouse Congratulations on your choice of a Real Good Toys product. Your kit has been precision made with meticulous care by our craftspeople using carefully selected
Tools and Tips: ( 1 )
") Tools and Tips: As you build the book will show in my many picture manual how to assemble. You can use your own methods as you desire, but these worked best for me. A smooth, flat work surface is very
Tools and Tips: As you build the book will show in my many picture manual how to assemble. You can use your own methods as you desire, but these worked best for me. A smooth, flat work surface is very
the East Side Townhouse in 1 / 2 Scale
 Instructions for Real Good Toys the East Side Townhouse in 1 / 2 Scale Kit #H-330 11/08 Congratulations on your choice of a Real Good Toys product. Your kit has been precision made in Vermont with meticulous
Tools and Tips: ( 1 )
") Tools and Tips: As you build instructions will show in my many picture manual how to assemble. You can use your own methods as you desire, my results are very good. A smooth, flat work surface is very
Tools and Tips: As you build instructions will show in my many picture manual how to assemble. You can use your own methods as you desire, my results are very good. A smooth, flat work surface is very
Best Barns USA Assembly Book
 Best Barns USA Assembly Book Revised September 12, 2017 the Arlington Building Size 12' x 20' Manufactured by Reynolds Building Systems, Inc. 205 Arlington Drive Greenville, PA 16125 This manual is copyrighted.
Special Edition Victorian Cottage, Jr.
 Instructions for Real Good Toys The Special Edition Victorian Cottage, Jr. Kit #SE-JM 159 02/09 Congratulations on your choice of a Real Good Toys product. Your kit has been precision made with meticulous
Country Victorian. Kit #MM-FO303 Real Good Toys
 the Country Victorian Instructions for Kit #MM-FO303 Real Good Toys 03/09 Congratulations on your choice of a Real Good Toys product. Your kit has been precision made with meticulous care by our craftspeople
KIT ASSEMBLY INSTRUCTIONS
 KIT ASSEMBLY INSTRUCTIONS We have designed these instructions as a stepby step procedure to simplify the assembly process. Nevertheless, we do recommend including someone with carpentry expertise on your
Shed Assembly Instructions
 Shed Kit Contents The shed kit includes all the parts needed to assemble your shed except for tools and fasteners such as screws and nails. The various pieces are pre-cut and many are marked to indicate
Pine Log Cabin and Cape Cod Playhouse
 Pine Log Cabin and Cape Cod Playhouse Assembly Manual Pine Log Cabin Assembly Manual revised 7/15/02 Dear Customer, Thank you for your purchase of our Pine Log Cabin Playhouse. The craftsmanship and detail
Hardee s Restaurant kit in HO scale
 Hardee s Restaurant kit in HO scale Parking lot base and cars not included This kit includes all building parts milled in white styrene plastic and laser cut white acrylic, clear acrylic window glazing,
Special Edition Vermont Farmhouse, Jr.
 Instructions for Real Good Toys Congratulations on your choice of a Real Good Toys product. Your kit has been precision made with meticulous care by our craftspeople using carefully selected materials.
The Saint Paul Building
 The Saint Paul Building Instructions for Assembly of The Saint Paul Building. Kit Contents: 65 each laser cut acrylic parts. 1 each sheet of AC roof unit parts. 1 each sidewalk. 3 each Window Glass Templates,
You can print these instructions by downloading the PDF here: Boxcar Assembly PDF
 The following information and photographs are what I did to build the kit. Your methods and needs may differ from this which is fine. There is no right or wrong way if you are used to scratch building.
GENERAL INSTRUCTIONS. Woodland Scenics PO BOX 98, LINN CREEK, MO woodlandscenics.com PREPARE PLASTIC PARTS PREPARE METAL CASTINGS
 #40700 Popa Weelie's Saloon INSTRUCTIONS CAUTION: Cutting tools recommended. Use with care. This item is not a Children s Product and is not intended for use by Children. Conforms to Health Requirements
J.W. cobbler 1:160 BUILDING KIT PF5210 WOODLAND SCENICS
 1:160 BUILDING KIT J.W. cobbler PF5210 The partially assembled walls, positive alignment system and prefinished edges make kit assembly quick, easy and accurate. This three-story brownstone features stacked
La Grange, Texas MKT Depot kit in HO scale
 La Grange, Texas MKT Depot kit in HO scale This kit includes all building parts laser cut in plywood, white and clear acrylic, and laser cut self-adhesive shingles. All parts fit together but may need