Sentinel Armor Kit Assembly Guide
|
|
|
- Lesley Gregory
- 5 years ago
- Views:
Transcription

1
2 1 Sentinel Armor Kit Assembly Guide
3 2 Thank you for purchasing the Mynock s Den Collection Sentinel Armor Kit by Vader s Vault. This guide will help you assemble your new kit, so be sure to keep it close at hand while you work. There are lots of components in this kit, so take the time familiarize yourself with the Sentinel Armor Kit Parts List below. Please note however, that if it s not listed or shown in the parts list, it s not included. Mounting hardware, consumables, and soft costume components such as shirt, pants, robe, gloves, shoes, etc. are available from other retailers, and are not included with this kit. The Recommended Tools and Materials section specifies which tools, materials and consumables we feel would be most useful to you in completing this kit, however these items are not included; they can be easily sourced online or at your local hardware retailer. Note that this guide does not include painting instructions. Paint types, colours and techniques are left to the discretion of the buyer. Lastly, please keep in mind that this guide shows you one of many possible ways to assemble this type of armor. It is by no means the only way! If you have another way of doing something, feel free to do what works best for you! And on that note, the galaxy anxiously awaits its new paragon! So, get building! :)

")


/ Thigh")

4 3 Sentinel Armor Kit Parts List (58 pieces) Pauldrons Chest Plate Elbow Plates Lower Bracers Upper Bracers Upper Bracer Blocks Upper Bracer (2)/ Thigh (2) Dummy Clasps Hand Plates

5 4 Hand Grieeblies Belt Pouches Knuckle Greeblies (3 per hand) Belt Canister Chest Oval Assembly Cod Plate Belt Datapad Thigh Plates (Front) Belt Front Thigh Grieeblies


")
6 5 Thigh Plates (Rear) Complete Foot Set Shin Plates Shin Plate Dummy Claps (2L, 2R) Calf Plates


7 6 Recommended Tools and Materials Utility knife 10 or 15 lb capacity industrial strength, sticky back velcro Heavy duty leather shears Sew-on velcro Belt sander 1 Elastic strap Rotary tool Quick-setting superglue Hot glue gun with glue sticks Bonding Cement designed for ABS plastic Scissors Webbing belt with a quick release buckle

8 220 grit sandpaper 7

9 8 Trimming the Plastic Parts The ABS plastic parts of your Sentinel kit come untrimmed, and you will need to cut them out. Most parts will be outlined with a trim line as shown below. For best results, cut the part out roughly using shears or a utility knife. Tackle the remaining flashing using a belt sander and/or a rotary tool. Clean up the edges using 220 grit sandpaper. You can also use the tip of the utility knife to mark break lines on the plastic; these lines will make it easy to snap excess plastic off without needing to actually cut through it. Be very careful doing this, however, as the knife can slip and damage the part beyond the area you wanted to mark!
 of industrial sticky-back velcro, and stick them to the inside of the pauldrons.")


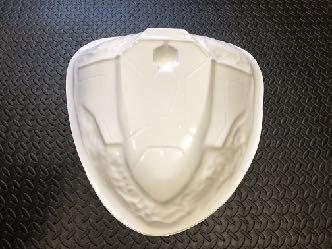
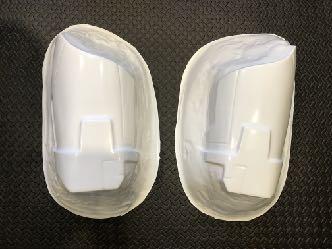
10 9 Pauldrons Cut the pauldrons out along the trim line, and soften the edges using a belt sander and sand paper. Cut a 4 piece of the fuzzy side ( loop side) of industrial sticky-back velcro, and stick them to the inside of the pauldrons. You will need to sew a piece of hook-side fabric velcro of similar size to the shoulders of a shirt of your choice, which will allow the pauldrons to sit on top of your shoulders without sliding off. Note: When attaching velcro to the inner surfaces of the armor, make sure that the loop" side faces the clothing. Using the coarse hook side runs the risk of snagging and damaging the clothing underneath. Chest Plate Cut the chest plate out along the trim line, and soften the edges using a belt sander, rotary tool, and sand paper. Cut two 4 pieces of industrial sticky-back velcro loop, and stick them to the inside of the chest plate at the bottom; attach two similar pieces of velcro in the collarbone area at the top. You will need to sew four pieces of hook-side fabric velcro of similar size to a shirt of your choice, which will secure the chest plate in place and prevent it from sliding around while wearing. The ABS chest plate is very light so no additional strapping should be necessary to keep it in place. However, there is an indentation on each side (circled in red) where you may choose to cut openings for an elastic strap (not included) should you choose to install one.


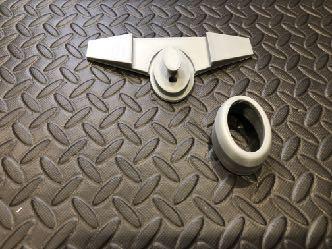
11 10 Click the two halves of the chest oval piece together, and tape the assembly to the chest plate with velcro as shown below. The two holes in the oval assembly backplate can be used to install LED lights (not included). Elbow Plates Cut each elbow plate out along the trim line, and soften the edges using a belt sander and sand paper. Glue an elastic strap (not included) down to the inside with superglue.


12 11 Affix a strip of s t i c k y - b a c k industrial velcro loop over the seam. This will help secure the elastic band in place. You may c h o o s e t o e l i m i n a t e t h e strap entirely and use only velcro; this will require you to s e w a corresponding patch of hook velcro to the elbows of your shirt. Bracers Cut the upper bracers out along the trim line, and soften the edges using a belt sander, rotary tool and sand paper. The lower bracers do not have a bottom trim line; trim the flashing off just above the point where the plastic begins to curve outward (along the red line shown).


13 12 Depending on the size of your forearms, you may need to trim the sides of the lower bracers further to make them fit. You will know whether you need to do this once you ve assemble the two halves and test fit them to yourself. If the bracers are too loose, move the trim line up as shown above. Trim the front and back of the lower bracers as shown below.

.")
.")
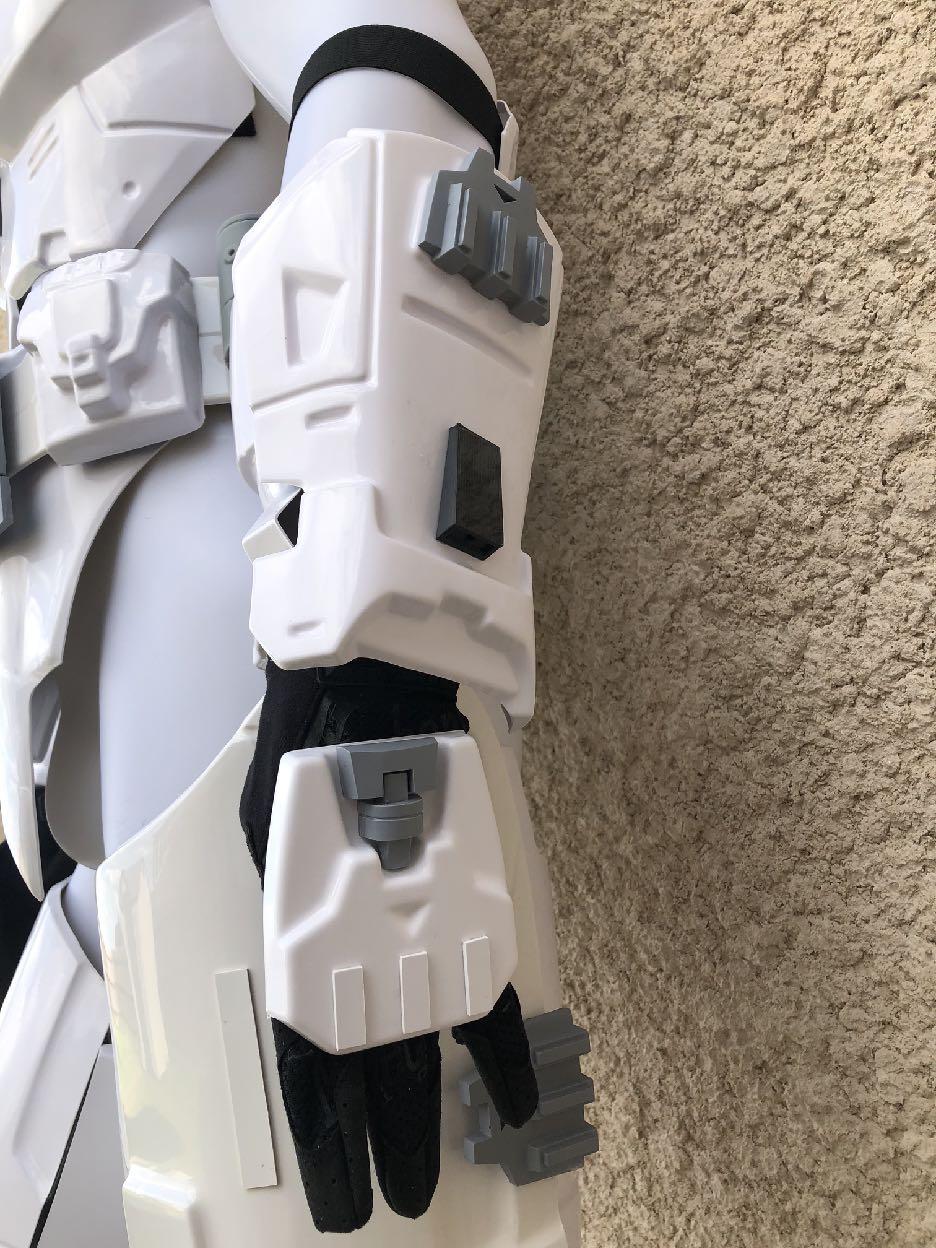
14 13 Superglue the 3D printed bracer block and resin dummy clasp onto the upper bracer as shown below. Superglue bonds resin to ABS plastic really well, so you shouldn t need to do anything else. However, if you choose you can drill a few pilot holes into both pieces and add some small screws for extra support from the inside (not shown). The upper bracer block has a hollow channel running through it to allow for installation of 3mm LED lights (not included). If you choose to use this feature, you will need to drill a hole through each upper bracer to be able to feed the wiring through. Attach a few strips of velcro to both halves as shown below, using hook on one half and loop on the other.


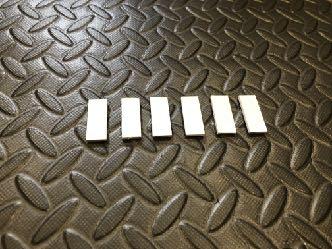
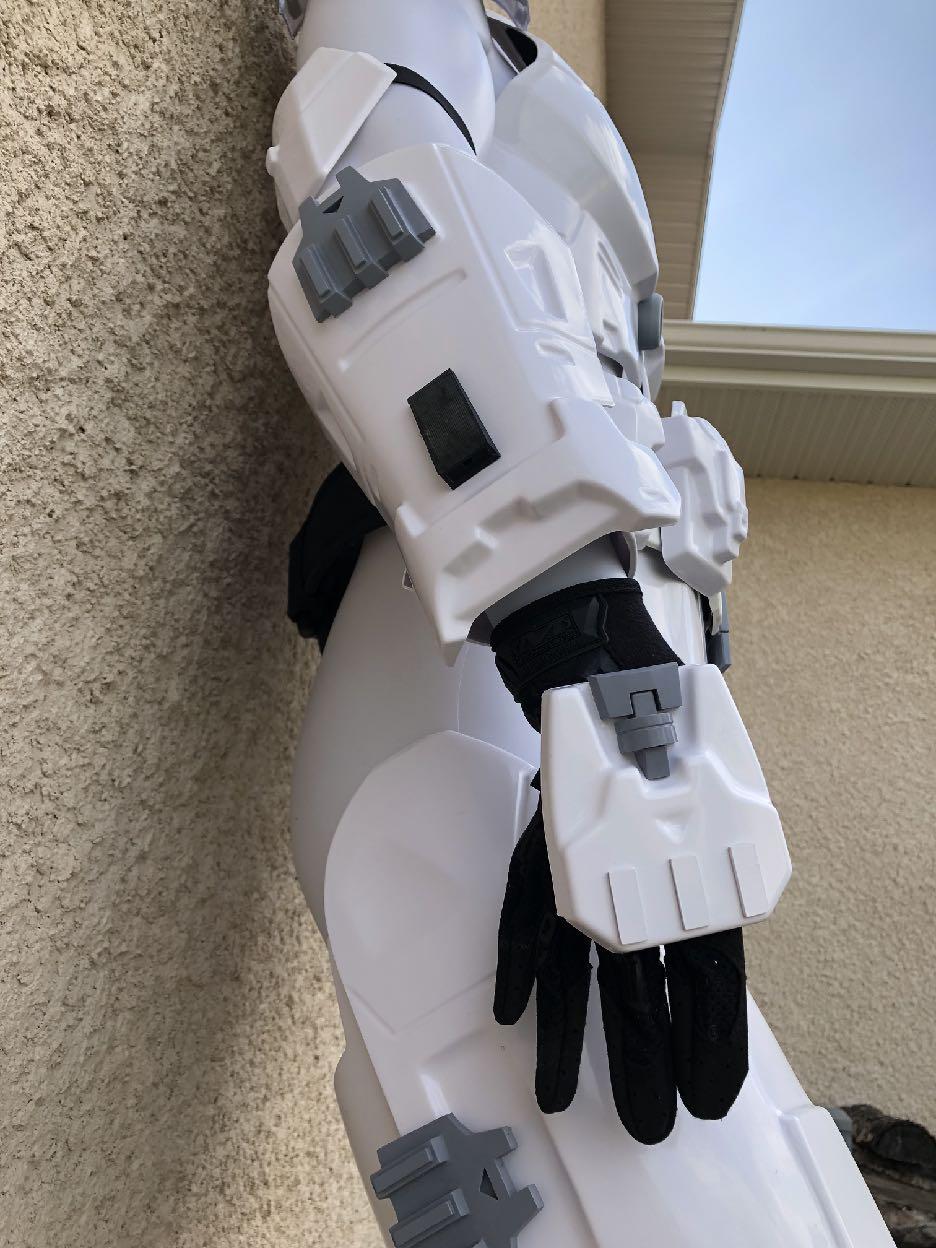
15 14 Connect both halves for a finished bracer assembly. Repeat this process to complete the second bracer. Hand Plates Cut each hand plate out along the trim line, and soften the edges using a belt sander and sand paper. Superglue the resin hand plate greeblie and the plastic hand plate knuckle strips to the ABS plate as shown below.


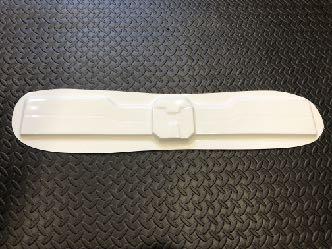
16 15 Hot glue the hand plate to gloves of your choosing to complete the hand assembly. Belt and Accessories Given the relatively short height of the mold and the resulting shallowness of the part, there is no trim line around the belt. Trim the vertical sides of the belt until it is thin enough to bend. This is best done by laying it flat on a belt sander.


17 16 There is also no trim line around the belt pouches; trim the flashing along the edge until there is no outward curling of plastic. Secure the pouch to the belt by taping it down with a strip of sticky-back industrial velcro. Apply a strip of loop-side sticky back velcro to the back of the resin data pad, and a corresponding hook side to the plastic belt, and attach it to the belt. Apply three loop-side strips of stickyback velcro inside the belt as shown. These will be the contact points where the belt will connect to the COD plate.


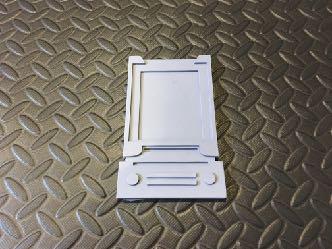
18 17 COD Plate Cut the COD plate out along the trim line, and soften the edges using a belt sander, rotary tool and sand paper. Cut out the belt slits as shown with a rotary tool, and smooth the edges with sand paper. Fit a web-belt (not included) through the slits so that the buckle is facing towards the wearer s back.

19 18 Affix three strips of hook side industrial velcro to the COD plate as shown, and attach the plastic belt so that the corresponding velcro pieces lock together. At this point the ends of the plastic white belt will stick out a bit. Cut a s t r i p o f l o o p sticky-back velcro, and wrap it around both the plastic and web belt at each end, which w i l l e ff e c t i v e l y tape the two together.


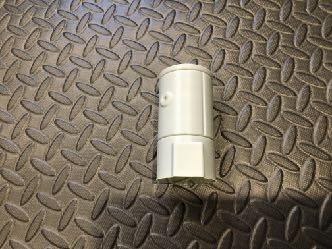
20 19 Attach the 3D printed canister to the end of the white plastic belt using velcro. If you received a heavier resin canister with your kit, you might need to screw the canister to the white belt for added security.


21 20 Thigh Plates Cut the front thigh plates out along the trim line, and soften the edges using a belt sander, rotary tool, and sand paper. Glue the front thigh grieeblies in place as shown in the photos below using ABS contact cement. You may also use superglue, however you first need to rough up the contact surfaces of both pieces with sandpaper to ensure good adhesion.


22 21 Superglue the resin dummy clasp onto the front thigh plate as shown below. You may secure this with a short screw from the inside for extra support if you choose. Apply a strip of loop sticky-back velcro to the inside of the front thigh plate along the longer outer edge as shown below. Apply another strip of loop sticky-back velcro along the shorter side, but offset it so that half the strip is exposed as shown below. This exposed sticky side will be attached to the back thigh plate, and will act like a soft hinge for the completed thigh assembly. What we re essentially doing here is taping the two halves together along one side, but instead of using tape we re using velcro, which has an incredibly strong adhesive backing. Repeat this process for the second thigh plate.


23 22 Cut the rear thigh plates out along the trim line, and soften the edges using a belt sander, rotary tool and sand paper. Apply a strip of hook sticky-back velcro along the longer outer edge of the rear thigh plate.


24 23 Connect the exposed sticky velcro strip of the front thigh plate to the inside of the rear thigh plate along the shorter edge. Close the two halves together so that the two opposing velcro strips engage. Apply a strip of loop sticky-back velcro to the inside of the front thigh plates, and sew hook strips of sew-on velcro to the front thigh of your costume pants. Repeat the process for the second thigh assembly. Note: The ABS thigh plates are light enough that no additional strapping should be necessary to keep them in place. Greaves Cut the shin and calf plates out along the trim line, and soften the edges using a belt sander and sand paper.


. Next we are going to create some velcro flaps to use as claps for the greaves.")
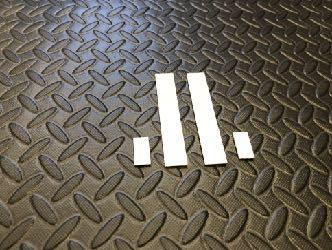
25 24 Apply several strips of loop sticky-back velcro along one of the inner sides of the calf plate, but offset them so that half the strips are exposed and facing out, just like we did with the front thigh plates. The exposed sticky strips will be attached to the inside of the shin plate, and will act like a soft hinge for the completed greaves. (What we re essentially doing here is taping the two halves together along one side, but instead of using tape we re using velcro). Next we are going to create some velcro flaps to use as claps for the greaves. To start, cut two pieces of velcro of equal length. Cut one of the pieces into two equal halves.

 Stick the adhesive back of the smaller p i e c e t o t h e")

26 25 Peel the protective backing off the larger piece. Peel the protective backing off one of the smaller pieces. (You can set the second smaller piece aside for now.) Stick the adhesive back of the smaller p i e c e t o t h e adhesive back of the larger piece. You will not be able to separate the two again, so make s u r e y o u d o i t correctly the first time!


27 26 You should now have a velcro flap that is half loop and h a l f e x p o s e d adhesive on one side, and full loop on the other. Create two more such flaps before proceeding to the next step. Affix the adhesive back of the velcro flaps we just created to the inside of the calf piece so that the loop side of the flap is sticking out past the plastic like in the photo below.


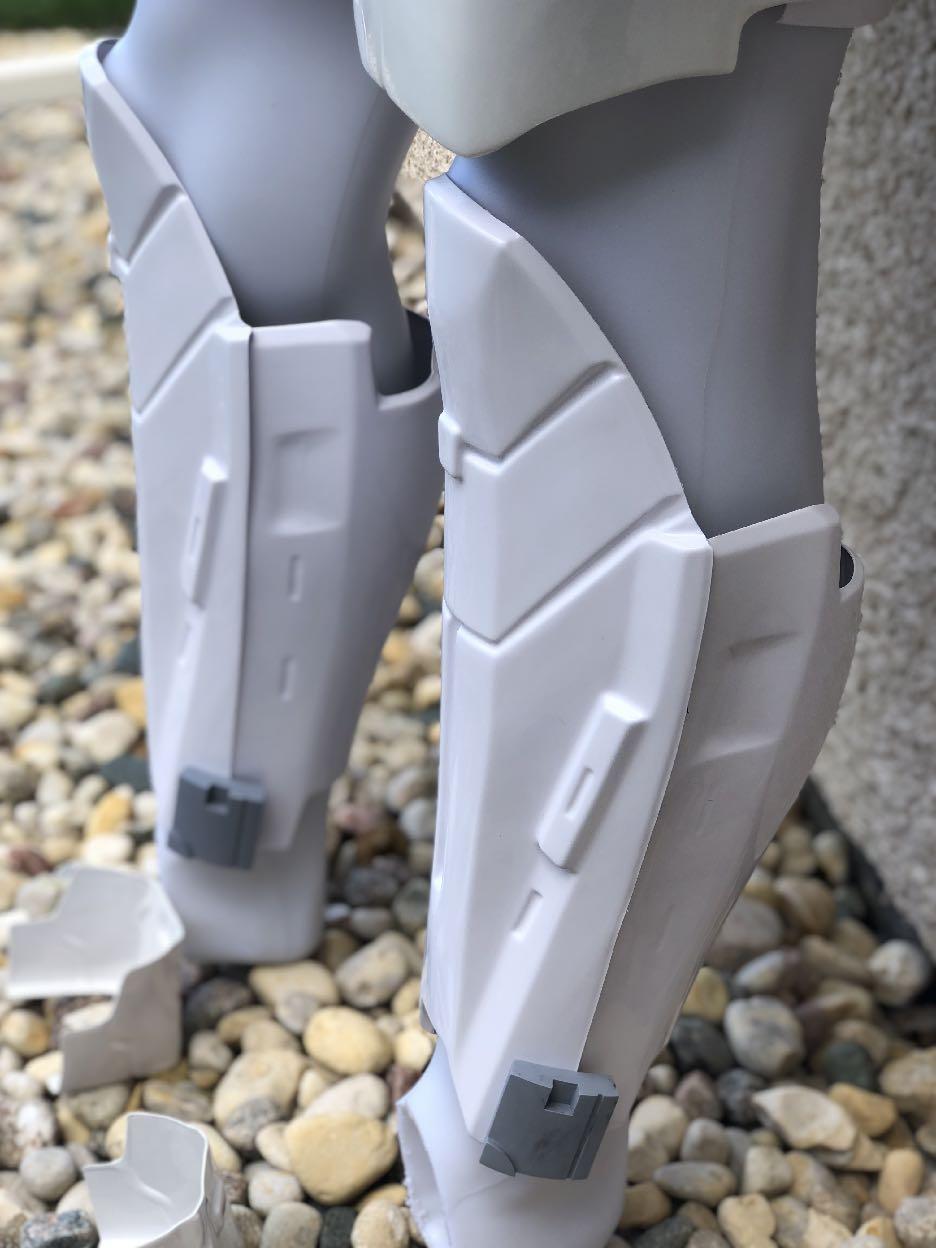
28 27 Affix the three hook strips of sticky-back velcro to the corresponding hook positions on the inside of the shin plate. The two hinged halves can now be opened and closed, making the greaves easy to pull on and off. To complete the greaves, superglue the shin plate dummy clasps into place as shown below. Note that each greave has two of these pieces (which are chiral), so you ll need to make sure you attach them in the correct orientation. You can screw there into place from the inside if you choose. For greater screen accuracy, you may choose to add a strap between the two halves of the greave like in the adjacent photo.

 should you choose to")
29 28 Your ABS greaves contain indentations where you may choose to cut openings for the elastic straps (not included) should you choose to install them.


30 29 Foot Plates Cut the foot plates out along the trim line, and soften the edges using a belt sander, rotary tool and sand paper.

31 30 The side pieces are mirror images of each other, so when attaching them to the footwear of your choice, be sure that you consult the photo below to see which pieces go on which foot. The method for attaching the foot plates to your shoes will vary greatly depend on the type of footwear you choose for your costume. Ultimately, you may use rivets, hot glue, velcro, or a combination of all these methods.
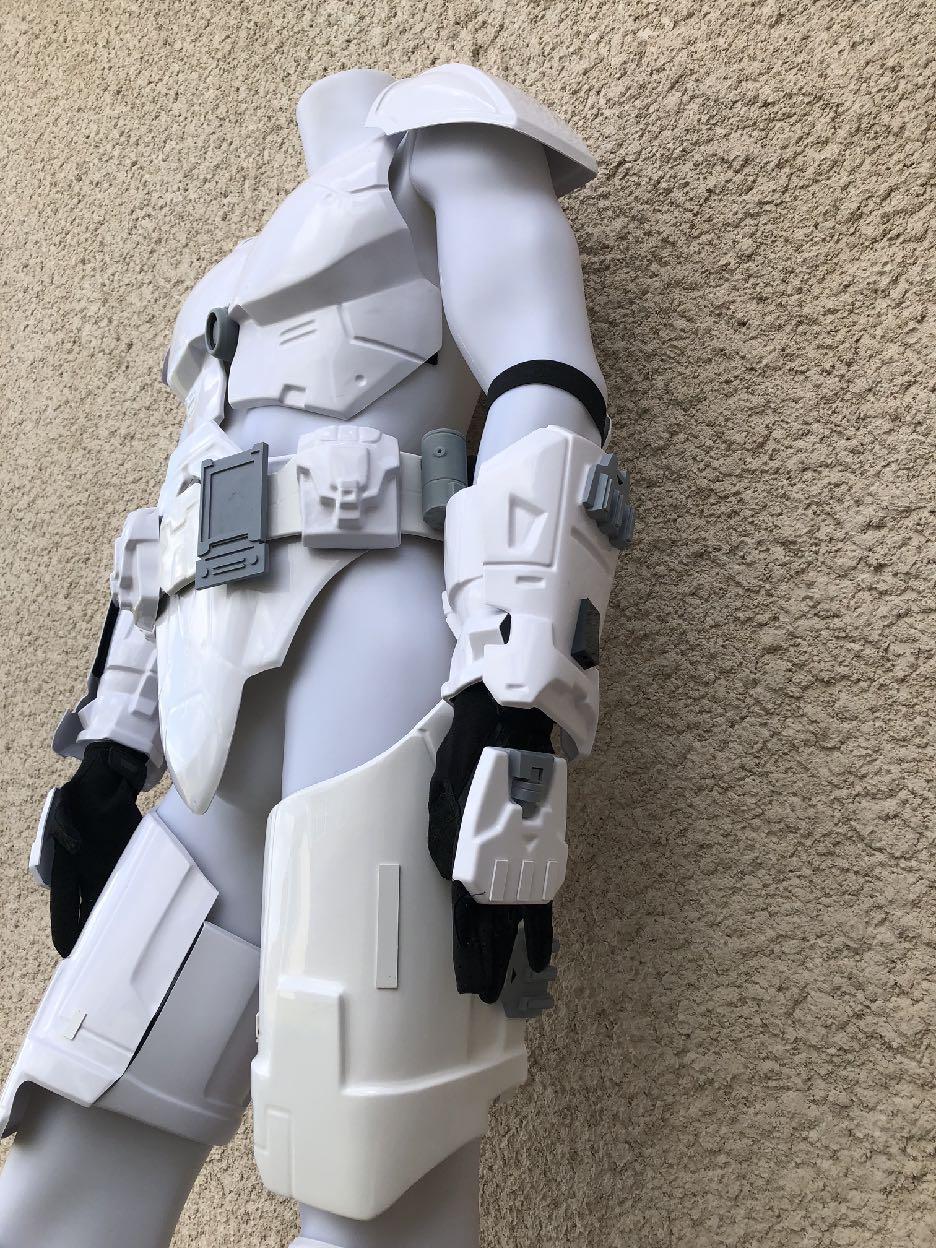
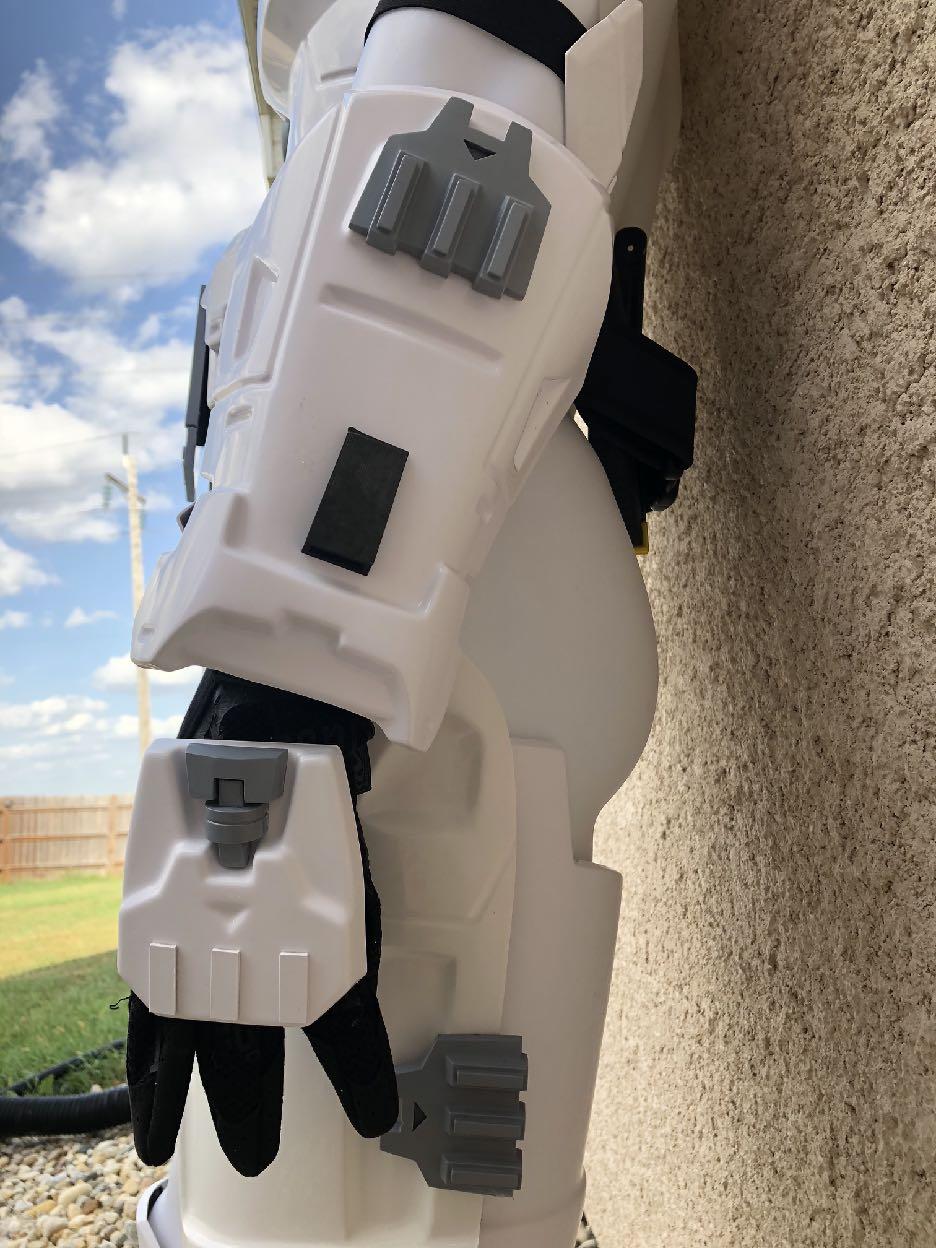
32 31 Completed Armor If you have followed this guide, your final assembled armor should look very similar to the following photos. For more information on the armor, general assembly techniques and completion ideas, head over to Thank you!
33 32

34 33

35 34

36 35
37 36
38 37
39 38
40 39
Printing and Assembly of Kwawu Arm
 Printing and Assembly of Kwawu Arm Jacquin Buchanan December 2016 This work is licensed under the Creative Commons Attribution-NonCommercial-ShareAlike 4.0 International License. To view a copy of this
Character: Ezio Auditore (Wetland Ebony Robes) Game: Assassin s Creed Brotherhood
 Game: Assassin s Creed Brotherhood") E Z I O P R O J E C T Character: Ezio Auditore (Wetland Ebony Robes) Game: Assassin s Creed Brotherhood Ezio Auditore is the protagonist of the second, third, and fourth games in the Assassin s Creed franchise.
E Z I O P R O J E C T Character: Ezio Auditore (Wetland Ebony Robes) Game: Assassin s Creed Brotherhood Ezio Auditore is the protagonist of the second, third, and fourth games in the Assassin s Creed franchise.
PanelKeeper GL1500 Kit
 Rudy's ** Removable side panel cover retainer system ** PanelKeeper GL1500 Kit Installs in about 10 minutes per side - No tools required! Both sides included Prevents loss of detachable panels Stop losing
Note: Lay-Up Schedules.
 Fabrication Method This PDE fabrication presentation is designed to display elements of the fabrication processes with accompanying images to better visualize the fabrication process. Please make sure
Slide the stock rubber tank mount caps onto the ends of the CS-1 tank mount:
 RYCA CS-1 BODY PARTS INSTALLATION GUIDE [The CS-1 installation guides should be used as supplements to the videos found on our Youtube Channel. There is no strict order to the build process, but it is
Swift assembly guide
 Swift assembly guide Download the assembly guide at www.scihighmodels.com/swift.pdf Sample kit shown with aluminium bells (available with the Deluxe kit) Shown here without main tanks Version 10/12/2010
The Sunshine An in-the-hoop project
 The Sunshine An in-the-hoop project All the music I walk to is on my phone, but my new iphone 6+ is too big to fit in my pocket. This case is the perfect solution. That s my iphone 6+ peeking out of it
19" emily, Jenny, & Portrait Dolls. By Dianna effner. Body Pattern and Construction. Strip
 Original Designs for the Doll Industry, Inc. PO BOX 174 JAMESTOWN, MISSOURI 65046 19" emily, Jenny, & Portrait Dolls Copyright 2001 By Dianna effner Body Pattern and Construction ArmATure ConSTruCTIon
POP PLUS / SPIDER SET-UP INSTRUCTIONS
 POP PLUS / SPIDER SET-UP INSTRUCTIONS 1 Place system frame on floor with screws indicating top. Expand upwards & outwards and secure frame connectors. Pop-Up display systems are made to be set-up and taken
How to Assemble the Vacuum Formed Plastic 7/8 Scale Lewis Gun
 How to Assemble the Vacuum Formed Plastic 7/8 Scale Lewis Gun 1. Read ALL the instructions before starting assembly. 2. Begin assembly by thoroughly washing the inside and outside surfaces of the vacuum
Contents. pages 20-24: Installing Edge sinks into. custom laminate countertops page 8: Installing Edge sinks into postform laminate countertops
 Contents pages 2-8: Installing Edge sinks into custom laminate countertops page 8: Installing Edge sinks into postform laminate countertops pages 9-14: Installing Acrylic sinks into custom laminate countertops
MUDGUN Drywall Finishing System
 Watch the demonstration video online at hydetools.com MUDGUN Drywall Finishing System Quick Start Guide Hyde Tools, Inc. / A Hyde Group Company / 800-872-4933 / custrelations@hydetools.com / hydetools.com
Hatch Installation For Pygmy Solo and Double Kayaks
 Introduction/Overview Hatch Installation For Pygmy Solo and Double Kayaks The hatch kit consists of several wooden lips, strapping and hardware. The hatch is constructed by cutting a hole in your deck,
london calling bag a sewing pattern by
 a sewing pattern by london calling bag This project on its own is a very big gusseted bag with a zippered top closure. But the optional details include a front pocket with Union Jack applique, buckle adjustable
ipod Case Tutorial Terrie Sandelin
 ipod Case Tutorial Terrie Sandelin When I couldn t find an ipod case that gave me what I wanted, I decided to come up with my own. I wanted to be able to attach it to a purse or belt, wanted to be able
RFID Video Poker Table DIY Build Guide
 The RFID Video Poker Table Build Guide V2 Version 2.0 www.videopokertable.net Page 1 Table of Contents Introduction... 3 The Demo Table... 4 Table Hardware... 4 Electronics (from videopokertable.net)...
Aeon AcousticPro UHD Series
 Aeon AcousticPro UHD Series EDGE FREE Fixed Frame Sound Transparent Projection Screen User s Guide Product Description: The Aeon AcousticPro UHD Series is a fixed frame projection screen that uses Elite
TherAdapt Products Inc. (800) phone (866) fax
 phone (866) fax") TherAdapt Products Inc. (800) 261-4919 phone (866) 892-2478 fax www.theradapt.com Feeding Chair- 2-in-1 Booster Seat Please read all of the following information before using this product. TherAdapt Products
TherAdapt Products Inc. (800) 261-4919 phone (866) 892-2478 fax www.theradapt.com Feeding Chair- 2-in-1 Booster Seat Please read all of the following information before using this product. TherAdapt Products
Ford F150 Rear Flares Set Part # Revision
 Ford F150 Rear Flares Set Part # 20074 Revision 1 04-01-09 Step 1: Prior to Installation: A) Bushwacker only approves installing the flares according to these written instructions with the hardware provided.
Leather Vest (Plus Size) 04/2012
 04/2012") Leather Vest (Plus Size) 04/2012 By: burda style magazine http://www.burdastyle.com/projects/leather-vest-plus-size-042012 Leather Vest Sewing Pattern. Materials Kid suede leather. To make this style in
Leather Vest (Plus Size) 04/2012 By: burda style magazine http://www.burdastyle.com/projects/leather-vest-plus-size-042012 Leather Vest Sewing Pattern. Materials Kid suede leather. To make this style in
Max Launch Abort System Prod. No *Kevlar is a registered trademark of Dupont
 Flying Model Parts List Max Launch Abort System Prod. No. 3014 A 11820 - Body Tube 3.5 Diam x 5.5" Long B 11824 - Orange Capsule Base Shoulder Ring C 16032 - Laser-cut Ring motor mount rear D 16033 - Laser-cut
Jeep Cherokee 4-Door XJ Set Part # Rev
 Jeep Cherokee 4-Door XJ Set Part # 10911 Rev-14 04-05-10 Step 1: Prior to Installation: A) Bushwacker only approves installing the flares according to these written instructions with the hardware provided.
FENDER FLARE INSTALLATION
 : 2011-2014 Ram 2500/3500 Fleetside 76.3 inch and 98.3 inch Bed. Tools Required 1. #2 Phillips Driver 2. Socket Wrench 3. 8mm Socket 4. 1/2 Wrench 5. Utility Knife 6. Awl or Similar Pointed Tool PRIOR
Elara NanoEdge Fixed Frame Screen User Guide
 Elara NanoEdge Fixed Frame Screen User Guide INTRODUCTION INTRODUCTION WARNING This product may contain sharp edges, please handle with care. Protective gloves are recommended. A minimum of two people
STYLE BAR & TONNEAU COVER INSTALLATION
 STYLE BAR & TONNEAU COVER INSTALLATION INSTALLATION MANUAL: 2005 to '09 Mustang P/N: 10-8002-C12071B Saleen Performance, Inc. 1225 East Maple Rd., MI 48083 800-888-8945 www.saleen.com 1 IF YOU ARE NOT
Curium 19H Installation Instructions & Parts List
 Curium 19H Installation Instructions & Parts List Illustration Curium 19H Right Hand Page 1 of 15 01/07/2016 Revision 2.1 IMPORTANT This shower screen / enclosure must be installed by suitably qualified
Panther TLSL. Fitting Guide. Fitting the Panther
 Panther TLSL Fitting Guide Fitting the Panther The Panther Spinal Brace is an orthopedic back brace that provides abdominal compression while restricting motion and supporting spinal alignment. Its design
10. Wing prep and subassembly
 Date Section Objective: Construct and fabricate the sub-assemblies of the wing panel. Required Parts: Wing left 11gal PN104-300, Wing right 1gal PN104-400, Wing left 15 gal option PN104-322, Wing right
Curium 19.4H Installation Instructions & Parts List
 Curium 19.4H Installation Instructions & Parts List Illustration Curium 19.4H Right Hand Page 1 of 21 30/06/2016 Revision 1.0 IMPORTANT This shower screen / enclosure must be installed by suitably qualified
Instructions for Installation on a Pitched Roof LIGHTWAY optical tube LW 260, LW 320, LW 520, LW 760
 Lightway, s.r.o. Registered office: Ledvinova 1714, 149 00 Praha 4 Offices: Za Humny 1054/4a, 161 00 Praha 6 tel.: 235 300 694, fax: 235 300 218 Company ID No.: 63669366, Tax ID No.: CZ63669366 Bank: KB
3Insert the second rod no. 4
 Yamato: Step-by-step 37 The stern block and searchlight control towers a b c d e f Recommended tools and materials Wood glue Sandpaper (no. 800 grain) Metal file Putty Craft knife For metal: Super Glue
Denise M. DeRose Handled Clamshell Handbag
 Denise M. DeRose Handled Clamshell Handbag Materials: Wood 2 discs between 6 and 9 in diameter -- 4/4, 6/4 or 8/4 1 piece of thin hardwood ¼ inch thick and 4 x 10 Wood for waste blocks Supplies Small piece
What s a Sticky Stick?
 Woodturning Fundamentals American Association of Woodturners, May 2013 Making a Sticky Stick a Lathe Sanding Accessory. Alan Zenreich zenaaw@zenreich.com What s a Sticky Stick? Like many woodturners, much
ALIEN ENCLOSURES CAMARO AND FIREBIRD Trunk Panel Kit Instructions
 ALIEN ENCLOSURES 67-69 CAMARO AND FIREBIRD Trunk Panel Kit Instructions TYPICAL TOOLS & MATERIALS NEEDED FOR UPHOLSTERY 2 Yards of Main Panel Material 1.5 Yards of Backer Material 3 yards of foam backing
LED Thin Frame Fixed Frame Screen User Guide
 LED Thin Frame Fixed Frame Screen User Guide INTRODUCTION INTRODUCTION WARNING - Sharp Edges This product may contain sharp edges, please handle with care. Protective gloves are recommended. WARNING -
INSTALLATION INSTRUCTIONS CJ-5 M38A PART # With Doors
 INSTALLATION INSTRUCTIONS CJ-5 M38A1 1955-1975 PART #109-011 With Doors Thank you for purchasing Specialty s Convertible Top for your Jeep vehicle. It has been designed for great fit and long wear. Please
Ziroli D-17 Beech Staggerwing
 Ziroli D-17 Beech Staggerwing Parts List Vacuform Parts: Miscellanous Pieces 1 Four Side Panels 1 3/16" Tube, 2" Long 2 Lower Dash - Back Dash 2 Felt, 12x24 3 Dash 3 Cordury 12x24 4 Dash Hood 4 Aluminum
Building Tips This model can be built using the following types of adhesives:
 Page 1 Building Tips This model can be built using the following types of adhesives: Epoxy (with or without microballons) Odorless cyanoacrylate (CA) with accelerator UHU Creativ for Styrofoam (or UHU
Name: Class: Monster Doll. Grading Rubric
 Name: Class: Monster Doll Grading Rubric Grade yourself on the skills listed below. (0 being the lowest, and 5 being the highest.) Once you have graded yourself in each area, pin your grading sheet to
BPF Toyota Tundra Mesh Installation Guide
 BPF 2007-2009 Toyota Tundra Mesh Installation Guide www.bpfabricating.com Tools Required Philips Screw Driver Flat Head Screw Driver Dremel or Rotary Tool Hand Saw or Multi Max Adjustable Square Tape Measure
Dash Recover Trim Fitting Instructions
 Tools required. We use a spray trim/carpet adhesive but a brush on contact glue will work just as well. Good scissors, very sharp knife, bradawl/scriber and hot air gun/hair dryer. Also carrying out this
Cabinet Mount Lifter Instructions
 PART LIST 2 @ Side Pivot Arms 1 @ Coupler Tube 1 @ Left Hand Bracket 1 @ Right Hand Bracket 2 @ Cover Support Arms w/ Foam Grip 1 set of Cover Saver 4 @ 4 Wood Screw 8 @ 1 Wood Screw 12 @ 1 Black Tek Screw
Installation tutorial for Console Customs Xbox Mode Dual Button (RFX-5B) Rapid fire Microchip for all Wired and Wireless controllers
 Rapid fire Microchip for all Wired and Wireless controllers") Installation tutorial for Console Customs Xbox 360 5-Mode Dual Button (RFX-5B) Rapid fire Microchip for all Wired and Wireless controllers This tutorial is designed to aid you in installation of a console
Installation tutorial for Console Customs Xbox 360 5-Mode Dual Button (RFX-5B) Rapid fire Microchip for all Wired and Wireless controllers This tutorial is designed to aid you in installation of a console
Product must be installed as shown using the screws and brackets provided. Use of incorrect hardware could result in damage to the product.
 General Notes These installation instructions are intended to be comprehensive for a typical Keyeira/Presto configuration. Your configuration may differ. If you have questions contact Geiger Customer Service
RAMPAGE P R O D U C T S. INSTALLATION INSTRUCTIONS BRONCO ZIPPER FASTRACK TOP PART #984xx BRONCO TOOLS REQUIRED
 RAMPAGE P R O D U C T S 84 (+/- 1/4 ) INSTALLATION INSTRUCTIONS BRONCO ZIPPER FASTRACK TOP PART #984xx BRONCO 1966-1977 TOOLS REQUIRED 3/8 WRENCH 7/16 WRENCH ½ WRENCH #2 PHILLIPS SCREWDRIVER 1/8 DRILL
Be Crafty. Technique Tutorial. How To Apply a Press Lock with Prongs PAGE 1
 PAGE 1 Totes, handbags and other accessories often need a secure closure. Something more than a hook & eye or snap, yet something that is visually appealing. Consider a press lock for quick and easy access,
The Allie An in-the-hoop project
 The Allie An in-the-hoop project A wallet/coin purse for the 5x7 hoop. The Allie has 3 credit card slots in the front section which features a large flap with a snap closure. You can carry coins or other
STEP 1 PRIOR TO INSTALLATION TOOLS FOR EASY INSTALLATION:
 STEP 1 PRIOR TO INSTALLATION A) Bushwacker only approves installing the fl ares according to these written instructions with the hardware provided. WARNING: Failure to install according to these instructions
Creating a Gorget for SCA Youth Combat
 3/26/2011 East Kingdom Barony of Bhakail Youth Combat In this guide we will be making a gorget from barrel plastic for use in SCA Youth Combat as per East Kingdom standards. This method is useful in creating
All Terrain Flares 2014 Chevy Silverado
 Page 1/8 Components: 1. Front Flares (2) 2. Rear Flares (2) Tools required: - Utility knife - #2 Phillips driver - Socket wrench - 13 mm Socket - 6 mm Allen Wrench - T-15 Torx bit - Trim Removal Tool -
U-bass Kit Assembly Instructions
 U-bass Kit Assembly Instructions Compiled by playubass.com This guide is built from the instructions found here: http://kalabrand.com/ubass-kit/index.html Tools Needed 5/8 (16 mm) Wrench 7/16 (~11 mm)
Cozy Crock Pot Carrier
 Cozy Crock Pot Carrier At our recent visit to the Heathers embroidery group near our Minnesota home, several of the members said they'd love to see us create a crock pot carrier project. Kenny thought
Dubnium 11 Installation Instructions & Parts List
 Dubnium 11 Installation Instructions & Parts List Illustration Dubnium, H1 Handle Right Hand: Open Out Page 1 of 25 IMPORTANT This shower screen / enclosure must be installed by suitably qualified individuals.
Wanderlust Suitcase Vanity
 Wanderlust Suitcase Vanity If you re like me, you re always up for an adventure. When I saw some examples of DIY reclaimed suitcases, paired with the exciting new Wanderlust embroidery design collection,
Tech Sheet. T4 Interior conversion kit how to - fitting instructions. 1. Rear seat belts. 2.
 Page 1 of 8 T4 Interior conversion kit how to - fitting instructions Thank you for purchasing our T4 interior conversion kit. This kit will enable you to convert any SWB left hand loading door T4 into
Applications: Section 1: Getting Started Tools Needed: BEFORE
 Installation of KBD Body Kits Porsche GT 3 Look/Style 2 Piece Polyurethane Front Bumper & Lip Applications: Porsche 996: 1999-2001 Porsche Boxster 986: 1997-2004 Page 1 Tools Needed: Philips Head Screwdriver
Mid Size Ranger Pro-fit Doors #06023 Installation & Operations Manual
 Mid Size Ranger Pro-fit Doors #06023 Installation & Operations Manual Before You Start: Please familiarize yourself with all the steps before beginning assembly. Compatibility Info: This Door System is
Wheelchair Quilts. A guide to make fitted quilts for those in a wheelchair
 Wheelchair Quilts A guide to make fitted quilts for those in a wheelchair Table of Contents Introduction Creating a Template Fitting the Template p. 2 p. 3 p. 5 Sew Blocks or Pattern p. 8 Quilt Top Assembly
Tools: Scissors, hand held single-hole punch, metal ruler or other good straight-edge, sharp knife or Exacto-knife.
 Instructions for Building a Kepler Paper Model Version 30 Mar 3, 2010 You need the following files: File Sheet # Printer Paper Color Kepler_model_instructionspdf plain b/w Photometerpdf 1 Photo stock color
Jeep Cherokee Door XJ Set Part # Revision J
 Jeep Cherokee 84-96 4 Door XJ Set Part # 10911 Revision J 6-5-06 Step 1: Prior to Installation: A) Fit: Verify the fit of the flares to vehicle. (Some filing, sanding, or cutting may be necessary to ensure
INSTALLATION GUIDE. TRANZFORM Sound TRANZFORM Space
 INSTALLATION GUIDE TRANZFORM Sound TRANZFORM Space Cornell Iron Works, Inc. 100 Elmwood Ave. Crestwood Industrial Park Mountain Top, PA 18707 Phone: 800.233.8366 or 570.474.6773 Fax: 800.526.0841 INSTALLATION
Sandtrooper Backpack Kit Instructions
 Sandtrooper Backpack Kit Instructions Start with opening the box Use the inventory sheet to identify parts and group them into components Note that "scrap plastic" can take many shapes and forms Usually
Sew Sweetness. Oriole Bag. Sara Lawson
 Sew Sweetness Oriole Bag Sara Lawson Oriole Bag This bag comes in 2 different sizes and comes together quickly with the creative use of darts and front and back fabrics! Try your hand at using a bit of
PILOT SEAT AND HARNESS
 1. Locate the following parts PILOT SEAT AND HARNESS #84 threading needle, 1 each #88 lacing cord, 1 each #119 aluminum seat, 1 each #120 plywood, pilot seat bottom, 1 each #121 wood screw, 3 each #293
The Useless Machine. DIY Soldering Edition. Instruction Guide v0004
 The Useless Machine DIY Soldering Edition Instruction Guide v0004 TM For the best outcome, follow each step in order. We recommend reading this guide entirely before you get started. Tools required: Soldering
PITTS S2S CONSTRUCTION
 PITTS S2S CONSTRUCTION FUSELAGE CONSTRUCTION 1) Place the right fuselage side over the plan and mark the former positions. Place the left side over the right side and mark the former positions. Glue F1
Full Size Ranger Pro-fit Doors #06015 Installation & Operations Manual
 Full Size Ranger Pro-fit Doors #06015 Installation & Operations Manual Before You Start: Please familiarize yourself with all the steps before beginning assembly. Compatibility Info: This Door System is
Prima Diva. .Style, function and loads of compliments That s what the Stella Sling Bag brings!!
 .Style, function and loads of compliments That s what the Stella Sling Bag brings!! Supplies: 1/2 Yard Main Print (Outside of wallet, Outside of pockets, optional strap, etc..) 5/8 Yard Accent Print (Lining
RFS Class II Rocket Assembly Instructions
 RFS Class II Rocket Assembly Instructions Instructions by: Loc Precision Photos by: Great Lakes Space Port Sheboygan Education Foundation, Inc. Welcome and thank you for joining the Rockets for Schools
FENDER FLARE INSTALLATION
 : 2009 - UP Ram 1500 Fleetside. (Exclude R/T Models) Tools Required 1. #2 Phillips Driver 2. Socket Wrench 3. 8mm Socket 4. 1/2 Wrench 5. Utility Knife PRIOR TO INSTALLATION Hardware Kit Included 5/16
Cobra X Q Construction Tips Construction: Bel y pan
 Cobra X Q Construction Tips : The white plastic in this kit is high impact styrene. It can be painted with most types of coatings if light coats are applied this is necessary due to the thickness of the
How to Install Metal Rivets on Sewing Projects
 Published on Sew4Home How to Install Metal Rivets on Sewing Projects Editor: Liz Johnson Wednesday, 14 March 2018 1:00 Rivets are everywhere. Airliners have rivets. The pockets of your Levis have rivets.
RH-412 STEEL DOORS INSTALLATION INSTRUCTIONS
 RH-412 STEEL DOORS INSTALLATION INSTRUCTIONS By following the steps outlined below, the assembly, installation and adjustment of the steel doors, will be a simple process. Let s start with the Driver Side.
Instructions for Installation on a Flat Roof
 Lightway, s.r.o. Registered office: Ledvinova 1714, 149 00 Praha 4 Offices: Za Humny 1054/4a, 161 00 Praha 6 tel.: 235 300 694, fax: 235 300 218 Company ID No.: 63669366, Tax ID No.: CZ63669366 Bank: KB
Mylar Moon Boots. Supplies. Cardboard. Mylar blanket. Duct tape. Craft knife. Ruler. Pen/Pencil
 Mylar Moon Boots 1. Design a custom box. Measure the length, width, and height of your foot and add an inch to each of these measurements.» Now draw a rectangle on your cardboard that has the new dimensions
Child s Purse An In-the-Hoop Project
 Child s Purse An In-the-Hoop Project Shoulder bag in two sizes, with optional quilting. You may also choose to close the bag with Velcro or with a snap or other type of closure. Files and instructions
UPPER DOOR KIT P/N
 UPPER DOOR KIT P/N 2879946 Application RZR XP4 1000 Before you begin, read these instructions twice and check to be sure all parts and tools are accounted for. Please retain these installation instructions
Peach, Daisy, Rosalina Crown Tutorial Version August 2010 Martyn
 Peach, Daisy, Rosalina Crown Tutorial Version 1.0 - August 2010 Martyn 1) Creating the template Right, this isn't the most enjoyable part but it is required, get your calculator out we're going to do some
Introduction. Rocky Mountain Westy Swing Away Carrier Kit Installation Instructions
 Rocky Mountain Westy Swing Away Carrier Kit Installation Instructions Introduction Thank you for purchasing the Rocky Mountain Westy Swing Away Carrier Kit. We pride ourselves in the products we develop
Premium Light Filtering Sheer Shade
 Premium Light Filtering Sheer Shade Installation Instructions Email: customerservice@blindster.com Call us: (888) 256-8672 Mon - Fri 8am - 7pm (CT) Congratulations on purchasing a Premium Light Filtering
HOW TO MAKE A COMPOSITION ZISA DOLL
 HOW TO MAKE A COMPOSITION ZISA DOLL WITH STUFFED FELT BODY AND 3D PRINTED HANDS AND HEAD A composition doll is made of different materials, in this case the body and limbs are sewn in felt and then padded,
Explorer Wiring Kit (assembled)
") Explorer Wiring Kit (assembled) For Vintage, Firestorm & Standard Series Please Read All Instructions Before Beginning. Tools you will need: Soldering Iron (35 watt preferably) Solder Wet Sponge Wire Clippers
Explorer Wiring Kit (assembled) For Vintage, Firestorm & Standard Series Please Read All Instructions Before Beginning. Tools you will need: Soldering Iron (35 watt preferably) Solder Wet Sponge Wire Clippers
From "American Woodturner" the Journal of the American Association of Woodturners, April 2015, vol 30, no 2 - CUSTOM - TOOL HANDLES
 From "American Woodturner" the Journal of the American Association of Woodturners, April 2015, vol 30, no 2 - CUSTOM - TOOL HANDLES Carl Ford I have found most commercially available tool handles uncomfortable
Ford Cut-Out Fender Flares Rear Pair
 Ford Cut-Out Fender Flares Rear Pair STEP 1 PRIOR TO INSTALLATION A) Bushwacker only approves installing the fl ares according to these written instructions with the hardware provided. WARNING: Failure
NATURE camp Engines. By: Daniel Tuhy
 NATURE camp 2015 Engines By: Daniel Tuhy Description: In this lesson students will gain a general knowledge of what an engine is and the different types of engines. Students will participate in 3 activities
uin RC FPRC ZERO Specificationss Empty Weight
 Flying Pengu uin RC FPRC ZERO Specificationss Wing Span 42.75 (1085 mm) Fuselage length 30.5 ( 775 mm) Empty Weight 9.5 10 oz. (150 160g) Estimated Flying Weight 20 255 oz. (320 400g) Wing Area: 151 sq.
Bound and Determined:
 Think You Don t Have Time to Create Beautiful Quilts? From quick-quilt adaptations of classic patterns to fun, fresh novelty designs, McCall s Quick Quilts provides you with a treasury of time- and effort-saving
PS 5077 cu. ft. Boxcar with EOC device. 1:29 scale resin craftsman kit. by Burl Rice
 PS 5077 cu. ft. Boxcar with EOC device 1:29 scale resin craftsman kit by Burl Rice www.burlrice.com Bill of materials (not included): Thick/medium viscosity CA PL adhesive, or Gorilla Glue Heavy Duty Construction
Rugged Ridge Body Armor Guard Kit, 5 Pieces, Black (07-Current JK 4-door)
") Rugged Ridge Body Armor Guard Kit, 5 Pieces, Black (07-Current JK 4-door) Installation Time: 60 Minutes Tools Required: Notes: Phillips head screwdriver 3/8 socket or Flat head screwdriver 1/2 socket 7
Rugged Ridge Body Armor Guard Kit, 5 Pieces, Black (07-Current JK 4-door) Installation Time: 60 Minutes Tools Required: Notes: Phillips head screwdriver 3/8 socket or Flat head screwdriver 1/2 socket 7
Jeep. Cut-Out Fender Flares Set of 4. Included in Hardware Kit:
 STEP 1 PRIOR TO INSTALLATION A) Bushwacker only approves installing the fl ares according to these written instructions with the hardware provided. WARNING: Failure to install according to these instructions
The Ballistic Blaster Rocket Kit should contain the following items. If anything is missing, call Customer Service at
 Ballistic Blaster User Guide Materials Included The Ballistic Blaster Rocket Kit should contain the following items. If anything is missing, call Customer Service at 800-358-4983. Body tube, 6-1/2" long,
* Drill and 3/32" drill bit: for drilling holes in the factory plastic upper for the screws to secure the brackets (factory upper installation only)
") * Two slider windows (four sliders windows for the 4-door kit) * Four brackets to secure the windows to the upper door frames (8 brackets for the 4-door kit) * Weatherstrip to seal the windows to the half
* Two slider windows (four sliders windows for the 4-door kit) * Four brackets to secure the windows to the upper door frames (8 brackets for the 4-door kit) * Weatherstrip to seal the windows to the half
Women's Travel Toiletry Bag
 Traveling just got a little more organized with this handy toiletry bag, designed specifically for the ladies! Large inside pockets made of clear vinyl and mesh make it easy to find just what you need.
Hatchback Wing Riser Kit
 Hatchback Wing Riser Kit 2015-06-11 Thank you for purchasing this PERRIN product for your car! Installation of this product should only be performed by persons experienced with installation of aftermarket
Home Haunters Haven. STALKER COSTUME
 Home Haunters Haven http://www.homehauntershaven.com/stalker.htm STALKER COSTUME Construction is fairly simple. See below for the pictures. Basically, all you need are the following: 1. A good hiking backpack
INSTALLATION INSTRUCTIONS JEEP SCRAMBLER FAST TRAC TOP PART #108-21X
 INSTALLATION INSTRUCTIONS JEEP SCRAMBLER FAST TRAC TOP PART #108-21X Thank you for purchasing Specialty s Convertible Top for your Jeep vehicle. It has been designed for great fit and long wear. Please
Installation Instructions
 by Plato Woodwork Installation Instructions Plato Woodwork, Inc. 200 Third Street SW P.O. Box 98 Plato, MN 55370 www.platowoodwork.com 800.328.5924 SECTION GUIDE GETTING STARTED PAGE # Installation Methods...
RAM Pocket Style Fender Flares Set of 4
 STEP 1 PRIOR TO INSTALLATION A) Bushwacker only approves installing the flares according to these written instructions with the hardware provided. WARNING: Failure to install according to these instructions
How to Insert a Tuck or Push Lock Closure
 Published on Sew4Home How to Insert a Tuck or Push Lock Closure Editor: Liz Johnson Friday, 15 August 2014 1:00 We've all seen this popular little clasp. It's the go-to closure on everything from casual
To adjust the length of the track
 DELUXE ROTARY CHAIN ROMAN BLIND KITS The standard kit has a 1:1 chain drive suitable for blinds up to 3kgs in weight. For heavier blinds up to 6Kg use a 1:4 chain drive, see instructions on page 2. There