CHRYSLER 300 CLUB Chrysler 300 Interior Door Star Emblem Replacement
|
|
|
- Hubert Chandler
- 5 years ago
- Views:
Transcription


1 CHRYSLER 300 CLUB 1964 Chrysler 300 Interior Door Star Emblem Replacement Dec 2014 Rev 4. Congratulations! You have purchased one of the finest replacement emblems made for your 1964 Chrysler 300. Please follow these instructions as it will ensure that you install the emblems properly on your door panels. If you have any questions on these procedures, contact Jamie Hyde at or for assistance. Please ask me first as these are nonreturnable and can be damaged quite easily until they are placed in service on the door panels. I also suggest watching the install video posted on the Club website under Tech Department in the How I Do It section. 1. The first step is to read these instructions from start to finish before you attempt to replace the emblems. The next step is to reread these instructions. Really, you will see something the second time you look at them. Trust me. 2. The door panels and emblems must be above 70 and below 100 degrees Fahrenheit to ensure that the 3M Industrial Adhesive on the back of the emblem bonds properly to the emblem base on the door. 3. It may be easier to install the emblem and to work on the door panel if they are removed. See step 2 and Image 1. Page 1


2 Image 4. Assemble the tools required to remove the existing emblem. Different types of razor blades and pliers can be used to grasp the edge of the emblem, and to clean the emblem base of stuck on adhesive prior to application. You will also need some clear lacquer thinner and Q-tips. 3M does not recommend any cleaner that could have trace amounts of oil such as over-the-counter rubbing alcohol as that could affect the bonding of the adhesive. See Images 2 and 3. Image 2 Page 2

3 Image 3 5. Probe and test the sides of the emblem to attempt to lift one of the edges as one edge may lift easier than another. Be VERY careful with any sharp tools around your door panels. A misguided razor blade, or tool will make quick work of your door panels. Grasp the lifted edge of the emblem with pliers and pull. Some emblems come off fairly easy, while others may be a little harder to remove. See Images 4 and 5. Also Note 15 Page 3

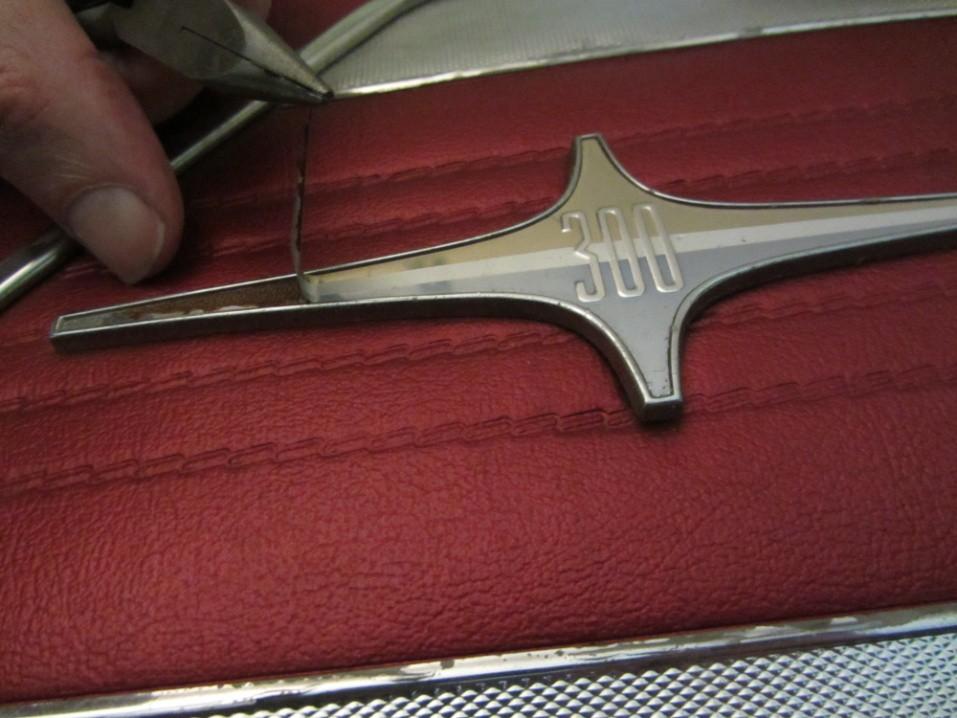
4 Image 4 Image 5 Page 4

5 Image 6 6. Scrape off the existing adhesive; it is the brown material remaining after removing the foil emblem. Again, take your time with sharp instruments around, and next to, your nice door panel. I use a very controlled movement of the blade with both hands holding the blade top and I take my time. As you can see, I have only one hand on the blade in this image and you may ask me why? Because the other hand is holding the camera. After I shot this image, I set the camera down and resumed removing the rest of the old glue with both hands on the blade. See Images 7 and 8. Page 5

6 Image 7 Do not try to use a heat gun to remove the old glue as all that does is quickly melt your vinyl door panels and only slightly annoys the glue. That old glue is tough stuff that has held up a lot better than the emblems it was designed to hold in place. With the heat gun blazing away, you think to yourself is the glue getting soft? About that time, you will notice that the glue is getting soft, and then you think to yourself do I have too much heat on the emblem base? By that time, your vinyl panel is already starting to deform in front of your eyes. Since the base acts like a heat sink, it flywheels and continues to melt the vinyl long after you have tossed the heat gun to the floor. Ask me how I know that? So in conclusion, use no heat and take your time. You are in no rush. This is the riskiest part of the job--cleaning and removing the glue with sharp tools and EPA regulated solvents. Do not use the thinner indoors unless you want to test your fire insurance policy or your marriage license. Page 6

7 Image 8 7. Use a small amount of lacquer thinner on a Q-tip to clean the remaining glue residue from the emblem base. Do not attempt to remove the glue by just using the lacquer thinner alone without scraping, as it will make a mess and you could get either glue reside or thinner on your door panels. If you think the old glue is hard to get off from the chrome metal base, try cleaning it off the vinyl when little globs of solvent soaked glue balls settles on to the surface and bore into the pores of the vinyl. Remember that lacquer thinner will also attack the vinyl of your door panels, so be careful with the thinner. It is powerful stuff! That brown gunk on the Q-tip in the image is old adhesive, as I have just flipped the Q-tip over. See Image 9. Page 7


8 Image 9 8. Always handle the emblems by the center edges as they will bend if you hold them by the long sides. See Image 10. Image Set the emblem, with the paper backing still applied, on the base to check the fit. It should drop right into the base evenly all the way around. If it does not sit flat, look closely to be sure all adhesive or pits are removed from the edges of the chrome base. Don t press it down, just test it Page 8

9 by dropping it in. You will be able to tell if it is all the way in by close inspection. When you are doing the final installation with the adhesive exposed, you will want to place the emblem onto the base starting with the small fin side first then one of the longer fins second in a two step rocking motion. Practice this with the backing still on the emblem and you will see what I mean. The emblem will follow the curve of the base. Then re-clean the base before step 10, as any trace of the oil on your fingers will affect the adhesion of the emblem. See Images 9 and 11 Image Show time! Remove the adhesive paper backing on the emblem by starting on the short side fin and pull to the center and stop. Move on to the side of one of the long fins and peel back that back to the center. Then grasp both edges of the paper backing and completely remove the backing while still holding the emblem by the edges. See Images 12, 13, and 14. Page 9

10 Image 12 Image 13 Page 10

11 Image Locate the emblem on the chrome base by indexing the lower edge of the emblem fin onto the center lower lip of the base. Make sure the 300 name is readable on the door panel from inside the car sitting in a normal fashion, and not standing on your head. Do Not TOUCH the underside of the emblem where the adhesive is located to test how sticky it is. Trust us, we have selected a good adhesive but if you insist on touching it, that action will transfer oil from your fingers to the adhesive face reducing its ability to stick. Also, Do Not BEND the emblem into place as damage to the emblem will result. Next, roll the emblem along the curve of the edge of the base s lip to locate the longer fin tip into its location on the base; centering the emblem while keeping the one side of the emblem elevated. See Images 15 and 16. Page 11


12 Image By now, the emblem will be getting lower to the base and somewhat self centering, but only if you have not pressed any of the adhesive to the base and started the bond. Finally, fully drop the emblem onto and into the base. You can use a small tool to push the edges of the emblem to encourage it to drop into the base, only if it is not fully centered. This is the final, and only, adjustment you can make. See Image 16. Image 16 Page 12

13 12. By now, the emblem should be fully centered and dropped all the way down. Next, you must activate the adhesive by firmly pressing down with your fingertips. Rub the flat places of the emblem, but try to avoid the 300 as you want that area to stand in full relief. I doubt you would be able to flatten the 300 but why take a chance. Go over the emblem many times because the heat and pressure from your fingers will help the bond form. Use no tools and watch the long fingernails. I do not think you can scratch the emblem face with your nails but then why take a chance. See Image 17. Image Step back and admire your work. Repeat the procedure for the other panel and tell your friends how talented you are. See Image 18. Page 13

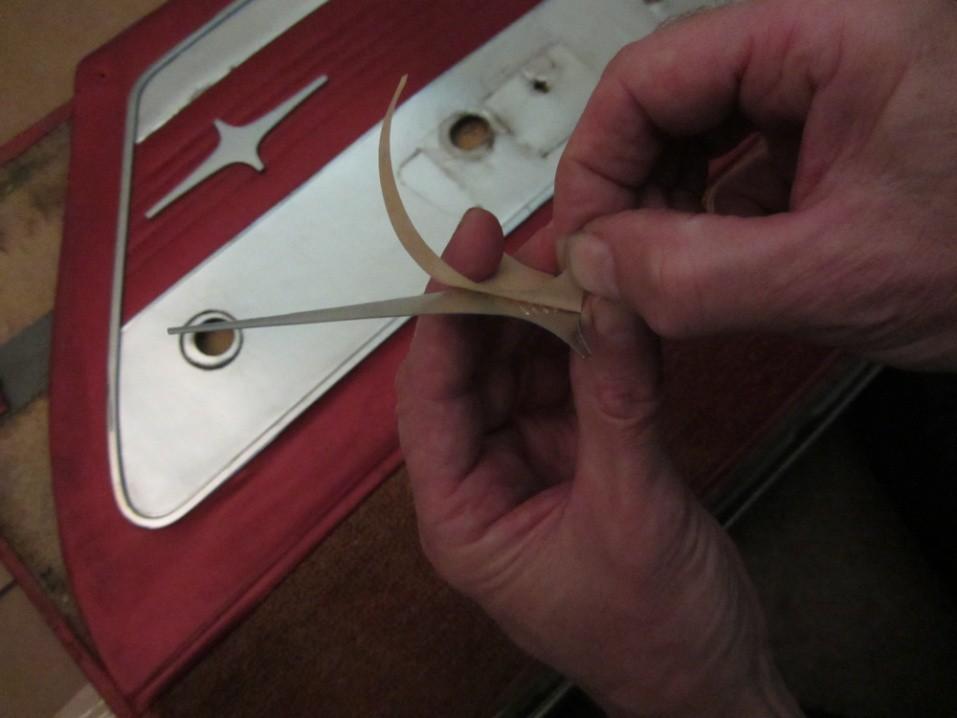
14 Image Care of emblems: They can withstand normal interior cleaning materials but avoid any abrasive cleaners or scrubbing brushes such as polishing compounds or Scotch Bright pads. They can be waxed if one wants to, but the originals were not waxed and are flat in appearance like these are. We put a lot of effort into making the color and finish as accurate as possible. 15. One additional note; when we shot the video it was apparent that some additional protection on the panel prior to scraping the adhesive with the blade was a good idea. So we managed to slip a piece of plastic under it for the video. In Image 19 I slipped an old flexible metal ruler under the emblem as it is only mounted on the long ends and in the center. See Image 19. Page 14

15 Image 19 Page 15
In this step-by-step guide we will teach you how to. Your kit includes:
 How to install your SSR speaker refoaming kit (View all of our DIY instructions by visiting www.springfieldspeakerstore.com and clicking on the DIY Instructions tab) In this step-by-step guide we will
Mustang Door Sill Plates Installation Guide
 Mustang Door Sill Plates Installation Guide The below installation instructions work for the following products: 1994-2004 Ford Mustang Steeda Polished Door Sill Plates Congratulations on purchasing a
DASH KIT INSTALLATION
 ÿÿÿÿÿ ÿÿÿÿÿÿÿÿÿÿÿÿ ÿÿÿ ÿÿÿÿÿ ÿÿ ÿÿÿ ÿÿÿÿÿÿÿÿÿÿÿÿÿÿ ÿÿÿÿÿÿÿÿÿÿ ÿÿÿÿ ÿÿÿÿ ÿÿ ÿÿÿÿÿ ÿÿÿÿÿÿÿÿ PROUDLY MADE IN THE USA DASH KIT INSTALLATION These instructions are aimed at the do-it-yourself installer. Read
Mirrorcraft Project Especially for Dogs
 Mirrorcraft Project Especially for Dogs DIY Customized Pet Mirror Make a mirror photo frame to Display your Pets Photo Irene Jacobs April 2007 Mirrorcraft is a fun craft to easily create you own customized
ProSeal Instructions for RB67 film back and camera body
 ProSeal Instructions for RB67 film back and camera body Please read these instructions completely before you start. Knowledge strengthens confidence, and like most jobs, this is better done right the first
Volvo 1800 Smiths Gauge Face Overlay Installation By Dave Barton
 Volvo 1800 Smiths Gauge Face Overlay Installation By Dave Barton These face overlays are the product of a lot of research. They are printed with a special printer using waterproof and UV resistant ink
Harmony Remote Repair
 Harmony Remote Repair harmonyremoterepair.com How to install your new Harmony One Front Cover/Touch Screen Important! Before you begin working on your Harmony One, you must discharge any static electricity
Installing Your New Creature From The Black Lagoon Tail Light DMD Panel MOD
 Installing Your New Creature From The Black Lagoon Tail Light DMD Panel MOD A few things before we start: The wooden speaker panel provided in this MOD was manufactured using a Precision CNC machine and
Contents. pages 20-24: Installing Edge sinks into. custom laminate countertops page 8: Installing Edge sinks into postform laminate countertops
 Contents pages 2-8: Installing Edge sinks into custom laminate countertops page 8: Installing Edge sinks into postform laminate countertops pages 9-14: Installing Acrylic sinks into custom laminate countertops
Cardboard Model Buildings
 Cardboard Model Buildings Get more model kits from http://www.modelbuildings.org PRINTING & ASSEMBLY TIPS: These OO designs can easily be resized by reducing the print percentage as follows: OO scale is
Masking: Each mirrored sheet is well protected by a durable paint backing and
 STORAGE Horizontal storage: If mirror sheets are stored flat, care must be taken to avoid warping, slipping and scratching. If different sizes are stored together the largest panels should at the bottom
M A N U A L 6 June 2017
 M A N U A L 6 June 2017 What are Protection Films? These films are meant to protect the vulnerable parts of cars, bicycles, motorbikes, etc... They are transparent glossy, so the underlying colour remains
Volvo 1800 Smiths Gauge Face Overlay Installation By Dave Barton
 Volvo 1800 Smiths Gauge Face Overlay Installation By Dave Barton These face overlays are the product of a lot of research. They are printed with a special printer using waterproof and UV resistant ink
Application guidance for Printed Vinyl decals
 Paint Masks - Dry Rub Decals - Waterslides - Printed media Telephone: Website: email: +44(0)7872 181119 (mobile) http://www.flightlinegraphics.com sales@flightlinegraphics.com Application guidance for
SIMPLEX ELITE MAT CUTTER
 INSTRUCTION MANUAL MODEL 750-1 / 760-1 SIMPLEX ELITE MAT CUTTER INSTRUCTIONS AND OPERATION MANUAL 40 in (101 cm) mat cutting system with bevel & straight cutters, production stops, 27 in (68 cm) squaring
Picture 4. Picture 1. Picture 2
 HP-41C Card Reader Repair The Short Fix Approach Tools needed include the following shown below. Two sizes of Phillips head screw drivers are good. One small and one medium small. Needle nose pliers are
REVISION LIST CHAPTER 25: AFT WINDOWS. The following list of revisions will allow you to update the Legacy construction manual chapter listed above.
 REVISION LIST CHAPTER 25: The following list of revisions will allow you to update the Legacy construction manual chapter listed above. Under the Action column, R&R directs you to remove and replace the
Fender Protectors. To ensure a successful installation, please read all of these instructions prior to starting.
 Fender Protectors To ensure a successful installation, please read all of these instructions prior to starting. General Instructions All Tough Stuff Protective Products use a waterproof contact adhesive.
Handrail H Series. Product Installation. Instructions. Installation Instructions For. Wall Mounted and Freestanding Round Handrails
 Product Installation Installation Instructions For Instructions Handrail H Series Installation Instructions for Wall Mounted and Freestanding Round Handrails Step Nosing F Series Concrete and Timber Step
Peg Away Putty Info. Are gloves required for handling Peg Away Putty?
 How does it work? Peg Away Putty comes to you as two separately packaged components: the tinted putty and a clear activator. As you begin your project, you will activate the putty by mixing these two parts,
DIY Instructions For NGPC Front Light Installation using the Gameboy Advanced SP Front Light
 DIY Instructions For NGPC Front Light Installation using the Gameboy Advanced SP Front Light Tools you will need: Phillips Screwdriver Flat head Screwdriver Tri-wing Screwdriver Exacto Knife Soldering
Beyond Rubber: Unique Techniques Your Own Stamps
 Beyond Rubber: Unique Techniques for or Making M Your Own Stamps There are many materials you can carve in order to make your own rubber stamps to use in décor projects. Popular materials include erasers,
Vinyl Installation Guide and Tips
 Vinyl Installation Guide and Tips Tools Needed: Squeegee; Grease Pencil (white or blue only!); 2" & 1/4" Masking Tape Prepare your surface and vinyl as outlined on back cover prior to employing this technique
Kota Japan Finest Edge Knife Sharpening Guide
 Kota Japan Finest Edge Knife Sharpening Guide Introduction A sharp knife is a joy to work with but it is very scarce in many kitchens. When you buy a new knife, you will notice that it loses its sharpness
QWALL 5.2 (2 Back Panels)
") QWALL 5. ( Back Panels) SHOWER ACRYLIC WALL INSTALLATION INSTRUCTIONS IMPORTANT DreamLine TM reserves the right to alter, modify or redesign products at any time without prior notice. For the latest up-to-date
QWALL 5. ( Back Panels) SHOWER ACRYLIC WALL INSTALLATION INSTRUCTIONS IMPORTANT DreamLine TM reserves the right to alter, modify or redesign products at any time without prior notice. For the latest up-to-date
1104. Clean up the door striker plates with a hand grinder using a wire brush and WD-40.
 Chapter 31 - Misc. Putting VW Back Together (Video Clip 31) 1104. Clean up the door striker plates with a hand grinder using a wire brush and WD-40. 1105. Install both door striker plates on the VW body
SIMPLEX STUDIO ELITE MAT CUTTER
 INSTRUCTION MANUAL MODEL 700- SIMPLEX STUDIO ELITE MAT CUTTER INSTRUCTIONS AND OPERATION MANUAL 0 inch (50 cm) capacity mat cutting system with bevel & straight cutters, production stops and squaring arm
A complete collection of information about installing a Dana Decals vinyl decal.
 INSTRUCTIONS COMPLETE COLLECTION CONTENTS: 1 2 3 4 5 6 7 8 Diagram of a Decal Detailed Transferring Tips Small Decal Installation A complete collection of information about installing a Dana Decals vinyl
Instructions for Installing Vinyl Stair Treads with Musson 3 Wide Double-Face Tape
 Instructions for Installing Vinyl Stair Treads with Musson 3 Wide Double-Face Tape (For No. 300 & No. 334 treads see special note in the Installation of Vinyl Stair Tread section below) Where To Install
SAW-PIERCING. 79. Fig. 29. Placing new blade in saw-frame.
 SAW-PIERCING. 79 First make a full-size drawing of the hinge, then by means of transfer paper transfer the design of the butt end to the copper or brass. Then lay out the knuckles as shown in Fig. 28,
Laser Printer Toner Transfer With Kitchen Parchment Paper and a Laminator, Version 1.3
 Laser Printer Toner Transfer With Kitchen Parchment Paper and a Laminator, Version 1.3 By R. G. Sparber Protected by Creative Commons. 1 Why? No matter how nicely you make something in your shop, it will
T-Top Headliner Repair Guide With detailed instructions
 T-Top Headliner Repair Guide With detailed instructions Supplies: Fabric: 1 ¼ yards will do -You can use any kind of fabric you want. Some fabrics will be harder to install than others. I d highly recommend
HURST COMP STICK KIT DODGE CHARGER, MAGNUM, AND CHRYSLER 300 (with AUTO-STICK) Catalog # & by Hurst Performance
 Catalog # & by Hurst Performance") HURST COMP STICK KIT 2005-2007 DODGE CHARGER, MAGNUM, AND CHRYSLER 300 (with AUTO-STICK) Catalog #538 0410 & 538 0411 2009 by Hurst Performance FORM 159 0410 03/09 Thank you for purchasing the Hurst Comp
HURST COMP STICK KIT 2005-2007 DODGE CHARGER, MAGNUM, AND CHRYSLER 300 (with AUTO-STICK) Catalog #538 0410 & 538 0411 2009 by Hurst Performance FORM 159 0410 03/09 Thank you for purchasing the Hurst Comp
Fairy Tale #4 Little Red Riding Hood. Fairy Tale #4: Mixed Media
 Fairy Tale #4: Mixed Media Little Red Riding Hood For this lesson s mixed-media assignment, I offer you three oil pastel techniques to add to your toolbox! 1 Technique #1 Masking Oil pastel on paper. SUPPLIES
Stenciling on Fabric. with Renegade (vinyl) Stencils. All Things Silhouette Early Edition
 Stencils. All Things Silhouette Early Edition") Stenciling on Fabric with Renegade (vinyl) Stencils 2016 Shelly Stokes Cedar Canyon Textiles www.cedarcanyontextiles.com You can purchase or make stencils from many different materials. Here are the pros
Stenciling on Fabric with Renegade (vinyl) Stencils 2016 Shelly Stokes Cedar Canyon Textiles www.cedarcanyontextiles.com You can purchase or make stencils from many different materials. Here are the pros
Mission Embossible. Tools. Materials: Copper sheeting Ammonia Pickling vinegar Newspapers Copper powder Nail polish or shelac
 Mission Embossible Jazz up your décor with copper Materials: Tools Copper sheeting Ammonia Pickling vinegar Newspapers Copper powder Nail polish or shelac Stylus Abrasive scrub pad Nail Scissors or tin
Model 2400/4000 Illustrated Installation Instructions
 Model 2400/4000 Illustrated Installation Instructions Contractors Wardrobe DESIGNERS MNUFCTURERS 26121 venue Hall Valencia, C 955 (661) 257-77 Fax: (661) 257-4907 Toll Free: (800) CW-DOORS (800) 293-6677
Module One: Non Powered Hand Tools
 Module One: Non Powered Hand Tools What is included in this module Why are we learning this? Safety rules Right tool for the right job Identity of Tools Hands on time Quiz Why are we here? Basic knowledge
Please read and understand all instructions before building!
 AGM-256 Pit Bull This kit contains all the parts necessary* to build a flying high power rocket: 1) Pre-slotted main airframe 1) Pre-slotted boat tail 1) Nose cone 4) Main fins 4) Canard fins 1) Piston
C Paint. Product Information Sheets
 T A T G O E C Paint Product Information Sheets Cottage Paint- 8oz jar Available in many pre-tinted colors -see chart. Used for painting furniture and cabinetry. Water based Clay paint that is easily distressed
Flash Coving. Chapter 8 Flash Coving 8. 1
 8 Flash Coving Chapter 8 Flash Coving 8. 1 Flash Coving A. TOOLS In addition to the normal tools (knives, dividers, recess scribers, straightedges, rollers, trowels, etc.), other tools are also needed
ProSeal Instructions for All Olympus XA style Cameras
 ProSeal Instructions for All Olympus XA style Cameras Please read these instructions completely before you start. Knowledge will increase your confidence, and like most jobs, this is better done right
Read Me First! PICKUP INSTALLATION MATRIX INFINITY VT MATRIX INFINITY MIC BLEND INSTALLATION GUIDE. *Minimum 20⁰ string break angle
 MATRIX INFINITY VT MATRIX INFINITY MIC BLEND INSTALLATION GUIDE Read Me First! We recommend having this system installed by an experienced repair technician *Minimum 20⁰ string break angle PICKUP INSTALLATION
EASY APPLICATION. Furniture Linoleum
 EASY APPLICATION Furniture Linoleum can be applied easily on all common materials such as MDF, chipboard and Plywood as well as steel or composite materials. Furniture Linoleum has a special matte appearance
Bath Accessory Installation
 Bath Accessory Installation Step 1 - Clean surface using a clean dry cloth or use rubbing alcohol to remove any residue (wax, grease, solvents). Allow to dry one hour. Caution! DO NOT use any household
INSTALLATION INSTRUCTIONS
 VESDURA VINYL PLANKS 3MM PVC GLUE DOWN - OAK COLLECTION Safety First CAUTION Asbestos Warning in existing floor. Do not sand, dry scrape, bead blast or mechanically pulverize existing resilient flooring.
Practical Information: ORALITE V98 Conformable Graphic Sheeting
 Page 1 of 5 General Information (hereto referred to as V98) is a tough, weather and solvent resistant product designed for graphics applications on vehicles with smooth painted or unpainted surfaces. Templating
Assembly Instructions 10 X 10 Aluminum Frame Building
 Assembly Instructions 10 X 10 Aluminum Frame Building 27 97 9 8 47 36 74 52 10 10 X 10 Square Building W/ Dome Includes: The Steel Entry Door with a Dead Bolt Lock assembly and Aluminum Door Frame. Metal
Volvo 240/260 New Face Overlay Installation Models By Dave Barton
 Volvo 240/260 New Face Overlay Installation 1975-80 Models By Dave Barton These custom faces are the product of years of research and experimentation. They are printed with a special printer using waterproof
#85-2-5A: PAINT STRIPPING AND FINISH ANALYSIS AND CORRECTION - (Aug 7, 1985)
") #85-2-5A: PAINT STRIPPING AND FINISH ANALYSIS AND CORRECTION - (Aug 7, 1985) "Please discard previous bulletin 85-2-5 due to this updated information." The corrosion protection provided by the factory
#85-2-5A: PAINT STRIPPING AND FINISH ANALYSIS AND CORRECTION - (Aug 7, 1985) "Please discard previous bulletin 85-2-5 due to this updated information." The corrosion protection provided by the factory
Cleaning your painting tools
 Take care of your tools and your tools will help take care of your house Leading Innovation in Home Improvement www.rdproduct.com Cleaning your painting tools It s a dirty job but somebody has got to do
Tech Tip for February 2000 Installing a 124 Spider Convertible Top
 Page 1 of 6 Back to Tech Tips Click on the animation for order info. Tech Tip for February 2000 Installing a 124 Spider Convertible Top Updated from Ciao!News volume 3 number 1, Summer 1996 Like our other
BELGIAN EXT. REC DINING TABLE
 BELGIAN EXT. REC DINING TABLE Date: Williams 20 Jul. 2015 Sonoma Product Information Dept. www.williams sonoma.com Page 1 of 5 Page 1 of 5 Important Safety Instructions: Please read all instructions carefully
QWALL 4 ACRYLIC SHOWER WALL INSTALLATION INSTRUCTIONS
 QWALL 4 ACRYLIC SHOWER WALL INSTALLATION INSTRUCTIONS IMPORTANT DreamLine TM reserves the right to alter, modify or redesign products at any time without prior notice. For the latest up-to-date technical
FRAMED SLIDING DOOR FOR TUB OR SHOWER ENCLOSURE INSTALLATION INSTRUCTIONS
 FRAMED SLIDING DOOR FOR OR SHOWER ENCLOSURE INSTALLATION INSTRUCTIONS QCI5023 REV. 0 Page 1 Certified 06/22/2016 INSTALLATION NOTES: Unpack your unit carefully and inspect for freight damage. Lay out and
Soldering Techniques NIAGARA COLLEGE TECHNOLOGY DEPT.
 Soldering Techniques NIAGARA COLLEGE TECHNOLOGY DEPT. Soldering 101 Soldering is the process of joining two metals together to form an electrically ll and mechanically secure bond using heat and a third
Paint Masks - Stencils - Dry Rub Decals - Waterslides +44(0) (mobile)
 (mobile)") Paint Masks - Stencils - Dry Rub Decals - Waterslides Telephone: Website: email: +44(0)7872 181119 (mobile) http://www.flightlinegraphics.com sales@flightlinegraphics.com Dry Rub Decals Dry rub decals
Paint Masks - Stencils - Dry Rub Decals - Waterslides Telephone: Website: email: +44(0)7872 181119 (mobile) http://www.flightlinegraphics.com sales@flightlinegraphics.com Dry Rub Decals Dry rub decals
INSTALLATION GUIDE VERSION 11/14
 INSTALLATION GUIDE VERSION 11/14 In this guide we will demonstrate effective techniques and methods for installing EDGE stainless steel sinks seamlessly in both laminate and solid surface. These techniques
FRAMED PANEL / DOOR / PANEL CONTINUOUS HINGE SHOWER ENCLOSURE INSTALLATION INSTRUCTIONS
 FRAMED / DOOR / CONTINUOUS HINGE SHOWER ENCLOSURE INSTALLATION INSTRUCTIONS QCI5229 Rev 0 6 INSTALLATION NOTES: Unpack your unit carefully and inspect for freight damage. Lay out and identify all parts
EPP Rebel Z 35. White Red w/ Blue Orange w/ Blue Orange w/burgundy Other. Specs. Color - Bottom White Black Checkers Silver Checkers Other Checkers
 EPP Rebel Z 35 Specs AUW ~10.0oz Width 35.28 Length 34.67 Wing Area 1.44 sqft Horz Area 2.35 sqft Vert Area.91 sqft
iphone 1st Generation Battery Replacement Written By: irobot ifixit CC BY-NC-SA Page 1 of 15
 Written By: irobot ifixit CC BY-NC-SA www.ifixit.com Page 1 of 15 INTRODUCTION Battery not lasting long? Swap it out (requires soldering). TOOLS: Probe and Pick Set (1) Desoldering Braid (1) SIM Card Eject
Installation tutorial for Console Customs Xbox Mode Dual Button (RFX-5B) Rapid fire Microchip for all Wired and Wireless controllers
 Rapid fire Microchip for all Wired and Wireless controllers") Installation tutorial for Console Customs Xbox 360 5-Mode Dual Button (RFX-5B) Rapid fire Microchip for all Wired and Wireless controllers This tutorial is designed to aid you in installation of a console
Installation tutorial for Console Customs Xbox 360 5-Mode Dual Button (RFX-5B) Rapid fire Microchip for all Wired and Wireless controllers This tutorial is designed to aid you in installation of a console
Turkey Football Panel
 Turkey Football Panel PROJECT TITLE: Turkey Football Turkey Football Panel A Stained Glass Project DESIGNED BY: Jeanne Baruth for Diamond Tech SKILL LEVEL: (Adult 1-5 1 being the easiest, 5 being difficult)
ROCK STAR. User Guide. Windshield Repair System. Part# RSR Equalizer Industries, Inc.
 ROCK STAR Windshield Repair System Part# RSR800 User Guide 2012 Equalizer Industries, Inc. Revision 11/10/17 www.equalizer.com 11. Clean the area that you have worked on with a good glass cleaner and a
How to make climbing grips. By,
 How to make climbing grips By, Items needed: * Items may be needed depending on your preference. - Carving Foam - Level Table - Cardboard - Pen - Ruler - Straight Edge - Box cutter - Hot melt glue gun
VERSION 1.7 PRT-ES USER GUIDE. ZiPPERTUBiNG CO. THE. (480)
") VERSION 1.7 PRT-ES USER GUIDE THE ZiPPERTUBiNG CO. www.zippertubing.com (480) 285-3990 R Table of Contents pg.1 TABLE OF CONTENTS Introduction... 2 Installation: Procedure A... 4 Installation: Procedure
VERSION 1.7 PRT-ES USER GUIDE THE ZiPPERTUBiNG CO. www.zippertubing.com (480) 285-3990 R Table of Contents pg.1 TABLE OF CONTENTS Introduction... 2 Installation: Procedure A... 4 Installation: Procedure
EXA 0-02a, EXA 1-02a, EXA 2-02a, EXA 3-02a.
 Printing Techniques EXA 0-02a, EXA 1-02a, EXA 2-02a, EXA 3-02a Found Object Printing http://artlabforkids.susanschwake.com/wp/?p=61 Crayon Etching 1. Cover the surface of a piece of paper or card with
INFINITY-Z SHOWER DOOR / TUB DOOR INSTALLATION INSTRUCTION. MODEL #s 01-Chrome
 INFINITY-Z SHOWER DOOR / TUB DOOR INSTALLATION INSTRUCTION IMPORTANT DreamLine reserves the right to alter, modify or redesign products at any time without prior notice. For the latest up-to-date technical
BASIC FIELD PREPARATION TIPS. Prospecting tips
 Prospecting tips When prospecting stop often and look around you, noting landmarks. Look back in the direction from which you came as this is what you will see when you return. When first spotting what
Installation Instructions
 GENERAL INSTALLATION INFORMATION To ensure maximum performance from your A 2 bath fixture, please read and follow the instructions and cautions. Carefully inspect the new fixture for any shipping damage.
A Precision 2000 Mixed Media Project
 Día de los Muertos (Day of the Dead) Panel A Precision 2000 Mixed Media Project PROJECT TITLE: Día de los Muertos (Day of the Dead) Panel DESIGNED BY: Andy Spencer SKILL LEVEL: (Adult 1-5: 1 being the
Read Me First! PICKUP INSTALLATION MATRIX INFINITY VT MATRIX INFINITY MIC BLEND INSTALLATION GUIDE. *Minimum 20⁰ string break angle
 MATRIX INFINITY VT MATRIX INFINITY MIC BLEND INSTALLATION GUIDE Read Me First! We recommend having this system installed by an experienced repair technician *Minimum 20⁰ string break angle PICKUP INSTALLATION
Repairing Apple Wireless Keyboard without destroying it.
 Repairing Apple Wireless Keyboard without destroying it. An Apple keyboard with non-functioning keys may be due to damaged traces on the two thin sheets of plastic inside, called the membrane. This is
Lexus ES350 Window Clip Replacement
 Page 1 of 10 1.0 Purpose The following instruction details the tools and supplies required, and the steps for removing and replacing the broken window clip in your 2007-2012 Lexus ES350. 2.0 Tools and
Sculpting Hands. With Deb Wood. Deb Wood /Enchanted Hearts All Rights Reserved
 Sculpting Hands With Deb Wood Deb Wood /Enchanted Hearts 2016. All Rights Reserved Copyright Notice and Disclaimer: The instructions herein are copyright protected and are intended for the personal use
Surf-N-Skim and Surf Pad System Installation Instructions
 Surf-N-Skim and Surf Pad System Installation Instructions Tools & Materials: Warm, clean, dry and well lit working environment; flexible straight edge or chalk line; single edge razor; plastic squeegees;
The Useless Machine. DIY Soldering Edition. Instruction Guide v0004
 The Useless Machine DIY Soldering Edition Instruction Guide v0004 TM For the best outcome, follow each step in order. We recommend reading this guide entirely before you get started. Tools required: Soldering
Wilkhahn. Care & Maintenance
 Wilkhahn. Care & Maintenance Wilkhahn. Care & Maintenance. Veneer Instructions Veneer - Day to day maintenance - Gently wipe down the surface of the table with a clean cloth, slightly dampened in water.
The build should take around 2 to 3 hours. However, by leaving yourself more time you can go at a relaxed pace and be sure not to miss anything.
 Before We Start Before we jump into building your Picade, make sure you have everything to hand. I know you're eager to jump right into the construction, but we need to get set up properly first! 1. Prepare
FRAMED SLIDING DOOR FOR TUB OR SHOWER ENCLOSURE 6150A-7150A
 FRAMED SLIDING DOOR FOR TUB OR SHOWER ENCLOSURE 6150A-7150A F AB GLASS AND MIRROR www.fabglassandmirror.com Call: +1 888-474-2221 Fax: (614)-334-4919 Office Timing: 8:30-18:00 EST info@fabglassandmirror.com
Cool, Quiet & Comfortable
 installation in a 32 Ford Coupe Cool, Quiet & Comfortable By Mr. Al Knack, Cotter, Arkansas 1. These are the products and suggested tools needed to install Hushmat in any type vehicle. A tape measure,
MICRO1L / MICRO2 / MICRO6 / MICRO140UV / MICROM0
 Application Guide MICROperforated Films APPLICATION AND REMOVAL Microperforated Films MICRO1L / MICRO2 / MICRO6 / MICRO140UV / MICROM0 REQUIRED ACCESSORIES QA squeegee (refer to our catalogue) QRigid for
Big Oz. Rocket. User Guide V0313
 Big Oz Rocket User Guide 59824 V0313 Materials Included The Big Oz Rocket Kit should include the following materials. If something is missing, contact Customer Service at 800-358-4983. 20-ounce plastic
Assembly Instructions: Kit #5
 Assembly Instructions: Kit #5 1. Insert the T-pin into one of the caps. 2. Insert the rotor core into the same cap as shown below. Apply some pressure to push the rotor core approximately 1/2" (10-12 mm)
Golden angels in an elegant design
 Golden angels in an elegant design The magic of advent these modern-looking, golden-gowned angels are simply perfect for giving your home a festive Christmas feel. Made using the clay-like FIMOair basic
Cabinet Scraper 05P32.05
 Cabinet Scraper 05P32.05 The Veritas Cabinet Scraper is a very versatile tool, capable of both rough and fine work. As supplied, both edges of the blade are ground at 45 and need only burnishing for rough
Custom Front Panel Upgrade Instructions
 Custom Front Panel Upgrade Instructions Here are the directions for upgrading your SP-II to an SP-IIB, with a custom blackanodized front panel and engraved lettering. There are only forty SP-IIB s in existence
675 Quick N Stall Neo Angle Framed Hinge Shower Enclosure
 INSTALLATION INSTRUCTIONS 675 Quick N Stall Neo Angle Framed Hinge Shower Enclosure Call Technical Dept @ 1-800-452-2726 QCI1003 Page 1 of 9 Certified 10/01/09 INSTALLATION NOTES: Unpack your unit carefully
DIY PCB TUTORIAL. What you will need:
 DIY PCB TUTORIAL DISCLAIMER: MAKING PRINTED CIRCUIT BOARDS AT HOME INVOLVES THE USE OF DANGEROUS CHEMICALS AND POWER TOOLS. THIS TUTORIAL IS INTENDED FOR PEOPLE WHO ALREADY HAVE EXPERIENCE MAKING PRINTED
PRIME SHOWER ENCLOSURE INSTALLATION INSTRUCTIONS
 PRIME SHOWER ENCLOSURE INSTALLATION INSTRUCTIONS IMPORTANT DreamLine reserves the right to alter, modify or redesign products at any time without prior notice. For the latest up-to-date technical drawings,
Frameless Bypass Slider
 INSTALLATION INSTRUCTIONS Frameless Bypass Slider QCI-5301 Heavy Glass Bypass Slider with Exposed Rollers QCI5301 Rev 0 Page 1 Certified 11/1/2016 Tools: To install your New Shower Enclosure, you may need
INSTALLATION INSTRUCTIONS FRAMELESS CONTINUOUS HINGE SHOWER ENCLOSURE QCI5233
 INSTALLATION INSTRUCTIONS FRAMELESS CONTINUOUS HINGE SHOWER ENCLOSURE QCI5233 QCI5233 Rev 0 Page 1 Certified 06/20/2016 INSTALLATION NOTES: Unpack your unit carefully and inspect for freight damage. Lay
Mixed Metal Heart Author: Patti Bullard Ph.D.
 Mixed Metal Heart Author: Patti Bullard Ph.D. Mixed Metal Heart Difficulty: Easy The beauty of mixed metals paired with a traditional heart shape is sure to bring joy to the jewelry maker as well as the
Basic Assembly For Conventional Series 9000 Structural Panels
 Steelcase, Inc. Grand Rapids, MI 49501 U.S.A. 1-888-783-3522 Basic Assembly For Conventional Series 9000 Structural Panels NOTE: Assembly directions for curved panels are the same as standard panels. Tools
APRON FRONT STAINLESS STEEL SINK Installation & Care Instructions
 Installation & Care Instructions FOR MODEL NUMBERS CA231132 CA231232 CA231235 CA231SB32 CA231SB35 CA231232 CA231132 RECOMMENDED TOOLS Tape Measure Safety Glasses Painter s Tape BEFORE YOU START CA231SB32
EZYSTONE WORKSURFACES
 EZYSTONE WORKSURFACES Installation & Maintenance Instructions 1. Tools Required Worktop Edge Finishing Kit Pack 1-100mm Velcro Backing Pad Pack 2-100mm Diamond Dry Cut Velcro Discs (100 Grit Yellow) (200
Ball-Joint Scrapers Steel Blade Carbide Blade 05K K21.04
 Ball-Joint Scrapers Steel Blade Carbide Blade 05K21.01 05K21.04 The Veritas Ball-Joint Scraper is based on a tool originally made by L.S. Starrett Tool Company but out of production for many years. Originally
Unit 5: Designing with Data (Safer Buildings) Contents
 Contents") Contents 1. Working with Balsa Wood and Foam Core. 1 a. Cutting & Safety 1 b. Joining 2 c. Aligning & Squaring... 3 2. Building the Base 3 3. Building the Roof Load Holder.. 4 1. Working with Balsa Wood
Contents 1. Working with Balsa Wood and Foam Core. 1 a. Cutting & Safety 1 b. Joining 2 c. Aligning & Squaring... 3 2. Building the Base 3 3. Building the Roof Load Holder.. 4 1. Working with Balsa Wood
Guardian Protection Leather Care Program
 Guardian Protection Leather Care Program FOOD FOR THOUGHT: While leather is the most durable upholstery used for furniture today and can last for years, proper care, such as frequent cleaning and conditioning,
ASX / OUTLANDER SPORT MZ538307EX SIDE MOULDING INSTALLATION AND HANDLING INSTRUCTIONS
 ASX / OUTLANDER SPORT MZ538307EX SIDE MOULDING INSTALLATION AND HANDLING INSTRUCTIONS Side moulding Thank you for purchasing the Mitsubishi Genuine Accessory. To install and use the product correctly with