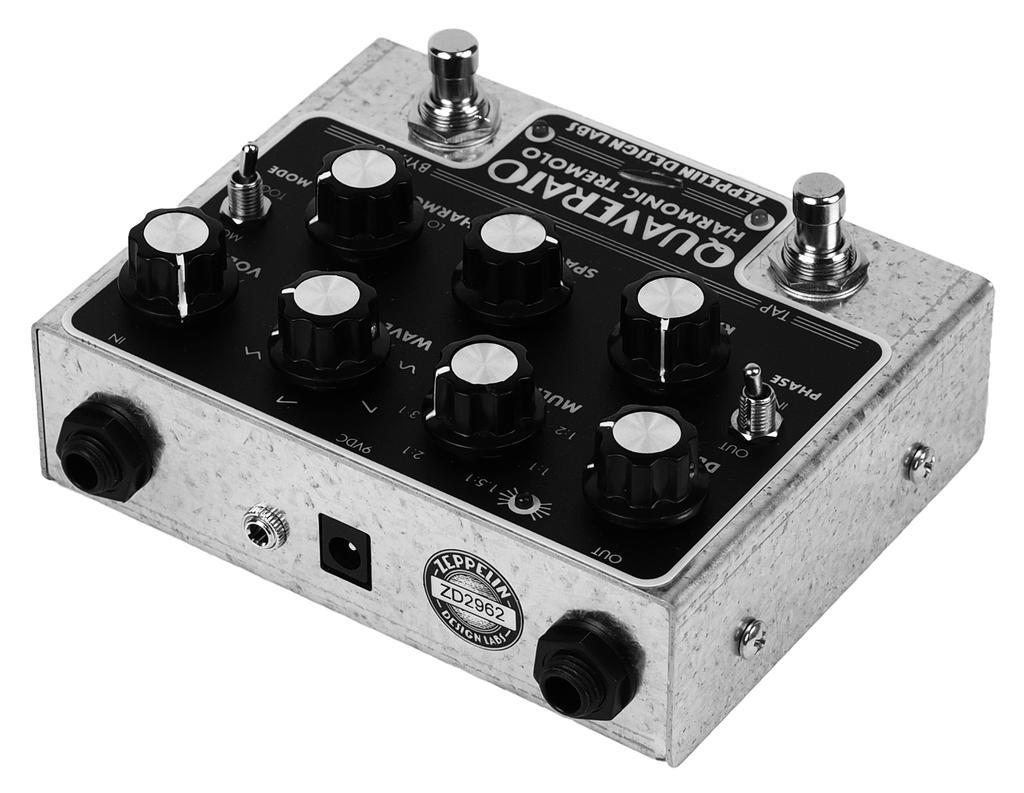
QUAVERATO MIDI MOD. Assembly Instructions
|
|
|
- Stephen Crawford
- 5 years ago
- Views:
Transcription


1 QUAVERATO MIDI MOD Assembly Instructions

2 QUAVERATO MIDI MOD Assembly Instructions WHAT YOU WILL NEED...3 WHAT S IN THE BOX...4 POPULATING THE PRINTED CIRCUIT BOARD...7 THE CHASSIS...13 UPDATING THE SOFTWARE...17 PUTTING IT ALL TOGETHER ZEPPELIN DESIGN LABS. NO PART OF THIS DOCUMENT MAY BE REPRODUCED WITHOUT WRITTEN PERMISSION FROM THE AUTHOR. ZEPPELIN DESIGN LABS TAKES NO RESPONSIBILITY FOR ANY DAMAGE OR HARM THAT MAY COME TO ANYONE OR ANYTHING THROUGH THEIR PRODUCTS. The QUAVERATO SOFTWARE is COVERED BY the Creative Commons Share-Alike/ATTRIBUTION/NON-COMMERCIAL license, which means you are free to add or build upon THE circuit idea AND THE SOFTWARE in any way your creativity allows, but any derivatives must be shared using the same license. 2
3 WHAT YOU WILL NEED Here s everything you will need to upgrade your Quaverato with the MIDI mod kit. In this assembly manual, we are assuming: 1. you have a Quaverato Harmonic Tremolo pedal, as a kit underway, or already assembled and in-service; 2. you know how to solder and how to use tools safely; but 3. you have no other particular experience with electronics. TOOLS 1. Soldering Iron (not a soldering gun, or a cold heat iron), good quality, watt, with a good medium or small sized tip, conical or screwdriver shape. One with a temperature control and a stand is best. Also, make sure you have a way to clean the tip: a wet sponge or a dry solder cleaning pad. 2. #2 Philips Screw Driver 3. Flush cutters or small diagonal cutters 4. Needle-nose pliers 5. Clamp or vise 6. Solder sucker or solder braid optional, but very handy if you have to remove / repair any components! 7. A center punch, awl, or nail-like sharp object 8. Drill press or other small power drill capable of drilling through the chassis 9. Drill bits: 1/8, 3/16, and 1/4 (3 mm, 4 or 5 mm, 6 mm) 10. Deburring tool or large drill bit around 7/ length of 2x4 block of wood or similar, to drill into 12. Scissors 13. USBTinyISP programmer for flashing the MIDI-compatible software onto your Quaverato (available at our website) SUPPLIES 1. Solder, 60/40 rosin core, the smaller diameter the better (we prefer.032 diameter). Make sure it s good quality; we prefer Kester brand, but most brands will work fine. 2. Masking or painters tape 3

4 WHAT S IN THE BOX Table 1: Quaverato MIDI Mod Kit Bill of Materials (BOM) is a complete parts list of everything that should be present in your kit, followed by photos of each part. Carefully go through the kit, identifying every part. Compare them with the photos. Besides verifying that nothing is missing, this will acquaint you with the parts and their names. If ANYTHING is missing, first double-check; we double-checked before sealing the box at our lab! If it s still missing, US right away at support@zeppelindesignlabs.com. If we goofed and shorted your kit, we will get replacement parts in the mail to you as soon as possible. If you lose or damage anything, we will be glad TIP: Empty the parts of the kit into a bowl, NOT onto the cluttered workbench, or onto the living room carpet! This will protect you from losing tiny parts. sell you replacements. Some of the parts in this kit are fairly common and you might be able to find them at your local electronics or hobby shop, but they can also be ordered directly from us. Contact support@zeppelindesignlabs.com. t o Figure 1: What s In The Box 4


5 Table 1: Quaverato MIDI Mod Kit Bill of Materials Part # Description Notes Qty RS Resistor, 220R R1 1 RS Resistor, 1K R2 1 CP Ceramic Capacitor 1uF C1 1 DI N4007 General Purpose Diode D1 1 IC Optocoupler 6N138 DIP 8 U1 1 HE Header, Single Row, 4 Pins P1 1 CB Pin Header Cable Connects to the Quaverato PCB 1 HD /8" TRS Audio Jack J1 1 PC MIDI Mod PCB 1 CB Female MIDI to 1/8 Male TRS Adaptor 1 TP Foam Tape 1 R2 R1 C1 D1 U1 P1 CB J1 PC CB TP

6 Figure 3: Component Values and Locations 6
7 POPULATING THE PRINTED CIRCUIT BOARD In assembling this kit, your work space should be well-lit, well-ventilated, and disposable; that is, don t work on the nice dining room table! Work on a utility surface that you can burn, drill and scratch. A piece of ¼ tempered masonite, or a chunk of MDF, makes an excellent cover if you don t have a utility work bench. CAUTION: Solder fumes are not healthy for you. The fumes consist of vaporized flux, which can irritate your nose, lungs, and even your skin. You MUST work in a space where the air drifts away from you as you work, so fumes do not rise straight onto your face. CAUTION: Solder residue usually contains lead, which is poisonous if you ingest it. Do not breathe the fumes, do not eat the supplies, wash your hands after you handle solder, and sweep and wipe up your work space after EVERY USE. The printed circuit board (PCB) holds the components in this circuit. All of the components will be installed on the component side of the board, which is the side that has the part numbers on it. The other side of the board is called the solder side, which, as the name implies, is the side on which the legs of the components are soldered to the board. Proper technique for installing and soldering components to a circuit board is demonstrated through several great resources on Instructables and Youtube under the search PCB soldering tutorial. The general procedure consists of the following: 1. Install the part on the component side of the board, by threading the wire leads through the appropriate holes in the board. For your convenience, the board has silk screen outlines indicating where the components should be placed, along with text indicating the part number and the component value. 2. Hold the component in place with your finger and turn the board over. 3. Gently bend the leads out at about 45 degrees to keep the component from falling out of its holes. 4. Flip the board over solder-side-up, and solder all of the components in one pass. 5. Clip the leads off with small diagonal cutters, right at the solder joint. 7


. This resistor is labeled RED, RED, BLACK, BLACK, BROWN.")
8 Let s begin! 1. Resistors: The values of resistors are given by a series of colored stripes on their body. There are several tutorials online describing how to decode these stripes, but we will identify each resistor for you by simply naming the stripe colors, and giving you the value and the part number. Fortunately, there are only two resistors in this mod kit, so it shouldn t be too difficult to tell them apart. Figure 3: Component Values and Locations is a good reference for all the components. If you are color blind or can t see the stripes clearly, then you must use your digital multimeter to measure the resistance of each resistor. Resistors are not polarized, meaning they can be installed in their holes in either direction. It doesn t matter which lead goes in what hole. The two resistors in this circuit are installed standing upright on the PCB so bend one lead nearly parallel with their bodies and install them standing up (1,2). 1 2 a. Start with the 220 ohm resistor (R1). This resistor is labeled RED, RED, BLACK, BLACK, BROWN. Bend the lead as described above and install it on the circuit board as in the picture (2). Bend the leads out on the back to keep the resistor from falling out of the board (3). 3 4 b. Next do the 1K resistor (R2), labeled BROWN, BLACK, BLACK, BROWN, BROWN. Compare to its picture in the BOM. Find it s location on the circuit board; install and bend the leads the same as the previous resistor (4). 8

. 5 3.")


9 2. Capacitor (C1): This circuit only has one ceramic capacitor. It doesn t matter which direction the capacitor is installed. Place the cap in its holes and bend the leads out on the back (5) Diode (D1): The diode is installed standing up like the resistors, but it is polarized, meaning it matters which direction it is installed. Notice the white stripe on one end of the body of the diode (6). The lead closest to this white stripe goes into the hole with the square pad. Bend the other lead nearly parallel with the body and install the diode as in the picture (7,8). Bend the leads out on the back (9)
. 10 11 12 5.")


10 4. Solder all the leads of the resistors, capacitor, and diode (10). Use your flush cutters to snip off the leads at the solder joint (11,12) Optocoupler (U1): The optocoupler is what we call an IC or integrated circuit chip. When soldering this IC, try to keep it from getting too hot. Most chips have a temperature threshold that shouldn t be exceeded. As a rule of thumb don t keep your iron on any leg longer than two seconds, and make sure the chip stays cool enough to touch. If you find you have a hard time keeping the IC from getting too hot, just solder one leg at time and let the chip cool off before proceeding to the next leg. a. The IC has a specific orientation. If you install it wrong, the MIDI mod will not work. These optocouplers have a dot near one corner. The pin nearest this dot is pin 1, and it goes into the hole with the square pad. Make sure it is installed as in the pictures (13,14)


: Install the 1/8 jack at J1.")

11 b. The leads on this IC are too short to bend out to hold the chip in place. A good way to install this component is to tack in one pin from the top of the PCB and then turn the board over to solder the rest of the pins (15,16). Don t forget to re-solder the tacked pin from the bottom. The pins are too short to snip off so you can leave them /8 TRS Audio Jack (J1): Install the 1/8 jack at J1. Make sure all the pins on this jack are straight. Line up the pins to the slots in the PCB and press the jack snug to the board (17,18). While holding the jack in place, flip the board over and solder the pins (19)
.")

.")
.")
12 7. 4-Pin Header: The short pins go through the board; the long pins point up (20). Make sure the bottom of the header is flat against the circuit board. Tack one pin on the end of the row down with solder while you hold the header in from the top (21). Once one pin has been tacked on, you can solder the other pins in place (22). Remember to properly re-solder the tacked on pin The PCB is now done. Put it aside while we modify the chassis of the Quaverato. 12


.")
.")
13 THE CHASSIS If you are modding a complete Quaverato that is already in service, you will have to open it up first. If you are working on the Quaverato kit, your pedal is still in pieces; skip to Use your #2 Philips screwdriver to remove the two screws in either side of the pedal (1). Use your pliers to remove the two plastic nuts from the 1/4 jacks (2). The bottom half of the chassis is now loose and you should be able to slide the two halves of the chassis apart (3,4)
.")


, punch a")


14 2. Cut out the paper drilling template by cutting around the solid line (5). Align the template to the front of the bottom half of the chassis (6). As you hold the template in place, hold it up to the light to align the holes in the chassis to the hole markings on the paper. The edge of the template should line up with the edge of the chassis. While making sure the template doesn t move from that position, use a few pieces of tape to hold it in place (7,8) With a center punch or a sharp, nail-like object (such as a nail), punch a divot in the chassis at the location indicated on the template (9). If you use a hammer and nail, do not stand the chassis up on top of the table as we did here. You might badly bend the chassis. Instead, hang the chassis over the edge of your work bench, so that the chassis face is supported directly by the table. Once you have made your mark, remove the template (10)

. b. Start by drilling a 1/8 (3 mm) hole.")
 bit. Drill very slowly. d. Finally, drill out the 1/4 (6 mm) hole in the same way (13).")
15 4. In this step we will drill a 1/4 (6 mm) hole in the chassis. For this process you need to be very careful. This is by far the most dangerous part of this whole operation. Use work gloves and safety goggles. If you have a drill press, use it. If you are not qualified to drill a hole in the chassis, do not attempt it. Get a qualified friend to help you. In this process, we will not try to drill out the 1/4 hole all at once. We will first drill a small hole through the chassis and then use larger bits to increase the hole size. a. Place the block of wood behind the face of the chassis that will be drilled, as in the picture. Mount the chassis and piece of wood in a vice to hold it steady, with the surface to be drilled facing up (11). b. Start by drilling a 1/8 (3 mm) hole. Put the bit in the chuck as far deep as it will go. Align the bit to the divot you made and start drilling on low speed (12). Go slow and use constant force against the metal. Do not let the drill bit slip away from the divot. If it slips away, re-align and start again. c. Now re-drill with a 3/16 (4, 4.5 or 5 mm) bit. Drill very slowly. d. Finally, drill out the 1/4 (6 mm) hole in the same way (13)
 (14).")
.")
16 e. Level out the lip around the hole with a deburring tool or a large drill bit -- about 7/16 (12 mm) (14). Deburr the chassis on both sides of the hole to allow the jack and circuit board to sit flush against the inside of the chassis (15) We are now ready to flash the MIDI-compatible software onto your Quaverato. 16
 and install it on your PC (sorry, neither MacOS nor Linux is supported at this time). Run the Updater and click the? to open the Help file.")
.")
. 4. Choose Quaverato from the Products drop down menu.")

17 UPDATING THE SOFTWARE 1. Download the ZDL Updater program from our website ( and install it on your PC (sorry, neither MacOS nor Linux is supported at this time). Run the Updater and click the? to open the Help file. Read this carefully to complete the installation. 2. Plug in the 6-pin ribbon cable header from the USBTinyISP into your Quaverato as in the picture (1). Please note the orientation of the ribbon cable on the Quaverato s ISP header: pin 1 is closest to the white dot on the PCB (3,4) Plug in the programmer s USB cable into your computer and start the ZDL Updater software (2). 4. Choose Quaverato from the Products drop down menu. Choose the latest version from the software drop down menu (version or higher). Press the FLASH button. If everything is connected correctly then you should see a status bar indicating that the Quaverato is being programmed. 5. If you got the message that the flash was a success (the status bar should reach 100%), then unhook the ribbon cable from your Quaverato and continue with the next step. If you got any other message then consult the Help file by pressing the? button. Review the troubleshooting procedures. 17

.")


18 PUTTING IT ALL TOGETHER 1. Apply the foam tape to the edge of the Quaverato s circuit board as shown in the picture. Don t let it overhang the board (1,2) Attach the 4-pin ribbon cable to the header on the MIDI board (3,4). 3. Attach the MIDI board to the chassis with the 1/8 jack nut as in the picture (5,6). The board should be parallel to the bottom of the chassis, with the solder side facing up. The ribbon cable should be laying against the bottom of the chassis (5). Screw the nut onto the jack, but don t over tighten it (6)
.")
.")

.")

19 4. Slide the two parts of the chassis together by lining up the 1/4 jacks to the holes on the bottom chassis (7). While the chassis is still open, plug the other end of the 4-pin ribbon cable into the header on the Quaverato s PCB (8). It is important to make sure the wire is not twisted. Close the chassis. Make sure the power jack is properly lined up with its square hole on the chassis and that it didn t end up behind the hole (9) Replace the 4 screws and two nuts you removed earlier (10,11) That s it! Your Quaverato is ready to be controlled by your favorite MIDI controller or sequencer or DAW. Please see the Quaverato MIDI User Manual for the details of how MIDI works on the Quaverato. 19
20 TOP EDGE 1/4" (6 mm) HOLE. MARK WITH CENTER PUNCH OR NAIL. DRILL 1/8" (3 mm) PILOT. STEP UP GRADUALLY TO FINAL HOLE SIZE. BE CAREFUL! USE DRILL PRESS IF POSSIBLE. ZEPPELIN DESIGN LABS 2950 N. WESTERN AVENUE CHICAGO ILLINOIS USA QUAVERATO MIDI MOD DRILL TEMPLATE REV. DATE 10/29/ SHEET 1 OF 1 SCALE:1:1
21
ABC V1.0 ASSEMBLY IMPORTANT!
 ABC V1.0 ASSEMBLY Before starting this kit, prepare the following tools: Soldering iron (15-20W will do), flush cutters, no.2 hex screwdriver or allen key and phillips screwdriver. Also briefly go through
LITTLE NERD v1.1 Assembly Guide
 last update: 9. 3. 2016 LITTLE NERD v1.1 Assembly Guide bastl instruments.com INTRODUCTION This guide is for building Little Nerd module from Bastl Instruments. It is good to have basic soldering skills
MICROGRANNY v2.1 - Assembly Guide
 last update: 9. 5. 2017 MICROGRANNY v2.1 - Assembly Guide bastl-instruments.com INTRODUCTION Welcome to the assembly guide for the MicroGranny kit. MicroGranny is a monophonic granular sampler by Bastl
KASTLE v1.5 - Assembly Guide
 last update: 14. 12. 2017 KASTLE v1.5 - Assembly Guide bastl-instruments.com INTRODUCTION Welcome to the assembly guide for the Kastle kit - mini modular synthesizer. It is suitable for beginners. It is
The ability to make basic voltage and resistance measurements using a digital multimeter
 Congratulations on your purchase of a new OneShot chassis! The PC01 OneShot combines a rugged enclosure, power supply, and discrete instrument DI in a compact 1/4U package. A few minutes of assembly are
4ms SCM Breakout. Kit Builder's Guide for PCB v2.1 4mspedals.com
 4ms SCM Breakout Kit Builder's Guide for PCB v2.1 4mspedals.com Shuffling Clock Multiplier Breakout This guide is for building a Shuffling Clock Multiplier Breakout module (SCMBO) version 2.1 from the
Standard Kit #1 (3-way switch)
") Standard Kit #1 (3-way switch) Please Read All Instructions Before Beginning. Tools you will need: Soldering Iron (35 watt preferably) Solder Wet Sponge Wire Clippers 3/8 Drill Bit 1/4 Drill Bit Variable
Standard Kit #1 (3-way switch) Please Read All Instructions Before Beginning. Tools you will need: Soldering Iron (35 watt preferably) Solder Wet Sponge Wire Clippers 3/8 Drill Bit 1/4 Drill Bit Variable
Explorer Wiring Kit (assembled)
") Explorer Wiring Kit (assembled) For Vintage, Firestorm & Standard Series Please Read All Instructions Before Beginning. Tools you will need: Soldering Iron (35 watt preferably) Solder Wet Sponge Wire Clippers
Explorer Wiring Kit (assembled) For Vintage, Firestorm & Standard Series Please Read All Instructions Before Beginning. Tools you will need: Soldering Iron (35 watt preferably) Solder Wet Sponge Wire Clippers
Value Location Qty Potentiometers C1M Distortion 1 A10k Volume 1. Footswitch 3PDT SW1 1. Jacks 1/4 Mono 2 DC Power 1
 Distortion BUILD INSTRUCTIONS Thank you for your purchase of our Distortion+ kit! We have completely redesigned our entire line of kits to be the most user friendly, while still maintaining their same
Telecaster Wiring Kits Please Read All Instructions Before Beginning. Tools you will need: Soldering tips: Removing Current Wiring: Step 1. Step 2.
 Telecaster Wiring Kits Please Read All Instructions Before Beginning. Tools you will need: Soldering Iron (35 watt preferably) Solder Wet Sponge Wire Clippers Wire Strippers 3/8 Drill Bit 5/32 Drill Bit
Congratulations on your purchase of the SparkFun Arduino ProtoShield Kit!
 Congratulations on your purchase of the SparkFun Arduino ProtoShield Kit! Well, now what? The focus of this guide is to aid you in turning that box of parts in front of you into a fully functional prototyping
Pingable Envelope Generator
 Pingable Envelope Generator Kit Builder's Guide for PCB v1.0.3 4mspedals.com PEG This guide is for building a Pingable Envelope Generator (PEG), which is an intermediate-level kit. You should be confident
Penrose Quantizer Assembly Guide
 Penrose Quantizer Assembly Guide Schematic and BOM The schematic can be found here: www.sonic-potions.com/public/penrosequantizerschematic.pdf The BOM is available at google docs: Link to BOM Prepare the
KLIK v1.0 - Assembly Guide
 last update: 12. 7. 2017 KLIK v1.0 - Assembly Guide bastl-instruments.com INTRODUCTION Welcome to the assembly guide for the KLIK by BASTL INSTRUMENTS. Klik is a synchronisation device that enables you
Standard Kit #1 (5-way switch)
") Standard Kit #1 (5-way switch) Please Read All Instructions Before Beginning. Tools you will need: Soldering Iron (35 watt preferably) Solder Wet Sponge Wire Clippers 3/8 Drill Bit 1/4 Drill Bit Variable
Standard Kit #1 (5-way switch) Please Read All Instructions Before Beginning. Tools you will need: Soldering Iron (35 watt preferably) Solder Wet Sponge Wire Clippers 3/8 Drill Bit 1/4 Drill Bit Variable
Eurorack DIY Kit Instructions. All Thonk kits are sold under our standard Terms and Conditions -
 MA VCA OVERVIEW For the most recent version of this document please visit http://thonk.co.uk/documents/ma/ For all technical support please visit http://bit.ly/1tl78e0 on Muffwiggler. All Thonk kits are
Lesson 2: Soldering. Goals
 Introduction: Its time to learn how to solder. So you have met all the components needed to make a DIY Gamer, now it s time to put it together. Soldering is joining the components to the printed circuit
Xkitz.com XLO-5CP Control Panel for Five Channel Color Light Organ
 Xkitz.com XLO-5CP Control Panel for Five Channel Color Light Organ Rev 1.15 An Optional accessory for the Xkitz XLO-5 or XLO-5DC 5 Channel Color Light Organs Introduction This kit contains all the electronics
GCI BRUTALIST JR. BUILD GUIDE
 GCI BRUTALIST JR. BUILD GUIDE The Brutalist Jr. is the DIY little brother to the GCI Brutalist, a high powered distortion pedal loosely based on the Providence Stampede SDT-1. It runs on 9v DC power or
Assembly and User Guide
 Assembly and User Guide AtariPunkr is an adjustable stepped tone generator. AtariPunkr provides hours of fun everyone! Powered by: 9V Battery Outputs: Mylar Speaker (Included) Stereo Output (3.5mm Jack)
The Useless Machine. Parts Only - Build Guide v0001
 TM The Useless Machine Parts Only - Build Guide v0001 For the best outcome, follow each step in order. We recommend reading this guide entirely before you get started. Tools required: One phillips screwdriver,
Value Location Qty Transistors 2N5485 Q1, Q2, 4 Q3, Q4 2N5087 Q5 1. Trim Pots 250k VTRIM 1. Potentiometers C500k Speed 1. Toggle Switch On/On Vibe 1
 P-90 BUILD INSTRUCTIONS Thank you for your purchase of our P-90 kit! We have completely redesigned our entire line of kits to be the most user friendly, while still maintaining their same great sound!
Bill of Materials: Metronome Kit PART NO
 Metronome Kit PART NO. 2168325 The metronome kit allows you to build your own working electronic metronome. Features include a small speaker, flashing LED, and the ability to switch between several different
Guitarpedalkits.com Overdrive Pedal Build Instructions
 Page 1 Guitarpedalkits.com Overdrive Pedal Build Instructions Follow the instructions in this guide to build your very own DIY overdrive pedal from GuitarPedalKits.com. If you re a first time builder,
LDB-1 Kit Instructions Page 1 of 8
 LDB-1 Kit Instructions Page 1 of 8 Important Information Congratulations and thank you for your purchase of the LDB-1 Little Drummer Boy Analog Drum Machine Kit! Before you start, please read the enclosed
Lighthouse Beginner s soldering kit
 Lighthouse Beginner s soldering kit Kit contains: 1 x 220 ohm resistor (Red, Red, Black) 1 x 82k ohm resistor (Grey, Red, Orange) 2 x 220k ohm resistors (Red, Red, Yellow) 2 x Diodes 1 x Power switch 1
Assembly Instructions
 Assembly Instructions For the SSQ-2F 3.1 MHz Rife Controller Board Kit v1.41 Manual v1.00 2012 by Ralph Hartwell Spectrotek Services GENERAL ASSEMBLY INSTRUCTIONS Arrange for a clean work surface with
Intellivision A/V Mod Installation Guide
 Intellivision A/V Mod Installation Guide This document will guide you through installing your Intellivision A/V Mod Kit to your Intellivision I, II, and III game consoles. Installation is basically the
BINARY. Logic functions for analog computation DIY BUILD GUIDE GRAYSCALE.
 BINARY Logic functions for analog computation DIY BUILD GUIDE GRAYSCALE http://grayscale.info BINARY DIY BUILD GUIDE Binary from Grayscale is a 1-bit analog computer for digital logic signals. Patch up
Pacific Antenna Code Practice Oscillator Kit
 Pacific Antenna Code Practice Oscillator Kit This kit is offered to initiate the first time builder in the various techniques of mechanical and electronic kit construction. At the end of the approximately
ELECTRICAL CONNECTIONS
 ELECTRICAL CONNECTIONS Lesson 13 EET 150 Electrical Connections Learning Objectives In this lesson you will: see different methods of making electrical connections. learn a procedure for making soldered
Construction Guide European Version
 Construction Guide European Version PCB This section describes how to build up the DRO-350 printed circuit board (PCB). The bare PCB is available for purchase on the order page. Static Protection Bare
Assembly and Installation Instructions for White Oak Audio Design PL400 Series 1 LED board
 Thank you for purchasing White Oak Audio Design s Phase Linear PL400 Upgrade LED Light Board. White Oak Audio Design products are meticulously engineered and tested to ensure a direct drop in fit with
tinycylon Assembly Instructions Contents Written by Dale Wheat Version August 2016 Visit dalewheat.com for the latest update!
 tinycylon Assembly Instructions Written by Dale Wheat Version 2.1 10 August 2016 Visit dalewheat.com for the latest update! Contents Assembly Instructions...1 Contents...1 Introduction...2 Quick Start
Project 747 VERSION 1.3 USER MANUAL February 22nd 2018
 VERSION 1.3 USER MANUAL February 22nd 2018 WWW.GARAGE1217.COM WARNING: Project requires knowledge of AC electrical systems, repair of said systems and restoration of said systems. If proper safety measures
Bill of Materials: PWM Stepper Motor Driver PART NO
 PWM Stepper Motor Driver PART NO. 2183816 Control a stepper motor using this circuit and a servo PWM signal from an R/C controller, arduino, or microcontroller. Onboard circuitry limits winding current,
VC Divider Assembly manual
 1 VC Divider Assembly manual Thank you for your purchase of the SSSR Labs VC Divider DIY Kit! This manual will help you assemble the VC Divider quickly and easily. Follow the instructions! As you may know,
Installing Your New Creature From The Black Lagoon Tail Light DMD Panel MOD
 Installing Your New Creature From The Black Lagoon Tail Light DMD Panel MOD A few things before we start: The wooden speaker panel provided in this MOD was manufactured using a Precision CNC machine and
OpenROV. Guide 3 - Electronics. We will now move to the assembly of the electronics that will control the ROV. Written By: OpenROV
 OpenROV Guide 3 - Electronics We will now move to the assembly of the electronics that will control the ROV. Written By: OpenROV 2017 openrov.dozuki.com Page 1 of 33 INTRODUCTION We will introduce soldering
Circuit Board Assembly Instructions for Babuinobot 1.0
 Circuit Board Assembly Instructions for Babuinobot 1.0 Brett Nelson January 2010 1 Features Sensor4 input Sensor3 input Sensor2 input 5v power bus Sensor1 input Do not exceed 5v Ground power bus Programming
Manual Version July 2007
 Manual Version 1.2 - July 2007 Page 1 Table of Contents Section1: M3 Phono Board Build...3 Phono Board Parts List...3 Preparation...4 Fitting the Valve Bases...6 Installing the Resistors...7 Starting the
Soldering is easy. here's how to do it. Andie Nordgren (Comics adaptation) Jeff Keyzer. by: Mitch Altman (soldering wisdom) (Layout and editing)
 Jeff Keyzer. by: Mitch Altman (soldering wisdom) (Layout and editing)") Soldering is easy here's how to do it by: Mitch Altman (soldering wisdom) Andie Nordgren (Comics adaptation) Jeff Keyzer (Layout and editing) Download this comic book and share it with your friends! Distribute
Soldering is easy here's how to do it by: Mitch Altman (soldering wisdom) Andie Nordgren (Comics adaptation) Jeff Keyzer (Layout and editing) Download this comic book and share it with your friends! Distribute
Building the Toothpick Audio CW Filter
 Building the Toothpick Audio CW Filter Introduction The toothpick is a simple variable bandpass audio filter designed to compliment the Splinter QRPp Trans-Receiver. The filter also contains an audio amplifier
Heartboard PCB Assembly Instructions
 Heartboard PCB Assembly Instructions Thanks for purchasing a Heartboard! These instructions will guide you through assembling and testing the Heartboard. Let s get started! Stuff you need Soldering iron
Installation tutorial for Console Customs Xbox ONE MaxFire ONE V2 PCB
 Installation tutorial for Console Customs Xbox ONE MaxFire ONE V2 PCB This tutorial is designed to aid you in installation of a console customs MaxFire ONE V2 Circuit board in the newer Xbox One Controllers
Starving Student II. Starving Student II. SS2 guide. Written By: 6L guides.diyaudio.com/ Page 1 of 24
 SS2 guide Written By: 6L6 2019 guides.diyaudio.com/ Page 1 of 24 INTRODUCTION This is a build guide for the hybrid headphone/pre-amplifier. You can buy a kit at the SSII product listing on the diyaudio
Lesson 2: Soldering. Goals
 Introduction: Its time to learn how to solder. So you have met all the components needed to make a DIY Gamer, now it s time to put it together. Soldering is joining the components to the printed circuit
Any Questions? Contact us or BSA Atomic Blinkie
 BSA Atomic Blinkie The heart of this blinkie is a tiny electronic chip embedded in each of the three LEDs. When power is applied, the chip tells the LED to turn on and off, or fade different colors By
Installation tutorial for Console Customs PS3 TrueFire Standard Rapid fire Microchip for Sixaxis and Dualshock 3 controllers
 Installation tutorial for Console Customs PS3 TrueFire Standard Rapid fire Microchip for Sixaxis and Dualshock 3 controllers This tutorial is designed to aid you in installation of a console customs rapid
Never power this piano with anything other than a standard 9V battery!
 Welcome to the exciting world of Digital Electronics! Who is this kit intended for? This kit is intended for anyone from ages 13 and above and assumes no previous knowledge in the field of hobby electronics.
TekBot Remote Control Receiver Board Construction
 TekBot Remote Control Receiver Board Construction Purpose This tutorial illustrates the procedure for construction of the Receiver board for the TekBot. A Guide to Soldering Many of you have soldered once
Pacific Antenna - Easy TR Switch
 Pacific Antenna - Easy TR Switch Kit Description The Easy TR Switch is an RF sensing switch that can be used to switch an antenna between a receiver and transmitter. It also has a second switched pair
The Useless Machine. DIY Soldering Edition. Instruction Guide v0004
 The Useless Machine DIY Soldering Edition Instruction Guide v0004 TM For the best outcome, follow each step in order. We recommend reading this guide entirely before you get started. Tools required: Soldering
Electronics Merit Badge Class 4. 12/30/2010 Electronics Merit Badge Class 4 1
 Electronics Merit Badge Class 4 12/30/2010 Electronics Merit Badge Class 4 1 Soldering Safety Note: A Soldering Iron gets hotter than 374 F. Do not touch the soldering iron s metal parts or you will receive
Frameless Inline Door With Return QCI5263
 INSTALLATION INSTRUCTIONS Frameless Inline Door With Return QCI5263 WALL MOUNT HINGES FRAMELESS DOOR / PANEL / RETURN PANEL QCI5263 REV. 0 Page 1 Certified 06/17/2016 Parts List with wall mount hinges
Assembly and Installation Instructions for White Oak Audio Design TM-1001 LED board
 Thank you for purchasing White Oak Audio Design s TM-1001 Upgrade LED Light Board. White Oak Audio Design products are meticulously engineered and tested to ensure a direct drop in fit with your tuner.
Gertboard Assembly Manual Rev 1.1
 Gertboard Assembly Manual Rev 1.1 The Gertboard is an add-on GPIO expansion board for the Raspberry Pi computer. It comes with a large variety of components, including buttons, LEDs, A/D converters, DACs,
Pacific Antenna Easy TR Switch
 Pacific Antenna Easy TR Switch Kit Description The Easy TR Switch is an RF sensing circuit with a double pole double throw relay that can be used to automatically switch an antenna between a separate receiver
Installation tutorial for Console Customs Xbox 360 Dual Rapid fire Microchip for wired and wireless controllers (all versions)
") Installation tutorial for Console Customs Xbox 360 Dual Rapid fire Microchip for wired and wireless controllers (all versions) This tutorial is designed to aid you in installation of a console customs
Installation tutorial for Console Customs Xbox 360 Dual Rapid fire Microchip for wired and wireless controllers (all versions) This tutorial is designed to aid you in installation of a console customs
SoftRock v5.0 Builder s Notes. December 12, Building a QSD Kit
 SoftRock v5.0 Builder s Notes December 12, 2005 Building a QSD Kit Be sure to use a grounded tip soldering iron in building the QSD board. The soldering iron needs to have a small tip, (0.05-0.1 inch diameter),
Installation tutorial for Console Customs Xbox Mode Dual Button (RFX-5B) Rapid fire Microchip for all Wired and Wireless controllers
 Rapid fire Microchip for all Wired and Wireless controllers") Installation tutorial for Console Customs Xbox 360 5-Mode Dual Button (RFX-5B) Rapid fire Microchip for all Wired and Wireless controllers This tutorial is designed to aid you in installation of a console
Installation tutorial for Console Customs Xbox 360 5-Mode Dual Button (RFX-5B) Rapid fire Microchip for all Wired and Wireless controllers This tutorial is designed to aid you in installation of a console
Geiger Counter Kit Assembly Instructions ( )
") Geiger Counter Kit Assembly Instructions (2012-05-11) To build this kit, you should know how to solder. And it will be much easier if you have made other kits before. But even if this is your first kit,
Geiger Counter Kit Assembly Instructions (2012-05-11) To build this kit, you should know how to solder. And it will be much easier if you have made other kits before. But even if this is your first kit,
SoftRock v6.0 Builder s Notes. May 22, 2006
 SoftRock v6.0 Builder s Notes May 22, 2006 Be sure to use a grounded tip soldering iron in building the v6.0 SoftRock circuit board. The soldering iron needs to have a small tip, (0.05-0.1 inch diameter),
Soldering and Desoldering Instruction
 Soldering and Desoldering Instruction Soldering is defined as "the joining of metals by a fusion of alloys which have relatively low melting points". In other words, you use a metal that has a low melting
upad Proto Base Assembly Guide v2.0
 upad Proto Base Assembly Guide v2.0 Last Updated September 1, 2015 Table of Contents Preface... 3 Introduction... 3 Required Tools... 3 Flux Pen... 3 Soldering Iron... 3 Solder... 3 Diagonal Cutters...
Read This Page First
 Read This Page First If you are reading this you know the manuals are always available at QRPKITS.com. This is version 8.0 of the manual dated 4/27/2016. There is no need to print out the whole assembly
AR.Drone 2 - Main Board External Antenna Modification Procedure. Document Number: EAM Check back for updates.
 Document Number: EAM-20130303-2 Check back for updates. 3/22/2013 NOTE: Along with this mod procedure, you will also need to: 1. Remove the Main Board. Refer to the Main Board Removal Procedure 2. Adapt
Warm Tube Clock. Before we start, please make sure that you have all required parts that come for the main board :
 Warm Tube Clock Assembly Instructions for the main board Introduction Congratulations on your purchase of OSH Nixie Tube Clock. In this document you will see all steps you need to follow in order to successfully
Custom Front Panel Upgrade Instructions
 Custom Front Panel Upgrade Instructions Here are the directions for upgrading your SP-II to an SP-IIB, with a custom blackanodized front panel and engraved lettering. There are only forty SP-IIB s in existence
Ultrasound Range Finder
 Ultrasound Range Finder PCB Version 1.0 Assembly Manual Range Finder Assembly Instructions Read This Before You Begin 1. Avoid touching the PCB copper traces and pads with your fingers until you are ready
Assembly Instructions for the 1.5 Watt Amplifier Kit
 Assembly Instructions for the 1.5 Watt Amplifier Kit 1.) All of the small parts are attached to a sheet of paper indicating both their value and id. 2.) Leave the parts affixed to the paper until you are
Bushwacker Jeep Flat Style Fender Flares Front Pair
 Bushwacker Jeep Flat Style Fender Flares Front Pair Note: These instructions involve cutting parts of your vehicle. Please read all instructions prior to starting. Installation Time: 3-4 Hours Tools Required:
Installing the Onyx Heated Bed
 Installing the Onyx Heated Bed This short supplement will guide you through replacing the Phebe I heated bed on your Rostock MAX with the new Onyx heated bed. Your Onyx upgrade kit should include the following
Frameless Inline Door QCI5254
 INSTALLATION INSTRUCTIONS Frameless Inline Door QCI5254 FRAMELESS DOOR / PANEL QCI5254 REV. 0 Page 1 Cer fied 06/16/2016 Parts List with wall mount hinges *Quanes may vary QCI5254 REV. 0 Page 2 Cer fied
Cricket 80a Assembly Manual v Copyright David Cripe NM0S The 4 State QRP Group
 Cricket 80a Assembly Manual v. 1.0 Copyright 2017 David Cripe NM0S The 4 State QRP Group Introduction Thank you for purchasing a CRICKET 80a Transceiver. We hope you will enjoy building it and find it
LP-200 Dummy Load / Wattmeter
 LP-200 Dummy Load / Wattmeter Enclosure Retrofit Assembly Instructions March 2009 TelePost Incorporated LP-200 is a trademark of TelePost Inc. Material in this document copyrighted 2009 TelePost Inc. 1
V6.2 SoftRock Lite Builder s Notes. November 17, 2006
 V6.2 SoftRock Lite Builder s Notes November 17, 2006 Be sure to use a grounded tip soldering iron in building the v6.2 SoftRock circuit board. The soldering iron needs to have a small tip, (0.05-0.1 inch
ScaleRCHelis.com V Light Controller Kit
 Thank you for purchasing the ScaleRCHelis.com V1.1 450 Light Controller Kit. This is something you can build in under a hour with some simple soldering equipment. Your kit will include all the parts necessary
FM Wireless Microphone Kit Instructions for Assembly Page 1 of 5
 Instructions for Assembly Page 1 of 5 1. Find Resistor R1. Remove any tape that may be attached to the leads. Bend the leads as needed to insert Resistor R1 into the printed circuit board in the holes
K8039 DMX CONTROLLED POWER DIMMER. Control a lamp or group of lamps trough a DMX signal. Suitable for resistive and mains voltage halogen lighting.
 DMX CONTROLLED POWER DIMMER K8039 Control a lamp or group of lamps trough a DMX signal. Suitable for resistive and mains voltage halogen lighting. Specifications control source: DMX-512, 3 pin XLR socket
THE THUNDERDRIVE (K-950)
") THE THUNDERDRIVE (K-950) OUTPUT DISTORTION Unplug when not in use to save battery life. TO AMP IN The Thunderdrive Modkitsdiy.com FROM GUITAR OUT Use these instructions to learn: How to build an effects
THE THUNDERDRIVE (K-950) OUTPUT DISTORTION Unplug when not in use to save battery life. TO AMP IN The Thunderdrive Modkitsdiy.com FROM GUITAR OUT Use these instructions to learn: How to build an effects
ECE 477 Digital Systems Senior Design Project. Module 11 Board Assembly and Soldering Techniques
 2011 by D. G. Meyer ECE 477 Digital Systems Senior Design Project Module 11 Board Assembly and Soldering Techniques Outline I ve got my board, now what? Which end of this thing gets hot? Flux is your friend.
Designed to send specific MIDI information upon each press. Ultra-low current requirement means a single coin cell will last years
 PedalSync MIDI Data Module Key Features Discrete MIDI Data delivery in a compact design Designed to send specific MIDI information upon each press Ultra-low current requirement means a single coin cell
Tips in Soldering. By Jesus Beltran. Team J (AKA J Crew) EEC 134AB, Professor Xiaoguang Liu UC Davis College of Engineering
 EEC 134AB, Professor Xiaoguang Liu UC Davis College of Engineering") Tips in Soldering By Jesus Beltran Team J (AKA J Crew) EEC 134AB, 2015 16 Professor Xiaoguang Liu UC Davis College of Engineering INTRODUCTION Basic soldering skills is a trait that every electronic/electrical
Tips in Soldering By Jesus Beltran Team J (AKA J Crew) EEC 134AB, 2015 16 Professor Xiaoguang Liu UC Davis College of Engineering INTRODUCTION Basic soldering skills is a trait that every electronic/electrical
The Switched Longwire Tuner SLT
 The Switched Longwire Tuner SLT Thank you for purchasing the SLT kit from Hendricks QRP Kits. This kit is a very high quality kit that you will find easy to build, yet when you finish, you will have a
Tek-Bot Remote Control Transmitter Board Construction
 Tek-Bot Remote Control Transmitter Board Construction Purpose This tutorial illustrates the procedure for construction of the Transmitter board for the Tek-bot. A Guide to Soldering Many of you have soldered
WARNING! ETCHED PARTS CONTAINED IN THIS KIT HAVE SHARP POINTS, EDGES AND CORNERS.
 MPD18 chassis build instructions K A (see below for details) J I G H L C D F E B M Parts list: Ident Quantity A Etched Nickel/Silver fret 1 B Wheel sets 2 C Worms 2 D Worm gears 2 E Shaft adapters 2 F
ArduTouch Music Synthesizer
 ArduTouch Music Synthesizer Assembly Instructions rev C Learn To Solder download for free at: http://mightyohm.com/soldercomic The following photos will show you how to solder. But feel free to download
01. Parts. Blink v1.1. Battery Holder x1. Red LED x1 Green LED x1 Blue LED x1. Resistors x3. Battery x1. Blink PCB x1. Push Button Switchers x3
 Blink L1 L2 L3 01. Parts Battery Holder x1 Red LED x1 Green LED x1 Blue LED x1 Resistors x3 Learn to Solder Kit Battery x1 L1 L2 L3 Blink PCB x1 S3 Push Button Switchers x3 02. Tools RECOMENDED Soldering
K44 Audio Splitter Board Kit
 Introduction The K44 has a great CW reader but one thing that slows most folks down is connecting audio from their receiver to the K44's audio input. recommends using audio from the receiver's audio line
Learn to solder electronics with the Maker
 Learn to solder electronics with the Maker Shed Solder Badge! How to assemble the Maker Shed Badge kit. Written By: Alexander ifixit CC BY-NC-SA www.ifixit.com Page 1 of 19 INTRODUCTION The Maker Shed
Introduction 1. Download socket (the cable plugs in here so that the GENIE microcontroller can talk to the computer)
") Introduction 1 Welcome to the magical world of GENIE! The project board is ideal when you want to add intelligence to other design or electronics projects. Simply wire up your inputs and outputs and away
Introduction 1 Welcome to the magical world of GENIE! The project board is ideal when you want to add intelligence to other design or electronics projects. Simply wire up your inputs and outputs and away
MACCHIATo. Assembly Manual MINI DIGITAL SYNTHESIZER
 MACCHIATo Assembly Manual MINI DIGITAL SYNTHESIZER 031219 MACCHIATO MINI-SYNTH DIGITAL SYNTHESIZER Assembly Manual INTRODUCTION... 3 HISTORY... 3 DESCRIPTION... 3 HOW IT WORKS... 4 WHAT YOU WILL NEED...
6' Wide Premium Greenhouse Benches
 6' Wide Premium Greenhouse Benches Premium Greenhouse Bench with Stationary Top 2015 FarmTek All Rights Reserved. Reproduction is prohibited without permission. STK# DIMENSIONS 112416S6X08 6' W x 3' H
FRAMELESS DOOR / PANEL WITH WALL MOUNT HINGES QCI5274
 FRAMELESS DOOR / PANEL WITH WALL MOUNT HINGES QCI5274 QCI0274 QCI5274 REV. Rev. 1 0 Page Page 1 1 Date Certified: Certified 06/16/2016 10/01/10 Parts List with wall mount hinges ITEM NO. Part # DESCRIPTION
MP573 Assembly guide. Soldering. MP573 Assembly guide PCB split PCB split. Document revision 2.2 Last modification : 22/08/17
 MP573 Assembly guide Safety warning The kits are main powered and use potentially lethal voltages. Under no circumstance should someone undertake the realisation of a kit unless he has full knowledge about
6' Wide Premium Greenhouse Benches
 6' Wide Premium Greenhouse Benches Premium Greenhouse Bench with Rolling Top 2015 FarmTek All Rights Reserved. Reproduction is prohibited without permission. STK# DIMENSIONS 112416R6X08 6' W x 3' H x 8'
Frameless Inline Door QCI5248
 INSTALLATION INSTRUCTIONS Frameless Inline Door QCI5248 FRAMELESS PANEL / DOOR / PANEL QCI5248 REV. 0 Page 1 Certified 06/16/2016 Parts List with glass to glass hinges *Quantities may vary. **Support Bar
Ribcage Installation. Part 2 - Assembly. Back-Bone V1.06
 Ribcage Installation Part 2 - Assembly Back-Bone V1.06 Contents Section 1 Before You Get Started... 2 Included With Your Kit:... 2 Figure: A... 3 CAUTION!... 4 Note:... 4 Tools Required... 5 Section 2:
16 Bit Micro Experimenter Assembly and Check out Instructions
 16 Bit Micro Experimenter Assembly and Check out Instructions The kit you purchased that includes PCB, schematic, complete parts list and these assembly instructions. A top picture of the complete assembly