Back Mount Outdoor Access Control Intercom with InformaCast Installer s Guide
|
|
|
- Ira Burns
- 5 years ago
- Views:
Transcription

1 Back Mount Outdoor Access Control Intercom with InformaCast Installer s Guide This step-by-step guide will help you install your outdoor InformaCast-enabled back mount access control intercom.

2 What s in the Box Page 2
3 PoE power What You Will Need Power-over-Ethernet (PoE) injector or PoE capable switch Remote communication point InformaCast server SIP server or Peer-to-peer device to call Network cable (Cat 5 or Cat 6) Wrench or ratchet set RTV sealant for weatherproofing Screwdrivers Small flat head screwdriver Phillips head screwdriver T-15 Torx pin screwdriver (optional for security screws) For wall mount installations: ½ conduit ½ set screw style connector ½ conduit nut ½ conduit sealing ring (4) ¼ -20 concrete or drywall anchors Page 3

4 Ethernet Wiring Image A The Ethernet cable can ONLY be installed in the orientation shown. Page 4

5 Wall Mount Installation *Refer to pages 2-3 for a list of included hardware and what you will need to properly install your Wahsega access control intercom. Page 5

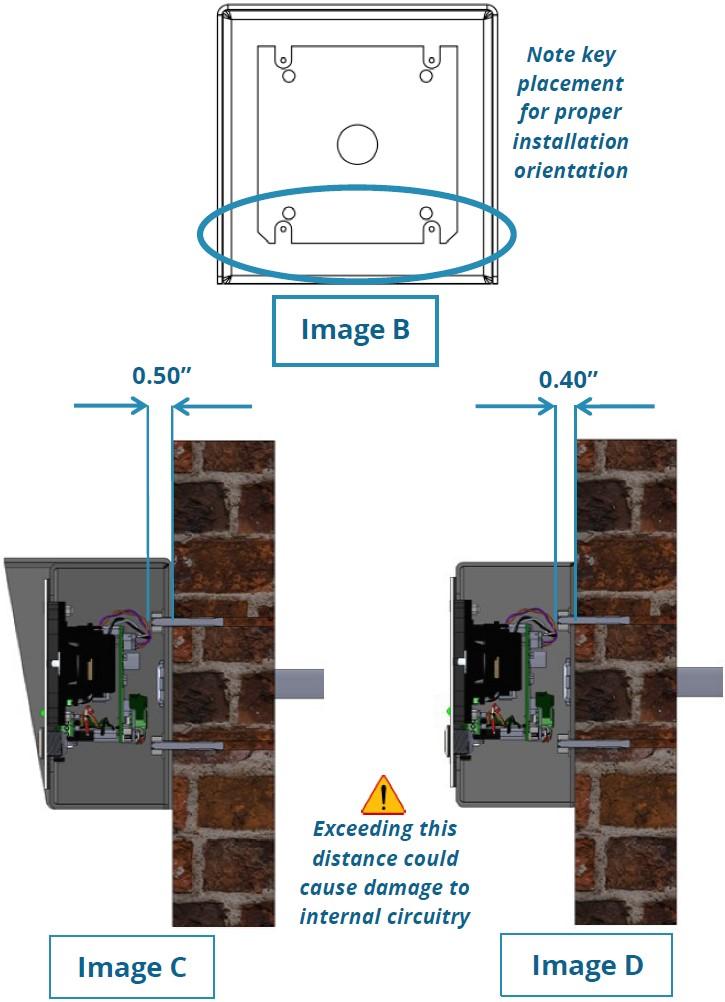
6 1. Using a ½ conduit plug and the appropriate drywall or concrete anchors for your application, affix back box to wall with or without optional weather hood, as shown below. Note key placement and refer to Image B on page 8 to check for correct installation orientation. Use template provided on page 14 to ensure accurate bolt placement. Studs or fasteners should protrude from the wall no more than 0.50 when using hood or 0.40 without hood (Images C & D, page 8). Back box installation using optional weather hood 2. For proper weatherproof deployment, use a ½ conduit sealing ring and fill anchor holes with a generous amount of RTV sealant before threading connectors. 3. Connect Ethernet cable in the orientation shown in Image A, page Before installing the faceplate, be sure to locate and note your device s MAC address, which is printed on a white sticker on the rear of the circuit board. Page 6

7 5. Attach the access control intercom s faceplate to the back box using either the Phillips head screws or the security screws provided. Faceplate installation using optional weather hood Faceplate installation without optional weather hood Page 7
8 Page 8

9 Pedestal Mount Installation *Refer to pages 2-3 for list of included hardware and equipment needed to properly install the Wahsega access control intercom. Page 9

10 1. Using the included hardware, bolt the back box and (optional) weather hood onto pedestal face as shown below, in the orientation shown in Image B, page For proper weatherproof deployment, apply a generous amount of RTV sealant onto both sides of the interior washers and around the perimeter of the pedestal opening, as shown below. 3. Connect Ethernet cable in the orientation shown in Image A, page Before installing the faceplate, be sure to make a note of your device s MAC address, which is printed on a white sticker affixed to the rear of the circuit board. Page 10


11 5. Attach the access control intercom s faceplate to the back box using either the Phillips head screws or the security screws provided. Faceplate installation using optional weather hood Faceplate installation without optional weather hood Page 11

12 Standards Compliant The outdoor intercom meets or exceeds the following RF emissions standards. FCC 47 CFR Part 15 Subpart B Industry Canada ICES-003 Issue 5 Cet appareil numérique de la classe A est conforme à la norme ICES-003 du Canada. This product is designed & manufactured in the USA. ISO 9001:2008 certified factory ROHS Compliant Industrial Temperature -40C +85C. This access control intercom is designed for an outdoor IP65 rating. Page 12
13 Images not to scale. Larger versions available at Wahsega.com. Page 13
14 Wall Installation Mounting Template This image is to scale. Use to find accurate bolt placement. Page 14
15 Back Mount Access Control Intercom with InformaCast WL-IC-BKMT-INF-OV Installation Guide Rev A Page 15
Subject: P0052 Bed Locator Installation Instructions
 Subject: P0052 Bed Locator Installation Instructions Tools required: Standard drill 1/4" diameter drill bit Phillips head screwdriver Screwdriver 5/16" hex nut driver Tape measure 4' (122 cm) level Power
Sentinel Electronic Safe Installation Guide
 Sentinel Electronic Safe Installation Guide by Rev 07/12/2004 P/N 100020 Table of Contents 1. OVERVIEW...3 2. SAFE INSTALLATION...3 2.1. TOOLS REQUIRED...3 2.2. SELECTING THE MOUNTING LOCATION...3 2.3.
Installation Instruction
 Tools Needed for Assembly Stud finder (for wood stud wall) Pencil Mark Electric drill Wood Stud Wall Installation Step 1. Locate the Wood Studs Installation Instruction Drill bit (for wood stud wall) Masonry
Jenny Legs Assembly Instructions
 Jenny Legs Assembly Instructions R EXTENDED PHILLIPS BIT MM ALLEN WRENCH 6MM HEX DRIVE /" 007 Steelcase Inc. Grand Rapids, MI 90 U.S.A. Printed in U.S.A. Page of 6 88000 Rev F Jenny Club Instructions:
Connecting the Radio:
 Connecting the Radio: Step 1: Connect the Cat5 cable from the radio into the RJ-45 jack marked CPE on the POE injector. The POE injector is not weather proof and should be installed indoors. Step 2: Connect
SMARTfit Functional and Brain Fitness Training Multi-Station Trainer Installation for Stud and Concrete Walls (US)
") SMARTfit Functional and Brain Fitness Training Multi-Station Trainer Installation for Stud and Concrete Walls (US) 2017 SMARTfit, Inc. www.smartfitinc.com 1 Unlike other fitness equipment which may require
SMARTfit Functional and Brain Fitness Training Multi-Station Trainer Installation for Stud and Concrete Walls (US) 2017 SMARTfit, Inc. www.smartfitinc.com 1 Unlike other fitness equipment which may require
BL-ER-P Ethernet Radio Unit for Pedestal Installation Guide
 Assemble the Antenna Riser 1. Remove the antenna riser assembly and the antenna from its packaging. 2. Remove the plastic cap, the nut, and the lock washer from the stem of the antenna. 3. Put the stem
Installation Guide. Mounting Kit for Mounting Philips Avalon CTS Cordless Fetal Transducer System on Wall, 2'' Post, Rail, or Slide-on Mounting Plate
 Installation Guide Mounting Kit for Mounting Philips Avalon CTS Cordless Fetal Transducer System on Wall, 2'' Post, Rail, or Slide-on Mounting Plate The purpose of this guide is to: 1. Describe mounting
SAFETY WARNINGS AND GUIDELINES
 SAFETY WARNINGS AND GUIDELINES Turn off and unplug all equipment prior to making electrical connections, including speaker wire connections. Reduce the volume level prior to making any change to the audio
SMARTfit High Intensity Cognitive Training. SMARTfit Trainer Installation Manual for Stud and Concrete Walls Revision 1.3
 SMARTfit High Intensity Cognitive Training SMARTfit Trainer Installation Manual for Stud and Concrete Walls Revision 1.3 2015 Unlike other fitness equipment which may require additional insurance, SMARTfit
Innovative Infrastructure for Electric and Hybrid Vehicles PEDESTAL EXTENSION KIT INSTALLATION GUIDE
 Innovative Infrastructure for Electric and Hybrid Vehicles PEDESTAL EXTENSION KIT INSTALLATION GUIDE PLEASE NOTE: This installation guide includes the latest information at the time of printing. ClipperCreek,
RBP-1215B-RX DODGE RAM QUAD CAB RX3
 RBP-1215B-RX3 2002-2017 DODGE RAM 15-3500 QUAD CAB RX3 Passenger side RX-3 Side Step Drill Template Passenger side rear Modular Bracket (6) L Support Brackets Driver side rear Modular Bracket Driver side
Showpiece Cabinet Integrated Stand For 32" - 52" LCD HDTV
 Showpiece Cabinet Integrated Stand For 32" - 52" LCD HDTV Installation and Assembly Instructions 2009 Incredible Technologies Inc. Version 0109 Showpiece Cabinet Integrated Stand for 32" - 52" LCD HDTV
Mounting Accessories. Installation Guide. VIVOTEK SD83XXE Speed Dome
 VIVOTEK SD83XXE Speed Dome Mounting Accessories AM-116/117 Pendant Pipe AM-118 Pendant Head AM-221 Gooseneck AM-231 Parapet Mount AM-519 Pendant Adaptor Installation Guide Corresponding part numbers: AM-116:
Melamine Plastic Laminate. Toilet Partition Installation Manual
 Melamine Plastic Laminate Toilet Partition Installation Manual PHONE: FAX: 1-866-317-2786 ATTENTION DO NOT MIX FASTENER PACKS EACH FASTENER PACK HAS THE NECESSARY BOLTS, BARRELS AND SCREWS TO INSTALL THE
Assembly Instructions Nevins Phone Booth
 Assembly Instructions Nevins Phone Booth Included Hardware Tools Required supplied by installer Drill & Bit Bolt A - (16) 1/4-20 x 1-1/2 hex head Bolt B - (20) 1/4-20 x 2-1/2 phillips head Screw 1 - (24)
Ginger Twin Full Bunk Bed
 N&D 0809 1. 2. 3. 4. 5. 6. 7. 8. 9. 10. 11. 12. 13. 14.! SAFETY WARNING Follow the information on the warnings appearing on the upper bunk end structure and on the carton. Do not remove warning label from
Outdoor Enclosure. VIVOTEK Pan/Tilt & Fixed Dome Series. Installation Guide
 VIVOTEK Pan/Tilt & Fixed Dome Series Outdoor Enclosure Using AE-131/-132 Outdoor Enclosure, AE-151 Outdoor Enclosure, AM-114 Pendant Head (outdoor), AM-116 and AM-117 Pendant Pipes, AM-221 Gooseneck, AM-212
Universal Voice Coil and 70 Volt Door Speaker V / V
 PagePac by ISSUE 2 Universal Voice Coil and 70 Volt Door Speaker V-5330120 / V-5330230 Installation Manual 947179 Your PagePac Door Speaker Note: The Door Phone Controller and PagePac 6 systems require
INSTALLATION INSTRUCTIONS Small Flat Panel Height-Adjustable, Extended Pitch Swing Arm Wall Mount Model KWE-110
 INSTALLATION INSTRUCTIONS Small Flat Panel Height-Adjustable, Extended Pitch Swing Arm Wall Mount Model KWE-110 The KWE dual swing arm wall mount is designed to provide a broad range of viewing for Small
INSTALLATION INSTRUCTIONS DODGE RAM 2 & 4WD 1500 PART # P5058
 INSTALLATION INSTRUCTIONS 2009-13 DODGE RAM 2 & 4WD 1500 PART # P5058 PARTS LIST: Qty Description Qty Description 1 Grille Guard 12 12-1.75mm Hex Nuts 2 Upper Frame Mounting s (for trucks without tow hooks
INSTALLATION INSTRUCTIONS GRILLE GUARD RAM 1500 PART # 5058/5058-2
 INSTALLATION INSTRUCTIONS GRILLE GUARD PART # 5058/5058-2 PARTS LIST: Qty Description Qty Description 1 Grille Guard 8 12-1.75mm x 35mm Hex Bolts 2 Upper Frame Mounting s (for trucks without tow hooks
DETAILED ILLUSTRATION
 FCF1100 Series (Mounting Knuckle to J-Box JB) - INSTALLATION INSTRUCTIONS electricity has been turned off and electrical 4) Reattach j-box cover, gasket and fixture to the j-box. to read these instructions
Thanks for shopping with Improvements! Chapin Secretary Desk Item #398643
 Thanks for shopping with Improvements! Chapin Secretary Desk Item #398643 Note: You will receive this desk in two boxes. To order, call 1-800-642-2112 West Chester, OH 45069 Made in China 1111 If you have
MAKO TM CASH DISPENSER
 MAKO TM CASH DISPENSER PEDESTAL INSTALLATION GUIDE VERSION 2.0 TDN 0702-000 2/99 CORPORATE HEADQUARTERS: RMA (RETURN MATERIAL AUTHORIZATION) RETURN ADDRESS: 522 E. Railroad Street 2405 B Street Long Beach,
AW58300HTA AW58300HTS USER S MANUAL
 AW58300HTA AW58300HTS USER S MANUAL 5.8 GHz Outdoor 300 Mbps Wireless Ethernet Access Point and Subscriber Unit Radios Industrial-grade, long-range wireless Ethernet systems AvaLAN W I R E L E S S The
AvaLAN AW58103HTS MANUAL ADDENDUM. 5.8 GHz Outdoor 100 Wireless 3-Port Ethernet Subscriber Unit Radio
 AW58103HTS MANUAL ADDENDUM 5.8 GHz Outdoor 100 Wireless 3-Port Ethernet Subscriber Unit Radio Industrial-grade, long-range wireless Ethernet systems AvaLAN W I R E L E S S AW58103HTS Addendum The AW58103HTS
Installation Instructions For Profile Series v.g1 Exit Device
 Installation Instructions For Profile Series v.g1 Exit Device A7757C Copyright 2004, 2008, Sargent Manufacturing Company, an ASSA ABLOY Group company. All rights reserved. Reproduction in whole or in part
INSTALLATION INSTRUCTIONS Flat Panel Static Wall Mount Model: GSM-111
 INSTALLATION INSTRUCTIONS Flat Panel Static Wall Mount Model: GSM-111 The GSM-111 static wall mount fits most 23" to 30" displays. The GSM-111 is designed to adapt to VESA 200mm/ 100mm compliant displays.
LCD LIFT Flat Panel Display System Installation Manual. Table of Contents
 LCD LIFT Flat Panel Display System Installation Manual Table of Contents Page Installation Overview... 2 Trim Ring Installation... 3 LCD Lift Installation....4 Actuator Switch Installation.5 Top Plate
VIT SB-16SS Pedestal. Conversion Guide
 Converting a to Baseline This guide describes the steps for removing another manufacturer s irrigation controller from a VIT SB-16SS pedestal and installing a Baseline controller. Remove All Parts of the
ClipperCreek, Inc. PEDESTAL INSTALLATION GUIDE TESLA WALL CONNECTOR & CLIPPERCREEK HCS. innovative infrastructure for electric and hybrid vehicles
 ClipperCreek, Inc. innovative infrastructure for electric and hybrid vehicles PEDESTAL INSTALLATION GUIDE TESLA WALL CONNECTOR & CLIPPERCREEK HCS PEDESTAL INSTALLATION GUIDE PLEASE NOTE This user s manual
Installation Instructions
 CD-W00-x0-1 Series Wall Mount CO 2 Transmitters Installation Instructions CD-W00-00-1, CD-W00-N0-1 Part No. 24-9601-94, Rev. E Issued August 14, 2014 North American Emissions Compliance United States This
TV WALL MOUNT ASSEMBLY GUIDE RF-TVMLPT01V2
 TV WALL MOUNT RF-TVMLPT01V2 For wood-stud and concrete wall installations Safety information and specifications...2 Tools needed...2 Package contents...3 Installation instructions...4 ASSEMBLY GUIDE Before
P a r k c o n s o l e s i n k a s s e m b l y i n s t r u c t i o n s
 P a r k c o n s o l e s i n k a s s e m b l y i n s t r u c t i o n s Before You Begin: Professional installation by two-person crew is required for this fixture. Install water supply and drain piping
Panel & Shelf Identification
 4 to 8 Aromatic Cedar Closet Model # 801 1 PLEASE READ INSTALLATION INSTRUCTIONS BEFORE ASSEMBLING Rev. C IF YOU ARE MISSING PARTS OR HAVE QUESTIONS PLEASE CONTACT: customerservice@cedargreen.net Tools
INSTALLATION INSTRUCTIONS KK-K9-C12-K CHEVY IMPALA
 INSTALLATION INSTRUCTIONS KK-K9-C12-K 2000-2005 CHEVY IMPALA READ ALL INSTRUCTIONS PRIOR TO INSTALLATION TOOLS REQUIRED: Power Drill Drill bits1/4 and 5/32 7/l6 wrench and socket 15,18 and\or 19mm socket
Hardware List For Small Block Tru Trac Serpentine System without A/C
 x4 Hardware List For Small Block Tru Trac Serpentine System without A/C x1 Short Spacer Nut 8mm-1.25 x 25mm 12pt. Cap Screw x3 Long Spacer Nut x1 3/8-16 x 3/4 12pt. Cap Screw x1 8mm-1.25 x 25mm Flat Head
Wall mounting bracket
 Install Manual Wall mounting bracket Please read this manual carefully before operating your set and retain it for future reference. OSW200 P/NO : MFL63640578 (1502-REV01) www.lg.com COMPONENT Install
Allow 60 from door face
 Setbacks Allow 60 from door face TOOLS NEEDED Tape Measure Marker or Pencil Masonry Drill Bit 3/8 Hammer Drill Hammer Socket Wrenches and Wrench: 9/16, 1/2, 7/16, 1/4 drive socket wrench and 1/2 socket
INSTALLATION INSTRUCTIONS ATV WINCH MULTI-MOUNT Multi-Mount Mounting-Kit: PN Application: YAMAHA BIGBEAR 00+
 INSTALLATION INSTRUCTIONS ATV WINCH MULTI-MOUNT Multi-Mount Mounting-Kit: PN 61025 Application: YAMAHA BIGBEAR 00+ Your safety, and the safety of others, is very important. To help you make informed decisions
19 to 39 TV WALL MOUNT - FULL MOTION
 19 to 39 TV WALL MOUNT - FULL MOTION RF-HTVMMAB For wood-stud and concrete wall installations Safety information and specifications...2 Tools needed...2 Package contents...3 Installation instructions...5
Parts Included: Tools Required: Canvas Office Landscape Interiors Off Module 90 Connector Kit Installation and Disassembly for Recycling Instructions
 Y Parts Included: Canvas Office Landscape Interiors Off Module 90 Connector Kit Installation and Disassembly for Recycling Instructions FT127.A N Shim A Light Seal B Foam Light Seal C G H Double-Face Tape
ASSEMBLY INSTRUCTIONS MANUAL
 PAGE 1 OF 9 RECOMMENDED TOOLS FOR ASSEMBLY: ALLEN WRENCH (INCLUDED) BOX WRENCH (INCLUDED) PHILLIPS SCREW DRIVER (NOT INCLUDED) PARTS IN CARTON: ALLEN WRENCH SCREWS (20 EACH) ROUND HEAD SCREWS (8 EACH)
INSTALLATION INSTRUCTIONS Small Flat Panel FMA Pivot Arrays Models: FMA-220 and FMA-320
 INSTALLATION INSTRUCTIONS Small Flat Panel FMA Pivot Arrays The FMA-220 and FMA-320 pivot array allow both horizontal and vertical display pitch adjustment. The pitch adjustment range is 30 (15 up / 15
O-Sullivan King 4 Poster Bed O-Sullivan Queen 4 Poster Bed Parts and Hardware List
 Parts and Hardware List A. Left Headboard Post 1 pc B. Right Headboard Post 1 pc C. Left Footboard Post 1 pc D. Right Footboard Post 1 pc E. Headboard Panel 1 pc F. Footboard Rail 1 pc. Spindles 4 pcs
NW2F8-12. Fixed Wall Racks INSTALLATION INSTRUCTIONS
 INSTALLATION INSTRUCTIONS Fixed Wall Racks Spanish Product Description German Product Description Portuguese Product Description Italian Product Description Dutch Product Description French Product Description
Installation and Assembly - Universal Articulating Swivel Double-Arm for 42" - 60" Plasma Screens
 Installation and Assembly - Universal Articulating Swivel Double-Arm for 42" - 60" Plasma Screens Models: PLAV 70-UNL, PLAV 70-UNL-S PLAV 70-UNLP, PLAV 70-UNLP-S R This product is UL Listed. It must be
INSTALLATION INSTRUCTIONS KK-K9-F14-K K9 KIT FOR FORD EXPEDITION
 INSTALLATION INSTRUCTIONS KK-K9-F14-K-32 32 K9 KIT FOR 2003-2016 FORD EXPEDITION TOOLS REQUIRED: Power Drill Drill Bit Set Standard & Metric Socket Sets Phillips Screw Driver Open End Wrench Set Wire Cutters
PHTM100 - Phantom 100 Flat Screen Wall Mount with Wafer Thin Projection Fits Screens up to 25 lbs with 100mm or 75mm Mounting Patterns
 PHTM100 - Phantom 100 Flat Screen Wall Mount with Wafer Thin Projection Fits Screens up to 25 lbs with 100mm or 75mm Mounting Patterns Features: Durable high quality gloss black baked on powder coat finish
#4 Phillips Driver Bit 1/8, 4mm, 5.5mm & 8mm (5/16 ) Allen Wrench. Safety Glasses
 Allen Wrench. Safety Glasses") ATLANTIS RAIL Contact Information: Atlantis Rail Systems 70 Armstrong Road 3900 Civic Center Drive Plymouth, MA 02360 North Las Vegas, NV 89030 (800) 541-6829 or (508) 732-9191 (508) 732-9798 www.atlantisrail.com
ATLANTIS RAIL Contact Information: Atlantis Rail Systems 70 Armstrong Road 3900 Civic Center Drive Plymouth, MA 02360 North Las Vegas, NV 89030 (800) 541-6829 or (508) 732-9191 (508) 732-9798 www.atlantisrail.com
HEAVY DUTY 11 STEEL CABINET
 HEAVY DUTY STEEL CABINET ASSEMBLY INSTRUCTIONS ONE DRAWER BASE CABINET 05-206 Parts List Part No Description Qty Image ONE DRAWER BASE CABINET Part No Description Qty Image SB- Cabinet Body EH-0 Euro Hinge
DX-TVMLPTB03. Low-Profile TV Wall Mount ASSEMBLY GUIDE. For either wood-stud or concrete wall installations
 ASSEMBLY GUIDE DX-TVMLPTB03 Low-Profile TV Wall Mount For either wood-stud or concrete wall installations Safety information and specifications...2 Tools needed...........................3 Package contents......................3
INSTALLATION INSTRUCTIONS GRILLE GUARD 09-ON DODGE RAM PART #
 INSTALLATION INSTRUCTIONS GRILLE GUARD 09-ON DODGE RAM PART # PARTS LIST: Qty Description Qty Description 1 Grille Guard 8 12-1.75mm x 35mm Hex Bolts 2 Brackets (for trucks without 22 12mm x 30.1mm OD
On-Roof Mounting Sets for Flat-Plate Collectors
 Engineering Submittal Sheet Installation sets for collectors Fig. 1 Installation set for 2 collectors 1 basic installation set, 1 extension installation set Basic installation set for each collector array
Notification System Installation Guide
 Notification System Installation Guide NOTE: It is strongly recommend that you hire a licensed electrician to perform the installation of this product. Materials Provided 1. Directory Sign (1) a. Directory
Installation and Assembly - Universal Articulating Swivel Double-Arm for 42" - 60" Plasma Screens
 Installation and Assembly - Universal Articulating Swivel Double-Arm for 42" - 60" Plasma Screens Models: PLAV 70-UNL, PLAV 70-UNL-S PLAV 70-UNLP, PLAV 70-UNLP-S R This product is UL Listed. It must be
COPPER / FIBER MANAGER RACK INSTALLATION INSTRUCTIONS PX Standard Release A March 2008
 COPPER / FIBER MANAGER RACK INSTALLATION INSTRUCTIONS PX101425 Standard Release A March 2008 A UPON RECEIPT OF YOUR Copper / Fiber Manager Rack Great care has been taken to insure that your Copper / Fiber
HO4 Surface Mount Installation Instructions Overview
 Overview Step 4 Mounting to Structure Pages 5-6 Step 5 Joining Luminaires Pages 7-8 Step 1 Mounting Types & Locations Page 2 Step 6 Closing Luminaires Page 9 Helpful Video 0-10V Dimming Step 2 Identification
Installation and Assembly: Flat Video Wall Mount For 40" to 65" Flat Panel Displays
 Installation and Assembly: Flat Video Wall Mount For 40" to 65" Flat Panel Displays Model: DS-VW665 Maximum Load Capacity: 125 lb (57 kg) 1 of 11 ISSUED: 03-22-12 SHEET #: 125-9288-4 06-25-13 NOTE: Read
PARTITION INSTALLATION INSTRUCTIONS
 PARTITION INSTALLATION INSTRUCTIONS 2015 Chevrolet Tahoe PPV / Part Number 5703FW, FWA & FEW Do not attempt to install this product on any vehicle equipped with third row seating! Parts List Distributed
For all Davis weather consoles including Vantage Pro2,
 USR MANUAL Universal Shelter For all Davis weather consoles including Vantage Pro2, Vantage Pro2 Plus R, Vantage Vue, nvoy 8X, and Weather nvoy Product Number 6618 R Davis Instruments, 3465 Diablo Avenue,
Assembly Instructions Nevins Phone Booth
 Assembly Instructions Nevins Phone Booth Included Hardware Tools Required supplied by installer Drill & Bit Socket Wrench Bolt A - (16) 1/4-20 x 1-1/2 hex head Bolt B - (20) 1/4-20 x 2-1/4 phillips head
x2 1/4 (6mm) Floor Anchor
 Floor Anchor") INSTALLATION GUIDE Main Components x1 Rail x5 Wall Spacer x2 Anti-jump Block x2 Straight Strap x1 Right Stopper x1 Left Stopper x5 5/16 (8mm x 60mm) Carriage Bolt x5 5/16 (8mm x25mm) Anchor x5 5/16 (8mm
INSTALLATION GUIDE Main Components x1 Rail x5 Wall Spacer x2 Anti-jump Block x2 Straight Strap x1 Right Stopper x1 Left Stopper x5 5/16 (8mm x 60mm) Carriage Bolt x5 5/16 (8mm x25mm) Anchor x5 5/16 (8mm
INSTALLATION INSTRUCTIONS INTERIOR WINDOW GUARDS WGI-C1, C2, C3 & C CHEVROLET FULL SIZE WINDOW VANS
 INSTALLATION INSTRUCTIONS INTERIOR WINDOW GUARDS WGI-C1, C2, C3 & C4 1997-2019 CHEVROLET FULL SIZE WINDOW VANS TOOLS REQUIRED: Power drill Safety goggles Hand jig saw Pencil Drill Bit Set File Set Phillips
Installation Instructions for Vista Air Vertically Folding Walls
 Installation Instructions for Vista Air Vertically Folding Walls Use these instructions in conjunction with your shop drawings to see the specifics that are particular to the model you are installing.
Stainless Steel 95C34 Series
 Stainless Steel 95C34 Series Toilet Partition Installation Manual PHONE: FAX: 866-317-2786 ATTENTION DO NOT MIX FASTENER PACKS EACH FASTENER PACK HAS THE NECESSARY BOLTS, BARRELS AND SCREWS TO INSTALL
CONCEALED VERTICAL ROD PANIC EXIT DEVICE
 INSTALLATION INSTRUCTIONS CRL JACKSON 1085-1085P CONCEALED VERTICAL ROD PANIC EXIT DEVICE crlaurence.com Phone: (800) 421-6144 Fax: (866) 921-0531 crlaurence.com usalum.com crl-arch.com 11M0236 ORDER OF
Installation and Assembly: In-wall Mount for 32" to 71" Flat Panel Displays
 Installation and Assembly: In-wall Mount for 32" to 71" Flat Panel Displays Model# Display size range IM760P, IM760P-S 32" to 71" (81 to 180 cm) IM760PU, IM760PU-S 32" to 65" (81 to 165 cm) This product
INSTALLATION INSTRUCTIONS Small Flat Panel Mounts Model: F-Series
 INSTALLATION INSTRUCTIONS Small Flat Panel Mounts Model: F-Series This Instruction Manual covers most of the F-Series wall and desk mounts, as well as selected F-Series pole mounts. NOTE: Some F-Series
IMPORTANT: WILL NOT FIT COUNTRYMAN MODELS
 Part #1410-0102-07 2 3 1 IMPORTANT: WILL NOT FIT COUNTRYMAN MODELS Apply masking tape around the bottom grille opening and across the bottom of the upper facto ry grille.. Open the hood and remove the
Installation and Assembly: Universal Projector Wall Arm
 Installation and ssembly: Universal Projector Wall rm Models: PST-2955, PST-2955-W, PST-2955, PST-2955-W Max UL Load Capacity: 35 lb (5.8 kg) 2300 White Oak Circle urora, Il 60502 (800) 865-22 Fax: (800)
Wildcat XX Stage 1 Audio Kit
 2436-466 Wildcat XX Stage 1 Audio Kit WARRANTY INFORMATION: All SSV Works enclosures are covered by a limited lifetime warranty against defects in material or workmanship. All SSV Works Electronics are
Triplex Instructions for Packing and Unpacking
 2-8-8-2 Triplex Instructions for Packing and Unpacking It is recommended that you review all these instructions before removing the engine or tender from the poly foam container. www.mthtrains.com Table
Kit Kit. GeoSteer GS-900 Radio Kit. GS-900 Radio Kit Installation Instructions Rev A
 200-0652-01 Kit 200-0652-02 Kit GeoSteer GS-900 Radio Kit Item Component Part Number Qty Notes 1. Assembly, Radio GS-900 200-0642-01 (North America) 200-0642-02 (Australia) 1 Radio assembly in kit is region
MOTORIZED STANDARD SHADE WITH CABLES Installation Instructions
 Tools Needed Drill Measuring Tape Pencil 2 Level Plumb Line ¼ Masonry Drill Bit Hammer Linesmans Pliers Cable Cutters Phillips & Flat-Head Screw Driver 11/32 Socket or Open End Wrench 5/32 Allen Wrench
BARN DOOR HARDWARE KIT
 INSTALLATION GUIDE Main Components x1 Rail x5 Wall Spacer x2 Anti-jump Block x2 Bent Strap x1 Right Stopper x1 Left Stopper x5 5/16 (8mm x 60mm) Carriage Bolt x5 5/16 (8mm x25mm) Anchor x5 5/16 (8mm x
Instruction Sheet D-CPU. Secure CPU Holder
 Instruction Sheet D-CPU Secure CPU Holder I-00457 Rev A PARTS LIST NOTE: Select Security Components when a more secure application is desired. Mounting Track with Mounting Tape Security Bracket Assembly
BioPrism Solid Surface
 Please read all instructions before installing products. These instructions are intended for use with InPro s standard toilet partitions, which include 58 high doors and wall panels, when deviating from
PFW 6851 Display Wall Mount, Turn & Tilt 80 kg INSTALLATION INSTRUCTIONS
 Display Wall Mount, Turn & Tilt 80 kg INSTALLATION INSTRUCTIONS 9531-007-Z00-01 Table of Contents Warning Statements 2 Parts List 3 Installation Tools 3 Wood Stud Installation 5 Concrete Surface Installation
ELECTRO-MECH SCOREBOARD CO. SL-230 / 330 RF MODEM INSTALLATION MANUAL
 ELECTRO-MECH SCOREBOARD CO. SL-230 / 330 RF MODEM INSTALLATION MANUAL Thank you for choosing an Electro-Mech Scoreboard for your athletic complex. We are confident that this product will give many years
Please read BOTH these Installation Instructions and the General Instructions prior to installing or operating this equipment.
 2012-14 Chevy Captiva Sport Attachment Tab Height: 21-1/2 Serial Number Attachment Tab Width: 18-1/2 Please read BOTH these and the General Instructions prior to installing or operating this equipment.
FORD INTERCEPTOR SEDAN READY BUCKLE
 INSTALLATION MANUAL FORD INTERCEPTOR SEDAN READY BUCKLE PART# FT3501RB We recommend you read through the installation guide prior to installation, if you have any questions please call us at 800-516-2322
INSTALLATION INSTRUCTIONS HEAVY DUTY TILT WALL MOUNT Model: PPH-2000
 INSTALLATION INSTRUCTIONS HEAVY DUTY TILT WALL MOUNT Model: PPH-2000 Specifications: Accomodates Akira and Orion 84" displays without interface bracket; accomodates other large flat panel displays with
16 STEEL CABINET HEAVY DUTY
 HEAVY DUTY 16 STEEL CABINET ASSEMBLY INSTRUCTIONS SIX DRAWER BASE CABINET 12-2013 Parts List Part No Description Qty Image SIX DRAWER BASE CABINET Part No Description Qty Image SB-1 Cabinet Body 1 SLD-01
Desk/Wall-Mount Rack
 Desk/Wall-Mount Rack Patent(s) Pending Installation Instructions Post P/N: 119-1752 119-1781 119-1782 119-4014 Frame P/N: 119-1591 119-1754 119-1755 Kit Contents (2) Frames (4) Posts Assembly Hardware
Extensive cable management on a footprint that fits on a 24-inch floor tile.
 RM945A-R2 Elite Rack Manager Extensive cable management on a footprint that fits on a 24-inch floor tile. Holds up to 1000 pounds. Customer Support Information Order toll-free in the U.S.: Call 877-877-BBOX
Riverside. Oakmont Queen Storage Bed Assembly Instructions
 Queen Storage Bed Page 1 of 7 8 pcs. 8 pcs. 1 pc. 1 pc. 8 pcs. 8 pcs. 8 pcs. 8 pcs. 1 pc. 1 pc. 20270 --5/0 Sleigh Headboard 20274 --5/0-6/6 Bed Rails 20273 -- 5/0 Storage Footboard, Panels, Slats Queen
TP4463. ASSeMBly INSTruCTIONS FLAT PANEL TV MOUNTING SYSTEM OPTION 1 OPTION 2 OPTION 3
 TP63 FLAT PANEL TV MOUNTING SYSTEM OPTION 1 OPTION 2 OPTION 3 Flat Panel TV Stand Stand with TV Mounting System Stand with Wall Mount ASSeMBly INSTruCTIONS for your safety, please follow these precautions:!
TITAN2-EDGE Public Access Computer Station Dual Track
 TITAN2-EDGE Public Access Computer Station Dual Track TITAN2-EDGE Rev A 6/17 Model TITAN2-EDGE ASSEMBLY AND ADJUSTMENT TITAN2-EDGE PARTS AND TOOLS PLEASE REVIEW these instructions before beginning the
PHTM200 - Phantom 200 Flat Screen Wall Mount with Wafer Thin Projection Fits Screens up to 50 lbs with 200mm Mounting Patterns
 PHTM200 - Phantom 200 Flat Screen Wall Mount with Wafer Thin Projection Fits Screens up to 50 lbs with 200mm Mounting Patterns Features: Durable high quality gloss black baked on powder coat finish Fits
INSTALLATION INSTRUCTIONS - NSF WALK-IN COOLER/FREEZER Wall-Mounted Shelving System - No Blocking
 The components included with this shipment comprise a fully-adjustable, heavy-duty cantilever shelving system. Installed properly, they ll provide decades of superior value in your walk-in cooler or freezer.
Installation Instructions
 Contemporary Square Floor Mounted Tub Filler Thank you for selecting American-Standard... the benchmark of fine quality for over 00 years. To ensure that your installation proceeds smoothly-- please read
Installation and Assembly: Ceiling mount for LCD screens up to 29"
 Installation and Assembly: Ceiling mount for LC screens up to 29" Models: LCC 18, LCC 18-S, LCC 36, LCC 36-S Patent Pending Features: Comes in two adjustable height ranges (in 1" increments): 18"-30" and
FLAVESCO ELEVATOR GUARDING USER MANUAL
 FLAVESCO ELEVATOR GUARDING USER MANUAL QMF 19 Rev 4.0 May 24 th 2013 WARNINGS GUARDING CAN BE INSTALLED AND REMOVED ONLY BY CERTIFIED ELEVATOR MECHANICS. MACHINE MUST BE SHUT DOWN AND LOCKED OUT BEFORE
SM-RAZOR-T-M/L/XL. Strong Low Profile Tilt Mount for Ultra-Thin Flat-Panel TVs INSTRUCTION MANUAL
 SM-RAZOR-T-M/L/XL Strong Low Profile Tilt Mount for Ultra-Thin Flat-Panel TVs INSTRUCTION MANUAL WARNINGS: Installation of this product should be done by a qualified professional. Do not begin installation
C PART LIST HARDWARE LIST. Kitchen Cart IMPORTANT NOTE
 88 9200 006C Kitchen Cart IMPORTANT NOTE Carefully remove all the parts from the carton and put them individually on a soft cloth to prevent scratches or other damages occuring to the parts. We have taken
Big Block Installation Manual For Systems without A/C
 Big Block Installation Manual For Systems without A/C Billet Specialties, Inc. 500 Shawmut Ave. La Grange, IL 60526 Tech Line (708) 588-0505 Fax (708) 588-7181 Hardware List For Chevrolet Big Block Tru
200A FLB VERTICAL 22113V LIFT W/CHAIN DRIVE WINCH
 PG. 1 OF 11 PORTA-DOCK, INC. 200A FLB VERTICAL 22113V LIFT W/CHAIN DRIVE WINCH STEP 1. Separate and group like parts and fasteners together. Locate the winch side member with the longer upright tube and
Medium Flat Panel Dual Swing Arm Wall Mount JWD-V
 INSTALLATION Medium Flat Panel Dual Swing Arm Wall Mount The single swing arm wall mount is designed for mounting a medium sized flat panel display. The can swing out from, or fold against, the wall depending