LS7 CHEVROLET TOP MOUNT Installation Manual For Systems with A/C #13460 / #13490
|
|
|
- Vivien Conley
- 5 years ago
- Views:
Transcription

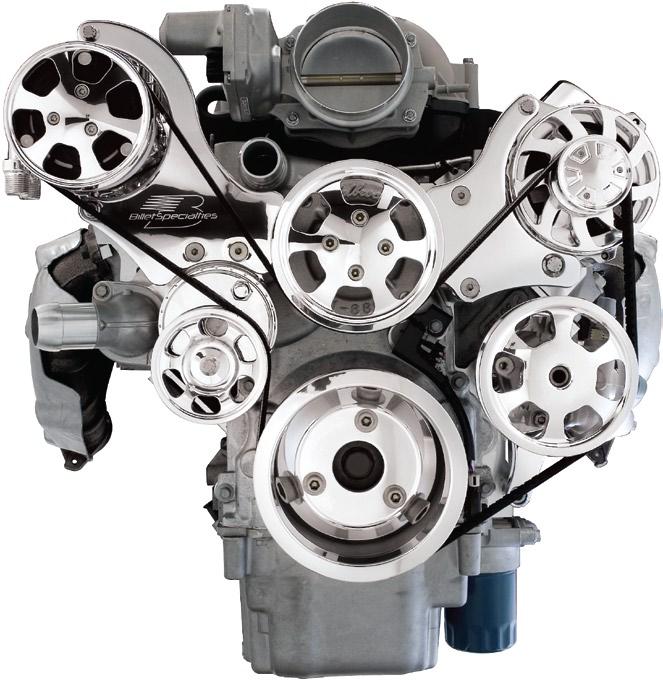


1 LS7 CHEVROLET TOP MOUNT Installation Manual For Systems with /C #13460 / #13490
2 PLESE RED LL INSTRUCTIONS EFORE INSTLLING NY COMPONENTS OF THE TRU TRC SERPENTINE SYSTEM Important: Thoroughly read the instructions, the removal and installation of the damper requires special tools, if after reading the instructions and you feel you may not be able to install the damper correctly illet Specialties recommends you to have a professional mechanic perform the installation. GM Part Number Damper Installation Tools Description J Crankshaft balancer remover or similar J Crankshaft balancer remover step plate J Flywheel holding tool J Crankshaft balancer and sprocket installer J Crankshaft front oil seal installer J ngle Meter Required Tools & Materials nti-seize Compound LocTite 272 Thread Locker 1/2" Drive Impact Wrench Torque Wrench Capable of 250ft/lbs. 1/4 Hex Key 5mm Hex Key 3/16 Hex Key 6mm Hex Key 5/16 Hex Key 8mm Hex Key 1/2 Combination Wrench 3/4 Combination Wrench 11/16" Combination Wrench Socket Wrench & Extension 1/2" Drive reaker ar 10mm 12pt. Socket 12mm 12pt. Socket 1-1/16" 12pt. Socket 3/8 12pt. Socket 5/8" Hex Socket (1/2" Drive) 24mm Hex Socket (1/2" Drive) Included Serpentine elt With P/S Goodyear 6-Rib Poly-V Serpentine Length: 67.0" # Without P/S Goodyear 6-Rib Poly-V Serpentine Length: 65.0" # Packaged With Power Steering Pump TECH TIP: illet Specialties recommends the use of nti-seize on all fasteners to prevent thread lock-up. Packaged With Water Pump 10mm-1.50 x 25mm Set Screw 1.425" Stand-Off 8mm-1.25 x 92mm lock Mounting Stud 8mm-1.25 Hex Nut Discard fter Use 8mm-1.25 x 118mm lock Mounting Stud 10mm-1.50 x 20mm Socket Head Cap Screw 8mm-1.25 x 95mm Socket Head Cap Screw 5/16-18 x 2-3/4" Socket Head Cap Screw 5/16" Lock Washer 1.103" Stand-Off 1.035" Stand-Off
3 Packaged In Main ox x4 8mm-1.25 x 25mm Flat Head Cap Screw 5/16-18 x 1" Hex Head Cap Screw 5/16" Flat Washer 8mm-1.25 x 40mm Flat Head Cap Screw Compressor Shoulder olt 1/2" Flat Washer 1/4-20 x 3/4" Socket Head Cap Screw 3/8-16 x 3/4" 12pt. Cap Screw x4 5/16-24 x 3/4" Socket Head Cap Screw x4 8mm-1.25 x 25mm 12pt. Cap Screw 10mm-1.5 x 20mm Socket Head Cap Screw 10mm-1.5 x 70mm 12pt. Cap Screw.5mm Shim Washer 1mm Shim Washer 8mm-1.25 x 25mm Socket Head Cap Screw Sc 3/8-16 x 1-1/4" Socket Head Cap Screw 3/8" ellville Washer LS7 Damper olt - GM Part #
4 Engine Prep Disconnect battery Remove existing accessory drive and water pump Remove factory crank pulley bolt with an impact wrench and 24mm socket Save the existing crank bolt, you will need it later Remove crank pulley/damper with the recommended tools: J Crankshaft balancer remover or similar J Flywheel holding tool J Crankshaft balancer remover step plate Clean gasket areas, inspect front crank seal and replace if necessary GM P/N Leave flywheel holding tool in position for damper installation Install Crank Damper Source: GM document # Recommended Installation Tools: J Crankshaft balancer and sprocket installer J Crankshaft front oil seal installer - Use threaded rod and nut only J Flywheel holding tool J ngle meter IMPORTNT: The nose of the crankshaft should be recessed mm ( in) into the balancer bore. Remove the old bolt and measure the hub to crankshaft distance. Installing New Crankshaft olt Coat the three to five threads of the new bolt with LocTite 272 thread locker. Notice: e sure to follow the torque procedure for installing the new crankshaft bolt. Use of impact tools, or not using torque and angle method will result in joint failure. Install and tighten the new crankshaft bolt a first pass to 37 ft.lbs. (50N M) Put a paint stripe on the bolt running from the 12 o'clock to the 6 o'clock position in order to verify the correct torque requested in the next step. IMPORTNT: When tightening for the second pass, a minimum torque of 236 ft.lbs. (320 N M) should be observed. If this torque is not achieved, the bolt (GM part # ) should be replaced. Tighten the crankshaft balancer bolt a second pass to 140 degrees using the J IMPORTNT: Recheck the position of the previously painted stripe to assure 140 degree rotation. chieving the correct torque angle is critical to the success of this repair. Over-torquing or under-torquing the joint will result in an unsatisfactory installation. Remove the J Flywheel Holding Tool. Inspect crank snout for burrs or scratches - clean up with fine emery cloth or steel wool. Slide the new damper on crank snout as far as possible. Use the J and the threaded rod and nut from J in order to install the balancer. ssemble the threaded rod, nut, washer and installer. Insert the smaller end of the installer into the front of the balancer. Using a wrench hold the hex end of the threaded rod. Use a second wrench and rotate the installation tool nut clockwise until the balancer is started onto the crankshaft. Remove the tool and reverse the tools direction. Position the larger end of the installer against the front of the balancer. Using a wrench hold the hex end of the threaded rod. Use a second wrench and rotate the installation tool nut clockwise until the balancer is installed onto the crankshaft. Remove the balancer installation tool. Install the old balancer bolt and tighten. Tighten old balancer bolt to 240 ft.lbs. (330N M) IMPORTNT: Failure to apply proper torque to the old balancer bolt may result in the balancer not being fully seated. This could lead to failure of this joint in the future.


![[] Thread the three 92mm studs into the passenger side of](/docs-images/89/100181870/images/5-3.jpg "the engine block, installed height should be 3 from block.")
![Figure 2: Install lternator racket [] Slide the alternator](/docs-images/89/100181870/images/5-4.jpg "bracket onto the driver side studs.")
 onto the threaded studs and finger tighten.")
![[] Finish by threading the 8mm-1.](/docs-images/89/100181870/images/5-6.jpg "25 x 95mm socket head cap screw through the alternator")

![[] Follow by threading in the two 118mm studs into the](/docs-images/89/100181870/images/5-8.jpg "driver side of the engine block, installed height should")

5 C Figure 1: Install Water Pump pply anti-seize to one end of each of the three 8mm-1.25 x 92mm long threaded studs and the two 8mm-1.25 x 118mm long studs. Use the two included 8mm-1.25 zinc plated nuts tightened against each other to act as a drive nut to ease installation if needed. [] Thread the three 92mm studs into the passenger side of the engine block, installed height should be 3 from block. Figure 2: Install lternator racket [] Slide the alternator bracket onto the driver side studs. Thread the remaining two short spacer nuts (1.103") onto the threaded studs and finger tighten. [] Finish by threading the 8mm-1.25 x 95mm socket head cap screw through the alternator bracket and water pump into the engine block. Tighten all fasteners firmly at this time. [] Follow by threading in the two 118mm studs into the driver side of the engine block, installed height should be 4 from block. [C] Slide water pump gaskets over studs, followed by the water pump. pply anti-seize to the exposed threads of all the studs. [D] Thread the three stainless stand-offs with machined groove (1.035") onto the passenger side of the water pump and finger tighten. D D

![[] Place compressor bracket onto water pump bosses as shown and attach with two of the 10mm-1.](/docs-images/89/100181870/images/6-1.jpg "5 x 20mm socket head cap screws. Tighten firmly.")
 8mm-1.25 x 25mm RP 12pt. cap screw (2) 8mm-1.")
![25 x 25mm flat head cap screws (1) 5/16-18 x 1 hex head bolt [] Thread the 5/16 hex head bolt and 5/16](/docs-images/89/100181870/images/6-3.jpg "flat washer through the back of the tensioner bracket.")

![[C] Finish by threading the 8mm RP 12pt.](/docs-images/89/100181870/images/6-5.jpg "cap screw through the top hole in the bracket and into the top standoff.")

6 Note Hole Position On racket C Figure 3: Install Compressor racket Figure 4: Install Tensioner & racket pply anti seize to the threads of the three 10mm-1.5 x 20mm socket head cap screws. [] Place compressor bracket onto water pump bosses as shown and attach with two of the 10mm-1.5 x 20mm socket head cap screws. Tighten firmly. Note: If bracket interferes with water pump it is upside-down. pply anti seize to the threads of the following: (1) 8mm-1.25 x 25mm RP 12pt. cap screw (2) 8mm-1.25 x 25mm flat head cap screws (1) 5/16-18 x 1 hex head bolt [] Thread the 5/16 hex head bolt and 5/16 flat washer through the back of the tensioner bracket. Place the bracket with the bolt and washer hanging through it on the passenger side of the water pump. [] Thread the two 8mm flat head cap screws through the bracket and into the bottom standoffs. [C] Finish by threading the 8mm RP 12pt. cap screw through the top hole in the bracket and into the top standoff. Tighten the three fasteners firmly. [D] lign threaded hole in the back of the tensioner with the threads of the 5/16 hex head bolt and washer sticking through bracket, finger tighten tensioner to bracket while aligning the top tensioner holes with the bracket. D D [] Follow by aligning recess in rear compressor bracket with keyway in installed bracket. Thread the final 10mm-1.5 x 20mm socket head cap screw through installed bracket and into rear compressor bracket. Tighten firmly.


![screws. [] Install Water pump pulley as shown and tighten firmly. [] Thread the two 8mm-1.](/docs-images/89/100181870/images/7-2.jpg "25 x 40mm flat head cap screws through the bridge bracket, tensioner and into the tensioner bracket and")


7 Figure 5: Install Compressor ridge racket pply anti seize to the two 8mm-1.25 x 40mm flat head cap screws. Place the bridge bracket on the passenger side, align the two bottom holes with the top two holes of the tensioner. Figure 7: Install Water Pump Pulley pply LocTite to the threads of the four 5/16-24 x 3/4 socket head cap screws. [] Install Water pump pulley as shown and tighten firmly. [] Thread the two 8mm-1.25 x 40mm flat head cap screws through the bridge bracket, tensioner and into the tensioner bracket and finger-tighten. Cup Towards Engine Figure 6: Install lternator ridge racket pply anti seize to the threads of two 8mm-1.25 x 25mm flat head cap screws. [] Place alternator bracket on driver side of water pump and line up holes with standoffs. Thread fasteners through bridge bracket and into standoffs and finger-tighten. Figure 8: Install Crankshaft Pulley pply LocTite to the threads of the three 3/8-16 x 1-1/4 socket head cap screws. [] Install crank the pulley as shown, install the elleville washers as shown with the cup facing away from the head of the fasteners. Tighten firmly.

![bracket. [] Thread the compressor shoulder bolt and washer through the rear compressor boss and into the compressor/tensioner bracket.](/docs-images/89/100181870/images/8-1.jpg "[] Thread the two 8mm RP 12pt. cap screws through the bridge bracket and into the front compressor bosses, finger tighten.")
![pply Loctite lue 242 to the following: (3) 1/4-20 x 3/4 socket head cap screws [C] Place cover on clutch and thread the socket head cap](/docs-images/89/100181870/images/8-2.jpg "screws through the cover and into the clutch, torque to 40-45 inch/lbs.")

![[] Thread the 10mm-1.50 x 70mm RP 12pt. cap screw through the bottom bridge bracket hole, alternator, and into the alternator bracket.](/docs-images/89/100181870/images/8-4.jpg "Finger tighten. [] Thread the 8mm-1.25 x 25mm RP 12pt. cap screw through the bridge bracket and into the top alternator boss.")

8 Figure 9: Install /C Compressor & Clutch Cover pply anti seize to the following: (1) Compressor Shoulder olt (2) 8mm-1.25 x 25mm RP 12pt. cap screws Place the compressor between the bridge bracket and compressor/tensioner bracket, aligning the compressor bosses with the bridge bracket. [] Thread the compressor shoulder bolt and washer through the rear compressor boss and into the compressor/tensioner bracket. [] Thread the two 8mm RP 12pt. cap screws through the bridge bracket and into the front compressor bosses, finger tighten. pply Loctite lue 242 to the following: (3) 1/4-20 x 3/4 socket head cap screws [C] Place cover on clutch and thread the socket head cap screws through the cover and into the clutch, torque to inch/lbs. C Figure 10: Install lternator pply anti seize to the following: (1) 8mm-1.25 x 25mm RP 12pt. cap screw (1) 10mm-1.50 x 70mm RP 12pt. cap screw Place alternator between bridge bracket and alternator bracket, align alternator bosses with the bridge bracket. [] Thread the 10mm-1.50 x 70mm RP 12pt. cap screw through the bottom bridge bracket hole, alternator, and into the alternator bracket. Finger tighten. [] Thread the 8mm-1.25 x 25mm RP 12pt. cap screw through the bridge bracket and into the top alternator boss. Note: 10mm shim washers are provided to shim the alternator if needed at the bottom. The alternator mounting boss may vary in thickness due to the polishing process. Tighten LL fasteners at this time. ll RP 12pt. fasteners, all flat head bridge bracket screws, 5/16 hex bolt behind tensioner and compressor shoulder bolt firmly. Caution: Over tightening these festeners will cause damage to the compressor clutch. Do Not Over Tighten.

![[] Installed height should not exceed 1/2 from block.](/docs-images/89/100181870/images/9-1.jpg "[C] pply anti seize to the exposed threads of the studs, thread the three 1.")

![5 x 20mm socket head cap screws. [] Install power steering bracket as shown with the three 10mm-1.](/docs-images/89/100181870/images/9-3.jpg "5 x 20mm socket head cap screws, tighten fasteners firmly.")


9 FOR KITS WITHOUT POWER STEERING CONTINUE TO FIGURE 13 Figure 11: Install Power Steering Stand-offs pply LocTite to the threads of one end of the three 10mm-1.5 x 25mm studs. [] Thread the three studs into the block as shown. [] Installed height should not exceed 1/2 from block. [C] pply anti seize to the exposed threads of the studs, thread the three 1.425" stand-offs onto each stud and tighten firmly. C Figure 12: Install Power Steering ssembly pply anti seize to the threads of the three 10mm-1.5 x 20mm socket head cap screws. [] Install power steering bracket as shown with the three 10mm-1.5 x 20mm socket head cap screws, tighten fasteners firmly. Install a 5/16 split washer on each of the two 5/16-18 x 2-3/4 socket head cap screws followed by anti-seize to the threads of each fastener. [] ttach power steering pump as shown, tighten fasteners firmly. IMPORTNT DO NOT STRT MOTOR until you have completely installed LL power steering hoses, reservoir, and added power steering fluid to the system. bleeding procedure sheet is included with this kit. Power steering fluid is the lubricant for the pump. Serious Damage will occur to power steering pumps if they are run dry. Pumps that have been run dry are not warrantable. NOTE: utomatic Transmission Fluid (TF) should never be used in place of a quality brand name power steering fluid.

![[] Pull breaker bar clockwise until tensioner boss lines up with hole in tensioner pulley, slide pulley onto boss and slowly return wrench to starting position, applying tension to the belt.](/docs-images/89/100181870/images/10-1.jpg "pply anti-seize to the threads of the 3/8-16 x 3/4 RP 12pt. cap screw. [C] Thread RP 12pt. cap screw with aluminum washer onto tensioner boss and tighten firmly (46 ft/lbs.).")
 8mm-1.")
![25 x 25mm socket head cap screws [] Install compressor manifold onto compressor with the two 8mm-1.25 x 25mm socket head cap screws and tighten firmly (13 ft/lbs).](/docs-images/89/100181870/images/10-3.jpg "Install hoses, connect clutch wire and charge system.")

10 C Figure 13: Install elt & Tensioner Pulley Route belt as shown below minus tensioner pulley. [] Place a 5/8 socket attached to a breaker bar on tensioner nut at approximately the 12 o clock position, align belt onto grove of tensioner pulley. [] Pull breaker bar clockwise until tensioner boss lines up with hole in tensioner pulley, slide pulley onto boss and slowly return wrench to starting position, applying tension to the belt. pply anti-seize to the threads of the 3/8-16 x 3/4 RP 12pt. cap screw. [C] Thread RP 12pt. cap screw with aluminum washer onto tensioner boss and tighten firmly (46 ft/lbs.). Figure 14: Install Compressor Manifold Continue with this step ONLY if you are going to be installing your air conditioning hoses and charging your system at this time. Remove the plate on top of the compressor body. pply anti-seize to the following: (2) 8mm-1.25 x 25mm socket head cap screws [] Install compressor manifold onto compressor with the two 8mm-1.25 x 25mm socket head cap screws and tighten firmly (13 ft/lbs). Install hoses, connect clutch wire and charge system. WITH POWER STEERING WITHOUT POWER STEERING IMPORTNT If you are NOT installing hoses and charging system at this time, place compressor manifold and hardware in a safe place and leave cover plate on compressor at this time. Do not connect clutch wire or apply power to clutch wire without the hoses connected and system charged serious damage will occur to compressor. Compressor Oil lthough the compressor is supplied with oil, the level may not be correct for the entire system. Consult the instruction manual of the air conditioning unit for proper levels and system charging procedures. This compressor is designed for use with ir Conditioning units only. Serious damage will occur to C compressor if used for anything other than its intended purpose. Warranty is Void if used for any non-c application.
SMALL BLOCK CHEVROLET
 SMLL LOCK CHEVROLET Installation Manual For Systems with /C #13220 / #13120 illet Specialties, Inc. 500 Shawmut ve. La Grange, IL 60526 Tech (708) 588-0505 Fax (708) 588-7181 PLESE RED LL INSTRUCTIONS
326/455 Pontiac Installation Manual For Systems With A/C #14900 / #14920
 326/455 Pontiac Installation Manual For Systems With / #14900 / #14920 PLESE RED LL INSTRUTIONS EFORE INSTLLING NY OMPONENTS OF THE TRU TR SERPENTINE SYSTEM Required Tools & Materials Prepping The lock:
348/409 CHEVROLET Installation Manual For Systems with A/C #14400 / #14420
 348/409 CHEVROLET Installation Manual For Systems with A/C #14400 / #14420 Billet Specialties, Inc. 500 Shawmut Ave. La Grange, IL 60526 Tech (708) 588-0505 Fax (708) 588-7181 PLEASE READ ALL INSTRUCTIONS
Small Block Ford. 289 / 302 / 351W / 5.0 Installation Manual For Systems without A/C #13605 / #13625
 Small lock Ford 289 / 302 / 351W / 5.0 Installation Manual For Systems without /C #13605 / #13625 illet Specialties, Inc. 500 Shawmut venue. La Grange, Illinois 60526 Tech Line (708) 588-0505 Fax (708)
INSTALLATION MANUAL CHEVROLET BIG BLOCK V4120 / V4220
 INSTALLATION MANUAL CHEVROLET BIG BLOCK V4120 / V4220 Billet Specialties, Inc. 500 Shawmut Avenue La Grange, Illinois 60526 TECH Line 708.588.0505 Fax 708.588.7181 www.billetspecialties.com PLEASE READ
HEMI / BB Chrysler Installation Manual For Systems with A/C #14800 / #14820
 HEMI / BB Chrysler Installation Manual For Systems with A/C #14800 / #14820 Billet Specialties, Inc. 500 Shawmut Avenue. La Grange, Illinois 60526 Tech Line (708) 588-0505 Fax (708) 588-7181 PLEASE READ
Ford FE Installation Manual For Systems with A/C #14700 / #14720
 Ford FE Installation Manual For Systems with A/C #14700 / #14720 Billet Specialties, Inc. 500 Shawmut Avenue. La Grange, Illinois 60526 Tech Line (708) 588-0505 Fax (708) 588-7181 PLEASE READ ALL INSTRUCTIONS
HEMI / BB Chrysler Installation Manual For Systems with A/C #14800 / #14820
 HEMI / BB Chrysler Installation Manual For Systems with A/C #14800 / #14820 Billet Specialties, Inc. 500 Shawmut Avenue. La Grange, Illinois 60526 Tech Line (708) 588-0505 Fax (708) 588-7181 PLEASE READ
HEMI / BB Chrysler Installation Manual For Systems without A/C #14805 / #14825
 HEMI / BB Chrysler Installation Manual For Systems without A/C #14805 / #14825 PLEASE READ ALL INSTRUCTIONS BEFORE INSTALLING ANY COMPONENTS OF THE TRU TRAC SERPENTINE SYSTEM IMPORTANT: Must use thin crank
Big Block Chevrolet Installation Manual For Systems with A/C #14220 / #14120
 Big Block Chevrolet Installation Manual For Systems with A/C #14220 / #14120 Billet Specialties, Inc. 500 Shawmut Ave. La Grange, IL 60526 Tech Line (708) 588-0505 Fax (708) 588-7181 PLEASE READ ALL INSTRUCTIONS
Small Block Ford. 289 / 302 / 351W / 5.0 Installation Manual For Systems with A/C #13600 / #13620
 Small Block Ford 289 / 302 / 351W / 5.0 Installation Manual For Systems with A/C #13600 / #13620 Billet Specialties, Inc. 500 Shawmut Avenue. La Grange, Illinois 60526 Tech Line (708) 588-0505 Fax (708)
INSTALLATION MANUAL CHEVROLET SMALL BLOCK V3120 / V3220
 INSTALLATION MANUAL CHEVROLET SMALL BLOCK V3120 / V3220 Billet Specialties, Inc. 500 Shawmut Avenue La Grange, Illinois 60526 TECH Line 708.588.0505 Fax 708.588.7181 www.billetspecialties.com PLEASE READ
LS1/LS6 CHEVROLET Installation Manual For Systems without A/C #13405 / #13425
 LS1/LS6 CHEVROLET Installation Manual For Systems without A/C #13405 / #13425 Billet Specialties, Inc. 500 Shawmut Avenue. La Grange, Illinois 60526 Tech Line (708) 588-0505 Fax (708) 588-7181 PLEASE READ
Big Block Installation Manual For Systems without A/C
 Big Block Installation Manual For Systems without A/C Billet Specialties, Inc. 500 Shawmut Ave. La Grange, IL 60526 Tech Line (708) 588-0505 Fax (708) 588-7181 Hardware List For Chevrolet Big Block Tru
FM2113PC/FM2114PC SBC Top Mount Alt, w/ A/C & Power Steering
 10) At this time assemble the power steering bracket and pump assembly from the instructions provided with the power steering bracket beginning at step 7. Return to step 10 on this sheet when complete.
FM2113PC/FM2114PC SBC Top Mount Alt, w/ A/C & Power Steering
 10) At this time assemble the power steering bracket and pump assembly from the instructions provided with the power steering bracket beginning at step 7. Return to step 10 on this sheet when complete.
Hardware List For Small Block Tru Trac Serpentine System without A/C
 x4 Hardware List For Small Block Tru Trac Serpentine System without A/C x1 Short Spacer Nut 8mm-1.25 x 25mm 12pt. Cap Screw x3 Long Spacer Nut x1 3/8-16 x 3/4 12pt. Cap Screw x1 8mm-1.25 x 25mm Flat Head
63824 Ford Combination Vacuum Pump/Alternator Mount
 63824 Ford Combination Vacuum Pump/Alternator Mount This kit is engineered to mount a Moroso enhanced style vacuum pump (22642) and a Nippon Denso 93MM alternator to a Ford small block engine equipped
CRITICAL INFORMATION:
 IMPORTANT ALERT: GM uses a very strong thread-locking compound on all body bolts. Use of an air assisted impact ratchet can cause damage to the threads on factory body mount bolts and the internal nut
INSTALLATION INSTRUCTIONS
 INSTALLATION INSTRUCTIONS R5 STEP BOARD APPLICATION: 2009-2017 Dodge Ram 1500 Quad / Crew Cab 2010-2017 Dodge Ram 2500/3500 Crew Cab PART NUMBER: 28-51040, 28-51045, 28-51050, 28-51055 ITEM QUANTITY DESCRIPTION
INSTALLATION INSTRUCTIONS
 AUTOMOTIVE PRODUCTS, INSTALLATION INSTRUCTIONS PLATINUM 4 OVAL STEP BAR (90 BENT END) APPLICATION: 2010-2015 Dodge Ram 2500/3500 Mega Cab PART NUMBER: 21-3570, 21-3575, 23-3570, 23-3575, 25-3570, 25-3575,
INSTRUCTIONS INSTRUCCIONES CONSIGNES
 AUTOMOTIVE PRODUCTS, INC. INSTRUCTIONS INSTRUCCIONES CONSIGNES APPLICATION: GMC SIERRA 1500 HDX & SPORTSMAN GRILLE GUARDS (2014 & UP) APPLICATION PART # S 57-3690, 57-3695, 40-3695, 45-3690 ITEM QUANTITY
INSTALLATION INSTRUCTIONS
 INSTALLATION INSTRUCTIONS SPORTSMAN WINCH MOUNT GRILLE GUARD APPLICATION: 2016-2018 Toyota Tacoma PART NUMBER: 40-93885, 45-93880, 46-23885 ITEM QUANTITY DESCRIPTION TOOLS NEEDED 1 1 WINCH TRAY 15MM SOCKET
Removing Right-Side. Components. Right-Side. Components. Click Here to Go Back AT THIS POINT
 Click Here to Go Back NOTE: There is an oil passage beneath the driven gear/drive gear assembly. This passage should be plugged prior to removing the driven gear and drive gear. Failure to do so could
Passenger/Right Front Mounting Bracket
 PARTS LIST: 1 Driver side running board 1 8mm Insert Installation Tool 1 Passenger side running board 4 10-1.50mm x 35mm Hex Bolt 1 Driver 10 10mm x 24mm OD x 2.2mm Flat Washer 1 Passenger 6 10mm Lock
Click Here to Go Back
 Click Here to Go Back Fig. -94 Fig. -97 CC42D 10. Remove the cap screw securing the gear shift stopper plate pin retainer; then remove the retainer. Fig. -95 CC45D 12. Remove the link arm and account for
w w w. h d o n l i n e s h o p. d e TIMKEN BEARING CONVERSION TOOL GENERAL INSTALLATION -J04672 REV Kit Number Models
 -J067 REV. 008-07- GENERAL Kit Number 8-08 Models TIMKEN BEARING CONVERSION TOOL For model fitment information, see the P&A Retail Catalog or the Parts and Accessories section of www.harley-davidson.com
INSTALLATION INSTRUCTIONS
 INSTALLATION INSTRUCTIONS SNYPER TUBULAR FENDERS APPLICATION: 2007-2017 Jeep Wrangler JK PART NUMBER: 62-1005, 62-1015 ITEM QUANTITY DESCRIPTION TOOLS NEEDED 1,2 2 FRONT FENDERS, DRIVER (1) AND PASSENGER
E4-WM5-Y542A00 MOUNTING INSTRUCTION
 This instruction is for both left front (driver) 41-269282 and right front (passenger) 41-269299 B8 8112 shocks. A step by step process is shown with images of the right front. The left front is a mirror
INSTALLATION INSTRUCTIONS CONTOURED LIGHT BAR APPLICATION: CHEVY EQUINOX/ GMC TERRAIN PART NUMBERS: ,
 INSTALLATION INSTRUCTIONS CONTOURED LIGHT BAR APPLICATION: 2010-2014 CHEVY EQUINOX/ GMC TERRAIN PART NUMBERS: 32-21020, 32-21025 ITEM QUANTITY DESCRIPTION TOOLS NEEDED 1 1 CONTOUR BAR TORQUE WRENCH 2 1
INSTALLATION INSTRUCTIONS
 AUTOMOTIVE PRODUCTS, INSTALLATION INSTRUCTIONS ROCK SLIDERS APPLICATION: 2007-2017 Jeep Wrangler JK 2 Door PART NUMBER: 42-7005 ITEM QUANTITY DESCRIPTION TOOLS NEEDED 1,2 2 ROCK SLIDER ASSEMBLY, DRIVER
TIRE RACK INSTALLATION INSTRUCTIONS Dodge Sprinter
 Aluminess Products Inc 9402 Wheatlands Ct. #A Santee, CA 92071 619-449-9930 TIRE RACK INSTALLATION INSTRUCTIONS 07-11 Dodge Sprinter Please read before beginning Stainless steel hardware may bind together
Assembly, Installation, Operation and Maintenance Instructions Kit, Base Rail Bracket Part # 31852
 . Assembly, Installation, Operation and Maintenance Instructions Kit, Base Rail Bracket Part # 31852 Dealer / Installer: Provide a copy of these instructions to the end user of this product. These instructions
INSTALLATION INSTRUCTIONS / DODGE RAM CREW CAB 2500/3500
 INSTALLATION INSTRUCTIONS 225019 / 225019-2 2010 DODGE RAM CREW CAB 2500/3500 PARTS LIST: Qty Description Qty Description 1 Driver/Left Side Bar 4 Plastic Square Retainer 1 Side Bar 2 12mm x 120mm Hex
INSTALLATION INSTRUCTIONS GRILLE GUARD 09-ON DODGE RAM PART #
 INSTALLATION INSTRUCTIONS GRILLE GUARD 09-ON DODGE RAM PART # PARTS LIST: Qty Description Qty Description 1 Grille Guard 8 12-1.75mm x 35mm Hex Bolts 2 Brackets (for trucks without 22 12mm x 30.1mm OD
INSTRUCTIONS INSTRUCCIONES CONSIGNES
 AUTOMOTIVE PRODUCTS, INC. INSTRUCTIONS INSTRUCCIONES CONSIGNES APPLICATION: 2007-2010 CHEVY/GMC SILVERADO/SIERRA 2500/3500 (EXCLUDES CLASSIC) APP PART #46-23715, 40-92315/45-92310 MAX WINCH TRAY, SPORTSMAN
CNC Router Parts. Standard Rack & Pinion Drive Assembly Instructions
 CNC Router Parts Standard Rack & Pinion Drive Tools List The following tools will be used for assembly and installation of the Standard Rack & Pinion Drive: Imperial Allen Wrench Set - 3/32", 5/32", 3/16",
INSTALLATION INSTRUCTIONS
 INSTALLATION INSTRUCTIONS PROTRAXX OVAL STEP BAR APPLICATION: 2009-2017 Dodge Ram 1500 Crew/Quad Cab 2010-2017 Dodge Ram 2500/500 Crew Cab PART NUMBER: 21-550, 21-555, 21-50, 21-55 AUTOMOTIVE PRODUCTS,
1. TOOLS + MATERIALS REQUIRED
 R INSTALLATION INSTRUCTIONS PRODUCT: BALDUR + ODEN CONFIGURATION: BI-PARTING DOOR MOUNT: TOP MOUNT Product is covered by U.S. patents. For more information visit www.krownlab.com. TOOLS + MATERIALS REQUIRED
4 BAY Low Profile - SINGLE XL DISPLAY WALL MOUNT CABINET
 D1/347Mxl SSEMLY INSTRUCTIONS 4 Y Low Profile - SINGLE XL DISPLY WLL MOUNT CINET TIP HZRD WRNING! Cabinet must be affixed to wall. For use with video monitors weighing 300 lbs (136kg) or less. Use with
INSTRUCTIONS INSTRUCCIONES CONSIGNES
 AUTOMOTIVE PRODUCTS, INC. INSTRUCTIONS INSTRUCCIONES CONSIGNES APPLICATION: 2007 13 CHEVY SILVERADO 1500 (except Classic ) MAX WINCH TRAY: HDX 46-22275 SPORTSMAN WINCH MOUNT GRILLE GUARD: 45-92270, 40-92275
MODEL SK61732 COMPRESSOR SERVICE KIT
 MODEL SK61732 COMPRESSOR SERVICE KIT For use on 607 and 617 Model Compressors with.32 Stroke WARNING: Unplug the compressor before beginning disassembly. CAUTION: Improper assembly or use of damaged parts
INSTALLATION INSTRUCTIONS GRILLE GUARD RAM 1500 PART # 5058/5058-2
 INSTALLATION INSTRUCTIONS GRILLE GUARD PART # 5058/5058-2 PARTS LIST: Qty Description Qty Description 1 Grille Guard 8 12-1.75mm x 35mm Hex Bolts 2 Upper Frame Mounting s (for trucks without tow hooks
General Four-Way Operation, Maintenance & Service Manual
 General Four-Way Operation, Maintenance & Service Manual SCOPE Included in the following pages you will find assembly drawings, exploded views, parts lists, assembly tips, operational descriptions and
DRIVE COMPONENTS REMOVAL. 9. FXCW/C: see Figure Remove bolt (9), sprocket retainer (8), and thrust washer (7). NOTE PRIMARY DRIVE LOCKING TOOL
, sprocket retainer (8), and thrust washer (7). NOTE PRIMARY DRIVE LOCKING TOOL") DRIVE COMPONENTS REMOVAL PART NUMBER HD-7977 TOOL NAME PRIMARY DRIVE LOCKING TOOL S To remove the primary chain, remove compensating sprocket, clutch assembly and primary chain as an assembly:. Remove
DRIVE COMPONENTS REMOVAL PART NUMBER HD-7977 TOOL NAME PRIMARY DRIVE LOCKING TOOL S To remove the primary chain, remove compensating sprocket, clutch assembly and primary chain as an assembly:. Remove
Tuf-Lite and Tuf-Lite II Fans 4000 Series Hub
 Tuf-Lite and Tuf-Lite II Fans 4000 Series Hub INSTALLATION MANUAL Hudson Tuf-Lite and Tuf-Lite II fan blades Adjustable Pitch Fan Assembly 15 thru 20 Diameter Hudson Tuf-Lite (black) fan blades are made
Tuf-Lite III Fans K Hi Temp 3000KHT Series Hub
 Tuf-Lite III Fans K Hi Temp 3000KHT Series Hub INSTALLATION MANUAL Adjustable Pitch Fan Assembly 11 thru 15 Diameter Hudson Tuf-Lite III fan blades Hudson Tuf-Lite III Hi Temp (Red) fan blades are of single
Tuf-Lite II Fans H Hi Temp 3000HT Series Hub
 Tuf-Lite II Fans H Hi Temp 3000HT Series Hub INSTALLATION MANUAL Hudson Tuf-Lite II Hi Temp Fan Blades Adjustable Pitch Fan Assembly 5 through 14 Diameter Hudson Tuf-Lite II Hi Temp fan blades (Red) are
INSTALLATION INSTRUCTIONS
 INSTALLATION INSTRUCTIONS E-SERIES STEP BARS / 4 OVAL STEP BARS APPLICATION: 2011-2017 Jeep Grand Cherokee PART NUMBER: 23-3610, 23-3615, 21-3610, 21-3615, 23-73610 ITEM QUANTITY DESCRIPTION TOOLS NEEDED
INSTALLATION MANUAL FRONT. See pages 2 and 3 of this manual for configuration options. Level of Difficulty. Product Photo (center section only)
") INSTALLATION MANUAL FRONT Level of Difficulty Moderate Product Photo (center section only) All hardware listed below will be provided with the bumpers center section. Additional hardware will be supplied
INSTALLATION MANUAL FRONT Level of Difficulty Moderate Product Photo (center section only) All hardware listed below will be provided with the bumpers center section. Additional hardware will be supplied
4.4 PUMP MAINTENANCE MODELS: DB, DC, DF, DG, DJ, DL
 4.4 PUMP MAINTENANCE MODELS: DB, DC, DF, DG, DJ, DL 4.4.1 EXPLODED VIEW DRAWING REF. QTY. DB DC DF DG DJ DL DESCRIPTION PART # 1 1 ADAPTOR FRAME 034007 2 12 LOCK WASHER 3/8 x 1/8 S.S. 034004 3 12 HEX HEAD
1. VERIFY ALL COMPONENTS
 R INSTALLATION INSTRUCTIONS RAGNAR+ODEN FACE MOUNT, BYPASSING. VERIFY ALL COMPONENTS BASE KIT Track stand-offs Front trolley kit * Rear trolley kit * Allen keys Track fastener kit - wood - Bottom guide
Tuf-Lite and Tuf-Lite II Fans 4000 Series Hub
 Tuf-Lite and Tuf-Lite II Fans 4000 Series Hub INSTALLATION MANUAL Hudson Tuf-Lite and Tuf-Lite II fan blades Adjustable Pitch Fan Assembly 15 thru 20 Diameter Hudson Tuf-Lite (black) fan blades are made
Tuf-Lite III Fans 3000K Series Hub
 Tuf-Lite III Fans 3000K Series Hub INSTALLATION MANUAL Adjustable Pitch Fan Assembly 11 thru 15 Diameter Hudson Tuf-Lite III fan blades Hudson Tuf-Lite III fan blades are of single piece fiberglass reinforced
It is highly recommended that you use a thread lock compound such as Loctite brand on all threads to keep them from vibrating loose.
 Installation instructions for FC12 Forward Controls for Kawasaki Vulcan 750 It is highly recommended that you use a thread lock compound such as Loctite brand on all threads to keep them from vibrating
4.2 - PUMP MAINTENANCE MODELS: AC, AS, WC, WS
 4.2 - PUMP MAINTENANCE MODELS: AC, AS, WC, WS 4.2.1 - EXPLODED VIEW DRAWING REF NO. 1 2 4 QTY 3 1 1.5 5 ¾ HP HP HP HP HP DESCRIPTION PART # 1 CASE 1.25 x 1 NPT 018266 1 CASE 1.25 X 1 NPT 018268 1 CASE
Tuf-Lite II Fans 3000H Series Hub
 Tuf-Lite II Fans 3000H Series Hub INSTALLATION MANUAL Adjustable Pitch Fan Assembly 5 through 14 Diameter Hudson Tuf-Lite II Fan Blades Hudson Tuf-Lite II (white, prev. Blue**) are made from fiberglass
installation guide 1 GUIDE#: pwb-assault-001
 assault WAKEBOARD tower installation guide INSTALLATION SUPPORT 1 important information This Aerial wakeboard tower fits motor boats with 76-108 inch wide beam widths. This measurement is taken from the
INSTALLATION INSTRUCTIONS CHEVY C-10 INDEPENDENT FRONT SUSPENSION
 INSTALLATION INSTRUCTIONS 73-87 CHEVY C-10 INDEPENDENT FRONT SUSPENSION Please read these instructions completely before starting your installation. Assemble suspension on vehicle before powder-coating
Tuf-Lite II Fans 3000H Series Hub
 Tuf-Lite II Fans 3000H Series Hub INSTALLATION MANUAL Adjustable Pitch Fan Assembly 5 through 14 Diameter Hudson Tuf-Lite II Fan Blades Hudson Tuf-Lite II (white, prev. blue**) fan blades are made from
Tuf-Lite II Fans 3000HC Series Hub
 Tuf-Lite II Fans 3000HC Series Hub INSTALLATION MANUAL Hudson Tuf-Lite II fan blades Adjustable Pitch Fan Assembly 8 through 10 Diameter Hudson Tuf-Lite II (White) are made from fiberglass reinforced vinyl-ester
Installation Guide Philips MP40/50/60/70 Installation Kit for Penlon Anesthesia Machine
 Installation Guide Philips MP40/50/60/70 Installation Kit for Penlon Anesthesia Machine The purpose of this guide is to describe installation of MP40/50/60/70 mounting equipment on the anesthesia machine.
installation guide 1 GUIDE#: pwb-assault-004
 assault WAKEBOARD tower installation guide INSTALLATION SUPPORT 1 important information This Aerial wakeboard tower fits motor boats with 76-108 inch wide beam widths. This measurement is taken from the
Jiminy Picket Vinyl Gate REALLY. Important stuff to know about installing your WamBam gate
 Jiminy Picket Vinyl Gate RELLY Important stuff to know about installing your Wamam gate. 1-877-778-5733 www.wambamfence.com CLEVER JOE Your Installation uddy November 2014 Reality Check 1 - Read Over Fence
TAILGATE SPREADER MATERIAL SAVER SYSTEM INSTALLATION & OPERATION MANUAL (TGS 300, TGS 600, & TGS 1100) TGS11328
 TGS11328") TAILGATE SPREADER MATERIAL SAVER SYSTEM INSTALLATION & OPERATION MANUAL (TGS 300, TGS 600, & TGS 1100) TGS11328 TABLE OF CONTENTS WARNINGS & CAUTIONS... 2 MATERIAL SAVER SYSTEM PARTS LIST... 3 EXISTING
TAILGATE SPREADER MATERIAL SAVER SYSTEM INSTALLATION & OPERATION MANUAL (TGS 300, TGS 600, & TGS 1100) TGS11328 TABLE OF CONTENTS WARNINGS & CAUTIONS... 2 MATERIAL SAVER SYSTEM PARTS LIST... 3 EXISTING
Peeping Tom Vinyl Gate REALLY. Important stuff to know about installing your WamBam gate
 Peeping Tom Vinyl Gate RELLY Important stuff to know about installing your Wamam gate. 1-877-778-5733 www.wambamfence.com CLEVER JOE Your Installation uddy January 2015 Reality Check 1 - Read Over Fence
Installation Guide Philips MP80/90 Installation Kit for Penlon Anesthesia Machine
 Installation Guide Philips MP80/90 Installation Kit for Penlon Anesthesia Machine The purpose of this guide is to describe mounting of MP90 equipment on the anesthesia machine. WARNING: USE OF MOUNTING
MODULAR BUMPER INSTALLATION MANUAL
 MODULAR BUMPER INSTALLATION MANUAL Parts List* 1 Center section 1 Side extension, passenger / right 1 Side extension, driver / left 1 Side cap, passenger / right 1 Side cap, driver / left 1 Brush guard,
INSTALLATION INSTRUCTIONS 3 ROUND & 4 OVAL SIDEBAR (90-DEG BENT END) DODGE RAM MEGA CAB PART NUMBER SB1214S SB1214B
 DODGE RAM MEGA CAB PART NUMBER SB1214S SB1214B") INSTALLATION INSTRUCTIONS PART NUMBER SB1214S SB1214B PARTS LIST: Qty Description Qty Description 1 Driver/Left Sidebar 4 12mm x 32mm OD x 3mm Flat Washers 1 Passenger/Right Sidebar 4 12mm Lock Washers
INSTALLATION INSTRUCTIONS PART NUMBER SB1214S SB1214B PARTS LIST: Qty Description Qty Description 1 Driver/Left Sidebar 4 12mm x 32mm OD x 3mm Flat Washers 1 Passenger/Right Sidebar 4 12mm Lock Washers
Required Tools: Procedure:
 Depending on the materials you process through your chipper, their moisture content, the climate you live in, and many other factors you may have difficulty removing the rotor from the engine shaft. The
Installation Instructions
 The IMS ETERNAL FIX PATENT PENDING Installation Instructions EPS recommends professional installation for the Eternal IMS Fix. Please take all precautionary safety measures. We also recommend putting the
RBP-1215B-RX DODGE RAM QUAD CAB RX3
 RBP-1215B-RX3 2002-2017 DODGE RAM 15-3500 QUAD CAB RX3 Passenger side RX-3 Side Step Drill Template Passenger side rear Modular Bracket (6) L Support Brackets Driver side rear Modular Bracket Driver side
PROSTEER BALL JOINT REBUILD INSTRUCTIONS V1.0
 DYNATRAC PRODUCTS 2003-2010 4X4 DODGE 2500/3500 HEAVY DUTY BALL JOINT PROSTEER BALL JOINT REBUILD INSTRUCTIONS V1.0 WARNING: Improper use or installation of this product can cause major failures that could
RPS. XR Front Drive Updates CORPORATION
 FACTORY CAT 1. To start a replacement of the XR Front Wheel Drive, make sure the machine is on level ground with the rear wheels chocked and always disconnect the batteries. 2. Locate the Positive and
INSTALLATION INSTRUCTIONS Medium Flat Panel Model MSP-SI1
 INSTALLATION INSTRUCTIONS Medium Flat Panel Model MSP-SI1 IMPORTANT! : The MSP-S11 Mount is designed for use with Sharp 45" LCD displays that have a 200mm x 200mm mounting pattern. IMPORTANT! : The mount
Installation instructions for FC17 Forward Controls for Triumph Rocket III Roadster
 Installation instructions for FC17 Forward Controls for Triumph Rocket III Roadster It is highly recommended that you use a thread lock compound such as Loctite brand on all threads to keep them from vibrating
INSTRUCTIONS
 IMPORTANT: THIS IS A HIGH PERFORMANCE PART AND IMPROPER INSTALLATION COULD RESULT IN INJURY OR DEATH! NEVER WORK UNDER AN AUTOMOBILE THAT IS NOT PROPERLY SUPPORTED AND BLOCKED FROM ROLLING. NO CREDIT OR
SAFETY INSTRUCTIONS. WARNINGS Always read tool manual before operating.
 SAFETY INSTRUCTIONS WARNINGS Always read tool manual before operating. Always wear safety glasses while operating or while in the vicinity of a tool in operation. For testing, always cycle tool away from
Form No Assembly & Operating Instructions for: SAFETY PRECAUTIONS
 Form No. 0230 Assembly & Operating Instructions for: 833 20300 83 2220 837 0-0008 078 SHOP PRESS Max. Capacity: 2 Ton These instructions are intended for various shop presses. Some models are shipped assembled
SERIES I MILLING MACHINES
 INSTALLATION, OPERATION, MAINTENANCE, AND PARTS LIST SERIES I MILLING MACHINES TP5260 Revised: August 29, 2005 Manual No. M-450 Litho in U.S.A. Part No. M -0009500-0450 June, 2003 MAINTENANCE PROCEDURES
TRIUMPH TIGER 800 PD NERF
 TRIUMPH TIGER 800 PD NERF 0505-0 Step Before you begin, place the bike on a hard level surface where you have room to work. Lay out the parts included in this kit and compare to the parts list on page
Submersible Turbine Assembly Manual
 Submersible Turbine Assembly Manual Table of Contents Submersible Turbine Kit Assembly Page Recommended Equipment... 2 Assembly Instructions...3-9 Special Tool Schematics... 10 Symbol Key Action Safety/Caution
MSR/MSB Mechanical Setting Tool
 Tech Unit No: 0620000004 Revision: B Approved By: Quality Engineer Date: 2014-12-16 MSR/MSB Mechanical Setting Tool FEATURES: Special designed Bow Spring provides positive control and allows one size Mechanical
Desk/Wall-Mount Rack
 Desk/Wall-Mount Rack Patent(s) Pending Installation Instructions Post P/N: 119-1752 119-1781 119-1782 119-4014 Frame P/N: 119-1591 119-1754 119-1755 Kit Contents (2) Frames (4) Posts Assembly Hardware
Inspection. Assembly Install the springs. 1. Discard the 0-rings. 2. Clean all parts in cleaning solvent.
 6010-34 Inspection 3. Install the springs. 1. Discard the 0-rings. 2. Clean all parts in cleaning solvent. 3. If spring test equipment is available, check the tension of each spring according to the specifications
PARTITION INSTALLATION INSTRUCTIONS
 PARTITION INSTALLATION INSTRUCTIONS 2015 Chevrolet Tahoe PPV / Part Number 5703FW, FWA & FEW Do not attempt to install this product on any vehicle equipped with third row seating! Parts List Distributed
08+ KAWASAKI KLR PD NERF
 08+ KAWASAKI KLR PD NERF 0505-1299 Before you begin, place the bike on a hard level surface where you have room to work. Lay out the parts included in this kit and compare to the parts list on page 5 of
SERVICE INSTRUCTIONS Model 9670 Lubricant Pump
 TM TM SERVICE INSTRUCTIONS Model 9670 Lubricant Pump 9670 DESCRIPTION Model 9670 Lubricant Pump is designed to pump light to heavy oils directly from the original container. This design features a 10:1
installation guide 1 GUIDE#: PWB-wwpontoon-pol-004
 f250 pontoon WAKEBOARD tower installation guide INSTALLATION SUPPORT 1 important information This WakeWorks tower fits Pontoon boats with 96 to 102 inch wide beam widths. This measurement is taken from
Yard & Pool Vinyl Gate REALLY. Important stuff to know about installing your WamBam gate Ver 1, February 2014
 Yard & Pool Vinyl Gate RELLY Important stuff to know about installing your Wamam gate. Ver 1, February 2014 1-877-778-5733 www.wambamfence.com Reality Check 1 - Read Over Fence Instructions First Your
USSC LLC 4 ONE LLC FIELD MODIFICATION INSTRUCTIONS
 1 OF 17 A 1. PURPOSE: Instructions for in field replacement of 9004 mechanical suspension top pan 2. SCOPE: 9004 mechanical suspension with legacy two point LX back frame and current LX back frame 3. PROCEDURE:
OPERATIONS MANUAL. Port-O-Slitter
 Tapco Products Company The World Leader in Specialty Tools for the Professional Port-O-Slitter OPERATIONS MANUAL General instructions, set up, accessories and guide to using your portable precision slitting,
Fortress Fe Posts must always be secured to the deck framing. Fortress Fe Posts should never be attached to only the deck boards.
 Installation Instructions for FortressCable V-Series Cable Stair Panel System with UB-05 With ngle dapter and Fe Posts It is the responsibility of the installer to meet all code and safety requirements,
SERVICE PARTS LIST. M18 FUEL SAWZALL Reciprocating Saw F56A BULLETIN NO CATALOG NO
 47(5x) 46 45 00 44 0 59 43 42 84 51 57 46 47 48 59 83 64 77 48 47(2x) 49(2x) 40 58 See service note on page 5 41 82 51 40 41 42 43 44 45 87 52 27 28 34 57 29 (6x) 60 28 EXAMPLE: Component Parts (Small
PNEUMATIC C-RING TOOLS SC73462 SAFETY INSTRUCTIONS. WARNINGS Always read tool manual before operating.
 PNEUMATIC C-RING TOOLS SC73462 SAFETY INSTRUCTIONS WARNINGS Always read tool manual before operating. Always wear safety glasses while operating or while in the vicinity of a tool in operation. For testing,
installation guide 1 GUIDE#: pwb-wwtowv1-pol-003
 g300 WAKEBOARD tower installation guide INSTALLATION SUPPORT 1 important information This WakeWorks wakeboard tower fits motor boats with 76-108 inch wide beam widths. This measurement is taken from the
JK TrailGate JK TrailGate
 INSTALLATION INSTRUCTIONS INST-17-66-010_A JK TrailGate IMPORTANT: Thank you for purchasing this Poison Spyder product. Please read through this entire document before proceeding with installation. If
Comp-DS Driveshaft. User Manual B
 Comp-DS Driveshaft User Manual 2010-1378B Driveshaft Parts List 1.22B 1.21C 1.22C 1.22D 1.21A 1.21B 1.22A 1.1 Figure 1 1.0 Complete Driveshaft 1.1 Tube and Flange Assembly 1.2 Coupling Assembly (2 required
INSTALLATION INSTRUCTIONS FOR FRONT CASTING DECK RAIL Ranger
 INSTALLATION INSTRUCTIONS FOR FRONT CASTING DECK RAIL Ranger TOOLS REQUIRED FOR INSTALLATION: Drill motor, (1) 5/16 inch drill bit, (1) 13/64 drill bit, (1) 3/16 inch hex wrench (1) 3/32 inch hex wrench.
Sized for Print. Primary timing chain - from 08/ L, without supercharger. Special Service tools. Camshaft Setting Tool
 Primary timing chain - from 08/1998 4.0L, without supercharger Special Service tools Camshaft Setting Tool 303-530 Timing chain tensioning tool 303-532 Wedges, primary chain 303-533 http://alldatapro.com/alldata/pro~v376737902~c36065~r0~od~n/0/80851247/83501684/84900382/86331920/34853741/100411974/34853743/56492475/1445